Salora 55UHC9202MS User manual

2Verbind de antenne met uw tv
3
Sluit de TV stekker aan op de netspanning
Batterijen in de afstandsbediening plaatsen
1
Voer twee AAA/R3 of equivalente batterijen in. Respecteer
de correcte polariteit (+/-) wanneer u de batterijen invoert
en vervang het deksel van het batterijcompartiment.
Steek het snoer in het stopcontact. De stand-by LED-
indicator licht op.
Om de tv in te schakelen vanuit de stand-bymodus kunt u;;
1. Druk op de Stand-by knop of een numerieke knop of
Zender +/- op de afstandsbediening.
2. Druk op de knop Stand-by of Zender +/- op de televisie.
Om de TV in te schakelen
4
Aan de slag
ONDERZIJDE ACHTERAAN
VAN DE TV
SATELLIET
ANTENNE
KABEL

SOURCESOURCE
Automatische instelling procedure
6
CONTROLEER DAT BEIDE EENHEDEN UITGESCHAKELD
ZIJN VOOR U DE VERBINDING TOT STAND BRENGT. Gebruik
een HDMI naar HDMI kabel om beide eenheden met elkaar te
verbinden. Druk op de BRON-knop op de afstandsbediening om
de HDMI-ingang te selecteren. Iedere maal deze knop ingedrukt
HMDI-ingang
5
Naar HDMI-aansluiting
op het apparaat
Wanneer u het tv-toestel voor de eerste maal gebruikt, zal een hulpprogramma u begeleiden bij het
installatieproces. Eerst verschijnt er een scherm voor het selecteren van de taal. Selecteer de
gewenste taal en druk op OK.
Stel uw voorkeuren in op het volgende scherm met de navigatieknoppen.
Selectie van uitzendingstypes
Digitaal Antenne: Als de zoekoptie ingeschakeld is, zal de tv op zoek gaan naar digitale aardse
uitzendingen nadat andere initiële instellingen zijn uitgevoerd.
Digitale kabel: Als de zoekoptie Kabel-uitzending ingeschakeld is, zal de tv op zoek gaan naar
digitale kabeluitzendingen nadat andere initiële instellingen zijn uitgevoerd. In overeenstemming
met uw andere voorkeuren, wordt een bevestigingsbericht weergegeven voor een zoekopdracht
start. Selecteer JA en druk op OK om door te gaan. Om de bewerking te annuleren, selecteer NEE
en druk op OK. U kunt Netwerk selecteren of waarden zoals Frequentie, Netwerk-ID en
Zoekstap instellen. Aan het einde drukt u op OK.
Opmerking: De duur van de zoekopdracht hangt af van de geselecteerde zoekstap.
Satelliet: Als de zoekoptie Satellietuitzending is ingeschakeld, zal de tv op zoek gaan naar
digitale satellietuitzendingen nadat andere initiële instellingen zijn uitgevoerd. Voor de
satellietzoekopdracht wordt uitgevoerd, moeten een aantal instellingen worden uitgevoerd. Het
menu Type Antenne verschijnt eerst. U kunt het type Antenne selecteren als Direct, Single
Satellite Cable or DiSEqC met de navigatietoetsen.
Analoog: Als de zoekoptie Analoge uitzending ingeschakeld is, zal de tv op zoek gaan naar
analoge kabeluitzendingen nadat andere initiële instellingen zijn uitgevoerd..
U kunt ook een uitzendingstype instellen als uw favoriet. De prioriteit wordt gegeven aan het
geselecteerde type uitzending tijdens het zoekproces en de zenders worden gerangschikt bovenin
de zenderlijst. Aan het einde, druk op OK om door te gaan.
U kunt de Winkelmodus (optioneel) hier activeren. Deze optie is enkel bedoeld voor gebruik in de
winkel. Het wordt aanbevolen de Thuismodus te selecteren voor thuisgebruik.
Nadat de initiële instellingen werden uitgevoerd, zal de tv op zoek gaan naar beschikbare
uitzendingen van de geselecteerde uitzendingstypes.
Nadat alle kanalen zijn opgeslagen, verschijnen de scanresultaten op het scherm. Druk op OK om
door te gaan. De Zender Bewerken Lijst wordt hierna getoond. U kunt de zenderlijst aanpassen
aan uw voorkeuren, of druk op de Menu toets om de lijst te verlaten en tv te kijken.
Opmerking: Schakel de Tv niet uit zonder de Eerste installatie gestart te hebben.

Verbind uw tv met het internet
7
De connectiviteitsfunctie biedt de mogelijkheid uw tv draadloos en bedraad aan te sluiten op het
thuisnetwerk. U kunt dit netwerksysteem gebruiken om een verbinding te maken met de Toshiba
portaalsite of voor toegang tot foto-, video- en geluidsbestanden die opgeslagen zijn op een mediaserver
en ze afspelen/weergeven op uw tv.
Hoewel, als uw tv geen draadloze USB dongle bevat of de interne wifi-functie niet ondersteunt, moet u het
bedrade verbindingstype gebruiken. Voeg uw tv toe aan uw thuisnetwerk door hem aan te sluiten met de
modem/router via een LAN-kabel (niet geleverd) zoals aangegeven in de tv.
Om uw TV met uw draadloos netwerk te gebruiken, hebt u mogelijk een draadloze USB dongle nodig. U
moet hem aansluiten op een van de USB-ingangen van de tv. Als uw tv de interne wifi-functie
ondersteunt, hebt u geen bijkomende draadloze adapters nodig.
Druk op de MENU knop om het hoofdmenu van de tv te openen. Selecteer Systeem>Instellingen met
de navigatieknoppen en druk op OK voor toegang. Selecteer Netwerk/Internetinstellingen en druk op
OK. Terwijl Netwerk type gemarkeerd is, drukt u op de Links of Rechts om een verbindingstype te
selecteren. De bedrade verbinding wordt automatisch tot stand gebracht. As de bedrade verbinding
geselecteerd is, zoekt de tv de beschikbare draadloze netwerken en rangschikt ze daarna. Maak uw
selectie en druk op de OK knop om een verbinding te maken. Als het draadloze netwerk beveiligd is met
een wachtwoord, moet u de correcte code invoeren voor toegang tot het netwerk. Zodra u een draadloze
verbinding tot stand hebt gebracht, wordt ze opgeslagen en u hoeft het wachtwoord niet meer in te vullen
om een verbinding te maken met hetzelfde draadloze netwerk. U kunt het opgeslagen wifi-profiel op elk
moment verwijderen. Wanneer een Eerste installatie wordt uitgevoerd, wordt dit profiel ook verwijderd.
Druk op de Internetknop op de afstandsbediening voor toegang tot de internetportal terwijl uw tv
verbonden is. U hebt toegang tot een brede waaier aan toepassingen en diensten met de internetportal
functie van uw tv.
Opmerking: De inhoud van de portalpagina is onderhevig aan wijzigingen op gelijk welk moment zonder
voorafgaande kennisgeving.
Nero MediaHome software downloadlink: http://www.nero.com/mediahome-tv.
Raadpleeg de handleiding voor meer informatie.
Bedrade verbinding
Draadloze verbinding
LAN (Ethernet) kabel
Of
USB-ingangen op de
achterzijde van de tv
LAN-ingang op de
achterzijde van de tv
Breedband
ISP
Aansluiting
Breedband
ISP
Aansluiting
TV met interne wifi

2Connect the antenna to your TV
3
Connect the TV to the mains socket
Insert the batteries into the Remote Control
1
Insert two AAA/R3 or equivalent type batteries inside.
Observe the correct polarity (+/-) when inserting batteries
and replace the battery cover.
Connect the power cord to the mains socket. Then the
standby LED lights up.
To switch on the TV from standby mode either;
1. Press the Standby button, a numeric button or
Programme +/- button on the remote control.
2. Press the Standby button or Programme +/- button on
the TV.
To switch the TV on
4
Quick Start Guide
REAR BOTTOM OF THE TV
SATELLITE
AERIAL
CABLE

SOURCESOURCE
Auto Setup procedure
6
PLEASE ENSURE BOTH UNITS ARE SWITCHED OFF
BEFORE CONNECTING. Use a HDMI to HDMI cable to
connect the two units together. To select the HDMI input,
press the Source button on the remote control. Each time it is
pressed the on-screen menu confirms your selection.
HDMI input
5
To HDMI connection
on the device
When the TV is operated for the first time, installation wizard will guide you through the process.
First, language selection screen will be displayed. Select the desired language and press OK.
On the following screens, set your preferences using the directional buttons.
About Selecting Broadcast Type
Digital Aerial: If this broadcast search option is turned on, the TV will search for digital terrestrial
broadcasts after other initial settings are completed.
Digital Cable: If this broadcast search option is turned on, the TV will search for digital cable
broadcasts after other initial settings are completed. According to your other preferences a
confirmation message may be displayed before starting to search. Select Yes and press OK to
proceed. To cancel operation, select No and press OK. You can select Network or set values such
as Frequency, Network ID and Search Step. When finished, press OK button.
Note: Searching duration will change depending on the selected Search Step.
Satellite: If Satellite broadcast search option is turned on, the TV will search for digital satellite
broadcasts after other initial settings are completed. Before satellite search is performed some
settings should be made. Antenna Type menu will be displayed first. You can select Antenna Type
as Direct, Single Satellite Cable or DiSEqC switch by using directional buttons.
Analogue: If Analogue broadcast search option is turned on, the TV will search for analogue
broadcasts after other initial settings are completed.
Additionally you can set a broadcast type as your favourite one. Priority will be given to the selected
broadcast type during the search process and the channels of it will be listed on the top of the
channel list. When finished, press OK to continue.
You can activate Store Mode (optional) option at this point. This option is intended only for store
use. It is recommended to select Home Mode for home use.
After the initial settings are completed TV will start to search for available broadcasts of the selected
broadcast types.
After all the available stations are stored, scan results will be displayed. Press OK to continue. The
Edit Channel List menu will be displayed next. You can edit the channel list according to your
preferences or press the Menu button to quit and watch TV.
Note: Do not turn off the TV while initializing first time installation.

Connect your TV to the Internet
7
Connectivity feature allows you to connect your TV to the home network wired or wirelessly. You can
use this networking system to connect to the Portal or to access photo, video and audio files that are
stored on a Media server connected to the network and play/display them on the TV.
However, if your TV does not have Wireless USB dongle or doesn’t support internal Wi-Fi feature,
you should use wired connection type. Add your TV to your home network by connecting it to the
modem/router via an LAN cable (not supplied) as illustrated.
To use your TV with your wireless network, you may need a Wireless USB dongle. You should
connect it to one of the USB inputs on the TV. If your TV supports internal Wi-Fi feature you won't
need any additional wireless adaptors.
Press the Menu button to open the main TV menu. Select System>Settings by using the
directional buttons and press OK to enter. Highlight Network/Internet Settings and press OK.
While Network Type is highlighted, press Left or Right buttons to select connection type. Wired
connection will be established automatically. If wireless connection is selected TV will search for the
available wireless networks and list them when finished. Select one and press the OK button to
connect. If the wireless network is password protected you should enter the correct code to access
the network. Once you have established a wireless connection, this will be saved and you shouldn’t
enter the password to connect to the same wireless network again. You can delete the saved wifi
profile any time. If a First Time Installation is performed, this profile will be deleted as well.
Press the Internet button on the remote to access internet portal, while your TV is connected. You
can access a wide range of applications and services, using the internet portal feature of your TV.
Note: Portal page content is subject to change at any given time without prior notice.
Nero MediaHome software download link: http://www.nero.com/mediahome-tv.
Refer to the instruction manual for more details.
Wired Connection
Wireless Connection
LAN (ethernet) cable
or
USB input/s on the rear
left side of the TV
LAN input on the rear side
of the TV
Broadband
ISP
connection
Broadband
ISP
connection
TV with internal Wi-Fi

2Branchez l'antenne à votre téléviseur
3
Branchez le téléviseur à l'alimentation secteur
Insertion des piles dans la télécommande
1
Insérez deux piles AAA/R3 ou des piles équivalentes à
l'intérieur. Respectez la bonne polarité (+/-) pendant
l'insertion des piles et remettez le couvercle du
compartiment des piles en place.
Branchez le cordon d'alimentation à la prise du secteur. Le
TÉMOIN de mise en veille s'allume.
Pour allumer le téléviseur à partir du mode veille :
1. Appuyez sur le bouton Veille, Programme + ∕ - ou un autre
bouton numérique de la télécommande.
2. Appuyez sur les boutons Veille ou Programme +/- du
téléviseur.
Pour allumer la TV
4
Guide de mise en marche rapide
COIN ARRIERE DU TELEVISEUR
SATELLITE
ANTENNE
CÂBLE

SOURCESOURCE
Auto Setup procedure
6
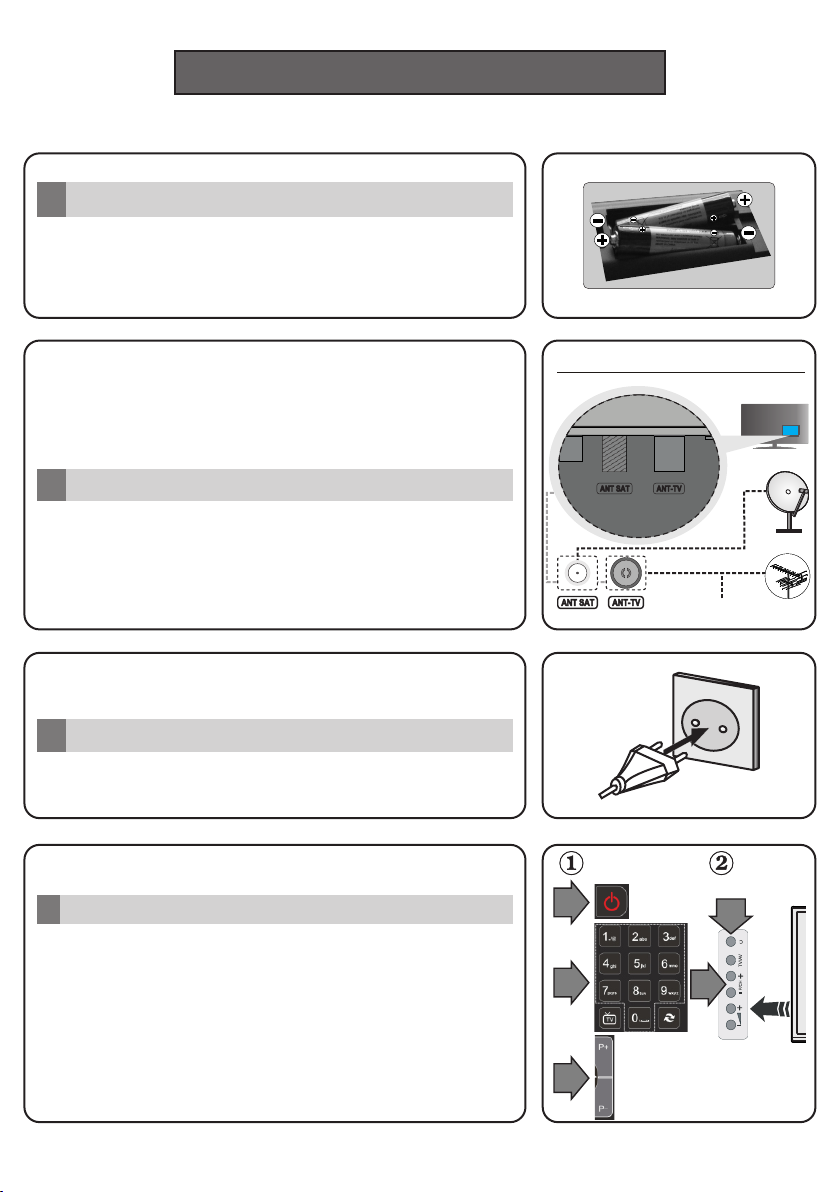
VEUILLEZ VOUS ASSURER QUE LES DEUX APPAREILS
SO N T ÉT E I N T S AVANT D E P R O C É D E R AU
BRANCHEMENT. Utilisez un câble HDMI à HDMI pour
brancher les deux unités. Pour sélectionner une entrée
HDMI, appuyez sur la touche « Source » de la
télécommande. Vous recevez une confirmation de votre
sélection chaque fois que vous appuyez sur le menu à
l'écran.
Entrée HDMI
5
Procédure de
configuration
automatique
Lorsque vous allumez votre téléviseur pour la première fois, un assistant d'installation vous guidera tout
au long du processus. Tout d'abord, l'écran de sélection de langue s'affichera. Sélectionnez la langue
désirée et appuyez sur OK.
À l'écran suivant, réglez vos préférences à l'aide des boutons de direction.
À propos de la sélection des types de diffusion
Antenne numérique : Si l'option de recherche des émissions est activée, le téléviseur procède à la
recherche d'émissions hertziennes une fois les autres réglages initiaux terminés.
Câble numérique : Si l'option de recherche des émissions par câble est activée, le téléviseur procède à
la recherche d'émissions numériques par câble une fois les autres réglages initiaux terminés. Selon vos
préférences, un message peut s'afficher avant le lancement de la recherche. Sélectionnez Oui et
appuyez sur OK pour continuer. Pour annuler l'opération, sélectionnez Non et appuyez sur OK. Vous
pouvez sélectionner Réseau ou des valeurs telles que Fréquence, ID de Réseau ou Étape de
Recherche. Une fois terminé, appuyez sur le bouton OK.
Remarque: La durée de la recherche varie selon le niveau de recherche sélectionné.
Satellite : Si l'option de recherche des émissions par Satellite est activée, le téléviseur procède à la
recherche d'émissions numériques par satellite une fois les autres réglages initiaux terminés. Avant
l'activation du mode satellite, vous devez effectuer certains réglages. Le menu Type d'antenne s'affiche
en premier. Vous pouvez sélectionner les types d'antenne tels que Direct, système satellite à deux
câbles ou commutateur DiSEqC à l'aide des boutons « » ou « ».
Analogique : Si l'option de recherche des émissions Analogique est activée, le téléviseur procède à la
recherche d'émissions analogiques une fois les autres réglages initiaux terminés.
Vous pouvez, en outre, choisir un type de diffusion comme favori. La priorité est accordée au type
d'émission sélectionné pendant le processus de recherche et les chaînes associées seront listées au
dessus de la Liste des Chaînes. Une fois terminé, appuyez sur le bouton OK pour continuer.
Vous pouvez activer l'option Mode de mémorisation (en option) à ce niveau. Cette option est
uniquement destinée à l'usage de magasin. Nous vous recommandons de sélectionner le Mode
domestique pour un usage domestique.
À la fin des réglages initiaux, le téléviseur lance la recherche des émissions disponibles des types
sélectionnés.
Une fois toutes les stations disponibles enregistrées, les résultats de la recherche s'affichent à l'écran.
Appuyez sur OK pour continuer. L'option Modifier la Liste des Chaînes s'affiche par la suite. Vous
pouvez modifier la liste des chaînes selon vos préférences ou appuyer sur le bouton Menu pour revenir
au mode télévision.
Remarque: Évitez d'éteindre le téléviseur lors de l'initialisation de la première installation.

Connectez votre téléviseur à Internet
7
La fonction de connectivité vous permet de connecter votre téléviseur au réseau domestique câblé ou
sans fil. Vous pouvez utiliser ce système de mise en réseau pour vous connecter au portail ou pour
accéder à l'album photo, aux fichiers vidéos et audio qui sont sauvegardés dans le serveur connecté au
réseau, et les jouer/afficher sur le téléviseur.
Cependant, si votre téléviseur n'a pas de clé USB sans fil ou ne prend pas en charge la fonctionnalité du
wifi interne, vous devrez utiliser une connexion avec fil. Ajoutez votre téléviseur au réseau domestique en
le connectant au modem/routeur via un câble LAN (non fourni) de la façon indiquée.
Pour utiliser votre téléviseur avec votre réseau sans fil, il vous faut une clé USB sans fil. Vous devez le
brancher à l'un des ports USB du téléviseur. Si votre téléviseur prend en charge la fonction du wifi interne,
vous n'avez pas besoin des adaptateurs sans fil supplémentaires.
Appuyez sur la touche Menu pour afficher le menu principal du téléviseur. Sélectionnez Système à l'aide
des boutons de direction et appuyez sur OK pour entrer. Sélectionnez Paramètres Réseau et appuyez
sur OK. Lorsque l'option Type de réseau est sélectionnée, appuyez sur le bouton Gauche ou Droite pour
sélectionner le type de connexion. La connexion câblée s'établira de manière automatique. Si la
connexion sans fil est sélectionnée, le téléviseur recherchera les réseaux sans fil disponibles et établira
une liste de ceux-ci une fois la recherche terminée. Sélectionnez un réseau et appuyez sur le bouton OK
pour vous y connecter. Si le réseau sans fil est protégé par un mot de passe, saisissez le code correct
pour y avoir accès. Une fois qu'une connexion sans fil a été établie, elle est enregistrée et vous n'aurez
plus besoin de saisir à nouveau le mot de passe pour vous connecter au même réseau sans fil. Vous
pouvez supprimer le profil du wifi enregistré lorsque vous le désirez. Si une Première Installation est
effectuée, ce profil sera également supprimé.
Appuyez sur le bouton Internet - sur la télécommande pour accéder au portail Internet lorsque votre
téléviseur est connecté. Vous pouvez accéder à une large gamme d'applications et de services grâce à
l'utilisation de la fonctionnalité du portail Internet de votre téléviseur.
Remarque: Le contenu de la page du portail peut être modifié à n'importe quel moment sans préavis.
Le lien de téléchargement du logiciel Nero MediaHome: http://www.nero.com/mediahome-tv.
Reportez-vous au manuel d'instructions pour plus de détails.
Connexion avec fil
Connexion sans fil
Câble LAN (Ethernet)
ou
Entrée/s USB à l'arrière
latéral du téléviseur
Entrée LAN au dos du
téléviseur
Large bande
ISP
Connexion
Large bande
ISP
Connexion
Téléviseur avec Wi-Fi interne
50340257
Table of contents
Languages:
Other Salora Smart TV manuals