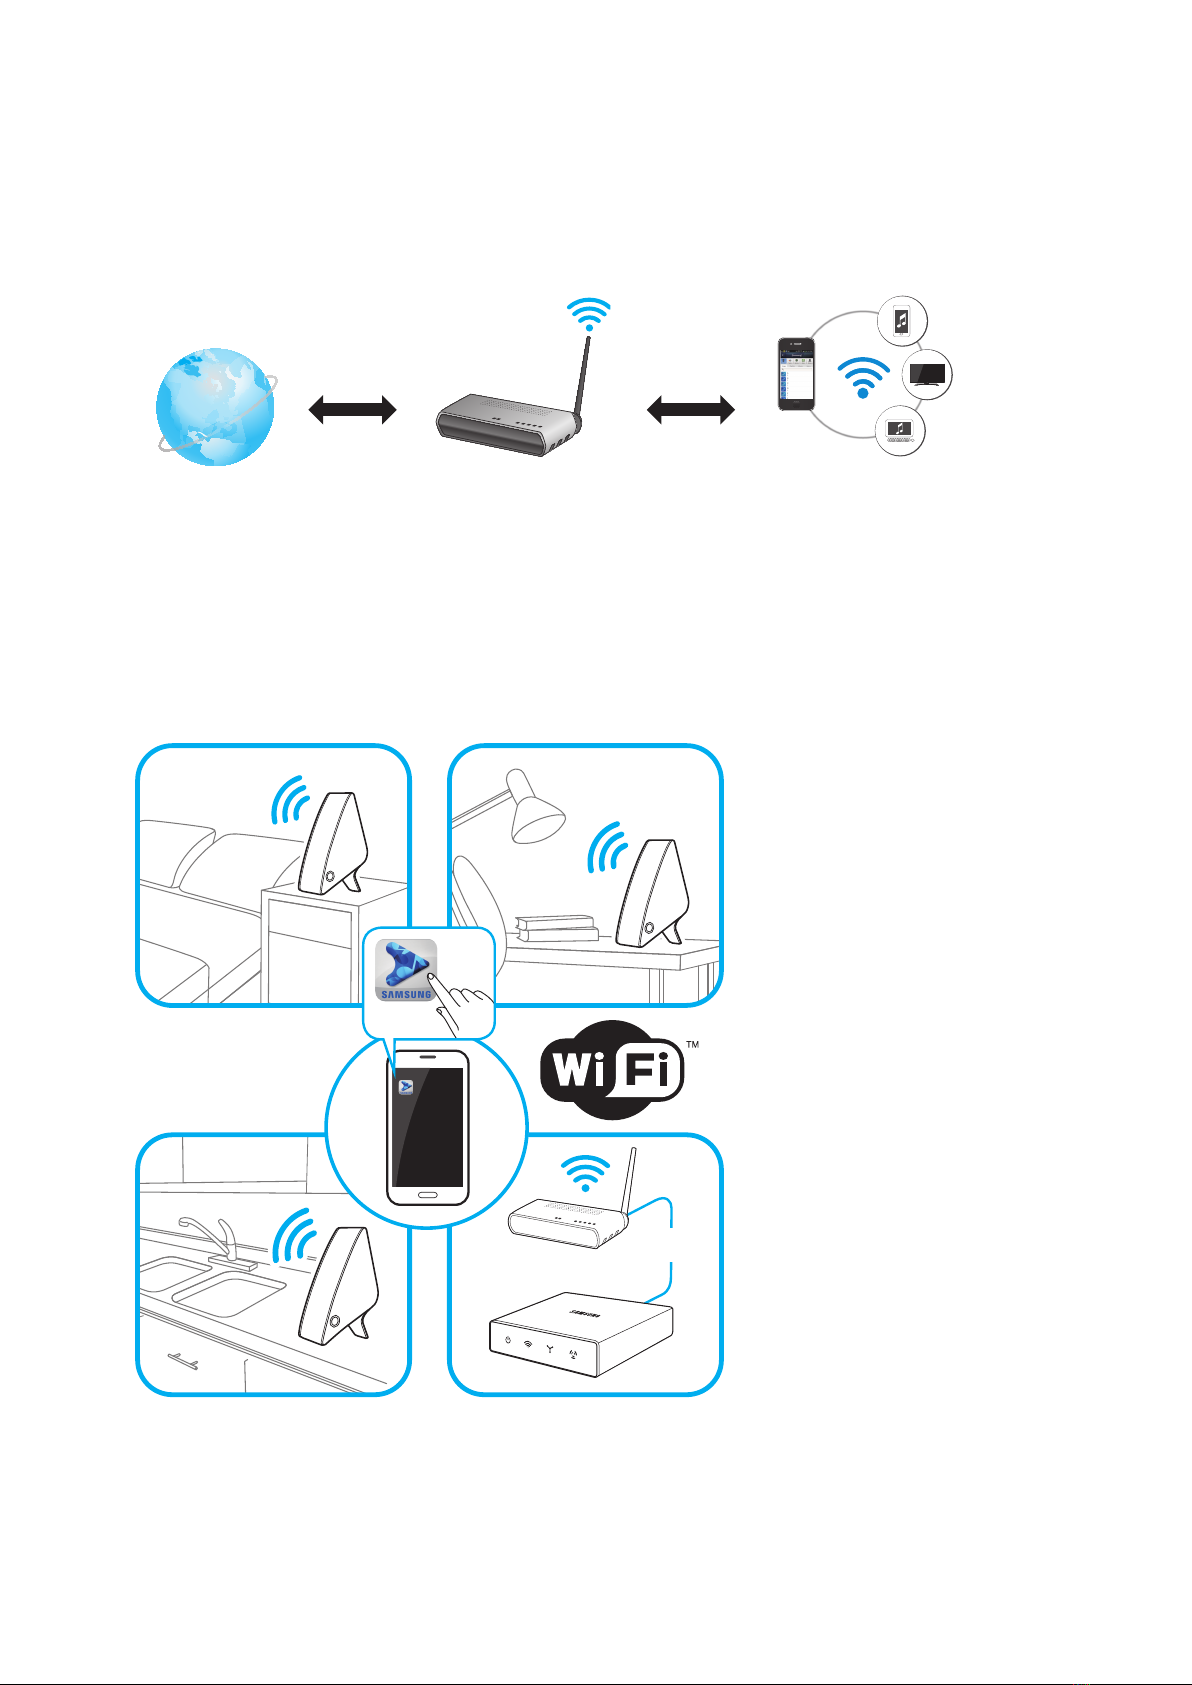
Samsung Shape WAM-750 User manual

WAM750/WAM751
User Manual
Wireless Audio - Multiroom
M7
imagine the possibilities
Thank you for purchasing this Samsung product.
To receive more complete service,
please register your product at
www.samsung.com/register

Contents
2
4
UNDERSTANDING YOUR M7
Before you begin ......................................................................................... 7
Communication Basics ..............................................................................................7
Basic Connection ........................................................................................ 7
How you can enjoy your M7 ........................................................................ 8
GETTING STARTED
Top Panel .................................................................................................... 9
Rear Panel................................................................................................. 10
Accessories............................................................................................... 11
Available Accessories (Not Included).......................................................... 11
Connecting the Power Cable..................................................................... 12
Connecting the Cover-Stand ..................................................................... 13
Separating the cover-stand ......................................................................................14
Installing on a wall...................................................................................... 15
Attaching the toroidal ferrite core to the power cord of the M7................... 16
Looping the power cable around the toroidal ferrite core ..........................................16
Sleep Mode............................................................................................... 17

3
4
CONNECTIONS
Connecting M7 following the App guide .................................................... 18
Connecting with a HUB (Not Included)....................................................... 18
Connecting the M7(s) to Your Network with a HUB (Not Included)............................18
Connecting without a HUB (Not Included).................................................. 21
Connecting the M7 to Your Network with a LAN Cable (For a Single M7) .................21
Connecting the M7 to Your Network via the WPS Method (For a Single M7).............23
Connecting the M7 to Your Network via the Wi-Fi Setup Method (For a Single M7)
- For Android............................................................................................................25
Connecting the M7 to Your Network via the Wi-Fi Setup Method (For a Single M7)
- For iOS ..................................................................................................................28
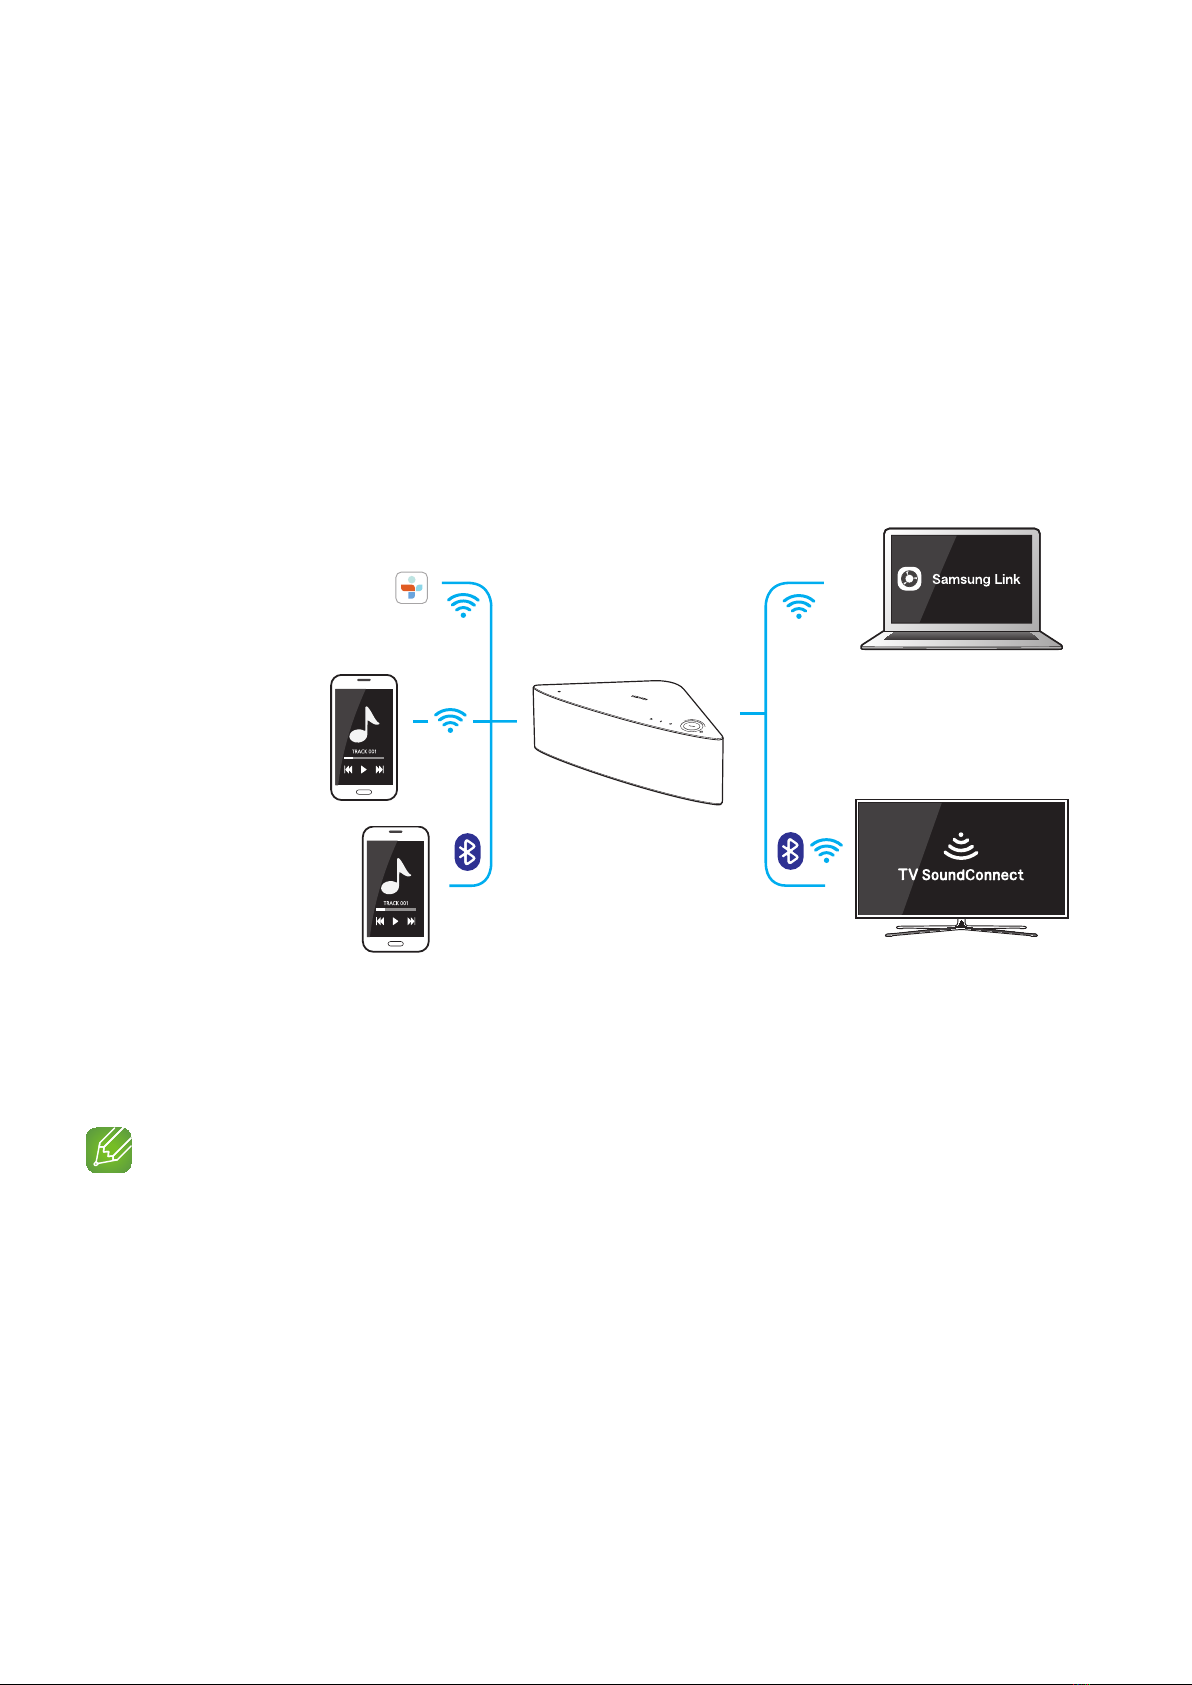
Connecting with TV SoundConnect function.............................................. 33
Disconnecting TV SoundConnect.............................................................................34
Connecting the M7 to Bluetooth Devices................................................... 35
Disconnecting Bluetooth ..........................................................................................36
Connecting with NFC function - For Android.............................................. 37
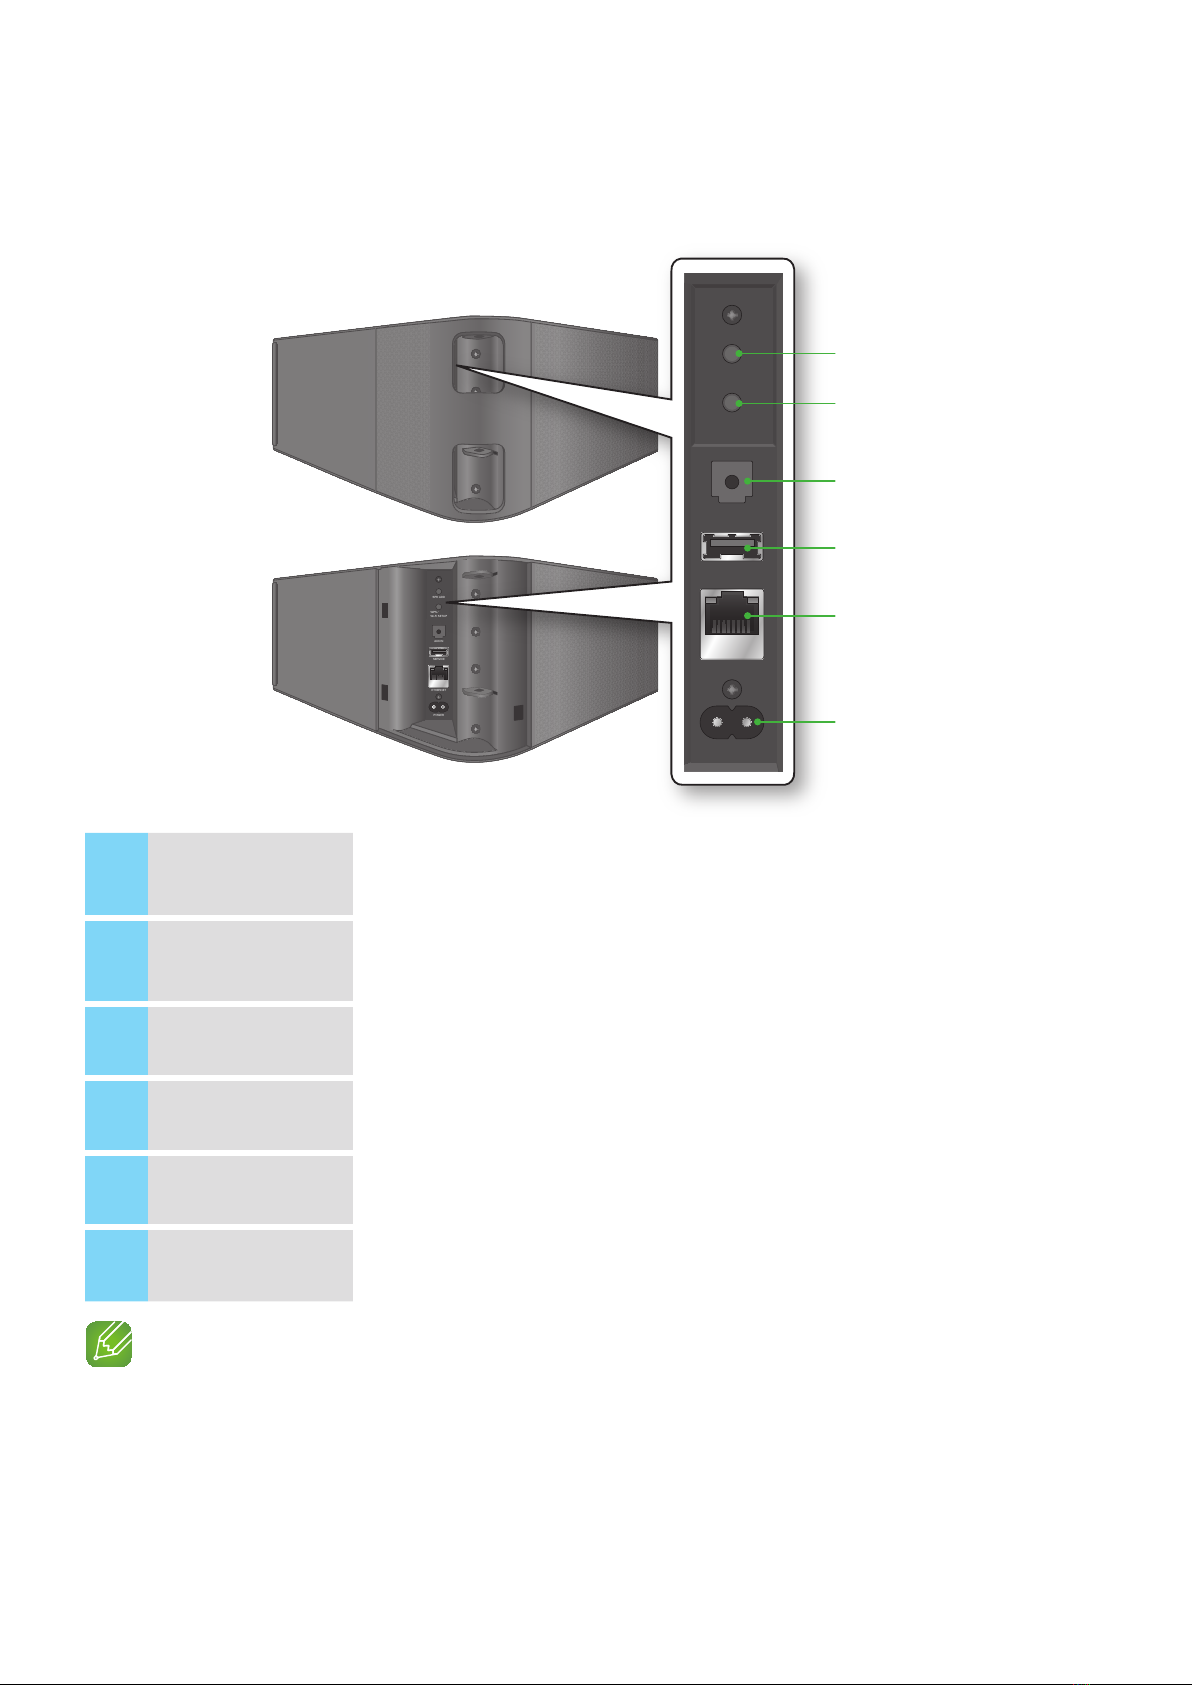
Connecting to the AUX IN.......................................................................... 38
Disconnecting AUX connection ................................................................................39
Adding an M7............................................................................................ 40
Connecting M7 following the App guide ...................................................................40
Adding an extra M7 to a HUB that is connected to an M7........................................44
Adding another M7 and Hub to a single M7 in use ...................................................45
Adding a HUB ........................................................................................... 47
Relocating the M7 ..................................................................................... 47

4
4
FUNCTIONS
Installing the Samsung Multiroom App....................................................... 48
Accessing the Samsung Multiroom App .................................................... 48
Using the Samsung Multiroom App .......................................................... 49
Renaming a connected M7 ......................................................................................49
Switching the input source .......................................................................................49
Changing the sort order of listed M7s ........................................................................... 50
Grouping M7s ..........................................................................................................51
Listening to Surround Sound Using Several Audio Devices.......................................52
Playing a Song .........................................................................................................54
Sorting songs...........................................................................................................55
Creating a Playlist.....................................................................................................56
Listening to a radio station .......................................................................................58
Setting Presets.........................................................................................................58
Setting the Default Radio Stations in Speaker Preset................................................60
Searching for a Radio Station...................................................................................60
Playing music from content providers.......................................................................61
Playing music from the Amazon cloud player............................................................61
Playing music from a selected device .......................................................................61
Playing Media Content Saved in a PC........................................................ 62
Samsung Link ..........................................................................................................62
Wireless Audio - Multiroom for Desktop....................................................................63

5
4
Using the Settings menu............................................................................ 65
Guide .......................................................................................................................65
Service.....................................................................................................................66
Speaker Settings......................................................................................................67
Clock .......................................................................................................................70
Support....................................................................................................................71
Open source licenses...............................................................................................72
App Version..............................................................................................................72
Reset your product.................................................................................... 73
Resetting the M7......................................................................................................73
Resetting the HUB (Not Included).............................................................................73
APPENDIX
Compatibility.............................................................................................. 74
Multiroom Music Experience (Group Play).................................................. 74
Troubleshooting......................................................................................... 75
Open Source License Notice ..................................................................... 77
Licences.................................................................................................... 77
Specifications ............................................................................................ 78

6
4
SAFETY INFORMATION
Regulatory Compliance Statements........................................................... 80
Warning ...................................................................................................................80
CAUTION.................................................................................................................80
Wiring the Main Power Supply Plug (UK Only) ..........................................................81
Important Safety Instructions....................................................................................81
Safety precautions..................................................................................... 82
Power Supply Precautions .......................................................................................82
Installation Precautions.............................................................................................83
Usage Precautions ...................................................................................................83
Cleaning Precautions ...............................................................................................84
Additional Information................................................................................ 84
About NFC (Android only).........................................................................................84
About the Network Connection ................................................................................84
Compatible products................................................................................................85
Copyright .................................................................................................. 85

Understanding Your M7
A Before you begin
❚Communication Basics
1 Requirements: Wireless Router, Smart Device
2 The wireless router should be connected to the Internet.
3 The smart device should be connected to the router via a Wi-Fi connection.
A Basic Connection
Wireless Router
Wired
Wireless Router Samsung LinkInternet
7
4

A How you can enjoy your M7
• Stream music through Internet radio, music services, or from the cloud.
• Play music through a Wi-Fi connection from your smart device.
• Play music from your phone, PC, or smart devices via Bluetooth.
• Use the TV SoundConnect function to play sound from your Samsung TV.
• You can configure multiple M7s in a Multi-room set-up with Internet radio, music services,
and Device.
- Note that Bluetooth and TV SoundConnect are not configured for Multi-room set-ups.
NOTE
9Depending on your region or manufacturer, supported streaming music services may differ.
tunein
You can play music stored
in your smart device with
the Samsung Multiroom
App.
Enable the Bluetooth function
of your smart device and the
[Samsung]AllConnect will
appear on the device list.
You can play music on devices
connected to your local network
using App's Devices menu.
You can listen to the sound from
your Samsung TV through the M7
by using the TV SoundConnect
function.
8
4

Getting Started
A Top Panel
1NFC Tag
Connect your NFC compatible device via Bluetooth to the M7 using the simple NFC
tagging procedure. (Android only)
2Internet Radio
Preset button
Press this button to listen to an Internet radio station. Each time you press this
button, the M7 switches to the next default station, cycling through the 3 default
stations.
3Bluetooth button
Press this button to enable Bluetooth.
4TV SoundConnect
button
Press this button to enable TV SoundConnect.
5Volume Control
Controls the volume level.
Touch and drag softly with your finger to make adjustments.
This will not work if you press with excessive force.
6Mute button
Mutes the sound from this M7. Press again to restore the sound to the previous
volume level.
NOTES
9When you turn on the M7, touch buttons appear on its top panel.
9Press and hold the Mute button for more than 5 seconds to place the M7 into Sleep Mode.
9Press and hold the TV SoundConnect button for more than 5 seconds to reset the TV SoundConnect
and connect a new TV.
9You can listen to a radio station by pressing the Internet Radio Preset button on the top panel of the
M7. Each time you press this button, the M7 switches to the next default station, cycling through the 3
default stations.
9Enable your smart device's Bluetooth by touching it to the NFC Tag on the top panel of the M7. (Android
only)
9
4
VOLUME
VOLUME
ytrewq

A Rear Panel
1SPK ADD button
(Speaker Add)
Press this button to add an M7 to your network.
2WPS/Wi-Fi SETUP
button
Press this button to connect your M7 to your network using WPS or Wi-Fi setup.
3AUX IN
Lets you connect the M7 to the analog output of a smart device.
4SERVICE
For service only. Lets service technicians update the firmware of the M7.
5ETHERNET
Lets you connect the M7 to your network using a LAN cable.
6POWER
Connection for the M7's power cord.
NOTES
9SPK ADD Button: Press for 1 second to pair your M7 with a HUB.
9WPS / Wi-Fi SETUP Button:
- Press for 1 second to connect the M7 to your wireless router using WPS.
- Press and hold down for more than 5 seconds until you hear a fast, 3 note beep to connect the M7 to
your network through your smart device using the Wi-Fi Setup method.
10
44
SPK ADD
WPS /
Wi-Fi SETUP
AUX IN
SERVICE
ETHERNET
POWER
SPK ADD
WPS /
Wi-Fi SETUP
AUX IN
SERVICE
ETHERNET
POWER
SPK ADD
WPS /
Wi-Fi SETUP
AUX IN
SERVICE
ETHERNET
POWER
q
w
e
r
t
y

A Accessories
Confirm you have the supplied accessories shown below.
VOLUME
Wireless Audio - Multiroom
M7 Power cord LAN cable Cover-Stand
Toroidal ferrite core User Manual Getting started
A Available Accessories (Not Included)
(6ea)
(M5 X L50mm-6ea)
Audio cable HUB: WAM250 Wall Mount
NOTES
9Information on available accessories and their release dates can be found on the Samsung website.
9When purchasing an accessory, check whether it is compatible with the M7.
9Use authentic Samsung accessories. Damage and problems caused by unauthorized accessories can void
your warranty.
11
44

A Connecting the Power Cable
1 Remove the rear cover.
2 Insert the power cable through the rear cover hole
into the M7 power port.
3 Close the rear cover.
NOTE
9When completing network setup, close the rear cover.
12
44
SPK ADD
WPS /
Wi-Fi SETUP
AUX IN
SERVICE
ETHERNET
POWER
SPK ADD
WPS /
Wi-Fi SETUP
AUX IN
SERVICE
ETHERNET
POWER
SPK ADD
WPS /
Wi-Fi SETUP
AUX IN
SERVICE
ETHERNET
POWER

A Connecting the Cover-Stand
1 Before attaching the Cover-Stand, remove the
rear cover.
Insert the power cable through the Cover-Stand
hole into the M7 power port.
2 The inside of the Cover-Stand has two sides.
One side (A) has four tabs - two large tabs and
two small tabs. The other side (B) has two large
tabs only. Insert the two large tabs on side A into
the two slots in the area marked A in the diagram.
3 Turn the M7 so the side marked B in the diagram
is facing you. With the thumbs of both hands,
press side B of the Cover-Stand so that the tabs
on side B snap into the slots in the area marked B
in the diagram. You may need to press side B of
the Cover-Stand with some force.
4 The M7 can now be installed vertically.
Caution
9Do not place the M7 on an unstable surface.
NOTES
9Turn the speaker upright using the stand to set the
speaker to MONO mode.
9Turning the product upright or laying it down in the
middle of playing music may temporarily cause unstable
sound.
13
44
VOLUME
VOLUME
A
VOLUME
B
➡

❚Separating the cover-stand
1 Locate the Cover-Stand's handle. See the diagram
on the right.
2 Push the Cover-Stand's handle while applying
force to the Cover-Stand in the direction of the
arrow.
Important : Push the Cover-Stand straight ahead,
parallel to the surface of the M7. You may need to
use some force.
3 The tabs release and the Cover-Stand separates
as shown in the figure.
NOTES
9Do not lift up the M7 by the stand. It may separate from the stand and cause damage or personal injury.
9When installing the M7 vertically, please make sure to use the stand.
If you do not, vibrations from the M7's speakers may cause the M7 to tip over or fall, damaging it.
14
44
➡

A Installing on a wall
Warning
9Please have a qualified installer install the Wall Mount Bracket.
9Check the strength of the wall before you install the Wall Mount Bracket. If the strength is insufficient,
make sure to reinforce the wall before installing the Wall Mount Bracket and the M7 on the wall.
9Samsung Electronics is not liable for any damage to the product due to the product being installed
inappropriately.
9After the installation is complete, do not hang on the M7 and avoid striking it or subjecting it to severe
impact. When reinstalling the Wall Mount Bracket and M7 in another location, use the same screws
as those supplied with the Wall Mount Bracket. (You can buy the screws from your product provider.)
1 Finish pairing the M7, and then make sure the App plays music properly through the
M7.
2 Close the back cover of the M7.
3 Install the Wall Mount Bracket (sold separately). You can mount it vertically or
horizontally. Follow the directions that come with the Bracket.
4 Fit the M7 into the corresponding slots of the Wall Mount Bracket.
The installation is complete.
NOTE
9For more information, please refer to the Wall Mount's Quick Setup Guide.
or
or
or
or
15
44

A Attaching the toroidal ferrite core to the power cord of the M7
Attaching the Toroidal ferrite core to the power cord of the M7 helps prevent RF interference
from radio signals.
1 Pull the fixing tab of the Toroidal ferrite core to open it.
2 Make a loop around the core with the power cable of the M7.
3 Attach the toroidal ferrite core to the M7 power cord as shown in the figure, and then
press it until it clicks.
❚Looping the power cable around the toroidal ferrite core
➧ ➧ ➧
•
Lift up to
release the
lock and open
the core.
•Make a loop around
the core with the
power cable.
NOTE
9It is better to attach Toroidal ferrite cores at each end of the cable, one close to the wall plug and another
close to the terminal where it connects to the M7.
16
44
SPK ADD
WPS /
Wi-Fi SETUP
AUX IN
SERVICE
ETHERNET
POWER

A Sleep Mode
`In Wi-Fi / Bluetooth / TV SoundConnect mode
- The M7 switches to the sleep mode if there is no music playback or no button operation
(either from the top panel or from the app) for 15 minutes.
`In AUX mode
- The M7 switches to the sleep mode if there is no button operation (either from the top
panel or from the app) for 8 hours.
NOTES
9While playing music in the Wi-Fi, Bluetooth, or TV SoundConnect connection modes, the M7 will not
switch to the Sleep mode.
9While playing music in AUX mode, it may switch to the Sleep mode.
9To switch to the Sleep mode manually, press and hold the Mute button for more than 5 seconds.
17
44

A Connecting M7 following the App guide
1 Connect your smart device to your Wi-Fi network.
2 Download the Samsung Multiroom app from Google Play or the App Store.
3 On your Smart device, select the Samsung Multiroom app. Setup starts.
4 Follow the directions on your smart device’s screen.
(Follow the App’s instructions and refer to page 18~39 for further information.)
Press here
A Connecting with a HUB (Not Included)
• If the M7 fails to connect to your network or its network connection operates abnormally,
place the M7 closer to the HUB or your router and try again.
• The M7 is a wireless network device. Its communications with your network may
be disrupted because of the distance between it and other devices on the network,
obstructions, or interference from other wireless devices.
❚Connecting the M7(s) to Your Network with a HUB (Not Included)
1 Connect a LAN cable to the router and the ETHERNET SWITCH on the back of the
HUB.
NOTE
9You can connect the LAN cable to any ETHERNET SWITCH Port on the HUB.
POWER
VOLUME
Wireless Router
LAN Plug In
HUB
Plug In
Connections
18
44

2 Attach the HUB's power cord to the power port on the rear of the HUB, and then plug
the power cord into an electrical outlet.
3
The power ( ) and the HUB ( ) indicators on the HUB's front turn on.
When the pairing indicator ( ) begins to flash, plug the M7(s) into an outlet.
The pairing indicator on the M7 starts to flash.
If the HUB's pairing indicator does not flash, press the SPK ADD button on the rear of the
HUB.
NOTE
9If you are adding multiple M7s, connect all the M7's to electrical outlets. If you are not connecting all
the M7s, refer to pages 40~46.
Press here
4 Wait until the pairing indicator on the M7 stops flashing. If the M7's LED indicator turns
solid blue, pairing is complete. The M7 may also beep.
NOTES
9Place each M7 at least 20 inches (50 cm) from the HUB when connecting them to the HUB.
9Your smart device cannot connect to the M7 or the HUB if there is no wireless router.
9To confirm you have a proper connection, check the pairing indicator on the front of the HUB.
- When you turn on the HUB for the first time, there is a 20 minute pairing period.
The pairing indicator ( ) will blink for these 20 minutes or until pairing occurs. When you press
the SPK ADD button to pair additional M7s, the pairing period is reduced to 10 minutes. The pairing
indicator ( ) flashes for 10 minutes or until pairing occurs. Turn on the M7 you want to pair while
the pairing indicator is flashing.
- If pairing mode has expired, press the SPK ADD button on the rear of the HUB to turn on pairing
mode again. Then, turn the M7 off and then on or press the SPK ADD button on the rear of the M7
to link the M7 to the HUB.
9For a proper connection, connect the HUB to your router before turning on the M7.
- Connecting the M7 to the HUB may take a few minutes.
- There will be a brief sound when the connection is established.
19
44

5 Connect your smart device to your Wi-Fi network. (The HUB and the smart device should
be connected to the same router.)
6 Download the Samsung Multiroom app from Google Play or the App Store.
7 On your smart device, select the Samsung Multiroom app. Setup starts.
8 If the automatic setup fails, run the App again and follow the instructions in the app guide
on your device to connect the M7 and the HUB.
NOTE
9After pairing is complete, the M7 naming screen appears. Edit the name or enter a name of your own
choosing.
20
44
Other manuals for Shape WAM-750
7
This manual suits for next models
1
Table of contents
Other Samsung Wireless Audio System manuals