Sandberg 134-30 User manual

Quick guide
Product overview
3. USB2.0: USB 2.0 Video output interface
4. IR receiver
5. DC 12V IN: Power supply
6. VISCA: RS-232, RS-485 control
1
2
3 4 5 6
Power on
Remoting
Standby
1. Lens
2. IR receiver
Indicator

Quick guide
Mounting options
On a Desk
On a Wall
On a tripod, for example
Sandberg item no. 134-26
Screw the wall mount bracket on the wall, refer to the following picture 1.
Fasten the camera on the wall mount bracket, refer to the following picture 2.
(Picture 1) (Picture 2)

Quick guide
Connection
USB2.0 (Dual USB-plug for DC by USB)
Optional Visca-connection RS-232/485
DC 12V IN

Quick guide
Software installation
The camera works driver-less and is compatible with most chat-applications.
The camera has no built in microphone. We recommend to use the camera together with Sandberg
Speaker Phone or another audio device with microphone and speaker.
Choose this device name on the device
list for video-camera:
ConfCam PTZ x10 Remote 1080P

Quick guide
Remote control
Open the back of the remote control and insert 2 x AAA batteries.

Quick guide
OSD Menu Introduction
Dome Menu Protocol Dome Address
Dome Protocol
Buadrate
Back
Dome IR Address
Pan Speed
Tilt Speed
Preset Freeze
Preset Resume
Back
Information Version
Model
Date
Language English
Exit
Lens Menu Exposure Brightness
Backlight
AE
Shutter
Flicker
Back
Color Hue
Saturation
Sharpness
WB
Color Temp
Back
Image Image Flip
Frame
Image Mode
Back
Information Version
Model
Date
Exit
Language English
OSD Mirror

DOME OSD
Press the “Dome OSD” button on the
remote control to log in Dome Menu as
follow. Press again same button to
log-off OSD Menu.
DOME Menu
Dome Address: Choose dome address
Dome Protocol: Choose control protocol
Buadrate: Choose baud rate
Back: Back to previous menu
Adjustable Value: 1-7; Default: 1
Optional: Visca/Pelco_D; Default: Visca
Optional: 2400/4800/9600/38400
Default: 9600
Quick guide
Protocol

Quick guide
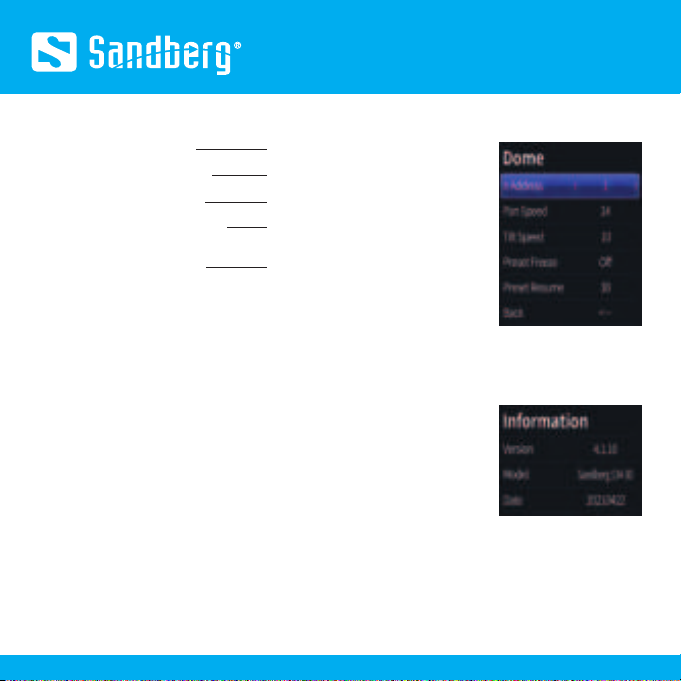
IR Address: Choose IR address
Pan Speed: Pan movement speed
Tilt Speed: Tilt movement speed
Preset Freeze: Image freezing during
preset call
Preset Resume: Location resume
(When camera stay 30 seconds before
power off where could be save as a
Preset, and camera will return this
Preset after Power on)
Back: Back to previous menu
Adjustable Value: 1-3; Default: 1
Adjustable Value: 1-24; Default: 14
Adjustable Value: 1-18; Default: 10
Optional: On/Off; Default: Off
Optional: Off/30s/60s/90s; Default: 30
Dome
Version: Firmware version info
Model: Camera model info
Date: Firmware version date
* The information may vary according
to product updates
Information
OSD menu language
Language
Log-off DOME OSD Menu
Exit

Quick guide
LENS OSD
Press the “Lens OSD” button on the
remote control to log in Lens Menu as
follow. Press again same button to
log-off OSD Menu.
LENS Menu
Brightness: Adjust image brightness
Backlight: Adjust the backlight
AE: Adjust the exposure settings
Shutter: Shutter speed
Flicker: Anti-flicker adjustment
Back: Back to previous menu
Adjustable Value: 0-255; Default: 64
Optional: Off / On; Default: Off
Optional: Auto/ Shutter; Default: Auto
Optional: 1/10000-1/25; Default: 1/25
Optional: 50/60; Default: 50
Exposure

Quick guide
Hue: Adjust image hue
Saturation: Adjust image saturation
Sharpness: Adjust image sharpness
WB: Select white balance mode
Color Temp: Adjust color temperature
Back: Back to previous menu
Optional: 0-100; Default: 50
Optional: 0-127; Default: 50
Optional: Auto/Manual; Default: Auto
Optional: 1500-15000; Default: 5000
Color
Image Flip: Mirror and rotate image
Frame: Select video frame rate
Image Mode: Select image style
Back: Back to previous menu
Optional: Off/All/Flip/Mirror
Default: Off
Optional 30/25; Default: 30
Optional Normal/Clear/Bright/Beauty
Default: Normal
Image
Version: Firmware version info
Model: Camera model info
Date: Firmware version date
Information
* The information may vary
according to product updates

OSD menu language
Language
Mirror the On Screen Display menu
OSD Mirror
Log-off DOME OSD Menu
Exit
Notes:
1. No Pan/Tilt movement function while OSD Menu on screen.
2. Address code, protocol, baud rate, picture freeze, preset memory function do not change after Reset of remote control.
3. Shutter can only be adjusted if it is selected as Shutter in the AE menu.
Quick guide
Special Preset Instruction
Special Preset, the user can only call to realize its function and cannot set them up. In addition, it can not be called through the remote
control, can only be called through control software (e.g. HD Camera Debugger), effective immediately after the call is completed.
Preset Position Functions
76
84
87
88
89
90
94
Enter stand-by status
Starting up 30s/60s/90s save preset bits, call each time, switch once. Low end models only support 30s calls, no 60s and 90s function.
Switch the remote controller address code 1(default value) 2, 3, once a call, switch once.
Switch control protocol VISCA (default), Pelco-D, once a call, switch once.
Switch baud rate 9600bps(default), 38400bps, once a call, switch once.
Image flip / mirror image
Restart camera and return default settings

Quick guide
1. Reset / Power
2. Address code selection key: camera address code and remote
control address code corresponding, can realize control.
(No.4 key is reserved)
3. PTZ control key: control PTZ movement and return to the
original position.
4. Focus control key: Auto / manual switch. The focal length is
adjusted by manual focusing.
5. Zoom control key: control optical zoom lens stretch.
6. Menu control key: it is divided into camera menu and lens
menu, and sets the parameters of camera and lens respectively.
Rev: flip control key, control the camera flip and mirror image.
7. Preset position function area: after pressing the preset address
1-6, then press the control key to take effect, and it can be set,
cleared and called.
8. Numbers key area: Preset address function
Function Description
Remote Control

Quick guide
S/N
1
2
3
Regional
Reset
Power ON/OFF
Camera ID Choose
Pan/Tilt control
4Lens Focus adjustments
Keynote Functions
Restart camera and back to default factory settings.
Power ON/OFF
Move camera up-side
Move camera down-side
Move camera go left
Move camera go right
Return to the original position
Auto focus automatically
Manual focus
Lens zoom in far end
Lens zoom in Near end
Choose camera according to your remote control
(“4” is reserved key)

Quick guide
S/N
5
6
7
Regional
ZOOM Control
OSD Menu
Preset position
Function Area
8Numbers key area
Keynote Functions
Zoom out / in
Login Dome OSD Menu
(Press again to log-off OSD.)
Control the camera flip and mirror image
To “Set” as preset position
To “Clear” preset position
To “Call” preset position
Numbers key 1 to 6 used for Presets.
Login Lens OSD Menu
(Press again to log-off OSD.)

Warranty
There is a five-year warranty on your Sandberg product.
Please read the warranty terms and register your new
Sandberg product at www.sandberg.world/warranty
For information on handling electronic waste, see www.sandberg.world/weee
http://helpdesk.sandberg.world
Support
Years
Warranty
Table of contents