Sandstorm SIPD8012 User manual

Instruction Manual
Speaker System with Docking
SIPD8012
iPod, iPhone and iPad not included
SiPD8012_IB_120907_Michelle.indd 1 07/09/2012 2:02 PM

SiPD8012_IB_120907_Michelle.indd 2 07/09/2012 2:02 PM

3
Contents
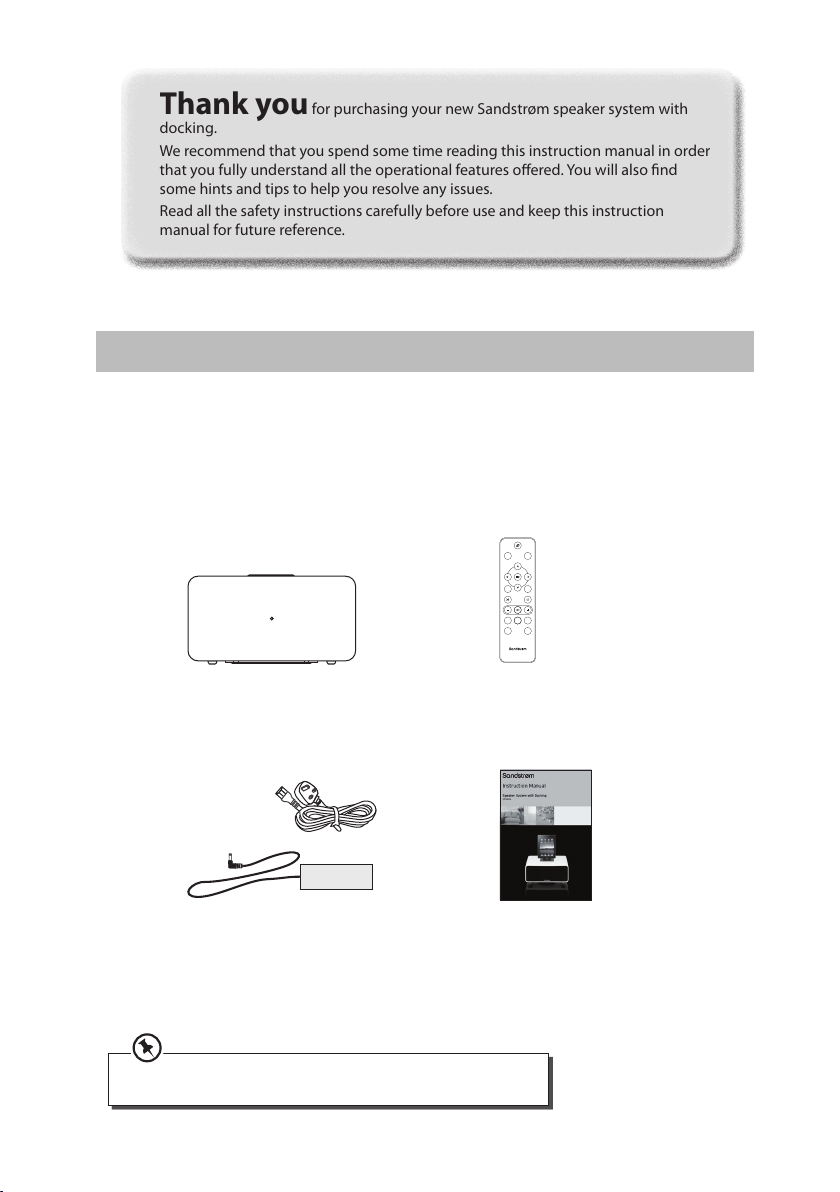
Unpacking.............................................................................................................................4
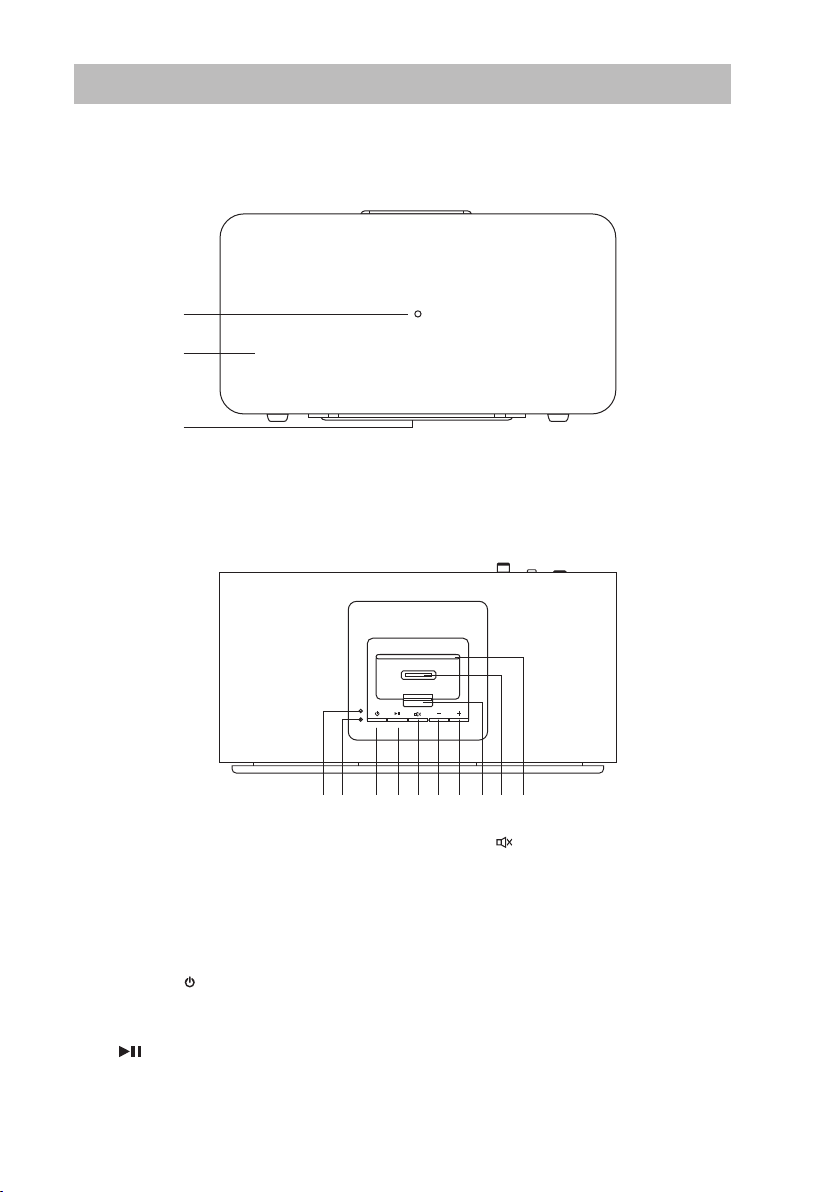
Product Overview.................................................................................................................5
Main Unit.........................................................................................................................................................5
– Front View..............................................................................................................................................5
– Top View.................................................................................................................................................5
– Rear View ...............................................................................................................................................6
Remote Control.............................................................................................................................................7
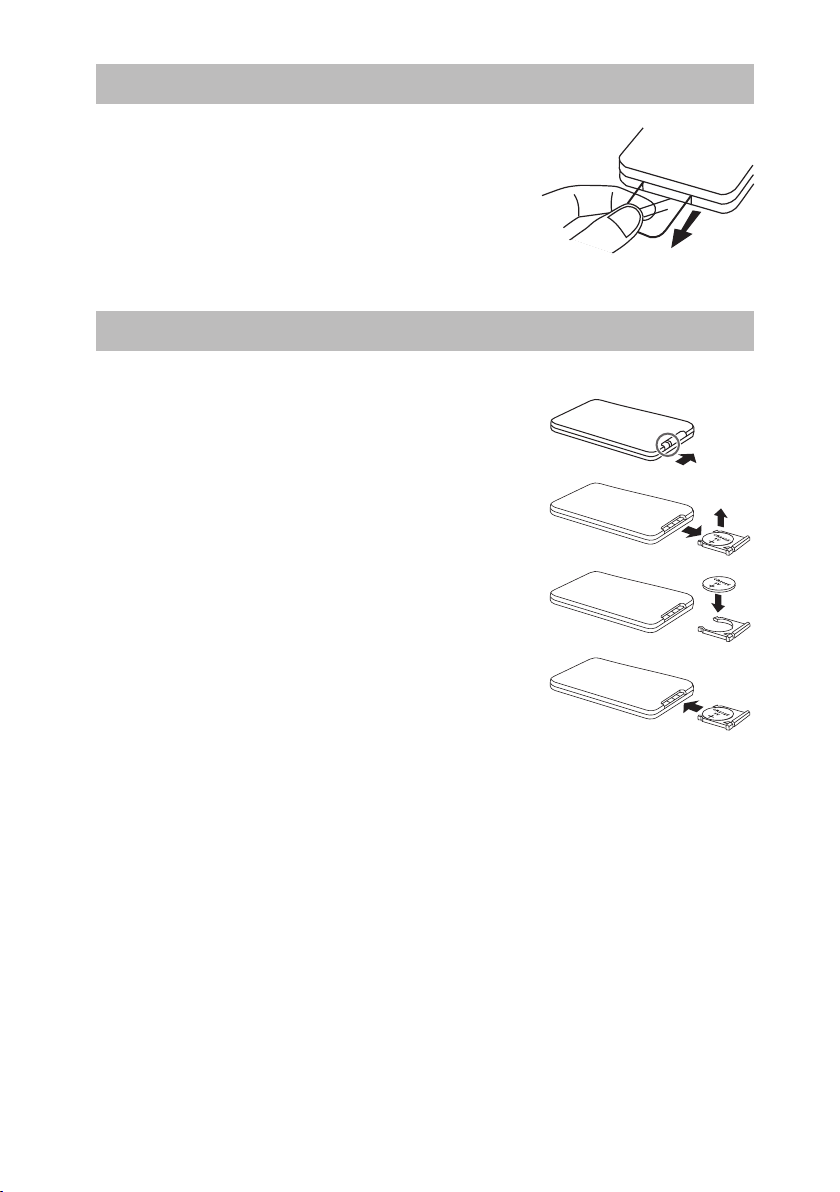
Removing the Insulating Strips from the Remote Control................................................8
Battery Replacement for the Remote Control....................................................................8
– Handling the Battery .........................................................................................................................8
– Handling the Remote Control........................................................................................................9
Remote Control Operation Range.......................................................................................9
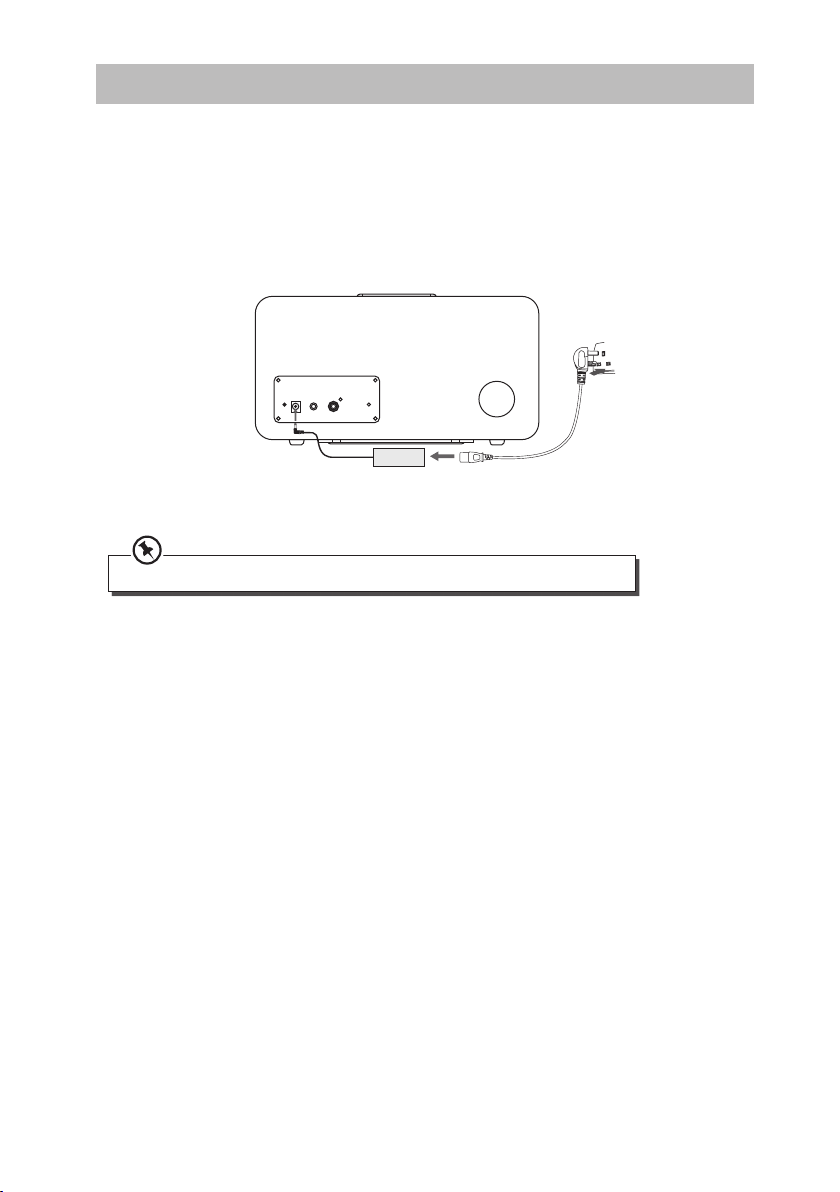
Connecting to the Mains Supply .......................................................................................10
Mains Power................................................................................................................................................ 10
General Operation..............................................................................................................11
Switching ON / OFF .................................................................................................................................. 11
Selecting Modes ........................................................................................................................................ 11
Adjusting the Volume.............................................................................................................................. 11
Adjusting the Sound Eect.................................................................................................................... 11
iPod / iPhone / iPad Operation ..........................................................................................12
Inserting the iPod / iPhone / iPad........................................................................................................ 12
To Play / Pause Playback ......................................................................................................................... 12
Skipping to Another Track ..................................................................................................................... 13
Random Playback...................................................................................................................................... 13
Repeat Playback......................................................................................................................................... 13
Charging your iPod / iPhone / iPad..................................................................................................... 13
Video Out Function .................................................................................................................................. 13
AUX IN operation................................................................................................................14
Maintenance .......................................................................................................................14
Cleaning the Unit ...................................................................................................................................... 14
Hints and Tips .....................................................................................................................15
Specications......................................................................................................................15
Safety Warnings..................................................................................................................16
SiPD8012_IB_120907_Michelle.indd 3 07/09/2012 2:02 PM

4
Remote Control x 1Mains Unit
Instruction Manual x 1Mains Adapter x 1
DOCK AUX
MENU ENTER
JAZZ FLAT
ROCK POPPOP CLASSIC
Thank youfor purchasing your new Sandstrøm speaker system with
docking.
We recommend that you spend some time reading this instruction manual in order
that you fully understand all the operational features oered. You will also nd
some hints and tips to help you resolve any issues.
Read all the safety instructions carefully before use and keep this instruction
manual for future reference.
Unpacking
Remove all packaging from the unit. Retain the packaging. If you dispose of it please do so
according to local regulations.
The following items are included:
If items are missing, or damaged please contact Partmaster (UK only).
Tel: 0844 800 3456 for assistance.
SiPD8012_IB_120907_Michelle.indd 4 07/09/2012 2:02 PM

5
SOURCE
Product Overview
Main Unit
Front View
Top View
1. Remote Control Sensor
Receives signal from the remote
control.
1. AUX Indicator
Lights up orange when the unit is in
AUX mode.
2. Status Indicator
Lights up green when the unit is in
iPod mode.
3. SOURCE Button
Switches between the iPod, AUX and
STANDBY modes.
4. Button
Plays/pauses/resumes playback.
2. Speakers
3. Subwoofer
5. Mute Button
Silences the unit or restores the sound.
6. Volume – Button
Decreases the volume.
7. Volume + Button
Increases the volume.
8. Docking Cover Lever
9. iPod Docking
10. Docking Cover
2
3
1
1 82 9 103 4 5 6 7
SiPD8012_IB_120907_Michelle.indd 5 07/09/2012 2:02 PM

6
1. DC IN Socket
Connects to the mains socket via
the mains adapter.
2. AUX IN Socket
3. Video Out Socket
Rear View
DC IN AUX IN VIDEOOUT
1 2 3
SiPD8012_IB_120907_Michelle.indd 6 07/09/2012 2:02 PM

7
Remote Control
1. STANDBY Button
Switches the unit between the ON
and STANDBY modes.
2. DOCK Button
Switches to iPod mode.
3. Button
Navigates up to select an item on an
iPod / iPhone / iPad menu screen.
4. Button
• Skips backwards to the beginning of
the track or to the previous track.
• Allows fast reversing of the current
track.
5. MENU Button
Displays iPod / iPhone / iPad menus.
6. SHUFFLE Button
Random playback of music tracks.
7. VOL – Button
Decreases the volume.
8. POP / JAZZ / ROCK / CLASSIC / FLAT
Buttons
9. AUX Button
Switches to AUX mode.
10. Button
Plays/pauses/resumes playback.
11. Button
• Skips forwards to the next track.
• Allows fast forwarding of the current
track.
12. Button
Navigates down to select an item on
an iPod / iPhone / iPad menu screen.
13. ENTER Button
Conrms the selection on a iPod /
iPhone / iPad menu screen.
14. Repeat Button
Repeats a music track.
15. MUTE Button
Silences the unit or restores the
sound.
16. VOL + Button
Increases the volume.
1
2
3
4
5
6
7
8
10
9
11
12
13
15
16
14
DOCK AUX
MENU ENTER
JAZZ FL AT
ROCK POPPOP CLASSIC
SiPD8012_IB_120907_Michelle.indd 7 07/09/2012 2:02 PM

8
Removing the Plastic Strip from the Remote Control
Remove the protective plastic strip from the battery if the
battery is being used for the rst time. It is located at the
bottom side of the remote control.
2. Pull out the battery holder and remove the old battery.
Battery Replacement for the Remote Control
The remote control requires a CR2025, 3V Lithium battery.
1. Slide and hold the battery release tab in the direction of
the arrow. (If you are having diculty with the tab, use a
paper clip to squeeze the tab.)
3. Replace with a new battery. (Ensure the + polarity faces
up.)
4. Insert the battery holder back into the remote control. It
will close with a click.
Handling the Battery
• Improper or incorrect use of batteries may cause corrosion or battery leakage, which
could cause re, personal injury or damage property.
• Install the battery correctly in the battery compartment. Normally the battery’s positive
polarity (+) will face up.
• When the battery is exhausted, the remote control will not function.
• Only use the battery type indicated in this manual.
• Do not dispose of the used battery as domestic waste. Dispose of it in accordance with
local regulations.
• Small button cell batteries such as the one used in the remote control are easily
swallowed by young children and this is dangerous. Keep loose button cells away from
young children and make sure that the battery is secure in the remote control. Seek
medical advice if you believe a battery cell has been swallowed.
SiPD8012_IB_120907_Michelle.indd 8 07/09/2012 2:02 PM

9
Remote Control Operation Range
• The remote control sensor on the front unit is
sensitive to the remote control’s commands up
to a maximum of 5 metres away and within a
maximum of a 60° arc.
• Please note that the operating distance may vary
depending on the brightness of the room.
Handling the Remote Control
• If you are having diculty removing the battery cover, use a paper clip to squeeze the
battery tab before pulling out the battery cover. Remove the battery.
• Do not drop the remote control.
• Do not allow anything to impact the remote control.
• Do not spill water or liquid on the remote control.
• Do not place the remote control on a wet object.
• Do not place the remote control under direct sunlight or near sources of excessive heat.
• Remove the battery from the remote control when not in use for a long period of time,
as corrosion or battery leakage may occur and result in physical injury, and/or property
damage, and/or re.
Within about 5m
30° 30°
DOCK AUX
MENU ENTER
JAZZ FLAT
ROCK POPPOP CLASSIC
SiPD8012_IB_120907_Michelle.indd 9 07/09/2012 2:02 PM

10
Connecting to the Mains Supply
Mains Power
• This unit is designed to operate with a DC 24V / 2.5A mains adapter (included).
• Unwind the mains cable to its full length. Connect the other end of the mains cable to
the DC IN Socket at the rear of the unit then connect the mains adapter to the mains
socket. Make sure the mains adapter is rmly inserted into the mains socket. The unit is
now connected and ready to use.
Ensure all connections are connected before connecting to the mains power socket.
• To switch the unit o completely, unplug the mains adapter from the mains socket.
DC IN AUXIN VIDEO OUT
SiPD8012_IB_120907_Michelle.indd 10 07/09/2012 2:02 PM

11
General Operation
Switching ON / OFF
• When you rst connect the unit to the mains socket, the unit will be in STANDBY mode.
• Press the SOURCE button on the unit or press the STANDBY button on the remote
control to turn the unit on. The status indicator will light up green (iPod mode) or orange
(AUX mode).
• You can also press the DOCK or AUX button on the remote control to turn on the unit.
The status indicator will light up green (iPod mode) or orange (AUX mode).
• Press and hold the SOURCE button on the unit or press the STANDBY button on the
remote control to switch the unit to STANDBY mode. The status indicator will switch o.
• Disconnect the mains adapter from the mains socket if you want to switch the unit o
completely.
Selecting Modes
While in STANDBY or ON modes:
• Press the SOURCE button repeatedly on the unit or press the DOCK button on the
remote control to switch to iPod mode. The status indicator will light up green.
• Press the SOURCE button repeatedly on the unit or press the AUX button on the
remote control to switch to AUX mode. The status indicator will light up orange.
Adjusting the Volume
The unit’s volume may have it’s volume turned up.
• Press the VOL +/– buttons to adjust the volume.
• Press the MUTE button to turn the sound o. The status indicator will ash green
or orange and audio output will be temporarily terminated. Press the MUTE button
again to resume audio listening.
Adjusting the Sound Eect
Press the POP, JAZZ, ROCK, CLASSIC or FLAT buttons on the remote control to select a
desired music mode.
• If the unit is idle for more than 4 hours, the unit will automatically switch o.
• While idling, the status indicator will ash for 10 minutes before it turns o.
Press any buttons to extend the time.
SiPD8012_IB_120907_Michelle.indd 11 07/09/2012 2:02 PM

12
• To use the remote control to operate the menus of the iPod touch series, iPhone series and iPod nano
6th generation, you need to enter the music menus on your iPod / iPhone / iPad rst.
• This manual provides the basic instructions of menu navigation on iPod / iPhone / iPad. For advance
operations, please refer to the instructions that accompanied your iPod / iPhone / iPad.
iPod / iPhone / iPad Operation
This unit can support the iPad, iPad2, iPad3, iPhone, iPhone 3G/3GS/4/4S and various iPod
models with 30-pin dock connectors, such as the iPod touch 2nd/3rd/4th Generation and iPod
nano 2nd/3rd/4th/5th/6th Generation.
Inserting the iPod / iPhone / iPad
1. If you are in AUX mode beforehand, press the SOURCE button repeatedly on the
unit or press the DOCK button on the remote control to select iPod mode. Slide the
switch to release the dock cover. Carefully slot your iPod / iPhone / iPad into the iPod
dock.
2. If the iPod / iPhone / iPad is connected, the unit
will start playback (it will take around 5 seconds for
the unit to identify the iPod / iPhone / iPad). The
iPod / iPhone / iPad battery will also be charged
automatically till the battery is fully charged.
3. Select your desired music and use the connected iPod
/ iPhone / iPad as usual.
4. Press the Button on the remote control or on the
unit to start / pause / resume playback.
5. Press the button on the remote control to go to the
beginning of the current track. Press the button
once more to go to the previous track.
6. Press the button on the remote control to select the
next track.
7. Press the MENU button on the remote control to navigate between dierent iPod /
iPhone / iPad menus. Press the buttons on the remote control to select the desired
iPod / iPhone / iPad option and then press the ENTER button on the remote control to
conrm the selection.
• The unit does not show any music information from your iPod / iPhone / iPad. Please view the music
information on your iPod / iPhone / iPad display.
• To avoid damaging your iPod / iPhone / iPad or the unit, please take care when inserting and removing
your iPod / iPhone / iPad from the dock.
To Play / Pause Playback
• Press the button on the remote control or on the unit to pause playback.
• To resume playback, press the button on the remote control or on the unit again.
SiPD8012_IB_120907_Michelle.indd 12 07/09/2012 2:02 PM

13
Skipping to Another Track
• Press the buttons on the remote control to skip backwards to the previous track or
skip forwards to the next track.
Random Playback
All the tracks on the disc can be played in a random order.
• During playback, press the button on the remote control.
• Press the buttons on the remote control to play the next random track.
• After all the tracks have been played once, the playback will stop automatically.
• To cancel the random playback, press the button on the remote control during
RANDOM playback. Normal playback will resume.
Repeat Playback
• Press the button once on the remote control. The unit will play the current track
repeatedly.
• Press the button twice. The unit will play all tracks repeatedly.
• Press the button once more again to cancel the repeat function.
Charging your iPod / iPhone / iPad
1. Your iPod / iPhone / iPad has an internal non-removable battery, the battery may need
to be charged if it has not been used for a while.
2. You can automatically charge the iPod / iPhone / iPad through the unit when it is
docked.
• If you charge the iPod / iPhone / iPad while playing music, it may take longer than normal to fully
charge the battery.
• At any time, you can control the iPod / iPhone / iPad player itself directly.
• Not all generation iPods cannot be charged.
• The charging function will only work with the mains adapter connected.
• The iPod / iPhone / iPad can be charged with this unit in either ON or Standby mode.
Video Out Function
When any iPod / iPhone / iPad model with video playback function is plugged into the unit,
videos / photos can be viewed on another display screen.
1. Connect a TV or display screen using the Video Out socket via the video connection
cable (not included).
2. Choose the video / photo le you would like to play / display and the iPod / iPhone /
iPad will automatically play / display the le on the desired video display.
SiPD8012_IB_120907_Michelle.indd 13 07/09/2012 2:02 PM

14
AUX IN Operation
1. Before connecting to the mains socket, use a 3.5mm AUX IN cable (not included) to
connect your audio device through the AUX IN socket at the rear of the unit.
2. Connect the mains adapter to the unit and then the mains socket.
3. Press the SOURCE button repeatedly on the unit or press the AUX button on the
remote control to switch to AUX mode. The status indicator will light up orange.
4. Press the VOL +/– buttons to adjust the volume to your desired level.
5. In AUX mode, operate your audio device directly for playback features.
Maintenance
Cleaning the Unit
Ensure the unit is fully unplugged from the mains socket before cleaning.
• To clean the unit, wipe the case with a slightly moist, lint-free cloth.
• Do not use any cleaning uids containing alcohol, ammonia or abrasives.
• Do not spray an aerosol at or near the unit.
SiPD8012_IB_120907_Michelle.indd 14 07/09/2012 2:02 PM

15
Hints and Tips
If a problem does occur, it may often be due to something very minor. The following table
contains various tips.
Problem Cause / Solution
Power
System does not
turn on or does
not respond to the
remote control.
• Make sure mains adapter is connected to the mains socket and
the unit properly and that the mains socket is turned on.
• Check that the remote control has a battery. The battery may
need to be replaced.
iPod/iPhone/iPad
The unit doesn’t
play iPod / iPhone
/ iPad les or
doesn’t function as
expected.
• Make sure the iPod / iPhone / iPad is connected properly.
• Check if the unit is o or in AUX mode. Press the SOURCE
button repeatedly on the unit or press the DOCK button on the
remote control switch to iPod mode.
• Make sure the iPod / iPhone / iPad is switched on.
• Vibrations may have caused the iPod / iPhone / iPad to come
loose from the docking station.
Remote Control
No functions or
short range.
• Insert a new battery.
• Aim remote control directly at the unit’s remote sensor.
Specifications
Model SIPD8012
Power Supply AC 100 - 240V ~50/60Hz
Power Consumption 60W
Output Power 2 x 18 Watts + 36Watts (subwoofer)
DC Output Voltage 24V 2.5A
Features and specications are subject to change without prior notice.
SiPD8012_IB_120907_Michelle.indd 15 07/09/2012 2:02 PM

16
• Read all the instructions carefully before
using the unit and keep them for future
reference.
• Retain the manual. If you pass the unit onto
a third party, make sure to include this
manual.
• Check that the voltage marked on the
rating label matches your mains voltage.
Damage
• Please inspect the unit for damage after
unpacking.
• Do not continue to operate the unit if you
are in any doubt about it working normally,
or if it is damaged in any way - switch o,
withdraw the mains adapter and consult
your dealer.
Location of Unit
• The unit must be placed on a at stable
surface and should not be subjected to
vibrations.
• Do not place the unit on sloped or unstable
surfaces as the unit may fall o or tip over.
• The mains socket must be located near the
unit and should be easily accessible.
• This unit is designed for indoor domestic
use only.
Temperature
• Avoid extreme degrees of temperature,
either hot or cold. Place the unit well away
from heat sources such as radiators or gas/
electric res.
• Avoid exposure to direct sunlight and other
sources of heat.
Naked Flames
• Never place any type of candle or naked
ame on the top of or near the unit.
Moisture
• To reduce the risk of re, electric shock or
product damage, do not expose this unit
to rain, moisture, dripping or splashing. No
objects lled with liquids, such as vases,
should be placed on the unit.
• If you spill any liquid into the unit, it can
cause serious damage. Switch it o at the
mains immediately. Withdraw the mains
adapter and consult your dealer.
Ventilation
• To prevent the risk of electric shock or
re hazard due to overheating, ensure
that curtains and other materials do not
obstruct the ventilation vents.
• Do not install or place this unit in a
bookcase, built-in cabinet or in another
conned space. Ensure the unit is well
ventilated.
Safety
• Always disconnect the unit from the mains
supply before connecting/disconnecting
other devices or moving the unit.
• Unplug the unit from the mains socket
before a lightning storm.
• In the interests of safety and to avoid
unnecessary energy consumption,
never leave the unit switched on while
unattended for long periods of time, e.g.
overnight, while on holiday or while out of
the house. Switch it o and disconnect the
mains adapter from the mains socket.
Mains Adapter Cable
• Make sure the unit is not resting on top of
the mains adapter cable, as the weight of
the unit may damage the mains adapter
cable and create a safety hazard.
Mains Adapter
• The mains adapter will continue to draw
electricity from the mains supply when
plugged in the mains socket. In the
interests of safety and to avoid unnecessary
energy consumption, never leave the
adapter plugged in the mains socket
while unattended for long periods of time.
Disconnect the adapter from the power
supply
Interference
• Do not place the unit on or near appliances
which may cause electromagnetic
interference. If you do, it may adversely
aect the operating performance of the
unit, and cause a distorted picture or sound.
Safety Warnings
SiPD8012_IB_120907_Michelle.indd 16 07/09/2012 2:02 PM

17
Batteries
• Batteries used in the unit are easily
swallowed by young children and this is
dangerous.
• Keep loose batteries away from young
children and make sure that the battery
holder tray is secure in the unit. Seek
medical advice if you believe a cell has been
swallowed.
• Please dispose of batteries correctly by
following the guidance in this manual.
Supervision
• Children should be supervised to ensure
that they do not play with the unit and the
remote control.
• Never let anyone especially children push
anything into the holes, slots or any other
openings in the case - this could result in a
fatal electric shock.
CAUTION
RISK OF ELECTRIC SHOCK
DO NOT OPEN
The lightning ash with arrowhead
symbol, within an equilateral
triangle, is intended to alert the user
to the presence of uninsulated
“dangerous voltage”within the
unit’s enclosure that may be of
sucient magnitude to constitute
a risk of electric shock.
The exclamation point within an
equilateral triangle is intended to
alert the user to the presence of
important operating and
maintenance (servicing) instructions
in the manual accompanying the unit.
Service
• To reduce the risk of electric shock, do not
remove screws. The unit does not contain
any user-serviceable parts. Please leave all
maintenance work to qualied personnel.
• Do not open any xed covers as this may
expose dangerous voltages.
Maintenance
• Ensure to unplug the unit from the mains
socket before cleaning.
• Do not use any type of abrasive pad or
abrasive cleaning solutions as these may
damage the unit’s surface.
• Do not use liquids to clean the unit.
SiPD8012_IB_120907_Michelle.indd 17 07/09/2012 2:02 PM

Notes for battery disposal
The built-in batteries used with this product contain chemicals that are harmful to the environment. To
preserve our environment, dispose of used batteries according to your local laws or regulations. Do not dispose
of batteries with normal household waste. Contact a qualied technician to remove the built-in battery prior to
disposal.
For more information, please contact the local authority or your retailer where you purchased the product.
IB-SIPD8012-120907V2
DSGRetailLtd•MaylandsAvenue•HemelHempstead
Herts•HP27TG•England
This symbol on the product or in the instructions means that your electrical and electronic
equipment should be disposed at the end of its life separately from your household waste. There
are separate collection systems for recycling in the EU.
For more information, please contact the local authority or your retailer where you purchased the
product.
Visit Partmaster.co.uk today for the easiest way to buy electrical spares and
accessories. With over 1 million spares and accessories available we can
deliver direct to your door the very next day. Visit www.partmaster.co.uk or
call 0844 800 3456 (UK customers only) Calls charged at National Rate.
“Made for iPod”, “Made for iPhone” and “Made for iPad” mean
that an electronic accessory has been designed to connect
specically to iPod, iPhone and iPod, respectively, and has
been certied by the developer to meet Apple performance
standards.
Apple is not responsible for the operation of this device or its compliance with safety and regulatory
standards.
Please note that the use of this accessory with iPod, iPhone or iPad may aect wireless performance.
iPhone, iPad, iPod, iPod classic, iPod nano, and iPod touch are trademarks of Apple Inc., registered in the U.S.
and other countries.
All other trademarks appearing herein are the property of their respective owners.
SiPD8012_IB_120907_Michelle.indd 18 07/09/2012 2:02 PM

SiPD8012_IB_120907_Michelle.indd 19 07/09/2012 2:02 PM

SiPD8012_IB_120907_Michelle.indd 20 07/09/2012 2:02 PM
Table of contents