Sankakogyo SIH-BH327BTW User manual

Induction Cooker
SIH-BH327BTW(220V)
Instruction Manual (with Installation Manual)
Safety Precautions................................................ 2
Names of Components.............................................. 5
Before Use................................................................ 6
What are Usable Pans/Pots?................................ 7
How to Use Cooker.................................................. 9
Troubleshooting.................................................... 13
How to Take Care the Cooker............................15
Installation Manual............................................ 16
Specifications...................................................... 19
Thank you for purchasing the SANKAKOGYO Induction cooker.
■ Thoroughly read this instruction manual and correctly use the cooker. Keep this manual
safe and read it when necessary.
Table of contents Page

2
Safety Precautions
●This section provides important safety precautions for preventing injury to the user and
others and property damage.
Fully understand the following contents (indications, pictograms) before reading the text,
and observe the described matters.
■Contents of indication
WARNING
This symbol indicates a situation in which incorrect handling of the
cooker may result in death or serious injury.
CAUTION
This symbol indicates a situation in which incorrect handling of the
cooker may result in injury to the user or property damage.
※1:“Serious injury” refers to a symptom that causes an after effect or requires hospitalization or
long-term hospital visits for treatment, such as sight loss, injury, burn (high temperature, low
temperature), electric shock, broken bone and poisoning.
※2:“Injury” refers to a symptom that does not require hospitalization or long-term hospital visits
for treatment, such as injury, burn and electric shock.
※3:“Property damage” refers to consequential damage concerning pet and the like.
WARNING
Handling
● Do not put combustibles or flammables on to the cooker.
● Do not disassemble, repair or modify the cooker.
● Do not use where children easily to touch and children use alone.
Also ,do not leave children alone near cooker.
● Do not use this cooker who need any help without the person who takes responsibility
safely's responsibility monitoring and instruction.(include children)
● Do not splash water on the cooker.
● Do not put an object other than cooking utensils (pan, pot, kettle, frying pan,
etc.) on the top plate.
The metal things such as a knife, a fork, a spoon, the cover may become hot.
● Do not impact the top plate. Do not climb on the top plate.
Should the top plate receive damage such as a crack, use of the cooker in that condition
may cause an electric shock or overheating.
In such a case, turn off the Power switch and the breaker for the dedicated circuit to
stop using the cooker, and immediately make a request for repair.
Be sure to observe them

3
● When you fry or bake food, do not leave the cooker. In preheating, set a weaker
heating power, and do not excessively heat the food.
● After using the cooker, confirm that the power supply is turned OFF.
● When cooking food that sticks or has a high viscosity, set a lower heating power
and occasionally stir the food.
● When the cooker is abnormal or has failed, immediately stop using it.
During frying food, follow the following instructions.
● Do not leave the cooker.
● Use an iron pan/pot with an undeformed bottom surface.
● Place the pan/pot at the center of the heating part.
CAUTION
Handling
● As the top plate is hot during use or for a while after use, do not touch it with
your hand.
● Do not use a pan/pot in an unstable condition.
● Do not place an object such as piece of paper, pan/pot coaster, iron plate for
heating use, and top plate dirt-prevention cover under the pan/pot.
● Do not heat an empty pan/pot or excessively heat a pan/pot.
● Do not touch a high temperature part such as pan/pot handle.
● Do not cover air inlet/outlet ports.
● Do not use the cooker for purposes other than cooking.
During frying, observe the following instructions.
● Turn off the power supply if a large amount of oil smoke is generated.
● During frying, pay attention to splashing of oil.

4
■ During or after use of the cooker, the fan operates to perform air suction/exhaust
in order to suppress the temperature rise in the main body.
While the cooker is energized, the sound of the cooling fan is heard, but this is not
an abnormality.
Even after the power supply to the cooker is turned off, the cooling fan operates for
two minutes at the longest until the temperature inside the main body lowers.
■ During cooking, a metallic sound may be generated depending on the type of the
pan/pot, but this is not an abnormality.
■ As the cooker emits magnetic field lines, do not put magnetically sensitive objects
close to the cooker.
・ Objects such as radio, television, hearing aid, cash card, magnetic card, IC card
■ Do not use electromagnetic induction heating cooking equipment, such as an Induction
rice cooker, on the top plate.
The magnetic field lines may cause such the cooker to fail.
■ After using, clean the top plate (after the top plate has cooled down).
■ Do not use the cooker with seasonings left spilled on it. Do not use the cooker with
food that has boiled over from the pan/pot.
■ Keep the pan/pot bottom surface clean. Do not scrape the top plate with a pan/pot
bottom.
If a pan/pot is used with protrusions attached on its bottom, the top plate may be damaged.
■ Do not put a hot pan/pot or a pan/pot that has been cooled in a refrigerator on the
top surface operation panel (indication lamps).
Failure to follow this instruction may cause breakage or failure.
■ Do not splash water on the top surface operation panel.
Failure to follow this instruction may cause the operation keys to malfunction.
■ Do not place seasonings or foods in the cabinet below the main body of the cooker.
Otherwise, the exhaust heat from the cooker may alter the seasonings or foods.
Request
Notice

5
Names of Components
Operation panel
Body

6
Before Use
■Function to prevent heating when no pan/pot is set (indication LED: )
When no pan/pot is placed or an unusable pan/pot is used, heating
is disabled.
※ The supplying power will stop after 10 minutes.After
that, the power will be turned off automatically after
10 seconds.
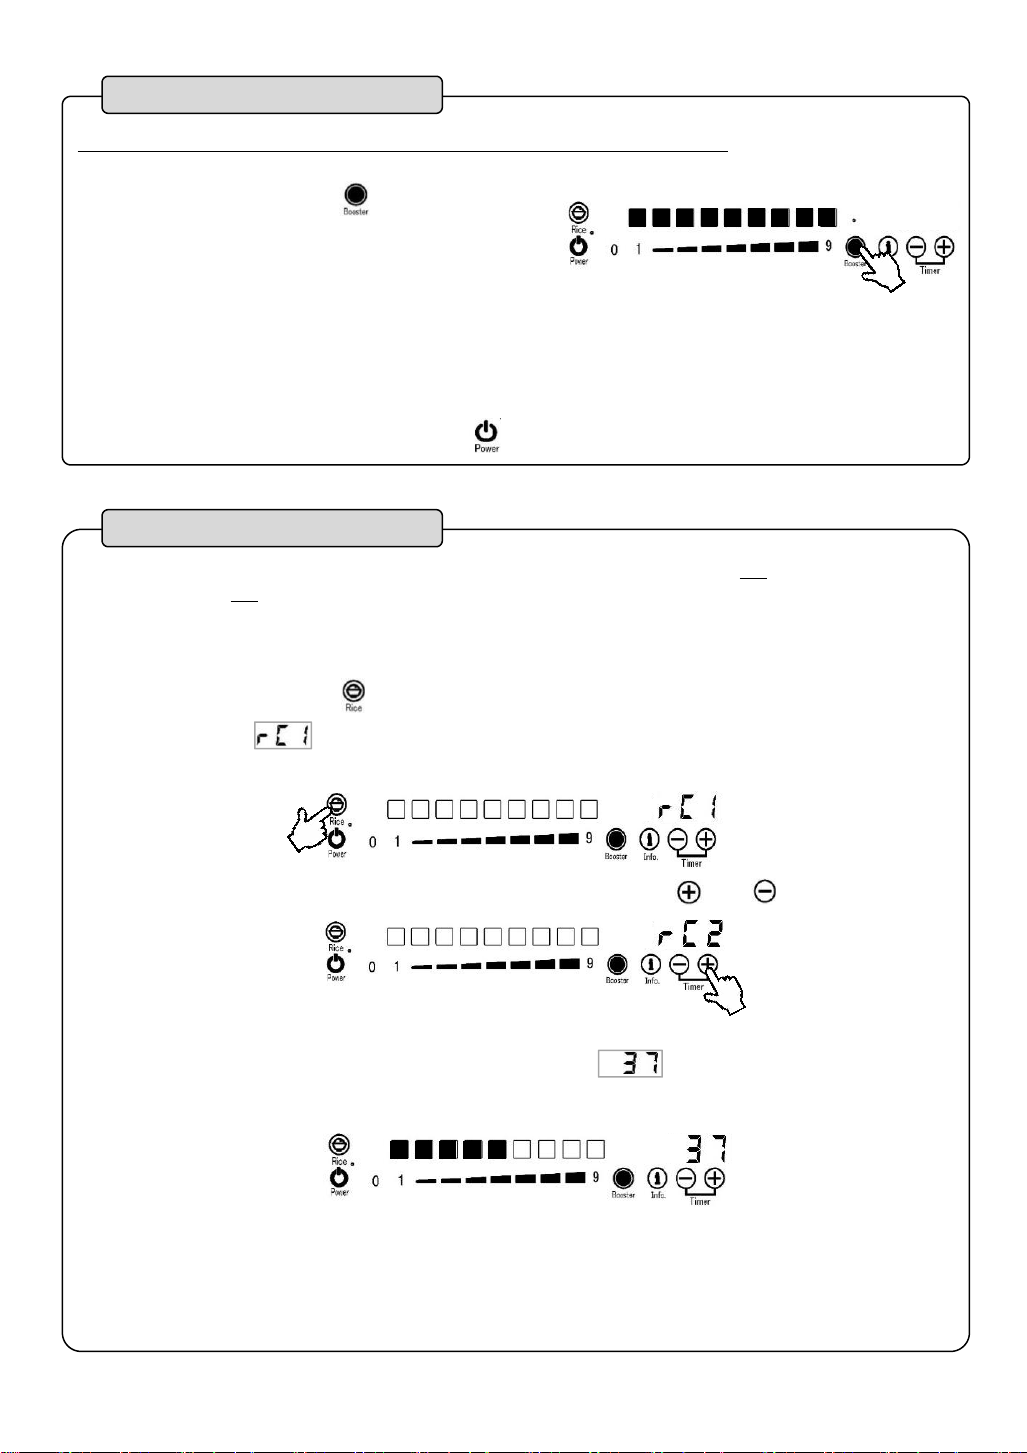
■Function to prevent failure to turn off
If no operation has been performed after heating operation, the
power supply will be turned off after a certain period has
elapsed.
※ The period until stopping differs depending on the heating
power. (Refer to the list on the right.)
※ When the booster is used, the heating power switches to “9”
and then the heating automatically stops.
■Function to automatically stop once an abnormality in operation panel is
detected (indication LED: )
An error sound may be generated and the power supply may be turned off if the operation panel
is splashed with liquid due to boiling over or the like, an object is placed on the operation
panel, or two adjacent keys are pressed at the same time.
■Function to prevent overheating (indication LED: / )
When the temperature inside the heater becomes abnormally high as the air inlet/outlet port is
covered or for some other reason, the heating power automatically decreases or the power supply
stops. If the temperature lowers to a normal temperature, the heating power and the power supply
will be restored.
■Function to prevent excessive temperature rise(indication LED: / )
If the temperature of the pan/pot bottom surface becomes abnormally high due to heating of an
empty pan/pot, the power supply to the cooker will be automatically turned off.
* When the heating power is low or depending on the pan/pot type, the power supply may not be
automatically turned off.
※ This function may be triggered when high-temperature cooking such as frying is performed.
■High temperature caution indication (indication LED: )
While the top plate is hot with the power supply turned off, the indication LED “Hot” lights
to notify that condition.
※ This indication is not displayed during cooking.
■Function to automatically turn off Power switch
If no operation has been made for approx. 10 seconds since turning on of the power supply, the
power supply will be automatically turned off.
※If the power supply has been turned off due to triggering of any of the above safety
functions, turn off the power supply once and then perform the intended operation
again.For safety functions, also refer to the relevant items on pages 13 to 14.
Safety functions

7
What are Usable Pans/Pots?
■ Points of purchase
●Even when a pan/pot is usable, the available heating power varies depending on its shape
and material.
●We recommend that you purchase pots/pots whose bottom is magnetic
【Material】
● Pans/pots made of iron/cast iron
● Pans/pots made of iron enamel
※ Do not heat an empty pan/pot or cause scorching. Failure to follow
this instruction may cause the enamel on the bottom surface to melt
and bake and may damage the top plate.
● Pans/pots made of stainless steel (magnetic)
※ Pans/pots made of 18-8/18-10 stainless steel that is not attracted
by magnet may cause the heating power to lower or disable heating
depending on the pan/pot type.
● Multi-layered pan/pot and pan/pot with attachment (aluminum pans/pots with stainless steel
patch or the like attached on the bottom surface)
Depending on the pan/pot type, there are pans/pots that may disable heating or cause the
heating power to lower.
※ A pan/pot cannot withstand high heating power and may deform depending on the pan/pot type.
In addition, some pans/pots cannot be used at the maximu heating power.
【Shape】
● Pans/pots whose bottom is flat and makes uniform contact with top plate.
● Pans/pots whose bottom diameter is 12 to 26 cm.
Depending on the material of pan/pot and its bottom shape, there are usable
pans/pots and unusable pan/pots. When purchasing a pan/pot, check the material
and bottom shape before use.
Bottom diameter
〇 Usable pans/pots

8
【Material】
● Pans/pots made of heat-resistant glass
● Pans/pots whose bottom is not magnetic
● Pottery and porcelain, earthen pot, and others
※ Do not use these pans/pots even when they are indicated as “for
Induction cookers.” Otherwise, the cooker may fail or cooking may
be disabled due to the lowered heating power.
● Pans/pots made of copper
● Pans/pots made of aluminum (aluminum foil pan/pot, retort pack, etc.)
● Fish burner/grill for direct fire
※ With pans/pots with enamel bottom surface in particular, the enamel at the bottom may melt and
bake causing the top plate to be damaged.
【Shape】
● Pans/pots whose bottom diameter (not pan/pot nominal diameter) is less than 12 cm
● Large pans/pots that stick out from top plate
● Pans/pots with round bottom (woks and others)
● Pans/pots with irregularity or warping of approx. 2 mm or greater, and pans/pots with
legs
※Do not perform heating with an object, such as pan/pot coaster and iron plate for heating use,
placed between the top plate and the pan/pot. (Failure to follow this instruction may cause the cooker
to fail.)
Bottom diameter
× Unusable pans/pots

9
How to Use Cooker
※The explanation given below is for use of left Induction
heater.(Right Induction heater can also be used in the
same manner.)
(1) Put ingredients in a pan/pot and place it at the center of the Induction heater.
(2) Press the Power key for 2 seconds or
longer to turn on the power supply.
(The Power lamp lights up.)
(3) Select the heating power by using the
heating power adjustment keys (1 to 9).
(The heating power indication LEDs up to
that corresponding to the pressed key
light up.)
※ If no operation is made in 10 seconds, the heater
state returns to (2).
※ If an object is placed near the operation panel, the heating power adjustment keys may not respond.
Ex.) The figure on the right shows heating power (7).
<Power consumption [W]>
Heat level
1
2
3
4
5
6
7
8
9
Booster
Left Induction
heater
85
200
360
600
860
1170
1510
1910
2200
2870
Right Induction
heater
-
※ The output value varies depending on the type, shape, and material of pan/pot.
※ When the right and left Induction heaters are used at the same time, there is a limit to the maximum
heating power.(Refer to “Heating power adjustment of Induction heater” on page 9.)
(4) When the cooking has finished, press the
“0” key to stop heating.
(5) After the use, press the Power key to turn off the power supply.
・ Finely adjust the heating power. It saves electricity expenses.
Cooking by heating
■Do not put an object on the operation panel.
・ When an object such as metal, bag with aluminum foil, container containing liquid, wet
cloth, or dripped liquid is placed on an operation key, the buzzer may sound, a lamp may
light up, or the power supply may be turned off during heating.
■When performing heating by putting a small amount of oil in a pan/pot, set the
heating power to a smaller value to avoid excessive heating.
・ The oil temperature may abruptly rise and the oil may catch fire.
・ The pan/pot may glow.
Request
Note on indication: The following indication
is provided in this instruction manual.
[Lighting of indicated LED : ●, ■ ]
Heating power adjustment by
sliding operation is possible.

10
※ This operation is available only on the left Induction heater.
●Steps (1) to (2) are the same as those for cooking by heating (page 9).
(3) Press the Booster key for one second or
longer.
(All heating power level display light up and
the Booster indicated LED lights up.)
※The continuous booster heating time is 8 minutes, and after 8 minutes have passed, the heating
power is automatically set to “9” and then the heating continues.
(4) When cooking has finished, press the “0” key to stop heating.
(5) After use, press the Power key to turn off the power supply.
※ Rice cooking using this heater is cooking according to the setting of “rC1 (rice: 290 g / water:
350 ml)” or “rC2 (rice: 435 g / water: 530 ml).”
(The amounts of rice and water are only guides. They may vary depending on the pan/pot type and
rice variety.)
● Steps (1) to (2) are the same as those for cooking by heating (page 9).
(3) Press the Rice key for two seconds or longer.
(The display lights up.)
(4)Select the desired rice cooking program by using and keys.
(5)After the program is selected, the heating power indication LEDs up to “5”
light in about 5 seconds and the display lights up to start rice
cooking.
(6)After rice cooking finishes, the buzzer sounds and the power supply is
automatically turned off.
※ After rice cooking, if no operation has been made for about 10 seconds, the power supply will
be automatically turned off.
Rice cooking
Cooking by using booster

11
● Steps (1) to (3) are the same as those for cooking by heating (page 9).
(4) Press the and keys at the same time.
(The display lights up.)
Ex.) The figure on the under shows the Power level display when the heating power is “7.”
(5) Set the time by using key and key.
It is possible to set 1 minute at the minimum to 9 hours 59 minutes at the maximum.
The set time can be reset by pressing the key and key at the same time.
(6) When the set time has arrived, the buzzer sounds and the power supply is
automatically turned off.
The high temperature indication ( ) is displayed while the top plate is hot.
※ After cooking by using the timer, if no operation has been made for about 10 seconds, the power
supply will be automatically turned off.
※ This function can be used even when the power is in OFF state.
◆ Press the power consumption indication key once.
(The left Induction power consumption indication lamp and
display light up.)
The power consumed in a single heating operation is
displayed. (Unit: kWh)
◆ Press the power consumption indication key twice.
(The left Induction cumulative power consumption indication lamp
and display light up.)
The cumulative power consumed until resetting is displayed.
(Unit: kWh)
※ Resetting procedure (cumulative power consumption)
Simultaneously press the power consumption display key and
minus key.
Cooking using timer
Timer cooking with this cooking heater supports heating-off cooking.
Power consumption indication

12
<Enabling key lock>
◆Press the operation lock key for two seconds or longer.
The Key lock lamp lights up, and keys other than the Power key
and Operation lock key are disabled.
※This function can be used only when the power is in the “ON”
state.
<Cancelling key lock>
◆With the power turned “ON,” press the Operation lock key for two seconds
or longer.
The key lock lamp goes off and all keys become operable.
※Concerning the heating power adjustment of the right/left Induction heaters, the operation
control is as shown in the table below.
※The heating power is restricted so that the total power consumption of the right and left
heaters is not 3520 W or higher.
※Booster cooking is possible only on the left Induction heater.
Key lock operation
Induction heater heating power adjustment

13
Troubleshooting
●If you find any abnormality in the heater, check the following points before requesting repair service.
●If the problem persists even after you have checked the following points, turn OFF the breaker and contact
the distributor where you purchased the cooker.
●Never disassemble the cooker and repair it by yourself because doing so poses a danger.
Phenomenon
Point to check
Remedy
The power supply does not
turn on.
The cooker does not operate
even when the Power key is
pressed.
●Is the breaker for the
dedicated circuit turned off?
●Did you press the Power key for
two seconds or longer?
●Turn on the breaker.
●Press the Power key for two
seconds or longer.
Even after turning off the
power supply, the operating
sound of the fan is heard.
●The cooling fan is operating
to lower the temperature
inside the cooker.
●When the temperature has
lowered (in two minutes at
longest), the cooling fan
automatically stops.
The buzzer sounded during
use and the power supply was
turned off.
●After heating operation, if no
operation has been made for a
certain period, the power
supply stops.
●Make an operation again.
The booster key does not
operate.
●Are you doing cooking by using
the booster in succession?
●Wait until the temperature
inside the cooker lowers, and
then make an operation again.
is displayed on the
display and heating is
disabled.
●Did you place a pan/pot?
●Is an unusable pan/pot placed?
(Refer to page 8.)
●Is the pan/pot position
largely displaced from the
center?
●Is the pan/pot bottom warped
or lifted?
●Correctly place a usable
pan/pot. (Refer to page 7.)
●Heating is not performed
unless a pan/pot is placed on
the heater.
is displayed on the
display and heating is
disabled.
●Are you depressing the
operation key or pressing two
or more keys at the same time?
●Is a conductive object such as
a pan placed on any of the
operation keys?
●Is liquid or the like splashed
on any of the operation keys?
●Is a bottle or bag containing
liquid or the like placed on
any of the operation keys?
●Clean the area around the
operation keys, and after the
indication LED goes off, make
an operation again.
Buzzing sound is heard
during cooking
●Depending on the pan/pot type,
buzzing sound may be
generated.
●This sound is not an
abnormality. Keep using the
cooker.

14
Phenomenon
Point to check
Remedy
and are
displayed on the display and
heating is stopped.
●The temperature inside the
main body has become high and
the overheating prevention
function is working.
Is the air inlet or outlet port
covered? (For positions of
inlet/outlet ports, refer to
page 5.)
●Is a vacant pan/pot heated?
The overheating prevention
function may have worked.
●Remove the covering object,
cool the cooker for a while,
and then use it.
●Turn off the power supply,
cool the cooker for a while,
and then use it.
and are
displayed on the display and
operation is disabled.
●The power source voltage is
abnormal.
●Incorrect power source
connection may be made. Turn
off the power supply and make
a request for repair.
and are
displayed on the display and
heating is stopped.
●Is there any object covering
the air inlet port? (For the
position of the air inlet
port, refer to page 5.)
●Remove the object covering the
air inlet port, and then
operate the cooker again.
●The cooling fan may have
failed. Turn off the power
supply and make a request for
repair.
and or
and are displayed on
the display and operation is
disabled.
●The sensor inside the cooker
is abnormal.
●The sensor inside the cooker
may have failed. Turn off the
power supply and make a
request for repair.
Pressing an operation key
causes no response. (When
power is in ON)
●Is an adhesive bandage, finger
sack or glove on your finger?
●Is there any object placed on
an operation key? Is there
dirt or water on an operation
key?
●Are two or more operation keys
pressed at the same time?
●Is the operation lock key ON?
●Touch operation keys directly
with your finger.
●Remove the object placed on
the operation panel. Turn off
the power supply and remove
dirt and water.
●Operate keys by touching them
one by one.
●Cancel the operation lock and
then make an operation. (Refer
to page 12.)
The trouble does not
correspond to any of the
above phenomena.
The display of indication
does not correspond to any
of the above displays.
●A component inside the heater
may have failed.
●A component inside the heater
may have failed. Turn off the
power supply and make a
request for repair.

15
How to take care the cooker
[Points to observe during taking care of the cooker]
● Wait until the top plate is sufficiently cooled down.
Turn off the power supply. Then, after the temperature caution indication goes off and the top plate
has been sufficiently cooled, take care of the cooker.
● Use kitchen detergent (neutral) by diluting it.
Do not use benzene, thinner, alcohol, or a scrubber.
Do not use acidic or strong alkali detergent (bleacher, synthetic detergent for residence, etc.)
(Failure to follow this instruction may cause discoloration.)
● Do not directly splash water on to the cooker.
If water or detergent gets in the cooker, it may cause failure. Therefore, do not directly splash
water on to the cooker.
● Also clean dirt from the pan/pot to use.
Dirt on a pan/pot may be baked on to the top plate and makes the top plate dirty.
※ After taking care of the cooker, make sure that the power supply is turned OFF.
※ Do not use a tool such as spraying steam cleaner, seam mop, or high pressure washer.
Attachment of steam or liquid to the interior of the cooker may cause failure.
<<Taking care of top plate (glass surface)>>
When the top plate becomes slightly dirty, immediately wipe off the dirt. If the top plate is used
in a dirty condition, the dirt may stick and it becomes difficult to remove it.
※ When the Power key in the operation panel is wiped with a wet cloth, the switch may respond, but
it is not a failure.
◎Light dirt
Wipe the dirt off with a wet cloth that has been tightly squeezed, and then wipe the top plate
with a dry cloth.
◎Oily dirt
Wipe the oily dirt off with a cloth moistened with diluted neutral detergent, remove the detergent
by wiping it off with a cloth moistened with water that has been tightly squeezed, and then wipe
the top plate with a dry cloth.
◎Persistent dirt
Rub the dirt with a balled-up plastic wrap attached with abrasive-free cream cleanser, and then
sufficiently wipe off the dirt.
※ Be sure not to rub the dirt excessively strongly.
※ Do not rub the dirt with a scrubber, the nylon face (hard face) of a sponge, or aluminum foil.
Otherwise, the top plate may be damaged.
<<Taking care of air inlet/outlet ports>>
If dust is accumulated in the ports, suck it out with a vacuum cleaner.
※ Use of the cooker with dust accumulated may cause failure.

16
Installation Manual
● Before installation, thoroughly read this manual for proper installation.
● After completion of installation, be sure to conduct a test run, and explain the correct
usage to the customer.
● Be sure to pass this installation manual to the customer and ask the customer to store
it by himself/herself.
● If the cooker is not installed as per this installation manual, the warranty of the cooker
will be void.
WARNING
● Electric wiring must be conducted by a “legally qualified person” in accordance with the
relevant laws and regulations including local electrical equipment technical standards.
● Install a dedicated circuit and a leakage circuit breaker that suits the machine ratings.
● Positively conduct installation as per the “Installation Manual.”
● Never disassemble, repair, or modify the cooker.
● When installing the cooker, keep a predetermined isolation distance from combustibles in
accordance with the local fire prevention ordinance and others.
● Ground wiring must be conducted by a “legally qualified person” in accordance with the
relevant laws and regulations including local electrical equipment technical standards.
● Do not damage the power cable, and do not connect it to an inappropriate plug.
● Do not cause shock to the top plate.
※ If the above warnings are not observed, there is a risk of electric leakage, fire, ignition,
injury, and electric shock.
CAUTION
● The material of the work top must be a heat-resistant material.
● During a test run, do not touch high temperature parts such as top plate and air outlet
port.
※ If the above cautions are not observed, there is a risk of fire, burn, and deformation.
■If a metallic part of the cooker makes contact with a metallic part of a system kitchen, make sure
that the metal (metal lath) in the wall of the structure and the metallic part of the system kitchen
do not contact with each other or install the cooker so that the metallic part of the cooker does
not make contact with the metallic part of the system kitchen.
■ If a heating apparatus such as oven is incorporated below this cooker, use an oven or the like
with a built-in cooling fan and keep a distance of 10 cm or greater from the top surface of the
oven or the like.
■ Do not install a refrigerator, dish washing machine, or drying machine below this cooking heater.
■ Be sure to keep the air inlet/outlet ports of the cooking heater uncovered.
■ Install the power cable so that it does not make contact with a high temperature parts and its
temperature is 75°C or below.
■ As the material to be installed near the cooking heater of a system kitchen, use a material that
withstands high temperatures. The adhesive to be used on the work top must have a resistance to
heat.
■ The work top must have a sufficient strength and must be flat.
■ When a thin plate made of stainless steel or the like is used, reinforce it by providing lining.
■ When power code is broken,replacing power code must done by the qualified person who has special
tools for preventing accidents.
Request

17
Be absolutely sure to have the electric work conducted by a person with a
qualification as an electrical engineer.
■ Conduct power source construction and installation work according to the local
safety rules.
■ To the power source , provide a 220V / 20A dedicated circuit (with breaker).
For safety, please install an earth leakage breaker.
■ Use an appropriate electric wire for indoor wiring (single wire with a diameter
of 2.0 mm or more).Wall outlet (box type) can use stranded wire of 3.5 mm² or more.
■ Be sure to conduct grounding wiring.
※Never connect the grounding wire to a gas pipe, water pipe, or grounding wire
for telephone.
類
1 Electric work and installation work
2 External dimension drawing (Unit: mm)
Socket type
250V/20A type

18
■Conduct installation by observing the laws and regulations related to installation.
3 Installation Location (Unit: mm)
※To install a partition plate,
provide a clearance of 100 mm or
greater at the rear part of the
kitchen.
Partition plate
4 Dimensions of parts related to system kitchen
[Installation hole]
20 or above (flat part)
※100 or above
90 or above
(from device
bottom face)
[Side view (simplified)]
20 or above (flat part)
Distances from noncombustible wall
and ceiling (metal, tiles, bricks, etc.)
Distances from combustible wall
and ceiling
Upper clearance (ceiling, etc.)
100 cm or more
<<Built-in>>
5 cm or more
Upper clearance (ceiling, etc.)
70 cm or more
0 cm or more
<<Built-in>>
5 cm or more
※ Including insulating panel made of metal, tiles, bricks
0 cm or more

19
Specifications
Model name
SIH-BH327BTW
Power supply
220 V (60 Hz)
Max. power
consumption (W)
3520 W
Dimensions
(approx.)
Width 720 mm × Depth 420 mm × Height 70 mm
Mass (approx.)
10 kg
Power cable
2.0 mm23-core EP rubber cabtire cable, length of 0.7 m
Heating power
adjustment
Left
Induction
heater
Power
consumption
2200 W (when booster is used: 2870 W)
Adjustment
range
90 to 2200 W, adjustable in 9 steps
(excluding booster)
Right
Induction
heater
Power
consumption
2200 W
Adjustment
range
90 to 2200 W, adjustable in 9 steps
Cooking timer
Usable between the ranges of 1 minute to 9 hours 59 minutes
※ Do not disassemble the top plate.
1. Fit the main body unit in the
installation hole.
※ Pay attention not to have the power
cable clamped between the main body and
the work top.
※ Horizontally install the main body
unit.
※ By“main body fittings,”the position
in the front/back and right/left
directions with respect to the
installation hole is fixed.
2. Connect the power cable to the 220V
power source.
※ Be sure to connect the grounding wire.
5 Installation method
Front: 2 locations
Back: 2 locations
Right/left side faces: 1 location each
Main body fittings

Table of contents
Popular Cooker manuals by other brands

Hotpoint
Hotpoint HDM67G0CCB/UK installation guide

Bosch
Bosch Fornuis HGV745228N instruction manual

Indesit
Indesit KG6407 AV/G Instructions for installation and use

Amica
Amica 508EE1W/1 instruction manual

Whirlpool
Whirlpool AKT 617 Product description sheet

Fisher & Paykel
Fisher & Paykel OR120DDWGX2 installation instructions