Schifler SWC 65 WT User manual

Magnetic Drilling Machine
SWC 65 WT
OPERATING MANUAL

Magnetic Drilling Machine
Operating Manual
This manual is for information only & not a legal document, the company has all
rights to change, cancel, amend any designs, specifications etc. without any prior notice.
5.1 How to mount tools or adapters in a Weldon arbor
5.2 Drilling with core cutters
6. Exploaded View
1. Safety Procedures
3. Description & Technical Data
5.5 Thread Cutting
8. Troubleshooting
5.6 Reaming/Counter-Sinking
4. Components Content
7. Helpful Tips
2. Accessories
5. Operating manual
5.3 Drilling with twist drills
Table of contents
5.4 Speed selection
SWC 65 WT

Magnetic Drilling Machine
Operating Manual
UNDERSTANDING SAFETY SYMBOLS
When using magnetic drilling machines please follow the general
safety instructions for electric power tools.
DANGER : The possibility of suffering harm , injury or even death if the
situation is not avoided during operation of the machine
WARNING : A statement or event that warns of something or that serves
as a cautionary example while using the machine
CAUTION : Care taken to avoid danger or mistakes during operation of
the machine
NOTE : A brief record of points or ideas written down as an aid to
memory while using the machine
1
Please read
the manual
Use eye
protection
Use ear
protection
Use safety
helmet
Wear appropriate
clothing
Disconnect before
opening
Use safety
chain
Warning for
electrical shock
Dangerous
environment
Don’t use in
wet places
Pacemaker
warning
SWC 65 WT

Magnetic Drilling Machine
Operating Manual
2
WARNING: THIS APPLIANCE MUST BE EARTHED.
1. Always secure the machine with the supplied safety chain before starting to
operate, this is to protect the user in case of power failure or breaking loose of the
magnet while in use.
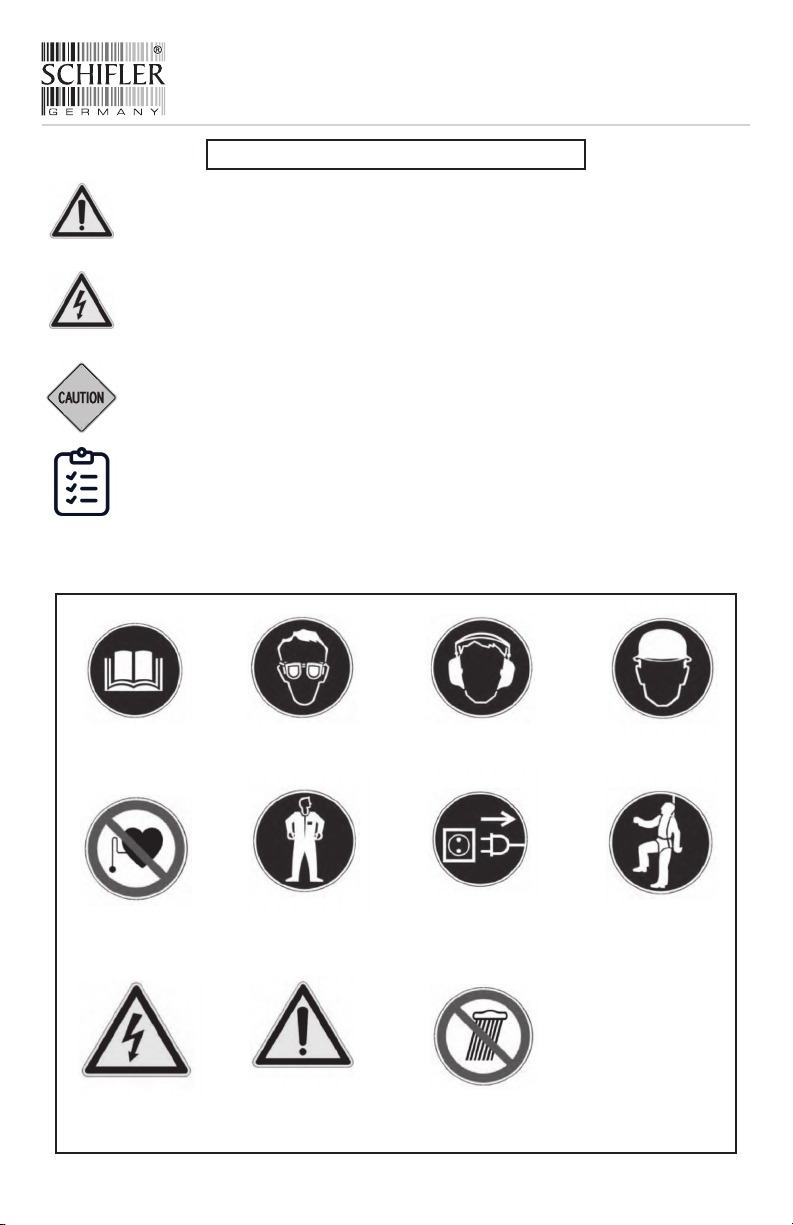
2. Always wear safety goggles and ear plugs.
4. Always ensure cutter retaining screws are secure – they sometimes vibrate loose in
use.
5. Regularly clean the work area and machine., remove swarf and dirt, paying
particular attention to the underside of the magnet.
6. With a gloved hand, after switching off the power, remove any swarf which might
have gathered around the cutter and arbor before proceeding to the next hole.
3. Disconnect from the power source when changing cutters or working on the
machine.
7. Remove tie, rings, watches and any loose adornments which might entangle with
the rotating parts of the machine.
10. Regularly inspect the machine and check the nuts and screws are tight.
8. Should the cutter get stuck in the workpiece, stop the motor immediately to
prevent personal injury. Disconnect from the power source and push and pull the
arbor by hand. DO NOT ATTEMPT TO FREE THE CUTTER BY SWITCHING THE MOTOR
ON AND OFF.
15. When and in any case if the hole cutter is jammed in work piece during drilling, stop
applying downward pressure and switch off the machine, check and take
appropriate action to eliminate cause of the jam.
9. If the machine is accidentally dropped, always thoroughly examine the machine for
signs of damage and check that it functions correctly before trying to drill a hole.
13. Use the magnetic drilling unit on a clean and flat surface only, to prevent the
machine breaking out because of poor clamping force.
11. Always ensure when using the machine in an inverted position use special cutting
paste or cutting spray which is specially designed for inverted position drilling.
12. Use only spare parts advised by your dealer for magnetic drilling machines.
14. If you discover any irregularity on machine cables immediately bring the machine
to a recognized dealer for a repair or maintenance service.
DO NOT USE MACHINE OUTSIDE OR IN WET ENVIRONMENT WITHOUT AN
(RCD) RESIDUAL CIRCUIT DEVICE. RCD MUST BE USED.
WARNING : DO NOT USE YOUR MAGNETIC DRILL ON THE SAME STRUCTURE
WHEN ARC WELDING IS IN PROGRESS. D.C. CURRENT WILL EARTH BACK
THROUGH THE MAGNET AND CAUSE IRREPARABLE DAMAGE.
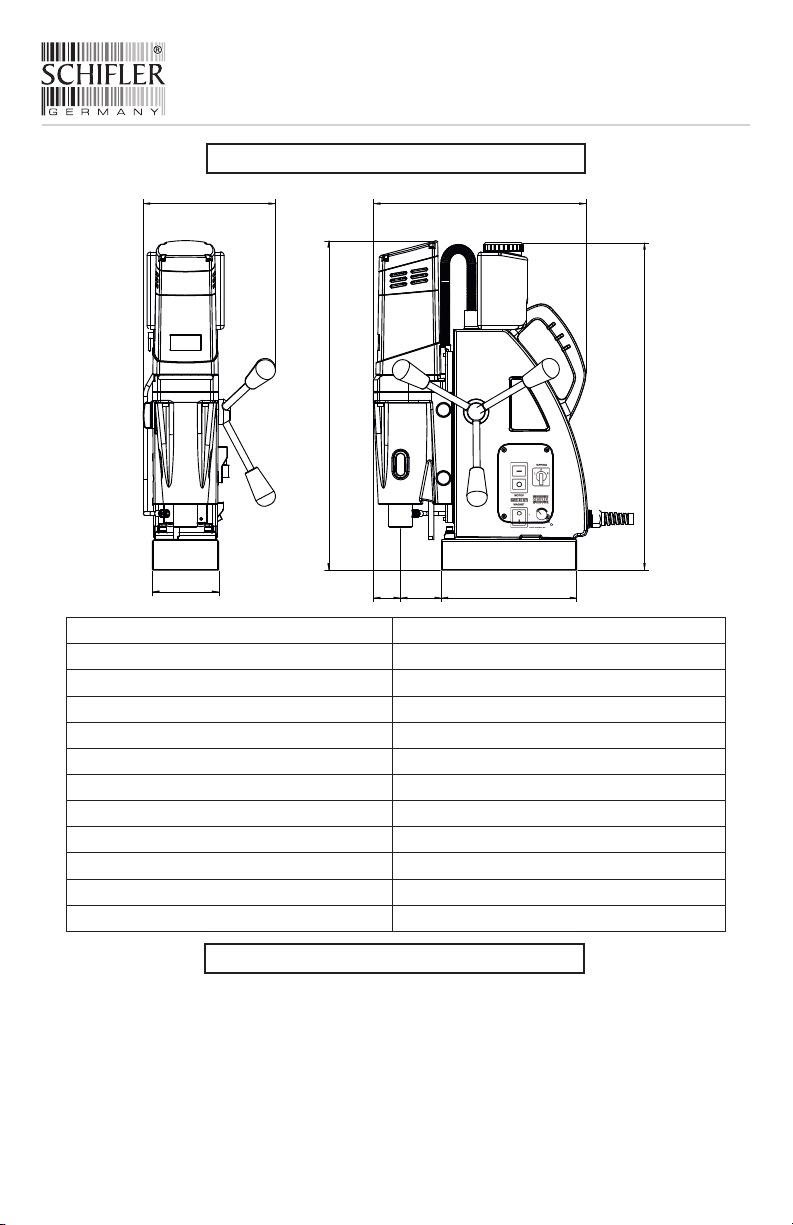
SWC 65 WT

Magnetic Drilling Machine
Operating Manual
3
The machine operators must start their work only after the protective glasses,
earmuffs and insulated shoes tightened to the legs but must ensure a
comfortable movement too. In case the operator has long hair, he must wear a
cap suited to the work environment. You must strictly adhere to these rules and
prohibit the staff from wearing clothes that are loosely fitted.
5. Children should never be allowed near the drill machine, especially when it is
being operated.
WARNING
3. Only when the surroundings around are brightly lit, use the machine instead
of a dark environment.
1. Say no to a messy work environment completely. Keep yourself protected
against fatal accidents by keeping the area clean.
6. Nobody should be in the area where the Drill machine is being used by the
Operator.
MANDATORY RULES TO ENSURE SAFETY
MANDATORY RULES FOR THE WORK PLACE
Never work towards the maintenance of the circuit board if you haven't followed
all the rules mentioned above.
4. You must never place flammable material near the machine or avoid using the
drill machine in the presence of anything flammable. The Drill machine tends
to produce sparks in the process of working, which may cause fire.
It is mandatory to read and follow all the safety norms, regulations and
instructions given in this Guide before you operate the machine to avoid
unwanted and fatal accidents. Follow the mentioned workplace safety measures
in the guide strictly to ensure your safety against electric shocks or injuries.
SELF PROTECTION
2. In case the floor is wet, stop the usage of the drill machine immediately. You
will expose yourself to the risk of shock if you don't.
1. Before you start using the Drill machine, make sure you inspect the condition
of the power cord and the plug. Replace them immediately if you see any
damage.
SAFETY INSTRUCTIONS
SWC 65 WT

Magnetic Drilling Machine
Operating Manual
4
4. If the thickness of the drilling machine is less than 10mm, you must
ensure that it is well-supported by iron plates right at the bottom that
come with a thickness higher than 10mm. The supporting iron plate must
have a base area greater than the drilling machine's area of the magnetic
base if you need to improvise the reliability of the capability of the
magnetic base's absorption. In case you opt for a supporting iron plate
which is thinner than the requirement, you will notice the drilling
machine becoming lose in the process of absorption that may lead to
unwanted and fatal accidents.
2. The power supply should always be in sync with what the equipment
requires. Hence, ensure the same while making sure that safety
measures for grounding and leakage are made available.
3. Study this manual well to understand the Do's and Don'ts of the Drilling
tools. They should be used strictly according to the size specified. The
material of the drilling workpiece comes with a magnetized absorption
and works better on a smooth surface. Double check that its thickness
ranges between 10mm-75mm, without the 0.5mm thickness of Iron
scrap and the presence of paint, granular impurities and any other
foreign particles should be avoided.
9. Add a certain amount of coolant to the equipment whenever you
5. Don't press the drill machine too hard as that may lead to an overload,
which tends to shorten the life of the magnetic drill. When in use, be
extremely attentive to the condition of the magnetic absorption of the
drill. Stop using the drill immediately if you notice any instability in the
magnetic absorption.
6. Whenever the drill starts to operate or shuts down, ensure that the
operating sequence of the motor and magnetic switch has been
complied.
8. Do not overload the motor for than a total duration of 30 minutes. If done
otherwise, it will lead to extreme heat getting generated that will result in
a fire or explosion. Switch off the motor when it is not in use.
7. Do not continuously operate the magnetic base with a full load as that
will cast a strong effect negatively on the life of the magnetic base. It may
also get heated up to an extent that it may catch fire. Never touch the
magnetic base, especially when it is extremely hot as that will cause a
serious burn. Turn off the switch and unplug immediately once you stop
using the magnetic base.
SWC 65 WT

Magnetic Drilling Machine
Operating Manual
5
14. While you use the magnetic drill on a particular workpiece, do not do the
process of welding on the same.
13. Even when the equipment stops working, never use your bare hands to
remove the iron fillings after the drilling process as that can cause injuries.
16. Switch off the main power supply and unplug the drilling machine after the
usage. If this is not done and the spindle and the tool continue to rotate, then
do not let the operator remove the drill and replace the gear with his bare
hands. Make sure you practice this to avoid injuries.
17. The generation of the magnetic field affects devices such as watches, mobile
phones and pacemaker installed to regulate the heartbeat. Make sure that
the operator takes of the watch and keeps the mobile phone before
operating the drilling machine and doesn't have a pacemaker installed in
him.
15. Use the handle function of the drilling machine to move it from one place to
another instead of pulling the power cable.
10. Whenever the magnetic drilling machine is in use and is suspended either in a
vertical or a horizontal position, you must get it fixedwith a device that gets
attached to the equipment so that it doesn't come down falling caused by the
sudden loss of power of the magnetic base. When you choose to drill in an
upside-down position, always opt for a cooling method that is reasonable.
Say a frank NO to the option of Liquid Cooling method as liquid will easily
infiltrate into the equipment and result in leakage of electricity. Instead of
Liquid Cooling method, choose Mist Spray Cooling.
12. Do not remove the drill if the spindle and the drill are in continuous motion.
Unplug the drill from the main power supply to change its gear and never
touch it with your bare hands.
replace the drill. In case you notice a blockage, switch off the motor
immediately. However, you must leave the magnetic base power on. The
logic behind this process is that in case you shut down the power supply of
the magnetic base directly, it may result in the operator suffering from
injuries. It will also harm the motor because of the sudden loss of magnetic
force of the magnetic base.
11. If a Supplier has provided or approved of the Parts and Tools, only then must
you use them as once installed on the equipment, they come with a
guaranteed usage safety.
SWC 65 WT

Magnetic Drilling Machine
Operating Manual
6
2. Disposal of grease: Follow the instructions given by the lubricant's
manufacturer.
1. Keep a close check on the bolt of the magnetic drill. It should not be lose and
the gap in the spindle should not be too large. The power cable of the drill
should be in a good condition. You must make sure that the machine is
maintained well.
7. Switch the machine off and unplug it from the main power socket before you
start the process or maintenance and cleaning.
ENVIRONMENTAL PROTECTION AND WASTE DISPOSAL
5. The operator must clean the magnetic drill after finishing the work, scrub the
side where the drill slides while working and apply lubricating oil on the drill
for the machine to last longer.
CLEANING AND MAINTENANCE
When it comes to the process of Maintenance, Inspection and Repair pertaining
to their electrical aspects, only a qualified electrician must be contacted to cater
to the task. The qualifications of these electricians change according to their
respective countries. They must follow the effective rules put in place when it
comes to processing, inspection and the maintenance of a Circuit Board in order
to avoid accidents.
1. Disposal of the old electrical equipment: Make sure you process the product
in accordance with EC Directive 2002/96/EC-WEEE, also known as Waste
Electrical and Electronic Equipment. In case of doubts or queries, contact the
Department of Waste Disposal.
4. It is always the After-Sales Service Department or the designated dealer who
cater to the maintenance of the drill machine.
6. Whenever you indulge in the process of cleaning the Drill with compressed
air, you must wear Goggles and to protect yourself and the other people
around you at the workstation.
3. The Lubricating Grease in the Gear Box should be changed by a professional
once you have used the drill for three months. Inspect well once the
professional finishes to double check that all the parts have been fully
lubricated.
2. Inspect the carbon brush and change it immediately if you notice that it is
worn out.
SWC 65 WT

Magnetic Drilling Machine
Operating Manual
Drill Chuck
Weldon Drill Chuck Adaptor Weldon Tapping Adaptor
Weldon Counter Sink
Core Drill
MT 2 / MT 3 Arbour
Pilot Pin Taper Drift
OPTIONAL TOOLS & ACCESSORIES
7SWC 65 WT

SWC 65 WT
Magnetic Drilling Machine
Operating Manual
Broach cutter (50 mm length) ø 12 mm - ø 65 mm
Tapping ø 20 mm
Twist drill ø 23 mm
-1 -1
RPM 250 min /450 min
Stroke Flexible Stroke upto 205 mm
Input supply voltage / Frequency 220V-240V / 50-60 Hz
Broach cutter (80 mm length) ø 18 mm - ø 65 mm
Motor power 1600 watt
Weight 16 kg (59.5 lbs)
Spindle MT3, 19 mm Weldon
Magnet power 18000 N
Broach cutter ( 35 mm length) ø 12 mm - ø 65 mm
DESCRIPTION & TECHNICAL DATA
194
97
479
460-670
1986040
311
2. Cooling Bottle 1 No.
4. 2,5 mm Allen Wrench 1 No.
6. 6,0 mm Allen Wrench 1 No.
1. Packing case 1 No.
3. Safety Belt 1 No.
5. 5,0 mm Allen Wrench 1 No.
COMPONENTS CONTENT
12. Taper Drift 1 No.
7. Instruction Manual 1 No.
8. Magnetic Drill Machine 1 No.
11. Pilot Pin 8x50 1 No.
9. MT3x19.05 Arbor 1 No.
10. Pilot Pin 6x50 1 No.
8SWC 65 WT

5 Start the motor by pressing the green motor start button (I).
6 Start bringing the cutter to the workpiece but handle with care and do not
apply too much pressure. The cutter has to find its way in to the material by
itself. After 2 mm, the groove of the cut will help the cutter maintain its place
and you can increase the power. Still it is not necessary to use a lot of
pressure. Too much pressure will cause damage and breakage.
CAUTION : For 100% magnet clamping force you need at least 10 mm of
steel. Coatings, paintings and dirt between magnet and workpiece will
affect clamping force.
2 Switch on the magnet.
5.1 How to mount tools or adapters in a Weldon arbor?
1) Make sure the machine is disconnected from the power supply.
4) Tighten the retaining screws.
5) Check if the center pilot can move inside the cutter (up and down).
2) Put the center pilot in the cutter hole.
5.2 Drilling with Core Drills
3) Put the cutter or adapter in the arbor, making sure the flat sides are
exactly in front of the arbor retaining screws.
1 Place the machine at the desired position
3 Ensure that the magnetic drilling unit is secure on the working piece.
4 Fill the arbor with lubrication/cutting oil in the special meant holes. Always
use cutting oil from your dealer.
OPERATING MANUAL
3
7
Magnetic Drilling Machine
Operating Manual
9SWC 65 WT

Magnetic Drilling Machine
Operating Manual
7 After the cutting is finished switch the machine off by pushing the red button.
6 Start bringing the twist drill to the workpiece but handle with care and do not
apply too much pressure. The drill has to find its way in to the material by
itself. It is not necessary to use a lot of pressure. Too much pressure will cause
damage and breakage.
- Adapter 19 mm Weldon - ½”x20 UNF
- Adapter 19 mm Weldon – B16 taper connection
3 Ensure that the magnetic drilling unit is secure on the working piece.
4 Apply cutting oil to the twist drill and workpiece. Always use cutting oil from
your dealer.
2 Switch on the magnet
Also twist drills with a direct Weldon connection are available
7 After the cut is finished the slug will automatically be ejected from the cutter,
switch the machine off by pushing the red button(0).
There are several accessories available to be able to use twist drills with your
magnetic drill.
8 If the slug gets stuck in the cutter, move the machine to a flat surface. Switch
on the magnet and gently bring the cutter down in contact with the surface.
This usually allows a slug to straighten and to eject.
5.3 Drilling with twist drills
These adapters will allow you to attach a drill chuck on to the hole cutter arbor.
(ranging from Ø 6 – Ø 12 mm)
- Adapter 19 mm Weldon – B18 taper connection
WARNING: THE SLUG WILL BE EJECTED AND IS VERY HOT
5 Start the motor by pressing the green motor start button.
1 Place the machine at the desired position
10
Drill ChuckWeldon Drill Chuck Adaptor
SWC 65 WT

Magnetic Drilling Machine
Operating Manual
SWC 65 WT
11
Warning:
It is recommend to run the machine for diameter up to 32mm on Speed 1
-1 -1
(450 min ) and for diameter above 32mm Speed 2 (250 min ) is recommended as
show.
5.5 THREAD CUTTING
TAPPING IS ONLY RECOMMENDED FOR THROUGH HOLES.
5.4 SPEED SELECTION
In order to select the desired gear speed follow diagram below.
It might be possible that while shifting the gears it could have stuck with the
already selected speed gear, adjust spindle of the machine by moving it clockwise
and anti clockwise direction simultaneously moving the speed knob.
Various tapping adaptors are used for thread cutting with your magnetic drilling
machine SWC 65 WT
ONLY USE SPIRAL TAP FOR TAPPING OPERATIONS
Switch off the machine before changing the gear knob.
1. Drill a hole using suitable drill or core drill.
These adapters will allow you to attach tap on the hole cutter arbor. Attach
desired tap to the adaptor.
2. Place the machine at the position to be tapped , place tapping cutter adaptor
in the hole cutter arbor.
SHOW PICTURE
Warning: Always stop the machine when changing gear.
Speed 1 Speed 2
Gear Speed Knob

Magnetic Drilling Machine
Operating Manual
3. Bring speed lever to the lowest position.
4. Adjust speed with the help of speed controller
6. Now bring the machine lever down toward the drilled hole. Once the
machine makes one rotation with the tap it will automatically cut the thread
in the hole as per required length. Tapping is only recommeded for through
holes.
5. Shift tapping button to the right
7. Once the tapping is done, stop the machine and shift tapping button to the
left (see figure) and start the machine. Spindle of the machine will
automatically reverse to its starting position. Use the handles to take adaptor
with tap completely out from the work piece.
5.6 REAMING/COUNTER-SINKING
2. In this process, always observe the limitations stated in the technical data for
the tools to be made use of.
1. You can make use of the machine for the process of Reaming or Counter-
sinking too, considering the machine's wide range of speed availability to
operate.
SWC 65 WT
12
0
L R
0
L R

Magnetic Drilling Machine
Exploded View
SWC 65 WT Motor complete / Antriebseinheit
SWC 65 WT
13

Magnetic Drilling Machine
Exploded View
SWC 65WT Motor complete / Antriebseinheit
Magnetic Drilling Machine
Exploded View
124 0709311704101 Screws ST4.8x30 4
131 0709311704156 Copper Gasket ø33x1.5
140 0709311704224 Needle Bearing 12-Oct 1
147 0709311707645 spring washer M8 2
162 0709311707799 Key B5x5x12 1
155 0709311707720 Cylindrical Pin ø4x12 1
137 0709311704200 Block ø20x24 2
150 0709311707676 Gear Shift Knob ø39.6x31 1
127 0709311704125 Shaft retainer ring ø10 1
152 0709311707690 Shift Lever ø6x21.5 M5 1
136 0709311704194 Needle Bearing 12-Sep 1
144 0709311707614 Gasket ø21xø12.2x1 1
149 0709311707669 Cylindrical Pin ø3x10 1
156 0709311707737 shaft retainer ring ø17 1
157 0709311707744 Main Shaft Gear Z45m1h15 1
160 0709311707775 Ball Bearing 6006 ZZ 1
161 0709311707782 Circlip ø55 1
154 0709311707713 Shaft retainer Circlip 26 1
139 0709311704217 Lever M8x90 1
143 0709311707607 Key A5x5x28 1
151 0709311707683 Plunger 4 1
145 0709311707621 Needle Bearing 4901 1
129 0709311704149 Copper Sleeve ø29x9.5 M16x1.5
126 0709311704255 O' Ring 84xø2 1
130 0709311704286 clutch helical gear Z44m0.8h8
135 0709311704187 Gasket ø15xø9.2x1
142 0709311707591 Transmission Gear Shaft # 2 Z13m1h16.5 1
146 0709311707638 washer M8 2
153 0709311707706 O' Ring ø21.2xø2.65 1
125 0709311704118 Rotor seal ring ø10xø15x4.5 1
158 0709311707751 Ball Bearing 6003 2RS 1
163 0709311707805 Spindle Drive Shaft ø34x145 MT3 1
132 0709311704163 Disc Spring ø31.5x16.2x1.25 Complete Set
159 0709311707768 Inner Frame Rotary Lip Seal ø20xø32x6 1
128 0709311704132 Ball Bearing 608 ZZ 1
133 0709311704170 Disc Spring ø31.5x16.8x0.8
138 0709311704293 Gear Casing 50-116x96x164 1
134 0709311704262 Transmission Gear Shaft #1 Z17m1h7/Z10m1h9
141 0709311704231 Double Gear Z34m1h6.3/Z41m1h8 1
148 0709311707652 Hex Screw 10.9 Grade M8x75 2
101 0709311695492 Cross Recessed Tapping Screw ST4.2x60 4
102 0709311703913 Motor Cover 50-86x86x45 1
106 0709311695539 Carbon Brush Holder 15.8x6.2x20 2
105 0709311695522 spring washer M4 4
Part no. Article Article Description Pcs
107 0709311695546 Carbon Brush 15.8x20x6.2 220V 1
109 0709311695553 Motor Housing 50-101x96x167 1
110 0709311695560 inlet cover 34x40x13 1
103 0709311695508 Motor Inlet cover 50-88x88x61 1
108 0709311703920 Scroll Spring 5x0.3 2
111 0709311695577 screws ST3.5x6.5 3
104 0709311695515 Screws M4x12 6
113 0709311695584 Screws ST4.2x70 2
114 0709311695591 Air Guide 50-ø87x43 1
117 0709311695621 Armature 1500W 220V 1
119 0709311704064 Ball Bearing 6001 ZZ 1
122 0709311704279 Spring Washer M5 4
121 0709311704088 Hex Screw M5x25 4
112 0709311703937 Field Coil 1500W 220V 1
115 0709311695607 Bearing Sleeve 6000 1
118 0709311704248 circlip ø28 1
120 0709311704071 Seal ø15xø21x3 1
123 0709311704095 Gear Box Cover 50-106x96x35 1
116 0709311695614 Ball Bearing 6000 ZZ 1
SWC 65 WT
14
}

Magnetic Drilling Machine
Exploded View
SWC 65 WT Magnetic frame / Magnetbohrständer
SWC 65 WT Circuit Diagram / Schaltplan
SWC 65 WT
15
4.1
4.2
ARMATURE
Magnet
Field Coil
ON / OFF
SWITCH
MOTOR
SWITCH

Magnetic Drilling Machine
Exploded View
SWC 65 WT Magnetic frame / Magnetbohrständer
Magnetic Drilling Machine
Exploded View
SWC 65 WT
16
Part no. Article Article Description Pcs
1 0709311695027 Main Body SWC 65 WT 1
3 0709311695041 screws M3x12 2
4 0709311695058 PCB 220V 1
4.1 0709311710126 Capacitor 1
4.2 0709311710133 Transistor 1
2 0709311695034 PCB Box 66x52x30.5 1
5 0709311695065 PCB COVER 66x52x24 1
11 0709311695126 Hex Screw M6x25 4
13 0709311695140 Hex Screw M5x15 2
33 0709311695348 Hex Screw M4x10 8
36 0709311695379 Feed Bush ø35xø25x15 2
31.1 0709311710072 Potential Meter 1
45 0709311695461 Hex Nut 8x1 1
15 0709311695164 Slide 20.5x250 1
31 0709311695324 Torsion Joint MA16-P-10 1
6 0709311695072 screws M4x10 3
44 0709311695454 Aluminium Valve ø15.5x37-90 1
12 0709311695133 hex Screw M5x25 1
7 0709311695089 Spring Washer M4 1
24 0709311695256 Hex Screw M5x8 4
28 0709311695294 Hose ø13 0.3
19 0709311695201 Hex Screw M5x10 8
14 0709311695157 spring washer M5 3
26 0709311695270 Shaft Retainer ring ø25 1
9 0709311695102 Magnet 198x97x47 220V 1
18 0709311695195 Cable Head MA12-08 1
10 0709311695119 Spring Washer M6 4
16 0709311695171 Grub Screw M4x10-10.9 2
25 0709311695263 Gasket ø25xø33x1 1
32 0709311695331 Control Panel 90x130x2 1
33.1 0709311710089 L & R Switch 1
8 0709311695096 Lock Washer 4 3
22 0709311695232 Slide Guide 16x27x285 2
27 0709311695287 Elbow Cable Connector 22OV 10A 1mm² 0.9
29 0709311695300 Connector ZT-M16-AD13 1
21 0709311695225 R- Clip 6.4mm 2
34 0709311695355 Motor Switch 220 V 1
35 0709311695362 Switch Cover 37x30.5x12 1
23 0709311695249 Panel 90x130x2 1
37 0709311695386 Magnet Switch KDC 1
39 0709311695409 Feeding Gear Shaft 37x118 Z14m1.5 1
40 0709311695416 Coolant Bottle 600ml 1
20 0709311695218 Washer M6 2
41 0709311695423 Coolant Nozzle 4mm 1
17 0709311695188 Rack 15x15x170 m1.5 1
38 0709311695393 Feeding Handle M10x150 3
30 0709311695317 Main Power Cable 250V 16A 1.5mm² 3.5m 1
35.1 0709311710096 Knob 1
42 0709311695430 PU Tube 6x4 0.3
43 0709311695447 Hoop ø6 1
47 0709311695485 Coolant Bottle Lid ø58x12 1
46 0709311695478 Coolant Container 600ml 1

Magnetic Drilling Machine
Operating Manual
TIP: Do not use your magnetic drill on the same structure when ARC welding is in
progress. D.C. current will earth back through the magnet and cause irreparable damage.
TIP: It is recommended that machine is laid to rest every 30 minutes in order to permit
grease to run across the gear box .
TIP: When using models with gear and variable speed always select a setting with low
transmission ratio and high motor speed, if possible.
WARNING: This appliance must be earthed.
TIP: During drilling it is recommended after a certain depth the cutter should be pulled up
on free load in order to permit grease to run across the gear box.
TIP: Most situations which cause problems or question marks have already occurred for
other users. Contact Schifler or your dealer to see if a solution exists for your situation.
(example: for drilling into non-magnetic material with your magnetic drill, a special
vacuum system has been designed).
TIP: For 100% magnet clamping force you need at least 10 mm of steel. Coatings,
paintings and dirt between magnet and workpiece will affect clamping force.
WARNING: After drilling the slug will be ejected and is very hot.
WARNING: When drilling in inverted position, cutting oil can enter the motor and can
cause irreparable damage.
WARNING: When drilling in inverted position, metal swarf can enter the motor. This can
cause irreparable damage and can cause electrical shocks.
WARNING: Steel plates of less than 10 mm thickness, coatings, paints and dirt between
magnet and workpiece can affect clamping force and create a possible dangerous
situation. Always make sure your magnetic drill is fastened with the supplied safety chain
and make sure your machine is sufficient attached to the workpiece to start drilling.
17
HELPFUL TIPS
SWC 65 WT

Magnetic Drilling Machine
Operating Manual
TROUBLESHOOTING
18
f. The machine is over-heated because of which the internal safety switch of the
machine is switching it off. Let the machine cool down for some time and then switch
it on.
a. You have not switched on the magnet. Switch it on.
d. You have missed selecting the direction of rotation. Click on select.
e. You haven't switched on the magnetic clamp. Switch it on.
3. If the type of error that you face revolves around the Magnetic clamp not functioning
to its best capability, following can be the possible causes along with the remedies:
2. If the type of error that you face revolves around the Circuit Breaker tripping in the
power distributor, following can be the possible causes along with the remedies:
b. Plenty of appliances have been connected to the same power circuit, resulting in the
tripping. Unplug a few of those appliances.
b. The connecting nipple has gotten clogged. Do a deep cleaning of the tank and the
nipple.
a. The machine has some defective parts. Immediately contact the Customer Service.
b. The surface where the machine is placed is not magnetic enough. Change the
placement and use a suitable base.
4. If the type of error that you face revolves around the lubrication system not
functioning to its best capability or failing to function at all, following can be the
possible causes along with the remedies:
a. The lubricant is over. Pour the required amount of lubricant into the machine.
Contact the Customer Service immediately if the steps and remedies described above do
not solve your problem.
c. The lubricant tap is jammed or has gotten closed. Open the tap.
1. If the type of error that you face revolves around the Motor not starting even after
pressing the ON/OFF button or the motor tends to stop while it is functioning, following
can be the possible causes along with the remedies:
a. The plug isn't properly inserted into the socket. Just re-insert the plug.
b. The Circuit Breaker has been switched off by accident. Switch it on.
c. The torque cut-off has been triggered. You just have to switch the machine off for a
few seconds and then switch it on.
SWC 65 WT
This manual suits for next models
1
Table of contents
Other Schifler Drill manuals