SciGene Hybex User manual

www.scigene.com
1287 Reamwood Avenue, Sunnyvale, CA 94089 USA • Tel 408-733-7337 • Fax 408-733-7336 • [email protected]
Hybex®
Microsample Incubator
USER MANUAL
Cat. #1057-30-0 (115V) and 1057-30-2 (230V)
FOR RESEARCH USE ONLY

Hybex®Microsample Incubator — USER MANUAL
Warranty
SciGene warrants that the Hybex® Microsample Incubator described in this manual shall be free of
defects in materials and workmanship for a period of 12 months from date of delivery. This warranty
does not cover removable blocks or accessories. In the event of a defect during the warranty period,
SciGene’s limit of liability will be to, at its sole discretion, provide replacement parts or replace the
product. The foregoing warranty is void in the event the unit was abused or modified or used in a
manner inconsistent with its intended purpose. SciGene makes no other warranty, expressed or implied
including warranties of merchantability and fitness for a particular purpose. In no event shall SciGene be
liable for any direct, indirect, special, incidental or consequential damagers or for any damages resulting
from loss arising out of or in connection with the sale, use or performance of the product.
Copyright
Copyright ©2004-2020 SciGene Corporation. All rights reserved. SciGene and Hybex are trademarks of
SciGene Corporation, Sunnyvale, CA. All other trademarks used in this manual are the property of their
respective owners.

Hybex®Microsample Incubator — USER MANUAL
Table of Contents
I. SAFETY NOTICES..............................................................................................................................................3
A. Intended Use ........................................................................................................................................................ 3
B. Instrument Safety................................................................................................................................................. 3
C. Symbols and Conventions .................................................................................................................................... 3
D. Warnings .............................................................................................................................................................. 4
E. Cautions................................................................................................................................................................ 5
F. Compliance........................................................................................................................................................... 5
II. UNPACKING AND SET UP.................................................................................................................................6
A. Unpacking the Heating Base ................................................................................................................................ 6
B. Items Provided ..................................................................................................................................................... 6
C. Environmental Requirements .............................................................................................................................. 6
D. Installing the Instrument...................................................................................................................................... 6
III. USING YOUR HYBEX SYSTEM ...........................................................................................................................7
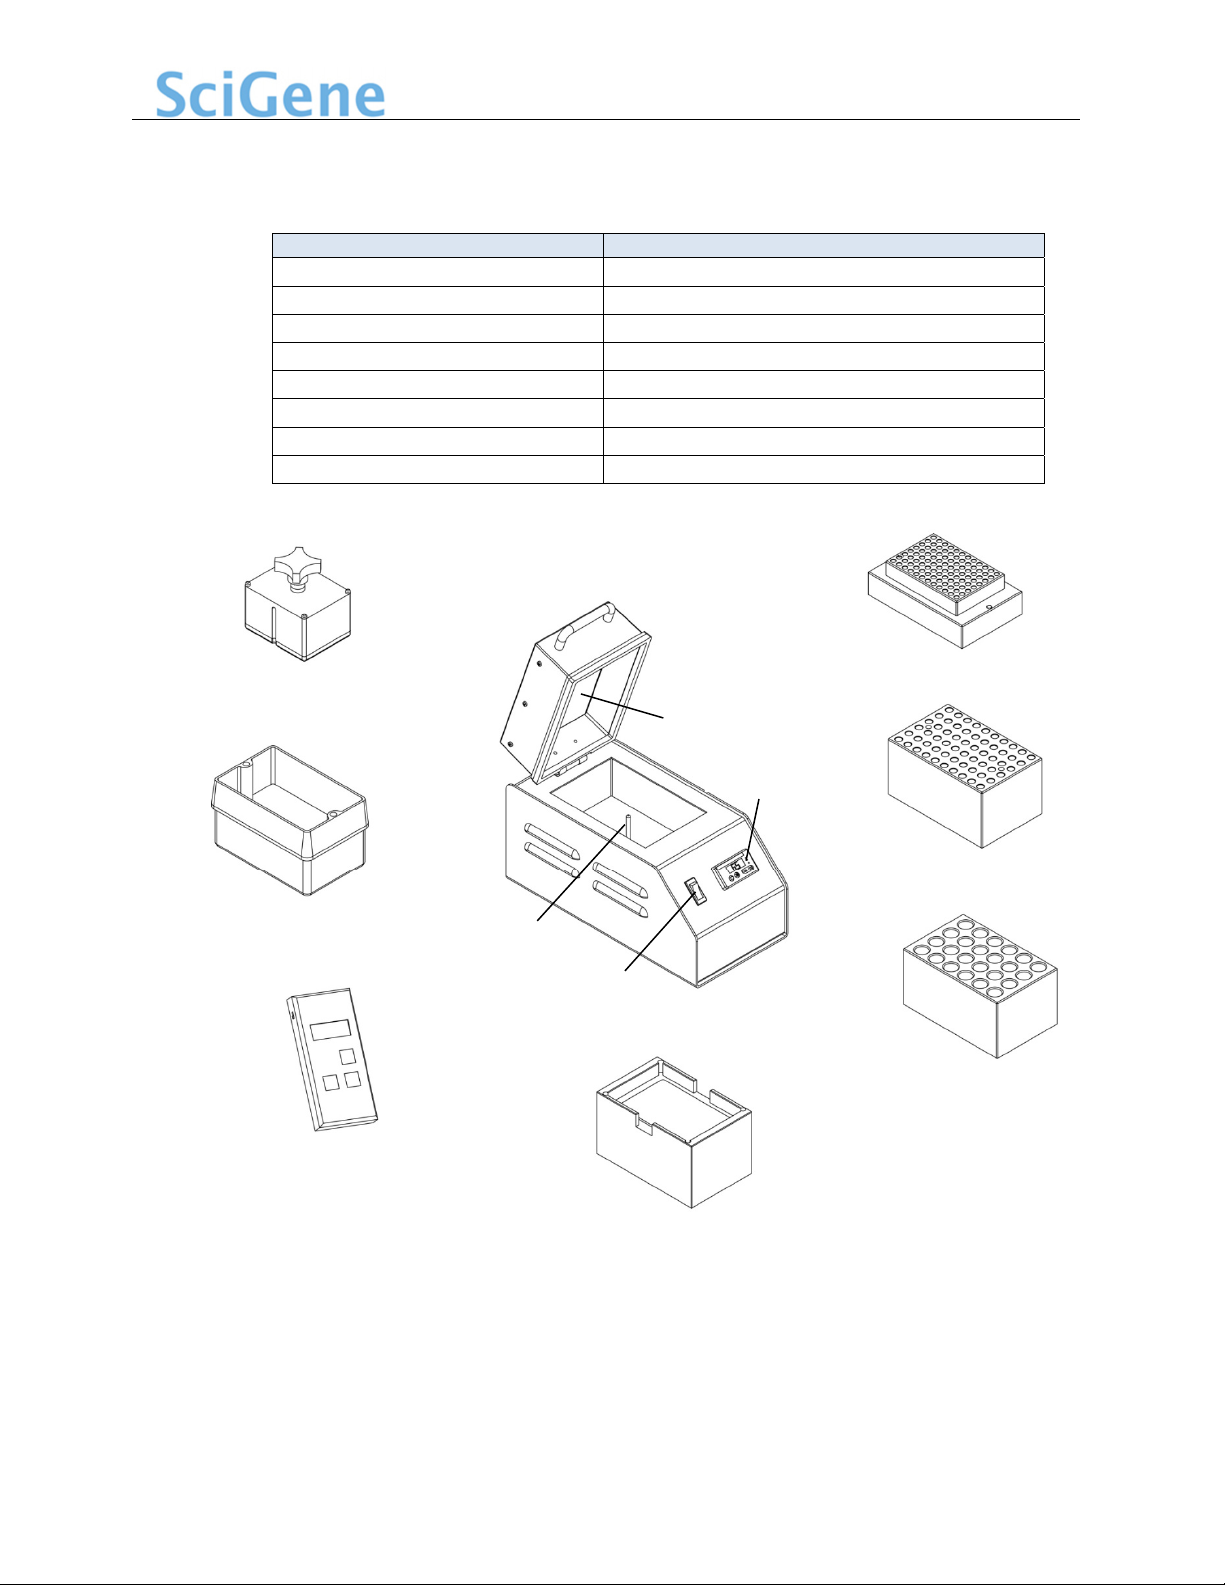
A. Components, Controls and Accessories ............................................................................................................... 7
B. Handling Tube Blocks and the Waterbath Insert ................................................................................................. 8
C. Using the Temperature Controller ....................................................................................................................... 8
D. Calibrating the Temperature Controller............................................................................................................... 9
IV. MAINTAINING YOUR HYBEX SYSTEM.............................................................................................................10
A. Powering Off....................................................................................................................................................... 10
B. Cleaning the Instrument..................................................................................................................................... 10
C. Checking and Replacing Fuses............................................................................................................................ 10
V. TROUBLESHOOTING ......................................................................................................................................11
VI. SPECIFICATIONS ............................................................................................................................................11
VII. ORDERING INFORMATION.............................................................................................................................11
VIII. APPENDIX A – Using and Calibrating a Watlow SD31 Controller .....................................................................12
A. Using the Watlow SD31 Temperature Controller .............................................................................................. 12
B. Calibrating the Watlow SD31 Temperature Controller ...................................................................................... 12
IX. DECLARATION OF CONFORMITY....................................................................................................................13

Hybex®Microsample Incubator — USER MANUAL
I. SAFETY NOTICES
A. Intended Use
The Hybex Microsample Incubator is intended for the heating and incubation of laboratory
samples. The instrument should only be used according to the instructions provided in this
manual. If the equipment is used in a manner not specified by the manufacturer (SciGene),
the protection provided by the equipment may be impaired.
La Hybex système est destiné pour le chauffage d'échantillons biologiques. L'instrument ne
devrait servir que selon les instructions fournies dans ce manuel de l'utilisateur et d'autres
documents techniques de SciGene. Si l'équipement est utilisé de manière non spécifiée par le
fabricant, la protection assurée par l'équipement peut être compromise.
B. Instrument Safety
Before operating the instrument, read the information in this section concerning hazards
and potential hazards. Ensure that anyone involved with the instrument’s operation is
instructed in both general safety practices for laboratories and specific safety practices for
the instrument.
Avant le fonctionnement de l'instrument, lisez les renseignements dans cette section
concernant les risques et les dangers potentiels. S'assurer que toute personne impliquée avec
le fonctionnement de l'instrument est instruit dans les pratiques générales de sécurité pour
les laboratoires et les pratiques de sécurité spécifiques pour l'instrument.
C. Symbols and Conventions
The following chart is an illustrated glossary of the electrical symbols that are used on the
Hybex Microsample Incubator. Whenever such symbols appear on instruments, please
observe appropriate safety measures.
Le tableau suivant est un glossaire illustré des symboles électriques qui sont utilisées sur le
système. Chaque fois que ces symboles apparaissent sur les instruments, veuillez observer les
mesures de sécurité appropriées.
1. Electrical Symbols
This symbol indicates that this is a protected ground terminal that must
be connected to earth ground before any other electrical connections
are made to the instrument.
Ce symbole indique qu'il s'agit d'un terminal de terrain protégé qui doit
être connecté à la terre avant que toutes les autres connexions
électriques sont apportées à l'instrument.
CAUTION: This symbol alerts you to consult this Operator’s Manual for
further information and to proceed with caution.
ATTENTION: Ce symbole vous avertit à consulter ce guide de l'utilisateur
pour plus d'informations et de procéder avec prudence.

Hybex®Microsample Incubator — USER MANUAL
CAUTION: This symbol alerts you to an electrical hazard. Consult this
Operator’s Manual for further information and proceed with caution.
ATTENTION: Ce symbole vous avertit d'un risque électrique. Consultez ce
guide de l'utilisateur pour plus d'informations et de procéder avec
prudence.
This symbol indicates the OFF position of the main POWER switch.
Ce symbole indique la position OFF de l'interrupteur principal.
This symbol indicates the ON position of the main POWER switch.
Ce symbole indique la position ON de l'interrupteur principal.
2. Non-Electrical Symbols
CAUTION: This symbol illustrates a heat hazard. Proceed with caution when
working around these areas to avoid being burned by hot components.
ATTENTION: Ce symbole illustre un danger pour la chaleur. Faire preuve de
prudence lorsque vous travaillez autour de ces zones pour éviter d'être brûlé
par les composants du chauds.
CAUTION: This symbol alerts you to consult this Operator’s Manual for
further information and to proceed with caution.
ATTENTION : Ce symbole vous avertit à consulter ce guide de l'utilisateur
pour plus d'informations et de procéder avec prudence.
D. Warnings
Failure to comply with the following warnings that are affixed to the product can lead to
possible personal injury or death.
Défaut de respecter les avertissements suivants qui sont apposées sur le produit peut
conduire à possibles lésions corporelles ou la mort.
This symbol on the rear of the instrument indicates the presence of the fuse
box. Warning: For Continued Protection Against Fire, Replace Only with
Same Type Rating of Fuse. Always disconnect the power cord before
attempting to replace the fuse.
Ce symbole sur l'arrière de l'instrument indique la présence de la boîte de
fusibles. Avertissement : Pour le maintien de la Protection contre l'incendie,
remplacer uniquement avec la même cote de Type de fusible. Toujours
débrancher le cordon d'alimentation avant d'essayer de remplacer le fusible.
This symbol indicates the presence of hazardous voltage. Always disconnect
the power cord before servicing.
Ce symbole indique la présence d' une tension dangereuse. Toujours
débrancher le cordon d'alimentation avant l'entretien.

Hybex®Microsample Incubator — USER MANUAL
E. Cautions
Failure to comply with the following cautionary statement affixed to the product may lead
to possible personal injury.
Omission de se conformer à la mise en garde suivante apposée sur le produit peut entraîner
des blessures possibles.
This symbol located both on and in front of the lid indicates the potential presence
of a Hot Surface. Use care when working in this area to avoid being burned.
Ce symbole situé sur et devant le couvercle indique la présence possible d'une
Surface chaude. Faire preuve de diligence lorsqu'il travaille dans ce domaine
pour éviter d'être brûlé.
F. Compliance
1. European Conformity (CE)
This symbol indicates the instrument is in compliance with all applicable
European Union Electromagnetic Compatibility and Low Voltage Directives.
2. Waste Electrical & Electronic Equipment Directive (WEEE)
WEEE is a European Community directive that became European Law in
February 2003. The crossed out wheelie bin symbol on a product or its
packaging indicates that it must NOT be disposed of with standard waste at the
end of its lifetime. Instead, it is your responsibility to return it to a designated
collection point for electronic equipment recycling. Contact your local SciGene
distributor for information on drop off locations.
3. Restriction of Hazardous Substances (RoHS)
The RoHS directive was adopted in February 2003 by the European Union. It
restricts (with exceptions) the use of six hazardous materials (including lead
and mercury) in the manufacture of various types of electronic equipment. All
SciGene instruments carrying the CE mark are also RoHS compliant.
4. Laboratory Equipment Standards
This symbol indicates the instrument meets Laboratory Equipment standards
UL 61010-1:2012 R04.16 and CAN/CSA-C22.2 61010-1:2012 + GI1 + GI2 as
certified by TÜV Rheinland of North America, Inc.
5. Electromagnetic Compatibility (EMC)
The Hybex System is a Class A digital device under FCC Title 47 Part 15B and
designated as Class A electrical equipment for measurement, control, and
laboratory use (EN61326).
Note regarding Canadian EMC compliance: Le present appareil numerique
n’emet pas de bruits radioelectrique depassant les limites applicables aux
appareils numeriques de class A prescrites dans le reglement sur le brouillage
radioelectrique edicte par le Ministere des Communications du Canada.
RoHS

Hybex®Microsample Incubator — USER MANUAL
II. UNPACKING AND SET UP
A. Unpacking the Heating Base
The Hybex Microsample Incubator heating base is shipped on its side within the interior
carton. Remove any packing material around the unit and lift the unit out; taking care not to
damage the hinged cover. Carefully inspect the heating unit for damage. Heat blocks and
other accessories are packaged separately from the heating base.
If there is evidence of damage, retain the shipping materials and contact SciGene
([email protected]) or your local distributor for assistance.
B. Items Provided
The following items are included with the Hybex heating base within the
re-closable plastic bag:
•
Power cord
•
User Manual
C. Environmental Requirements
Ensure that the area where the incubator is installed meets the following conditions, for
reasons of safety and performance:
Ambient temperature +15 to +32°C (58 to 90°F)
Relative humidity 15 to 80% RH non-condensing
Air flow clearance 3 inches (8 cm) minimum on both sides
D. Installing the Instrument
1. Place the unit on a level surface within a few feet of the power source. Ensure the
lid can be opened completely without interference and leave 3 inches of clearance
along the back and sides for air circulation.
2. Plug the provided power cord into the back of the unit and then to a properly
grounded outlet. Use only the power cord provided.
Do NOT operate the system without a block inserted into the base unit!
Ne pas faire fonctionner le système sans un bloc insérée dans l'unité de base!
See Section VII. ORDERING INFORMATION for a list of available accessories and Section III.
B. Handling Tube Blocks and the Waterbath Insert for how to insert and remove blocks.
Allow 3 inches of
clearance on both sides
Allow 15 inches
of total vertical
clearance to fully
open the lid.
Allow 3 inches of
clearance at the back
for the power cord.

Hybex®Microsample Incubator — USER MANUAL
III. USING YOUR HYBEX SYSTEM
A. Components, Controls and Accessories
Name Function
Power Switch Turns on main power to unit
Temperature Controller Used to set and observe block temperature
Heated Lid Heats the sealed air around the block
Temperature Probe Senses the temperature of the block
Heat Block Holds tubes or plates for heating
Microarray Incubation Chamber*For array hybridization (2 needed for operation)
Waterbath Insert*For heating buffers or water
Digital Thermometer* For calibrating system temperature
*Optional accessories
Microarray Incubation Chamber
Cat. #1057-38-0 (2/Kit)
Heat Block for 0.2 ml Tubes or Plate
Cat. #1057-31-0
Waterbath Insert
Cat. #1057-35-0
Digital Thermometer
Cat. #1051-52-0
Heated Lid
Power
Switch
Temperature
Probe
Temperature
Controller
Heat Block for Flat Bottom Microplate
Cat. #1057-39-0
Heat Block for 0.6 ml Tubes
Cat. #1057-33-0
Heat Block for 1.5 ml Tubes
Cat. #1057-34-0

Hybex®Microsample Incubator — USER MANUAL
B. Handling Tube Blocks and the Waterbath Insert
Tube heating blocks and the waterbath insert are placed and removed from the heating unit
with the aid of two bolts (provided) that act as handles.
To properly install a block or insert:
1. Thread the two bolts several turns into the block.
2. Grasp the ends of the bolts, lift the block, and then carefully lower it into the unit;
guiding it over the temperature probe. The opening in the bottom of the block
should fit over the probe.
3. Remove the threaded bolts before using the system.
Do not operate the system without a block inserted into the base unit!
Ne pas faire fonctionner le système sans un bloc insérée dans l'unité de base!
When using a waterbath insert do NOT leave the heated lid in down position for
more than 90 minutes. Excess condensation will form that may damage the
heating base.
Lors de l'utilisation d'un insert de bain-marie ne pas laisser le couvercle chauffant en
position basse pendant plus de 90 minutes. L'excès de la condensation se forme qui
peut endommager la base chauffante.
C. Using the Temperature Controller
The Hybex Microsample Incubator is equipped with an
EZ-Zone temperature controller that has been calibrated
at the factory to provide accurate block temperatures
from 35 to 99°C. The controller has two LED displays and
four push buttons. The left display shows ACTUAL block
temperature in red. The right display shows the SET
temperature in green.
To program the temperature controller:
1. Turn on the instrument.
2. Program the desired SET temperature by pressing the up or down arrow buttons:
•Press the up arrow button to increase the current SET temperature
•Press the down arrow button to decrease the current SET temperature.
3. Verify the new SET temperature is shown in the green display on the right. The
instrument will now adjust the block heater until the SET temperature is attained.
SciGene recommends checking calibration according to your laboratory schedule. See
section III. D. Calibrating the Temperature Controller for details.

Hybex®Microsample Incubator — USER MANUAL
D. Calibrating the Temperature Controller
The temperature controller is calibrated at the factory to provide accurate block
temperatures from 35 to 99°C. Calibration is required only if the controller displays a block
temperature which differs by more than one degree (1°C) from a NIST calibrated T-type
digital thermometer (sold separately, SciGene cat. #1051-52-0). Contact SciGene Customer
Service (custserv@scigene.com) or your local distributor to purchase a thermometer.
To calibrate the temperature controller:
1. Insert a block into the Hybex incubator, turn ON the
instrument and set the controller to 65°C. Allow 15
minutes for temperature to stabilize.
2. Using the cable provided with the digital thermometer
(cat. #1051-52-0), plug one end into the blue receptacle
found on the back panel of the Hybex incubator and
the other end into the thermometer.
3. Turn on the thermometer. Allow 1 minute for
thermometer to stabilize. The actual temperature of
the block will be displayed.
4. Calculate the difference between the digital
thermometer and the temperature controller to
determine the adjustment value. For example, if the
thermometer reads 63.9°C while the controller reads
65°C, then the adjustment value is -1.1°C.
5. On the controller, press the up and down arrows simultaneously for 3 seconds. The
left display shows “A1” and the right display shows “open”.
6. Press the Advance Button (green circle) 3 times until the right display shows “i.CA”.
The left display will show the offset value between the controller and thermometer
when the unit was last calibrated.
7. Using the up or down arrows, add the adjustment value from step 4 above to the
existing offset value shown on the controller. For example, if the adjustment value is
-1.1°C and the current offset is -0.3°C then the new offset is -1.4°C.
8. Press the Infinity Key (∞) twice to exit calibraon and return to the operaon
display. Verify that the temperature on the thermometer matches the display. Your
incubator is now calibrated to provide accurate temperatures between 35 and 99°C.

Hybex®Microsample Incubator — USER MANUAL
IV. MAINTAINING YOUR HYBEX SYSTEM
A. Powering Off
Turn the power switch to the OFF position and unplug the power cord before performing
any service procedure.
B. Cleaning the Instrument
Clean outer metal surfaces and the heated lid using a soft cloth and mild, detergent-based
cleaner. Avoid abrasive cleaners that can scratch surfaces. Do NOT use caustic or strongly
alkaline solutions (e.g., strong soaps, ammonia, or bleach).
If running radioactive or biohazardous reactions, consult your institution’s radiation safety
officer or biosafety office for assistance.
Turn the power switch to the OFF position and unplug
the power cord before performing any service procedure!
Tournez le commutateur d'alimentation sur la position OFF et débranchez
le cordon d'alimentation avant d'effectuer toute opération de service!
Remove liquid or condensation (wipe dry) while instrument
is OFF and block is cool or at room temperature!
Enlever le liquide ou la condensation (essuyer), tandis que l'instrument
est éteint et le bloc est frais ou à température ambiante!
C. Checking and Replacing Fuses
There are two fuses located in a removable fuse block below the power cord receptacle on
the back of the unit. A blown fuse appears dark. Always replace fuses with those of the
same amperage and voltage as shown on the label below the fuse block.
Turn the power switch to the OFF position and unplug
the power cord before performing any service procedure.
To remove fuses:
1. Insert a small, flat blade screwdriver
into the tab recess just below the plug
receptacle.
2. Push down to release the fuse block.
3. Slide fuse holder out from the fuse
block while holding the retaining tab
out of the way.
4. Gently pry out the fuses.

Hybex®Microsample Incubator — USER MANUAL
V. TROUBLESHOOTING
Symptom Cause Solution
Instrument does not turn on. No power or
blown fuse
Check power source and power cord
connection. Replace fuse beneath
power cord (on back of unit) if
necessary.
Controller is not responding
when buttons are pressed.
Controller is faulty or
the settings have
been corrupted.
Contact SciGene or your distributor to
reset the controller to factory settings
or replace the controller.
VI. SPECIFICATIONS
Electrical
Cat. #1057-30-0 115V AC; 50/60 Hz; 3A
Cat. #1057-30-2 230V AC; 50/60 Hz; 1.6A
Dimensions
Outside (H x W x D) 10 x 6 x 12 inches (21 x 15 x 30 cm) — cover closed
Weight
Instrument 6 lbs (3 kg) — without block
Performance
Temperature Range Ambient +5°C to 99°C
Temperature Regulation ± 0.1°C
Controller
Controller Type Digital PID
Display Four-line LED
Calibration Output T-type Thermocouple
Environmental
Ambient temperature Operation: +15 to +32°C (58 to 90°F)
Storage: -20 to +60°C (-4 to 140°F)
Relative humidity Operation: 15 to 80% RH non-condensing
Storage: 10 to 90% RH non-condensing
VII. ORDERING INFORMATION
Cat. # Description UoM
1057-30-0 Hybex Microsample Incubator, heating base, 115V. EA
1057-30-2 Hybex Microsample Incubator, heating base, 230V. EA
1057-31-0 0.2 ml tube block. Holds 96x0.2ml PCR tubes or single plate EA
1057-33-0 0.6 ml tube block. Holds 60x0.6ml tubes EA
1057-34-0 1.5 ml tube block. Holds 32x1.5ml microcentrifuge tubes EA
1057-39-0 Flat-bottom heat block. Holds a microplate. EA
1057-35-0 Waterbath Insert for Hybex Incubator EA
1057-38-0 Hybex Microarray Chamber Kit. EA
1051-52-0 Digital thermometer. Includes cable and NIST certificate EA

Hybex®Microsample Incubator — USER MANUAL
VIII. APPENDIX A – Using and Calibrating a Watlow SD31 Controller
** For selected Hybex incubators manufactured between 2005 and 2010.**
A. Using the Watlow SD31 Temperature Controller
The controller has a single LED panel with four buttons. The set
temperature is displayed if the SET key is pressed and held otherwise the
ACTUAL block temperature is displayed.
To set the block temperature:
1. Hold in the SET button to view the previous set temperature.
2. While holding down the SET button, press the up or down arrow button until the
desired set temperature is shown.
3. Release the buttons to display the actual temperature. The instrument will adjust
block heating until the new temperature is attained.
B. Calibrating the Watlow SD31 Temperature Controller
Re-calibrating the Hybex temperature controller is recommended only if the display varies
by more than one degree (1°C) to a connected NIST-certified T-type digital thermometer
(SciGene cat. #1051-52-0).
To adjust the controller to achieve accurate temperatures:
1. Insert a block into the Hybex incubator, turn ON the instrument and set the
controller to 65°C. Allow 15 minutes to stabilize.
2. Using the cable provided with the digital thermometer (cat. #1051-52-0), plug one
end into the blue receptacle found on the back panel of the Hybex incubator and
the other end into the digital thermometer.
3. Turn on the thermometer. Allow 1 minute for thermometer to stabilize. The actual
temperature of the block will be displayed.
4. Calculate the difference in the temperature shown on the controller and the digital
thermometer. For example, if the controller displays 52.5°C and the digital
thermometer displays 51.0°C, the difference (offset) is 1.5°C.
5. On the temperature controller, press the Infinity Key (∞) for
three seconds until “OPEN” appears.
6. Press the down arrow four times until “Cal” appears.
7. Press and hold the SET key. The existing offset value between
the controller and digital thermometer is displayed.
8. Press and hold the SET key and use the up/down arrows to
adjust the offset value to the temperature dHeaifference calculated in Step 4. For
example, if the controller shows a temperature 1.5°C lower than the thermometer,
adjust the offset by adding 1.5 to the value shown.
9. Press the Infinity Key (∞) to exit calibraon and return to the operaon display.
Verify that the temperature on the thermometer matches the display. Your
incubator is now calibrated to provide accurate temperatures between 35 and 99°C.

Hybex®Microsample Incubator — USER MANUAL
IX. DECLARATION OF CONFORMITY
Hybex Microarray and Microsample Incubation System
SciGene
1287 Reamwood Avenue
Sunnyvale, CA 94089 USA
Declares that the above referenced product(s) meets the essential requirements of
the following European Union Directives by using the relevant standards shown
below to indicate compliance.
EMC Directive 2014/30/EU
Standards:
EN 61326-1 2013 Electrical equipment for measurement, control and
laboratory use to include:
LVD Directive 2014/35/EU
EN 61010-1 2010 Safety requirements for measurement, control and
laboratory use
3rd Edition Part 1: General requirements
RoHS Directive 2015/863/EU
Terry Gill Sunnyvale, California, USA
Name of Authorized Representative Place of Issue
Director of Product Manufacturing July 31, 2019
Title of Authorized Representative Date of Issue
Signature of Authorized Representative
This manual suits for next models
2
Table of contents
Other SciGene Accessories manuals