Seagull SEA-310 User manual


Introduction
Congratulations on your purchase of the SEA-310 Guitar Amplifier/Powered Speaker. If you’ve used
guitar amplifiers before, start with these instructions:
•Connect the power supply to the SEA-310 and turn it on.
•Plug your guitar into the “Guitar” input.
•Plug your phone into the AUX input if you want to use a backing track.
•Have fun!
This manual will help you get the most from your SEA-310. You’ll get insights on how it works. You’ll see
options for using it as a guitar amp and powered speaker, how to power it from your car, and how to
use it to drive an external speaker. You’ll also find a full description of the cables you may need.
If you want to learn more about how the SEA-310 works, you’ll find the schematic diagram in the
Assembly Instructions. You will also see technical information added to our website
www.seagullelectronickits.com. Remember, the SEA-310 is a high-quality product and you can assemble
and disassemble it as many times as you wish.
Features:
•15 Watts of Output Power.
•Guitar and AUX Inputs allow you to play your guitar with a backing track from your phone.
•Drive, Tone, Presence, and Volume controls.
•Can be powered from the supplied AC adapter or the power port on your car.
•Rugged case with clear Plexiglass back.
•External Speaker jack allows use of an external monitor or headphones.
Besides being a great guitar amp, the SEA-310 is designed for experimenters and hobbyists. Everything
you want to know about it can be found on our website, and its simple construction and inexpensive
through-hole components make it easy and fun to work on.

Contents
Introduction .................................................................................................................................................. 2
Features: ....................................................................................................................................................... 2
Signal Flow Through the SEA-310 ................................................................................................................. 4
Playing Your Guitar Through the SEA-310 .................................................................................................... 5
Powering the SEA-310 from Your Car ........................................................................................................... 5
External Speaker Jack.................................................................................................................................... 5
Using the SEA-310 as a Powered Speaker .................................................................................................... 6
Option 1 – Use the AUX Input................................................................................................................... 6
Option 2 – Use the Guitar Jack.................................................................................................................. 7
Option 3 – Modify the SEA-310 to Reroute the Aux Input to the Guitar Input ........................................ 7
External Noise Pickup from Cell Phones ....................................................................................................... 8
Cables............................................................................................................................................................ 8
SEA-310 Specifications .................................................................................................................................. 9

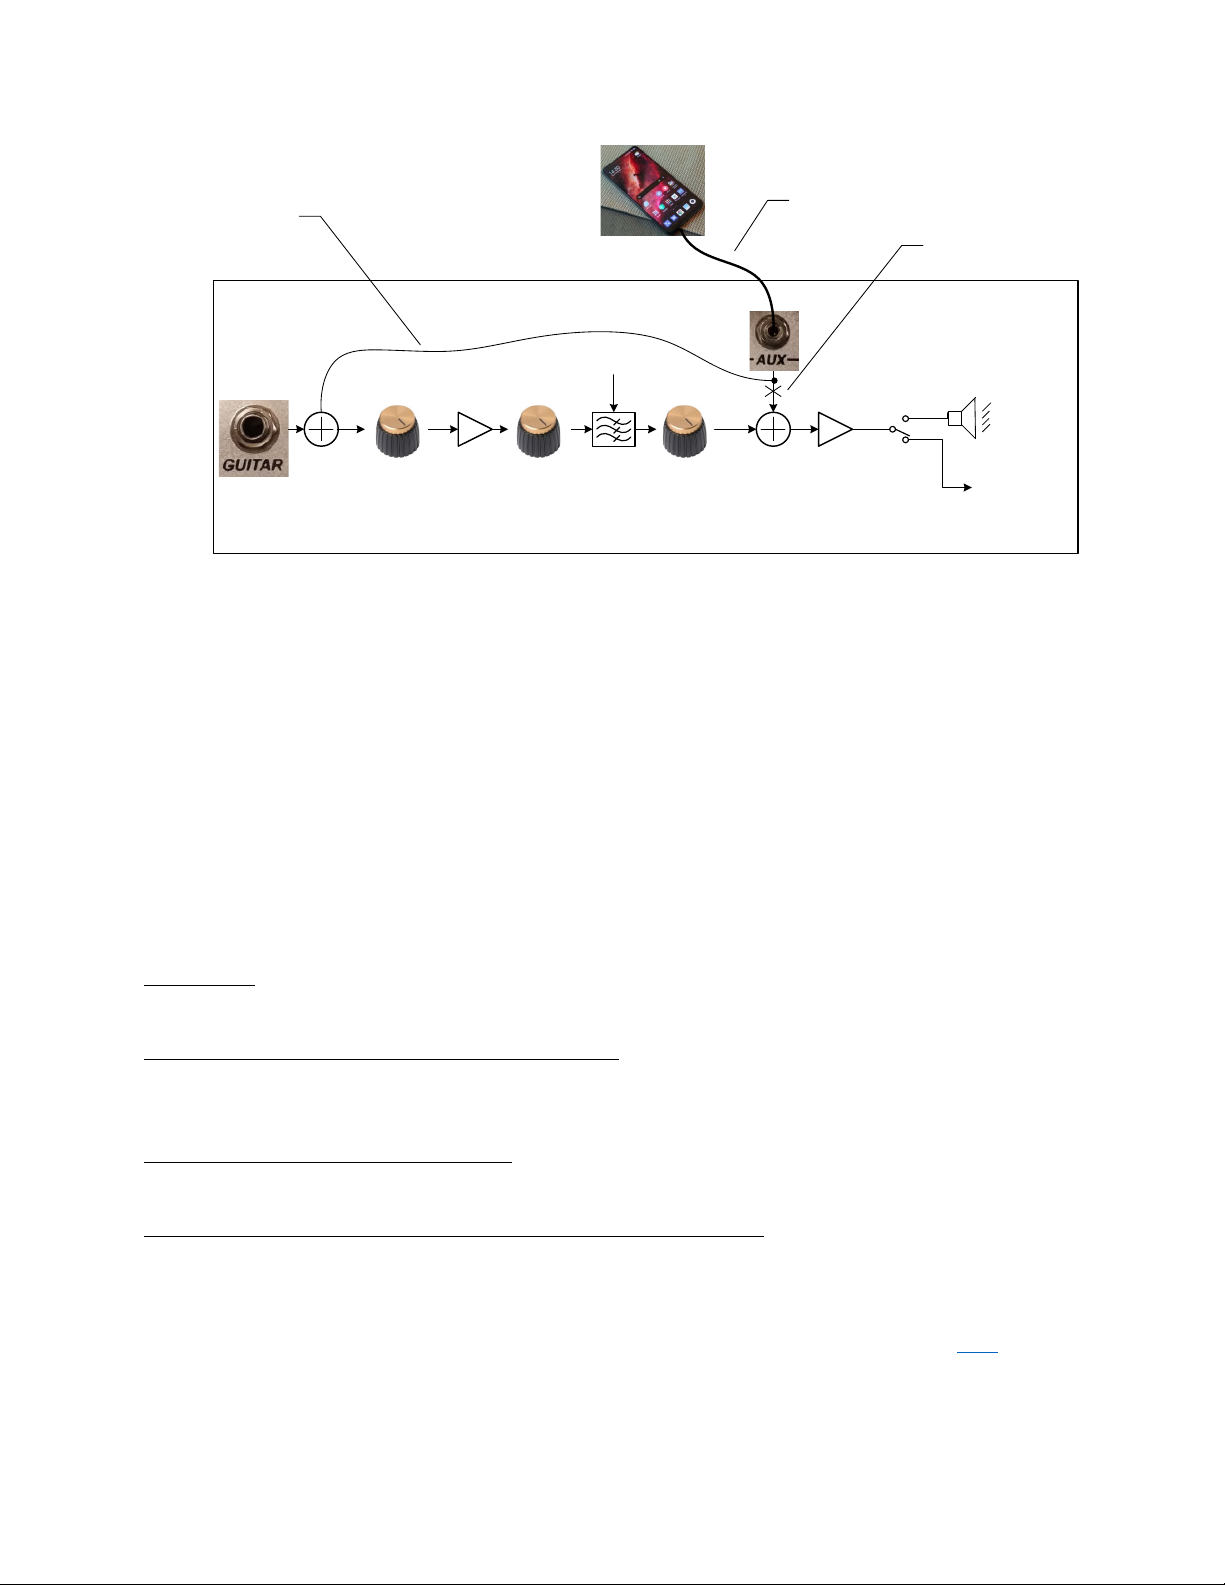
Signal Flow Through the SEA-310
Figure 1 shows how signals flow through the SEA-310. The signal from the Guitar input passes through
the Drive adjustment. If the Drive is set low, then the signal level into the Voltage Amplifier is low, and
the amplifier will not distort. Turning the drive level up, raises the input level at the Voltage Amplifier
and distortion results. By changing the Drive level, you can make your guitar sound clean, warm, edgy,
or fuzzy. The Voltage Amplifier output is fed to the Tone control which shapes the frequency response of
the SEA-310. Turning it fully counterclockwise gives a bass sound, and fully clockwise gives a trebly
sound. The signal is then fed to the presence circuit which is enabled or disabled by the Presence switch
on the front panel with the knobs. When Presence is on, the circuit creates a dip in the frequency
response which many players prefer. The final control is the Volume which controls the overall level of
the SEA-310 output. The Aux input is used to feed your backing tracks into the SEA-310. Note that the
Drive/Tone/Volume controls only affect your guitar. To change the level of your backing tracks at the
SEA-310 output, you must change the volume level of the AUX source (typically your phone). The
combined Guitar and AUX signal feeds the Power Amplifier which drives the internal or external
speaker. If nothing is plugged into the External Speaker jack, the output goes to the internal speaker. If
you plug a external speaker into the External Speaker Jack, the internal speaker will be disconnected and
the SEA-310 will drive the External speaker only.
Drive Tone Volume
Guitar
Input
AUX Input
Voltage
Amplifier
Power
Amplifier External
Speaker
Connector
Internal
Speaker
Presence
Circuit
Presence
Switch
FIGURE 1-SIGNAL FLOW THROUGH THE SEA-310

Playing Your Guitar Through the SEA-310
After plugging your guitar into the Guitar input on the SEA-310, you’ll want to adjust the SEA-310’s
controls to get the sound you want. The SEA-310 has the controls you need, so go ahead and adjust the
Drive, Tone, and Presence controls until it sounds right. Then use the Volume control to adjust the
overall level. If you have a backing track on your phone, plug the phone’s earpiece jack into the AUX jack
on the SEA-310. Since the controls on the SEA-310 only affect the Guitar input, you’ll have to set the
level of your backing track using the volume control on your phone.
Powering the SEA-310 from Your Car
Plug this end of the Automotive
Power Cable into the 12 V
Power Port on your car.
Plug this end of the adapter
cable into the SEA-310.
FIGURE 2-USING THE 12 VAUTOMOTIVE POWER CABLE TO POWER THE SEA-310 FROM AN AUTOMOTIVE POWER
PORT.THIS CABLE IS NOT INCLUDED WITH THE SEA-310. SEE “CABLES”BELOW FOR A LINK WHERE YOU CAN BUY IT.
External Speaker Jack
If you want an even bigger sound from the SEA-310, connect it to an external 4 or 8-Ohm monitor
speaker using the EXT SPKR jack shown in Figure 3. Plugging a cable into the EXT SPKR Jack, disconnects
the internal speaker, and the SEA-310 will drive the external speaker only. Do not connect the EXT SPKR
to a ground referenced monitor or the SEA-310 will be damaged.

FIGURE 3-EXTERNAL SPEAKER JACK.THIS IS A BALANCED (UNGROUNDED)CONNECTION.DO NOT CONNECT TO A
GROUND-CONNECTED MONITOR.
Using the SEA-310 as a Powered Speaker
The SEA-310 makes a great powered speaker. Three options are provided. Refer to the descriptions and
figures below to pick the option that is the best fit for how you want to use your SEA-310.
Option 1 – Use the AUX Input
The easiest way to play audio through the SEA-310 is to simply plug the stereo audio source into the Aux
connector as shown in Figure 4. When using this option, the only way to control the Volume and Tone is
with the controls on your phone. For the best sound, turn the SEA-310 Drive control fully CCW to
minimize noise pickup from the guitar amplifier circuitry.
Drive Tone Volu me
Aux Input
Voltage
Amplifier
Power
Amplifier External
Speaker
Connector
Internal
Speaker
Presence
Circuit
Presence
Switch
3.5 mm Male to Male
Stereo Audio Cable
FIGURE 4-OPTION 1-USE THIS OPTION FOR PLAYING BACKING TRACKS WITH YOUR GUITAR OR JUST LISTENING TO THE
BACKING TRACK.NOTE THAT YOU MUST ADJUST THE TRACK’S VOLUME AND TONE FROM YOUR PHONE.

Option 2 – Use the Guitar Jack
This option is shown in Figure 5 allows you to plug your phone into the Guitar input using a special
adapter cable. The advantage of this option is that you can control Volume and Tone with the controls
on the SEA-310 instead of having to adjust them with your phone. The cable you need is a 3.5mm TRS to
1/4" TS Stereo to Mono Summing Cable with Resistors. It is very important that the cable has the
internal resistors because they sum the stereo signal from your phone into a mono signal for the SEA-
310.
Drive Tone Volu me
Aux Input
Voltage
Amplifier
Power
Amplifier External
Speaker
Connector
Internal
Speaker
Presence
Circuit
Presence
Switch
3.5 mm male TRS to ¼”
TS stereo to mono cable
with resistors
FIGURE 5-OPTION 2–USE THIS OPTION IF YOU WANT TO ADJUST VOLUME AND TONE WITH THE SEA-310 INSTEAD OF
YOUR PHONE.NOTE THAT IT REQUIRES A SPECIAL CABLE.
Option 3 – Modify the SEA-310 to Reroute the AUX Input to the Guitar
Input
This option is shown in Figure 6. For this option, you must make a small modification to the SEA-310 PCB
that reroutes the connections from the AUX jack to the Guitar input. You can use a simple and
inexpensive 3.5 mm Male to Male Stereo Audio Cable, and you’ll be able to control the audio from the
controls on the SEA-310. If you make the modification, you will not be able to use the SEA-310 to play
backing tracks, but you can still use it as your guitar amp. The modification is simple – and you can easily
remove it later if you wish. Instructions for the modification can be found at
http://www.seagullelectronickits.com.
Drive Tone Volume
Aux Input
Voltage
Amplifier
Power
Amplifier External
Speaker
Connector
Internal
Speaker
Presence
Circuit
Presence
Switch
Disconnect this
connection on the PCB
Add this wire to the PCB
3.5 mm Male to Male
Stereo Audio Cable
FIGURE 6-OPTION 3-THIS OPTION REQUIRES THAT YOU MAKE A SIMPLE MODIFICATION ON THE SEA-310 PCB. THIS
ALLOWS YOU TO PLAY YOUR AUDIO THROUGH THE SEA-310 USING THE INEXPENSIVE 3.5 MM TO 3.5 MM CABLE.IF YOU
MODIFY THE BOARD YOU CANNOT USE THE SEA-310 TO PLAY BACKING TRACKS.
External Noise Pickup from Cell Phones
If you set your phone very close to the SEA-310, you may hear some clicks and pops from the speaker.
This is caused by the radio frequencies from the phone interfering with the circuitry in the SEA-310. If
you move the phone a few feet away from the SEA-310, the interference will stop.
Cables
Guitar Cable – This cable connects your guitar to the SEA-310. It is usually called a “Standard Instrument
Cable.” This cable has ¼” male connectors on each end.
Apple Lightning to 3.55 mm Headphone Jack Adapter – This adapter plugs into your iPhone and allows
you to connect your iPhone to the AUX input of the SEA-310 through a 3.5 mm Male to Male Stereo
Audio Cable.
3.5 mm Male to Male Stereo Audio Cable – This cable is used to connect your phone or computer to the
AUX input of the SEA-310. It has 3.5 mm male connectors on each end.
3.5 mm TRS to 1/4" TS Stereo to Mono Summing Cable with Resistors – This cable has a 3.5 mm stereo
male plug on one end and a ¼” mono male plug on the other. Resistors in the cable sum the stereo
signal from your phone into a mono signal for the SEA-310 guitar input. This cable is used for using your
SEA-310 as a powered speaker using Option 2 above. We recommend the “6 Ft Castline Gold 3.5mm TRS
to 1/4" TS Mogami 2549 Stereo to Mono Summing Cable with Resistors” which is available here.

Speaker Cable – This cable is used to connect the EXT SPKR connector on the SEA-310 to a 4 or 8-Ohm
monitor speaker cabinet. This cable looks like a Standard Instrument Cable, but it is different because it
has heavier gauge wire inside. Use a cable with AWG #16, #14, or #12 wire.
Automotive Power Cable – This cable is used to power the SEA-310 from the power port on your car.
The cable should be capable of supplying 4 Amps, and it should have a 2.1 mm, center-positive jack, and
it should have an internal fuse. We recommend the MPD ZA5073 from Memory Protection Devices.
SEA-310 Specifications
Guitar Input, input Impedance: 240 kΩ.
AUX input, input Impedance: 10 kΩ.
Maximum voltage gain: 60 dB.
Rated Power, 4 Ωload – 10 Watts, 3% THD.
Maximum Average Power, 4 Ωload – 14 Watts, 6.6% THD.
Peak Power, 4 Ωload: 18 Watts.
Frequency response: 68 – 4000 Hz (3 dB, tone mid, Presence off).
Thermal protection: Damage not possible with 4 Ω load.
Table of contents
Popular Musical Instrument Amplifier manuals by other brands


RedPlate
RedPlate TweedyDrive Operation manual

Laney
Laney Hardcore MXD15 user manual

Roland
Roland Jazz Chorus JC-120H Operation manual

Ibanez
Ibanez Tone Blaster 100H owner's manual

thomann
thomann Harley Benton AirBorne Go user manual

Mesa/Boogie
Mesa/Boogie Three Channel Dual & Triple Rectifier Solo... owner's manual