Sealife ReefMaster Quick start guide

Guide to Underwater Photography for
ReefMaster and SportDiver Film Cameras
Great Pictures Made Easy
Guide to Underwater Photography for
ReefMaster and SportDiver Film Cameras
Great Pictures Made Easy
by
Item #SL240
Item #SL240

Close-Up Set with 8X and 16X lenses.
(SL959) for close-up macro pictures.
Moisture Muncher desiccant
to prevent fogging (SL911).
External Flash (SL960)
for more colorful pictures.
Wide angle lens increases field
of view by 50% (SL970).
4Rechargeable Ni-MH Batteries,
Size AA (Nickel Metal Hydride)
SL191
Hard and soft carry cases.
4sizes available.
Camera Accessories:
For more information please visit the Sealife website at:
www.sealife-cameras.com
Popular

1
I. Introduction
Thank you for purchasing a SeaLife camera. You are on your way to discovering
the beauty and magic of our underwater world. Your SeaLife camera will add a
new dimension of excitement to your undersea adventure. There is no better way
to preserve your memories or share the thrills with your friends and family than by
showing a picture.
This manual will teach you how to set-up and care for your underwater camera to
ensure years of trouble-free operation. You will learn the secrets on how to take
great pictures. Good and bad picture samples are included in this manual for you
to compare and learn from your experience. The rest of the adventure is up to
you.
Please let us know if there is any way we can help by contacting us at

2
Contents: PAGE
I. Introduction ..............................................................................................................1
II. Getting to Know Your Camera ..........................................................................4
III. MUST DO! ................................................................................................................6
IV. How Easy It Is......Set up your new SeaLife Camera ................................7
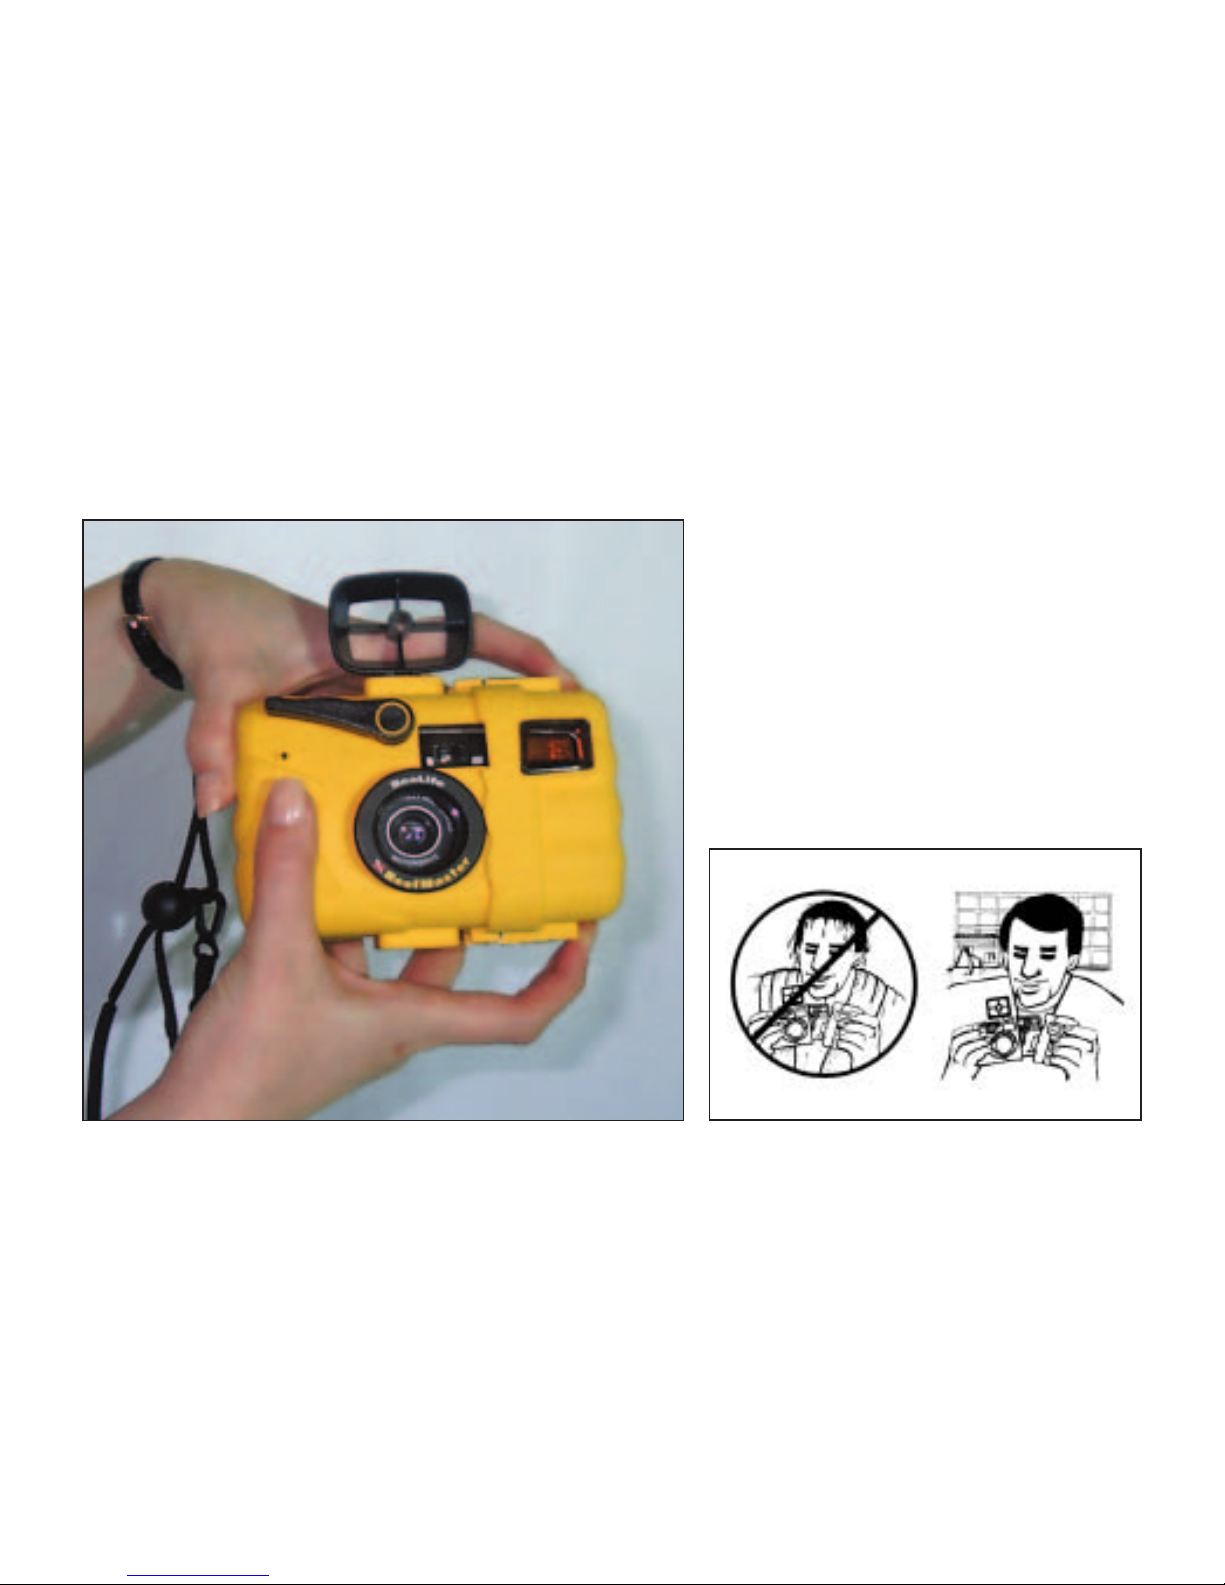
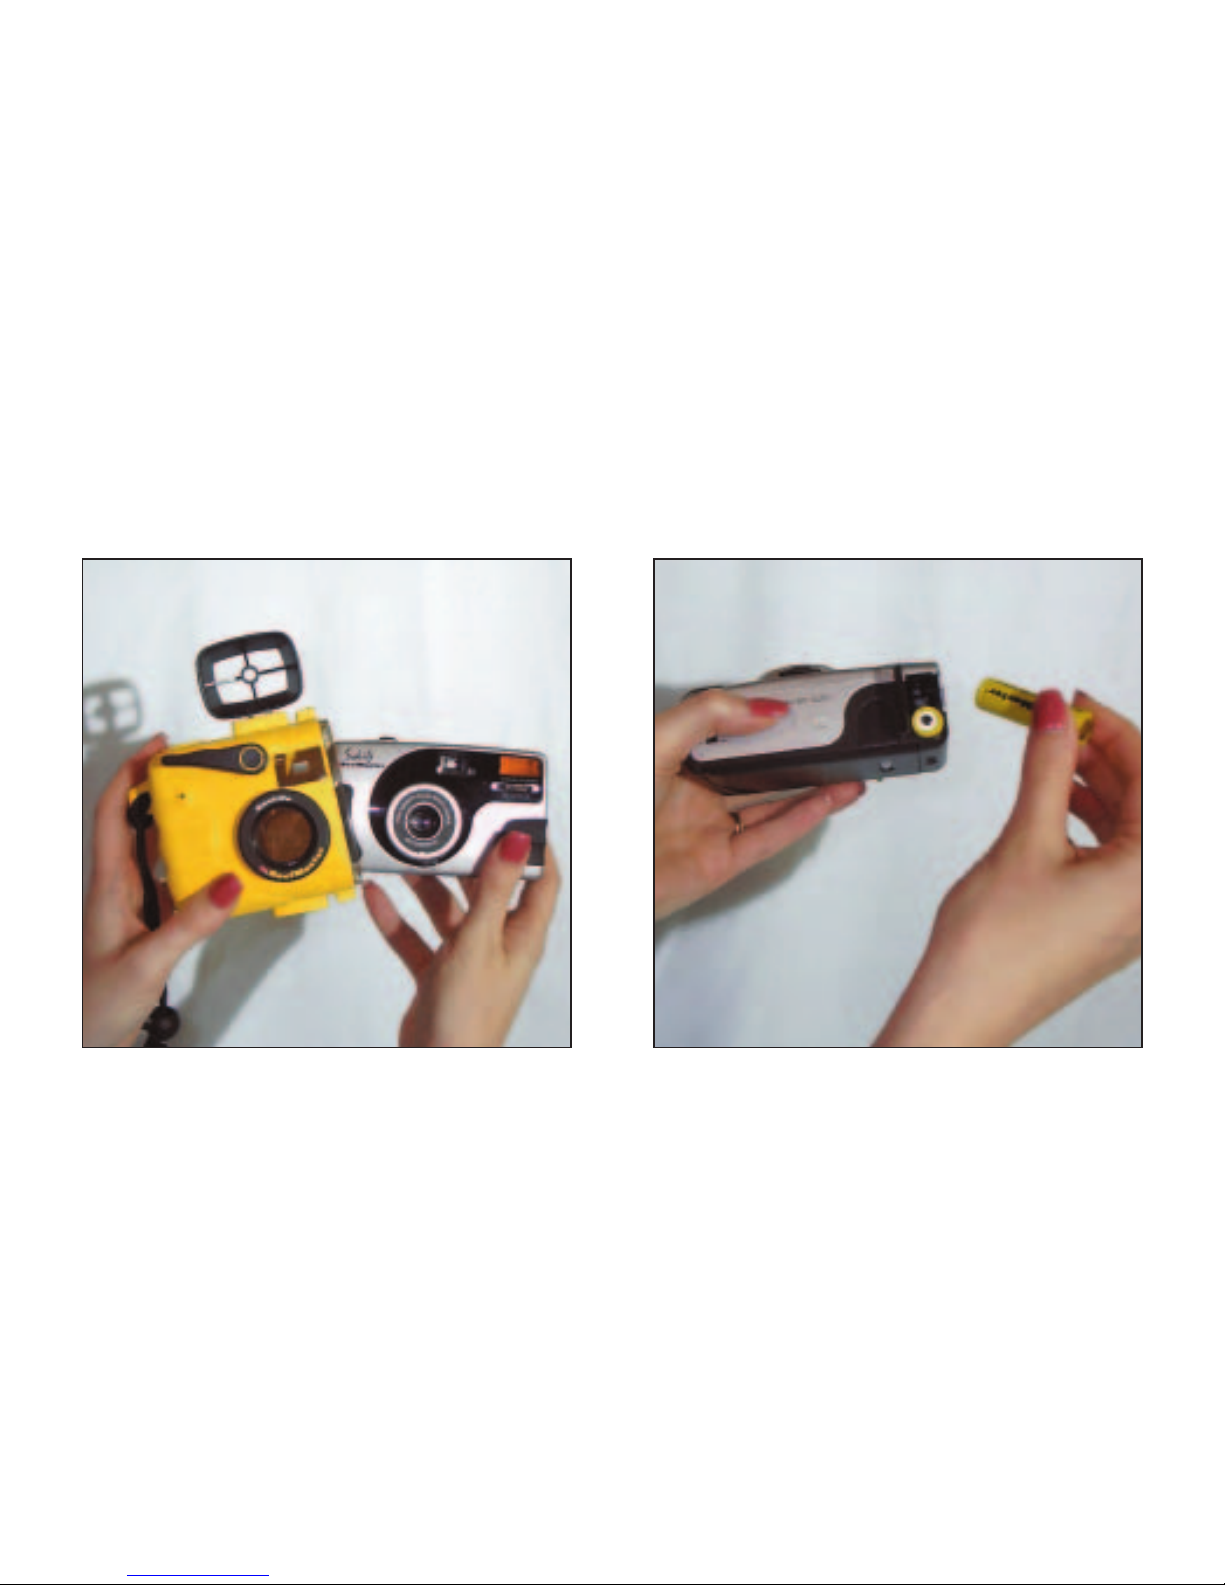
a. Remove Inner Camera ..................................8 g. Taking a Test Picture ......................14
b. Turn Power On ..............................................9 h. Checking the Battery Condition ......14
c. Loading Film and Fresh Batteries ................10 i. Cleaning After Use ..........................15
d. Clean O-Ring / Seal Area ............................11 j. Re-Winding the Film ........................16
e. Insert SeaLife Anti Fog Desiccant................12 k. Dry Storage ......................................17
f. Insert Inner Camera and close housing ......13
V. Tips for Great Picture ........................................................................................18
a. Just Do It! ....................................................18 h.
Distance Range for SeaLife Cameras
..25
b. Capture the Magic ......................................18 i. Pictures on Boats and Beaches ......27
c. The Great Hunt ............................................19 j. Catch, Click and Release ................27
d. Great Effects ................................................20 k.
Pictures on Land in Dry Conditions
....28
e. Key to Good Pictures ..................................22 l. Using the Flash ................................28
f. Taking Pictures Underwater ........................23 m. Inspiring Books ................................29
g. Distance Without Close-Up Lens ................24 n. U/W Photo Courses ........................29

3
VI. Examples of Good & Bad Pictures ..............................................................30
VII. SeaLife Film Camera Models and Accessories ......................................34
a. Spare Parts ..................................................................................................................34
b. SeaLife Close-Up and Wide Angle Lenses..................................................................35
c. External Flash ..............................................................................................................36
d. Care and Maintenance Items ......................................................................................37
e. Storage Cases ............................................................................................................38
f. Film Camera Models ..................................................................................................39
g. Digital Camera Models ................................................................................................40
VIII. Trouble Shooting Guide ................................................................................41
IX. Service and Warranty ......................................................................................44
Warning: Before operating the camera you must read and understand this
manual. For updates to this manual visit www.sealife-cameras.com.
Send your suggestions regarding this manual to:
Pioneer Research
Attn: Sealife Manuals
97 Foster Rd, Moorestown, NJ 08057

4
Sports Finder
Color Coded
Frame Counter
Viewfinder
Color
Coded
Frame
Counter
Opening
Latch
Shutter
Release
Flash
Main O-Ring
(Don’t remove or grease.
Keep Clean)
Opening
Latch
Power Switch and
Lens Cover
2AA
Batteries
Flash
Override
(ReefMaster
RC only)
Viewfinder
Window
Flash
Window
Applies to SeaLife ReefMaster®and Sport Diver II
Film Rewind
II. Getting to Know Your Camera:

5
Sports Finder
Color Coded
Frame Counter
Main O-Ring
(Don’t remove or grease.
Keep Clean)
Opening
Latch
Viewfinder
Window
Opening
Latch
Flash
Window

6
III. MUST DO!
Very Important: Not following these points may void your warranty.
All Camera Models
A) Before opening the camera housing: Everything, including your hands, arms, and head
must be ABSOLUTELY DRY: Have a dry towel handy. Change film or batteries in an
air-conditioned or dry, cool room. Insert the 1.5 g. Moisture Muncher Capsule to
prevent fogging. (See page 12). One drop of water in the housing may cause the lens
to fog.
B) The O-ring must be completely seated in the groove, smooth and clean. DO
NOT REMOVE or GREASE O-RING!. O-ring is glued in place. Follow O-ring care
instructions on page 11.
C) After use and before opening immediately wash closed camera housing in fresh
water and dry well.It’s normal for some water to become trapped between the
ReefMaster armor and housing. This will not cause any damage and eventually dry.
In addition, periodically wash open housing without inner camera. After washing, dry
well. Clean lenses with cleaning pads lightly soaked in detergent and water, then
rinse and dry. Do not let drops dry on lenses.
D) Use the unbreakable airtight SeaLife Dry Case for dry storage with a large 1 oz.
Moisture Muncher Pack and for transportation on boats, airplanes, trucks etc. The
lifetime of batteries as well as the camera and other tools or electronics will be
greatly extended. (See page 17).

7
IV. How Easy It Is...
Set up your new SeaLife Camera
Most important: When opening the
housing, your hands, arms, head, and
the camera must be completely dry
and clean of water, sand and dust.
Always load your camera in an air-
conditioned or dry cool room.
Open both latches

8
a) Remove Inner Camera
Remove the inner camera from the housing and insert fresh AA batteries.
Remove the inside camera Insert 2 fresh AA Alkaline
batteries in film cameras. SeaLife
rechargeable NiMH batteries are
recommended.

9
b) Turn Power On
Turn Camera Power on before inserting camera in housing: Open the lens cover by
moving the switch below the lens of the inner camera. This will turn the power on. Push the
shutter release to test power (without film).
Turn power ON by opening
lens cover switch.
Open film door by sliding down latch
on back of inner camera.

a) Use 200 speed 24 exposure film and 2
fresh AA Alkaline batteries. Replace
batteries if “Flash Ready” light takes
more than 12 seconds to recycle.
b) Turn camera power ON (below lens of
inner camera) by opening lens cover
switch.
c) Before loading film, push shutter button
once to test camera advance.
d) Insert film roll. Make sure roll is properly
seated onto rewind shaft.
e) Pull film tab over and into take-up spool
and press shutter until film engages.
Film should lay flat across film plane and
sprocket teeth.
f) Close film door. If the film door is
obstructed by film roll, remove and re-
insert roll until film door closes without
any obstruction.
g) Push Shutter button to advance film to
picture “1” in the frame counter window.
h) You might advance film by one frame
with the film door open to check proper
advance and position of the film.
c) Loading Film and Fresh Batteries
Advance until frame counter reads 1. Film
counter turns red 4 frames before end of film.
Close door. If hatch does not close easily,
film cartridge is not in correct position.
10

11
d) Clean O-Ring / Seal Area
The waterproof seal is the most critical part. It must be kept meticulously clean. You must
carefully check the O-ring area before each use. Brush away any sand, dirt, hair, etc.
from O-ring. Use the cleaning brush provided.
The O-ring should never be greased or removed. If the O-ring shows signs of damage
have it replaced by an authorized SeaLife Service Facility. Ask your dealer or contact the
SeaLife Service Center (see back cover) or your country’s distributor.
Do not remove O-rings. Clean off O-ring with
brush provided.

12
e) Insert SeaLife Anti Fog Desiccant. This will prevent
fogging of the lens and protect the electronics from humidity.
The small 1.5 g capsule fits between 2 ribs of ReefMaster film
camera models and 2 cartridges clip into the housing of digital
cameras. Do this in dry air without delay since Moisture
Muncher will absorb moisture immediately once you open the
air tight package. It is best done the night before the dive so
Moisture Muncher has enough time to absorb all the humidity
inside the camera. Whenever possible, load the camera in dry
air, such as in an air conditioned room.
Always take a good supply of Moisture Muncher with you
when you go on vacation. The larger 28 g / 1 oz. size is
recommended to keep the inside of your airtight SeaLife Dive
Travel and Accessory Case, tools and batteries completely
dry and free from mildew and corrosion. SeaLife desiccant
capsules and the larger Moisture Muncher Bag contain color
indicator crystals that change from blue to pink as it absorbs
moisture. Replace Moisture Muncher when crystals are pink in
color. See page 37 for more details about Moisture Muncher.
IMPORTANT: Do not obstruct O-ring or sealing area with Moisture
Muncher or housing will flood.
Film Cameras

13
f) Insert Inner Camera and close housing lid
Insert the inner film camera with the power on and lens open (power switch below the
lens). Make sure the Moisture Muncher or any other matter does not interfere with closing
the housing.
Power save function:
The power will turn off automatically, when the
camera is not used within about 2 to 3 minutes
and will turn on again by a light touch on the
shutter release.
Hold the latch down deep inside the strike
while closing. Do not use force.
Take a test picture. If film does not advance or FLASH READY light does not turn on, see
page 41 for Trouble Shooting Guide.

14
g) Taking a Test Picture
Just push the trigger or the shutter button
of the camera. Everything is automatic.
h) Checking the Battery Condition
2. Alkaline AA batteries normally last for
about 8 rolls of film.
1. If FLASH READY takes longer than 12
seconds to turn on after taking a picture,
your batteries are not in good condition and
should be replaced. Always take extra
batteries along.

15
i) Cleaning After Use
After leaving the water, the sealed camera housing should be washed thoroughly in
fresh water. Never let salt water dry on the camera or the housing. Dry with a clean
towel. Salt crystals will damage the O-ring and lens and attract humidity. Never let water
drops dry on any lens. Wipe it dry with a soft lens cleaning tissue. Allow camera to dry
completely before storage.

16
j) Re-Winding the Film
With power on, slide the small switch at the bottom of the inner camera to rewind the film.
When the film is completely rewound and winder has stopped, open the back cover and
put your film in a marked dry container and store it cool. When taking your film to the lab,
remember to request sample prints, called index print. (See page 33, letter e).

17
k) Dry Storage
For long-term storage remove the
batteries from the camera. Leaking
batteries can ruin your camera. Store
the camera with the latches not
tightened inside an air tight SeaLife
Dry Case with one large 1 oz. bag of
Moisture Muncher. (See page 37).
For storage of additional parts you can
cut openings in the foam with a sharp
knife. If you buy the case as an
optional accessory, pick & pluck foam
lets you customize it. The large knob
below the handle is a pressure
equalizing valve. Turn this open after
being in an airplane or at high altitude.
The SeaLife Dry Box has enough
space for optional accessories, close-
up lens, extra film, batteries, and
perhaps even your spare parts. (See
Spare Parts list on page 38).
Rechargeable NiMH batteries can lose up to 10% of power per day at room temperature.
They should be stored refrigerated, but best is to re-charge them over night before your
dive.

18
V. Tips for Great Pictures
a) Just Do It!
One of the best ways to learn about underwater photography is to just do it and learn
from your best shots and from mistakes. Even the best photographers have taken
countless bad pictures… that’s the way they became better and better. Here is the trick:
Just shoot anything in front of your lens in a variety of conditions, distances, colors,
objects etc. Then look at every picture and take a note of what’s good or bad about the
shot. We evaluated several thousand pictures and found that even amateurs can take
great pictures by simply avoiding a few common mistakes. (For the most common errors
see the picture examples on pages 30-33). You will be surprised that among your
snapshots you will find some award-winning pictures. Put the good ones in an album.
But keep one bad shot of each typical error. After a while you will achieve good control
and even perfection.
The best pictures are taken with a close-up lens which also acts as an underwater filter.
The SeaLife 3X Close-Up Lens has a distance range from 2ft. - 4 ft/60 - 120 cm. In lower
water visibility, the SeaLife Close-Up Lens is a must. The key to good pictures is to get
close. The reason is that water absorbs more light than air. In air you could see up to 30
miles, in water your eyes can see 100 ft., at most, but a camera can see less than half of
that and much less red and yellow than your eyes.
b) Capture the Magic
What do you want to capture on film? What attracts you to underwater photography?
What scenes are so breathtaking that people say “this is so unbelievable, I wish I had a
camera to show this to my friends”?
You will encounter strange creatures, see incredible effects of light and colors, explore
Other manuals for ReefMaster
1
This manual suits for next models
1
Table of contents