Seccua UrSpring Guide
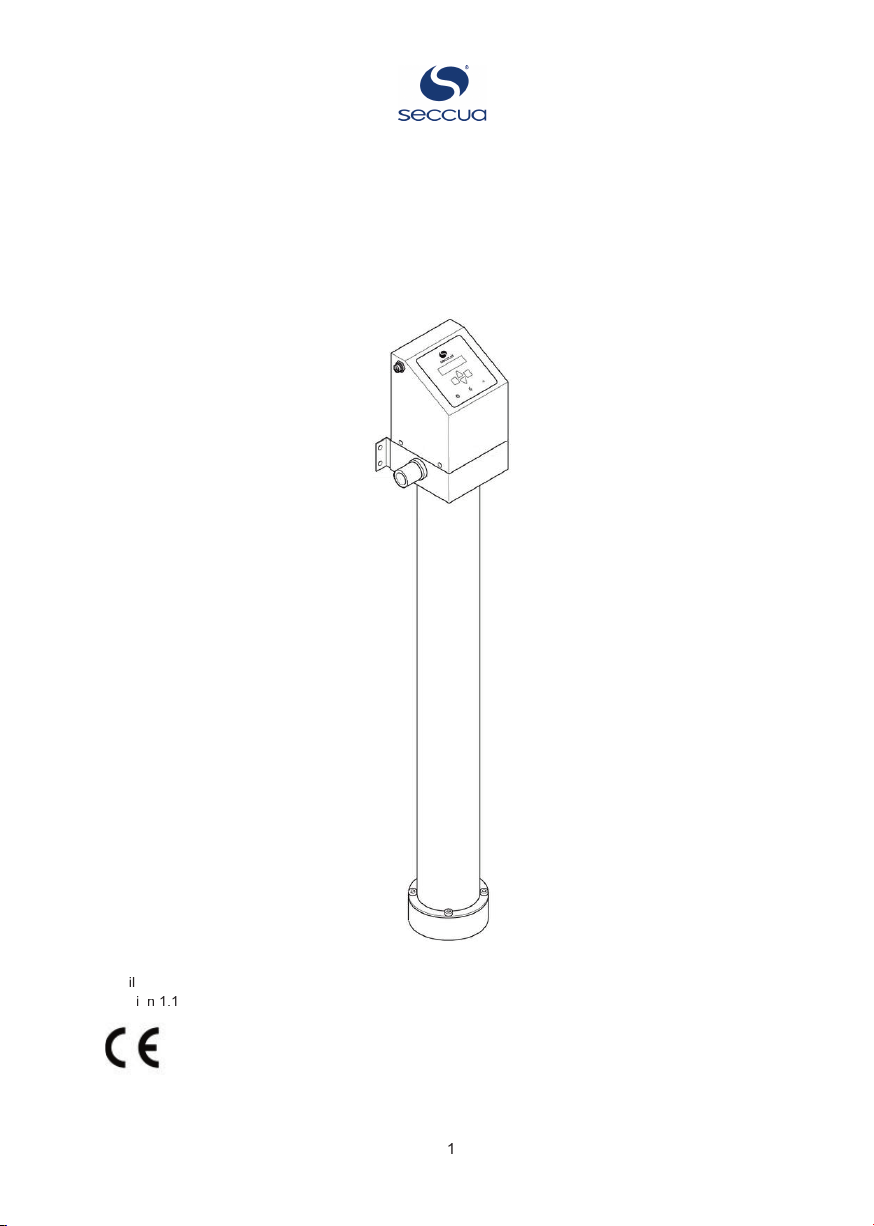
Installation and User Instructions
Seccua UrSpring
A
p
r
i
l
2
0
2
0
V
e
r
s
i
o
n
1
.
1
0
P
a
g
e
1
/
5
0

DISCLAIMER
Seccua Holding AG makes no representations or warranties with respect to this manual and, to the
maximum extent permitted by law, expressly limits its liability for breach of any warranty that may be
implied to the replacement of this manual with another. Furthermore, Seccua reserves the right to revise
this publication at any time without incurring an obligation to notify any person of the revision.
The information provided in this documentation contains general descriptions and/or technical
characteristics of the performance of the products contained herein. This documentation is not intended
as a substitute for and is not to be used for determining suitability or reliability of these products for
specific user applications. It is the duty of any such user or integrator to perform the appropriate and
complete risk analysis, evaluation and testing of the products with respect to the relevant specific
application or use thereof. Neither Seccua nor any of its affiliates or subsidiaries shall be responsible or
liable for misuse of the information that is contained herein. If you have any suggestions for
improvements or amendments or have found errors in this publication, please notify us.
All pertinent state, regional, and local safety regulations must be observed when installing and using this
product. For reasons of safety and to help ensure compliance with documented system data, only the
manufacturer or authorized Seccua Partners shall perform repairs to components.
Failure to observe this information can result in injury or equipment damage.
TRADEMARKS
Seccua Holding AG has made every effort to supply trademark information about company names,
products and services mentioned in this manual. Trademarks shown below were derived from various
sources. All trademarks are the property of their respective owners.
General Notice: Some product names used in this manual are used for identification purposes only and
may be trademarks of their respective companies.
COPYRIGHT
Copyright © 2020 by Seccua Holding AG
All rights reserved. No part of this publication may be reproduced, distributed, or transmitted in any form
or by any means, including photocopying, recording, or other electronic or mechanical methods, without
the prior written permission of the publisher. For permission requests, write to the publisher, addressed
“Attention: Permissions Coordinator,” at the address below.
The Americas:
S
e
c
c
u
a
A
m
e
r
i
c
a
s
L
L
C
1
601 Concord Pike, Suite 100
D
E 19803-3600 Wilmington
U
.S.A.
8
44-533-1305
c
u
s.seccua.com
All other countries:
S
e
c
c
u
a
G
m
b
H
K
rummbachstrasse 8
8
6989 Steingaden
G
ermany
T
e
l
.
+
4
9
(
0
)
8
8
6
2
9
1
1
7
2
-
0
F
a
x
+
4
9
(
0
)
8
8
6
2
9
1
1
7
2
-
1
9
I
n
t
e
r
n
e
t
:
www.seccua.com
P
a
g
e
2
/
5
0

Contents
1. Introduction 5
1.1 Intended use 5
1.2 Filtering principle 5
1.3 Overview of the UrSpring 6
1.4 About this manual 7
1.5 Warranty 8
2. Using the UrSpring 9
2.1 User interface 9
2.2 Using the menu 10
2.3 Viewing controller measurements 10
2.3.1 Flow 10
2.3.2 Pressure drop (p-drop) 10
2.3.3 Filter state 10
2.3.4 Filter life left 11
2.3.5 Current pressure difference 11
2.4 Configuring the controller 11
2.4.1 Enter the serial key (SK) 12
2.4.2 Select the the English language for the controller menu 12
2.4.3 Select metric or US units 12
2.4.4 Select the time format 13
2.4.5 Set the correct time 13
2.4.6 Set the water temperature 13
2.4.7 Set the flush length 13
2.4.8 Select to delay flush during water use 14
2.4.9 Flushing the filter module 14
Daily flush 14
Automatic flush when fouled 15
Manual flush 15
2.5 Reset the UrSpring to factory settings 15
2.6 Change a filter module 15
2.6.1 Preparation 16
2.6.2 Remove filter module 16
2.6.3 Place a new filter module 17
3. Installing the UrSpring 18
3.1 Before you start 18
3.1.1 Safety for installation 18
3.1.2 Check the requirements 18
Page 3/50

3.1.3 Additional components to be included in the water lines 19
3.1.4 Requirements for installation 19
3.2 Installation steps 21
STEP 1 Check the contents of the package 21
STEP 2 Mount the UrSpring 22
STEP 3 Connect the water couplings 24
STEP 4 Prepare the O-rings and filter module 26
STEP 5 Place the filter module 28
STEP 6 Connect the power 29
STEP 7 Rinse the filter membrane 31
4. Maintenance 32
4.1 Maintenance schedule 32
4.2 Maintenance instructions 33
4.2.1 Calibrating the pressure sensors 33
4.2.2 Removing the controller from the valve block 33
4.2.3 Exchanging the pressure sensors 34
4.2.4 Exchanging the solenoid valve 35
4.2.5 Cleaning the solenoid valve 38
4.2.6 Exchanging the flow sensor 39
4.2.7 Cleaning the flow sensor 39
4.3 Spare parts 40
4.3.1 UrSpring spare part sets 40
4.3.2 Single spare parts 41
5. Troubleshooting 42
5.1 Error codes 42
5.2 Support 44
6. Specifications 45
6.1 Dimensions 45
6.2 Operating data 45
6.3 Electrical connection 46
7. Using pipe couplings 47
7.1 Using custom couplings 47
7.2 Using John Guest quick connect couplings 47
8. Storage, transport and disposal 49
8.1 Storage, e.g. Winterization 49
8.2 Transportation 50
8.3 Disposal 50
Page 4/50

1. Introduction
1.1 Intended use
The Seccua UrSpring is intended to be used exclusively for filtering well water or
city water.
U
s
e
o
f
t
h
e
U
r
S
p
r
i
n
g
f
o
fof
r
a
n
y
o
t
h
e
r
o
r
a
d
d
i
t
i
o
n
a
l
p
u
r
p
o
s
e
s
t
h
a
n
f
i
l
t
e
r
i
n
g
w
e
l
l
w
a
t
e
r
o
r
c
i
t
y
w
a
t
e
r
i
s
c
o
n
s
i
d
e
r
e
d
a
s
i
n
n
o
n
-
c
o
n
f
o
fof
r
m
i
t
y
w
i
t
h
t
h
e
i
n
t
e
n
d
e
d
u
s
e
.
A
n
y
u
s
e
o
t
h
e
r
t
h
a
n
t
h
a
t
d
e
s
c
r
i
b
e
d
i
n
t
h
e
s
e
i
n
s
t
r
u
c
t
i
o
n
s
i
s
r
e
g
a
r
d
e
d
a
s
u
n
i
n
t
e
n
d
e
d
u
s
e
.
S
e
c
c
u
a
w
i
l
l
n
o
t
a
c
c
e
p
t
a
n
y
l
i
a
b
i
l
i
t
y
f
o
fof
r
d
a
m
a
g
e
a
n
d
i
n
j
u
r
y
r
e
s
u
l
t
i
n
g
f
r
o
m
n
o
n
-
c
o
n
f
o
fof
r
m
i
n
g
u
s
e
o
f
t
h
e
U
r
S
p
r
i
n
g
.
1.2 Filtering principle
T
h
e
S
e
c
c
u
a
F
i
l
t
r
a
t
i
o
n
r
e
m
o
v
e
s
t
u
r
b
i
d
i
t
y
a
n
d
p
a
t
h
o
g
e
n
s
(
v
i
r
u
s
e
s
,
b
a
c
t
e
r
i
a
l
i
k
e
l
e
g
i
o
n
e
l
l
a
,
p
a
r
a
s
i
t
e
s
a
n
d
p
r
o
t
o
z
o
a
n
s
l
i
k
e
a
m
o
e
b
a
s
,
c
r
y
p
t
o
a
n
d
g
i
a
r
d
i
a
)
f
r
o
m
w
a
t
e
r
s
u
p
p
l
i
e
d
f
r
o
m
s
p
r
i
n
g
o
r
w
e
l
l
w
a
t
e
r
.
T
h
e
U
r
S
p
r
i
n
g
c
o
n
s
i
s
t
s
o
f
a
c
o
n
t
r
o
l
u
n
i
t
a
n
d
a
r
e
p
l
a
c
e
a
b
l
e
f
i
l
t
e
r
.
T
h
e
S
e
c
c
u
a
f
i
l
t
r
a
t
i
o
n
u
s
e
s
c
e
r
t
i
f
i
e
d
m
e
m
b
r
a
n
e
s
w
i
t
h
p
o
r
e
s
i
z
e
s
d
o
w
n
t
o
2
0
n
a
n
o
m
e
t
e
r
s
t
o
f
i
l
t
e
r
t
h
e
w
a
t
e
r
.
T
h
e
f
i
l
t
e
r
i
s
c
o
s
t
e
f
f
fff
i
c
i
e
n
t
a
n
d
u
s
e
s
n
o
c
h
e
m
i
c
a
l
s
o
r
r
a
d
i
a
t
i
o
n
.
P
a
g
e
5
/
5
0

1.3 Overview of the UrSpring
P
a
g
e
6
/
5
0
1.4 About this manual
T
h
i
s
m
a
n
u
a
l
d
e
s
c
r
i
b
e
s
h
o
w
t
o
s
a
f
e
l
y
u
s
e
,
i
n
s
t
a
l
l
a
n
d
m
a
i
n
t
a
i
n
t
h
e
S
e
c
c
u
a
U
r
S
p
r
i
n
g
.
U
s
i
n
g
t
h
e
U
r
S
p
r
i
n
g
i
s
d
e
s
c
r
i
b
e
d
f
i
r
s
t
,
b
e
c
a
u
s
e
t
h
e
e
n
d
u
s
e
r
w
i
l
l
u
s
e
t
h
e
m
a
n
u
a
l
m
o
s
t
o
f
t
ft
f
e
n
f
o
fo
f
r
t
h
i
s
p
u
r
p
o
s
e
.
B
e
f
o
fo
f
r
e
u
s
i
n
g
,
i
n
s
t
a
l
l
i
n
g
o
r
m
a
i
n
t
a
i
n
i
n
g
t
h
e
U
r
S
p
r
i
n
g
:
●
R
e
a
d
,
u
n
d
e
r
s
t
a
n
d
a
n
d
k
n
o
w
a
l
l
t
h
e
s
a
f
e
t
y
i
n
s
t
r
u
c
t
i
o
n
s
i
n
t
h
i
s
m
a
n
u
a
l
.
●
F
o
l
l
o
w
a
l
l
t
h
e
s
a
f
e
t
y
p
r
e
c
a
u
t
i
o
n
s
a
n
d
i
n
s
t
r
u
c
t
i
o
n
s
d
e
s
c
r
i
b
e
d
i
n
t
h
i
s
m
a
n
u
a
l
.
F
a
i
l
u
r
e
t
o
d
o
s
o
c
a
n
r
e
s
u
l
t
i
n
s
e
r
i
o
u
s
i
n
j
u
r
y
o
r
d
e
a
t
h
.
●
K
e
e
p
t
h
i
s
m
a
n
u
a
l
f
o
fo
f
r
f
u
t
u
r
e
r
e
f
e
r
e
n
c
e
a
n
d
p
a
s
s
t
h
e
m
o
n
t
o
s
u
b
s
e
q
u
e
n
t
u
s
e
r
s
o
f
t
h
e
p
r
o
d
u
c
t
.
I
n
a
d
d
i
t
i
o
n
t
o
t
h
i
s
m
a
n
u
a
l
,
v
i
d
e
o
’
s
w
i
t
h
i
n
s
t
a
l
l
a
t
i
o
n
a
n
d
o
p
e
r
a
t
i
o
n
i
n
s
t
r
u
c
t
i
o
n
s
c
a
n
b
e
f
o
fo
f
u
n
d
o
n
https://www.youtube.com/user/WaterWonderfulLife/featured
For further support and the latest version of the documentation
please visit our website http://www.seccua.com.
Page 7/50

1.5 Warranty
All Seccua GmbH products are subject to strict quality inspections. If, however, you have a
complaint, please report it to Seccua GmbH, in accordance with the general warranty
conditions. These can be found at https://www.seccua.com/warranty.
NOTICE By putting the UrSpring into operation, you automatically agree to the warranty
conditions of Seccua GmbH. If you do not agree with the warranty conditions, do not operate
the UrSpring and return it to your dealer.
For a claim of the manufacturing warranty, a prior warranty registration is required via
https://www.seccua.com/registration
Page 8/50
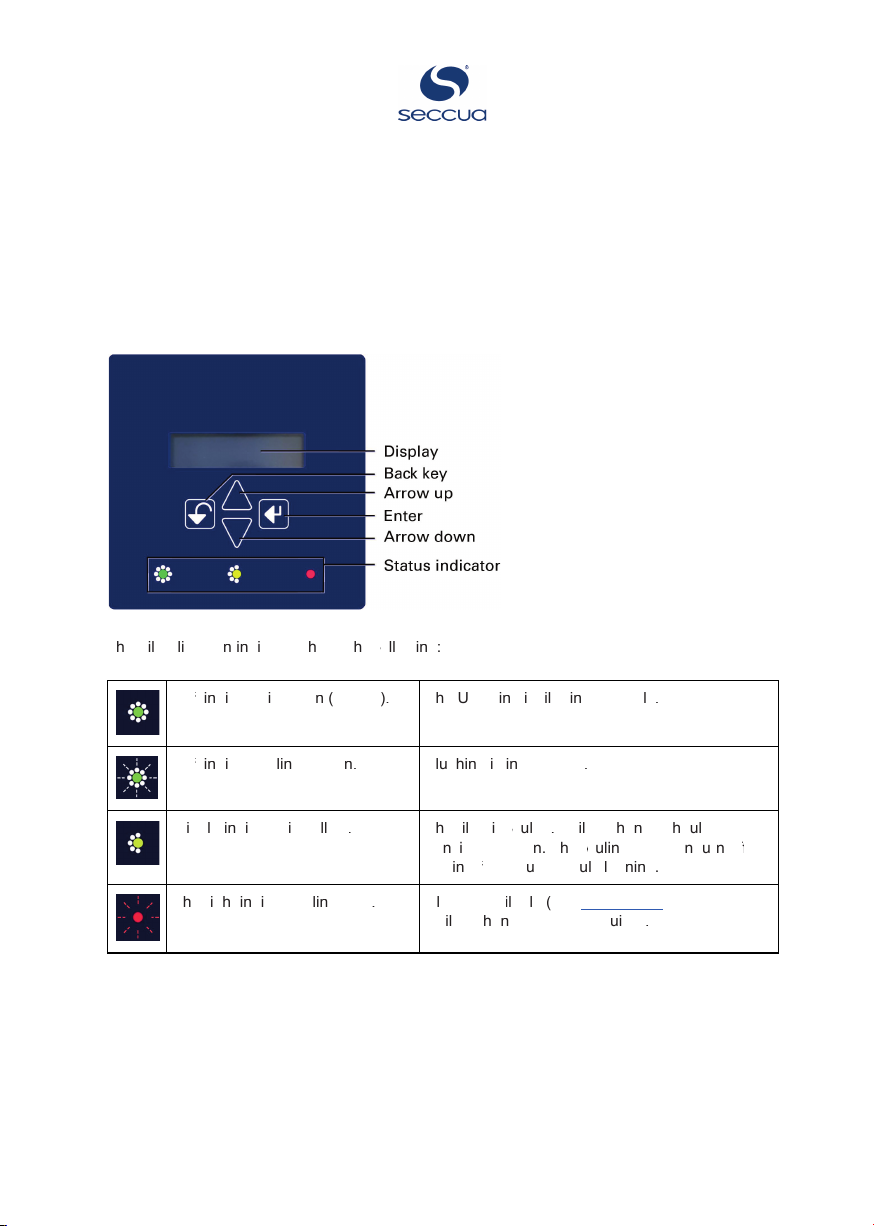
2. Using the UrSpring
2.1 User interface
The UrSpring user interface on the control unit is shown in the image below.
T
h
e
F
i
l
t
e
r
l
i
f
e
s
p
a
n
i
n
d
i
c
a
t
o
r
s
h
o
w
s
t
h
e
f
o
fo
f
l
l
o
w
i
n
g
:
L
e
f
t
ft
f
i
n
d
i
c
a
t
o
r
i
s
g
r
e
e
n
(
s
t
e
a
d
y
)
.
T
h
e
U
r
S
p
r
i
n
g
i
s
f
i
l
t
e
r
i
n
g
c
o
r
r
e
c
t
l
y
.
L
e
f
t
ft
f
i
n
d
i
c
a
t
o
r
b
l
i
n
k
s
g
r
e
e
n
.
F
l
u
s
h
i
n
g
i
s
i
n
p
r
o
g
r
e
s
s
.
M
i
d
d
l
e
i
n
d
i
c
a
t
o
r
i
s
y
e
l
l
o
w
.
T
h
e
f
i
l
t
e
r
i
s
f
o
fo
f
u
l
e
d
.
A
f
i
l
t
e
r
c
h
a
n
g
e
s
h
o
u
l
d
b
e
c
o
n
s
i
d
e
r
e
d
s
o
o
n
.
T
h
e
f
o
fo
f
u
l
i
n
g
L
E
D
c
a
n
t
u
r
n
o
f
f
ff
f
a
g
a
i
n
a
f
t
ft
f
e
r
a
s
u
c
c
e
s
s
f
u
l
c
l
e
a
n
i
n
g
.
T
h
e
r
i
g
h
t
i
n
d
i
c
a
t
o
r
b
l
i
n
k
s
r
e
d
.
A
l
a
r
m
s
a
v
a
i
l
a
b
l
e
(
s
e
e
Error codes).
A
f
i
l
t
e
r
c
h
a
n
g
e
m
a
y
b
e
r
e
q
u
i
r
e
d
.
P
a
g
e
9
/
5
0

2.2 Using the menu
To go to a menu item use the and buttons on the controller. Select the menu item with
t
h
e
b
u
t
t
o
n
.
2.3 Viewing controller measurements
2.3.1 Flow
This indicates the flow of water through the filter in l/min (gpm).
2.3.2 Pressure drop (p-drop)
This shows the current pressure difference between the feed water and filtered water in bar
(psi).
NOTICE The maximum pressure difference may not exceed 2.5 bar (36.26 psi).
A filter should reduce the pressure as little as possible. Therefore a high pressure difference is
an indication that the filter is fouled and should be flushed (see Flushing the filter module). If
flushing does not reduce the pressure difference sufficiently, the filter should be changed (see
Place a new filter).
2.3.3 Filter state
Shows the filter state as a percent compared to a new filter.
D
i
s
p
l
a
y
s
h
o
w
s
D
e
s
c
r
i
p
t
i
o
n
#
#
#
#
#
#
#
#
#
#
#
#
1
0
0
%
o
f
i
n
i
t
i
a
l
p
e
r
f
rf
r
o
fo
f
r
m
a
n
c
e
l
i
k
e
a
n
e
w
f
i
l
t
e
r
.
#
#
#
#
#
#
#
#
#
7
5
%
o
f
i
n
i
t
i
a
l
p
e
r
f
rf
r
o
fo
f
r
m
a
n
c
e
o
r
m
o
r
e
t
h
a
n
9
m
o
n
t
h
a
f
t
ft
f
e
r
f
i
l
t
e
r
i
n
s
t
a
l
l
a
t
i
o
n
.
#
#
#
#
#
#
5
0
%
o
f
i
n
i
t
i
a
l
p
e
r
f
rf
r
o
fo
f
r
m
a
n
c
e
o
r
m
o
r
e
t
h
a
n
1
8
m
o
n
t
h
a
f
t
ft
f
e
r
f
i
l
t
e
r
i
n
s
t
a
l
l
a
t
i
o
n
.
#
#
#
2
5
%
o
f
i
n
i
t
i
a
l
p
e
r
f
rf
r
o
fo
f
r
m
a
n
c
e
o
r
m
o
r
e
t
h
a
n
2
7
m
o
n
t
h
a
f
t
ft
f
e
r
f
i
l
t
e
r
i
n
s
t
a
l
l
a
t
i
o
n
.
N
O
T
I
TI
T
C
E
T
h
e
f
i
l
t
e
r
s
t
a
t
e
i
s
c
a
l
c
u
l
a
t
e
d
a
f
t
ft
f
e
r
t
h
e
f
i
r
s
t
c
l
e
a
n
i
n
g
c
y
c
l
e
h
a
s
b
e
e
n
c
o
m
p
l
e
t
e
d
.
N
o
t
e
t
h
a
t
t
h
e
f
i
l
t
e
r
n
e
e
d
s
t
o
b
e
e
x
c
h
a
n
g
e
d
a
t
l
e
a
s
t
e
v
e
r
y
3
y
e
a
r
s
.
P
a
g
e
1
0
/
5
0

2.3.4 Filter life left
Shows the estimated percentage of the filter-life left, before the filter needs to be replaced.
2.3.5 Current pressure difference
NOTICE This function is not available with UrSpring Home devices.
This shows the current pressure difference between the feed water and filtered water.
To show the pressure difference:
1. Select the menu Operating Data? > Filter State.
2. Use and to display Diff. Pressure and select it with .
T
h
e
d
i
s
p
l
a
y
s
h
o
w
s
t
h
e
p
r
e
s
s
u
r
e
d
i
f
f
ff
f
e
r
e
n
c
e
.
NOTICE The maximum pressure difference may not exceed 2.5 bar (36.26 psi).
A filter should reduce the pressure as little as possible. Therefore a high pressure difference is
an indication that the filter is fouled (or the current water consumption exceeds the UrSpring
capacity) and should be flushed (see Flushing the filter module). If flushing does not reduce the
pressure difference sufficiently, the filter should be changed (see Place a new filter).
2.4 Configuring the controller
The controller can be configured in the settings menu.
To select a menu item use the and buttons on the controller. Select the menu item with
t
h
e
b
u
t
t
o
n
.
R
e
c
o
m
m
e
n
d
e
d
s
e
t
t
i
n
g
s
T
y
p
e
o
f
w
a
t
e
r
R
e
c
o
m
m
e
n
d
e
d
s
e
t
t
i
n
g
s
C
i
t
y
w
a
t
e
r
●
S
e
t
a
u
t
o
m
a
t
i
c
d
a
i
l
y
c
l
e
a
n
i
n
g
.
S
e
e
Daily flush.
●
S
e
t
t
h
e
f
l
u
s
h
l
e
n
g
t
h
t
o
5
s
e
c
.
S
e
e
2.4.7 Set the flush length.
●
S
e
l
e
c
t
t
o
d
e
l
a
y
f
l
u
s
h
i
n
g
d
u
r
i
n
g
w
a
t
e
r
u
s
a
g
e
.
S
e
e
2.4.8 Select
to stop flush during water use.
W
e
l
l
w
a
t
e
r
o
r
C
i
t
y
W
a
t
e
r
,
w
h
i
c
h
m
i
g
h
t
s
h
o
w
b
r
o
w
n
w
a
t
e
r
f
r
o
m
t
i
m
e
t
o
t
i
m
e
.
●
S
e
t
a
u
t
o
m
a
t
i
c
d
a
i
l
y
c
l
e
a
n
i
n
g
.
S
e
e
Daily flush.
●
S
e
l
e
c
t
a
u
t
o
m
a
t
i
c
f
l
u
s
h
i
n
g
w
h
e
n
t
h
e
f
i
l
t
e
r
i
s
f
o
fo
f
u
l
e
d
.
S
e
e
Automatic flush when fouled.
●
S
e
t
t
h
e
f
l
u
s
h
l
e
n
g
t
h
t
o
1
0
s
e
c
.
S
e
e
2.4.7 Set the flush length.
●
S
e
l
e
c
t
t
o
d
e
l
a
y
f
l
u
s
h
i
n
g
d
u
r
i
n
g
w
a
t
e
r
u
s
a
g
e
.
S
e
e
2.4.8 Select
to stop flush during water use.
P
a
g
e
1
1
/
5
0

H
o
t
w
a
t
e
r
●
S
e
t
a
u
t
o
m
a
t
i
c
d
a
i
l
y
c
l
e
a
n
i
n
g
.
S
e
e
Daily flush.
●
S
e
l
e
c
t
a
u
t
o
m
a
t
i
c
f
l
u
s
h
i
n
g
w
h
e
n
t
h
e
f
i
l
t
e
r
i
s
f
o
fo
f
u
l
e
d
.
S
e
e
Automatic flush when fouled.
●
S
e
t
t
h
e
f
l
u
s
h
l
e
n
g
t
h
t
o
5
s
e
c
.
S
e
e
2.4.7 Set the flush length
.
2.4.1 Enter the serial key (SK)
NOTICE The SK code is different for each type of filter. Always make sure to enter the right SK
code of the individual filter in the control unit.
To enter the SK:
1. Find the sticker on the filter or filter packaging box.
2
.
S
e
l
e
c
t
t
h
e
m
e
n
u
C
h
a
n
g
e
s
e
t
t
i
n
g
s
?
>
S
e
r
i
a
l
k
e
y
.
T
h
e
d
i
s
p
l
a
y
s
h
o
w
s
:
SN:0------
3. Use and to change the numbers and confirm each number with .
R
e
p
e
a
t
t
h
i
s
u
n
t
i
l
t
h
e
c
o
m
p
l
e
t
e
s
e
r
i
a
l
k
e
y
i
s
e
n
t
e
r
e
d
.
2.4.2 Select the the English language for the controller menu
1. Select the menu Change settings? > Language (or Sprache).
2. Use and to select the English language and confirm with .
2.4.3 Select metric or US units
1. Select the menu Change settings? > Units.
2. Use and to select Metric or US units and confirm with .
P
a
g
e
1
2
/
5
0

2.4.4 Select the time format
1. Select the menu Change settings? > Time format.
2. Use and to select am/pm or 24h time format and confirm with .
2.4.5 Set the correct time
NOTICE Setting the time is important to make sure the flushing (Flushing the filter module)
happens at the prefered time.
1. Select the menu Change settings? > Set Time.
The display shows: Set hour.
2. Use and to select the correct current hour and confirm with .
T
h
e
d
i
s
p
l
a
y
s
h
o
w
s
Set min.
3. Use and to select the correct current minutes and confirm with .
2.4.6 Set the water temperature
The water temperature setting is not available in the UrSpring Home..
NOTICE The water temperature influences the lifetime of the filter. The controller uses this
setting to predict a precise lifetime.
1. Select the menu Change Settings? > Water Temp.
2. Use and to set the correct temperature and confirm with.
2.4.7 Set the flush length
The recommended flush lengths are:
● For city water 5 seconds (maximum 10 seconds)
● For well water 10 seconds (maximum 20 seconds)
● For hot water 5 seconds (maximum 10 seconds)
Note that if the cleaning has to be improved, it is not useful to increase the flush length to longer
than the maximum mentioned above. In that case it is better to flush more than once a day (see
Automatic flush when fouled).
.
The prefered length can be entered as follows:
1. Select the menu > “Chg. Flush mode?” > “Flush length”.
2. The display shows: x Seconds.
3. Use and to set the prefered duration and confirm with .
P
a
g
e
1
3
/
5
0
2.4.8 Select to delay flush during water use
If you want that an upcoming flush cycle is delayed when there is water usage, you can select
this funcion.
CAUTION! Only activate this option when the filtered water is directly connected to the piping
device of a home. When there is always flow, this function could then suppress flushing
permanently. Therefore, do not activate this function when:
● the filtered water outlet is connected to a storage tank.
● the UrSpring is used in a hot water circulation device.
To stop flush during water use:
1. Go to menu Chg. Flush mode? > Flush when Flow.
2. The display shows: Set:
3. Use and to set option to Set: NO and confirm with .
2.4.9 Flushing the filter module
The filter module gets fouled during use. Flushing will clean the filter.
NOTICE : To set the flush duration see Set the flush length.
Daily flush
Daily cleaning can be selected as a standalone option or additional to automatic cleaning when
the filter is fouled:
● For city water and hot water it is recommended to select daily flush as a standalone
option.
● For well water it is recommended to combine daily flush with automatic flush when
fouled.
To select a daily flush:
1. Select the menu Chg. Flush mode? > Flush daily at.
The display shows: Set hour.
The recommended time of day when flush is done is 00:30 (because in the night
typically no water usage is expected).
2. Use and to select the correct current hour and confirm with .
T
h
e
d
i
s
p
l
a
y
s
h
o
w
s
Set min.
3. Use and to select the correct current minutes and confirm with .
4
.
G
o
t
o
m
e
n
u
C
h
g
.
F
l
u
s
h
m
o
d
e
?
>
D
a
i
l
y
=
O
F
F
o
r
D
a
i
l
y
=
O
N
.
I
f
t
h
e
d
i
s
p
l
a
y
s
h
o
w
s
Daily = ON, the controller is ready to flush daily.
5. If the display shows Daily = OFF, push .
6
.
U
s
e
o
r
t
o
s
e
l
e
c
t
Daily: ON and confirm with ` .
P
a
g
e
1
4
/
5
0
Automatic flush when fouled
NOTICE The UrSpring device can be set to perform an automatic cleaning of the filter,
depending on its fouling. The UrSpring monitors the state of fouling of the filter using the
pressure difference between feed water and filtered water, the flow during filtration and the
temperature of the filtered water.
The automatic cleaning mode is generally recommended. It definitely should be used whenever
the water contains particles from time to time, which can also occur in city water applications.
1. Select the menu Chg. Flush mode? > Flush if fouled.
2. The display shows the threshold: when Flow < .. %.
3. Use and to change the threshold percentage and confirm with .
W
h
e
n
t
h
e
t
h
r
e
s
h
o
l
d
i
s
r
e
a
c
h
e
d
t
h
e
U
r
S
p
r
i
n
g
w
i
l
l
s
t
a
r
t
a
c
l
e
a
n
i
n
g
c
y
c
l
e
.
I
t
i
s
r
e
c
o
m
m
e
n
d
e
d
t
o
n
o
t
a
l
l
o
w
t
h
e
f
i
l
t
e
r
f
l
o
w
t
o
b
e
l
o
w
6
0
%
o
f
f
a
c
t
o
r
y
-
n
e
w
p
e
r
f
rf
r
o
fo
f
r
m
a
n
c
e
.
T
h
e
d
i
s
p
l
a
y
s
h
o
w
s
Set hours.
Continue to enter the minimum time that the UrSpring will continue normal operation
between two automatic flushes.
1. Use and to select the minimum hours between flushes and confirm with .
T
h
e
d
i
s
p
l
a
y
s
h
o
w
s
Set min.
2. Use and to select the minutes and confirm with .
N
o
t
e
t
h
a
t
w
h
e
n
t
h
e
c
l
e
a
n
i
n
g
o
f
t
h
e
f
i
l
t
e
r
n
e
e
d
s
t
o
b
e
i
m
p
r
o
v
e
d
,
s
e
l
e
c
t
s
e
t
t
i
n
g
s
t
o
f
l
u
s
h
m
o
r
e
o
f
t
ft
f
e
n
:
s
e
l
e
c
t
f
l
o
w
<
7
0
%
o
r
8
0
%
a
n
d
a
m
i
n
i
m
u
m
t
i
m
e
b
e
t
w
e
e
n
f
l
u
s
h
e
s
o
f
0
0
:
2
0
.
Manual flush
1. Select the menu Manual flush? > Start flushing.
2. Push to start flushing the filter module.
2.5 Reset the UrSpring to factory settings
N
O
T
I
TI
T
C
E
A
l
l
p
e
r
s
o
n
a
l
i
s
e
d
s
e
t
t
i
n
g
s
w
i
l
l
b
e
d
e
l
e
t
e
d
i
f
y
o
u
r
e
s
e
t
t
o
f
a
c
t
o
r
y
s
e
t
t
i
n
g
s
.
1
.
S
e
l
e
c
t
t
h
e
m
e
n
u
C
h
a
n
g
e
S
e
t
t
i
n
g
s
?
>
S
e
t
t
o
D
e
f
a
u
l
t
?
.
2
.
U
s
e
o
r
t
o
s
e
l
e
c
t
YES and confirm with .
2.6 Change a filter module
T
h
e
f
i
l
t
e
r
m
o
d
u
l
e
m
u
s
t
b
e
e
x
c
h
a
n
g
e
d
f
r
o
m
t
i
m
e
t
o
t
i
m
e
,
w
h
e
n
t
h
e
f
i
l
t
e
r
m
o
d
u
l
e
g
e
t
s
f
o
fo
f
u
l
e
d
o
r
t
h
e
l
i
f
e
s
p
a
n
o
f
t
h
e
f
i
l
t
e
r
i
s
o
v
e
r
.
W
e
r
e
c
o
m
m
e
n
d
t
h
a
t
t
h
e
f
i
l
t
e
r
m
o
d
u
l
e
i
s
r
e
m
o
v
e
d
a
n
d
r
e
p
l
a
c
e
d
b
y
a
n
a
u
t
h
o
r
i
z
e
d
s
e
r
v
rv
r
i
c
e
p
a
r
t
n
e
r
e
v
e
r
y
t
w
o
t
o
t
h
r
e
e
y
e
a
r
s
.
P
a
g
e
1
5
/
5
0

2.6.1 Preparation
NOTICE Make sure spilled water can not cause any damage.
1. Close the water in feed and filtered water lines.
2. Depressurize the UrSpring with a manual flush (see Flushing the filter module).
3. Disconnect the power by removing the plug from the mains socket.
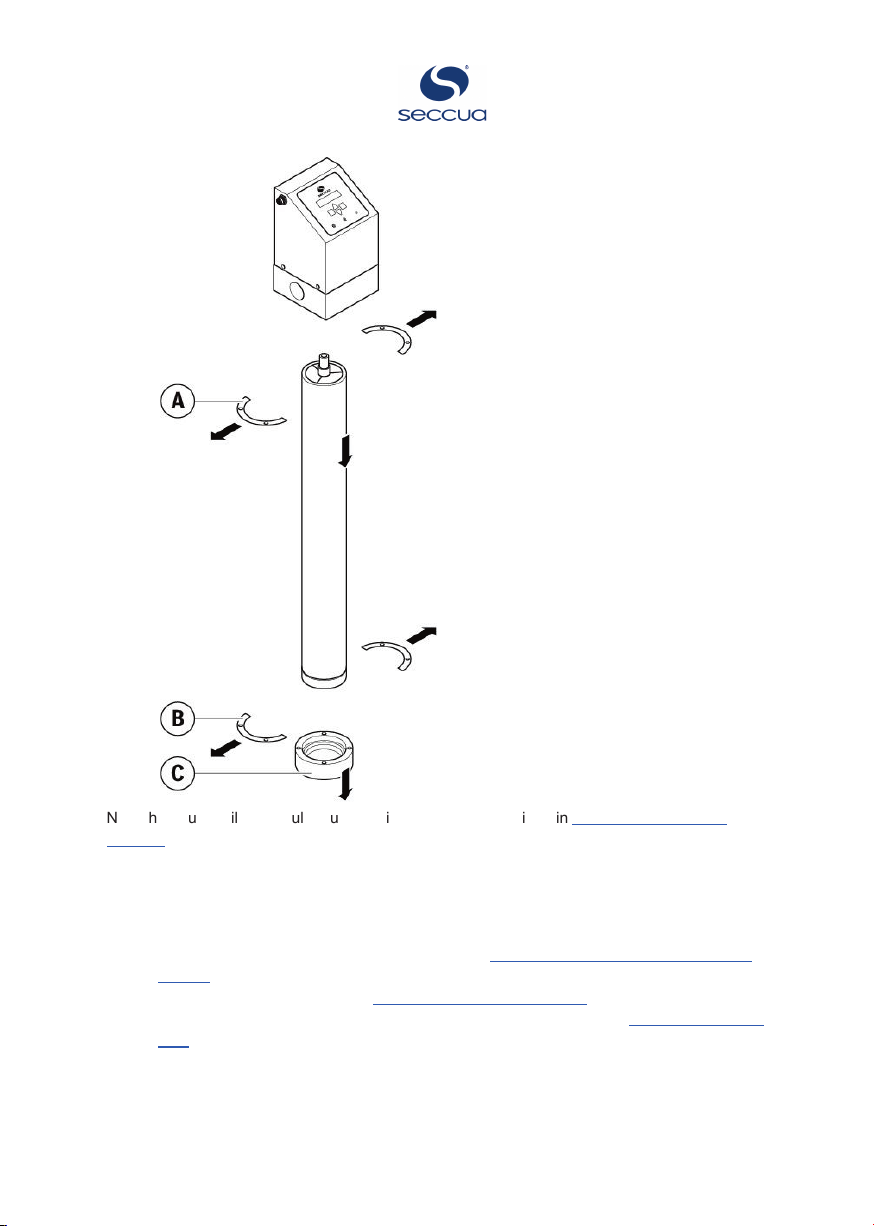
2.6.2 Remove filter module
1. Place a bucket or other water container under the filter module.
2. Remove the bottom clamps Ⓑ from the filter module.
3. Pull the end cap Ⓒ from the filter module. Be careful not to damage the end cap.
4. Let the water flow out of the filter module.
5. Remove the top clamps Ⓐ from the filter module.
6. Pull the filter module out of the control unit.
Page 16/50
N
o
t
e
t
h
a
t
a
u
s
e
d
f
i
l
t
e
r
m
o
d
u
l
e
m
u
s
t
b
e
d
i
s
p
o
s
e
d
o
f
a
s
d
e
s
c
r
i
b
e
d
i
n
Storage, handling and
disposal.
2.6.3 Place a new filter module
To place a new filter module:
1. Prepare the new O-rings and filter module: see STEP 4 Prepare the O-rings and filter
module
2. Place a new filter module: see STEP 5 Place the filter module
3. Enter the serial key of the new filter module in the control unit. (see Enter the serial key
(SK)).
Page 17/50

3. Installing the UrSpring
W
e
r
e
c
o
m
m
e
n
d
t
h
a
t
t
h
e
U
r
S
p
r
i
n
g
i
s
i
n
s
t
a
l
l
e
d
a
n
d
c
o
m
m
i
s
s
i
o
n
e
d
b
y
a
q
u
a
l
i
f
i
e
d
i
n
s
t
a
l
l
e
r
.
3.1 Before you start
3.1.1 Safety for installation
●
A
l
w
a
y
s
f
o
fo
f
l
l
o
w
t
h
e
i
n
s
t
r
u
c
t
i
o
n
s
a
n
d
s
a
f
e
t
y
p
r
e
c
a
u
t
i
o
n
s
i
n
t
h
i
s
m
a
n
u
a
l
.
F
a
i
l
u
r
e
t
o
f
o
fo
f
l
l
o
w
t
h
e
i
n
s
t
r
u
c
t
i
o
n
s
c
a
n
r
e
s
u
l
t
i
n
s
e
r
i
o
u
s
i
n
j
u
r
y
o
r
d
e
a
t
h
.
●
D
o
n
o
t
c
h
a
n
g
e
t
h
e
p
o
w
e
r
c
o
n
n
e
c
t
i
n
g
p
l
u
g
o
r
t
h
e
p
o
w
e
r
s
u
p
p
l
y
c
a
b
l
e
.
●
M
a
k
e
s
u
r
e
t
h
e
p
o
w
e
r
s
u
p
p
l
y
c
a
b
l
e
i
s
n
e
v
e
r
i
n
w
a
t
e
r
.
●
U
n
p
l
u
g
t
h
e
U
r
S
p
r
i
n
g
b
e
f
o
fo
f
r
e
i
n
s
t
a
l
l
a
t
i
o
n
o
r
m
a
i
n
t
e
n
a
n
c
e
.
●
D
o
n
o
t
m
o
d
i
f
y
fy
f
o
r
o
p
e
n
t
h
e
p
r
o
d
u
c
t
.
3.1.2 Check the requirements
Before you install the UrSpring make sure that:
● The UrSpring capacity is typical for a 4-6 people household.
● The water feed pressure is at least 2.5 bar (36 psi).
● The water pressure in the piping is less than 5 bar (72 psi).
If the water pressure in the feed line can exceed 5 bar, a pressure
reducing valve must be installed.
●
W
h
e
n
u
s
i
n
g
t
h
e
J
o
h
n
G
u
e
s
t
q
u
i
c
k
c
o
u
p
l
i
n
g
s
i
n
c
o
m
b
i
n
a
t
i
o
n
w
i
t
h
s
t
a
i
n
l
e
s
s
s
t
e
e
l
p
i
p
e
s
,
t
h
e
p
i
p
e
s
m
u
s
t
h
a
v
e
a
g
r
o
o
v
e
(
s
e
e
s
e
p
a
r
a
t
e
J
o
h
n
Q
u
e
s
t
d
a
t
a
s
h
e
e
t
)
.
●
A
v
o
i
d
w
a
t
e
r
h
a
m
m
e
r
o
r
p
r
e
s
s
u
r
e
s
h
o
c
k
s
b
y
e
.
g
.
e
x
t
e
r
n
a
l
v
a
l
v
e
s
o
r
p
u
m
p
s
i
n
t
h
e
f
e
e
d
o
r
f
i
l
t
e
r
e
d
w
a
t
e
r
l
i
n
e
.
T
h
i
s
c
o
u
l
d
d
a
m
a
g
e
t
h
e
U
r
s
p
r
i
n
g
.
I
f
n
e
c
e
s
s
a
r
y
,
i
n
s
t
a
l
l
a
b
l
a
d
d
e
r
t
a
n
k
b
e
t
w
e
e
n
t
h
e
U
r
S
p
r
i
n
g
,
w
h
i
c
h
c
a
n
c
a
u
s
e
t
h
e
w
a
t
e
r
h
a
m
m
e
r
a
n
d
t
h
e
U
r
S
p
r
i
n
g
.
●
A
b
r
a
s
i
v
e
p
a
r
t
i
c
l
e
s
i
n
t
h
e
f
e
e
d
w
a
t
e
r
,
s
u
c
h
a
s
m
e
t
a
l
o
r
p
l
a
s
t
i
c
d
e
b
r
i
s
,
g
r
a
v
e
l
o
r
s
i
m
i
l
a
r
c
a
n
d
a
m
a
g
e
t
h
e
U
r
S
p
r
i
n
g
f
i
l
t
e
r
.
T
h
e
r
e
f
o
fo
f
r
e
,
a
s
t
r
a
i
n
e
r
w
i
t
h
a
m
a
x
i
m
u
m
m
e
s
h
s
i
z
e
o
f
3
0
0
µ
m
n
e
e
d
s
t
o
b
e
p
l
a
c
e
d
u
p
s
t
r
e
a
m
,
t
o
p
r
o
t
e
c
t
t
h
e
f
i
l
t
e
r
o
f
t
h
e
U
r
S
p
r
i
n
g
.
P
a
g
e
1
8
/
5
0

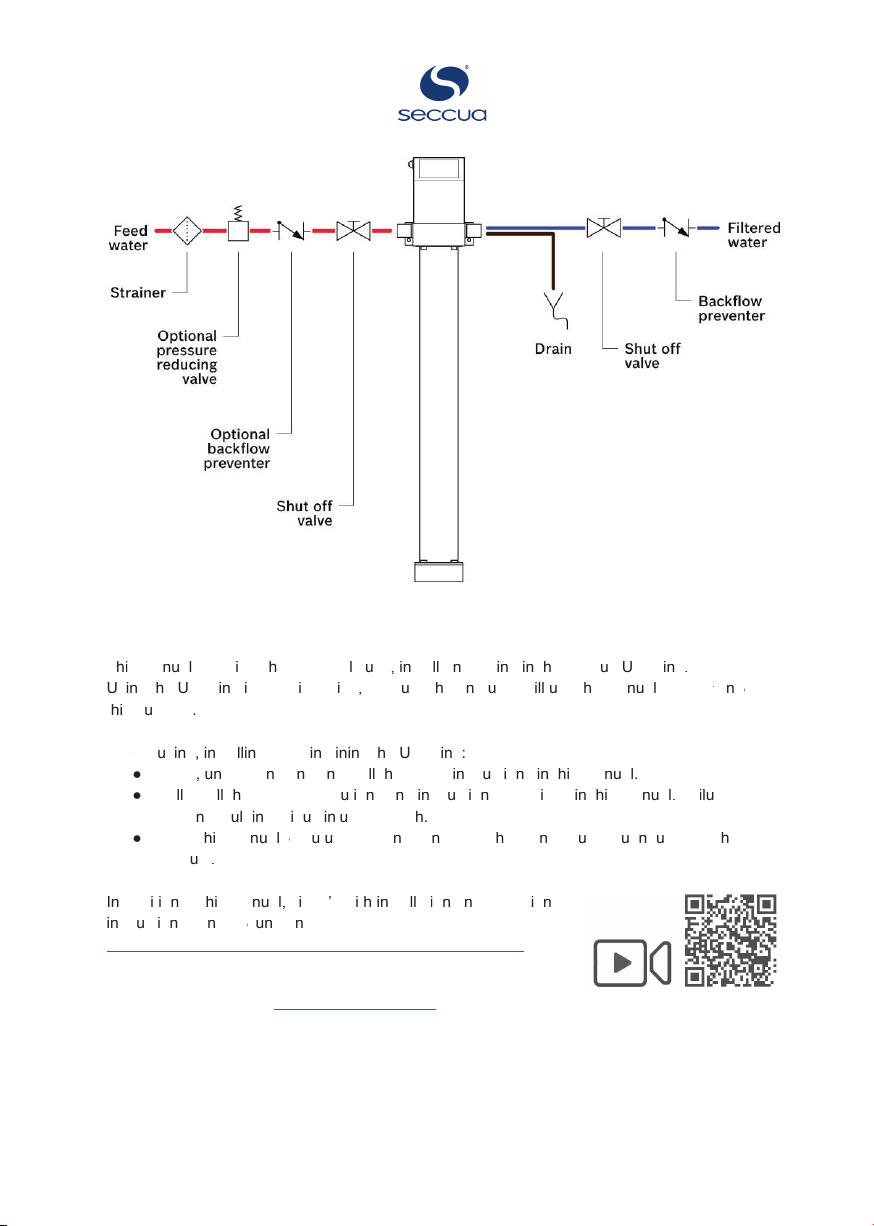
3.1.3 Additional components to be included in the water lines
In the feed water line:
● To protect the filter against abrasive particles, which may occur in your
feed-water, such as metal- or plastic-debris or gravel, a strainer with a
maximum mesh size of 300µm needs to be installed. For well water
applications, a flushable prefilter between 100 to 300 µm is highly
recommended.
● A pressure reducing valve must be installed if the pressure may reach
values higher than 5 bar (72 psi). Caution, pressure of the public supply
network can increase during the night!
● A shut off valve needs to be located upstream the UrSpring for installation
and exchange of filter cartridges.
● If connected to a public water supply, a backflow preventer needs to be
installed to prevent suction of water from your piping network into the
community main water lines, in case of unexpected drop of pressure in the
water mains.
In the filtered water line:
● A backflow preventer must be installed.
● A shut off valve needs to be located downstream the UrSpring for
installation and exchange of filter cartridges.
● If there is no outlet in the filtrate line close by, to dispose the rinse water of
the filter, an outlet should be installed.
3.1.4 Requirements for installation
Tools and materials
The following tools and materials (not included) are required for installing the UrSpring:
● Drill, screws, wall plugs, four mounting screws
● Screwdrivers
●Saw or pipe-cutter (depending on your piping-device)
● Pipe wrench
● Measuring tape
● Bucket
●
D
o
n
o
t
u
s
e
o
r
g
a
n
i
c
o
r
f
a
t
t
y
s
e
a
l
a
n
t
s
(
g
r
e
a
s
e
s
)
a
t
t
h
e
w
a
t
e
r
c
o
n
n
e
c
t
i
o
n
s
.
G
r
e
a
s
e
s
c
a
n
m
i
g
r
a
t
e
i
n
t
o
t
h
e
w
a
t
e
r
a
n
d
d
a
m
a
g
e
t
h
e
m
e
m
b
r
a
n
e
w
i
t
h
a
l
a
y
e
r
o
f
g
r
e
a
s
e
.
P
a
g
e
1
9
/
5
0

● Do not use hemp and grease at the water connections to prevent germ
growth.
● Do not use flexible hoses made from rubber. Rubber hoses offer ideal
growing conditions for bacteria.
●Do NOT use fittings with tapered threads (standard US NPT) to screw
into the UrSpring.
Requirements for mounting the UrSpring:
● Make sure you have a space of 1 x 1.5 meter (wxh) (3.5ft x 5 ft) available
for mounting the UrSpring.
● Make sure that the wall intended for mounting is suitable to carry the weight
of the UrSpring when filled with water (see Specifications).
● Make sure there is sufficient space on the front side of the UrSpring to
allow easy operation of the control unit and allow service and maintenance.
● Make sure that there is 20 cm (8") of space available below the UrSpring to
allow filter replacement.
Requirements for electrical power:
● The power socket must be grounded.
● Distance between socket and the UrSpring must be less than 1.5 m.
● The power supply cable and socket must correspond to the requirements
of the UrSpring (see Specifications).
● Make sure that all electrical connections are compliant with local ordinance
and directives.
● Do not use extension cables.
Requirements for water pipes:
● When using the John Guest quick couplings, all water pipes must have an
outer diameter of 22 mm.
● Water pipes are made of copper, stainless steel or plastic.
When using the John Guest quick couplings in combination with stainless
steel pipes, the pipes must have a groove (see separate John Quest
datasheet).
● Make sure a drain is available. Drain capacity larger than 30 liter/minute (8
gpm).
● Make sure that an outlet such as a sink or drain is available in the filtered
water line. This is required to flush the UrSpring during commissioning.
Page 20/50
Table of contents
Popular Water Filtration System manuals by other brands

Kinetico
Kinetico ERGO RO BLUE Instructions for use

ATB
ATB AQUAMAX PRO G operating instructions

Clean Water Systems
Clean Water Systems Fleck 9100 Installation & start?up guide

EM-Technik
EM-Technik 7F800 Operation and assembly instructions

Culligan
Culligan 9" Installation, operation and service instructions

Grohe
Grohe Blue Bio-Clean 40 434 manual

Premier
Premier 500320 UV-3 Installation, operation and maintenance manual

Vulcan-Hart
Vulcan-Hart ScaleBlocker SPS600V Specifications

Kenmore
Kenmore SINGLE-UNDERSINK-FILTER manual

OVIO
OVIO OHC-7000D user manual

Clean Water Systems
Clean Water Systems 7500 Series Installation & start?up guide

Lakos
Lakos JPX quick start guide


