Seiki SE55UY01UK User manual

1
CONTENTS
Important Safety Instructions 2
Safety Information 3
Preparation 4
What is Included 4
Front View 5
Rear View 6
Installing the Base Stand 7
Removing the Stand for Wall-Mounting 7
Remote Control 8
Connecting External Devices 9
General Operation 10
Initial Setup 10
Selecting the Input Source 12
Channel Selection 12
Display Channel Information 12
Volume Adjustment 12
Customizing TV Settings 13
Channel Settings 13
Picture Settings 19
Sound Settings 20
Time Settings 21
Lock Settings 22
Setup Settings 23
Using the Features 24
EPG (Electronic Programme Guide) (DTV Mode) 24
Teletext (ATV Mode) 26
Digital Teletext (DTV Mode) 27
PVR (Personal Video Recorder) 28
Time Shift Function (DTV Mode) 28
Recording DTV Programme onto a USB Storage Device 29
Timer Programming 30
Entertainment 31
Connecting a USB Storage Device 31
Viewing Photos 31
Listening to Music 33
Viewing Movies 34
My Text 36
Digital Reception 37
Supported File Formats 37
Troubleshooting 38
Maintenance 39
Plug Replacement-UK and Ireland only 39
Specication 40
Dispose Information 40

2
Warning: To prevent the spread of re, keep candles or
other open ames away from this product at all times.
IMPORTANT SAFETY INSTRUCTIONS
• Read these instructions – All the safety and operating instructions should be read before this product is
operated.
• Keep these instructions – The safety and operating instructions should be retained for future reference.
• Heed all warnings – All warnings on the appliance and in the operating instructions should be adhered to.
• Follow all instructions – All operating and use instructions should be followed.
• Do not use this apparatus near water – The appliance should not be used near water or moisture – for
example, in a wet basement or near a swimming pool, and the like.
• Cleanonlywithdrycloth.
• Donotblockanyventilationopenings.Installinaccordancewiththemanufacture’sinstructions.
• Donotinstallnearanyheatsourcessuchasradiators,heatregisters,stoves,orotherapparatus(including
ampliers)thatproduceheat.
• Donotdefeatthesafetypurposeofthepolarizedorgrounding-typeplug.Apolarizedplughastwoblades
with one wider than the other. A grounding-type plug has two blades and a third grounding prong. The wide
bladeorthethirdprongareprovidedforyoursafety.Iftheprovidedplugdoesnottintoyouroutlet,consult
an electrician for replacement of the obsolete outlet.
• Protectthepowercordfrombeingwalkedonorpinchedparticularlyatplugs,conveniencereceptacles,and
the point where they exit from the apparatus.
• Onlyuseattachments/accessoriesspeciedbythemanufacturer.
• Useonlywiththecart,stand,tripod,bracket,ortablespeciedbythemanufacturer,or
soldwiththeapparatus.Whenacartisused,usecautionwhenmovingthecart/apparatus
combination to avoid injury from tip-over.
• Unplugthisapparatusduringlightningstormsorwhenunusedforlongperiodsoftime.
• Referallservicingtoqualifiedservicepersonnel.Servicingisrequiredwhentheapparatushasbeen
damagedinanyway,suchaspower-supplycordorplugisdamaged,liquidhasbeenspilledorobjects
have fallen into the apparatus, the apparatus has been exposed to rain or moisture, does not operate
normally, or has been dropped.
• Pleasekeeptheunitinawell-ventilatedenvironment.
• WARNING: To reduce the risk of fire or electric shock, do not expose this apparatus to rain or
moisture.Theapparatusshallnotbeexposedtodrippingorsplashing.Objectslledwithliquids,
such as vases should not be placed on apparatus.
• WARNING:Thebatteriesshallnotbeexposedtoexcessiveheatsuchassunshine,reorthelike.
• WARNING: The mains plug is used as disconnect device, the disconnect device shall remain readily
operable.
• WARNING: To reduce the risk of electric shock, do not remove cover (or back) as there are no user-
serviceablepartsinside.Referservicingtoqualiedpersonnel.
Thislightningflash witharrowheadsymbolwithinanequilateraltriangleisintendedto
alerttheusertothepresenceofnon-insulated“dangerousvoltage”withintheproduct’s
enclosurethatmaybeofsufcientmagnitudetoconstituteariskofelectricshock.
Theexclamationpointwithinanequilateraltriangleisintendedto alerttheuserto
the presence of important operating and maintenance instructions in the literature
accompanying the appliance.
ThisequipmentisaClassIIordoubleinsulatedelectricalappliance.Ithasbeendesigned
insuchawaythatitdoesnotrequireasafetyconnectiontoelectricalearth.

3
SAFETY INFORMATION
This product contains electrical or electronic materials. The presence of these materials may, if not disposed of
properly, have potential adverse effects on the environment and human health.
Presence of this label on the product means it should not be disposed of as unsorted waste and must be collected
separately. As a consumer, you are responsible for ensuring that this product is disposed of properly.
ThisTVincorporatesHigh-DenitionMultimediaInterface(HDMI™)technology.HDMI,theHDMIlogoand
High-DenitionMultimediaInterfacearetrademarksorregisteredtrademarksofHDMILicensingLLC.
Toensurereliableandsafeoperationofthisequipment,pleasecarefullyreadalltheinstructionsin
this user guide, especially the safety information below.
Electrical Safety
• The TV set should only be connected to a main power supply with voltage that matches the label
at the rear of the product.
• To prevent overload, do not share the same power supply socket with too many other electronic
components.
• Do not place any connecting wires where they may be stepped on or tripped over.
• Do not place heavy items on any connecting wire, which may damage the wire.
• Hold the main plug, not the wires, when removing from a socket.
• During a thunderstorm, or when not using the television for extended period of time, turn off the
power switch on the back of the television.
• DonotallowwaterormoisturetoentertheTVorpoweradapter.DoNOTuseinwet,moistareas,
such as bathrooms, steamy kitchens or near swimming pools.
• Pull the plug out immediately, and seek professional help if the main plug or cable is damaged,
liquidisspilledontotheset,iftheTVsetaccidentallyexposedtowaterormoisture,ifanything
accidentally penetrates the ventilation slots or if the TV set does not work normally.
• Do not remove the safety covers. There are no user-serviceable parts inside. Trying to service the
unityourselfisdangerousandmayinvalidatetheproduct’swarranty.Qualiedpersonnelmust
only service this apparatus.
• To avoid a battery leakage, remove batteries from the remote control, when the remote is not use
for long period, or when the batteries are exhausted.
• Donotbreakopenorthrowexhaustedbatteriesintoare.
Physical Safety
• Do not block ventilation slots in the back cover. You may place the TV in a cabinet, but ensure at
least5cm(2’’)clearanceallaround.
• Do not tap or shake the TV screen, or you may damage the internal circuits. Take good care of the
remote control.
• TocleantheTVuseasoftdrycloth.Donotusesolventsorpetroleumbaseduids.
• Do not install near any heat sources such as radiators, heat registers, stoves or other apparatus
(includingampliers)thatproduceheat.
• Donotdefeatthesafetypurposeofthepolarizedorgrounding-typeplug.Apolarizedplug has
two blades with one wider than the other. A grounding plug has two blades and a third grounding
prong. The wide blade, or the third prong is provided for your safety. If the provided plug does not
tintoyouroutlet,consultanelectricianforreplacementoftheobsoleteoutlet.
• Protect the power cord from being walked on or pinched particularly at plugs.
• Unplug the apparatus during lightning storms or when unused for long periods.
• Referallservicingtoaqualiedservicepersonnel.Servicingisrequirediftheapparatusdoesnot
operate normally or if the apparatus, including the power supply cord or plug, has been damaged
in any way.
• Servicingisalsorequiredifliquidhasbeenspilled,orobjectshavefallenintotheapparatus;when
theapparatushasbeenexposedtorainormoisture;oriftheapparatushasbeendropped.
• Always connect your television to a power outlet with protective ground connection.

4
Remote Control with BatteriesTV Set
PREPARATION
What is Included
User Manual
User Manual
QuickStartGuide
Quick
Start Guide
MINI YPBPR cable MINI AV cable
UHD HDMI Cable
Base Stand Stand Support
SixScrews:MP4×12-HO
SixScrews:TPW4×12A-HO

5
PREPARATION
Front View
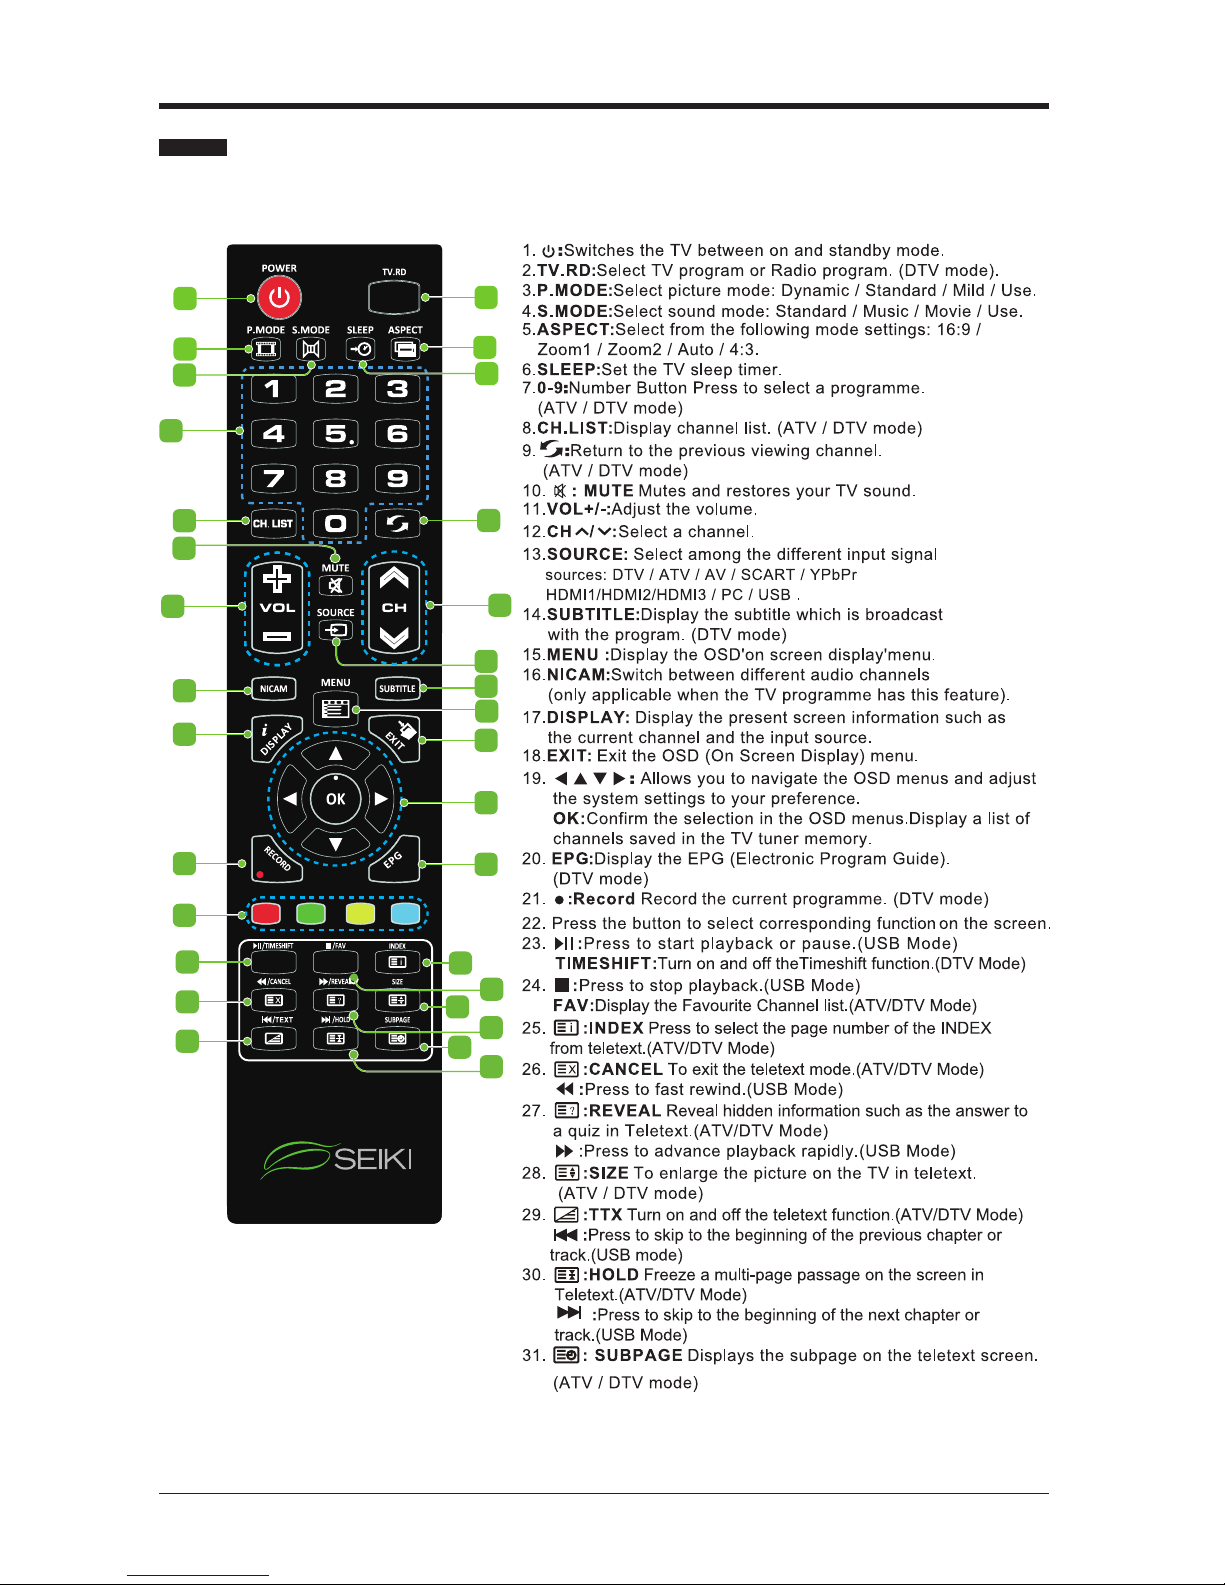
1. POWER
SwitchtheTVbetweenOn/Standbymode.
2. SOURCE
Press to select among different input signal sources.
3. MENU
DisplaytheOSD(onscreendisplay)menu.
4. CH /
Press to select a channel.
5. VOL +/-
Press to adjust the volume.
6. POWER Indicator
Illuminate blue when the TV is turned on. Illuminate red when the TV is in standby mode.
7. IR (Infrared Receiver)
Receive IR signals from the remote control.

6
PREPARATION
Rear View
1. Power Cord
Connect to AC power outlet.
2. Headphone Socket
ConnecttothecompositeVIDEOand
AUDIO(L/R)outputsocketsonexternal
video devices.
3. SCART Socket
Connect to SCART cable between the
SCART socket on the TV and the SCART
socket on the external device (decoder,
or DVD player).
4. PC AUDIO Input
Connect to a computer audio output.
5. VGA Input
Connect to a computer or other devices
with a VGA interface.
6. DTV/TV Input
Connecttotheantenna(75ΩVHF/UHF)
socket with the RF coaxial cable.
7. COAXIAL Digital Audio Output
Connect to the audio socket on the digital
audio system.
8. MINI YPBPR
Connect to AV devices with component
(Y/Pb/Pr)videoandaudiooutputsockets.
COMPONENT&VIDEOsharewithAUDIO
IN(L/R)subscribeto.
9. MINI AV
ConnecttothecompositeVIDEOand
AUDIO(L/R)outputsocketsonexternal
video devices.
10. CI Slot
Used to insert a CI card. A CI card allows
you to view all the channels that you
subscribe to.
11. HDMI Inputs
ConnecttoaHigh-Denition(HD)signal
output device.
12. USB Port
Connect to a USB storage device to play
compatible video,audio ,photo and text
les.(USBmode).
SCART VGAPC AUDIO DTV/TV COAXIAL
MINI
YPBPR
2 3 4567 8
HDMI HDMI HDMI
USB
MINI
AV
910 11 12

7
PREPARATION
Installing the Base Stand
WARNING: This apparatus is intended to be supported by UL Listed wall mount bracket.
Removing the Stand for Wall-Mounting
• 1.Lay the TV face-down on a flat,
cushioned surface to avoid damaging
or scratching.
• 2.Fix the stand support to the TV using
the 6 pcs provided screws(MP4x12-
HO).
• 3.Fix the base stand to the TV
using the 6 pcs provided screws
(TPW4x12A-HO).
• 1. Lay the TV face-down on a flat,
cushioned surface to avoid damaging
or scratching.
• 2. Untighten the 6 pcs screws holding
the stand assembly and remove them.
• 3. Attach the wall-mount bracket to
the TV using the mounting holes on
the back of the TV. Mount this TV
according to the instructions included
in the wall-mount bracket.
1
2
8
PREPARATION
Remote Control
3
2
5
1
17
16
8
18
20
14
15
9
21
22
23
26
29
10
25
24
28
27
31
30
13
7
46
11 12
19

9
CONNECTING EXTERNAL DEVICES
SCART VGAPC AUDIO DTV/TV COAXIAL
MINI
YPBPR
HDMI HDMI HDMI
USB
MINI
AV
OR
Game Console
Blu-rayPlayer/Recorder
Satellite
Antenna Cable
Video Camera
VCR Satellite Receiver
SCART Cable
(not included)
YPBPR Cable
(not included)
MINI YPBPR Cable
(included)
RF Cable
(not included)
MINI AV Cable
(included)
CI module
AV Cable
(not included)
Headphones
Audio Cable
(not included)
HDMI Cable
(included)
Computer Audio System HDMI Device
COAXIALCable
(not included)
VGA Cable
(not included)
3.5mm Audio Cable
(not included)

10
CUSTOMIZING TV SETTINGS
Initial Setup
• Connect one end of the RF coaxial cable (not included) to the aerial socket on
the wall and the other end of the cable to the RF (75) socket at the rear right
bottom view of your TV.
• Connect the mains cable to the mains socket after you have completed all the
connections.
• In standby mode, press the button at the bottom right of TV or the button
on the remote control to turn the TV on. The red LED indicator will turn blue.
• ThersttimeyouturnyourTVonitwillgostraighttotheWELCOMEscreen.
PleaseconnecttheaerialandthenpresstheOKbuttonorpressEXITtogoto
the No Signal screen.
• ThersttimeyouturntheTVon,pressthe buttons to select your desired
mode setting.
• Press the buttons to navigate the menu and change the settings.
General Operation

11
GeneralOperation
OSD
Language
Selects your desired language to be displayed on the
menu. The default on-screen menu language is set as
English.
Country Selects the country where you will operate the TV. The
defaultcountryissetasUK.
Mode Setting Selectstheenergymode:HomeMode/StoreMode.
Tuning Setup SelectstheTuningtype:ATV+DTV/DTV/ATV.
OK
Press the OK button to start auto tuning. Channel
Tuning will commence. This operation may take up to
several minutes. The display will show the progress of
the tuning and the number of channels found.

12
• Press the DISPLAY button to view the current information.
Selecting Input Source
Channel Selection
GeneralOperation
• Press the SOURCE button at the bottom right of the
TV or the SOURCE button on the remote control to
display the Input Source list.
• Press the buttons to select the input source that
youwant:DTV/ATV/AV/SCART/YPbPr/HDMI1/
HDMI2/HDMI3/PC/USB.
• Press the OKbuttontoconrmyourselection.
• Press the CH / buttons on the remote control repeatedly or the 0-9 buttons to
select the channel.
Alternative:
Press the CH.LIST button to enter the Channel List. Then use the buttons
to highlight and select the channel. Press the OK button to view the selected
channel.
Display Channel Information
• Press the VOL + / - buttons at the bottom right of the TV or on the remote control
to adjust the volume.
• If you wish to switch the sound off, press the button. Press the button again
or the VOL + buttons to resume audio listening.
Volume Adjustment
Move Select Exit
Input Source
DTV
ATV
AV
SCART
YPbPr
HDMI 1
HDMI 2
HDMI 3
PC
USB
O K EXIT
13
Channel Settings
• Press the buttons to select Auto Tuning and then press the OK button.
• In the Tune Type menu. Press the buttons to select the country where
youwilloperatetheTVandtheTuneType:ATV+DTV/DTV/ATV.PresstheOK
button to start auto tuning.
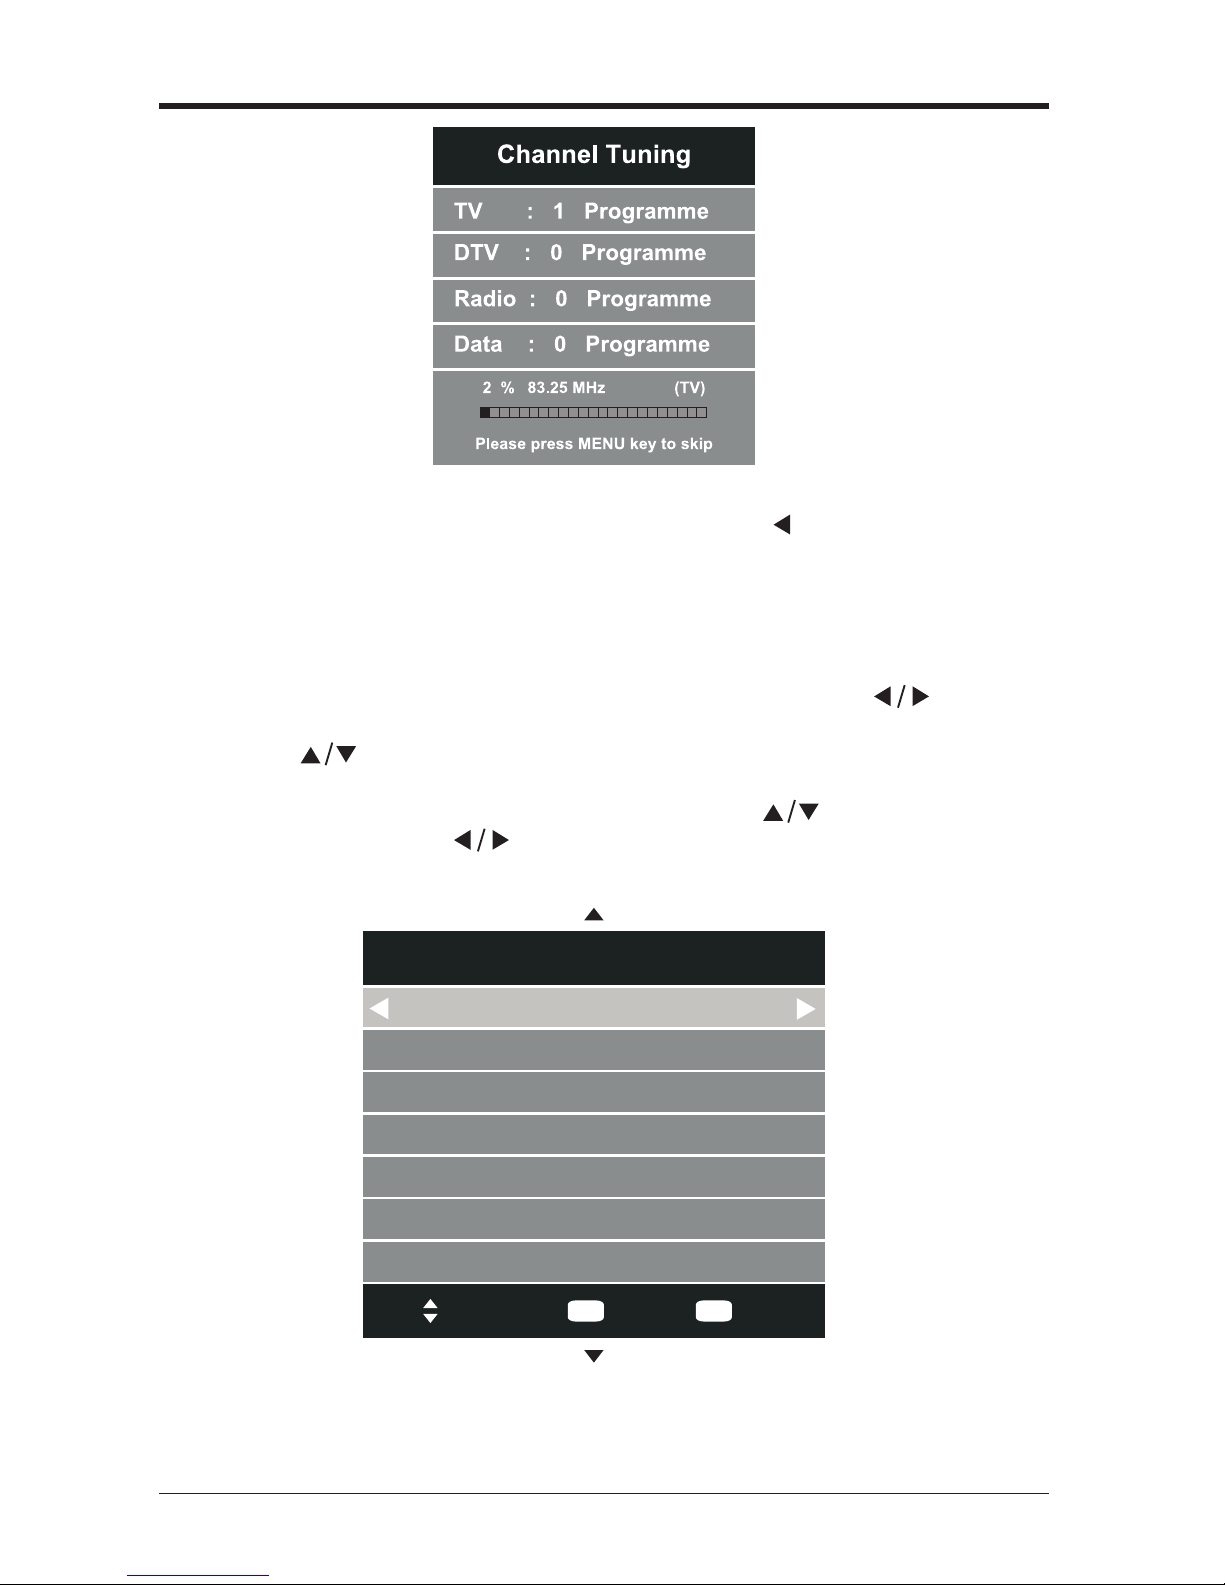
• Channel tuning will commence. This operation may take up to several minutes.
The display will show the progress of the tuning and the number of channels
found.
Auto Tuning
CUSTOMIZING TV SETTINGS
Tune Type ATV+DTV
UK Greece Portugal
France Italy Spain
Exit
EXIT
Back
MENU
14
ATV Manual Tuning (ATV Mode)
• Press the MENU button to display the main menu. Press the buttons to
select CHANNEL and then press the OK button.
• Press the buttons to select ATV Manual Tuning and then press the OK
button.
• The ATV Manual Tuning screen will pop up. Use the buttons to select the
following options and the buttons to adjust the setting.
CUSTOMIZINGTVSETTINGS
• If you want to skip the ATV tuning, press the MENU button to interrupt the tuning
half way. A pop-up screen will be displayed, press the button to select YES to
conrm.YouwillthengostraighttoDTVtuning.Youmayrepeattheabovestepif
you also want to skip the DTV tuning. An installation reminder will appear the next
time you turn on the TV.
ATV Manual Tuning
-
+
Current CH
Colour System
Sound System
Fine-Tune
AFC
Search
Move Back
MENU
1
Exit
EXIT
PAL
DK
64.25Mhz
On

15
CUSTOMIZINGTVSETTINGS
• Afternishingthemanualtuningadjustmentofachannel,presstheRED button
to save your channel before tuning the next channel.
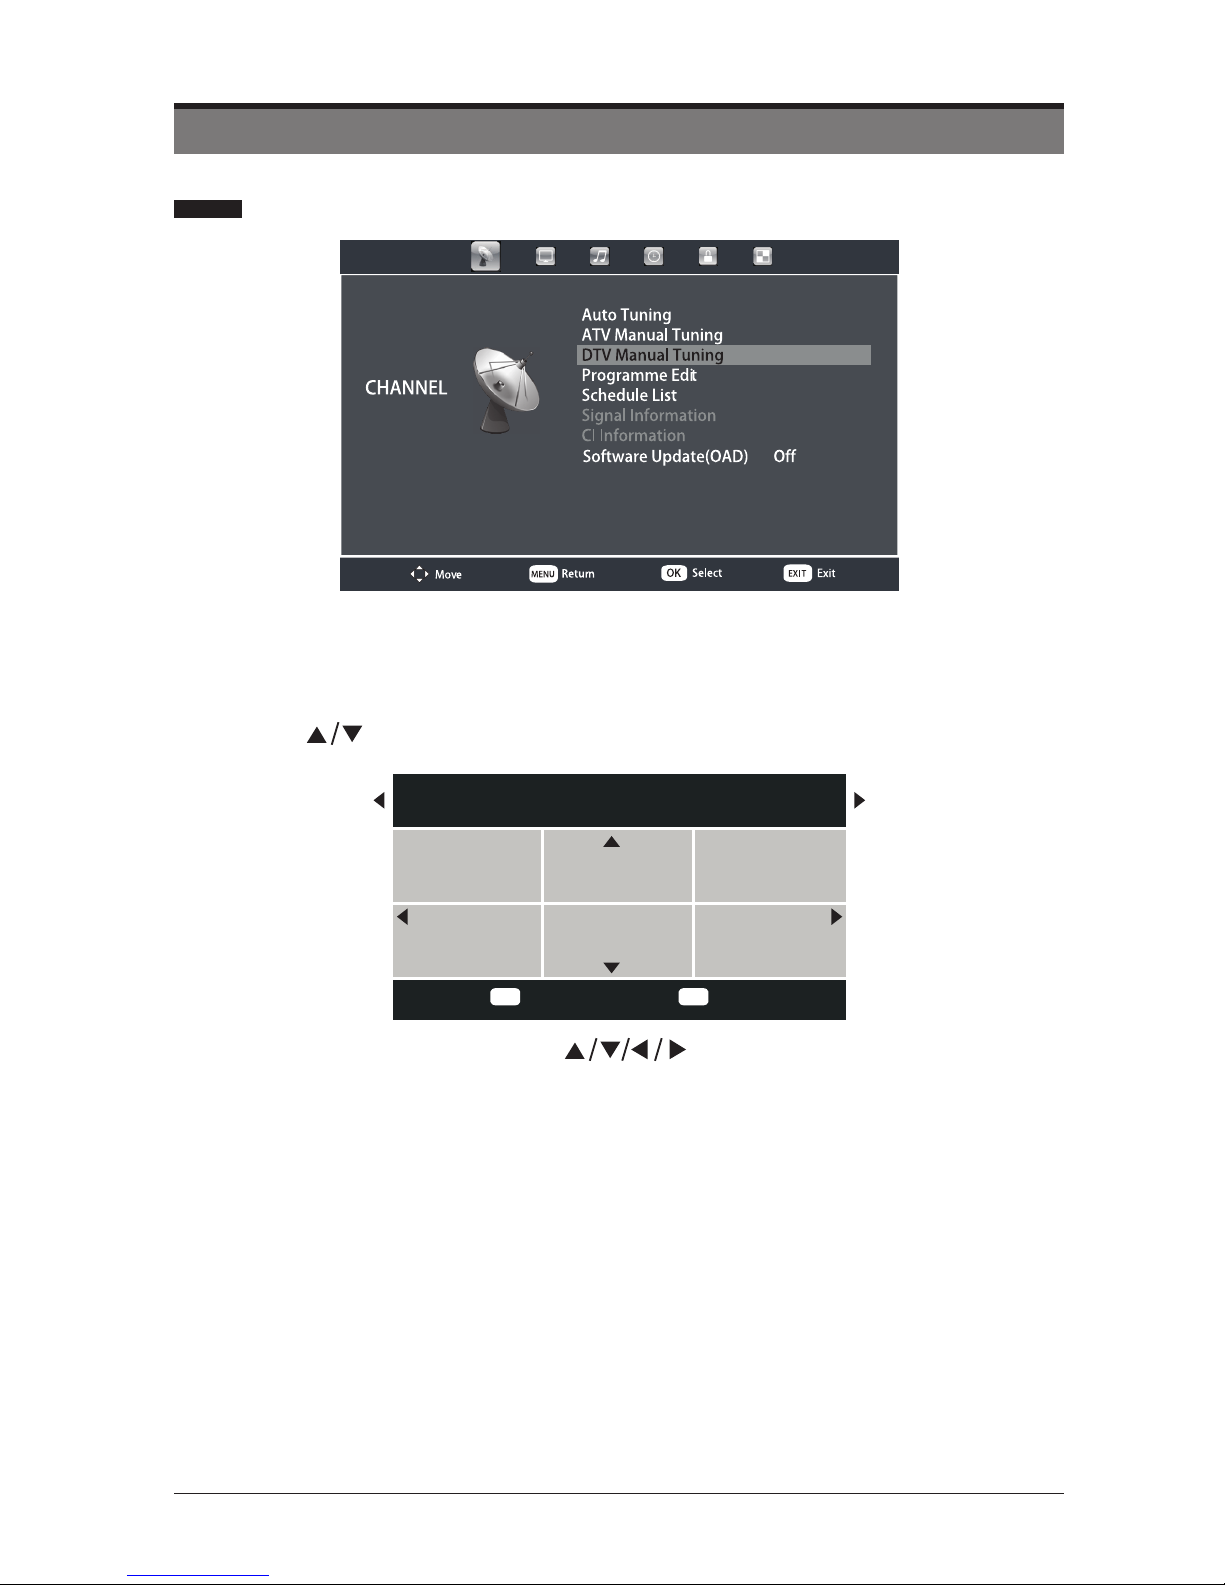
DTV Manual Tuning
• Press the MENU button to display the main menu. Press the buttons to
select CHANNEL and then press the OK button.
• Press the buttons to select DTV Manual Tuning and then press the OK
button.
• In the DTV Manual Tuning menu. Press the buttons to select the desired
UHF channel and then press the OK button to commence the search of that
channel. When the signal has been tuned, the picture and signal strength will be
displayed on the screen.
Programme Edit
• Press the MENU button to display the main menu. Press the buttons to
select CHANNEL and then press the OK button.
• Press the buttons to select Programme Edit and then press the OK button.
• A Programme Edit screen will pop up. Press the buttons to select the
programme you want to edit.
Current CH
Colour System
Sound System
Fine-Tune
AFC
Search
Selects a channel number.
Selectsacoloursystem:PAL/SECAM.
Selectsasoundsystem:I/DK/L/BG.
Press the buttons to make manual fine tuning
adjustments.
Press the buttons to start the manual tuning.
AutoFrequencyControl:On/Off.

16
ATV Mode
CUSTOMIZINGTVSETTINGS
DTV Mode
• Delete
Press the RED button to delete the selected channel.
• Rename (For ATV mode only)
Press the GREEN button to rename the selected channel. Press the buttons
to select the characters to represent the station name. Press the buttons
to move to the next character and then press the OKbuttonagaintoconrmthe
new name.
• Move
Press the YELLOW button to move the selected channel.
• Skip
Press the BLUE button to select the channels that you want to skip when you are
selecting channels. Press the BLUE button again to undo it.
• FAV (Favorite)
Press the FAV button to set the selected channel as one of the favorite
programmes. Press the FAV button again to undo it.
1 C-02
CH.Name
eOK
Programe Edit
Back
EXIT
Select
O K
Delete SkipMove
Fav Fav
Renname
1 C-02
2 C-04
3 S-03
ATV
ATV
ATV

17
CUSTOMIZINGTVSETTINGS
Schedule List
• Press the MENU button to display the main menu. Press the buttons to
select CHANNEL and then press the OK button.
• Press the buttons to select Schedule List and then press the OK button to
view the schedule list.
Move Press the buttons to select the programme.
Delete Press the RED button to delete the selected programme.
Add Press the Yellow button to add the programme.
Edit Press the Blue button to edit the programme.
Schedule List
(65% Used) 05:21 21 Jul
1/1 Programme Title Date 800 Barnkanalen
1No Title 21/01/2009 No Title
05:26-05:56
MOVE Delete Add Edit Exit
EXIT
Signal Information (DTV Mode)
• Press the MENU button to display the main menu. Press the buttons to
select CHANNEL and then press the OK button.
• Press the buttons to select Signal Information and then press the OK button
to view the signal information.
CI(Common Interface) Information (DTV Mode )
The common interface allows the use of a Common Access Module to enable you
to view scrambled (pay to view) service. These services are provided by TopUp
TV and others. The Common Access Module and viewing card can be obtained
from the service provider.
Note:
Do not repeatedly insert or remove the Common Access Module as this
may damage the interface and cause a malfunction.
This feature is not available in all countries.

18
CUSTOMIZINGTVSETTINGS
To insert the Common Access Module
• Before you insert the Common Access Module, ensure that the TV is switched
offandtheviewingcardisinsertedinaccordancewiththeServiceProvider’s
Instructions.
• Insert the Common Access Module into the slot. Flip the Common Access Module
to another side and try again if you feel resistance.
• Switch the TV on.
To remove the Common Access Module
• Before you remove the Common Access Module, ensure that the TV is switched
off.
• Pull the Common Access Module from the slot.
• Switch the TV on.
To view the module information
• Press the MENU button to display the main menu. Press the buttons to
select CHANNEL and then press the OK button.
• Press the buttons to select CI Information and then press the OK button.
• A CI Information main menu will pop up. Press the buttons to select the
options and then press the OK button to view.
Software Update (OAD)
• Press the MENU button to display the main menu. Press the buttons to
selectCHANNELandthenpresstheOKbutton.
• PressthebuttonstoselecttheSoftwareUpdate(OAD)andthenpressthe
OKorbuttontoupdatethesoftware.

19
• Press the MENU button to display the main menu. Press the buttons to
select PICTURE and then press the OK button.
• Press the buttons to select the option you want to adjust in PICTURE menu.
• Press the buttonstoadjusteachoption’ssetting.
• Press the EXIT button to exit the menu.
Picture Settings
CUSTOMIZINGTVSETTINGS
Picture Mode
Cyclesamongpicturemode:Standard/Mild/Personal
/Dynamic.
Alternative: you may press the P.MODE button to select
the picture mode directly.
Contrast Adjusts the difference between light and dark levels in
the picture. (For User mode)
Brightness Increases or decreases the amount of white in the
picture. (For User mode)
Colour Controls the colour intensity. (For User mode)
Tint Adjust the balance between red and green levels
Sharpness Adjusts the level of crispness in the edges between light
and dark areas of the picture. (For User mode)
Colour Temp
Cyclesamongcolourtemperature:Normal/Warm/
Cool.Adjusts the colour components independently to
achieve a warm or cool. (For User mode)
• Warm: increase red tint
• Normal
• Cool: increase blue tint
Noise Reduction Reduces the noise level of the connected device:
Middle/High/Off/Low.
120Hz Mode Cycle among Motion Estimate and Motion
Compensationmodes:Middle/High/Off/Low.
Mode Setting
Selectstheenergymode:HomeMode/StoreMode
• Home Mode:Viewing at home
• Store Mode:For store demo, the brightness is
higher then home mode on

20
• Press the MENU button to display the main menu. Press the buttons to
select SOUND and then press the OK button.
• Press the buttons to select the option you want to adjust in SOUND menu.
• Press the buttonstoadjusteachoption’ssetting.
• Press the EXIT button to exit the menu.
Sound Settings
Sound Mode
Allows the selection of an audio-enhancement
technique:Standard/Music/Movie/Sports/Personal.
Alternative: you may press the S.MODE button to select
the sound mode directly.
Treble Controls the relative intensity of higher-pitched sounds.
(For User mode)
Bass Controls the relative intensity of lower-pitched sounds.
(For User mode)
Balance Adjusts the relative volume of the speaker in a multiple
speaker system.
Auto Volume Volume levels are automatically controlled (e.g.,
advertisements tend to be louder than the programmes).
SPDIF Mode Selectsthedigitalaudiooutputmode:PCM/Auto/Off.
AD Switch
(For DTV mode)
Audio Description is an auxiliary audio function that
provides an additional audio track for visually challenged
persons.This function handles the Audio Stream for the
AD(Audio Description),when it is sent along with the
main audio from the broadcaster.
• setto"Off"fornormalbroadcastingsoundcoming
out from speakers.
• setto"On"toactivatethedescriptionsoundtrackif
available.
CUSTOMIZINGTVSETTINGS
Table of contents
Other Seiki HDTV manuals


Popular HDTV manuals by other brands


Insignia
Insignia NS-26L450A11 Quick setup guide

Sony
Sony KDL-40HX701 - 40" Bravia Hx701 Series Hdtv Specifications

Medion
Medion LIFE E12480 user manual

Samsung
Samsung UN46B7000 - 46" LCD TV brochure

Panasonic
Panasonic TC-P42XT50L Simplified service manual

Panasonic
Panasonic Viera TC-L65WT600 Manual de usuario