Seiki SE24HD01UK User manual

1
CONTENTS
How to watch a DVD 11
Notes on DVD playback 11
DVD Controls 12
Initial setup 13
General operation 13
Getting Started 11
How to Navigate menus-Selecting
Source 14
Electronic Programme Guide (EPG)
(DTV Mode) 14
Teletext (ATV Mode) 15
Digital Teletext (DTV Mode) 16
Time Shift Function (DTV Mode) 16
Recording DTV Programme onto a USB
Storage Device 17
Timer Programming 18
Play Recorded Programme 19
Picture Management 19
Sound Management 20
Channel Management 21
Lock System Management 25
Setup Management 25
Basic Features 14
Viewing Photo 30
Listening to Music 31
Viewing Movies 31
My Text 32
Entertainment 30
Important Safety Instructions 2
What is Included 4
Front View 5
Rear View 6
Installing the Base Stand 7
Removing the Stand for Wall-Mounting 7
Remote Control 8
Using the Bulit-in DVD Player 33
Notes on DVD playback 33
Basic DVD playback Fuctions 34
Playing Multimedia Discs 36
Using the DVD Language setup page 36
Using the DVD Screen Setup page 37
Using the DVD Audio Setup page 38
Using the DVD Custom Setup page 38
Preparation 4
Safety Information 3
Connecting External Devices 10
Parental Control 40
Using the DVD Features 33
Troubleshooting 42
Specication 44
Disposal Information 44
Limited Warranty 45
Plug Replacement-UK and Ireland only 43
Digital Reception 41
Supported le formats 41
2
IMPORTANT SAFETY INSTRUCTIONS
• Read these instructions – All the safety and operating instructions should be read before this product is
operated.
• Keep these instructions – The safety and operating instructions should be retained for future reference.
• Heed all warnings – All warnings on the appliance and in the operating instructions should be adhered to.
• Follow all instructions – All operating and use instructions should be followed.
• Do not use this apparatus near water – The appliance should not be used near water or moisture – for
example, in a wet basement or near a swimming pool, and the like.
• Cleanonlywithdrycloth.
• Donotblockanyventilationopenings.Installinaccordancewiththemanufacture’sinstructions.
• Donotinstallnearanyheatsourcessuchasradiators,heatregisters,stoves,orotherapparatus(including
ampliers)thatproduceheat.
• Donotdefeatthesafetypurposeofthepolarizedorgrounding-typeplug.Apolarizedplughastwoblades
with one wider than the other. A grounding-type plug has two blades and a third grounding prong. The wide
bladeorthethirdprongareprovidedforyoursafety.Iftheprovidedplugdoesnottintoyouroutlet,consult
an electrician for replacement of the obsolete outlet.
• Protectthepowercordfrombeingwalkedonorpinchedparticularlyatplugs,conveniencereceptacles,and
the point where they exit from the apparatus.
• Onlyuseattachments/accessoriesspeciedbythemanufacturer.
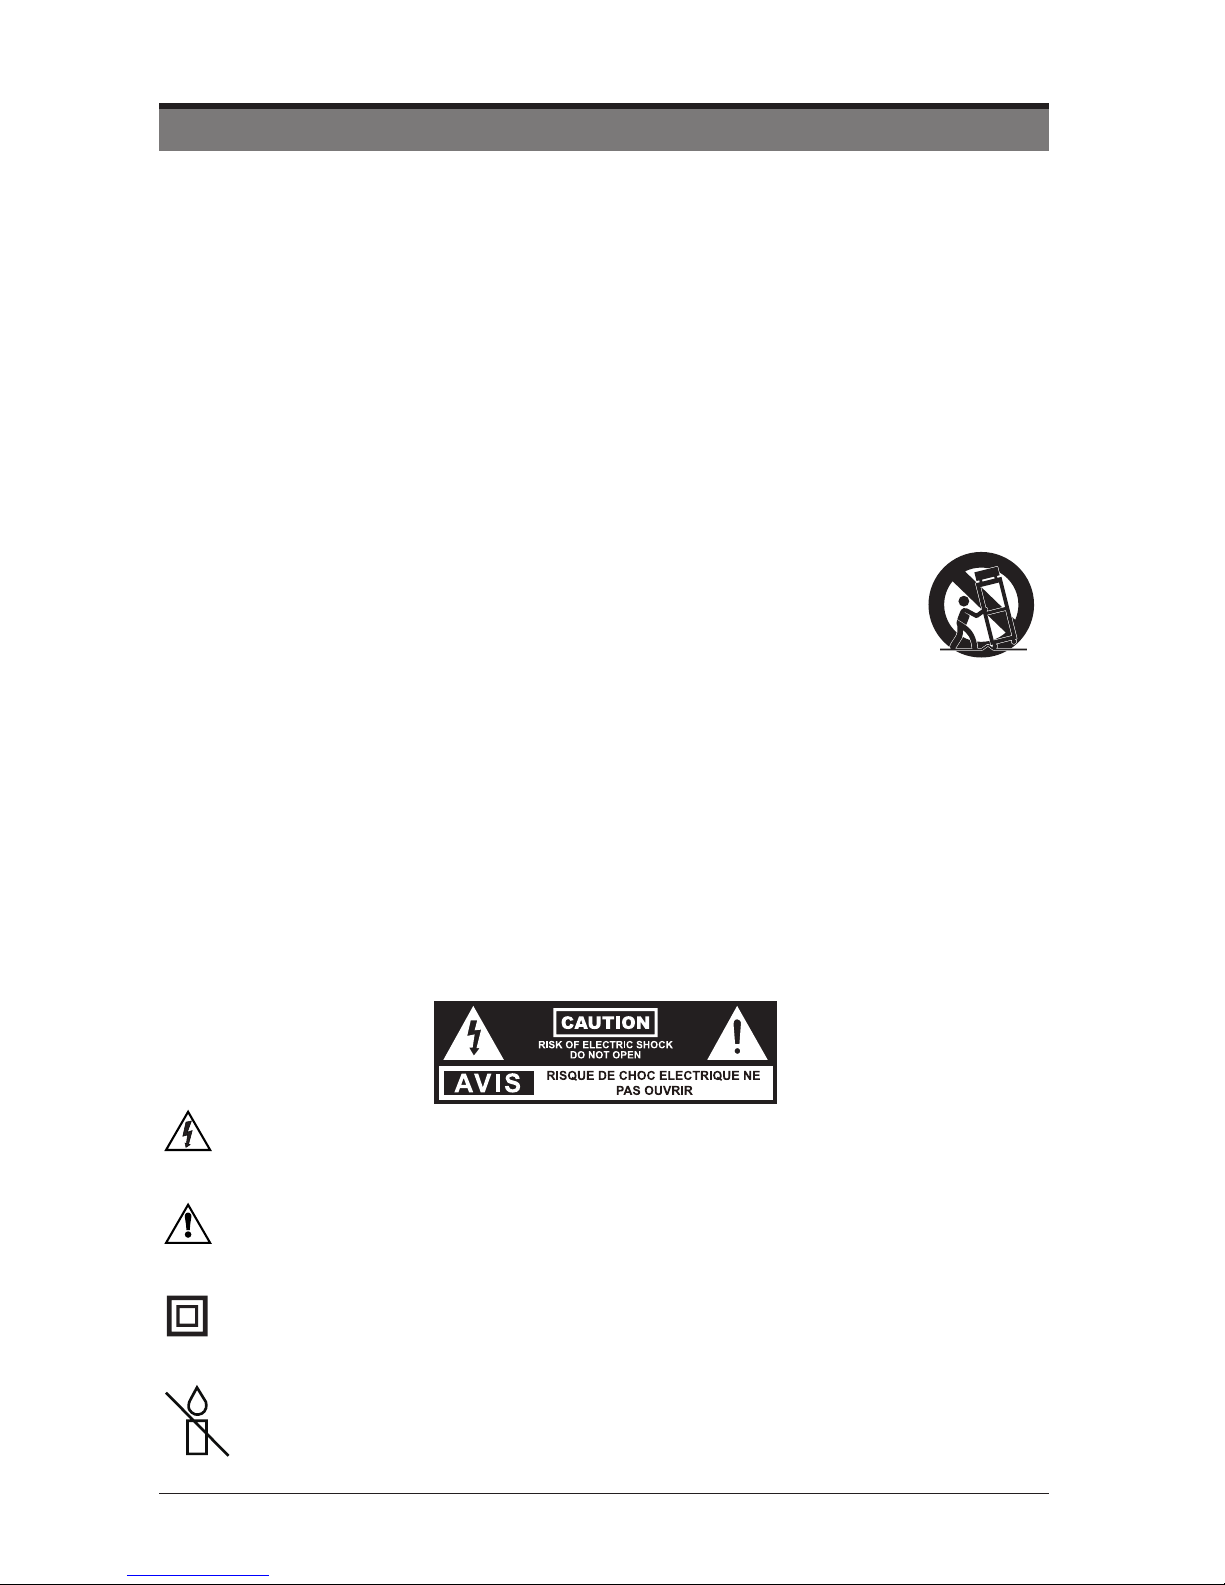
• Useonlywiththecart,stand,tripod,bracket,ortablespeciedbythemanufacturer,or
soldwiththeapparatus.Whenacartisused,usecautionwhenmovingthecart/apparatus
combination to avoid injury from tip-over.
• Unplugthisapparatusduringlightningstormsorwhenunusedforlongperiodsoftime.
• Referallservicing toqualifiedservicepersonnel.Servicingisrequiredwhentheapparatushasbeen
damagedinanyway,suchaspower-supplycordorplugisdamaged,liquidhasbeenspilledorobjects
have fallen into the apparatus, the apparatus has been exposed to rain or moisture, does not operate
normally, or has been dropped.
• Pleasekeeptheunitinawell-ventilatedenvironment.
• WARNING: To reduce the risk of fire or electric shock, do not expose this apparatus to rain or
moisture.Theapparatusshallnotbeexposedtodrippingorsplashing.Objectslledwithliquids,
such as vases should not be placed on apparatus.
• WARNING:Thebatteriesshallnotbeexposedtoexcessiveheatsuchassunshine,reorthelike.
• WARNING: The mains plug is used as disconnect device, the disconnect device shall remain readily
operable.
• WARNING: To reduce the risk of electric shock, do not remove cover (or back) as there are no user-
serviceablepartsinside.Referservicingtoqualiedpersonnel.
Thislightningflashwitharrowheadsymbol withinanequilateraltriangleisintendedto
alerttheusertothepresenceofnon-insulated“dangerousvoltage”withintheproduct’s
enclosurethatmaybeofsufcientmagnitudetoconstituteariskofelectricshock.
Theexclamationpointwithinanequilateraltriangleisintendedto alerttheuserto
the presence of important operating and maintenance instructions in the literature
accompanying the appliance.
ThisequipmentisaClassIIordoubleinsulatedelectricalappliance.Ithasbeendesigned
insuchawaythatitdoesnotrequireasafetyconnectiontoelectricalearth.
Warning: To prevent the spread of re, keep candles or
other open ames away from this product at all times.

3
SAFETY INFORMATION
This product contains electrical or electronic materials. The presence of these materials may, if not disposed of
properly, have potential adverse effects on the environment and human health.
Presence of this label on the product means it should not be disposed of as unsorted waste and must be collected
separately. As a consumer, you are responsible for ensuring that this product is disposed of properly.
This unit utilises a laser.Use of controls sdjustments or performance of procedures
otherthanthosespeciedheveinmayresultinhazardousradiationexposure.
WARNING: Topreventinjury,thisapparatusmustbesecurelyattachedtotheoor/wallin accordancewiththe
installation instruction.
Toensurereliableandsafeoperationofthisequipment,pleasecarefullyreadalltheinstructionsinthisuserguide,
especially the safety information below.
Electrical Safety
• The TV set should only be connected to a main power supply with voltage that matches the label at the rear of
the product.
• To prevent overload, do not share the same power supply socket with too many other electronic components.
• Do not place any connecting wires where they may be stepped on or tripped over.
• Do not place heavy items on any connecting wire, which may damage the wire.
• Hold the main plug, not the wires, when removing from a socket.
• During a thunderstorm, or when not using the television for extended period of time, turn off the power switch on
the back of the television.
• Donotallowwateror moisturetoentertheTVor poweradapter.DoNOTuseinwet,moistareas, suchas
bathrooms, steamy kitchens or near swimming pools.
• Pulltheplugoutimmediately,andseekprofessionalhelpifthemainplugorcableisdamaged,liquidisspilled
onto the set, if the TV set accidentally exposed to water or moisture, if anything accidentally penetrates the
ventilation slots or if the TV set does not work normally.
• Do not remove the safety covers. There are no user-serviceable parts inside. Trying to service the unit yourself is
dangerousandmayinvalidatetheproduct’swarranty.Qualiedpersonnelmustonlyservicethisapparatus.
• To avoid a battery leakage, remove batteries from the remote control, when the remote is not use for long period,
or when the batteries are exhausted.
• Donotbreakopenorthrowexhaustedbatteriesintoare.
• Forbestresults,usetypeAAA(example-alkaline,carbon-zinc,etc.)batteries.
• Install only new batteries of the same type in your product.
• Failure to insert batteries in the correct polarity, as indicated in the battery compartment, may shorten the life of
the batteries or cause batteries to leak.
• Do not mix old and new batteries.
• Do not mix Alkaline, Standard (Carbon-Zinc) or Rechargeable (Nickel Cadmium) or (Nickel Metal Hydride)
batteries.
• Batteries should be recycled or disposed of as per state and local guidelines.
• Do not attempt to recharge disposable batteries.
• Do not short circuit battery terminals.
• Keep away from children.
Physical Safety
• Donotblockventilationslotsinthebackcover.YoumayplacetheTVinacabinet,butensureatleast5cm(2’’)
clearance all around.
• Do not tap or shake the TV screen, or you may damage the internal circuits. Take good care of the remote
control.
• TocleantheTVuseasoftdrycloth.Donotusesolventsorpetroleumbaseduids.
• Do not install near any heat sources such as radiators, heat registers, stoves or other apparatus (including
ampliers)thatproduceheat.
• Donotdefeatthesafetypurposeofthepolarizedorgrounding-typeplug.Apolarizedplughastwobladeswith
one wider than the other. A grounding plug has two blades and a third grounding prong. The wide blade, or the
thirdprongisprovidedforyoursafety.Iftheprovidedplugdoesnottintoyouroutlet,consultanelectricianfor
replacement of the obsolete outlet.
• Protect the power cord from being walked on or pinched particularly at plugs.
• Unplug the apparatus during lightning storms or when unused for long periods.
• Referallservicingtoaqualifiedservicepersonnel.Servicingisrequirediftheapparatusdoesnotoperate
normally or if the apparatus, including the power supply cord or plug, has been damaged in any way.
• Servicingisalsorequiredifliquidhasbeenspilled,orobjectshavefallenintotheapparatus;whentheapparatus
hasbeenexposedtorainormoisture;oriftheapparatushasbeendropped.
• Always connect your television to a power outlet with protective ground connection.
4
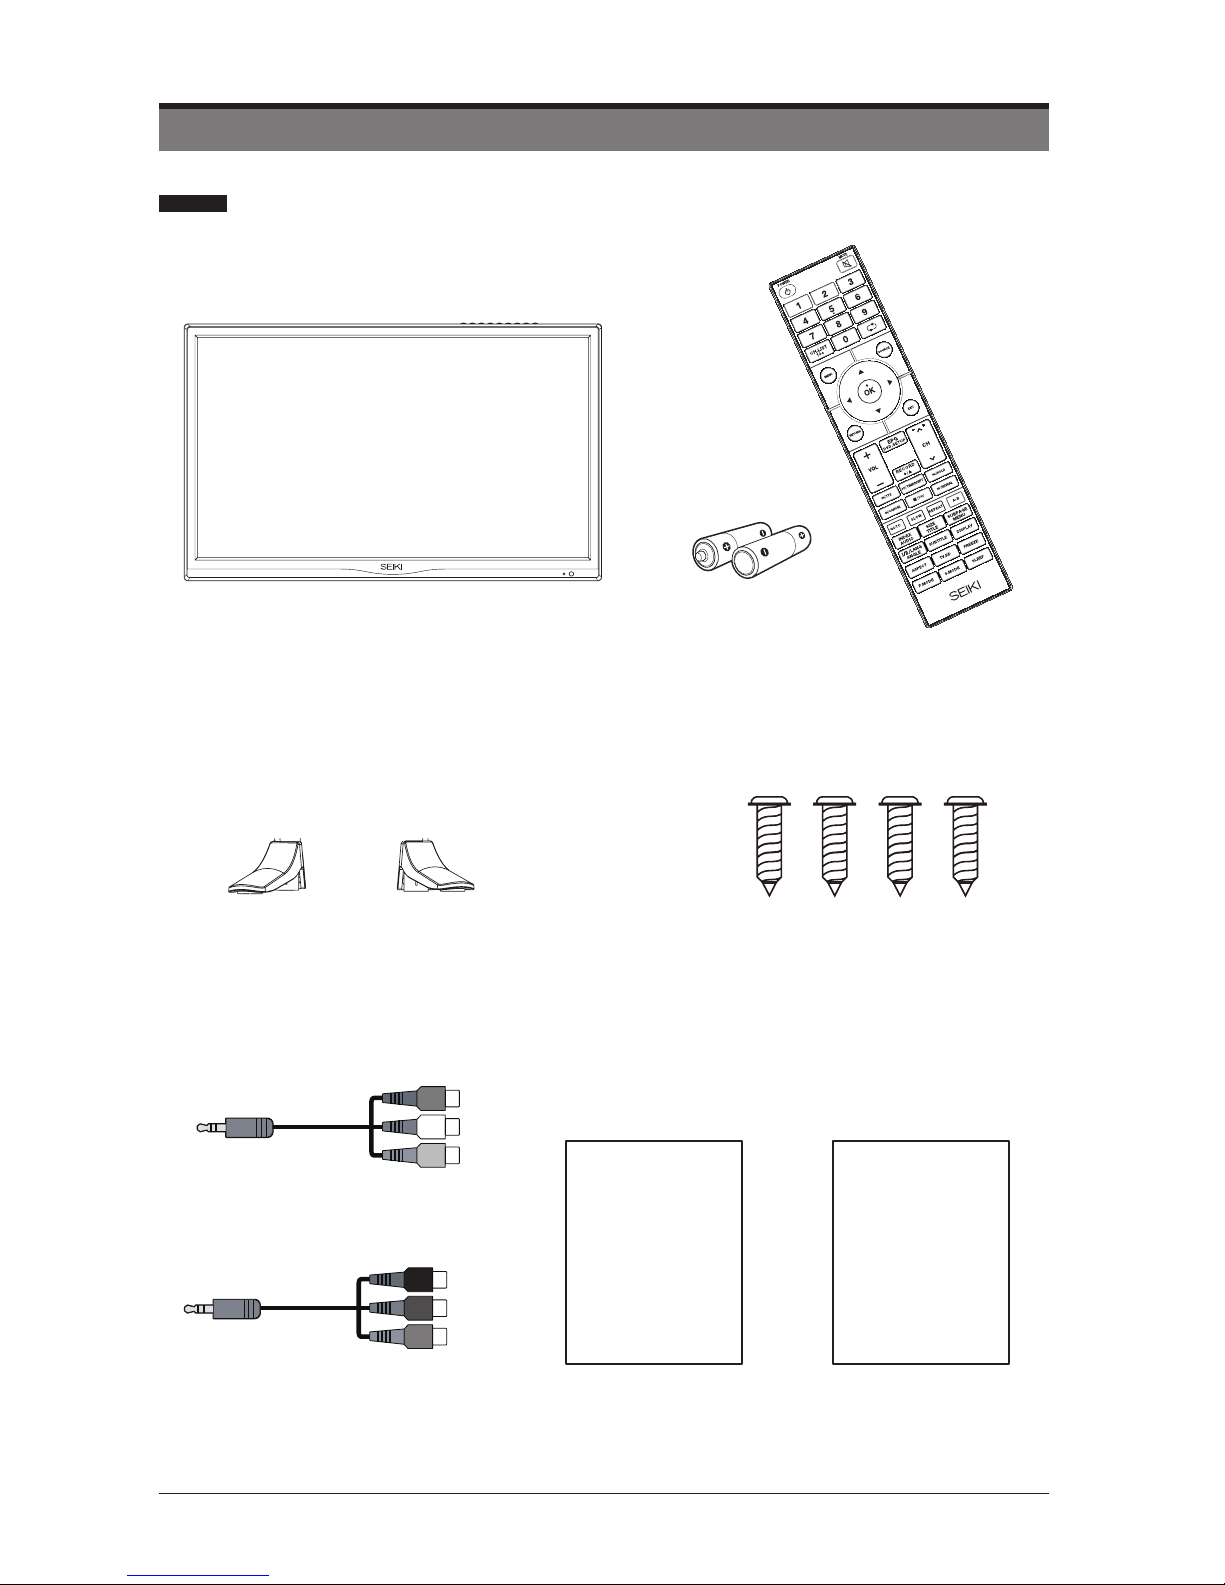
Remote Control with BatteriesTV Set
User Manual
User Manual
QuickStartGuide
Quick
Start Guide
Base Stand Four Screws
PREPARATION
What is Included
MINI YPBPR cable
MINI AV cable

5
PREPARATION
Front View
2
1
1.
Press to eject disc. (DVD mode)
2.
Press to start playback or pause.(DVD
mode)
3. VOL -/+ button
Decreases the volume.
Increases the volume.
4. CH-/+ button
Moves down a channel.
Moves up a channel.
5. Menu button
Displays the OSD (on screen display)
menu.
6. SOURCE button
Press to select among different input signal
sources: DTV / ATV / SCART /AV / YPbPr /DVD/
HDMI/ PC / USB.Confirmed the selection on
OSD menu.
7. button
Turns the TV on when in standby mode or
turns the TV off into standby mode.
8. POWER Indicator
Illuminate blue when the TV is turned on.
Illuminate red when the TV is in standby
mode.
9. Infrared Receiver
Receive the IR signals from the remote
control.

6
PREPARATION
Rear View
1. Power Cord
Connect to AC power outlet.
2. Headphone Socket
Connect to the Headphones.
3. PC AUDIO Input
Connect to a computer audio output.
4. VGA Input
Connect to a computer or other devices
with a VGA interface.
5. SCART Socket
Connect to SCART cable between the
SCART socket on the TV and the SCART
socket on the external device (decoder,
or DVD player).
6. COAXIAL Digital Audio Output
Connect to the audio socket on the digital
audio system.
7. DTV/TV Input
Connecttotheantenna(75ΩVHF/UHF)
socket with the RF coaxial cable.
8. OPTICAL Output
Connect a digital sound system to this
jack.
9. HDMI Input
ConnecttoaHigh-Dention(HD)signal
output device.
10. USB Port
Connect to a USB storage device to play
compatibleaudioandphotoles.(USB
mode).
11. MINI YPBPR
Connect to AV devices with component
(Y/Pb/Pr)videoandaudiooutputsockets.
COMPONENT&VIDEOsharewithAUDIO
IN(L/R)subscribeto.
12. MINI AV
ConnecttothecompositeVIDEOand
AUDIO(L/R)outputsocketsonexternal
video devices.
13. CI Slot
Used to insert a CI card.A CI card allows
you to view all the channels that you
subscribe to.For more information,see
"Conditional Access" section.
VGAPC AUDIO SCART DTV/TVCOAXIAL
USB
CI
MINI
YPBPR
MINI
AV
PC IN
7
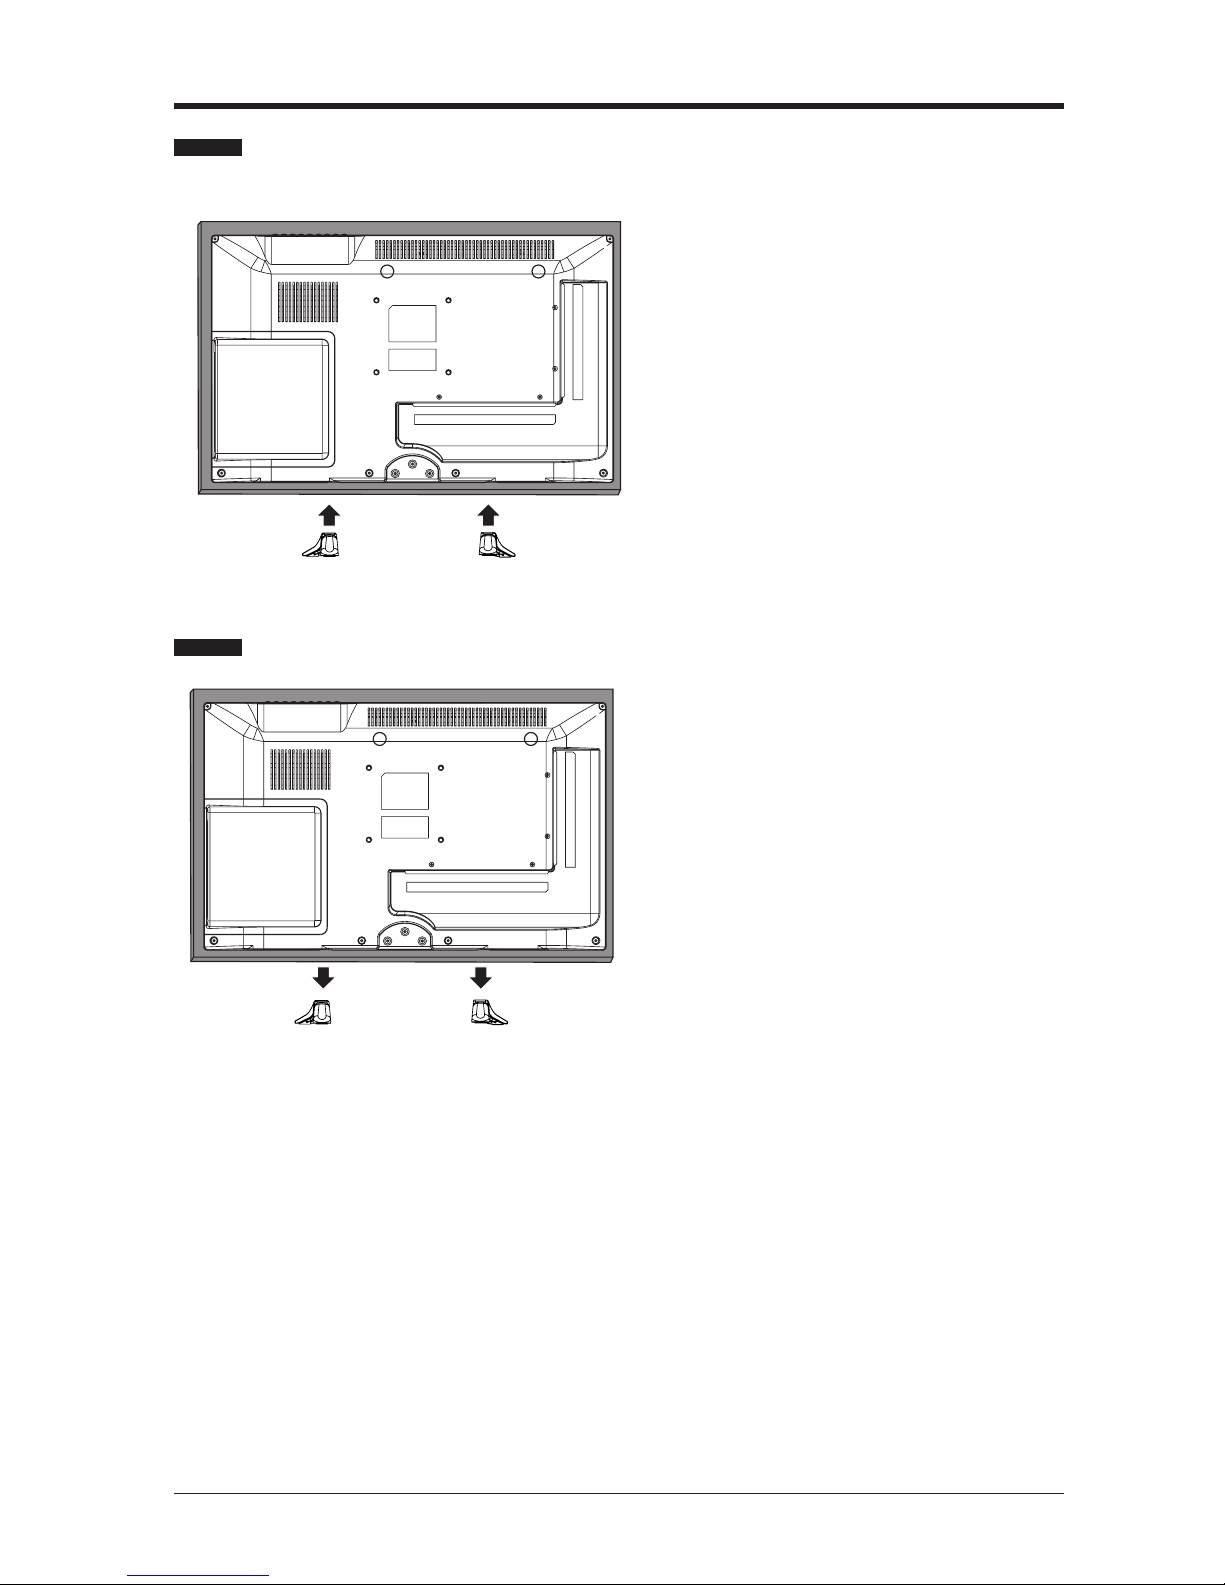
Installing the Base Stand
PREPARATION
WARNING: This apparatus is intended to be supported by UL Listed wall mount bracket.
1. Lay the TV face-down on a flat,
cushioned surface to avoid damaging or
scratching.
2. Untighten the 4 pcs screws holding
the stand assembly and remove them.
3. Attach the wall-mount bracket to the
TV using the mounting holes on the
back of the TV. Mount this TV according
to the instructions included in the wall-
mount bracket.
Removing the Stand for Wall-Mounting
1.Lay the TV face-down on a flat,
cushioned surface to avoid damaging
or scratching.
2.Fix the left base stand to the TV using
the 2 provided screws.
3.Fix the right base stand to the TV
using the 2 provided screws.
8
PREPARATION
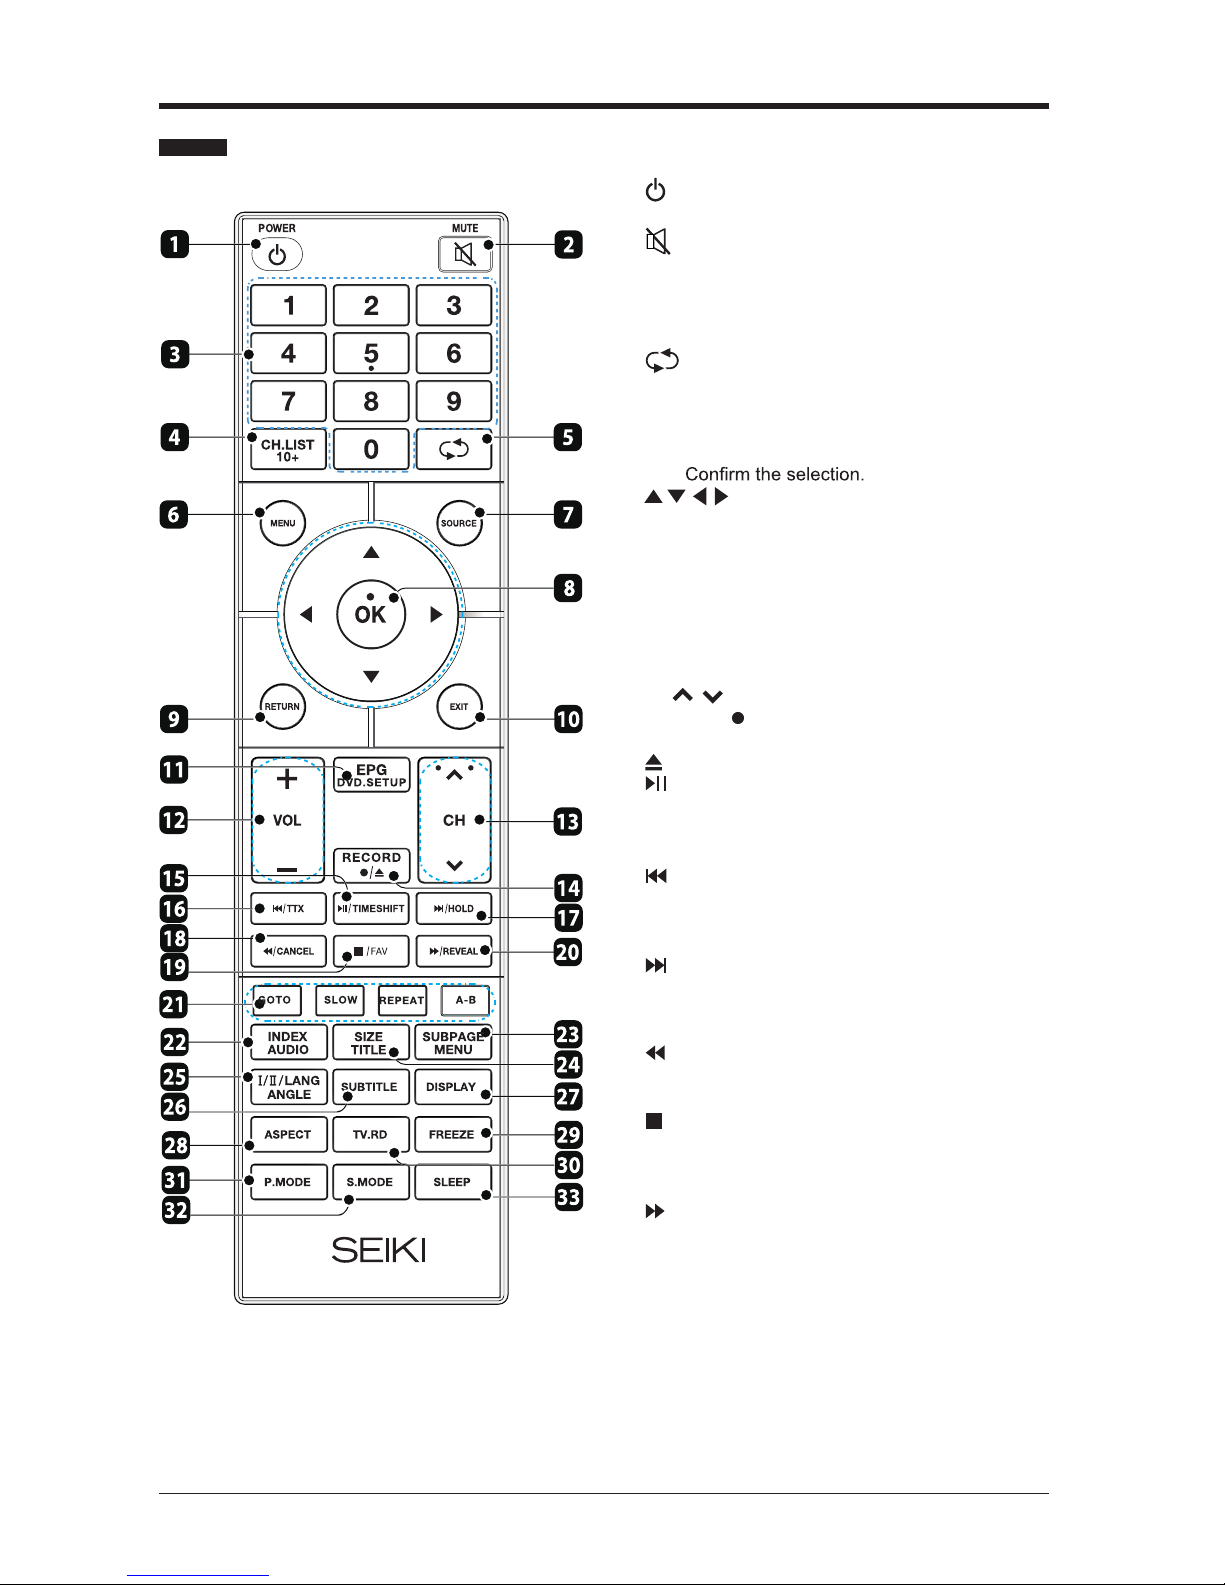
Remote Control
1. : Switch the TV between on and standby
mode.
2. :Mute and restore your TV sound.
3. 0-9 Number Buttons: Use to select a
programme.
4. CH.LIST: Display programme list (DTV / ATV
modes).
5. : Go back to the previous viewing channel.
6. MENU: Display the main menu
7. SOURCE: Select among the different input
signal sources: DTV / ATV / SCART / AV/
YPbPr /DVD/ HDMI/ PC / USB.
8. OK:
:Allows you to navigate through the
OSD menu and adjust the TV's settings to your
preference.
9. RETURN: Return to previous menu.
10. EXIT: Exit the OSD menu.
11. EPG: Display the Electronic Program Guide
DVD.SETUP:Display the DVD OSD menu.
(DTV mode).
12. VOL + / : Adjust the volume.
13. CH / : Select a channel.
14. RECORD/ : One button recording function,
: Ejects a disc.
press to record current program (DTV mode).
15. :Start or pause playback (USB / DTV
modes).
TIMESHIFT: Press to turn the timeshift function
on and off (DTV mode).
16. :Press to skip to the beginning of the
previous chapter or track (USB / DTV modes).
TTX: Turn on and off the teletext function.(ATV/
DTV Modes)
17. :Press to skip to the beginning of the next
chapter or track (USB / DTV modes).
HOLD: Press to freeze a multi-page Teletext
passage on screen (DTV / AV / SCART modes).
18. :Press to fast rewind (USB / DTV modes).
CANCEL: Press to cancel the Teletext mode
(DTV / AV / SCART modes).
19. :Press to stop playback (USB / DTV /ATV
modes).
FAV: Press to show your Favourite Channels
list (DTV / ATV modes).
20. :Press to fast forward (USB / DTV modes).
REVEAL: Press to reveal hidden information
such as answers to a quiz on Teletext (DTV /
AV / SCART modes).
21. RED / GREEN / YELLOW / BLUE: Use these
buttons to select corresponding function shown
on screen and in menus.
22. INDEX: Press to select the page number of the
AUDIO: Change the audio language or audio
channel (DTV / DVD mode).
index from Teletext (DTV mode).
-

9
PREPARATION
Remote Control
24. SIZE:
TITLE: Press to return to the main title
page. (DVD mode).
Press to enlarge the picture on the TV
Teletext(DTV/ AV/SCART modes).
25. LANGUAGE: Select the DTV audio language
(DTV mode).
: Press to switch between different audio
languages (only applicable when the broadcast
supports this function).
26. SUBTITLE:Press to display the subtitles
broadcast with the program (DTV mode).
Selects the subtitles on the USB drive (USB
mode).
27. DISPLAY:Press to show information about the
current screen such as current channel or input
source.
28. ASPECT: Select from the following settings:
Auto/4:3/16:9/Zoom1/Zoom2/Subtitle/
JustScan(OnlyHDMImode).
29. FREEZE:Freezethepicture.
30. TV.RD: Press to select between TV and Radio
programs (DTV mode).
31. P.MODE: Press to select picture mode.
32. S.MODE: Press to select sound mode.
33. SLEEP: Press to set the TV's sleep timer.
Note:
Remove battery during storage or when you are not
using the device for a long time.
To control the device using the remote control, point
the remote control at the device and then press the
buttonwiththerequiredfunction.
The maximum range of the remote control is about
5 meters with a deviation of up to +/- 30° from the
perpendicular d irection t o the reception s ensor o f
the remote c ontrol o n the front side o f the device.
The falling capacity of t he b atteries gradually
reduces the remote control range.
There must b e no s olid o bstacles in t he a re a
between t he r emote control and the device w hen
the remote control is being used.
During standard use the lifetime o f batteries in the
remote control is about 1 year.
When t he e ffective r ange of t he r emote control is
substantially reduced, or w hen t here are problems
with its use, change both the batteries in the remote
control.
If y ou w ill not be using the remote c ontrol f or a
longer period of t ime, t ake out both batteries from
it - i n this i n this w ay y ou w ill p revent p otential
damage caused by their leakage.
23. SUB
MENU: Display the setup information of
DVD menu.
PAGE: Press to display the subpage on
the Teletextscreen(DTV/AV/SCART modes).
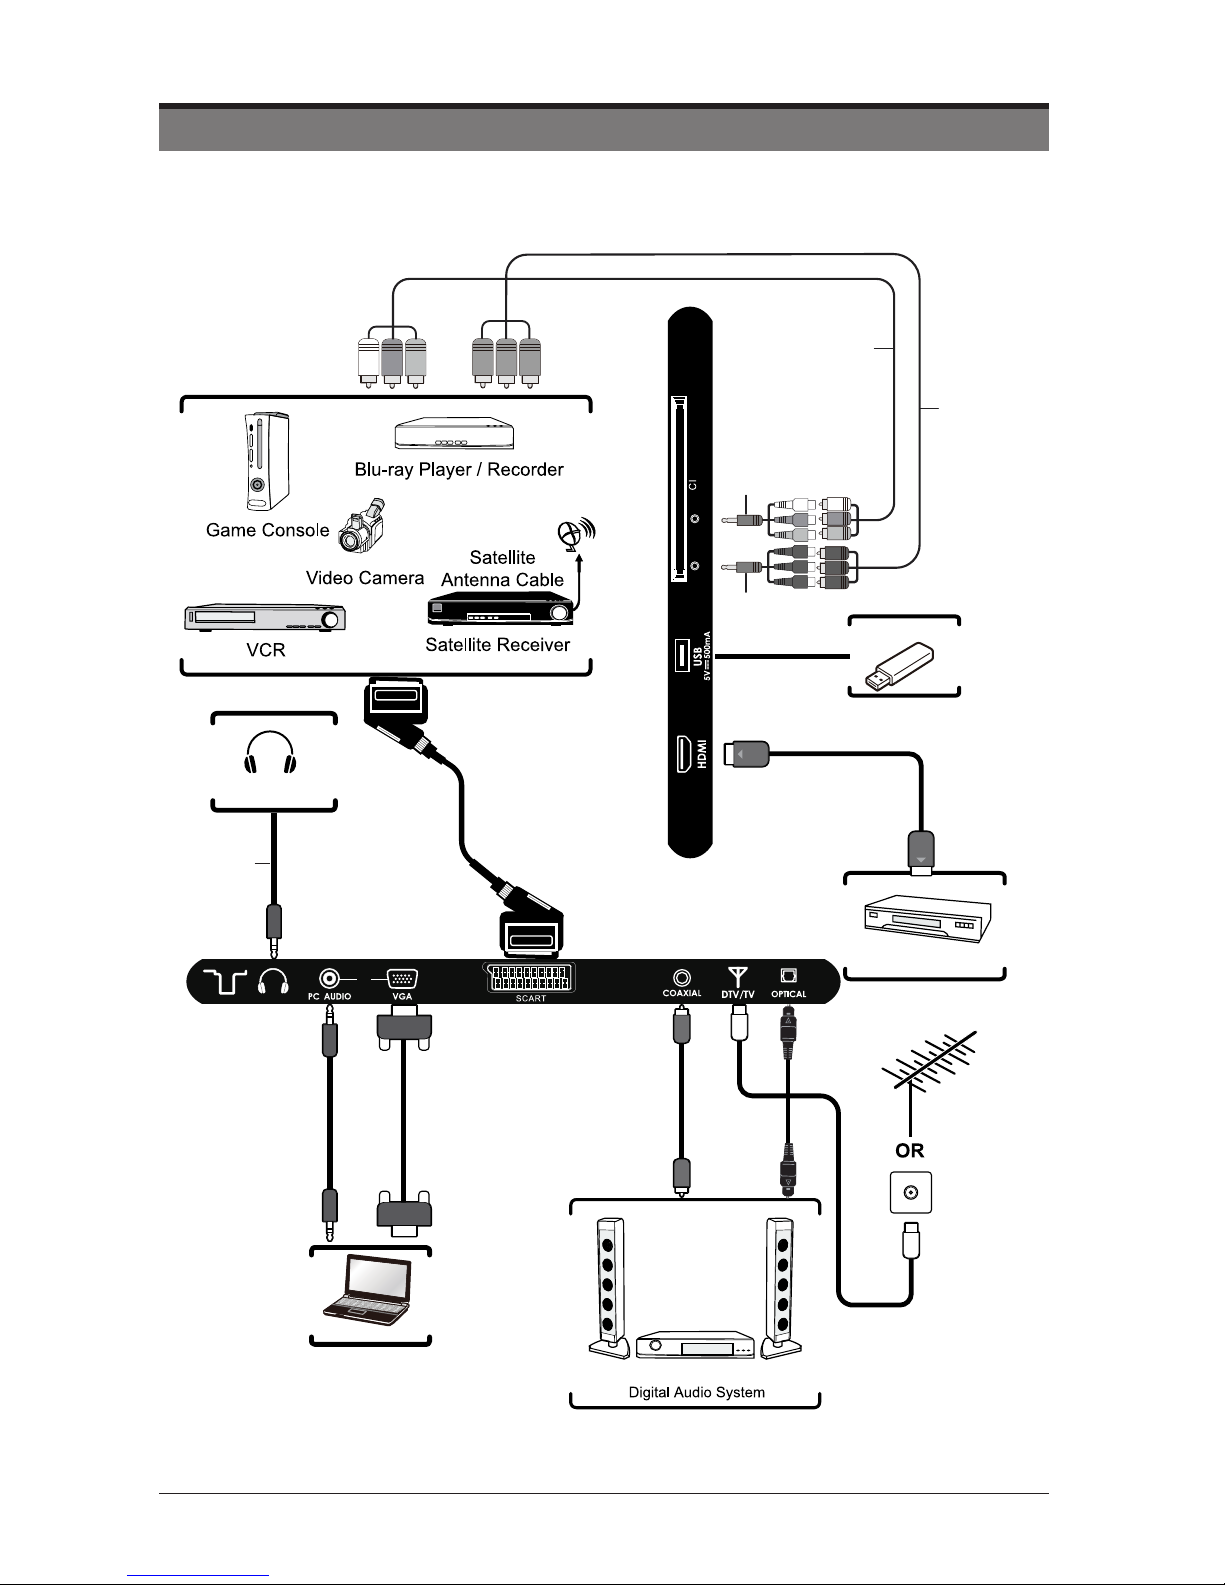
10
CONNECTING EXTERNAL DEVICES
Headphones
Computer
HDMI Device
MINI
YPBPR
MINI
AV
USB
Audio Cable
(not included)
VGA Cable
(not included)
3.5mm Audio Cable
(not included)
COAXIALCable
(not included) OpticalCable
(not included)
RF Cable
(not included)
SCART Cable
(not included)
HDMI Cable
(not included)
MINI YPBPR Cable
(included)
MINI AV Cable
(included)
AV Cable
( not included)
YPBPR Cable
( not included)
PC IN
11
Most discs will be automatically loaded
and play will start automatically if the
disc does not have any menus recorded
on it.If play does not start automatically,
press the“ ” button on the remote control,
or the “ ” button at the bottom right of the
TV.
A menu may appear on the TV screen
afterafewmomentsorthelmmaystart
immediatelyaftertheFilm/TVCompany
introduction. This will depend on the disc
content and may differ on each disc.
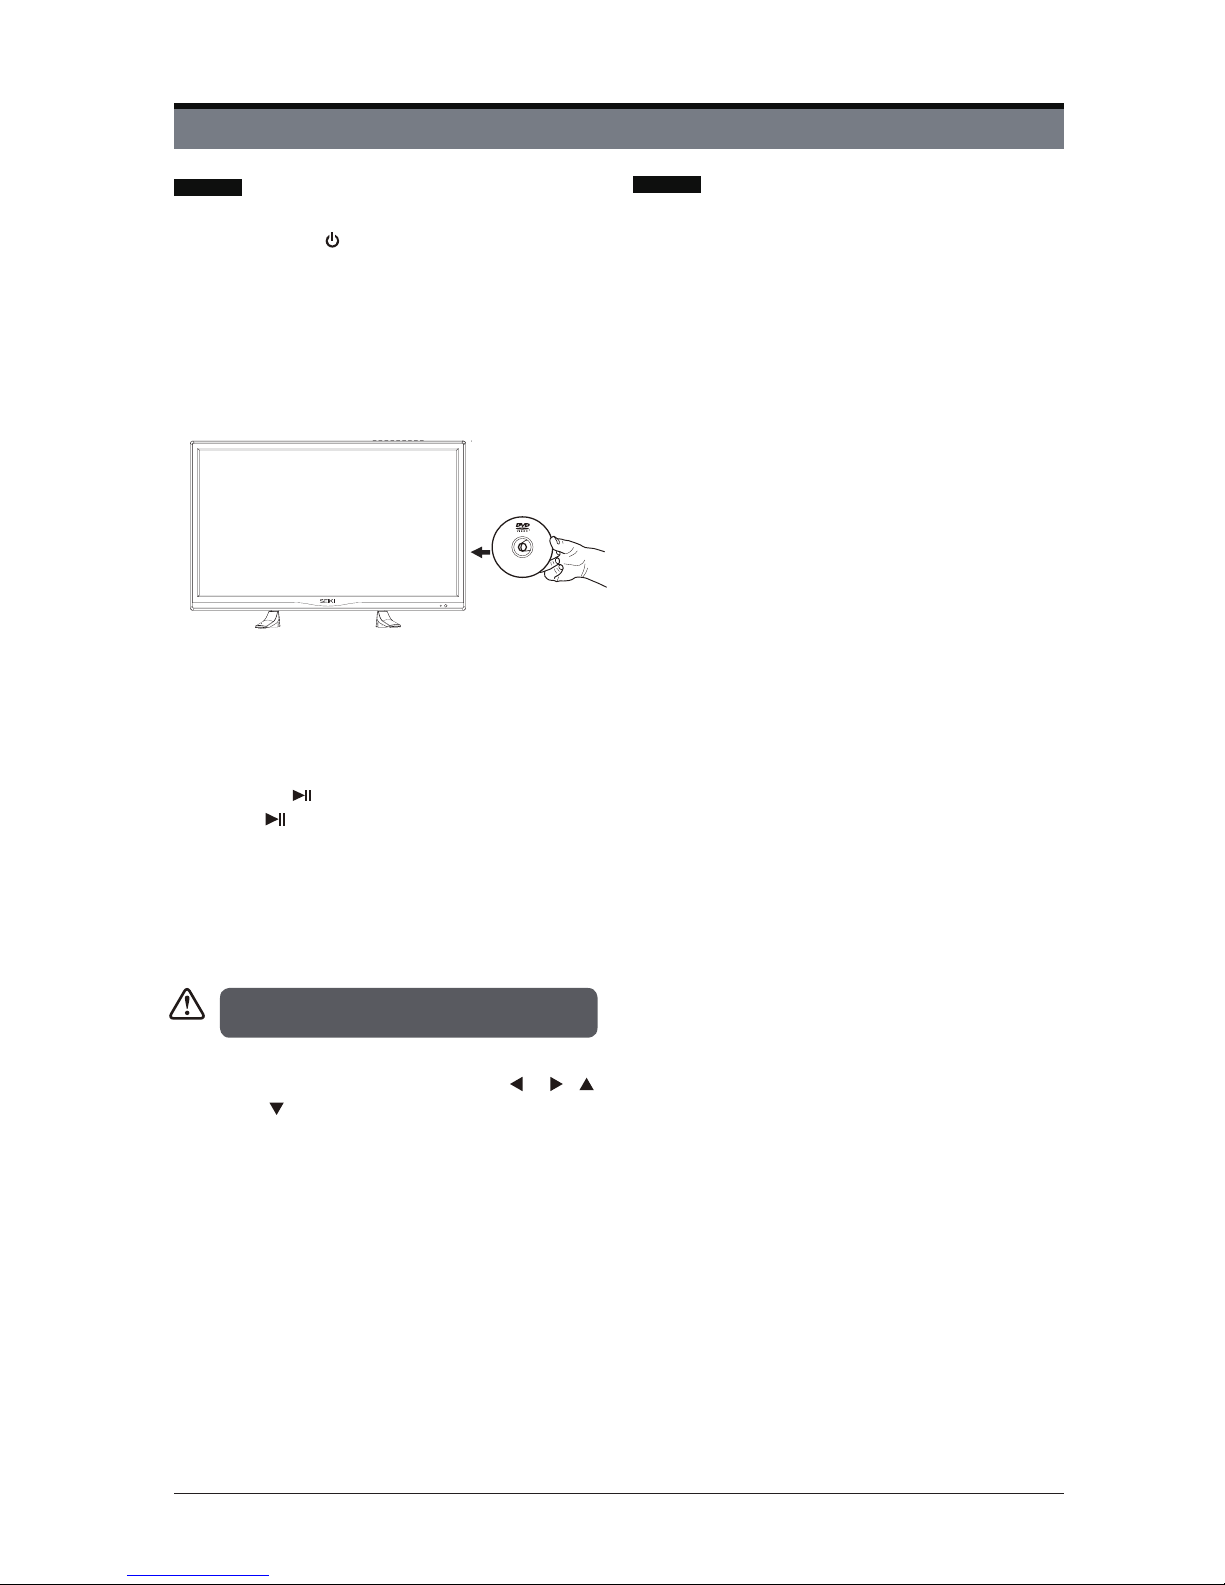
GETTING STARTED
How to watch a DVD Notes on DVD playback
1. Press the “ ” button on the TV or remote
control.
2. Switch to DVD source using the
“SOURCE”buttonontheremotecontrol.
3. Insert a disc into the loader.The label
side of the disc MUST be facing you
when looking at the TV screen.
4. Press the navigation buttons “ ”, “ ”, “ ”
or “ ” or the number buttons to select
therequiredtitle.
5. PresstheOKbutton.Theselecteditem
starts to play.
Steps 4 and 5 are only available when a menu is
recorded on the disc.
•NosoundwillbeheardduringRapid
advance or Rapid reverse.
•NosoundwillbeheardduringSlowmotion
play.
•ReverseSlowmotionplayisnotavailable.
•Insomecases,thesubtitlelanguagewill
not be changed immediately to the selected
one.
•Whenthepreferredlanguagewillnot
select, even after pressing the button
several times, it means the language is not
available on the disc.
•WhentheDVDplayerisrestartedorthe
disc is changed, the subtitle selection is
automatically changed back to the initial
settings.
•Ifalanguageisselectedthatisnot
supported by the disc, the subtitle language
willautomaticallybesettothedisc’spriority
(default) language.
•Usuallya‘circulation’willhappenwhile
switching to another language, this means
you can cancel the subtitle by pressing the
same button a number of times until “Subtitle
Off”appearsonthescreen.
•Whenthepoweristurnedonorthedisc
is removed, the language heard will be the
one selected at the initial settings.
•SomeDVDsmaynotcontainrootand/or
title menus.
•Reversesteppingisnotavailable.
•Forreference:Ifyouattempttoentera
number greater than the total time of the
current title, the time search box disappears
and “Input Invalid ” message appears on
top-left corner of screen.
•Theslideshowisdisabledwhenthe
ZOOMmodeison.
Label side
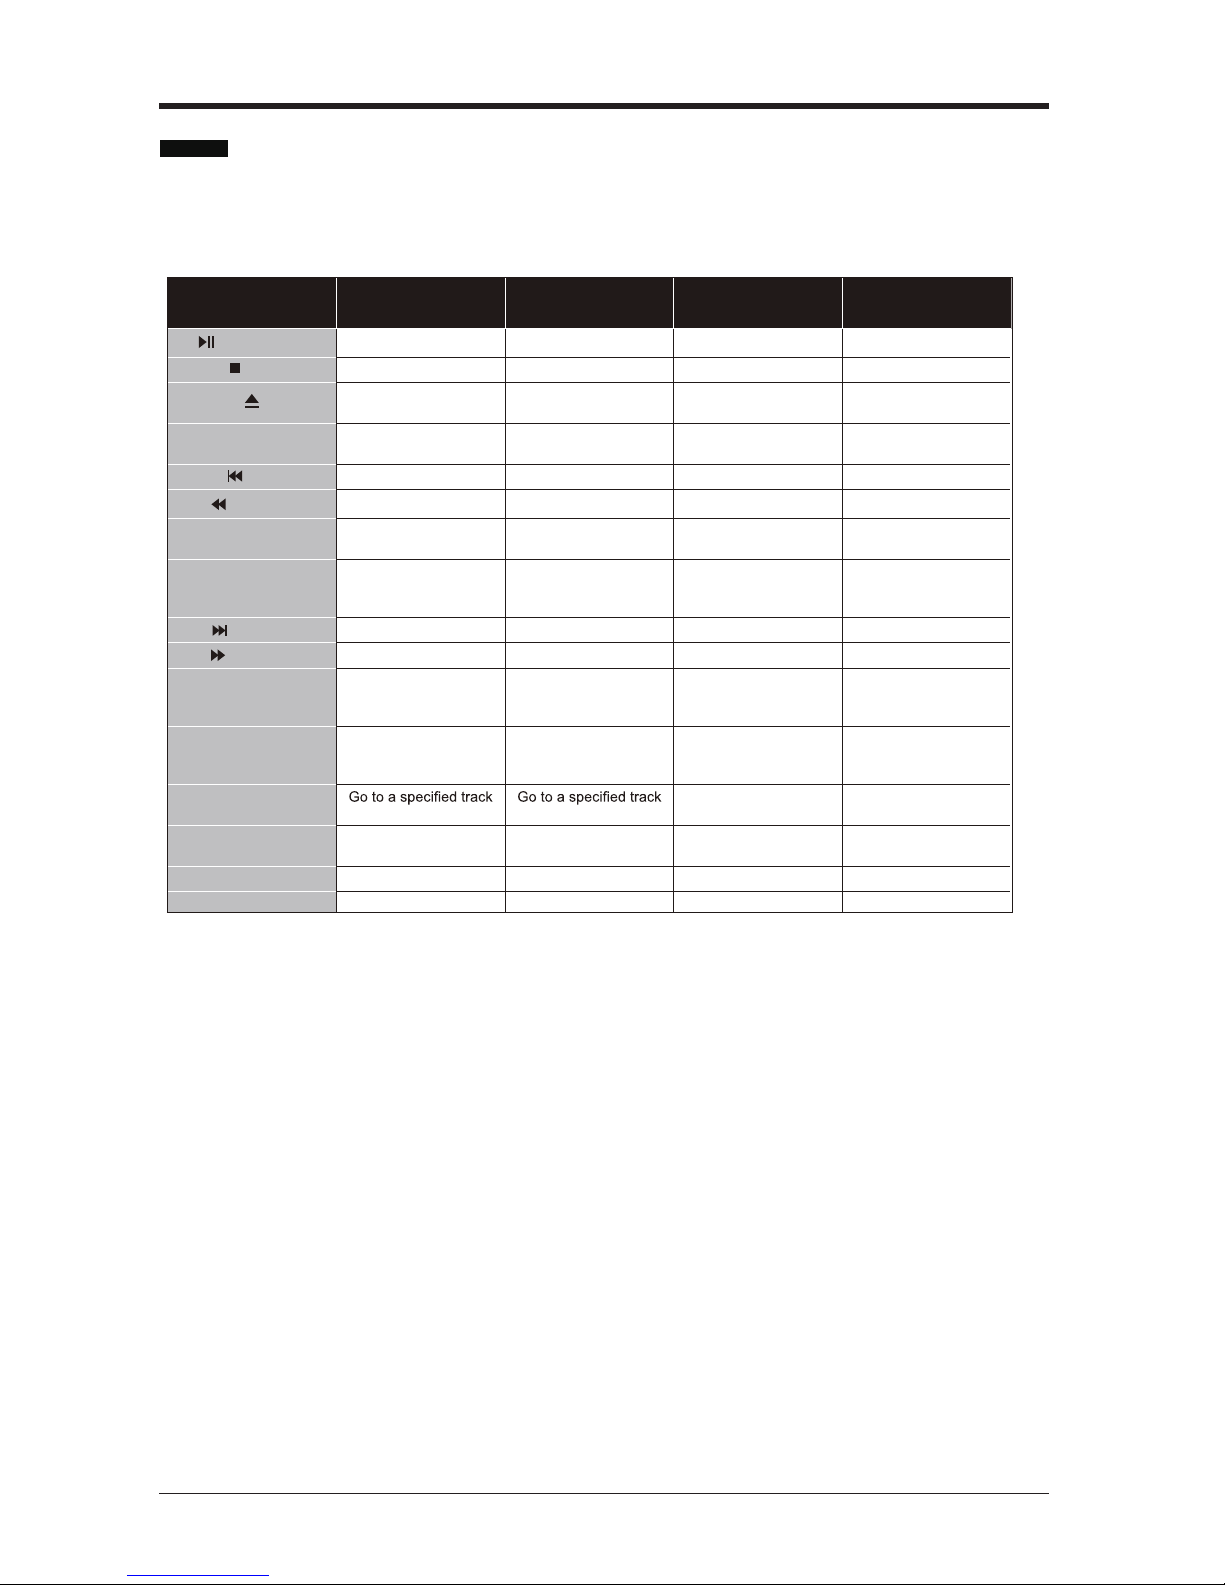
12
DVD Controls
You can operate DVD, movie CD, music or picture CD’s content by using the correct buttons
on your remote control. Below are main functions of commonly used remote control buttons.
GETTING STARTED
Buttons on
Remote Control DVD Playback Movie Playback Picture Playback Music Playback
Play/Pause Play/Pause Play/Pause Play/Pause
/FAV Stop Stop Return to the picture list Stop
Open or close the dics
tray
Open or close the dics
tray
Open or close the dics
tray
Open or close the dics
tray
DVD.SETUP Displays the DVD OSD
menu
Displays the DVD OSD
menu
Displays the DVD OSD
menu
Displays the DVD OSD
menu
/TTX Skip backward Skip backward Skip backward Skip backward
/CANCEL Rapid reverse Rapid reverse X Rapid reverse
TITLE/SIZE Display disc menu (if
available)
Display disc menu (if
available) X X
SUBTITLE
Subtitle on-off. Press
repeatedly to switch
between subtitle option
Subtitle on-off. Press
repeatedly to switch
between subtitle option
X X
/HOLD Skip forward Skip forward Skip forward Skip forward
/REVEAL Rapid advance Rapid advance X Rapid advance
MENU/SUBPAGE
Return to the main menu
of a loaded DVD (if
available)
Return to the main menu
of a loaded DVD (if
available)
Return to the main menu
of a loaded DVD (if
available)
X
AUDIO/INDEX
Press repeatedly to
switch amony audio
option (if available)
Press repeatedly to
switch amony audio
option (if available)
X
Press repeatedly to
switch amony audio
option (if available)
GOTO or time on a loaded disc or time on a loaded disc X X
SLOW Slow down playback
speed
Slow down playback
speed X X
REPEAT Displays repeat options Displays repeat options Displays repeat options Displays repeat options
A-B Reprat a selected section Reprat a selected section X Reprat a selected section
/TIMESHIFT
13
1. Connect one end of the RF coaxial cable to
the aerial socket on the wall and the other
end of the cable to the RF (75Ω) socket at
the rear left side of your TV.
2. Connect the mains cable to the mains socket
after you have completed all the connections.
3. Connect AC power cable. At this stage, the
TV switches to standby mode. The red LED
indicator will illuminate on the front panel of
the TV.
4. In standby mode, press the button at the
top of the TV or the button on the remote
control to turn the TV on. The red LED
indicator will turn blue.
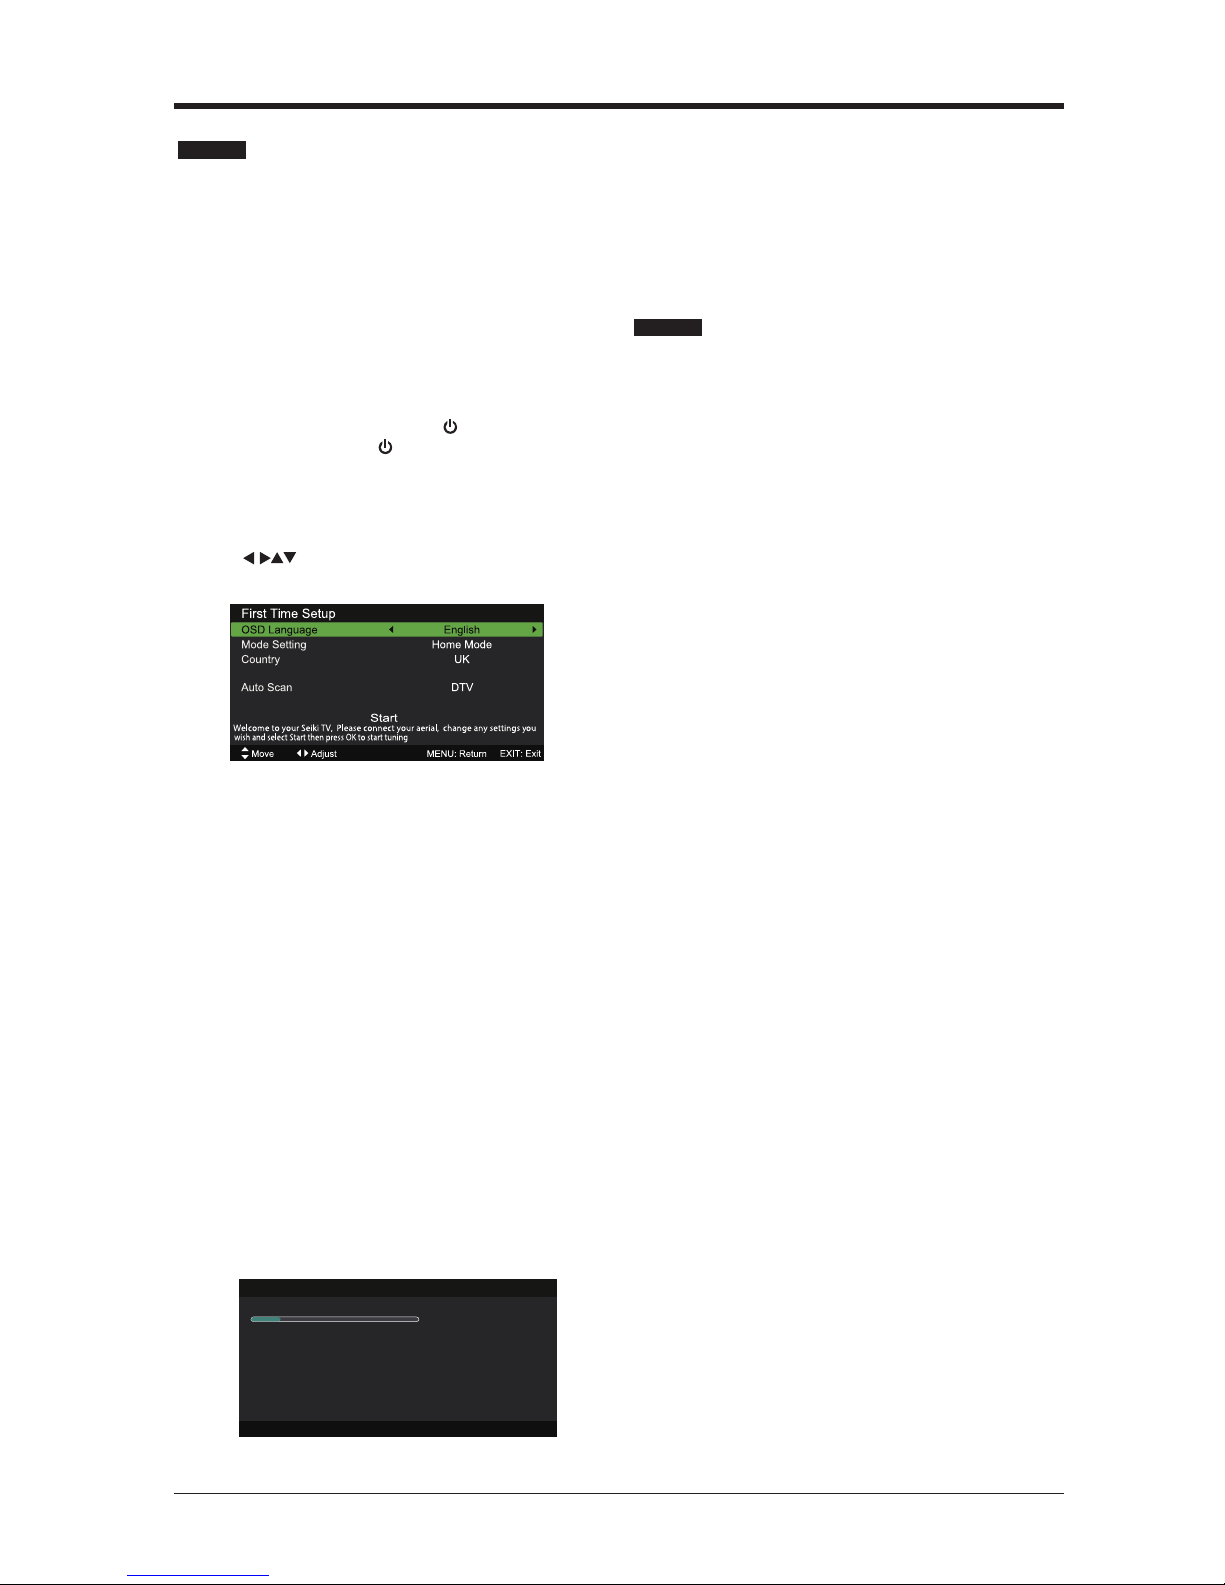
5. The first time you turn the TV on, it will go
straight into First Time Setup menu. Press
the buttons to navigate the menu and
change the settings.
OSD Language
Selects your desired language to be
displayed on the menu. The default
on-screen menu language is set as English.
Mode Setting
Selects your desired mode setting.
• Home Mode: Viewing at home.
• Store Mode: For store demo, the brightness
is higher than home mode.
Country
Selects the country where you will operate
the TV. The default country is set as UK.
Tuner Type
Selects the tuner type: Antenna / Cable.
Auto Scan
Selects the auto scan type: DTV+ATV / DTV
/ATV.
Start
Press the OK button to start auto tuning. Auto
Scan will commence. The display will show
the progress of the tuning and the number of
channels found.
Press the SOURCE button on the remote
control and select DTV to switch the TV to
Digital Terrestrial Television Broadcasting.
Information Banner
Whenever you change channel using the CH+/
CH- buttons or the number buttons, the TV
displays the broadcast picture along with an
information banner on the top left of the screen
(available only in DTV/ATV mode).
The information banner can be displayed at
any time while watching TV by pressing the
DISPLAY button on the remote control.
6. If you want to skip the DTV tuning, press the
MENU button to interrupt the tuning half way.
General Operation
Initial Setup
Auto Scan
Scanning CH21
Digital Channels Found:
DTV :0 Radio :0 Data:0
MENU: Stop EXIT: Exit
GETTING STARTED
Tuner Type Antenna

14
1. Press the SOURCE button at the top of the
TV or the SOURCE button on the remote
control to display the Input source list.
2. Press the buttons to select the input
sourcethatyouwant:DTV/ATV/SCART/
AV/YPbPr/DVD/HDMI/PC/USB.
3. Press OK button to confirm your selection.
This system has an Electronic Programme
Guide (EPG) to help you navigate through all
the possible viewing options.
The EPG supplies information such as
programme listings, start and end times for
all available services. In addition, detailed
information about the programme is often
available in the EPG (the availability and amount
of programme information will vary, depending
on the particular broadcaster).
This function can be used only when the EPG
information is broadcast by broadcasting
companies.
The EPG displays the programme details for the
next 7 days.
1. Press the EPG button to switch on EPG.
2. Press EPG button or EXIT button again
to switch off EPG and return to normal TV
viewing.
Info bar commands:
RED (Prev. Date)
Press the RED button to view the schedule of
the previous day.
GREEN (Next Date)
Press the GREEN button to view the schedule
of the next day.
YELLOW (Schedule)
Press the YELLOW button to view the preset
reminders in the schedule list. Press the
YELLOW button to return to the EPG.
BLUE (Reminder)
Press the BLUE button while on the selected
programme, the Reminder setting menu will be
displayed.
Press the buttons to adjust the settings
and then press the Save button to confirm the
settings. After confirmation, the EPG Schedule
List will then be displayed with your preset
reminders shown. Press the YELLOW button
to return to the EPG. The TV will automatically
tune to the selected programme when it starts.
REC
Timer Programming.
OK
Press to display detailed information of the
selected programme (if available).
Electronic Programme Guide (EPG) (DTV Mode)
How to Navigate Menus- Selecting Source
BASIC FEATURES
Move
PROGRAMGUIDE
2008/12/2510:00:0-2008/12/2510:15:0PinkyandPerky
My Fair Lady
It’sChristmaaaas!It’sChiristmasDaybutthereseemstobeashortageofpresentsatPPCTVandeveryoneisfed
up.PinkyandPerkyreallsetheyforgottosendeveryone’sChristmasliststoSanta.[S]
PrevDate NextDate Schedule Reminder
OK:SelectDisplay:DisplayEPG:Exit
002BBCTWO
007 BBC THREE
070 CBBC Channel
080 BBC NEWS
105 BBC Red Bu.. ...
Christmas Day Eucharist The Santa Clause2
Dec 25 2008
10:00 11:00
The is BBC THREE
Bear Behavi... Shau... ChuckVision Chris... Hider in the House Sherlock Holmes an..
BBC News our World: Stormch... BBC News The Best of Five Min.. .
BBC Red Button
25 Dec 2008 10:03:34
[Children’s][S]
001BBCONE Pinky an....
SOURCE
DTV
ATV
SCART
AV
YPbPr
DVD
HDMI
PC
USB

15
BASIC FEATURES
Page HOLD
If the page of text you have selected contains
subpages, these subpages will automatically be
displayed in order with a delay to allow you to
have enough time to read the page.
To stop the movie to the next sub page, press
the HOLD button.
To continue moving through the sub pages,
press the HOLD button again.
Alternative: Press the SUBPAGE button,
and then use the 0-9 buttons to enter a 4-digit
page number.
To Reveal Information
Press the REVEAL button to reveal
concealedinformation(quizanswersetc.).
Press the REVEAL button again to conceal
the information again.
Fasttext
At the bottom of the teletext screen is a row of
subject headings in red, green, yellow and blue.
The remote control has a row of colour buttons
corresponding to the row of coloured subjects
on the screen.
Pressing one of the colour buttons will take you
directly to the page corresponding to the subject
heading.
Teletext is a free service broadcast by some
TV stations which gives up-to-the-minute
information on news, weather, television
programmes, share prices and many other
topics. Using the Teletext control buttons you
can view pages of information that are listed in
the teletext index.
To Turn on Teletext Function
In ATV mode, press the TTX button to enter
Teletext mode. Press the INDEX button to
display the index page.
Press the TTX button once to exit and the
TV will return to the channel you were watching.
To select a page of text
Find the number of the page in the index and
enter it using the 0-9 buttons. The number of
the page will appear on the top left corner of the
screen.
The page counter will search for your page.
When it finds it, the page will be displayed.
To move to the next page of text, press the
button.
To move to the previous page, press the
button.
To return to the index page, enter the “100” by
using the 0-9 buttons or press the INDEX
button.
Mix
To view a page of text while watching a TV
programme, press the TTX button twice.
The text will be superimposed over the TV
programme.
Double height text
If you have difficulty reading the text on the TV
you can double the height of the text.
Press the SIZE button. The top half of the
page will be displayed in double height text.
Press the SIZE button again. The bottom
half of the page will be displayed in double
height text.
Press the SIZE button again to return to the
full page.
Make sure the TV channel you are watching
transmits teletext.
“No Teletext” sign will show on the screen if teletext
is not available.
Teletext (ATV Mode)

16
BASIC FEATURES
Digital teletext can access special digital teletext
services and specific services which broadcast
digital teletext. You will need to turn off Subtitle
Function before using teletext.
1. In DTV mode, press the TTX button to
display the teletext page.
This function allows the TV to virtually record
the live viewing broadcast programme.
Note: If the transfer rate of the USB storage
device is too slow for recording or time shift
function, a warning statement will be shown on
the screen. If this happens, please upgrade your
USB storage device.
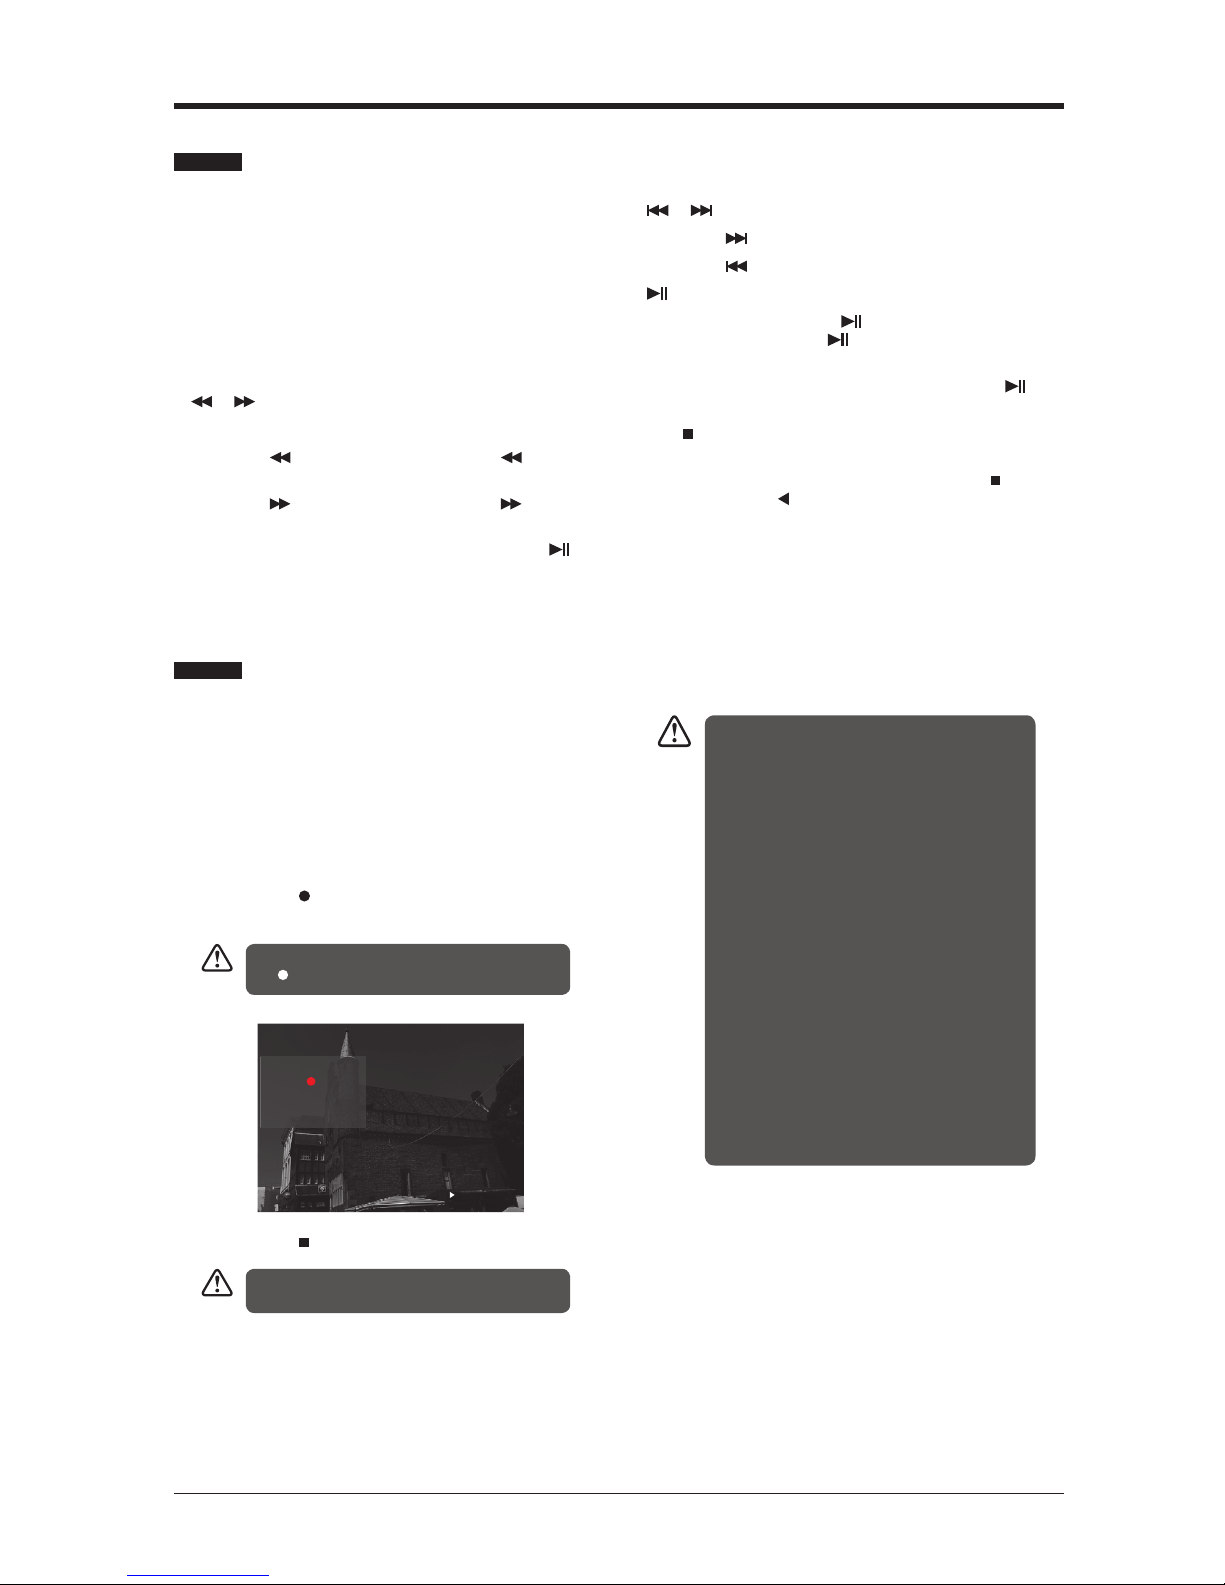
During normal TV viewing, you may press the
TIMESHIFT button to virtually pause the live
viewing broadcast programme if you want to
gooutforawhile(e.g.goingtothebathroom/
kitchen). “ II “ will show on the screen.
When you have returned, press the button
to display the PVR Time Shift progress bar and
then press the buttons to select “ ” on the
bar. Press the OK button to play the missed
broadcast programme. “ ” will show on the
screen.
The video and sound may have a little bit of
delay or be out-of-sync for a few seconds when
the unit starts to playback the missed broadcast
programme. It will soon turn to normal.
2. Press the 0-9 buttons to select a page
number.
3. Follow the instructions on digital teletext and
move onto the next step by pressing OK,
, RED, GREEN, YELLOW, BLUE or 0-9
buttons etc.
4. To change digital teletext service, select a
different service by pressing the 0-9 buttons
or the buttons.
Alternative: You may press the RED button
to the TTX button to display the teletext
information when you see a red logo
displayed on the screen (e.g. BBC).
5. Press the TTX button to exit.
Digital Teletext (DTV Mode)
Time Shift Function (DTV Mode)
• Time Shift Mode and Recording functions
may not work if the signal strength is weak.
• Stop the time-shift function before switching
to another input source.
The ‘PVR Time Shift Progress Bar’
1 Indicates the status of the currently
displayed video ( / / / )
2 Indicates the time lagging behind
the live broadcast (PVR reviewing)
3 Indicates the available recording
time on your USB storage device
PauseF BF FP rev. Next Stop
00:00:06
00:01:36
Available Time
345:14:08/345:15:44
1
3
2
17
BASIC FEATURES
Use this function to record the DTV programme
you are watching on the main screen and save
it for future viewing. The recording from timer
programme or direct recording may have a
little bit of delay when it starts to record the
broadcast programme.
Please make sure the USB device is inserted. If
not, a warning message will pop up.
1. Press the REC button to record the
programme that you are currently watching.
2. Press the Stop button to stop recording.
Using the Remote Control
You can shift playback to any point of the
virtually recorded programme. Press the
TIMESHIFT button to display the PVR Time
Shift progress bar again.
TIMESHIFT
During playback, press the TIMESHIFT button to display
a still screen.
or
When playing,
•Pressthe button repeatedly to speed up x2/x
4/x8/x16.
•Pressthe button repeatedly to speed up x2/x
4/x8/x16.
•Duringfastforward/fastbackwardstate,pressthe
button to return to normal playback.
To display the recording information, press
the REC button.
or
•Pressthe button to jump about 10% forward.
•Pressthe button to jump about 10% back.
•Duringplayback,pressthe button to display a still
screen and then press the button again to resume
playback.
•Duringfastforward/fastbackwardstate,pressthe
button to return to normal playback.
OK/
If you want to exit the PVR Time Shift progress bar and
return to the current live broadcast, press the OK/ button
and then press the button to confirm.
Time Shift Function (DTV Mode)
Recording DTV Programme onto a USB Storage Device
Recording will stop automatically when the
disk is full.
• If a hard disk is used, make sure its mains
adapter is connected to the mains supply.
• If a USB hub is used, make sure its mains
adapter is connected to the mains supply as the
total current consumption may exceed 500mA.
• The maximum supported storage space of the
hard disk is 1 TB.
• The file system only supports FAT32 format.
• If you want to store the video streaming of a DTV
programme, the transfer rate of the USB storage
devicemustnotbelessthan5MB/s,otherwise
the picture and sound of the programme will be
affected and a warning statement will be shown
on the screen. If this happens, please upgrade
your USB storage device.
• The TV screen will be blank temporarily as it will
take time to start up and stabilise the connected
hard disk. This is normal and the starting time
may vary depending on the brand and the
memorysizeoftheconnectedharddisk.
• Disconnect the USB storage device if it is not
in use.
Recording
Recorded Time : 00 : 00 : 47
Available Time: 3837 Minute
16QVC
A Traditional Christ
18
BASIC FEATURES
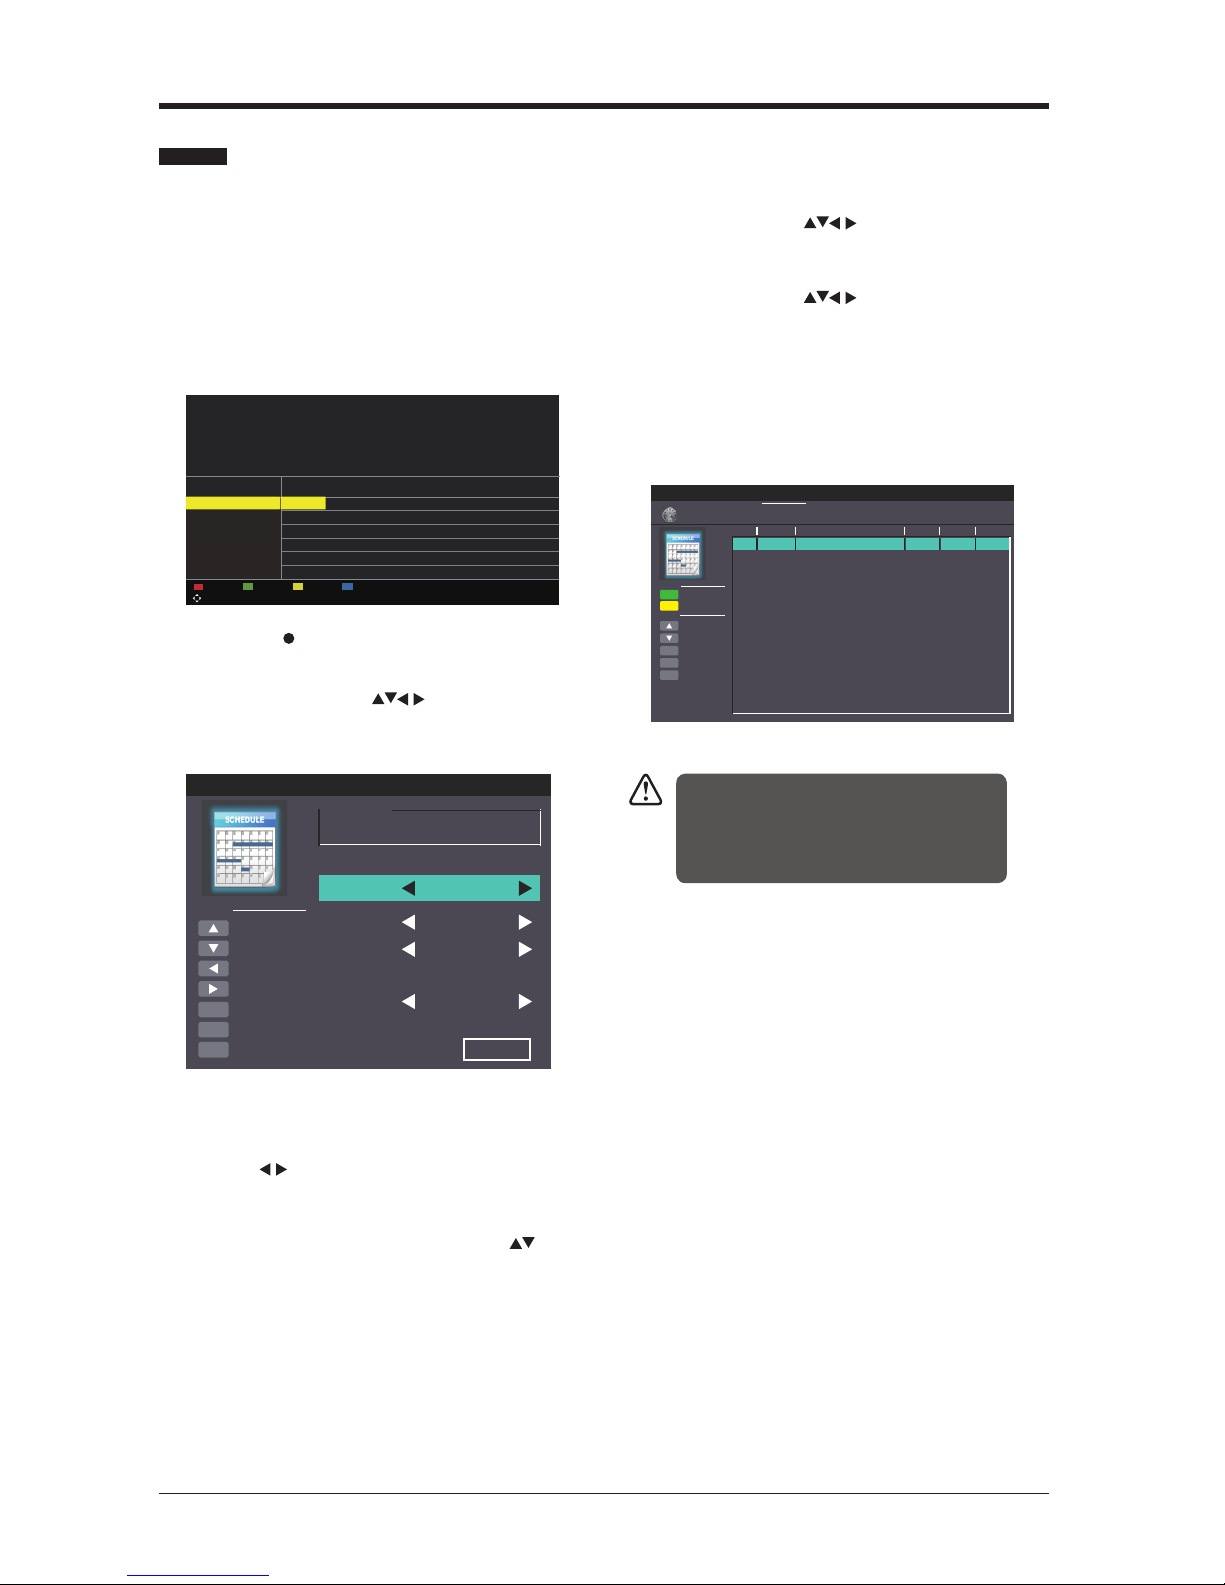
This function is used for scheduled recording.
The recording from timer programme or direct
recording may have a little bit of delay when it
starts to record the broadcast programme.
Please make sure the USB device is inserted. If
not, a warning message will pop up.
1. Press the EPG button on the remote control.
The EPG menu will appear.
2. Press the (REC) button on the remote
control while on the selected programme,
the Scheduled Record menu will be
displayed. Press the buttons to select
the settings in the RECORD menu for the
Frequency,Channel,Starttime,andEnd
time.
Frequency
Press the buttonstoselectthefrequency
(Off/Once/Daily/Weekly/Weekday).
Channel
Press the OK button and then press the
buttons to select the channel that you want to
record.
Start time(forModeOnce,Daily,Weekly,
Weekday) Press the buttons to adjust the
start time.
End time(forModeOnce,Daily,Weekly,
Weekday) Press the buttons to adjust the
end time.
3. After finishing all the recorder adjustments,
press the Save button to confirm your
settings.
4. The Scheduled Record Setting List will
then be displayed with your preset reminders
shown.
5. Press the EXIT button to exit EPG.
Timer Programming
• When the preset time is reached, the TV will start
recording automatically.
• If a programme recording starts when the TV is in
standby mode, the LED indicator will alternatively
flash red and blue.
Scheduled Record - Group 1
Move Up
Move Down
Adjust
Adjust
Select
Return
Exit
Hot Key
OK
MENU
EXIT
Setting Status
Setting Is Not In Use
Frequency Off
1BBCONE
2008-12-25
1 0 : 0 5
2008-12-25
1 0 : 1 5
Channel
Start Time
End Time
Save
DeleteOne
Move Up
Move Down
Select
Return
Exit
Function
OK
MENU
EXIT
Frequency
Off
Off
Off
Off
Off
Off
Off
Off
Off
Off
Off
Off
Off
Off
Off
Off
Hot Key
Date
Scheduled Record
Scheduled Record Setting List
Standby
Delete All
Group
1
2
3
4
5
6
7
8
9
10
11
12
13
14
15
16
Channel
Start Time
Duration
10:03
25 Dec 2008 Thu.
Move
PROGRAMGUIDE
2008/12/2510:00:0-2008/12/2510:15:0PinkyandPerky
My Fair Lady
It’sChristmaaaas!It’sChiristmasDaybutthereseemstobeashortageofpresentsatPPCTVandeveryoneisfed
up.PinkyandPerkyreallsetheyforgottosendeveryone’sChristmasliststoSanta.[S]
PrevDate NextDate Schedule Reminder
OK:SelectDisplay:DisplayEPG:Exit
002BBCTWO
007 BBC THREE
070 CBBC Channel
080 BBC NEWS
105 BBC Red Bu.. ...
Christmas Day Eucharist The Santa Clause2
Dec 25 2008
10:00 11:00
The is BBC THREE
Bear Behavi... Shau... ChuckVision Chris... Hider in the House Sherlock Holmes an..
BBC News our World: Stormch... BBC News The Best of Five Min.. .
BBC Red Button
25 Dec 2008 10:03:34
[Children’s][S]
001BBCONE Pinky an....

19
BASIC FEATURES
You can play a recorded programme from the
recorded programme list or from a USB Storage
Device.
1. Press the SOURCE button on the top of the
TV or the SOURCE button on the remote
control then press the buttons to select
the USB mode and then press the OK
button.
2. Press the buttons to select MOVIE and
then press the OK button.
3. Press the buttons to select your storage
device and then press the OK button.
4. Press the buttons to select the “
usbrecord ” folder and then press the OK
button.
5. Press the buttons to select your recorded
programme and then press the button to
view.
6. Press the OK button or the DISPLAY button
to display the function bar. Press the
buttons and then press the OK button to
selectthefunction:Pause/Prev./Next/FB
/FF/Stop/QuickMenu(Repeat/Encode
Type).
7. Press the EXIT button to return to the
previous menu.
Play Recorded Programme
1. Press the MENU button to display the
main menu. Press the buttons to select
Picture in the main menu, then press the
or OK button, it will highlight the first option.
2. Press the buttons to select the option you
want to adjust in Picture menu.
3. Press the buttons to change the
following settings.
TIPS:
• You can change the value of brightness,
contrast, sharpness and saturation when
the picture is in Personal mode.
• You can press P.MODE button on the
remote control to change the Picture Mode
directly.
Play Recorded Programme
Picture Management (ATV / DTV Mode)
Movie
Move ChangePageOKSeleteQuickMenuEXIT Return
USB1
USB1
Movie
Move ChangePageOKSeleteQuickMenuEXIT Return
USB1/Movie
AITEMP
Movie
MY PVR
Photo
Text
Music
LE32G
1/1
QuickMenu
00 : 05 : 1300 : 00 : 22
FileName
VideoCodec :
Resolution
Bitrate :
Animals.AVI
MPEG4
640 x 480
4158120 bps
AudioCodec :
SampleRate :
Channel :
MP3
44100Hz
2
Picture
Picture Mode
Brightness
Contrast
Sharpness
Saturation
Hue
Colour Temp
Aspect Ratio
Standard
Standard
16:9
50
50
50
50
0
Move Adjust MENU:ReturnEXIT: Exit
Picture
Picture Mode
Brightness
Contrast
Sharpness
Saturation
Hue
Colour Temp
Aspect Ratio
Standard
Standard
16:9
50
50
50
50
0
Move Adjust MENU:ReturnEXIT: Exit
Photo Music Movie Text
20
BASIC FEATURES
Picture Mode
Allows the selection of a picture-enhancement
technical from among the following options:
Dynamic/Standard/Mild/Personal.
Brightness
This item can adjust the optical fiber output of
theentirepicture;itwillaffectthedarkregionof
the picture.
Contrast
This item can adjust the highlight intensity of
the picture, but the shadow of the picture is
invariable.
Sharpness
This item can adjust the peaking in the detail of
the picture.
Saturation
This item can adjust the saturation of the colour
based on your own like.
Hue
This item may use in compensating colour
changed with the transmission in the NTSC
code.
Colour Temp
This item can increase or reduce warm colour
of the picture personally (red), and the cold
colour (blue) according to your like. The choice
of Cold, that means it will increase the blue tone
for the white. But choosing the Warm, it will
increase the red colour for the white.
Aspect Ratio
Allows you to watch the screen in various
pictureformats:Auto/4:3/16:9/Zoom1/
Zoom2.
Advanced Settings
• Noise Reduction: Reduces the noise level of
theconnecteddevice(Medium/Strong/Off
/Weak).
• Dynamic Contrast: Adjusts the dynamic
contrast(Medium/Strong/Off/Weak).
4. Press the EXIT button to exit menu.
Picture Management
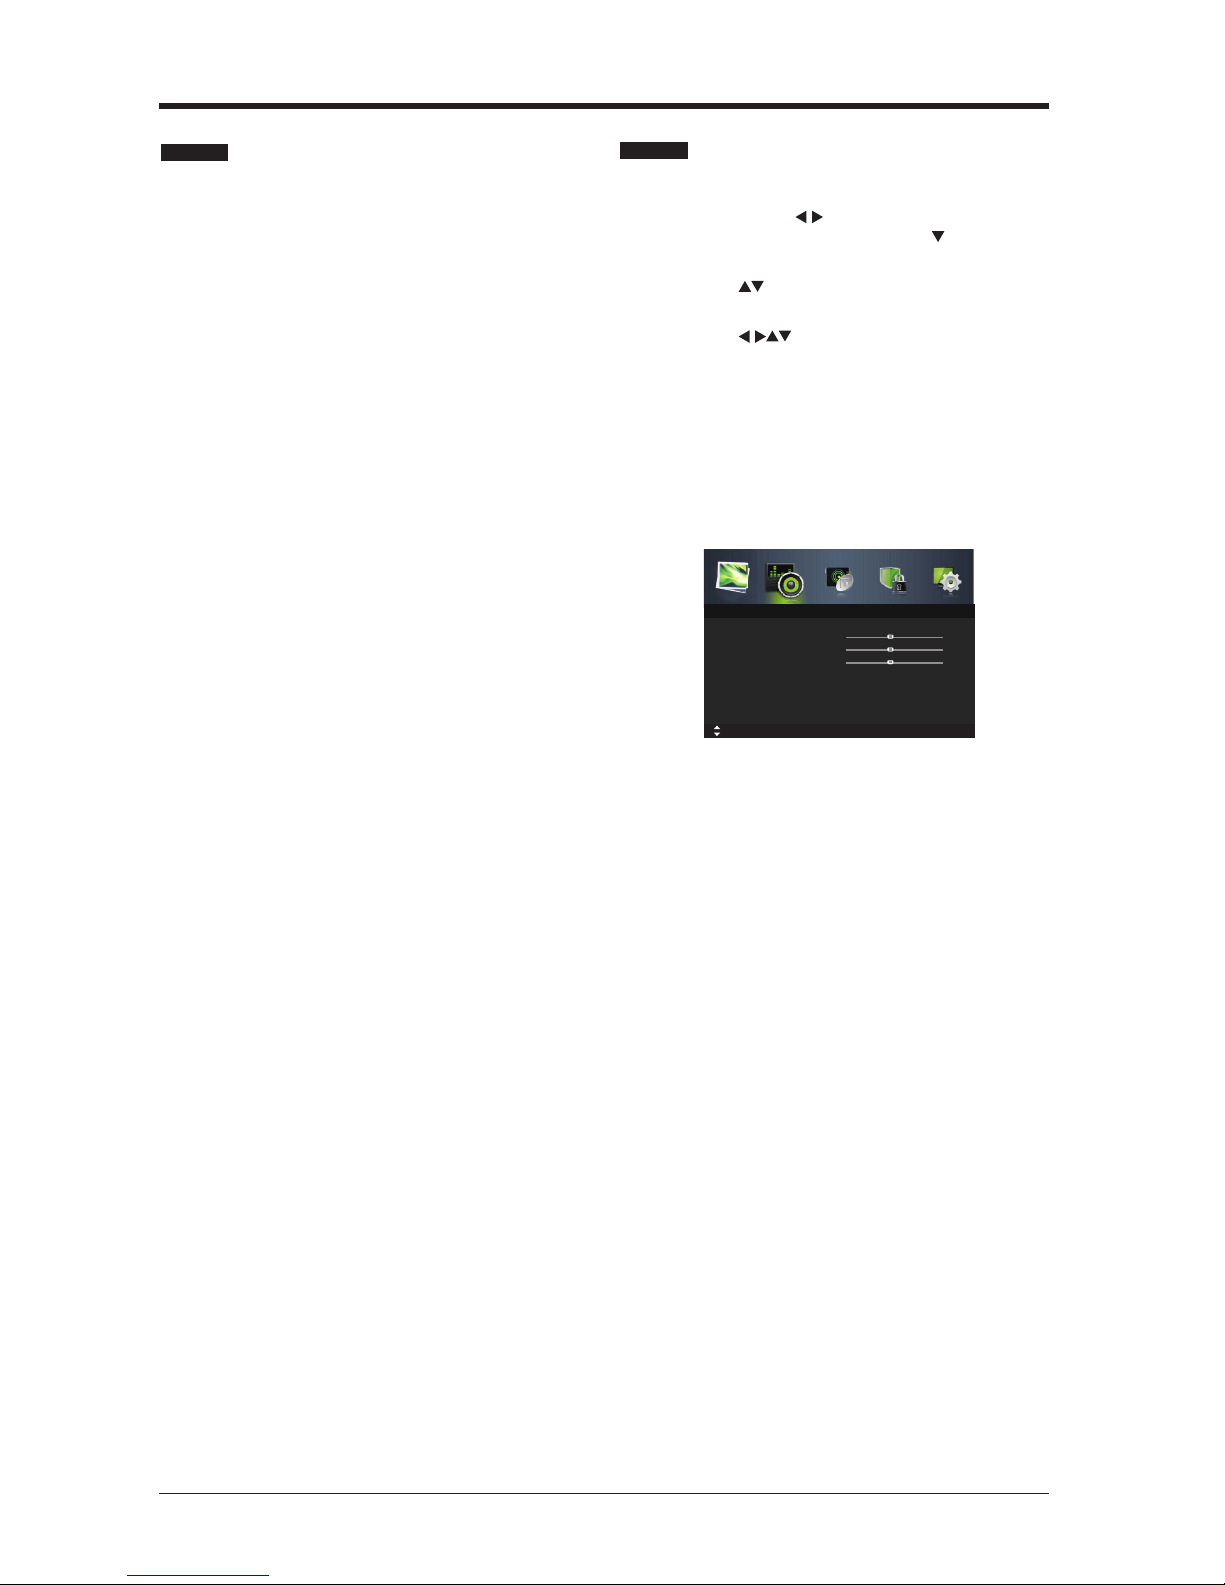
1. Press the MENU button to display the main
menu. Press the buttons to select Sound
in the main menu, then press the or OK
button, it will highlight the first option.
2. Press the buttons to select the option you
want to adjust in Sound menu.
3. Press the buttons to change the
following settings.
TIPS:
• You can change the value of treble and
bass when the sound is in Personal mode.
• You can press the S.MODE button on the
remote control to change the Sound Mode
directly.
Sound Mode:
Allows the selection of an audio-enhancement
technical from among the following options:
Standard, Music, Movie and Personal. You can
change the value of Treble and Bass when the
sound is in Personal mode.
Treble
Controls the relative intensity of higher-pitched
sounds.
Bass
Controls the relative intensity of lower-pitched
sounds.
Balance
Adjusts the relative volume of the speakers in a
multiple speaker system.
Surround Sound
SelectstoturnOn/OffSurroundSound.
Sound Management
Sound Mode
Treble
Bass
Balance
Surround Sound
EQSetting
AVL
SPDIF
Standard
On
On
PCM
0
0
0
Move MENU:ReturnEXIT: Exit
Sound
This manual suits for next models
1
Table of contents
Other Seiki LCD TV manuals

Seiki
Seiki SC552GS User manual

Seiki
Seiki SC261FS User manual

Seiki
Seiki SC462TC User manual

Seiki
Seiki SC552GS User manual

Seiki
Seiki SC32HT04 User manual

Seiki
Seiki SE39HE02 User manual

Seiki
Seiki LC-55TD5 User manual

Seiki
Seiki LC-32G82 Owner's manual

Seiki
Seiki SC323FI Owner's manual

Seiki
Seiki LC-24G82 User manual

Seiki
Seiki LC-32B56 User manual

Seiki
Seiki SC601TS Owner's manual

Seiki
Seiki LC-40G81 Owner's manual

Seiki
Seiki LC-32G82 Owner's manual

Seiki
Seiki LC-32G82 User manual

Seiki
Seiki SC261FS User manual

Seiki
Seiki SC501TS User manual

Seiki
Seiki SE65JY25 User manual

Seiki
Seiki SC601GS User manual

Seiki
Seiki SC391TS User manual


