Seiki SE32HD01UK User manual

1
En -
CONTENTS
Important Safety Instructions 2
Safety Information 3
Preparation 4
What's Included 4
Front View 5
Rear View 6
Installing the Stand 7
Removing the Stand for Wall-Mounting 7
Remote Control 8
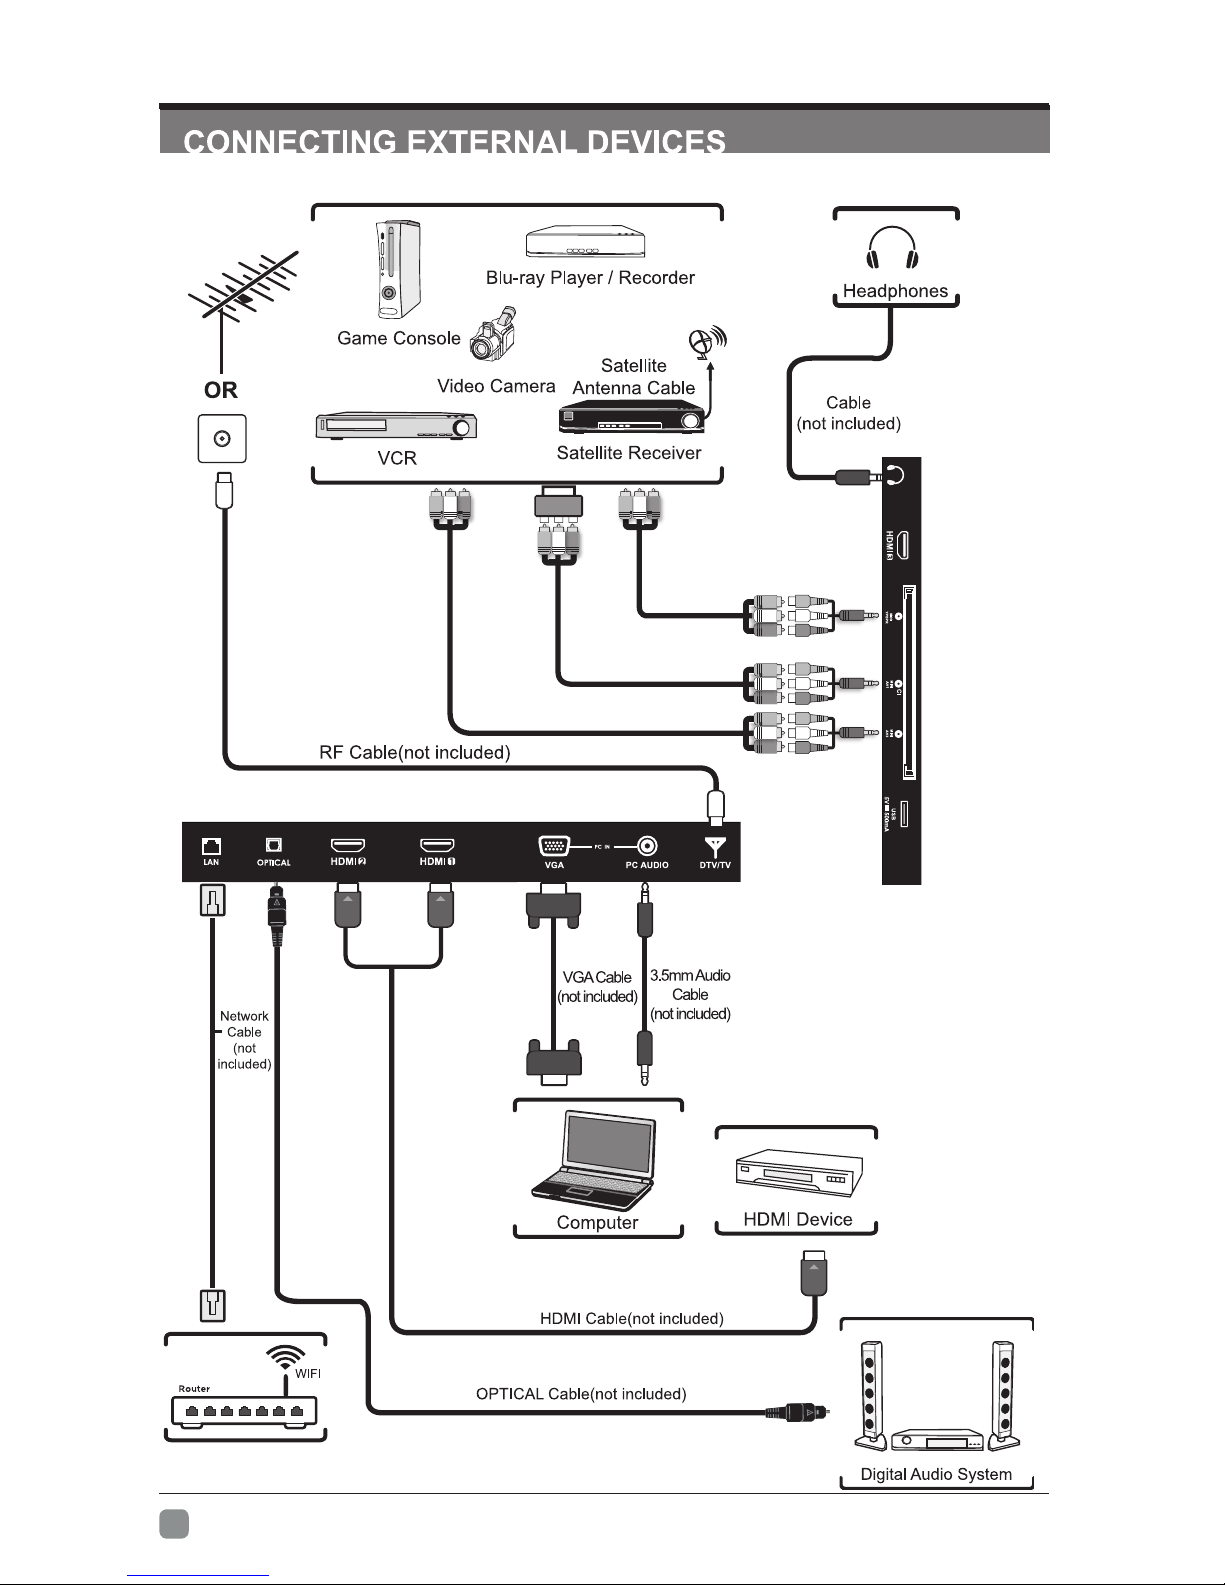
Connecting External Devices 10
Customizing TV Settings 11
Initial Setup 11
Navigating the Setup Settings 13
Streaming 13
Media 14
Viewing Photos 15
Listening to Music 15
Viewing Movies 16
My Text 17
Source 17
Setup 18
Settings 18
Audio 19
Picture 20
Channel 21
Time 25
Network 26
Lock 28
Using the Features 29
Parental Control 35
Troubleshooting 36
Maintaining 37
Specication38
DisposalInformation 38
Limited Warranty 39
OTT APP Service 40

2
En -
Warning:Topreventthespreadofre,keepcandlesorotheropen
amesawayfromthisproductatalltimes.
IMPORTANT SAFETY INSTRUCTIONS
• Readtheseinstructions – All the safety and operating instructions should be read before this product is
operated.
• Keeptheseinstructions – The safety and operating instructions should be retained for future reference.
• Heedallwarnings – All warnings on the appliance and in the operating instructions should be adhered to.
• Followallinstructions – All operating and use instructions should be followed.
• Donotusethisapparatusnearwater – The appliance should not be used near water or moisture – for
example, in a wet basement or near a swimming pool, and the like.
• Cleanonlywithdrycloth.
• Donotblockanyventilationopenings.Installinaccordancewiththemanufacture’sinstructions.
• Donotinstallnearanyheatsourcessuchasradiators,heatregisters,stoves,orotherapparatus(including
ampliers)thatproduceheat.
• Donotdefeatthesafetypurposeofthepolarizedorgrounding-typeplug.Apolarizedplughastwoblades
with one wider than the other. A grounding-type plug has two blades and a third grounding prong. The wide
bladeorthethirdprongareprovidedforyoursafety.Iftheprovidedplugdoesnottintoyouroutlet,consult
an electrician for replacement of the obsolete outlet.
• Protectthepowercordfrombeingwalkedonorpinchedparticularlyatplugs,conveniencereceptacles,and
the point where they exit from the apparatus.
• Onlyuseattachments/accessoriesspeciedbythemanufacturer.
• Useonlywiththecart,stand, tripod,bracket,ortablespeciedbythemanufacturer,or
soldwiththeapparatus.Whenacartisused,usecautionwhenmovingthecart/apparatus
combination to avoid injury from tip-over.
• Unplugthisapparatusduringlightningstormsorwhenunusedforlongperiodsoftime.
• Referallservicingtoqualifiedservicepersonnel.Servicingisrequiredwhentheapparatushasbeen
damagedinanyway,suchaspower-supplycordorplugisdamaged,liquidhasbeenspilledorobjects
have fallen into the apparatus, the apparatus has been exposed to rain or moisture, does not operate
normally, or has been dropped.
• Pleasekeeptheunitinawell-ventilatedenvironment.
• WARNING: To reduce the risk of fire or electric shock, do not expose this apparatus to rain or
moisture.Theapparatusshallnotbeexposedtodrippingorsplashing.Objectslledwithliquids,
such as vases should not be placed on apparatus.
• WARNING:Thebatteriesshallnotbeexposedtoexcessiveheatsuchassunshine,reorthelike.
• WARNING: The mains plug is used as disconnect device, the disconnect device shall remain readily
operable.
• WARNING: Toreducetheriskofelectricshock,donotremovecover(orback)astherearenouser-
serviceablepartsinside.Referservicingtoqualiedpersonnel.
Thislightningflashwitharrowheadsymbolwithinanequilateraltriangleisintendedto
alerttheusertothepresenceofnon-insulated“dangerousvoltage”withintheproduct’s
enclosurethatmaybeofsufcientmagnitudetoconstituteariskofelectricshock.
Theexclamationpointwithinanequilateraltriangle isintendedtoalerttheuserto
the presence of important operating and maintenance instructions in the literature
accompanying the appliance.
ThisequipmentisaClassIIordoubleinsulatedelectricalappliance.Ithasbeendesigned
insuchawaythatitdoesnotrequireasafetyconnectiontoelectricalearth.

3
En -
SAFETY INFORMATION
This product contains electrical or electronic materials. The presence of these materials may, if not disposed of
properly, have potential adverse effects on the environment and human health.
Presence of this label on the product means it should not be disposed of as unsorted waste and must be collected
separately. As a consumer, you are responsible for ensuring that this product is disposed of properly.
WARNING:Topreventinjury,thisapparatusmustbesecurelyattachedtothe floor/wallinaccordancewiththe
installation instruction.
Toensurereliableandsafeoperationofthisequipment,pleasecarefullyreadalltheinstructionsinthisuserguide,
especially the safety information below.
Electrical Safety
• The TV set should only be connected to a main power supply with voltage that matches the label at the rear of
the product.
• To prevent overload, do not share the same power supply socket with too many other electronic components.
• Donotplaceanyconnectingwireswheretheymaybesteppedonortrippedover.
• Donotplaceheavyitemsonanyconnectingwire,whichmaydamagethewire.
• Hold the main plug, not the wires, when removing from a socket.
• Duringathunderstorm,orwhennotusingthetelevisionforextendedperiodoftime,turnoffthepowerswitchon
the back of the television.
• Donotallowwateror moisturetoentertheTVorpoweradapter. DoNOTuseinwet,moist areas,suchas
bathrooms, steamy kitchens or near swimming pools.
• Pulltheplugoutimmediately,andseekprofessionalhelpifthemainplugorcableisdamaged,liquidisspilled
onto the set, if the TV set accidentally exposed to water or moisture, if anything accidentally penetrates the
ventilation slots or if the TV set does not work normally.
• Donotremovethesafetycovers.Therearenouser-serviceablepartsinside.Tryingtoservicetheunityourselfis
dangerousandmayinvalidatetheproduct’swarranty.Qualiedpersonnelmustonlyservicethisapparatus.
• To avoid a battery leakage, remove batteries from the remote control, when the remote is not use for long period,
or when the batteries are exhausted.
• Donotbreakopenorthrowexhaustedbatteriesintoare.
• Forbestresults,usetypeAAA(example-alkaline,carbon-zinc,etc.)batteries.
• Install only new batteries of the same type in your product.
• Failure to insert batteries in the correct polarity, as indicated in the battery compartment, may shorten the life of
the batteries or cause batteries to leak.
• Donotmixoldandnewbatteries.
• DonotmixAlkaline, Standard(Carbon-Zinc)orRechargeable(NickelCadmium)or(NickelMetalHydride)
batteries.
• Batteries should be recycled or disposed of as per state and local guidelines.
• Donotattempttorechargedisposablebatteries.
• Donotshortcircuitbatteryterminals.
• Keep away from children.
Physical Safety
• Donotblockventilationslotsinthebackcover.YoumayplacetheTVinacabinet,butensureatleast5cm(2’’)
clearance all around.
• DonottaporshaketheTVscreen,oryoumay damagetheinternalcircuits.Takegoodcareoftheremote
control.
• TocleantheTVuseasoftdrycloth.Donotusesolventsorpetroleumbaseduids.
• Donotinstall nearanyheatsourcessuchasradiators,heatregisters,stovesorotherapparatus(including
ampliers)thatproduceheat.
• Donotdefeat thesafetypurposeofthepolarizedorgrounding-typeplug.Apolarizedplug hastwobladeswith
one wider than the other. A grounding plug has two blades and a third grounding prong. The wide blade, or the
thirdprongisprovidedforyoursafety.Iftheprovidedplugdoesnottintoyouroutlet,consultanelectricianfor
replacement of the obsolete outlet.
• Protect the power cord from being walked on or pinched particularly at plugs.
• Unplugtheapparatusduringlightningstormsorwhenunusedforlongperiods.
• Referallservicingtoaqualifiedservicepersonnel.Servicingisrequirediftheapparatusdoesnotoperate
normally or if the apparatus, including the power supply cord or plug, has been damaged in any way.
• Servicingisalsorequiredifliquidhasbeenspilled,orobjectshavefallenintotheapparatus;whentheapparatus
hasbeenexposedtorainormoisture;oriftheapparatushasbeendropped.
• Always connect your television to a power outlet with protective ground connection.
4
En -
PREPARATION
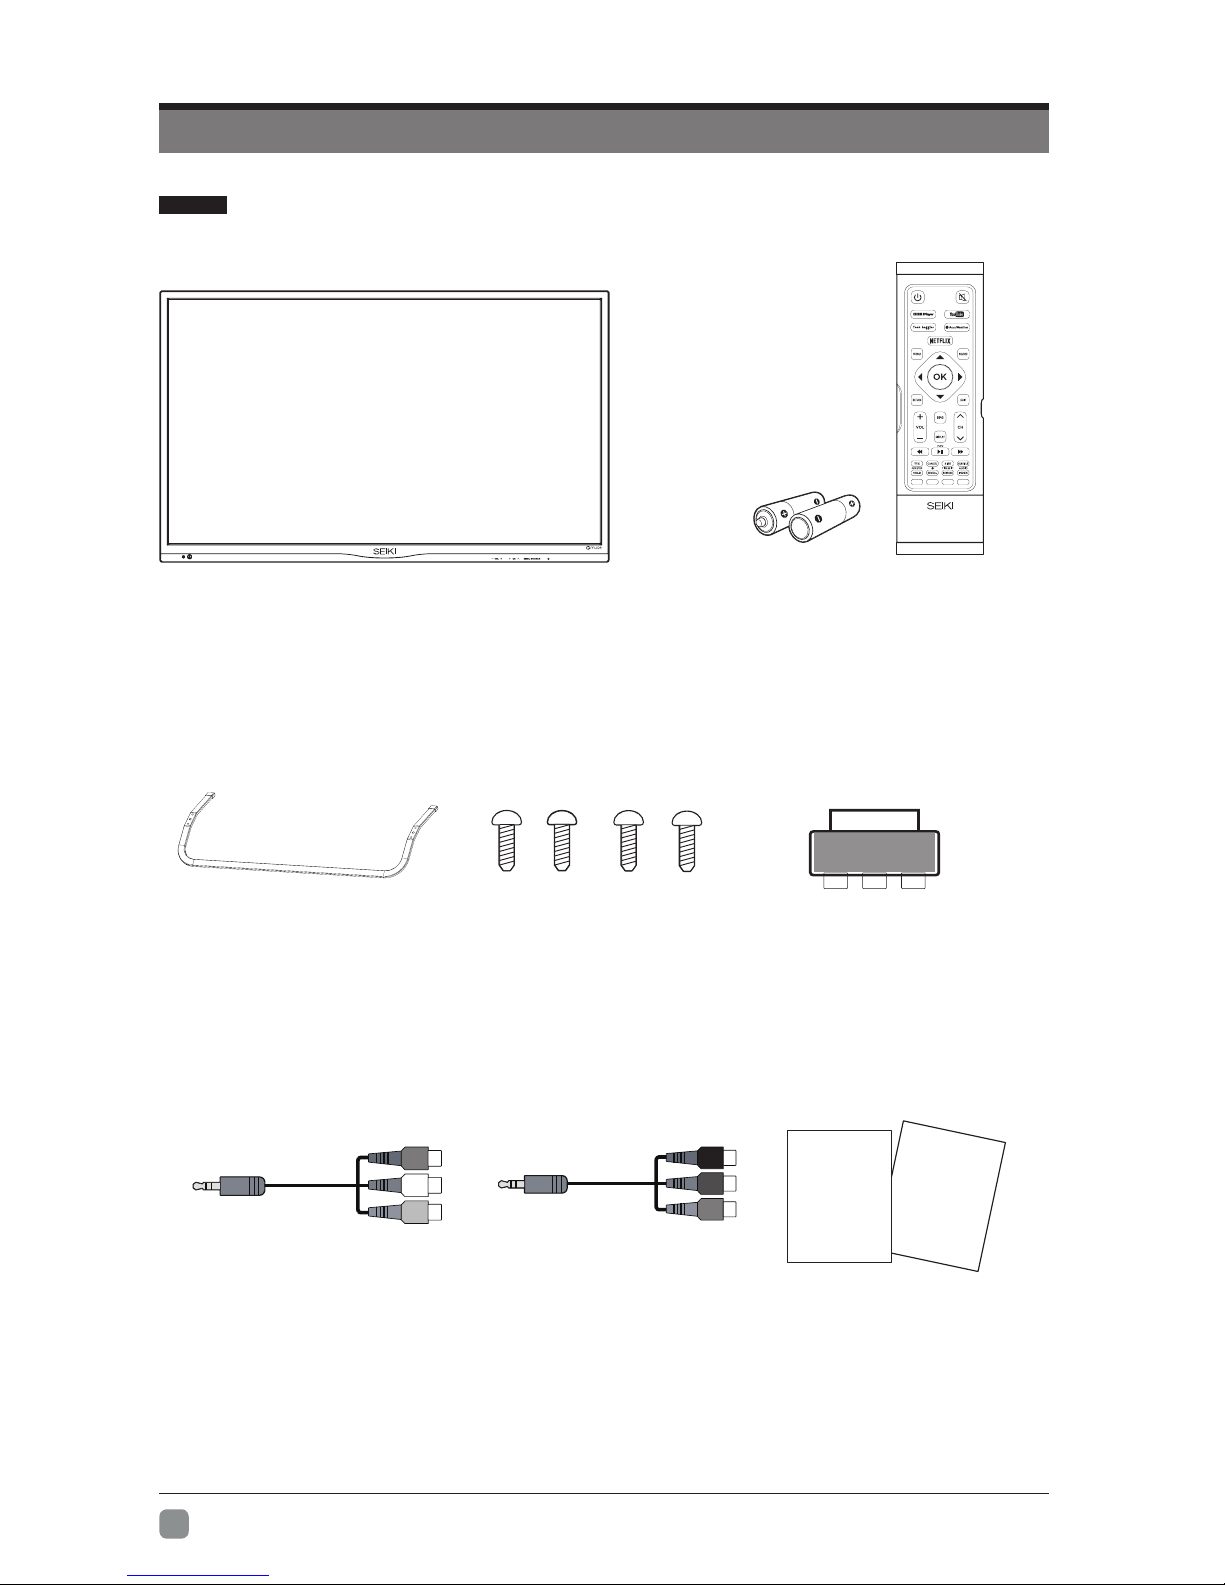
What's Included
Remote Control with Batteries
Base Stand
TV Set
Screws x4
MINIYPBPRcable
MINI AV cable UserManual&
QuickStartGuide
Quick
StartGuide
User Manual
AV-SCART
5
En -
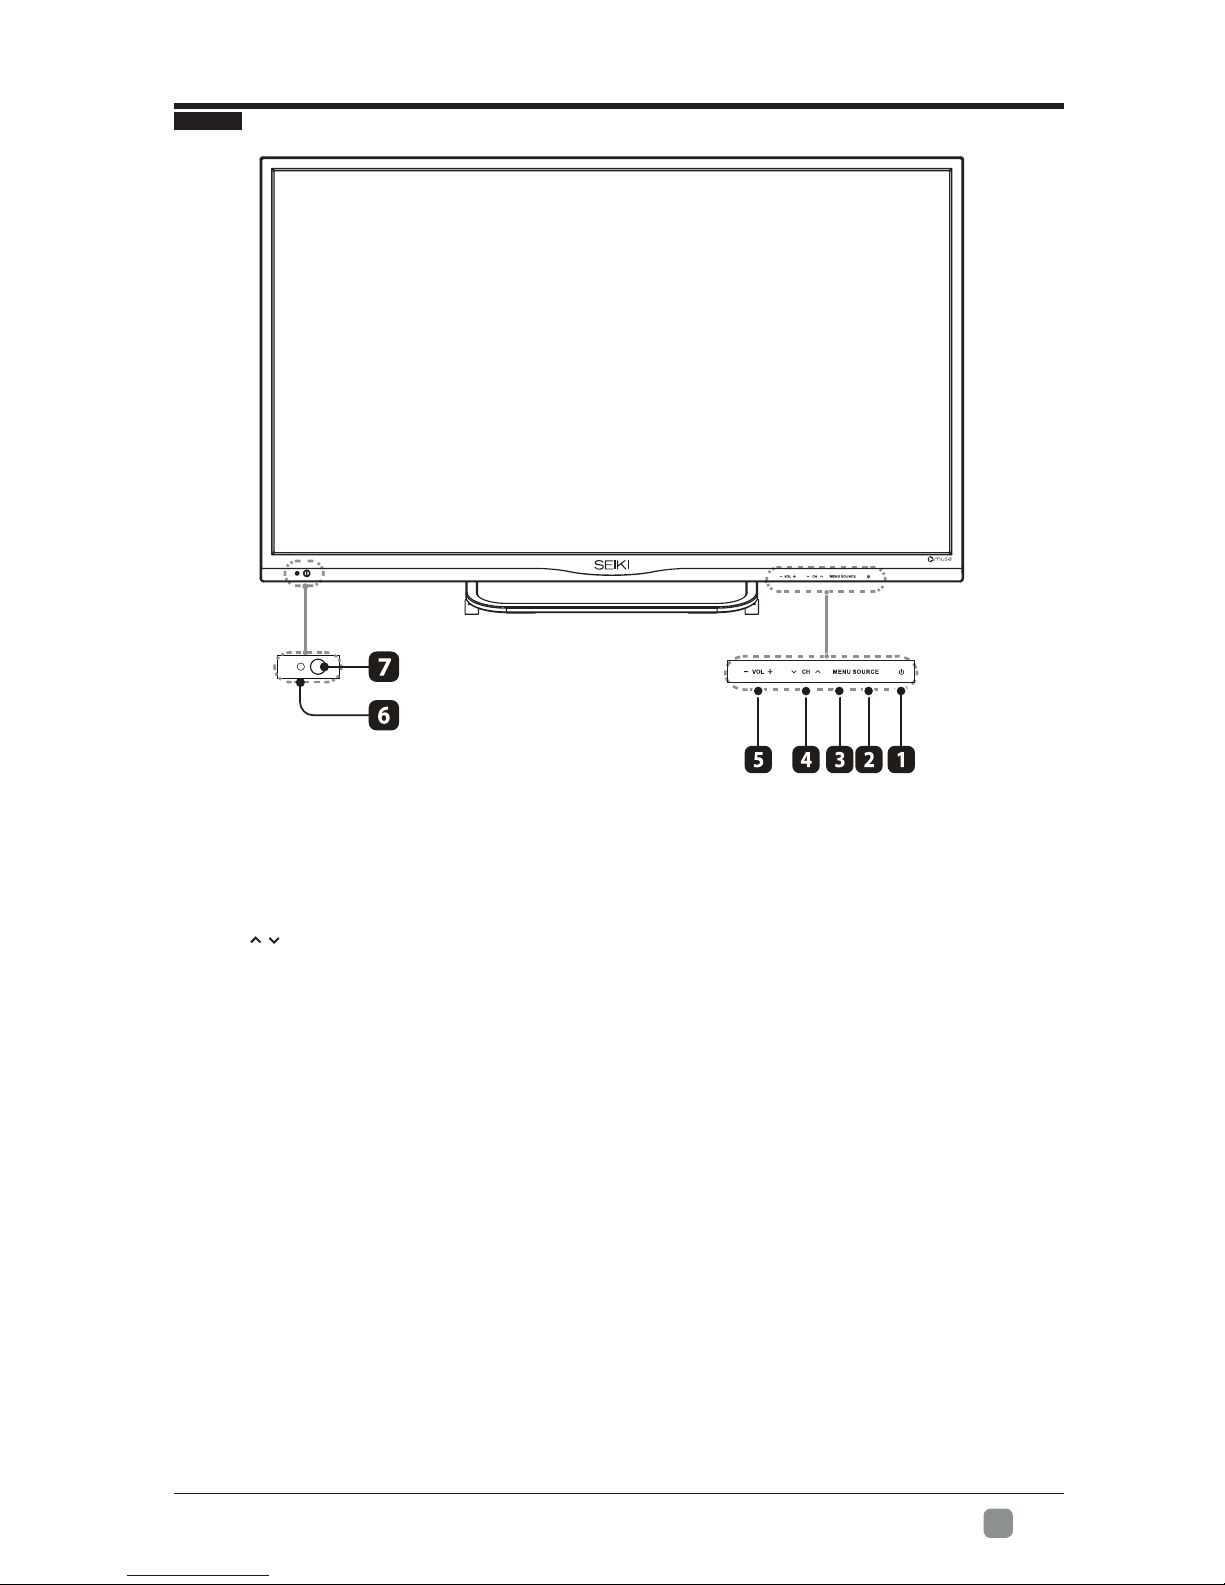
FrontView
1. POWER
SwitchtheTVbetweenOn/Standbymode.
2. SOURCE
Press to select among different input signal sources.
3. MENU
Displaythemainmenu.
4. CH/
Press to select a channel.
5. VOL+/-
Press to adjust the volume.
6. POWERIndicator
Illuminate blue when the TV is turned on. Illuminate red when the TV is in standby mode.
7. IR(InfraredReceiver)
Receive IR signals from the remote control.
PREPARATION

6
En -
1. PowerCord
Connect to AC power outlet.
2. LAN
Network connection port.
3. OPTICAL
Connect a digital sound system to this
jack.
4. HDMIInput
ConnecttoaHigh-Denition(HD)signal
output device.
5. VGAInput
Connect to a computer or other devices
with a VGA interface.
6. PC AUDIO Input
Connect to a computer audio output.
7. DTV/TVInput
Connecttotheantenna(75ΩVHF/UHF)
socket with the RF coaxial cable.
8. HeadphoneSocket
Connect to the Headphones.
9. MINI YPBPR
Connect to AV devices with component
(Y/Pb/Pr)videoandaudiooutputsockets.
COMPONENT&VIDEOsharewithAUDIO
IN(L/R)subscribeto.
10.MINI AV
ConnecttothecompositeVIDEOand
AUDIO(L/R)outputsocketsonexternal
video devices.
11. CI Slot
UsedtoinsertaCIcard.ACIcardallows
you to view all the channels that you
subscribe to.
12.USB Port
ConnecttoaUSBstoragedevicetoplay
compatible video,audio ,photo and text
les.(USBmode).
PREPARATION
RearView

7
En -
PREPARATION
Installing the Stand
1.Lay the TV face-down on a flat,
cushioned surface to avoid damaging
or scratching.
2.Fix the Left Base Stand to the main
unit using 2 pcs provided screws.
3.Fix the Right Base Stand to the main
unit using 2 pcs provided screws.
• 1.Lay the TV face-down on a flat,
cushioned surface to avoid damaging
or scratching.
• 2.Untightenthe4pcsscrewsholding
the stand assembly and remove them.
• 3.Attach the wall-mount bracket to
the TV using the mounting holes on
the back of the TV. Mount this TV
according to the instructions included
in the wall-mount bracket.
Removing the Stand for Wall-Mounting
8
En -
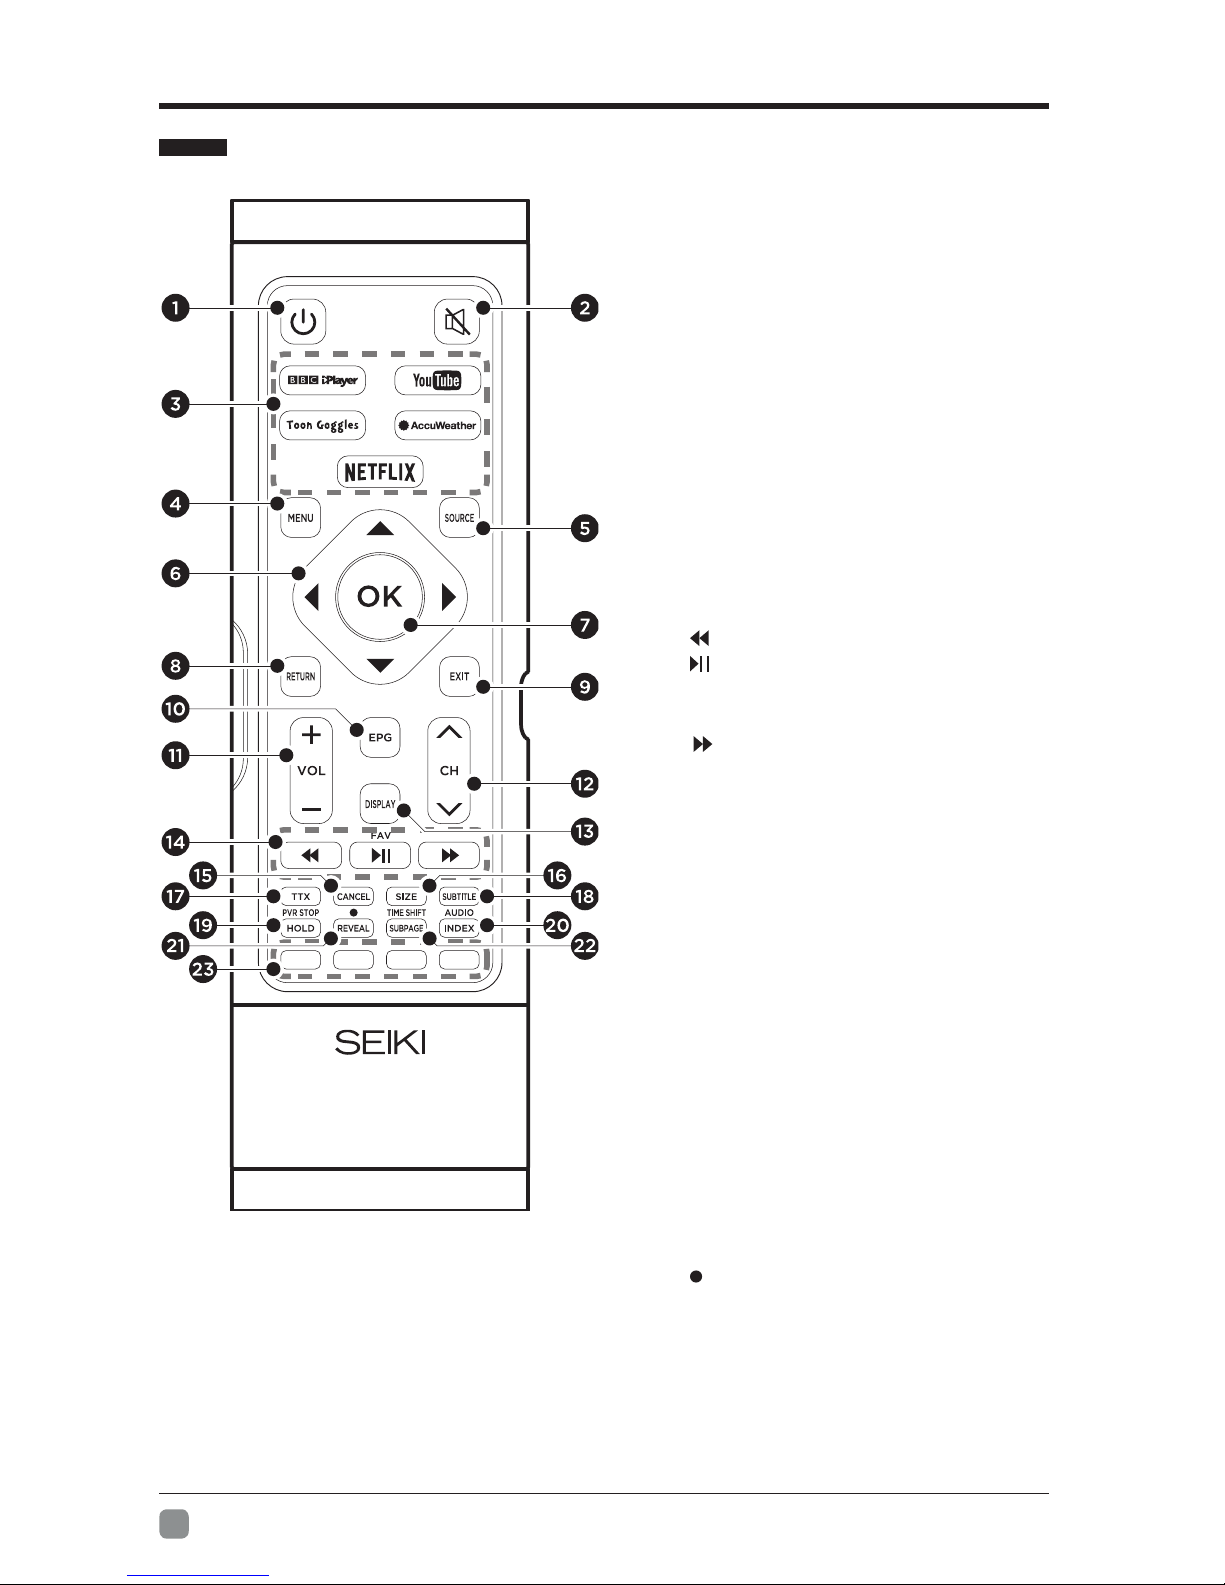
Remote Control
1. Switches the TV between on and
standby mode.
2. Mute and restore sound.
3. Press to view the desired APP.
4. Displaythemainmenu.
5. Select input source.
6. Navigate on screen display menu.
7. Conrmtheselection.
8. Return to previous menu.
9. Exit the main menu.
10. DisplaytheEPG(ElectronicProgram
Guide)(DTVmode).
11. Adjust the volume.
12. Select a channel.
13. Displaythepresentscreeninformation
such as the current channel and the
input source.
14. • : Reverse playback rapidly.
• : Start playback or pause.
• FAV:DisplaytheFavouriteChannel
list.(ATV/DTVMode)
• : Reverse playback rapidly.
15. Toexittheteletextmode.(ATV/DTV
Mode)
16. To enlarge the picture on the TV in
teletext.(ATV/DTVMode)
17. Turn on and off the teletext function.
(ATV/DTVMode)
18. Displaythesubtitlesbroadcastwiththe
program(DTVmode).
19. • HOLD:Freezeamulti-pagepassage
onthescreeninTeletext.(ATV/DTV
Mode)
• PVR STOP:Stop the PVR recording.
20. • INDEX:Press to select the page
numberoftheINDEXfromteletext.
(ATV/DTVMode)
• AUDIO:Adjust the audio in VGA
automatically.
21. • REVEAL : Hidden information such
astheanswertoaquizinTeletext.
(ATV/DTVMode)
• : Record the current programme.
(DTVMode)
22. • SUBPAGE:Displaysthesubpage
ontheteletextscreen.(ATV/DTV
Mode)
• TIMESHIFT:Turn on and off the
Timeshiftfunction.(DTVMode)
23. COLOUR BUTTON:Access to
corresponding function in APP service.
PREPARATION
9
En -
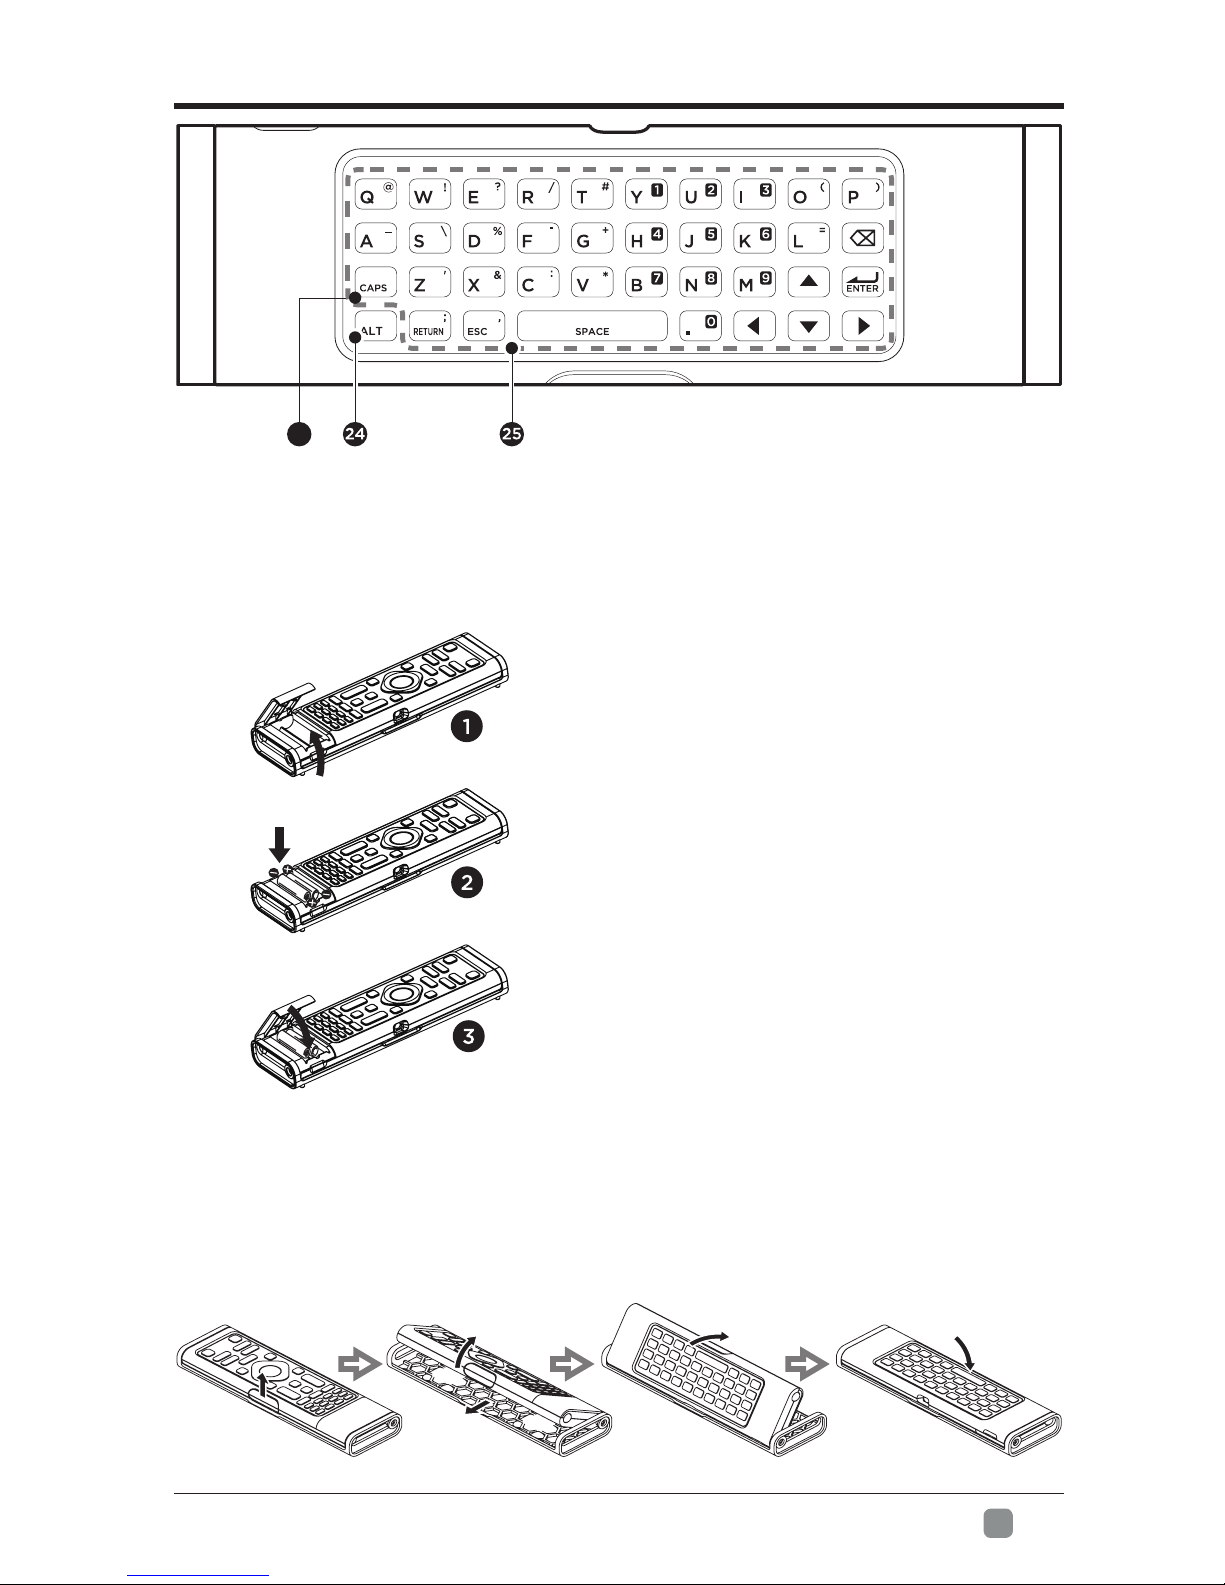
Remote Control Set Up
Remote Control Set Up
24. UsetheALTbuttontoconverttothe
blue special symbols and numbers.
25. Usetocontroltheletterkeysand
make the desired words.
2. Insert 2xAAA batteries with correct
polarity(+/-)asindicated.
1. Remove the battery compartment
cover.
3. Replace the cover.
Holdtheremotecontrolhorizontallyandpushitoutofthebackshell,thenturnit
upside down.
26
26. Usetoswtichlettercase.
PREPARATION
10
En -
Remarks: Component/AV1 is sharing with Audio in (L/R).

11
En -
CUSTOMIZINGTVSETTINGS
Initial Setup
• Connect the power cord to t he power s ocket after you have c ompleted a ll t he
physical connections. At this stage, the TV will enter Standby Mode and the red
LEDindicatorwillilluminate.
• In Standby Mode, press the button on the main unit or on the remote control t
turn the TV on. TheredLEDindicatorwillturnblue.
• WELCOME screen.
OSD Language
• Use buttons to select your desired language to be displayed on the menu,
Mode
• Use buttonstoselectthedesiredmode:HomeMode/StoreMode
• After pressing theOK button you will go to the First Time Setup menu.
English/Deutsch/Français/Español/Português/Italiano/Dutch.Thedefaulton-screen
menu language is set as English.
First Time Setup
WELCOME:
We hope you will be very happy with your new TV. If you
connectyour aerial andthenpressOKtostartAutoTuning, orpress
.
EXIT to cancel.
OK: Select Exit: Exit
please call our helpline on 0345 6588290(Local Rates Apply). Please
W
MENU EXIT
wish and select “TV Setup” to start tuning or “Network Setup” for the network

12
En -
TV Setup
NetworkSetup
• Use buttonstoselectyourdesirednetworktype:Lan/Wireless,thenconnect
to the network.
Country Selects the country where you will operate the TV. The
defaultcountryissetasUK.
TV System SelectsthedesiredTVsystem:DVB-T
Scan Mode Scanandselectthetunetype:ATV+DTV/DTV/ATV.
Start
After finishing all the preliminary settings, press the
OK button to start auto tuning. Channel Tuning will
commence. This operation may take up to several
minutes. The display will show the progress of the
tuning and the number of channels found.
CUSTOMIZINGTVSETTINGS
MENU EXIT
MENU EXIT
13
En -
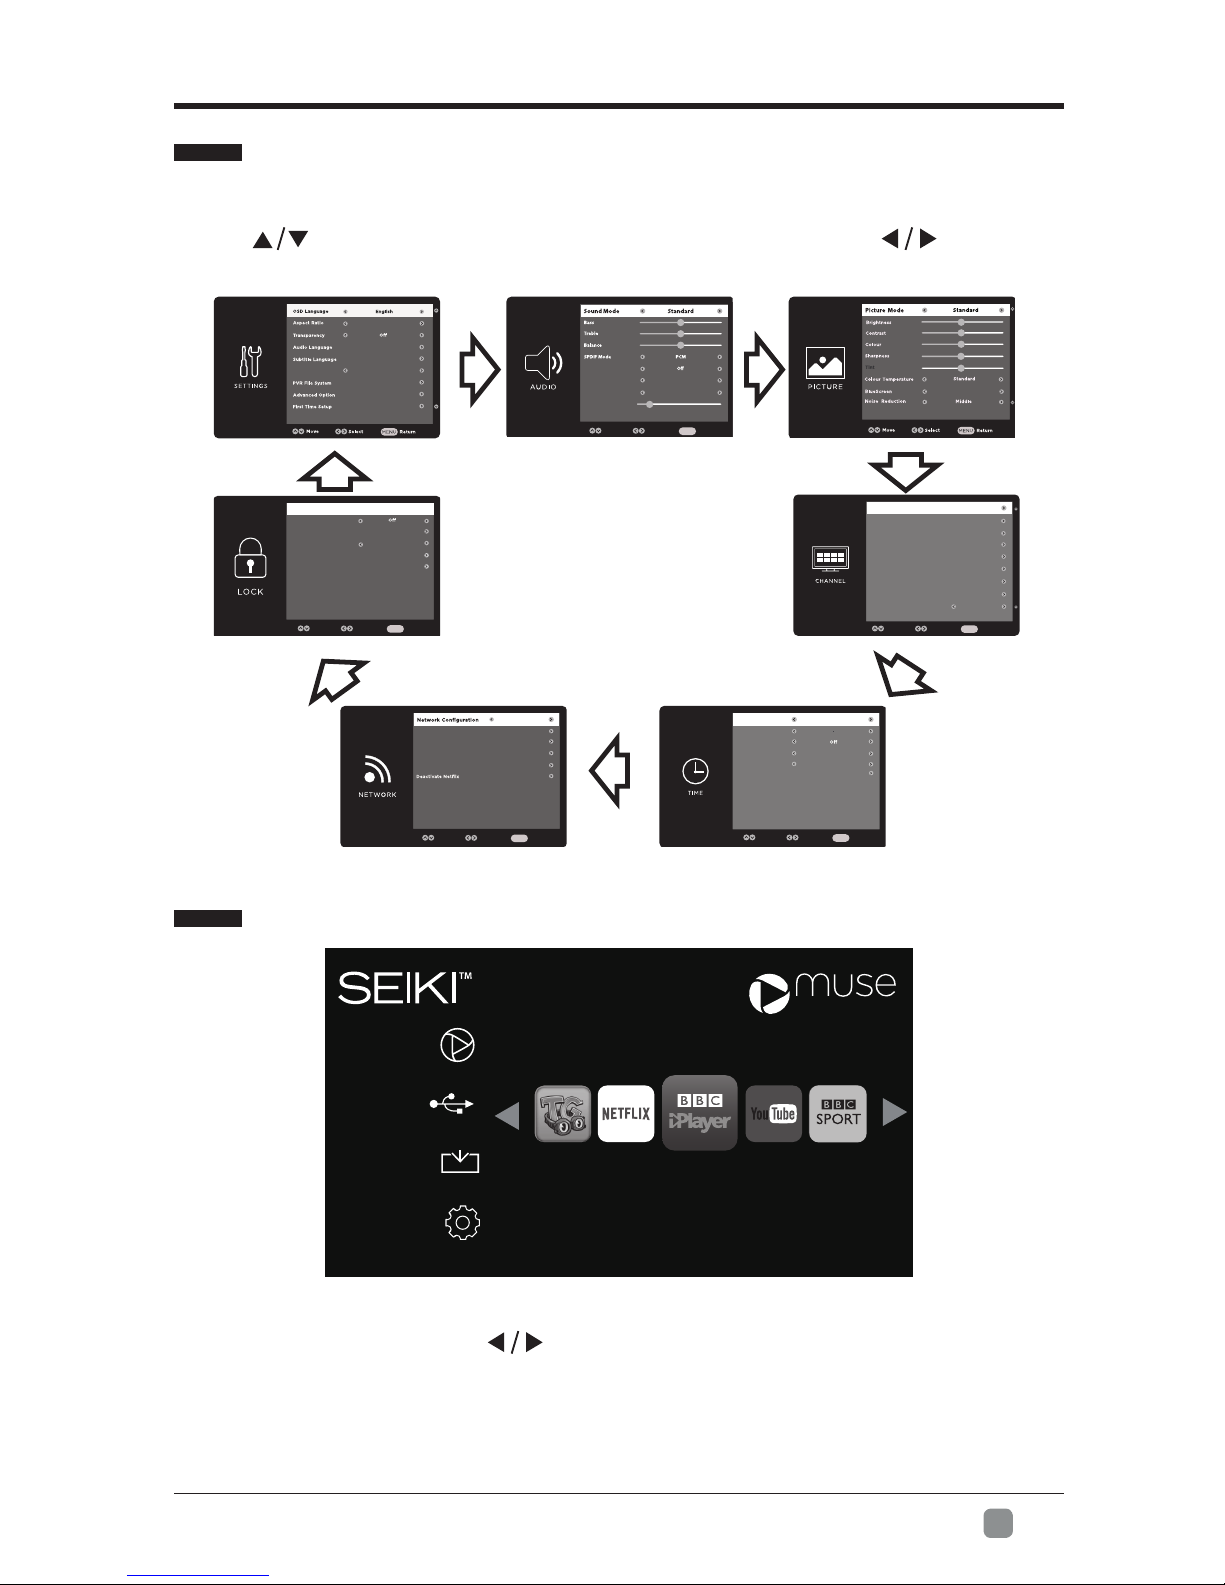
Navigating the Setup Settings
• Press the MENU button to display the main menu.
• Use buttons to select SETUP menu and then press buttons to
navigate and select the available menu.
STREAMING
• Press the MENU button on the main unit or on the remote control to display the
STREAMING. Then press buttons to select the desired APP and press OK
buttontoviewwhatyouwant.Orpressthehotkeyontheremotecontroltoenter
the APP directly.
CUSTOMIZINGTVSETTINGS
Note:After the TV connects to network, the status Unconnected will alter to
Connected(Weak/Strong).
STREAMING
MEDI A
SOURCE
SETUP
streaming media
Network Status:Connected(Weak)
STREAMING
MEDI A
SOURCE
SETUP
Network Status:Connected(Weak)
streaming media
Mode Home Mode
Auto
AVL On
Off
AD Switch
AD Volume
Move Select Return
MENU
Surround Sound
On
Auto Start
DTV Manual Tuning
ATV Manual Tuning
Programme Edit
Channel List
Favourite List
Signal Information
CI Information
OA
DO
n
Move Select Return
MENU
Auto Sync
Clock
Sleep Timer
Auto Sleep
OSD Time
Time Zone
04.3
20S
4
Move Select Return
MENU
On
4hour
Lan
Wired Network
Wi-Fi Network
Network Status
Network Upgrade
ESN THTFOTT0020000000000000000000
000200002205
Move Select Return
MENU
Enable
Off
Channel Locks
Parental Rating
Set Password
Clear Loc
Input:0-9
k
Move Select Return
MENU
----
Please Enter Password

14
En -
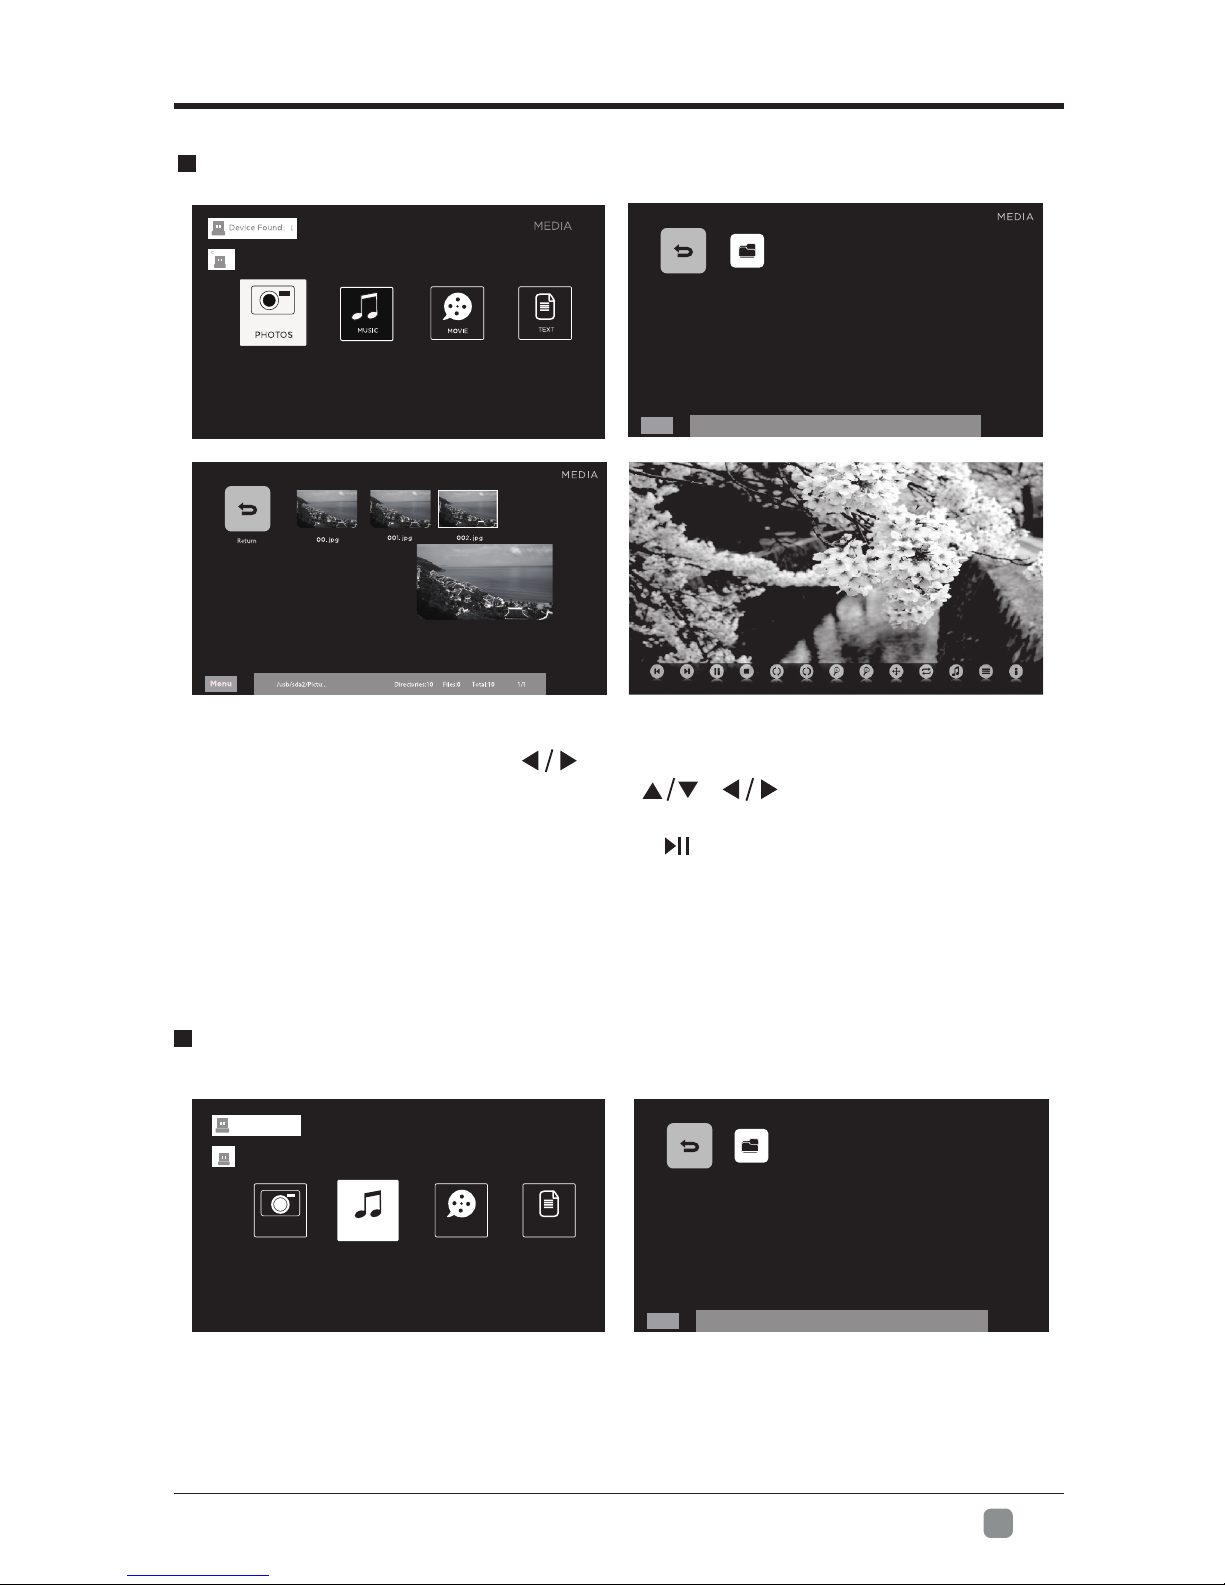
• Press the MENU button on the main unit or on the remote control and then press
buttons to select the MEDIA, and then press OK button to enter.
Toongoggles
A subscription video on-demand platform that offers
animated, fun and educational cartoons, engaging
games and songs from all over the world and in many
different languages to children.
NETFLIX EnjoysTVshows&moviesstreamedinstantlyoverthe
Internet.
BBC iPlayer Enjoy BBC iPlayer exclusives and your favourite BBC
programmes from the last 30 days.
YouTube YouTubeyourwayonthebestscreeninyourhouse.
BBC SPORT Watch exclusive live sporting events and catch-up on
the latest video highlights, results and headlines.
BBC NEWS Get the latest breaking news from the BBC and our
global network of journalists.
AccuWeather
Displaysthecurrentweatherconditionsandthe
temperature anywhere in the world in centigrade or
Fahrenheit.
MEDIA
Network Status: Connected(Weak)
CUSTOMIZINGTVSETTINGS
NOTE:Portable storage devices( USB disk or Hard disk) should be inserted.
15
En -
CUSTOMIZINGTVSETTINGS
ViewingPhotos
• After entering MEDIA, press buttons to select PHOTOS and then select
the desired disk type to enter. Then use / buttons to navigate in the
picture folder and then press OK button enter. When selecting the desired picture,
a thumbnail screen will pop up. Then press button to display.
Note: File format supported: JPEG/JPG.
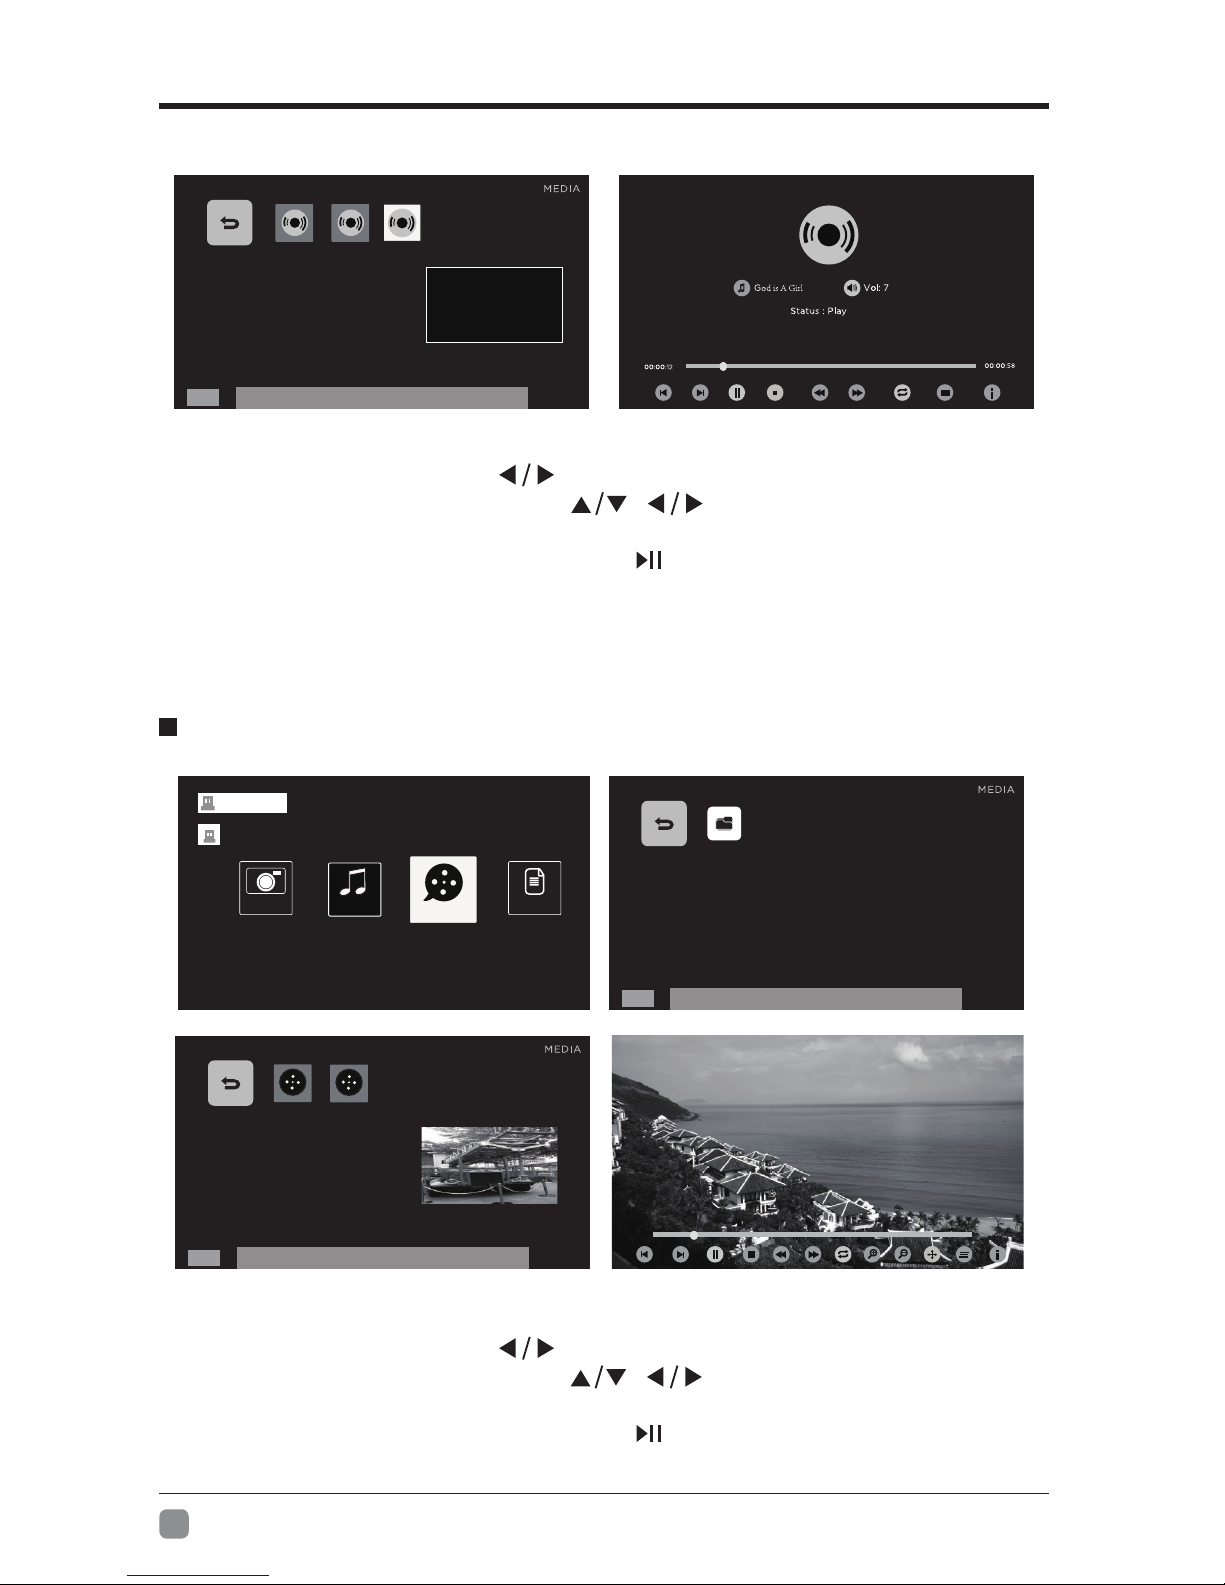
Listening to Music
Return JPG
/usb/sda2 Directories:10 Files:0 Total:10 1/1
Menu
Return MP3
/usb/sda2 Directories:10 Files:0 Total:10 1/1
Menu
MEDIA
MEDIA
PHOTOS MUSIC
Device Found:1
MOVIE TEXT
C
16
En -
CUSTOMIZINGTVSETTINGS
Note: File format supported: MP3.
• After entering MEDIA, press buttons to select MUSIC and then select the
desired disk type to enter. Then use / buttons to navigate in the music
folder and then press OK button enter. When selecting the desired music, a
thumbnail screen will pop up. Then press button to display.
ViewingMovies
• After entering MEDIA, press buttons to select MOVIE and then select the
desired disk type to enter. Then use / buttons to navigate in the movie
folder and then press OK button enter. When selecting the desired movie, a
thumbnail screen will pop up. Then press button to display.
00:00:12
Speed: Normal
MPEG-4 mov QDesign-audio 240x180.mov
Repeat:SEQUENCE Zoom:1
00:00:58
Return
/usb/sda2/AudioD irectories:10 Files:0 Total:10 1/1
Menu
001. mp3 002. mp3
00. mp3
Title:
Album:
Artist:
Year:
Bit Rate:
Sample Frequency:
Return
/usb/sda2/VideoD irectories:10 Files:0 Total:10 1/1
Menu
MPEG-2
MPEG -1
Return MPEG-1
/usb/sda2 Directories:10 Files:0 Total:10 1/1
Menu
MEDIA
MEDIA
PHOTOS
Device Found:1
TEXT
C
MUSIC MOVIE

17
En -
CUSTOMIZINGTVSETTINGS
My Text
SOURCE
• Press the MENU button on the main unit or on the remote control and press
buttons to select the SOURCE menu. Then press buttons to select
different input sources among:DTV/ATV/AV1/AV2/MINIYPBPR/HDMI1/
HDMI2/HDMI3/VGA and press OKbuttontoconrm.
• After entering MEDIA, press buttons to select TEXT and then select the
desired disk type to enter. Then use / buttons to navigate in the
text folder and then press OK button enter. When selecting the desired text, a
thumbnail screen will pop up. Then press button to display.
Why are you so far from me?
In my arms is where you
ought to be.
How long will you make me
walt?
I don’t know how much more i can
take.
(Chorus:)
I missed you
But i haven’t met you
Oh but I want to
How i do
1 / 11
Return TXT
/usb/sda2 Directories: 10 Files:0 Total:10 1/1
Menu
MEDIA
PHOTOS
Device Found:1
C
MUSIC MOVIE
MOVIE
TEXT
STREAMING
MEDIA
SOURCE
SETUP
DTV AV1 AV2 MINI YPBPR
Network Status: Connected(Weak)
ATV VGA
streaming media
Return
/usb/sda2/txt Directories: 10 Files:0 Total:10 1/1
Menu
Italy. txt
Deutsch.txt English.txt
Why are you so far from me?
In my arms is where you
ought to be.
How long will you make me
walt?
I don’t know how much more i can
take.

18
En -
SETUP
CUSTOMIZINGTVSETTINGS
• Press the MENU button on the main unit or on the remote control to display the
main interface. Then press buttons to select SETUP menu and press
button to select the desired option.
SETTINGS
• Press buttons to select SETTINGS menu and then press OK button to enter.
Press buttons to select the following setting options and then press
buttonstoadjusteachoption’ssetting.
OSD Language SelectyourdesiredOSDlanguageamongEnglish/
Deutsch/Français/Español/Português/Italiano/Dutch.
Aspect Ratio Choose to view the TV picture in various formats among
Auto/4:3/16:9/Zoom1/Zoom2.
Transparency SelecttoturnOn/Offtransparencyfunction.
Audio Language
Allows you to select your desired primary or secondary
audiolanguage.(Availablefordigitalchannelsifmultiple
audiolanguagesarebroadcast.)
Subtitle Language
Allows you to select Subtitle, primary or secondary
subtitlelanguage,HearingImpaired.(Availablefor
digital channels if multiple subtitle languages are
broadcast.)
Mode
Press buttons to select Mode and then press the
buttonstoselectyourdesiredmode:HomeMode/
Store Mode.
•Home Mode: Viewing at home.
•Store Mode: For store demo,the brightness is higher than
home mode.
Mode Home Mode
Auto
19
En -
CUSTOMIZINGTVSETTINGS
• Press buttons to select AUDIO menu and then press OK button to enter.
Press buttons to select the following audio options and then press
buttonstoadjusteachoption’ssetting.
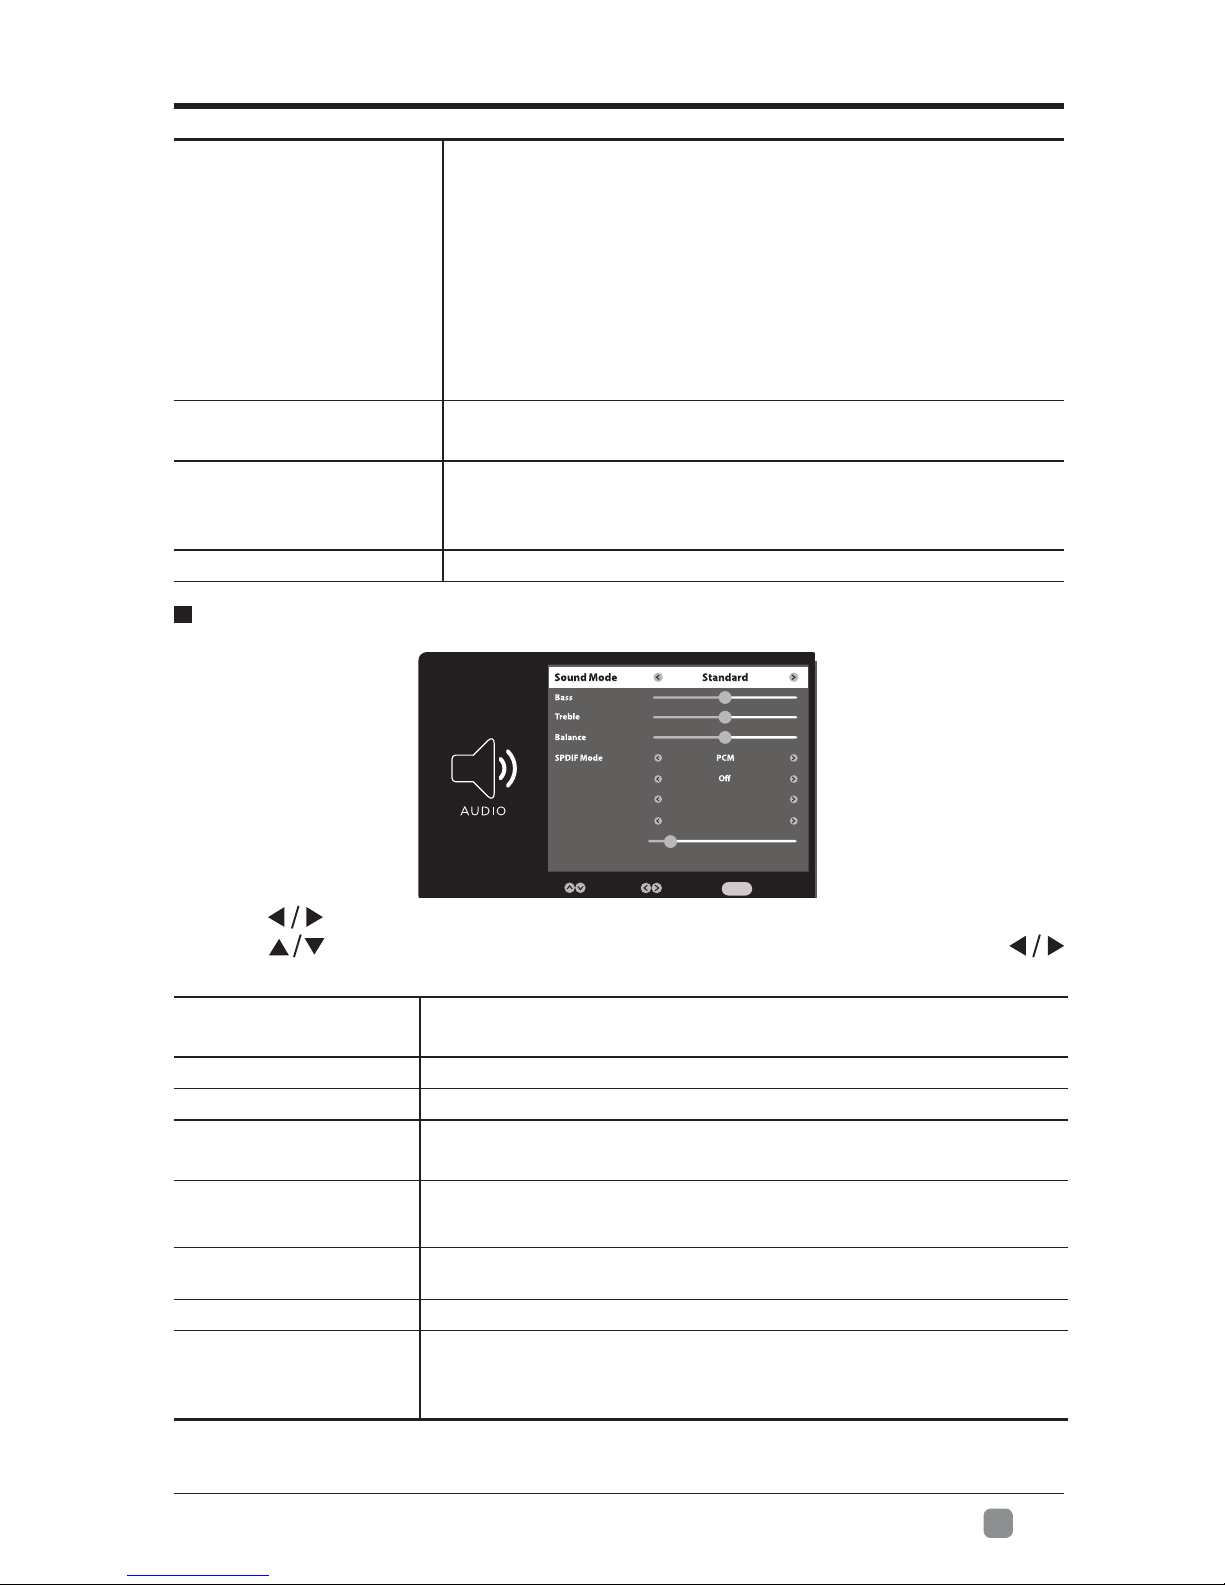
AUDIO
Sound Mode Allow the selection of an audio-enhancement technique:
Standard/Music/Movie/User.
Bass Control the relative intensity of lower-pitched sounds.
Treble Control the relative intensity of higher-pitched sounds.
Balance Adjust the relative volume of the speaker in a multiple
speaker system.
SPDIF Mode SelectthedigitalaudiooutputmodebetweenAuto/PCM/
off.
Surround Sound SelectstoturnOn/OffSurroundSound.
AVL VolumelevelsareautomaticallycontrolledtoOnorOff.
ADSwitch
AudioDescriptionisanauxiliaryaudiofunctionthat
provides an additional audio track for visually challenged
persons.
PVR File System
Select to set the PVR File System settings.
File Manager:Tomanagethele.
SelectDisk:Select the disk where you want to store
your recorded content.
Time Shift Size: Selectyourdesiredlesize:512MB,
1GB, 2GB, 4GB.
Format: to start formatting.
Speed:ThisshowsyouthetransferrateofyourUSB
storage device.
Advanced Option Adjustadvancedoption'ssetting:H-POS,V-POS,Clock,
PhaseorAuto.(VGAsourcemodeonly)
First Time Setup
AllowsyoutoselecttheOSDlanguageandthecountry
whereyouwilloperatetheTVthersttime.Thenitwill
search automatically for TV programmes.
Reset Restore the TV to factory default settings.
AVL On
Off
AD Switch
AD Volume
Move Select Return
MENU
Surround Sound
20
En -
CUSTOMIZINGTVSETTINGS
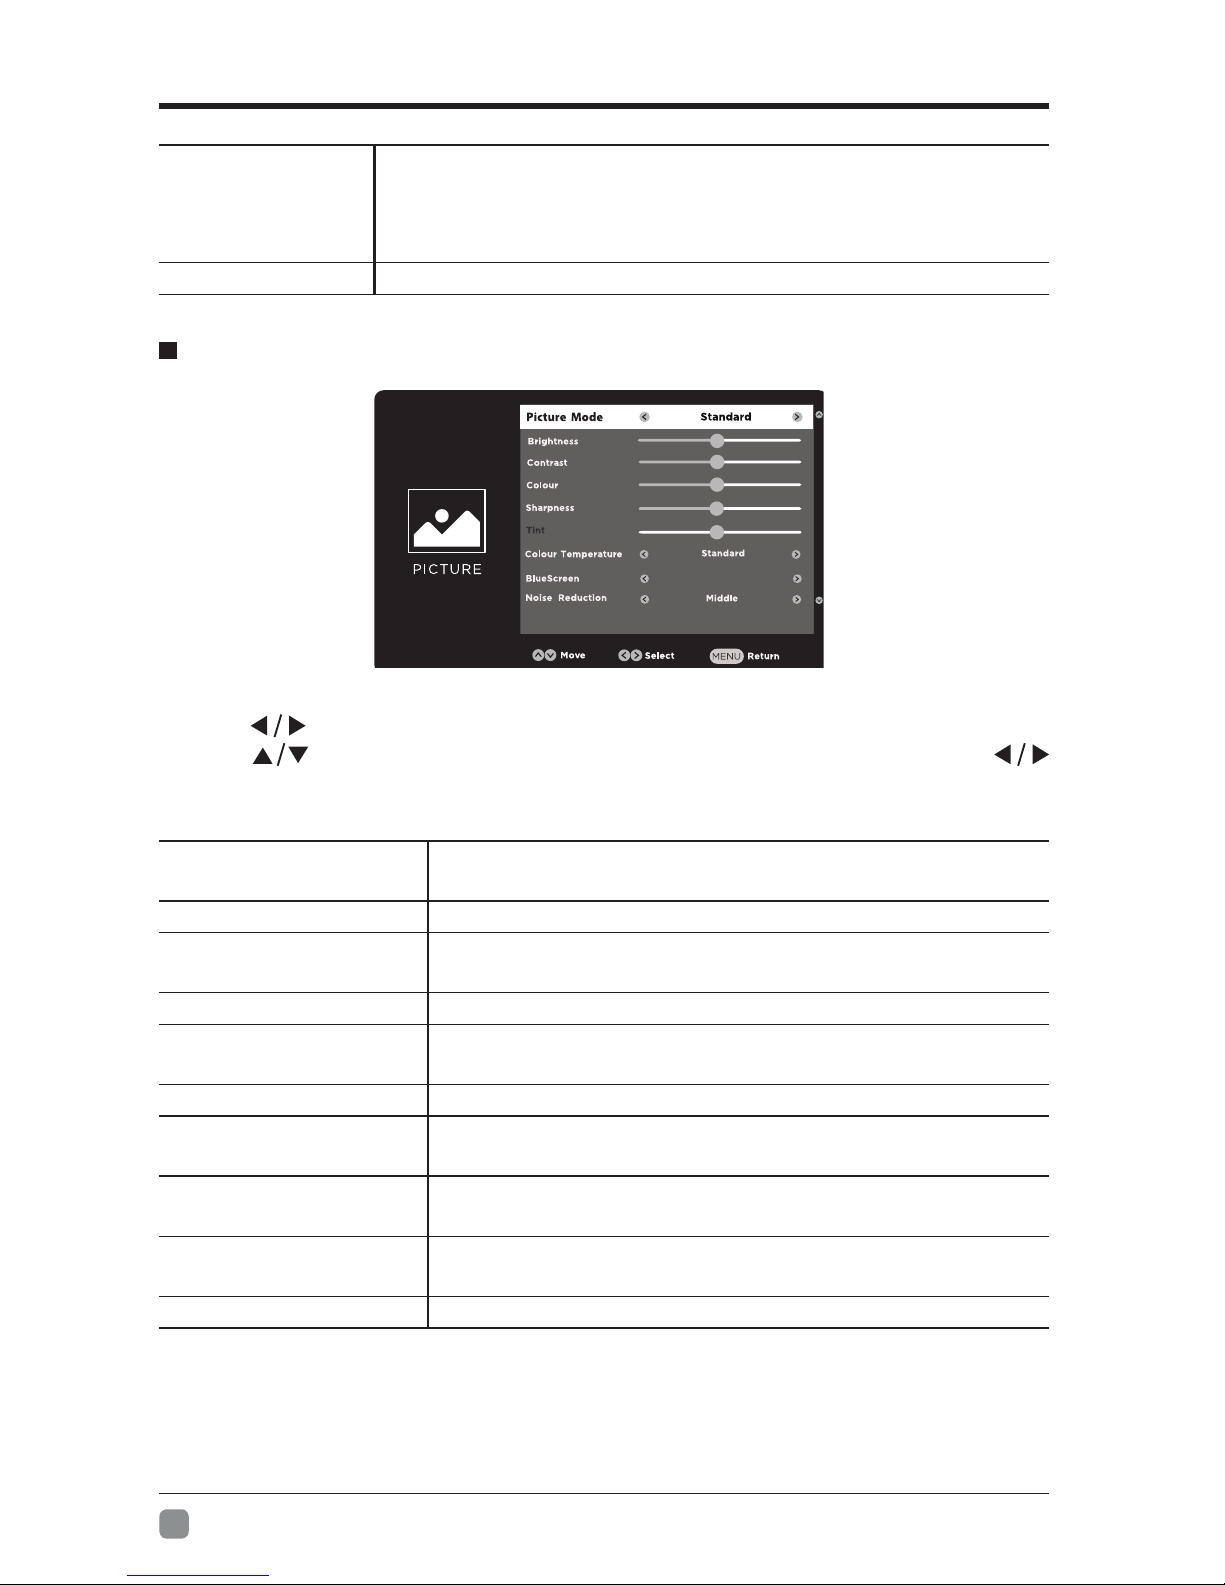
• Press buttons to select PICTURE menu and then press OK button to enter.
Press buttons to select the following picture options and then press
buttonstoadjusteachoption’ssetting.
PICTURE
Picture Mode Cycle among picture mode: Standard/Dynamic/Movie/
User.
Brightness Increase or decrease the amount of white in the picture.
Contrast Adjust the difference between light and dark levels in
the pictures.
Colour Control the colour intensity.
Sharpness Adjust the level of crispness in the edges between light
and dark areas of the picture.
Tint Adjust the balance between red and green levels.
Colour Temperature Cycleamongcolourtemperatures:Standard/Warm/
Cool.
BlueScreen AllowthebluebackgroundtoturnOn/Offduringweakor
no signal conditions.
Noise Reduction Reduces the noise level of the connected device:
Middle/Strong/Off/Weak.
Dynamic Contrast SetdynamiccontrasttoOn/Off.
ADSwitch
•setto"Off"fornormalbroadcastingsoundcomingoutfrom
speakers.
•setto"On"toactivatethedescriptionsoundtrackif
available.
AD Volume Setthevolumeofthedescriptionsoundtrack:On/Off.
On
This manual suits for next models
1
Table of contents
Other Seiki Smart TV manuals

Seiki
Seiki SC-50UK700N User manual

Seiki
Seiki SC-65UK700N User manual

Seiki
Seiki SC5500US User manual

Seiki
Seiki SC-55AU600 User manual

Seiki
Seiki SC-49AU600 User manual

Seiki
Seiki SC-70UK850N User manual

Seiki
Seiki SC-32HK860N User manual

Seiki
Seiki SC-75AU600 User manual

Seiki
Seiki SC6500US User manual

Seiki
Seiki SC4000S User manual


