Seitz Phototechnik AG Roundshot 28-220 User manual

Page 0
© by Seitz Phototechnik AG, Hauptstr. 14, 8512 Lustdorf, Switzerland
Technical changes reserved, Released: 4.2007
Instruction Manual
Roundshot 28-220

Page 1
© by Seitz Phototechnik AG, Hauptstr. 14, 8512 Lustdorf, Switzerland
Technical changes reserved, Released: 4.2007
CONTENTS
1. System Overview
1.1 Camera system Roundshot 28-220 2
1.2 Accessories 3
1.2 Functioning of the camera 4
1.3 Lenses 4
1.4 Viewfinder 5
2. Control and Functions
2.1 Main switch 6
2.2 Start/stop button 6
2.3 Control unit 6
2.4 Calibration with water bubble indicators 9
2.5 Light metering 9
2.6 Distance setting on the lens 9
3. Tips and Resources
3.1 Film spools 10
3.2 Panorama images 10
3.3 Length of film and number of panoramas per film 10
3.4 Maintenance 11
3.5 Return of equipment / recycling 11
4. Technical Data 12
Page

Page 2
© by Seitz Phototechnik AG, Hauptstr. 14, 8512 Lustdorf, Switzerland
Technical changes reserved, Released: 4.2007
13
12
11
1. System Overview
1.1 Camera system Roundshot 28-220
Socket for viewfinder
Cover release
Lens button
Lens
Mechanical-electrical lock
Water bubble indicators
Display
Tripod mount (3/8‘‘)
Connection for power charger and external release
Start/stop button
Mode button
Selection button up
Selection button down
Camera head
Engine with control
unit
12
3
4
7
6
10
89
15
16
18
19
Spool holder for non-exposed film
Spool for non-exposed film
Spool holder for exposed film
Spool for exposed film
Film pressure plate
Exposure slit
Film plane and drum for film transport
14
17
20
5
1
2
3
4
5
6
7
8
9
10
11
12
13
14
15
16
17
18
19
20

Page 3
© by Seitz Phototechnik AG, Hauptstr. 14, 8512 Lustdorf, Switzerland
Technical changes reserved, Released: 4.2007
1.2 Accessories
Allows exact control of the image field and the
positioning of the camera. Can be turned 360° and can
be adjusted for shift lenses
Application
1. Quick adaptor for rapid changing of the camera off the
tripod
2. Perfect positioning of the camera in its starting
position through smooth turning of the upper part of
the adapter
3. Built-in water bubble indicator allows perfect
calibration when the camera is held over the head
4. Optional security strap for hand-held shots
Easy release of the camera if camera is in higher or
inaccessible position. 3 possible functions:
1. Activate camera from "stand-by"
2. Start camera
3. Stop camera
Ideal accessory for secure storage and transport of your
equipment
Set-up
Quick Adaptor
Waterproof case (Peli-
Case)
Viewfinder
In socket for viewfinder (1)
Cable for external release
(1.6m)
In connection for external
release (9)
Between tripod (3/8‘‘) and
28-220

Page 4
© by Seitz Phototechnik AG, Hauptstr. 14, 8512 Lustdorf, Switzerland
Technical changes reserved, Released: 4.2007
1.3 Functioning of the camera
The camera consists of two parts: a camera head with lens and an engine with integrated control unit. The camera
head rotates during exposure around its axis, while the engine and control unit remains fixed. Within the camera
head the film transport system is located. When starting the shot, the release opens a small vertical exposure slit
(19). The light that enters through the lens is projected on the cylindrical film plane (20). At the same time, the film
transport system is activated. This device moves the film smoothly from the spool holder for non-exposed film (14)
to the one for exposed film (16). The selected shutter speed defines the rotating speed of the camera.
1.4 Lenses
1.4.1 Lens mount
The camera has been conceived as a compact medium format camera and has been designed for a focal length of
28mm. The parameters for nodal point, length of film and exposure are defined exactly for a focal length of 28mm.
Important: Use only lenses with a focal length of 28mm!
Other focal lengths would require other parameters and would yield, with this camera, distorted and unsharp images.
Important: Normal (AF) lenses have a smaller image circle and lose sharpness at the upper and lower edges. The
best results are achieved with shift PC lenses.
Possible lens mounts:
Nikon 28mm
To remove proctecting lid: press lens button (3) in. At the same time move protecting lid counter-clockwise until its
mark aligns with the button.
To mount lens: position lens on the bayonet mount and move counter-clockwise until the lens locks
To remove lens: press lens button (3) in while at the same time moving the lens clockwise.
Leica R and Contax 28mm
To mount lens: position lens on the bayonet mount and move counter-clockwise until the lens locks
To remove lens: press lens button (3) in while at the same time moving the lens clockwise.
(Contax: press from above inwards)
Page 5
© by Seitz Phototechnik AG, Hauptstr. 14, 8512 Lustdorf, Switzerland
Technical changes reserved, Released: 4.2007
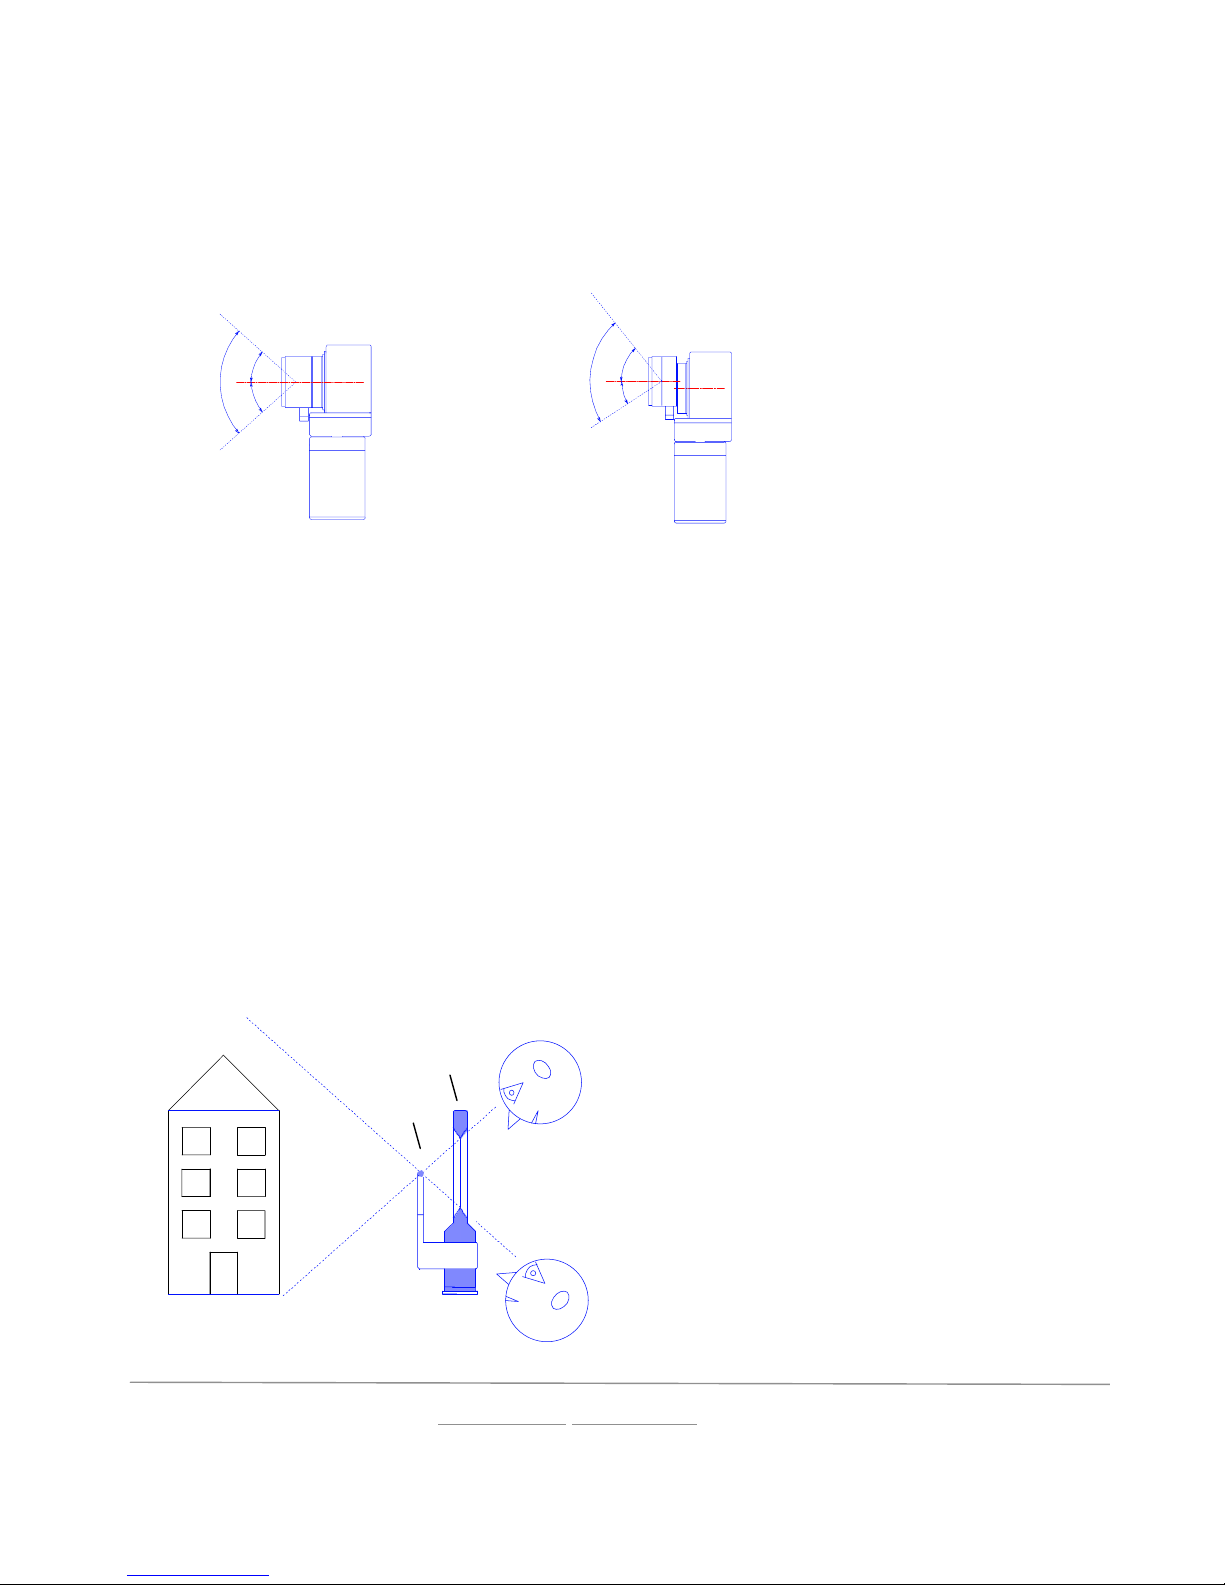
1.4.2 Vertical height of image
83°
41.5°
41.5° 31.5°
81°
49.5°
Normal lenses Shift lenses
Height of image: 83° Height of image: 81°
For example: Nikon PC Shift: +/- 8mm
The same applies
when the lens is
shifted downwards
1.5 Viewfinder
1.5.1 Insert viewfinder
The viewfinder can be fitted easily in the socket (1). For this the trimming on the viewfinder needs to point forward.
Slide viewfinder in until it clicks to lock. The viewfinder can be rotated by 360°.
Important: do not turn the camera head. This can transport film when the mechanical-electrical lock (5) is off.
1.5.2 Determine image field with the viewfinder
Turn the smaller part of the viewfinder with the positioning thread towards the object.
The vertical image field can be determined as follows:
Look through viewfinder from above until the upper
limit of the viewfinder aligns with the positioning
thread. The corresponding point in space is the lower
margin of the image.
Positioning
thread
View-
finder
Lower margin
of image
Upper margin
of image
Look through viewfinder from below until the lower
limit of the viewfinder aligns with the positioning
thread. The corresponding point in space is the upper
margin of the image.

Page 6
© by Seitz Phototechnik AG, Hauptstr. 14, 8512 Lustdorf, Switzerland
Technical changes reserved, Released: 4.2007
When using a shift lens the viewfinder can be shifted upwards and downwards by 8mm. To do this, slide the L-shaped
part (with the positioning thread) up or down.
1.5.3 Remove the viewfinder
Turn viewfinder until you can see a small indent. Then slide viewfinder from socket (1).
Removing the viewfinder is advisable especially for fast shutter speeds and for transport.
2. Control and Functions
The mechanical-electrical lock (5) serves as the main switch for the camera. In the upper position of the lock, the
camera head is locked and the camera system turned off. To activate the camera press lock (5) down and press
start/stop button (10) once. The camera goes into standby mode 2 minutes after the last selection is done.
We recommend locking the camera after taking images. To do this press mechanical-electrical lock (5) upwards and
move camera head clockwise until it locks. This activates the transport lock and prevents unintended rotations of
the camera.
Battery status
Insert new film
New
Spooling film to end
End
Timer
Film counter
34
Degree of panorama360°
Shutter speed
T
2.1 Main switch
2.2 Start/stop button
The start/stop button (10) wakes the camera from standby mode. It releases a shot and stops it if the button is
pressed before the image is complete. It also serves to activate or stop the 10 second timer.
2.3 Control unit
The camera display has the following icons and symbols:

Page 7
© by Seitz Phototechnik AG, Hauptstr. 14, 8512 Lustdorf, Switzerland
Technical changes reserved, Released: 4.2007
2.3.1 Shutter speed
The camera operates in 2 speed modes: SLOW and FAST. Beneath the lens a small switch is located:
Position out (left): Shutter speeds of 1/60 to 8 sec.
Position in (right): Shutter speeds of 1/500 to 1 sec. (green LED of camera flashes)
The SLOW mode deactivates the day filter, which allows to let in 3 x more light at the same rotating speed. This is
advantageous for shots with little light (for instance at night).
3008
1504
752
403001
211501/2
11751/4
6401/8
3211/15
1,5111/30
0,761/60
31/125
1,51/250
0,71/500
SLOW modeFAST mode
Rotation time for 360°panorama, secondsShutter speed, seconds
To select the shutter speed press mode button (11) until the icon „T“ blinks. Then select the shutter time using
selection buttons up (12) or down (13).
2.3.2 Degree of panorama
To select the degree of the panorama press mode button (11) until the icon „degree of panorama“ blinks. Then
select the degree using selection buttons up (12) or down (13). The angle can be determined from 0° to 999° (entire
length of film) in 45° increments.
2.3.3 Film counter
The film counter displays the remaining single shots, counting in 1/8 rotations (i.e. 45°).
120 film: 35 x 45°
220 film: 70 x 45°
The end of film is indicated as soon as the counter reaches the value “0“.

Page 8
© by Seitz Phototechnik AG, Hauptstr. 14, 8512 Lustdorf, Switzerland
Technical changes reserved, Released: 4.2007
2.3.4 Timer
To select the timer press mode button (11) until the icon „timer“ blinks. By pressing the start/stop button (10) the 10
second count-down of the timer is activated and the green LED blinks once per second. 3 seconds prior to the shot
the frequency of the LED is doubled.
2.3.5 Spooling film to end
To select the spooling function press mode button (11) until the icon „film end“ of the display blinks. By pressing the
start/stop button (10) the remaining film and paper edge is spooled onto the spool for exposed film (16).
This function can also be selected when the film is not entirely exposed. The icon „spooling film to end“ appears
automatically at the end of film.
2.3.6 Insert new film
The icon „insert new film“ appears automatically after completing „spooling film to end“.
Open cover release (2) and lift off cover. Swing film pressure plate (18) backwards. Open spool holder for exposed
film (16) and remove exposed film (17). Remove empty film spool (15) and place in spool holder for exposed film
(16). Insert new film in spool holder (14), pull paper edge of film between camera and film pressure plate (18) with
black surface towards exposure slit (19). Attach film to empty spool (16).
Release mechanical-electrical lock (5) and move film counter-clockwise until „Start“ mark of non-exposed film (15)
aligns with start mark of spool holder (14). Then swing back film pressure plate (18) until securely fastened.
Put on cover and close cover release (2). If camera in standby mode press start/stop button (10).
To select the film type press mode button (11) until the icon „Film new“ blinks (if not displayed automatically). Then
select film type (120 or 220) with selection buttons up (12) or down (13). If the correct film is selected press start/stop
button (10). The camera transports the non-exposed film forward to the exposure slit (19).
The camera is now ready for exposure.
2.3.7 Battery status
The symbol indicates the status of the battery. With a complete power load up to 100 films can be exposed,
depending on speed of operation and temperature. To load the battery connect the camera to a power source with
the universal speed charger unit. The maximum loading time is 4 hours, which is indicated by the blinking of the
green LED of the universal speed charger.

Page 9
© by Seitz Phototechnik AG, Hauptstr. 14, 8512 Lustdorf, Switzerland
Technical changes reserved, Released: 4.2007
2.4 Calibration with water bubble indicators
If you want to portray the horizon as a straight line it is important to hold the camera steady. To do this, the camera
is calibrated with 2 water bubble indicators that are positioned at the upper end of the engine body. Holding the
camera at a significant angle results in a wave-like horizon.
2.5. Light metering
The reading of the exact aperture and shutter time can be done with an external light meter. For optimum results
the section of the panorama with most relevance should be taken as a reference. During daylight the section with
bright sunlight should not be taken as the primary reading as this may lead to under-exposure of the panorama. The
obtained light reading can be set on the lens (aperture) and using the shutter speed function. Some lenses, such as
the Nikon AF 28mm, reach optimum image circle only after aperture 11. When selecting lower apertures with this
lens a reduction in light and sharpness on the upper or lower margins may occur.
2.6 Distance setting on the lens
The camera system requires exact setting of the lens. The system is optimised for an average distance of 7 metres,
i.e., at this distance optimum sharpness can be reached, normally 3 to 5mm after the infinity setting of the lens.
Thanks to the slit-scan technology very high depth of field can be reached.
Depending on lens brand and type small differences in focal length and distance markings can occur. That is why
we recommend to test the lens in use under different distance settings.
To do this, place the camera on a tripod placed 7 metres away from an object with smaller and larger letters. Ideally
leave the aperture open, optionally reduce by one „f-stop“ and correct shutter speed accordingly. Take different
shots of the object, varying the distance setting slightly each time from infinity to 5 metres. Plot shutter speeds,
apertures and distance parameters on a notepad or on a display table.
After film development choose optimum distance setting and mark this value on the lens.

Page 10
© by Seitz Phototechnik AG, Hauptstr. 14, 8512 Lustdorf, Switzerland
Technical changes reserved, Released: 4.2007
3. Tips and Resources
3.3 Length of film and number of panoramas per film
The number of possible shots with the 28-220 camera are displayed in the following table. We recommend using a
larger degree of the panorama than actually necessary (for instance 405° for a 360° shot). This allows to choose the
best section of the image later.
3.1 Film spools
Always use identical film spools for non-exposed and exposed film, as different brands have different spool
dimensions.
3.2 Panorama images
In FAST mode at shutter speeds 1/500 to 1/60 hand-held shots are possible. To do this, hold the engine and control
unit firmly in your hands above your head as to avoid to be in the picture.
For shots on a tripod place the camera on the 3/8‘‘ mount on the tripod. To avoid to be in the picture choose slow
shutter speeds or use the 10 second timer.
Length of film used
Film length (mm) = Focal length x 2 x π/ 360 x degree of shot
Focal length Degree of shot
90 135 180 225 270 315 360 405 450
28 44.8 67.1 89.5 111.9 134.3 156.6 179.0 201.4 223.8
Available film length (mm)
120 medium format 780
220 medium format 1,560
Number of panoramas per film
Example 28-220 (28mm lens)
Film Degree of shot
90 135 180 225 270 315 360 405 450
120 17.4 11.6 8.7 7.0 5.8 5.0 4.4 3.9 3.5
220 34.9 23.2 17.4 13.9 11.6 10.0 8.7 7.7 7.0
Example 28-220: Film for a 360° shot with 28-220 camera (28mm lens) is 17.9 cm long
(28mm lens) Number of shots per 120 film (780mm long): 3 x 405° und 1 x 360°
Number of shots 220 film (780mm long): 6 x 405° und 2 x 360°

Page 11
© by Seitz Phototechnik AG, Hauptstr. 14, 8512 Lustdorf, Switzerland
Technical changes reserved, Released: 4.2007
3.4 Maintenance
The exposure slit (19) of the camera must be kept clean at all times. Remove dust particles with sticky scotch tape to
prevent horizontal stripes on the film. The lower, brown rubber ring (film transport) may not be oily or lubricated. If
necessary clean rubber ring with spirit or similar liquid.
More tips and resources are available on our website www.roundshot.ch
3.5 Return of equipment / recycling
Your Roundshot product and the accessories are produced from highest quality materials and parts and will provide
you continued pleasure. Should you nevertheless want to dispose of your Roundshot equipment one day, it should
not be placed in normal waste. The correct disposal of your old equipment is a contribution to preventing possible
negative causes for the environment.
We wish you continued success and fun with your Roundshot 28-220!
For optimum recycling we kindly ask you to return us your camera (with
accessories) to the following address:
Seitz Phototechnik AG
Environment & Recycling Department
Hauptstr. 14
8512 Lustdorf / Switzerland
This return shipment to the manufacturer is free of charge.
The service is available worldwide.
Please contact us to arrange the return shipment and prepare the
materials for the delivery. Your camera and accessories will be picked up
by our courier service and will be recycled in our factory.

Page 12
© by Seitz Phototechnik AG, Hauptstr. 14, 8512 Lustdorf, Switzerland
Technical changes reserved, Released: 4.2007
4. Technical Data
Telrad viewfinder, quick adaptor, cable for external release, waterproof casePossible further accessories
Power charger, NiMh batteryStandard accessories
Mechanical-electricalFilm transport lock
2 water bubble indicatorsCalibration
Universal speed charger 100-240VPower charger
AutomaticFilm transport
NiMh Akku 4.8V 3.5APower supply
10 seconds with bright LEDTimer
-Density exposure
Selectable in increments of 45°to infinityDegree of panorama
1/500 to 8 secondsShutter speeds
LCD (shutter speed, degree of panorama, shot counter, battery status, timer, film selection, winding
functions)
Display
With selection buttons and LCDControl
1.5 kgWeight
67 x 116 x 220 mmDimensions (L x W x H)
manualExposure variation (bracketing)
0.7 secondsFastest scan for 360°
-Light meter
2.0 mmSlit
Optimum at 7m, depending on lensDistance setting
Telrad viewfinderViewfinder
8 x mit 220 Film, 4 x mit 120 Film360°shots per film
180mmLength of image at 360°
84°(vertical); 50mmMaximum height of image
+/- 8mm with PC ShiftShift
Nikkor 2.0, 2.8; PC Nikkor 3.5; AF Nikkor 1.4, 2.8; Leica Elmarit R 2.8, Contax Distagon T 2.8; more on
demand
Lens brands
Bayonet für 28mmLens mount
28mmLens
120/220 medium formatFilmformat
Table of contents


