SELWOOD SPATE PD75 User manual

Selwood Spate PD75 Manual
1
SELWOOD SPATE PD75
Operating & Service Manual
The products of Selwood Limited, are designed,
developed and produced in the company's Chandler's
Ford factory. Many features are covered by world-
wide patents. Product names such as Spate, Simplite
and Seltorque, are registered trademarks.
As all products are subject to continuous development,
the company reserves the right to alter the
specifications and information given in this manual
without prior notice.
Whilst every care has been taken in the preparation of
this publication the information it contains must not be
regarded as binding.
Amendments to this publication will only be issued to
cover those design changes which fundamentally alter
the build or operation and servicing procedures. They
will be distributed through the company's dealers and
agencies.
Your attention is drawn to the following symbols used
throughout this manual:-
CAUTION
This caution symbol draws attention to special
instructions or procedures that, if not correctly
followed, may result in damage to, or destruction of
equipment.
WARNING
This warning symbol draws attention to special
instructions or procedures that, if not strictly
observed, may result in personal injury.
WARNING
A WARNING SYMBOL WITH THIS TYPE OF
TEXT DRAWS ATTENTION TO SPECIAL
INSTRUCTIONS OR PROCEDURES WHICH, IF NOT
STRICTLY OBSERVED MAY RESULT IN SEVERE
PERSONAL INJURY, OR LOSS OF LIFE.
Additional copies of this manual are available
from Selwood Pt. No 0308023000
Published by Selwood Limited
© Selwood Limited JULY 2016
Additional copies of this manual may be ordered from
Selwood Limited, Pump Division, by quoting the
publication number shown on the outside back cover.
REPLACEMENT PARTS
Instructions for Ordering
1. Always quote the pump serial number located on
the plate fastened to the pump.
2. Always quote the ten digit part number for the
component, not the item reference number.
3. Always quote the description of the component.
Items usually supplied together as sub-assemblies, will
have the sub-assembly part number printed at the
bottom of the relevant page.
HEALTH AND SAFETY AT WORK
April 1975
As manufacturers of pumps and associated equipment
we wish to inform you that, in compliance with Section
6 of the Act, safety precautions should be taken with
certain of our products.
We take every care to ensure as is reasonably
practicable that our products are safe and without risk
to health when properly used. Nevertheless,
appropriate health and safety precautions must be
taken, and in particular you are requested to have
special regard to the operational and safety
requirements leaflet P769 which accompanies each
pump on despatch from our premises.
Q
U
A
L
I
T
Y
A
S
S
U
R
E
D
F
IR
M
Our products also conform to the E.E.C. machinery
Safety Directive and carry the C.E. mark.
CALIFORNIA USA
PROPOSITION 65 WARNING
Diesel engine exhaust and some of its
constituents are known to the State of
California to cause cancer, birth
defects, and other reproductive harm.
WARNING
Pumps and engines may be fitted with
seals or 'O' rings manufactured from
VITON or similar material.
When temperatures reach 400°C
(720°F) a corrosive acid is produced,
which cannot be removed from the
skin.
If signs of material decomposition are
evident, or if in doubt, always wear
disposable heavy-duty gloves.

Selwood Spate PD75 Manual
2
SAFETY PRECAUTIONS
WARNING
ALL ITEMS IN THIS SECTION, IF NOT STRICTLY
OBSERVED, COULD RESULT IN SEVERE
PERSONAL INJURY OR LOSS OF LIFE.
1. Use only lifting equipment of suitable capacity for
the size and weight of the equipment being lifted
2. The equipment must always be lifted using safe
working practices and in accordance with any
local and national guidelines or statutes. If in
doubt, consult Selwood Pumps or a local lifting
expert.
3. Whilst lifting the unit keep personnel well away
and never allow people underneath.
4. Personnel working on the pump must always wear
clean, correctly fitting clothing and safety footwear.
Clothing impregnated with oil or fuel can constitute
a health hazard through prolonged contact with
the skin and may also constitute a fire hazard.
5. Check the type of liquid that the pump has been
employed on before working on them. Residues
could be hazardous to your health. If in doubt,
flush thoroughly with clean water before
commencing work.
6. Rotating equipment presents a hazard in itself.
Alert surrounding personnel before starting and
post notifications whilst in operation.
7. Moving parts are guarded to protect you. Guards
removed for maintenance must be replaced before
starting the pump.
8. Never insert anything into the pump body whilst
the pump is running and the suction or delivery
hoses are disconnected.
9. Use all flange bolt holes and ensure the correct
bolt size and quality is utilised when connecting
suction and delivery hoses.
10. Collapsible hoses must never be used on the
suction side of the pump.
11. Keep the hose end suction area free from debris.
Although the pump can handle solids up to the
size indicated in the Technical Data section of this
manual, larger or irregular solids may cause
blockage with damage to pump components.
12. Always allow adequate ventilation for the pump
driver. Diesel engines require air for both
combustion and cooling. This air must never be
allowed to re-circulate.
13. Be aware of burn and fire risks from items such as
exhaust pipes and silencers. Never place
flammable items around the unit.
14. Liquid pressure may still be present even after
shutdown of the pump. Particular attention should
be paid to delivery lines that are long, or rise
through any height, as these can contain large
volumes of liquid. These lines must be isolated
and drained down before commencing work.
Sudden release of this liquid can cause serious
injury to an operator either directly or indirectly
through the rotational motion it can induce.
WARNING! Delivery hose and any associated
pipe work should be capable of withstanding the
maximum system operating pressure. Selwood
recommend the minimum pressure rating of 6Bar
hose. Suction hose should be of the non-collapsible
variety.
WARNING! The pump should only be
operated within the speed and pressure limits
detailed in Section 2.1 of this manual.
1. If there is a danger of freezing, the fluid, normally
retained within the pump between operating
cycles, should be drained off through the drain
taps provided.
2. WARNING! Never start or run the pump
against a closed delivery valve. Failure to comply
may result in damage to the unit or personal
injury.
3. WARNING! Noise level at operator
position (Start Panel) may exceed 80dB(A).
Hearing protection must be worn at all times when
the unit is running. Failure to comply may result in
hearing damage or loss.

Selwood Spate PD75 Manual
3
SELWOOD SPATE PD75
CONTENTS
Title Page
Safety Precautions....................................................... 2
1 GENERAL INFORMATION................................ 4
1.1 Installation .......................................................... 4
1.2 Operation............................................................ 4
1.3 Maintenance ....................................................... 4
1.4 I.C. Engines ........................................................ 4
1.5 Electric Motors.................................................... 4
1.6 Pneumatic Motors............................................... 5
2 Pump specification........................................... 5
2.1 Performance ....................................................... 5
3 ROUTINE MAINTENANCE ................................ 5
4 LUBRICATION AND FASTENING TORQUES.. 6
Pump Lubrication ........................................................... 6
Engine Sump ................................................................. 6
5 INSTALLATION, COMMISSIONING AND
OPERATION ...................................................... 6
5.1 Self Priming ........................................................ 6
5.2 The Suction Strainer ........................................... 6
5.3 Securing and Joining Hoses ............................... 6
5.4 Oil Handling ........................................................ 6
5.5 Oil Tolerant Regulators....................................... 7
5.6 Regulator Blanks ................................................ 7
5.7 Full Flow Relief Valve ......................................... 7
5.8 Use of the Spate High Pressure Nozzle ............. 8
5.9 Use of Air Inflator Attachment............................. 8
5.10 Frost and Ice....................................................... 8
6 CONDITIONS OF WARRANTY ......................... 8
7 FIELD SERVICING............................................. 9
7.1 To Dismantle a Pump Cylinder ........................... 9
7.2 Examination and Replacement of Flexible
Components ....................................................... 9
7.2.1 Priming Annulus and Actuator Valve ....... 9
7.2.2 Connecting Rod Cylinder Seal .............. 10
7.2.3 Actuator Seal......................................... 10
7.2.4 Pressure Regulator Assembly ............... 10
8 WORKSHOP SERVICING ............................... 11
8.1 Dismantle Pump Drive Mechanism................... 11
8.2 PUMP DRIVE MECHANISM
MAINTENANCE TOOLS .................................. 11
8.3 Assemble Pump Drive Mechanism................... 12
9 TROUBLE SHOOTING GUIDE........................ 13
10 PARTS LISTS .................................................. 17
10.1 Pump Parts....................................................... 17
10.2 Oil Tolerant Regulator....................................... 19
10.3 PD75 / Yanmar L48 Site unit - non EPA ........... 21
10.4 PD75 / Yanmar L48 electric start Site unit -
non EPA ........................................................... 23
10.5 PD75 / RM210 GLOBE AIR MOTOR 2
WHEEL PUMP UNIT ........................................ 27
10.6 PD75 ELECTRIC STATIC ASSEMBLY -
2.2kW & 3.0kW................................................. 29
10.7 PD75 – HYDRAULIC MOTOR MOUNTING......31
10.8 PD75 – HYDRAULIC MOTOR
CONNECTION KIT BREAKDOWN ...................33
10.9 PD75 / HONDA GX160 PORTABLE -
0310002000 ......................................................35
10.10 Stone catcher MK2............................................37
10.11 PD75 2.2Kw with Stone catcher Threaded
Inlet/Outlet.........................................................38
10.12 PD75 3Kw with Stone catcher Threaded
Inlet/Outlet - 0316177000..................................42
10.13 PD75/Yanmar L48 Diesel Static with
s/catcher............................................................44
11 NOTES..............................................................46

Selwood Spate PD75 Manual
4
1 GENERAL INFORMATION
1.1 Installation
1. The pump unit and its associated baseplate or
trolley mounting should be positioned on a firm
horizontal platform, and in the case of portable
units restrained from accidental movement.
2. If the pump is fitted with push-on type suction and
delivery spigots the hoses must be firmly secured
on these spigots with heavy duty clamps or clips
capable of withstanding the system operating
pressure. The integrity of the hose clamping
arrangements should be checked at regular daily
intervals in the case of static installations or
whenever the pump is repositioned in the case of
portable units. Similar precautions should be
taken with clamps securing multiple lengths of
hose on installation where long delivery and
suction lines are involved.
3. Delivery hose and any associated pipework
should be capable of withstanding the maximum
system operating pressure. Suction hose should
be of non-collapsible variety.
1.2 Operation
1. CAUTION The pump should only be
operated within the speed and pressure limits
detailed in the operating handbook for the model
in question.
2. If there is a danger of freezing, the fluid normally
retained within the pump between operating
cycles should be drained off through the drain taps
provided.
3. WARNING Positive displacement pumps
of the PD75 type should not be run against a
closed valve on the delivery side. If there is a
danger of high system pressures developing
because of closed delivery valves or some other
reasons the pump should be fitted with a full flow
relief valve adjusted to a lift at a safe working
pressure for the pump and pipework system.
4. Where protective caps are used to prevent
damage to the suction and delivery spigots during
storage or in transit they must be removed before
the pump is started up.
1.3 Maintenance
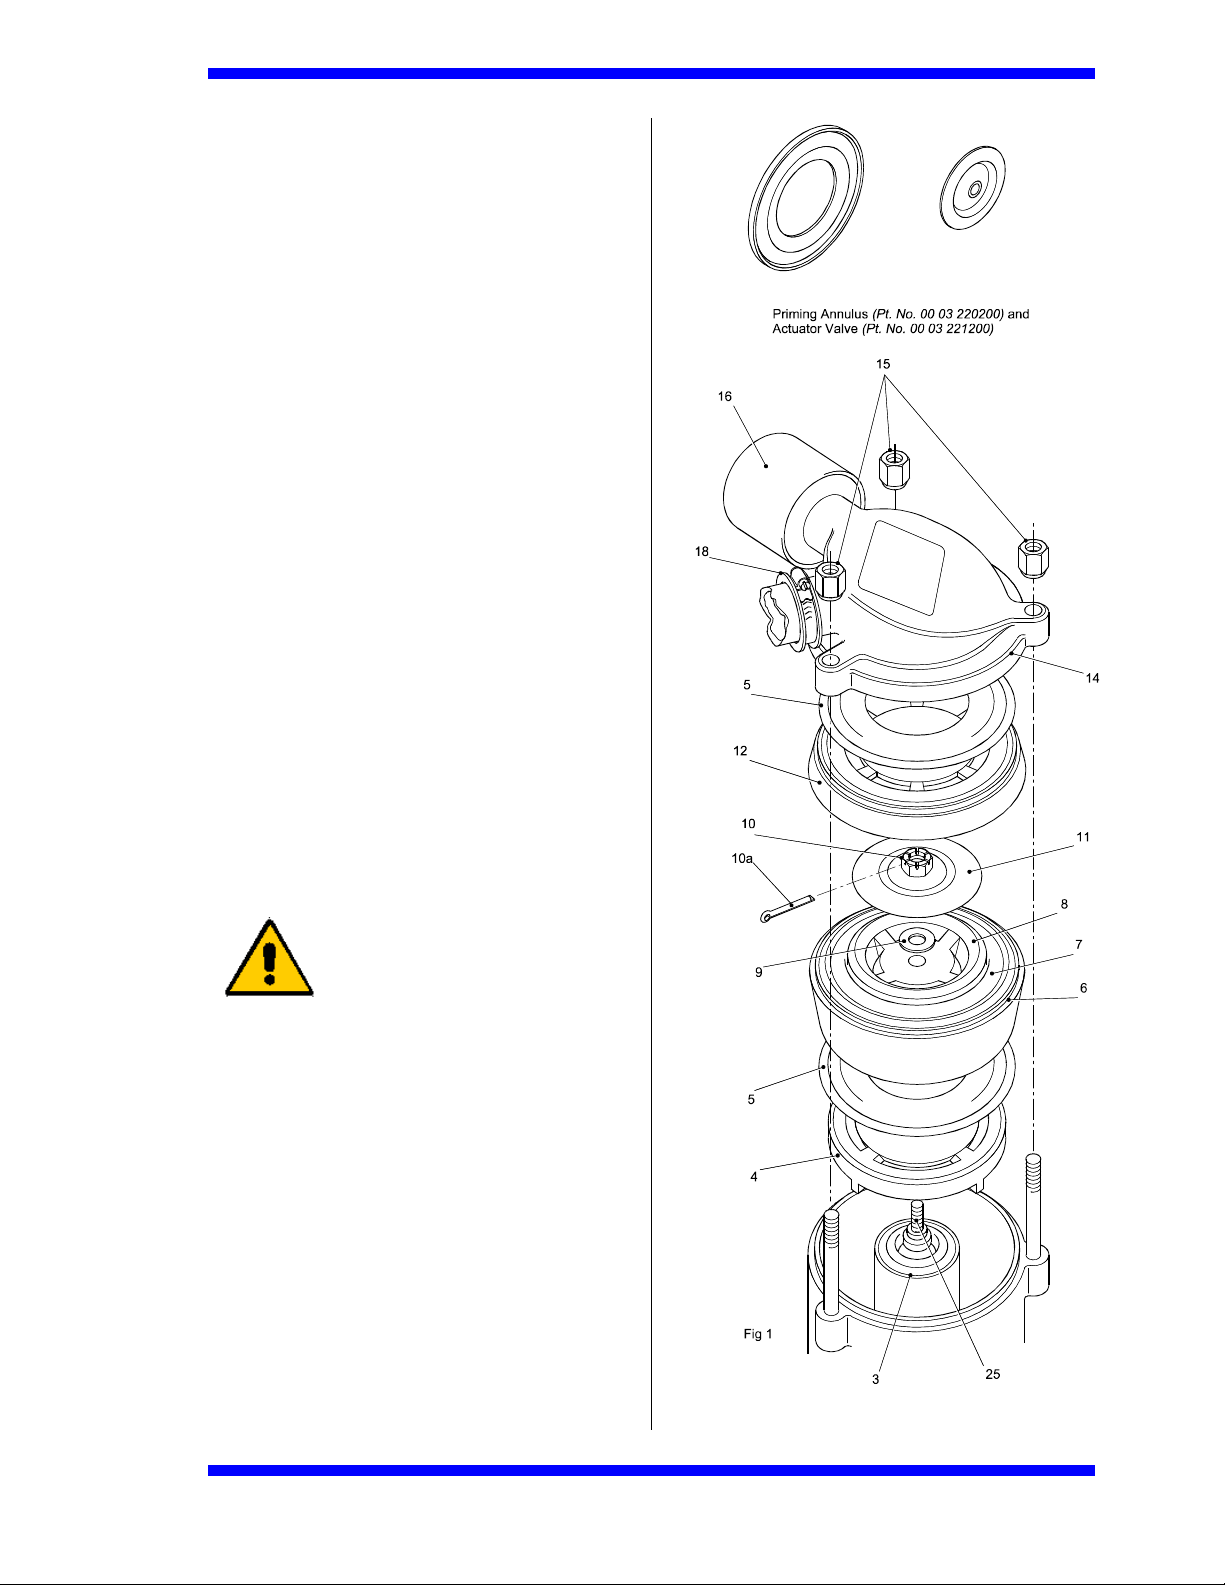
1. Inspection and maintenance. Regular flushing
after use and periodic stripping and inspection of
the cylinders will help maintain the PD75 in best
condition. All bearings are sealed for life so
lubrication is only necessary when re assembly of
the pistons to the connecting rods occurs. See
lubrication section for advice on products and
brands. Appropriate flushing with clean water after
use will further aid long service life. The engine or
driver should be maintained in accordance with
the manufacturer’s instructions.
2. Replacement parts. Only the manufacturers or
factory approved components should be used as
replacement parts and where necessary they
should be fitted with the assistance of the special
purpose tools indicated in the operating and
servicing manual.
3. All maintenance work must be carried out with the
pump and engine/motor stationary.
1.4 I.C. Engines
1. Where I.C. engines are used to power the pump
they have been mounted in accordance with the
engine manufacturers recommendations and
adequate guarding provided between the pump
and engine.
2. Exhaust and Exhaust Pipes. If there is a risk of
accidental contact by operators, the exhaust
system should be lagged or screened and the
outlet directed away from operators or other
persons likely to be nearby. Direct contact with
flammable materials of all types must be avoided.
The importance of adequate ventilation to ensure
removal of exhaust fumes when engines are
operated in enclosed or covered accommodation
cannot be overstressed. Engines should not be
run in hazardous explosive atmospheres.
3. Access and Operation. Ensure that the operator
can start, control and stop the engine easily by
making all controls readily accessible. Fit remote
controls if access is difficult. Follow the
instructions laid down in the engine
manufacturer's Operators Handbook for starting,
operating and stopping procedures.
4. Fuel. In addition to the fire hazard associated with
fuel and lubricating oils, preventative action is
necessary with respect to leakage, contamination
and bodily contact.
5. WARNING Electrical Connections. It is
essential that earth terminals are connected with
an absolutely sound earth point and care should
be taken to ensure that the correct sized
conductors are selected to suit the current and
distance it is to be carried.
1.5 Electric Motors
1. All electrical connections should be made with
adequately rated conductors and starters.
Isolators and other associated switchgear should
be of adequate capacity for the imposed power
loadings. All electrical equipment should be
adequately earthed. All connections to be made
by a qualified electrician to BS7671 latest revision.
2. WARNING Isolate the power supply
before carrying out any commissioning, servicing
or maintenance work on the pump or electric
motor.

Selwood Spate PD75 Manual
5
1.6 Pneumatic Motors
1. All Pneumatic connections should be made with
adequately rated fittings and other associated
devices should be of a sufficient rating for the
pressures involved.
All connections and/or maintenance of pneumatic
equipment should be made following the Pressure,
Equipment, Regulations, 1999 and the Pressure
Systems, Safety, Regulations 2000.
2. WARNING Isolate the air supply before
carrying out any commissioning, servicing or
maintenance work on the pump or pneumatic
motor.
3. LUBRICATING OIL CAPACITIES
Horizontal 330ml
Use good quality hydraulic oil with a viscosity
Of around 100cSt (460SSU) at 40°C (104°F)
AIRLINE FILTRATION AND LUBRICATION
Use 64 micron filtration or better. Choose a
lubricator
Suitable for the flow required. Prior to initial start-
up,
Inject oil into the inlet port.
Lubricator drop rate 4-5 drops/minute continuous
operation
Lubricator drop rate 8-10 drops/minute intermittent
operation
GENERAL DATA
Motor rpm 1500MAX
Input pressure 6 BAR Max
Flow rate 67 litres/minute max
MASS (motor only) 26kgs (57.3 lbs)
MOMEMT OF INERTIA of rotating parts 0.56 gm²
(motor only)
MAX OVERHUNG FORCE on motor shaft 890 N
(200lbf)
TEMPERATURE RANGE -20°C to +80°C (-4°F to
+176°F)
You are requested to take such steps as are
necessary to ensure that this information is made
available to all those involved with the use of our
products. This information must be made available not
only to your own employees at their workplace, but
also to anyone who may purchase or otherwise
acquire (hire) such products for use in his own
workplace.
It is our intention constantly to review our obligations
under the Act and we will be issuing from time to time
further information with regard to the safe application,
use, inspection, and service associated with our
products.
2 PUMP SPECIFICATION
2.1 Performance
Capacity 31.8m³/h,
7000gal/h
Total Head 40m, 130ft
Delivery Head 30.5m, 100ft
Self-Priming Lift 8.8m H20, 29ft H20
Suction Lift 9.1m, 30ft
Solids Size 6mm, 0.25in
Air Handling 3.77l/s, 8ft3/min
Pump Speed 1500 strokes per
min
Port Size Spigot 75mm, 3in
3 ROUTINE MAINTENANCE
Lack of routine maintenance is the most frequent
reason for the breakdown of pumps. We earnestly
advise users to ensure that at least the following
actions are taken.
1. Check these oil levels daily:
a) Engine oil.
2. In cold weather, when there is a possibility of frost,
always drain water from the pump particularly
where the pump may experience long periods of
inactivity. During these conditions, drain the
following areas:
a) Pump body.
b) Delivery pipework.
CAUTION
Failure to drain the pump body and delivery
line in these conditions could result in the pumped
product residue freezing and cracking the casing.
3. Do NOT run the pump if significant quantities of
water escape through the bearing frame drain
hole. This indicates failure of the inner neck seal
and must be repaired before running can continue.
Refer to servicing instructions for further advice.
4. Do NOT run the pump if malfunction is suspected
in any of its parts.
5. A hose strainer should always be fitted to the free
end of the suction line if there is a possibility of
oversized solids entering the pump. The
dimensions of rocks, pebbles, etc. must not
exceed 6mm Refer to Selwood Ltd if in need of
advice in this connection.
6. As loss of prime and indeed loss of on-stream
performance can easily arise as the result of
leaking pipework joints, we recommend that all
line fittings associated with the pump should be
checked periodically for air-tightness.
7. It is most Important to use the correct fuel oil in the
engine. Make sure that it is appropriate for the
weather conditions (summer or winter) and that it
is clean and free from water and foreign matter.
Unsatisfactory running performance, excessive
wear and damage can all result from the use of
Incorrect or contaminated fuel.

Selwood Spate PD75 Manual
6
8. Periodically check the tension of all nuts and bolts,
especially those securing the engine and pump to
the chassis.
9. Pump servicing must always be carried out in
accordance with the instructions given in this
manual. Only components supplied and approved
by Selwood Ltd should be used. It is advisable to
hold a small stock of spare parts to cover
breakdown circumstances. The Company will be
pleased to give advice in this connection.
10. Engine servicing must always be carried out in
accordance with the instructions given in the
manufacturer's manual. Do not hesitate to contact
Selwood Ltd if the need for further advice arises.
11. Please contact Selwood Ltd in the event of
experiencing difficulty when servicing. The
company will also be very pleased to give advice
in connection with the machine's installation,
operation and maintenance.
12. All practical work must be carried out in
compliance with the Health and Safety at Work
Act, 1975. Always start the engine in accordance
with the manufacturer's instructions.
NOTE: If the above advice is followed, the likelihood
of an expensive break down will be greatly diminished.
The pump should give a long and trouble free life if
these measures are put into effect.
4 LUBRICATION AND
FASTENING TORQUES
Pump Lubrication
It is most important to maintain the correct levels of oil
in the engine or driver ensure that the oil is of the
recommended quality and is free from contamination.
Selwood recommend the use of the following Shell
products, which should be applied as per the following
table. In some territories, the following grades may be
known under differing trade names, please contact
Selwood if problems occur in identifying the correct
product.
COMPONENT SHELL
GRADE
BP grade
Engine - Yanmar
L48
Rimula X
15W-40
Vanellus C5
Global
Wheel hubs Alvania - EP
LF2
Energrease
LS-EP2
Actuator bores Ensis SDB Castrol
Rustilo 431
COMPARTMENT SERVICE INTERVAL
HOURS MONTHS
Engine Sump Refer to engine
manual 200hr
Wheel hubs
ON ASSEMBLY 12
Actuator bores ON ASSEMBLY 6-12
5 INSTALLATION,
COMMISSIONING AND
OPERATION
5.1 Self Priming
In normal practice, the SPATE PD75 pump remains
primed after initial use, even when the hoses are
removed and it is out of service. When priming a new
pump, or after draining for any reason, maximum self-
prime lift of 8.8/9.1m (29/30ft) will only be obtained if
the flood prime manifold is filled with water through the
delivery connection.
5.2 The Suction Strainer
Always use the 75mm SPATE hose strainer supplied
with the pump. Make sure that it is firmly secured to
the suction hose by using heavy duty clamps or clips
illustrated. Failure to secure the strainer firmly may
result in its loss and consequential blockage of the
hose and pump by excessive solids.
5.3 Securing and Joining Hoses
The pump is fitted with push-on type suction and
delivery spigots and the hoses must be firmly secured
to these spigots with heavy duty clamps or clips.
When pumping at high pressure, to high heads or
compressing air, the SELCLAMP (Patented) heavy
duty hose clamp which is designed to withstand
pressures up to 6.9bar (100lbf/in2) is recommended.
The clamp can be hand tightened and does not require
tools.
Hoses of various lengths can be joined together by the
push-on method using hose joint sleeves which should
be firmly clamped to avoid leakages, particularly in the
suction hose.
5.4 Oil Handling
The standard synthetic rubber seals (Items 3 and 7)
and valves (Items 5 and 11) of the Spate PD75 pump
are suitable for handling most lubricating oils and
greases without undue chemical deterioration.
The standard pressure regulator inner sleeve is made
from natural rubber as there is no available synthetic
with the necessary characteristics for this duty. Oils
and hydrocarbons will damage this regulator sleeve. If

Selwood Spate PD75 Manual
7
the pump is to be used for handling products of this
type then the complete pressure regulator assembly
must be changed, on each pump cylinder, to either oil
tolerant regulators or oil blanks. This choice depends
on existing pump speed and viscosity of product to be
handled.
5.5 Oil Tolerant Regulators
Oil tolerant regulators, as their name suggests, are
suitable for handling most oil and water mixes at pump
speeds up to the max 1500rpm.
For high viscosity oils or greases the pump speed
should be reduced to allow the internal valves (Items 5
and 11) time to respond to the thicker material. Oil
tolerant regulators are directly interchangeable with the
standard items, and can be retro fitted if required.
Regulators are available as individual assemblies (Part
No. 0393040000). These pressure regulators allow
the pump to operate at maximum speed and output on
oil applications; viscosity effects permitting.
The vent hole may be orientated to point downwards
thus minimizing the spread of pumped products in the
event of a failure.
The Oil Resistant Pressure Regulator consists of an
aluminium LM6 body and a Spate PD75 neck seal
(Part No. 0003316000) backed by a natural rubber
anti-vibration mount. Replacement neck seals must be
fitted using assembly tool (Part No. 0393038000).
The regulators may be fitted to existing pumps as
follows:
1. Remove standard regulators.
2. Remove pump cylinder heads.
3. Ensure the two components abut at face 'X'. It
may be necessary to dress the locating taper of
Item 4 to achieve this.
4. Fit special studs (Item 10) into cylinder heads.
5. Secure inner bodies to special studs (using nut
Item 15) and seal into cylinder head spigots in
accordance with above sketch instructions.
6. Secure outer body (Items 5, 7, 8, 9, 13 and 14)
assembly to inner body flange with four M8
screws and nuts (Items 11 and 12) orientating the
vent hole downwards.
5.6 Regulator Blanks
Regulator blanks were introduced before the
development of oil tolerant regulators, and are a non
pressure damping plug that allows pumps to transfer
oil/water slurries and other hydrocarbons which were
not suitable for standard regulator sleeves. Their use
requires the pump speed to be reduced, to below
1250rpm due to the lack of pressure damping.
Damage and loss of performance can occur if run
faster when they are fitted.
Regulator blanks may still be fitted for some
applications although their use has declined with the
advent of the more versatile oil tolerant regulator. In
order to fit regulator blanks the regulator assembly on
each cylinder must be removed and a blanking plate
(Part No. 0003528000) with a connecting rubber (Part
No. 0003236200) and clip (Part No. 9505007004)
must be fitted in its place.
5.7 Full Flow Relief Valve
The full flow relief valve (Part No. 0003353000)
should be fitted if it is likely that the pump will operate
against a closed delivery line or heads greater than
the maximum operating pressure of the pump. The
valve is simple in operation but is factory set and it is
not recommended that adjustments be made in the
field unless instructed to do so.

Selwood Spate PD75 Manual
8
5.8 Use of the Spate High
Pressure Nozzle
For pressure washing or jetting the SPATE high
pressure nozzle (optional extra) will not over-
pressurise the pump, but for all other high-pressure
operations the manufacturers should be consulted.
Maximum recommended working pressure of the
pump is 30.5m (100ft) head, or 3bar (43lbf/in2).
5.9 Use of Air Inflator Attachment
The pump is capable of compressing air to a
maximum pressure of 4.8bar (70bf/in2). An air
adaptor is available for tyre inflation, etc. The adaptor
should be attached to the pump delivery spigot and
secured very firmly with heavy duty clips or clamps.
The priming manifold must be filled with water to
obtain maximum air pressure. When operating dry,
the pump air pressure will be considerably reduced.
Make sure that the suction hose has been
disconnected before starting the pump to compress
air.
WARNING
Compressed Air is Dangerous.
5.10 Frost and Ice
To prevent ice damage in cold weather remove the
suction and delivery hoses, open the drain taps in the
pump cylinders and continue to run the pump until all
water has been expelled.
6 CONDITIONS OF
WARRANTY
For a period of twelve months from delivery of any
Selwood pump to the first user thereof, or eighteen
months from the despatch of any such pump by
Selwood, whichever period is the shorter, Selwood
will repair or, at its option, replace any component,
which in the opinion of Selwood has failed due to
defective workmanship or materials.
For full terms and conditions please contact Selwood
Ltd.

Selwood Spate PD75 Manual
9
7 FIELD SERVICING
7.1 To Dismantle a Pump
Cylinder
1. Slacken the induction manifold connector clip
(18).
2. Remove the pump cylinder head nuts (15) and
cylinder head (14).
3. Remove the priming annulus (5) and delivery port
plate (12).
4. Remove the split pin (10a) and release the
actuator nut (10) with the actuator valve (11)
attached.
5. Remove the actuator washer (9) from the
connecting rod (25).
6. Remove the cylinder body ring (6) complete with
actuator (8) and seal (7) assembly.
7. Remove the priming annulus (5) and suction port
plate (4).
8. If the pump drive mechanism is to be dismantled,
remove the connecting rod cylinder seal (3).
NOTE: This should not be removed when only
cleaning or inspecting the cylinder parts.
Before re-assembly:
1. Wash all components and assemble wet.
2. Check that the 4.8mm (3/16") diameter flood
prime hole in the delivery port plate (12) is clear
and that the drain tap is not blocked.
3. Ensure that the actuator washer (9) is in place
and the actuator nut (10) is completely tightened.
Recommended torque 5.5kg m (40lb/ft.).
Caution
Tighten cylinder head nuts evenly.
Do not overtighten the cylinder head
nuts (15). 18 Ib ft MAX (2.48Kgf-m)
7.2 Examination and
Replacement of Flexible
Components
7.2.1 Priming Annulus and Actuator Valve
These flexible mouldings of synthetic rubber are oil
resisting and are not expected to fail in normal use.
Look for splits due to excess pressure or distortion
due to petrol contamination. Each priming annulus
must be a free fit in the cylinder ring and cylinder
head recess.
Replacement
Re-assemble these parts wet if possible, and turn
each priming annulus over to improve its seating.

Selwood Spate PD75 Manual
10
7.2.2 Connecting Rod Cylinder Seal
These seals are synthetic rubber mouldings, oil
resisting, and with long use may develop cracks
around the inner neck diameter. When these have
grown to half to three-quarters of the original
thickness the seals should be replaced. The pump
should not be operated for any long period with failed
seals. Radial crack in the seals can be ignored. It is
advisable to replace both connecting rod cylinder
seals and both actuator seals at the same overhaul
period.
Replacement
1. Prise the old seals out of their housings and
position the pump connecting rod out as far as it
will go, by rotating the engine flywheel. (This is
very important).
2. Wet the end of the connecting rod and push the
seal on with the palm of the hand.
3. Press the seal centre completely into the recess
of the connecting rod and its outer flange into the
body housing.
7.2.3 Actuator Seal
These seals are oil resisting synthetic rubber
mouldings. Over a long wear life cracks develop
around the inside neck recess, but the seals need
replacement only when half to three-quarters of the
original moulded thickness is separated. It is
advisable to replace both actuator seals and both
connecting rod cylinder seals at the same overhaul
period.
Replacement
1. Press the inner flange of the seal completely into
the actuator.
2. Wet the outer flange and press it into the cylinder
ring, making sure that all mating surfaces are
clean and free from grit.
3. Replace the actuator washer, tighten the actuator
nut completely and replace the split pin.
It is very important that this joint should be completely
re-tightened to the recommended torque of 5.5kg m
(40lb. ft.). Failure to tighten sufficiently may result In
wear of the connecting rod end and the actuator
centre. If this wear takes place the connecting rod
and Actuator must be replaced.
7.2.4 Pressure Regulator Assembly
Natural rubber moulding. (See Oil Handling, Section
2.4).

Selwood Spate PD75 Manual
11
8 WORKSHOP SERVICING
8.1 Dismantle Pump Drive
Mechanism
1. Dismantle the pump cylinders as described in
Field Servicing, refer to pump dismantling page
7.
2. Remove the pump register nuts (41).
3. Withdraw pump unit to separate the drive
coupling.
4. Slacken the coupling grub screw (40), and
remove the pump half coupling (31 or 47) using
the extractor tool (Part No. 0003292000) with its
two 3/8" whitworth bolts.
5. Remove the main bearing housing (28) using the
extractor tool (Part No. 0003292000) with its two
½" whitworth bolts. The main bearing (22) will
usually be left behind on the eccentric drive shaft.
6. Place the pump body assembly on the press
table, supporting the connecting rods with the
connecting rod support tube (Part No.
0003294000) using press tool (Part No.
0003293000) to press out the eccentric drive
shaft.
7. Remove the connecting rods complete with
bearings and spacers.
8. Press out the rear main bearing, if required, with
press tool (Part No. 0003293000). Removal of
the rear main bearing in most cases results in its
damage because it can only be pressed out from
the centre race and this should only be carried
out when it is necessary to replace the bearing.
NOTES:
1. Figures shown thus (23) denote Parts List
Drawing Numbers.
2. All particulars subject to alteration without
notice, Illustrations not binding in detail.
3. Extractor tool (Part No. 0003292000) is also
utilised to remove the centrifugal clutch
drum when fitted.
8.2 PUMP DRIVE MECHANISM
MAINTENANCE TOOLS

Selwood Spate PD75 Manual
12
8.3 Assemble Pump Drive
Mechanism
1. Place the drive shaft assembly washer (Part No.
0014121000) on the Main Assembly Peg (Part
No. 0003296000) now place the pump body
casting vertically on the main assembly peg,
through the hole below the suction hose spigot,
with the pump hose spigot facing the operator.
2. Place the rear main bearing (22) into position in
the pump body casting and over it 60mm (2 3/8")
collar (Part No. 0003293A00). Insert press tool
(Part No. 0003293000) into the collar, and over it
fit universal press tool (Part No. 0003295000)
flange downwards, to provide correct centring of
the pump. Press the main bearing into its
housing until it meets the main assembly peg
(Part No. 0003296000).
3. Place the Thick Spacer (23) centrally on the rear
main bearing with the chamfer facing towards the
bearing.
4. Assemble the connecting rod bearings (26) into
the connecting rods (25) with the use of the
universal press tool (Part No. 0003295000).
Then insert the left side connecting rod into its
operating position First. It will be found that the
flat part of the flange on the connecting rod has
to face the operator in order to insert it. When in
position, rotate the connecting rod so that this flat
surface faces downwards.
5. Place the thin spacer (27) centrally on the
bearing in the connecting rod.
6. Insert the right side connecting rod into its
operating position with the flat surface on the
flange of the connecting rod facing upwards, but
do not turn it over, i.e. the two flat surfaces
should now face outwards from the centre.
7. Offset the centre of the connecting rod bearings
and thin spacer 3.8mm (0.15") from the centre
line of the Rear Main Bearing and then insert the
eccentric drive shaft (24).
8. Press in the eccentric drive shaft, until the shaft
end is firmly seated against the main assembly
peg (Part No. 0003296000).
9. Assemble the front main bearing (22) into the
main bearing housing (28) with the use of the
universal press tool (Part No. 0003295000).
Then press this assembly on to the eccentric
shaft until the bearing housing is firmly seated on
the machined surface in the pump body casting,
by use of the universal press tool (Part No.
0003295000).
10. Press the pump half-coupling (31 or 47) on to the
eccentric drive shaft with the stock end of the
rear bearing press tool (Part No. 0003293000)
until it is flush with the end of the eccentric drive
shaft. Insert the key (36) and tighten the grub
screw (40) using the body drain hole for access.
NOTE: The connecting rods should be within 0.8mm
(0.030") of centre in the connecting rod seal housings
in the pump body casting.

Selwood Spate PD75 Manual
13
9 TROUBLE SHOOTING GUIDE
Proceed in the sequence in which the actions are given.
PUMP WILL NOT PRIME, OR LOSES PRIME HAVING PUMPED PRODUCT FOR A BRIEF PERIOD OF TIME
ACTION COMMENT
1 Check that pumping chambers contain liquid. The pump's priming ability will be greatly increased if
the chambers are filled.
2 Check that duty lift does not exceed pump's
standard capability.
This pump is capable of priming to a maximum
vertical height of 8.8m (29ft) H20.
3 (a) Check all suction-side hoses, fittings and
joints for air leaks.
(b) Check strainer and suction hose for
blockages.
Priming problems are VERY often caused by faults in
supply pipework. Air must NOT be allowed to pass
into the system across couplings, etc.
Do not use un-reinforced hose. Always fit a strainer
of correct size and type either to the submerged end
of the hose, or into the pump's suction spigot.
Selwood Pumps provide special strainers for this
purpose - they are easy to clean but difficult to
remove.
4 Check product viscosity. As viscosity rises, pump speed must be reduced.
Refer to Selwood Pumps for advice in connection with
specific fluid and duty requirements.
5 Check for solids trapped beneath valves and also
for damaged valve seats.
Occasionally, solids become trapped and so prevent
the valves sealing. Fluids containing a high
proportion of abrasive solids can cause seat erosion
which likewise impairs valve efficiency.
6 Check condition of annular valves. Contact with non-permitted chemicals can sometimes
cause the rubber to swell. When at rest, the valves
should contact their seats.
7 Check condition of actuator and connecting rod
seals.
These components guide the actuator, and also seal
the pumping chambers. It is essential that they
should not be split or perforated in any way.
8 Check pump castings for holes, splits or porosity. Fluids containing a high percentage of abrasive solids
can lead to severe erosion of the passageways.
9 Check for air leaks across cylinder rings. The actuator seal and priming annuli have sections of
rubber that seal the cylinder rings. Damage to a ring's
sealing surfaces during fitting, for example, can lead
to leakage of air into the pump's chambers.
10 Check that actuators reciprocate freely when
pump shaft is turned.
Bearing failure might result in inadequate
displacement. However, as the bearings are
generously-sized this situation is unlikely to arise.
11 Check that drain tap is not open. Drain taps are sometimes left open overnight.

Selwood Spate PD75 Manual
14
OUTPUT AND HEAD ARE LESS THAN PUBLISHED FIGURES
ACTION COMMENT
1 Check strainer and suction pipework for
blockages. Also check that air is not being pulled
through a vortex created in the supply reservoir.
Choking of the supply system by solids will increase
the flow resistance, thus increasing the head against
which the pump has to operate, and reducing output.
Entry of air through faulty pipe joints will have a
similar effect. Reduction also occurs if air is entrained
through a vortex - to eliminate, increase strainer's
submergence.
2 Check sizes of suction and delivery hoses. Use wire-reinforced hose for suction system. Length
should be minimised and pump sited as close to
supply reservoir as possible. Unnecessary bends and
fittings should not be incorporated in either the suction
or delivery pipework systems. Stop valves
downstream of the pump must never be closed when
pump is running.
3 Check condition of annular valves and flexing
seal.
When at rest, the priming annuli should touch their
seats. Flexing seals should be free from cracks and
perforations.
4 Check for solids trapped in pump body and
manifold.
Blockages are most unlikely to occur if the correct
strainer is fitted.
5 Check pump speed. Normal operating pump speeds are:
•Up to 1500rpm driven by I.C. engine.
•Up to 1450 or 1000rpm if driven by electric motor.
FLUID ESCAPING FROM PUMP UNIT
ACTION COMMENT
1 If fluid is leaking from drain hole in body, check
condition of connecting rod seal.
The pump should not be run in this condition.
Immediately replace seal if examination reveals a split
component.
2 If fluid is leaking from pressure regulator, check
condition of rubber sleeve.
As natural rubber is used for these components, the
regulator assembly must not be fitted if the pump has
to handle hydrocarbon products, for example.
3 If fluid is leaking from manifold connectors, tighten
clips and check delivery pressure.
Delivery pressure must not exceed 30.5m (100ft).
PUMP IS UNEXPECTEDLY NOISY
ACTION COMMENT
1 Check that noise does not emanate from engine,
chassis or tank.
Loose fasteners, particularly those associated with
the tow bar, can give rise to unexpected noises.
2 Check that there is at least 2m of flexible hose
connected to the suction and discharge spigots.
Pump can be used for rigid-pipework installations
provided that they incorporate these two lengths of
hose.
3 Check that maximum fluid pressures are not being
exceeded.
Refer to Fluid Escaping from Pump Unit, Action 3 for
maximum delivery heads.
4 Check that duty suction lift is not excessive. In some circumstances, lifts over 5.5m (18ft) H2O, can
cause water-hammer problems in manifold.
5 Check that pump speed is not too high. Refer to Output and Head are Less than Published
Figures, Action 5 for maximum delivery heads.
6 If running at normal maximum speed, check that
pressure regulators are fitted.
Speed must be reduced if regulators are not used.
7 Check that negative delivery head is not occurring. Negative delivery heads are only permissible if the
pump is fitted with a snifter valve. Refer to Selwood
Pumps for advice.
8 Check condition of rubber bushes in flexible
coupling.
The pump is coupled to its driver by means of a pin
and bush coupling. It is important that the rubber
bushes should be in good condition.

Selwood Spate PD75 Manual
15
PUMP IS UNEXPECTEDLY NOISY (continued)
ACTION COMMENT
9 Check that pump is not handling solids of
excessive size.
If a strainer is not fitted, over-sized solids can pass
into the pump. Maximum permitted size 6mm
(0.25in).
10 Check condition of reciprocating and rotating
parts.
The problem could be due to a loose actuator nut, or
to failure of the drive shaft or eccentric bearings.
PUMP MECHANISM IS SEIZED AND CANNOT BE ROTATED BY HAND
ACTION COMMENT
1 Check that ice has not formed in pump body. This condition can easily arise in cold weather if the
pump is stationary and has not been drained.
2 Check for over-size solids in pump body. Absence of a strainer can lead to unacceptably large
solids entering the pump and obstructing the
actuators.
3 Check that drive-shaft bearings have not seized. Bearing seizure can arise if the pump has been
operated for long time periods with a failed connecting
rod seal.
Refer to Selwood Pumps if the above advice does not solve your problem.

Selwood Spate PD75 Manual
16

Selwood Spate PD75 Manual
17
10 PARTS LISTS
10.1 Pump Parts
ITEM DESCRIPTION PART NUMBER QTY
1 Pump Body Casting 0003302000 1
Pump Body 2.5" BSP Male Threads (optional) 0003509640 1
2 Cylinder Studs 0003240000 6
3 Con. Rod Cyl. Seal 0003316000 2
Con Rod Seal - Viton (optional) 0003316094 2
4 Suction Port Plate 0003215000 2
5 Priming Annulus 0003220200 4
Priming Annulus - Viton (optional) 0003220294 4
6 Cylinder Body Ring 0003223000 2
7 Actuator Seal 0003337000 2
Actuator Seal - Viton (optional) 0003337094 2
8 Actuator 0003219000 2
9 Actuator Washer 9030510359 2
10 Actuator Nut 0003248000 2
10A Split Pin 0003249000 2
11 Actuator Valve 0003221200 2
Actuator Valve - Viton (optional) 0003221294 2
12 Delivery Port Plate 0003324000 2
13 Cylinder Drain Tap 0003350000 2
14 Cylinder Head 0003225000 2
15 Cylinder Nuts 0003212000 6
16 Pressure Regulator Assy - Natural Rubber 0003230200 2
Oil Resistant Pressure Regulator Nitrile
(optional)
(Not Illustrated)
0393040000 2
Oil tolerant Pressure Regulator Viton (optional)
(Not Illustrated)
039304000B 2
18 Clip 9505007004 2
19 Cylinder Induction Manifold Connector. 0003236200 2
20 Induction Manifold 0003314000 1
Manifold 2.5" BSP Male Thread (optional) 0003509630 1
21 Rubber Plug 0003243000 1
22 Main Bearing 0003202A00 2
23 Main Bearing Spacer (Thick) 0003398000 1
24 Eccentric Drive Shaft (Standard) 0003304000 1
Eccentric Shaft 0.15" Stroke (optional) 0003509480 1
25 Connecting Rod 0003205200 2
26 Connecting Rod Bearing 0003204000 2
27 Connecting Rod Spacer (Thin) 0003399000 1
28 Main Bearing Housing 0003217000 1
When ordering spares, please state:
PUMP NUMBER - PART NUMBER - DESCRIPTION OF PART

Selwood Spate PD75 Manual
18
Oil tolerant regulators, as their name suggests, are suitable for handling most oil and water mixes at
pump speeds up to the max 1500rpm.
For high viscosity oils or greases the pump speed should be reduced to allow the internal valves (Items 5
and 11) time to respond to the thicker material. Oil tolerant regulators are directly interchangeable with
the standard items, and can be retro fitted if required. Regulators are available as individual assemblies
(Part No. 0393040000). These pressure regulators allow the pump to operate at maximum speed and
output on oil applications; viscosity effects permitting. They will also enable the use of the Lister/Petter
AD1 and clutch at 1500rpm.
The vent hole may be orientated to point downwards thus minimizing the spread of pumped products in
the event of a failure.
The Oil Resistant Pressure Regulator consists of an aluminium LM6 body and a Spate PD75 neck seal
(Part No. 0003316000) backed by a natural rubber anti-vibration mount. Replacement neck seals must
be fitted using assembly tool (Part No. 0393038000)

Selwood Spate PD75 Manual
19
10.2 Oil Tolerant Regulator
ITEM DESCRIPTION PART NUMBER QTY
4 Inner Body 0393036000 1
5 Outer Body 0393035000 1
7 AV Mount 9680M00004 1
8 Seal Guide 0393037000 1
9 Neck Seal 0003316000 1
9 Neck Seal -Viton- (Optional) 0003316094 1
10 Stud 0393039000 1
11 Rect. Sect Spring Washer M8 9030080229 4
12 Hex Hd. Setscrew M8x25 9000080251 4
13 Plain Washer M10 9030100024 1
14 Hex Self Locking Nut 9025100344 1
15 Full Nut 9025100004 1
Assy Part No for Standard Seal 0393040000
Assy Part No for Viton Seal 039304000B
When ordering spares, please state:
PUMP NUMBER - PART NUMBER - DESCRIPTION OF PART

Selwood Spate PD75 Manual
20
Table of contents
Other SELWOOD Water Pump manuals
Popular Water Pump manuals by other brands

MQ Multiquip
MQ Multiquip QP3TS Operation manual

Grundfos
Grundfos Unilift KP 150 manual

Pfeiffer Vacuum
Pfeiffer Vacuum DUO 3 MC operating instructions

Grundfos
Grundfos CRE Series Installation and operating instructions

WITA
WITA Delta Plus UE 70A Series TRANSLATION OF THE ORIGINAL INSTALLATION AND OPERATING INSTRUCTIONS

Truper
Truper PRETUL MOTB-2P manual