SENADA AUSTIN User manual

1
AUSTIN
OWNER’
SMANUAL

2
Welcome
Thank you for purchasing AUTSIN from Senada Bikes.
Please read carefully and understand this manual fully before
assembling and riding your bike.
If you have questions after reading this manual, please
contact us by email.
We are here to help!
Email:[email protected]

3
Table of Contents
Attentions ................................................................. 4
General Info ...............................................................8
Product parameters ....................................................... 17
Manual control instrument ..................................................20
Display content introduction ................................................ 21
Button introduction ....................................................... 276

4
Attentions
Battery and Charging:
Charge at 0℃~45℃(32-113℉), discharge at -20℃〜60℃(68-140℉), please keep
the battery dry. Do not put the battery in acidic or alkaline liquid. Avoid rain and keep
away from fire, heat, and high-temperature environments.
It is strictly forbidden to connect the positive and negative poles of the battery
reversely. It is strictly forbidden to damage, disassemble the battery or cause
short-circuit.
Please use the original charger for charging, with a charging time of no more than 8
hours and a charging current no larger than 2A. When not in use for a long time,
please store the battery in a cool and dry place, and charge the battery for 5 hours
every month. The user must follow the manual instructions when charging, otherwise,
the consequences will be at their own risk.
Pay attention to the battery type and applicable voltage that the charger can charge,
and it is strictly forbidden to mix. When charging the battery, it should be placed in a
ventilated environment. It is strictly forbidden to charge in residential buildings,

5
enclosed spaces, or under sunshine and in high-temperature environments. When
charging, plug in the battery first, then connect to the power supply socket; after full
charge, disconnect the socket side first, and then unplug the battery. When the green
light is on, the power supply should be cut off in time, and it is forbidden to connect the
charger to the AC power supply for a long time without charging.
During the charging process, if the indicator light is abnormal, there is a peculiar smell,
or the charger casing is overheated (over 176°F or 80°C), stop charging immediately,
and repair or replace the charger. During the use and storage of the charger, pay
attention to avoid foreign objects entering, especially water or other liquids, so as to
avoid a short circuit inside the charger. The charger should not be carried with the bike
often. If it is necessary to carry it, it should be placed in the toolbox after the shock
absorption treatment is done. Do not disassemble or replace the accessories in the
charger by yourself.
Ride:
This product is prohibited for use by children under 12 years old; adolescents aged
12-16 should use it under adult supervision. Do not use it until you read the
instructions carefully and understand the performance of the product; do not lend it to
people who can't manipulate the product for riding.

6
Before riding the bike, check whether the brakes are working. When you use the brake,
please activate the rear brake first, and then the front brake.
Pay attention to the brake tightness. If the brake is too loose, use an Allen key to
tighten it. Pay attention to the braking distance, it will increase when riding in rain or
snow.
Please be sure to wear a safety helmet when riding the e-bike, follow the traffic rules,
and do not drive on motorized lanes and roads with many pedestrians.
Please check the tire pressure before riding. The recommended tire pressure is
35~45PSI. When riding on downhill and non-paved roads, make sure the speed does
not exceed 15km/h (9.3mph). When using the motor, please be careful not to hit the
wheels vigorously and keep the rotating shaft lubricated. It is not allowed to ride with
more than the maximum load (265 lbs or 120kg).
After use, please do not park the bike in the building hall, evacuation stairs, or safety
exits. Please park the bike correctly in accordance with the procedures and safety
information detailed in this manual and local policies.

7
Liability statement:
After riding, please store the bike in a place without sunlight and rain, not in a
residential building; Regularly check the motor and brake; Regularly check the bike's
screws, especially those that need to be tightened, and tighten them regularly.
Recommended torque: (unit: kgf.cm) Steering handlebar screws 60-80, stem screws
175 ~ 200, seat cushion screws 175 ~ 200, wheel screws 320 ~ 450; The front and
rear wheels of the e-bike should align with the central axis of the front fork or frame;
Regularly check if there is scratches, cracks or excessive wear in tires. The inner tube
and valve should be perpendicular to the wheel hub and not crooked.
Damaged or excessively worn tires need to be replaced immediately, please find a
professional technician to replace your tires. If your tires accidentally puncture and
leak, please contact a professional technician for repair or replacement.
Maintenance:
The company reserves the right to modify and interpret the product models,
specifications, or related information mentioned in this manual; The functions of a
specific model mentioned in this user manual are only applicable to that specific

8
model; The product models, specifications, or related information mentioned in this
user manual are subject to any modification or change without prior notice; Without
the prior written permission of the company, the contents of this manual may not be
copied, modified, reproduced, transmitted or published in any form.
Please read this manual carefully before using the product, and operate in accordance
with the manual, otherwise, the company will not be responsible for product damage
or personal and property damage caused by improper use or mistakes
General Info
Assembly and Fit
Correct assembly and fit are essential elements of ensuring your bicycling safety,
performance, and comfort. Even if you have the experience, skill, and tools to
complete these essential steps before your first ride, Senada Bikes recommends
having a certified, reputable bike mechanic check your work.
NOTICE: If you do not have the experience, skills, or tools to complete assembly
and operation, Senada Bikes highly recommends having a certified, reputable bike
mechanic complete these procedures as well as any future adjustments or

9
tuning.operation
NOTICE: A critical aspect of assembling your bike by Senada Bikes is securing the
front wheel and checking the tightness of the rear wheel axle nuts. These
mechanisms may become loose or unsecured during shipment or over time. The
torque and security of all-wheel mounting hardware should be inspected upon arrival
and on a regular basis. Both wheels need to be properly secured before operating
your bike.
Mandatory Equipment and Use Locations
Before all rides, ensure you have all required and recommended safety equipment
and are following all laws pertaining to using an electric bike in your region.
Changing Components or Attaching Accessories
The use of non-original components or spare parts can jeopardize the safety of
your e-bike, void your warranty, and, in some cases, cause your e-bike to not
conform with laws pertaining to your bike.
Safety Check Before Each Ride

10
Always check the condition of your bike before you ride in addition to having
regular maintenance performed. If you are unsure of how to conduct a complete
check of the condition of your bike before every ride, you should consult a certified,
reputable bike mechanic for assistance.
Electrical System
The electrical system on your e-bike offers various levels of power assistance and
lighting for different operating conditions and user preferences. It is critical that you
familiarize yourself with all aspects of your bike’s electrical system and check to see
that it is working correctly before every ride.
The front and rear brake levers contain safety power cutoff switches, which disable
the hub motor’s assistance when applied, and both levers should be checked for
correct operation. The throttle should provide smooth acceleration when gradually
applied.
If the throttle, brake lever cutoff switches, pedal assistance, or lighting are
functioning abnormally, intermittently, or not working, please discontinue using your
e-bike immediately and contact the Senada Bikes Support Team for assistance.

11
Brakes
Ensure brakes are working correctly, all braking system components are free from
damage and properly secured. When you fully squeeze the brake levers, ensure
neither the front nor rear brake levers touch the handlebar. Take your bike to a
certified, reputable bike mechanic to have the brakes repaired if you find a problem.
Tires and wheels
Your wheels should always spin straight and must be repaired or replaced if they
wobble side to side or up and down when spinning. If your wheels become untrue or
the spokes loosen, which can happen with normal use, we recommend that a certified,
reputable bike mechanic performs all wheel tuning and truing operations on your bike
from Senada Bikes.
Do not attempt to true wheels or tighten spokes unless you have adequate knowledge,
tools, and experience. Ensure the tires and inner tubes are in good working condition
without any visual damage and have the correct amount of air pressure. Always
replace tires and inner tubes with punctures, cuts, or damage before you ride, in case
of tire and component wear, and make your riding unsafe.
Quick Release Levers
There is a quick-release lever located on your e-bike for securing the seat tube. This

12
provides convenience to the user since they allow the seat tube to be adjusted
without tools. Since quick-release levers can be loosened during transportation, or
accidentally between or during rides, it is important that you regularly check to
ensure these components are properly secured.
Accessories, Straps, and Hardware
Ensure all hardware is secured and all approved accessories are properly
attached per the specific component manufacturer’s instructions. It is good
practice to look over all hardware, straps, and accessories before each ride and
if you do discover something is wrong or find something you are not sure about,
have it checked by a certified, reputable bike mechanic.
Suspension, Handlebar, Grips, and Seat Adjustments
The suspension fork on your e-bike will affect the handling of the bike, you need to
understand how it works before use. The suspension fork should be properly adjusted
for your weight and terrain. Ensure the handlebar and handlebar stem are properly
aligned, fitted to the user, and secured to their recommended torque values.
Handlebar grips should not move easily on the handlebar end.
Loose, worn, or damaged handlebar grips should be replaced before you ride and can

13
be purchased from Senada Bikes. The seat and saddle tube should be properly
aligned, and fitted to the user, and the saddle tube quick release should be properly
tightened, fully closed, and secured before riding.
Battery Charged, Secured, and Unplugged
Ensure the battery is adequately charged and operating properly. The battery
gauge on the LCD display and the charge status indicator on the battery should
read similarly. Ensure the battery charger is unplugged from the outlet, battery,
then stored in a safe location before you ride.
14
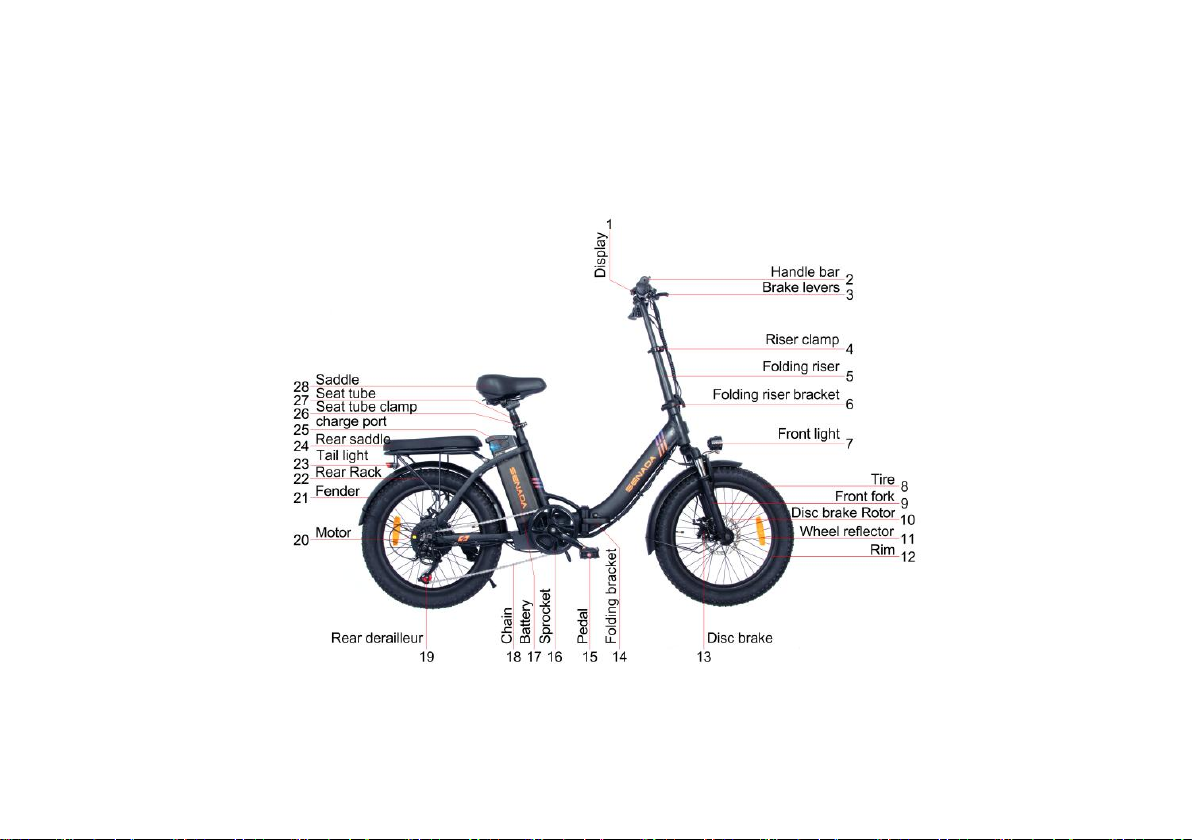
Product function diagram

15
Function introduction:
Figure1 Figure2 Figure 3
1. Charging: Push and turn the plastic cover on the battery (Figure 1), connect the
charger to start charging, when the battery is full and the indicator light of the charger
changes from red to green, the battery is fully charged.

16
2.Power on: Refer to Figure 2, turn the key on the battery; refer to Figure3,
press and hold to turn on/off the display.
3.Power display: After the power is turned on, the dashboard lights up to display
the power. The power is displayed in 5 grids, corresponding to high, medium and low
power.
4.Front light: Refer to Figure 3, press and hold “+”to turn on/off the headlight.
5.Start the Pedal assisted riding mode: Short press“+”to set the PAS from
0 to 1, pedal the bicycle,start the power assist mode. If you don't need power
assistance, you can turn off the power or turn off the battery or set the PAS to 0.
Please always start riding from lower PAS level.

17
Product parameters
Parameter
Standard Version
Outlook
&Dimension
Body Material
Aluminum Alloy
Color
Black / White
Unfolding Size
1680mm*560mm*1200mm
Folding size
900mm*500mm*770mm
Hub Form
Spoke wheel
Wheel Size
20 inches
Packing Size
960mm*380mm*745mm
Performance
Parameters
Gross weight /Net weight
34.5kgs/27.8kgs
Maximum Load
120kg
Maximum Speed
25mph
Range
≦28 miles(electric mode)
≈65miles(pedal assist model)
Maximum Climbing Angle
25 degree
Proper Temperature
-10°C-45 °C (14℉-113℉)
Waterproof Level
IP54
Battery Type
18650 lithium ion power battery
Battery Capacity
14ah

18
Electrical
Specifications
Battery Rated Voltage
48V
Motor Rated Power
500W
Motor Form
Assist mode,pure electric mode
Motor Type
20 inches / High-speed gear / Spoke
wheel brush-less motor
Motor Rated No-Load
Speed
390±10r/min
Charger Output
54.6V 2.0A
Charger Input
100~240V 50/60Hz 3.0A
Under voltage Protection
Value
39V
Over current Protection
Value
20A±1A
Charging Time
6-7 hours
Features
Instrument Display
Multifunctional LCD screen
Front Lighting
YES
Braking Method
Front disc brake + Rear disc brake
Tire Specifications
Pneumatic tires
Tire:20×3.0
Air Valve: 20×3.0, the inner tube

19
valve is AV
Front Fork
Suspension front fork
Gear
7 Speeds transmission
Note: The factors, including battery power capacity, load, tire pressure, road
conditions, chain and lubrication between wheel and axle, etc. will affect the maximum
speed; the cruising distance indicated in this manual file is the test result from the
riding test conducted uninterruptedly with a load of 60 kg, at the speed of 7-25mile/h
for US, and on the flat and hardened road surface, from full charge to full power
consumption. Driving habits, temperature, load, tire pressure, road condition, and
other factors will affect the actual cruising distance.

20
Display control instrument
0. LCD display
1. Display function
Speed display, power assist display, power indicator, error code, mileage display,
voltage display, 3.75mph push assist, cruise control, single boot time, brake
indication, headlight display.
2.Control set function
Power switch control, headlight switch control, 3.75 mph push assist setting
Table of contents
Other SENADA Bicycle manuals


