Sergio iScratch User manual
1
Sergio iScratch Operation Manual
Thank you for purchasing the Sergio iScratch music sound effect system for your iPod® For MP3 player. The Sergio iScratch is
the latest innovation from Sergio, a long time leader in the design of professional audio systems. It is designed specifically to
create your own music style, and remix music anywhere in an easy and fun way.

1
IMPORTANT
Read Before Proceeding
Please read through this operating instruction so you will know how to operate this product properly. After you have finished
reading the instruction, put it in a safe place for future reference.
In some countries or regions, the shape of power plug or power outlet may sometimes differ from that shown in the
explanatory drawings. However the method of connecting and operating the unit is the same.

2
Table of Contents
Table of Content
1. Package Contents
………………………………………………………………………………………………………………………….3
2. Features
……………………………………………………………………………………………………………………………………..…4
3. Quick Start
…………………………………………………………………………………………………………………………………… 5
4. Controls and Indicators
…………………………………………………………………………………………………………………… 7
5. iPod / MP3 Player
…………………………………………………………………………………………………………………………10
6. Using iScratch
………………………………………………………………………………………………………………………………12
7. Wiring Diagrams
……………………………………………………………………………………………………………………………15
8. Specification
………………………………………………………………………………………………………………………………… 16
9. Consumer Guide to Product Safety
………………………………………………………………………………………………………17
10. Trouble Shooting
…………………………………………………………………………………………………………………………… 19
11. Warranty
………………………………………………………………………………………………………………………………………22

3
Package Contents
The iScratch package includes the following:
1. iScratch sound effect unit
2. A headphone set (with microphone)
3. A power adaptor
4. Operation manual CD

4
Features
iPod / MP3 Player
The iScratch can be used with three different combinations of signal sources:
iPod + iPod
MP3 player + MP3 player
iPod + MP3 player
The iPod will be charged when inserted into iScratch, provided the iScratch is on
Two universal iPod docking stations accept all iPod models (Top Surface)
Two line-in 3.5mm plugs for MP3 players (Rear)
Music Mix
Scratch effect with (24 seconds scratch recording time)
Loop programs
Cross-fade music mix from source A to source B. Simultaneous occurrence of a fade-in and a fade-out. The cue
channel will allow the headphones (only) to monitor the player that is „faded out‟
5
Quick Start
1. Connect the included wall-mount power supply to the
jack marked „5VDC‟ for iScratch.
2. Connect AV cord from your sound system to the iScratch
output jacks (RCA type).
Note: Connect the iScratch outputs to a suitable sound
system. This may be powered speakers, a professional
sound system, or the audio inputs of a television.

6
3. Insert iPod devices into the docking connectors or connect an MP3
player into the line-in jacks (rear).
iPod
Mini
iPod 4, 5th
generation
iPod nano
iPod
Classic
iPod Touch
4GB,
6GB
20GB
30GB
40GB
60GB
80GB
1st Gen
1, 2 and 4GB
2nd Gen
2, 4 and 8GB
3rd Gen
4 and 8GB
4th Gen
8 and 16GB
80GB
160GB
1st Gen
8, 16 and 32GB
2nd Gen
8,16 and 32GB
3rd Gen
32 and 64GB
4. Switch Power On.

7
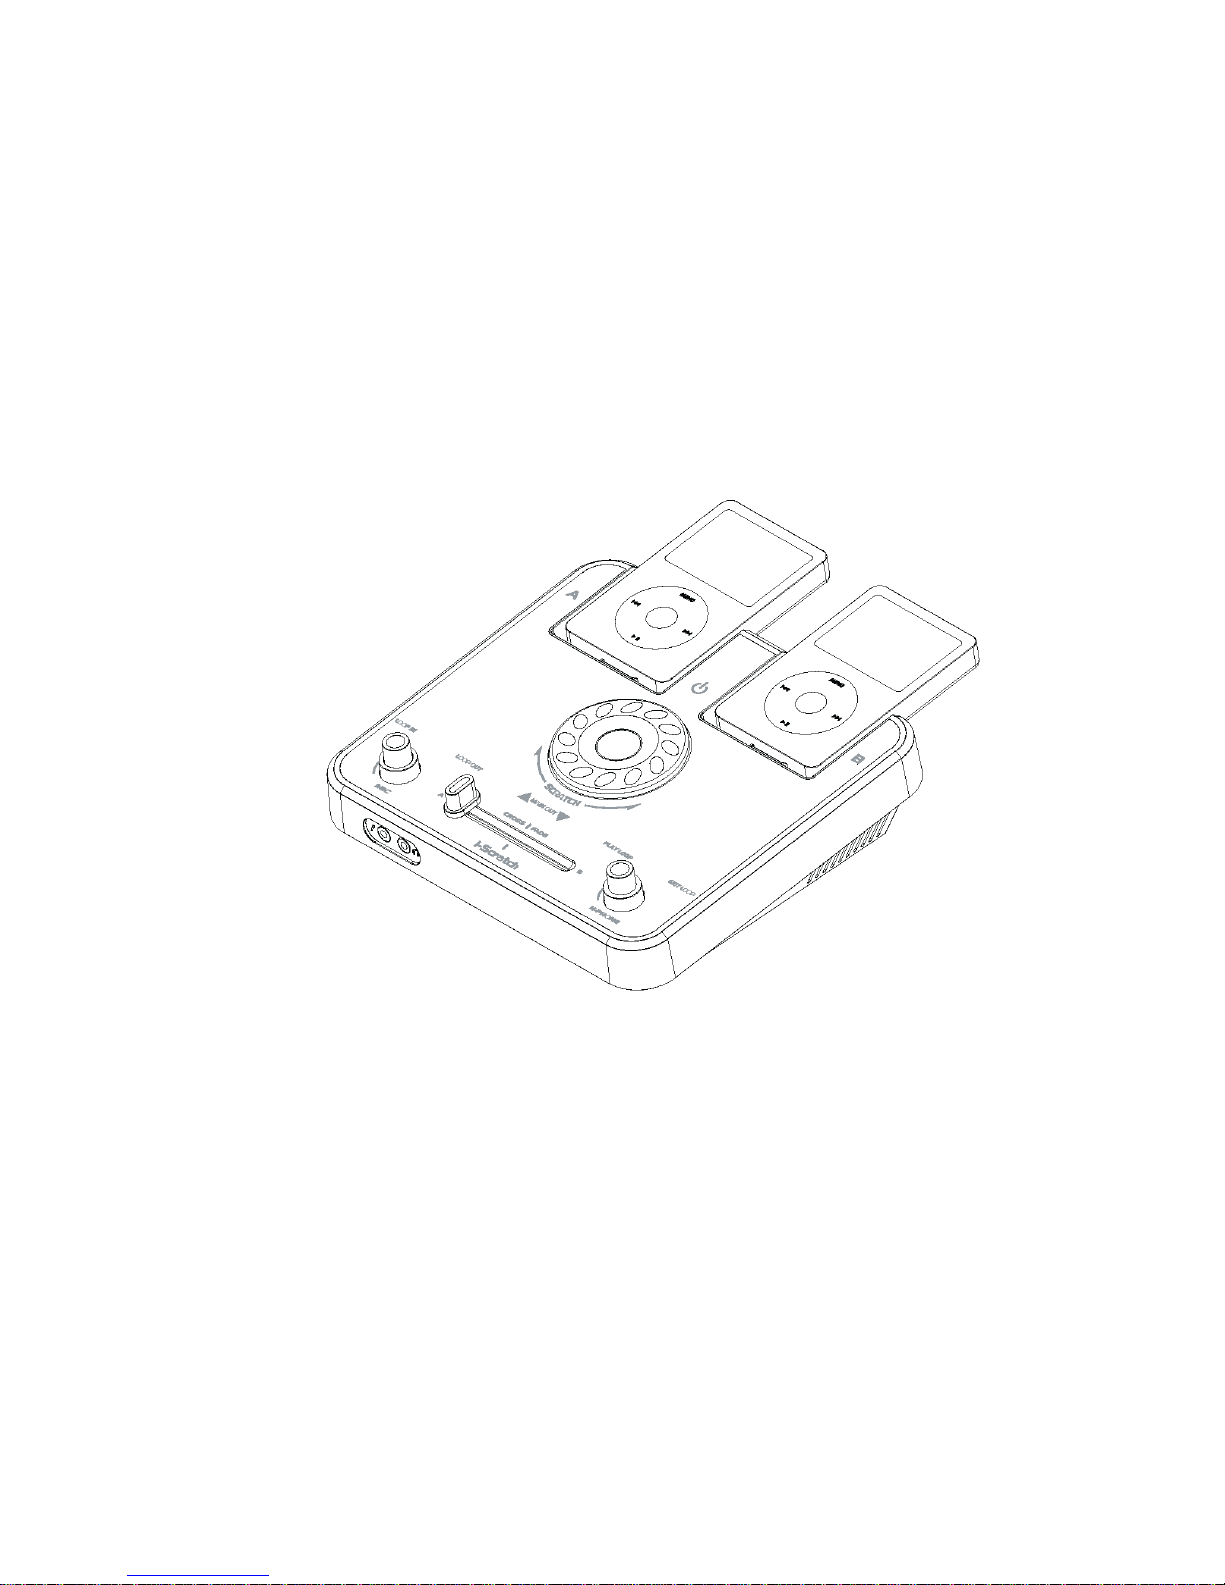
Controls and Indicators
1. Microphone Jack (3.5mm dia.)
2. Headphone Jack (3.5mm dia.)

8
3. Loop In Feature Touch Pad
4. Microphone Volume Knob
5. Loop Out Feature Touch Pad
6. CROSS | FADE
7. Main Output Volume Touch Pad
8. Play Loop Touch Pad
9. Headphone Volume Knob
10. Exit Loop Touch Pad
11. iPod / MP3 player Source A
12. Scratch Knob
13. Power ON/OFF Switch
14. iPod / MP3 player Source B
9
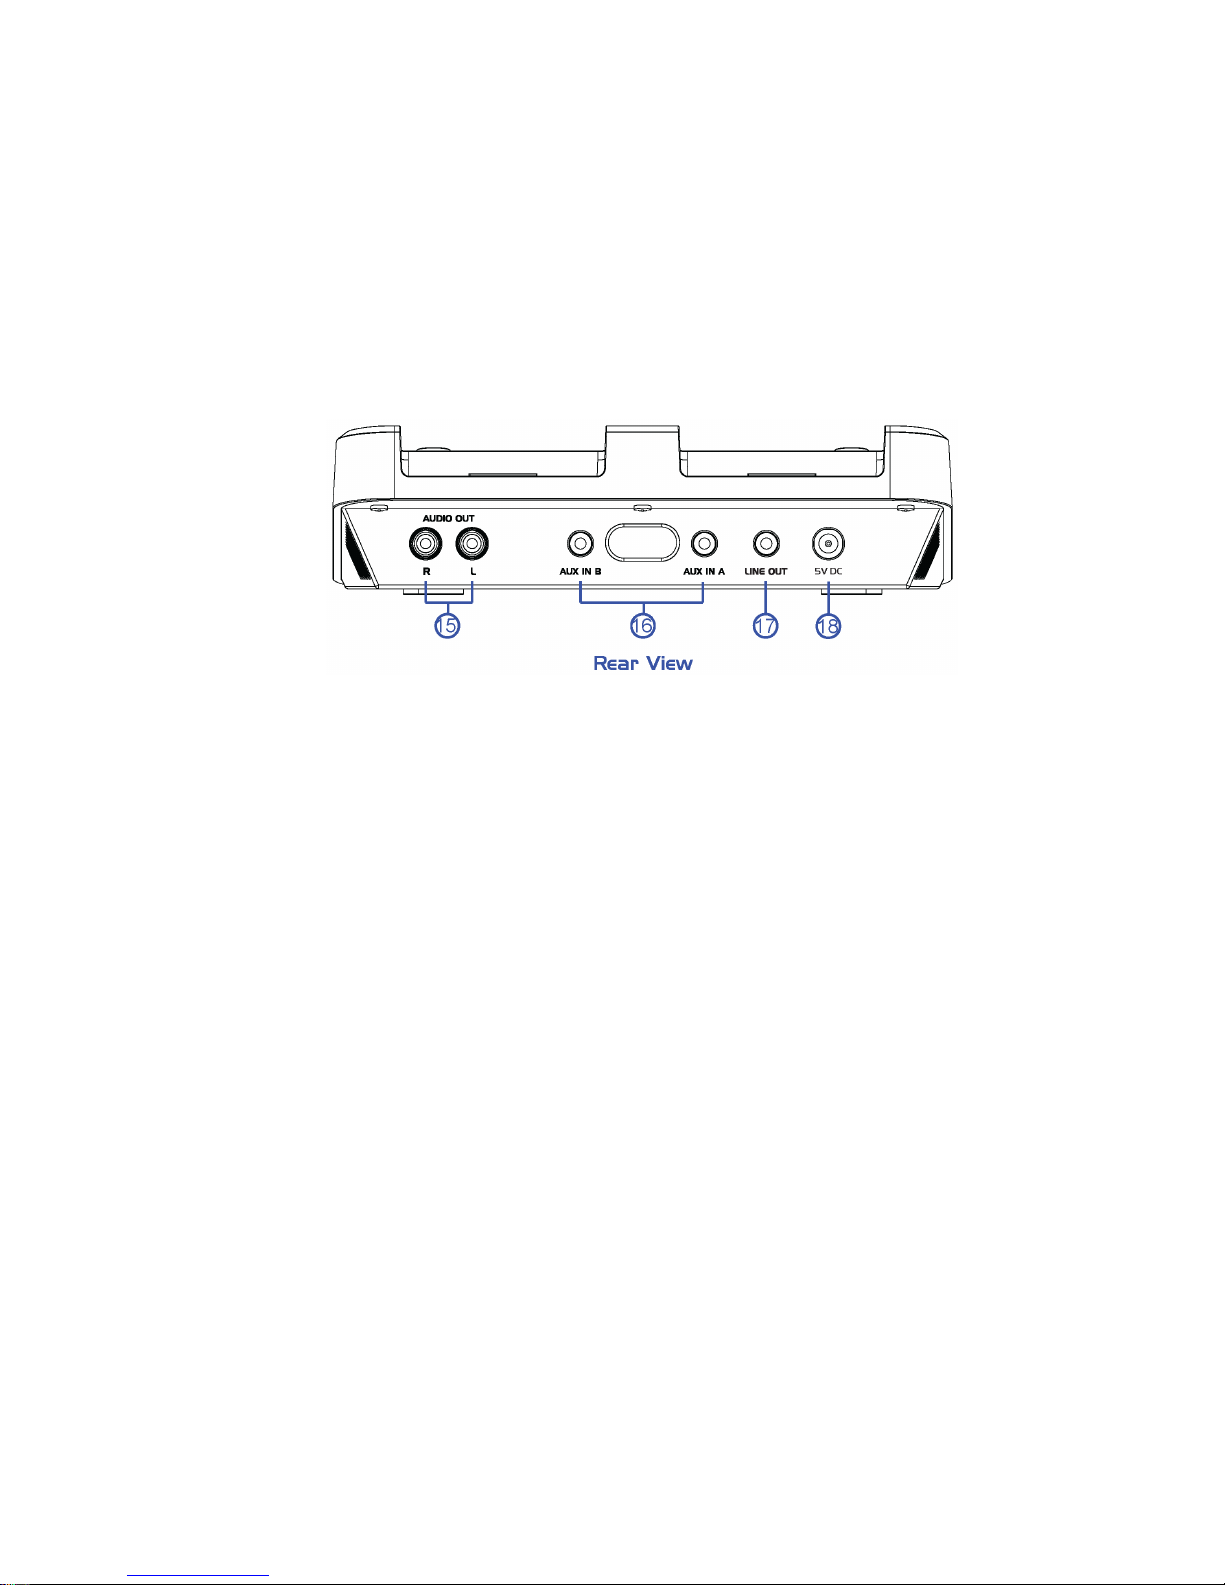
15. Right / Left Channel Output Jack
16. MP3 player Source A / B Input
17. Record Lineout
18. 5V Input Jack

10
iPod / MP3 Player
Charge your iPod
Note: Please make sure you are using the correct insert for your iPod or MP3 player and that it is properly docked into the
iScratch. Failure to do so may damage your iPod or MP3 player.
*[While your iPod is docked in the system, it recharges (until fully charged). Note that iPod Shuffles and other
non-docking iPod will NOT be charged.]
Listening to your iPod
1. Plug-in your multimedia speaker / subwoofer RCA
jack into iScratch‟s Right / Left Channel Output Jack.
If you are using the microphone/headphone, plug it
into the headphone and microphone jacks.
2. Turn the power ON.
3. Insert the iPod onto the dock. (iPod will automatically
turn ON)
4. Choose your music on iPod.
11
5. Adjust output volume from main output volume knob or headphone output volume knob.
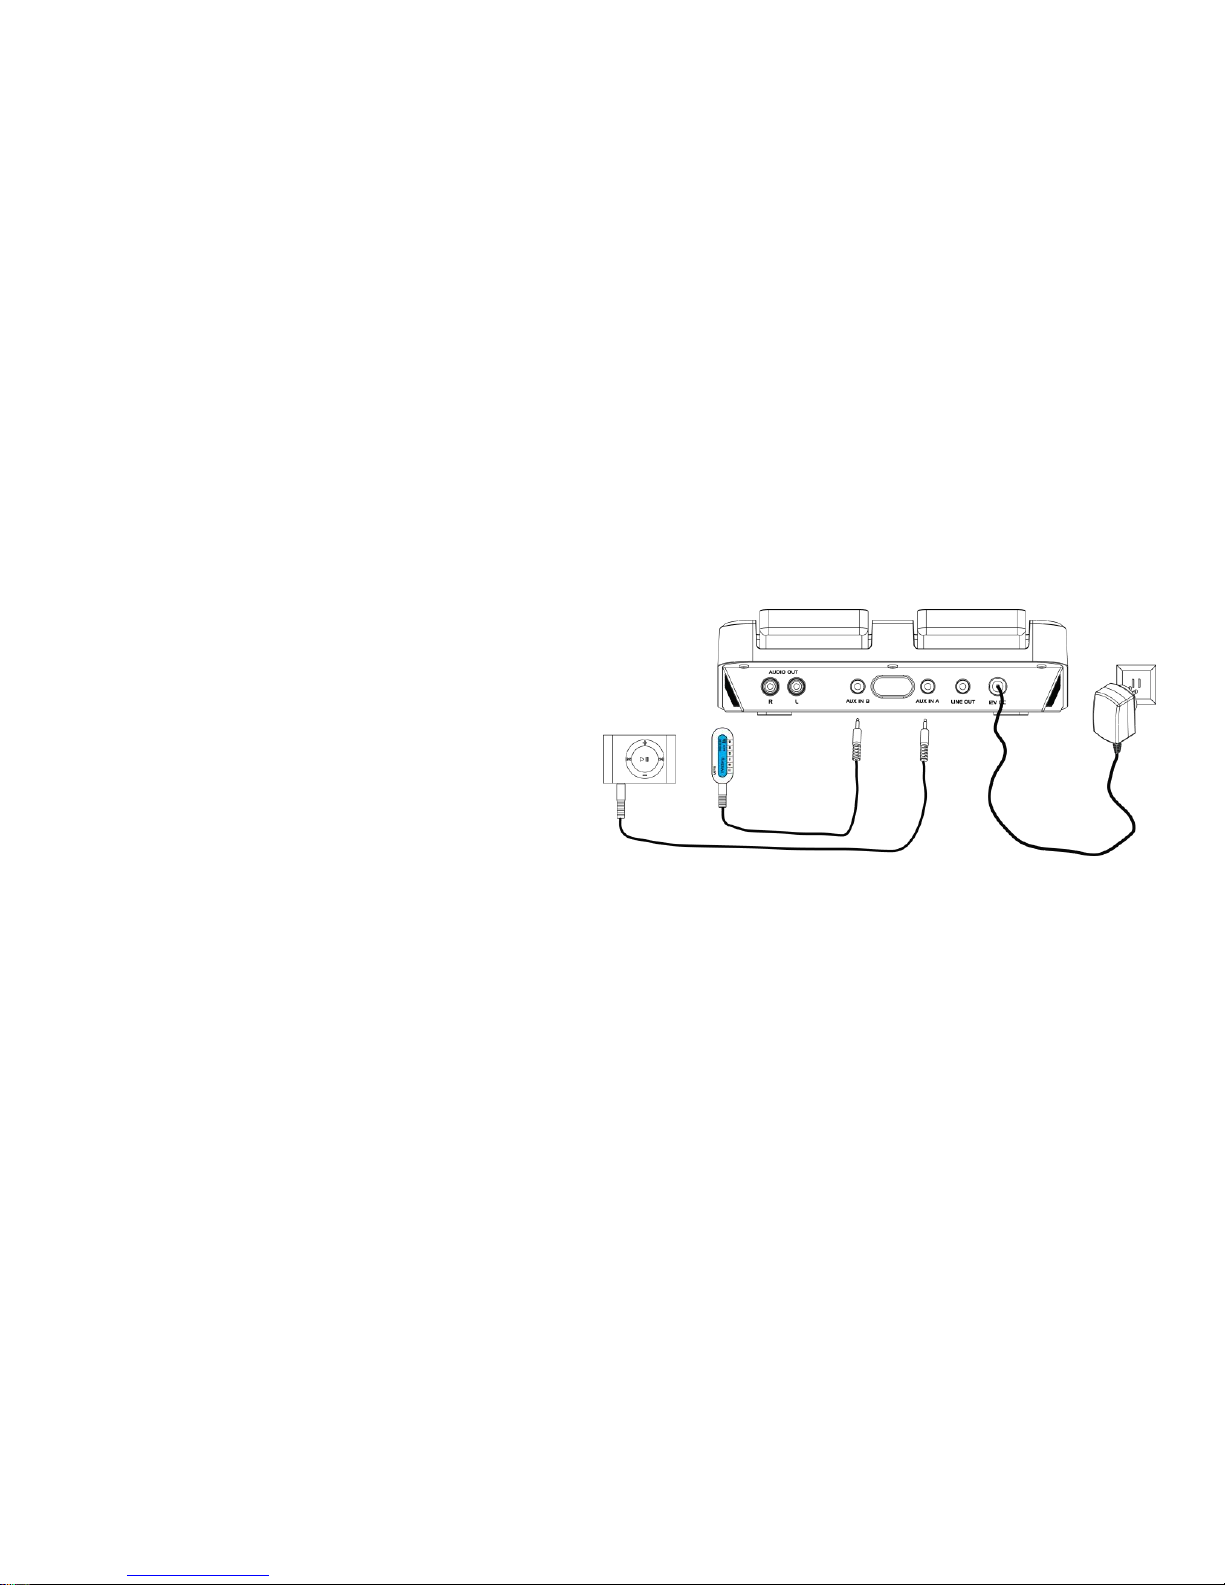
Listening to a non docking iPod or other portable audio devices
1. Plug-in your multimedia speaker / subwoofer RCA jack into iScratch‟s Right / Left Channel Output Jack. If you are using
micro headphone, please plug-in your Micro headphone cord to headphone and microphone inserts.
2. Turn the power ON.
3. Connect your MP3 player‟s audio patch cord to the
line-in jack.

12
Using iScratch
Loop In / Loop Out / Play Loop / Exit Loop
Loop function in iScratch allows users to create their own manual loops on the other side of the player by setting the “A”(Loop
In) and“B”(Loop Out) points freely, with the option to EXIT and Play Loop.
Loop In and Loop Out allows user to set up a seamless loop.
Play Loop allows DJ to restart the loop in the Loop In Point.
Exit Loop will clear the loop at any point.
Scratch
Scratch is the main feature of iScratch. Scratch automatically record the music up to 24 seconds while the music is playing.
Therefore, users can rewind and fast forward the music within the 24 seconds.
Cross fader
The cross fader does two things at the same time: It fades between the two music sources, allowing you to blend from one
program into a new one, but also it does the exact opposite to the CUE channel. This allows you to cue up a new song on the
player that ISN‟T being sent to the main output. This allows you to cue up to a precise spot so that you can start the new
program and quickly cross-fade to it to align the beat of the two programs.
13
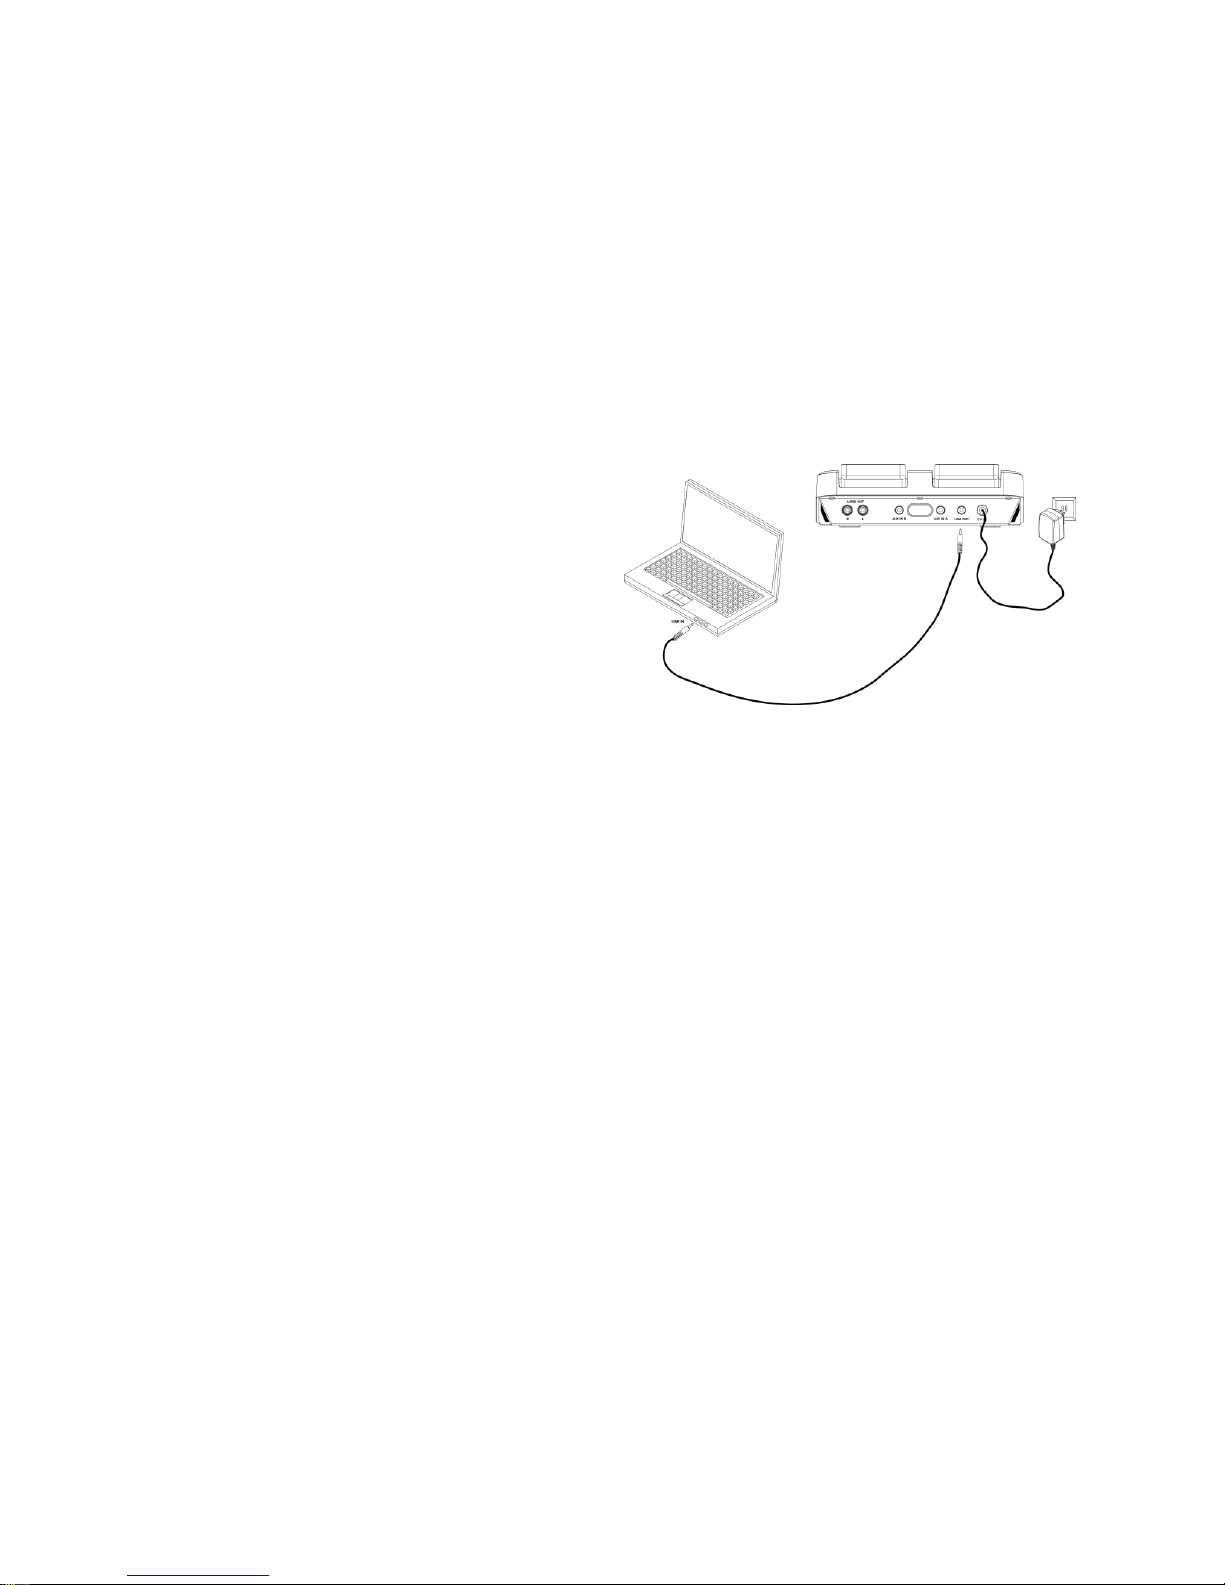
Recording music to computer
1. Turn the power ON.
2. Plug one end of an audio cable into phone line-out jack
and other end to computer sound card‟s line-in jack. Of
course, this requires a stereo cable.
For Windows Users:
3. Turn ON your computer, and start the “Sound Recorder”recording program on your Windows XP for recording purpose. (You
may use your favorite recording software to record your created music).
Before starting sound recorder from Windows XP, you have to configure your software program as following:
a. Go to Start.
b. Choose Control Panel
c. Choose Sounds and Audio Devices
d. Choose Advance under Volume tab
e. Choose Option
f. Choose Properties
g. Check the Line in option and press OK
h. Adjust the line in volume to max and press OK

14
Steps for starting sound recorder from Windows XP:
a. Go to Start.
b. Choose All Programs.
c. Choose Accessories.
d. Choose Entertainment.
e. Choose Sound Recorder.
Note1: Not all computers have stereo inputs. Be sure to check if you want to mix directly into your computer.
Note2: If you do not satisfy with Windows‟sound recorder program, please download or purchase other recording program
from Internet or stores.
For Other Operating System Users:
Please follow the above step1 ~ step2, and use your favorite recording programs by downloading from the Internet or
purchase from stores.
15
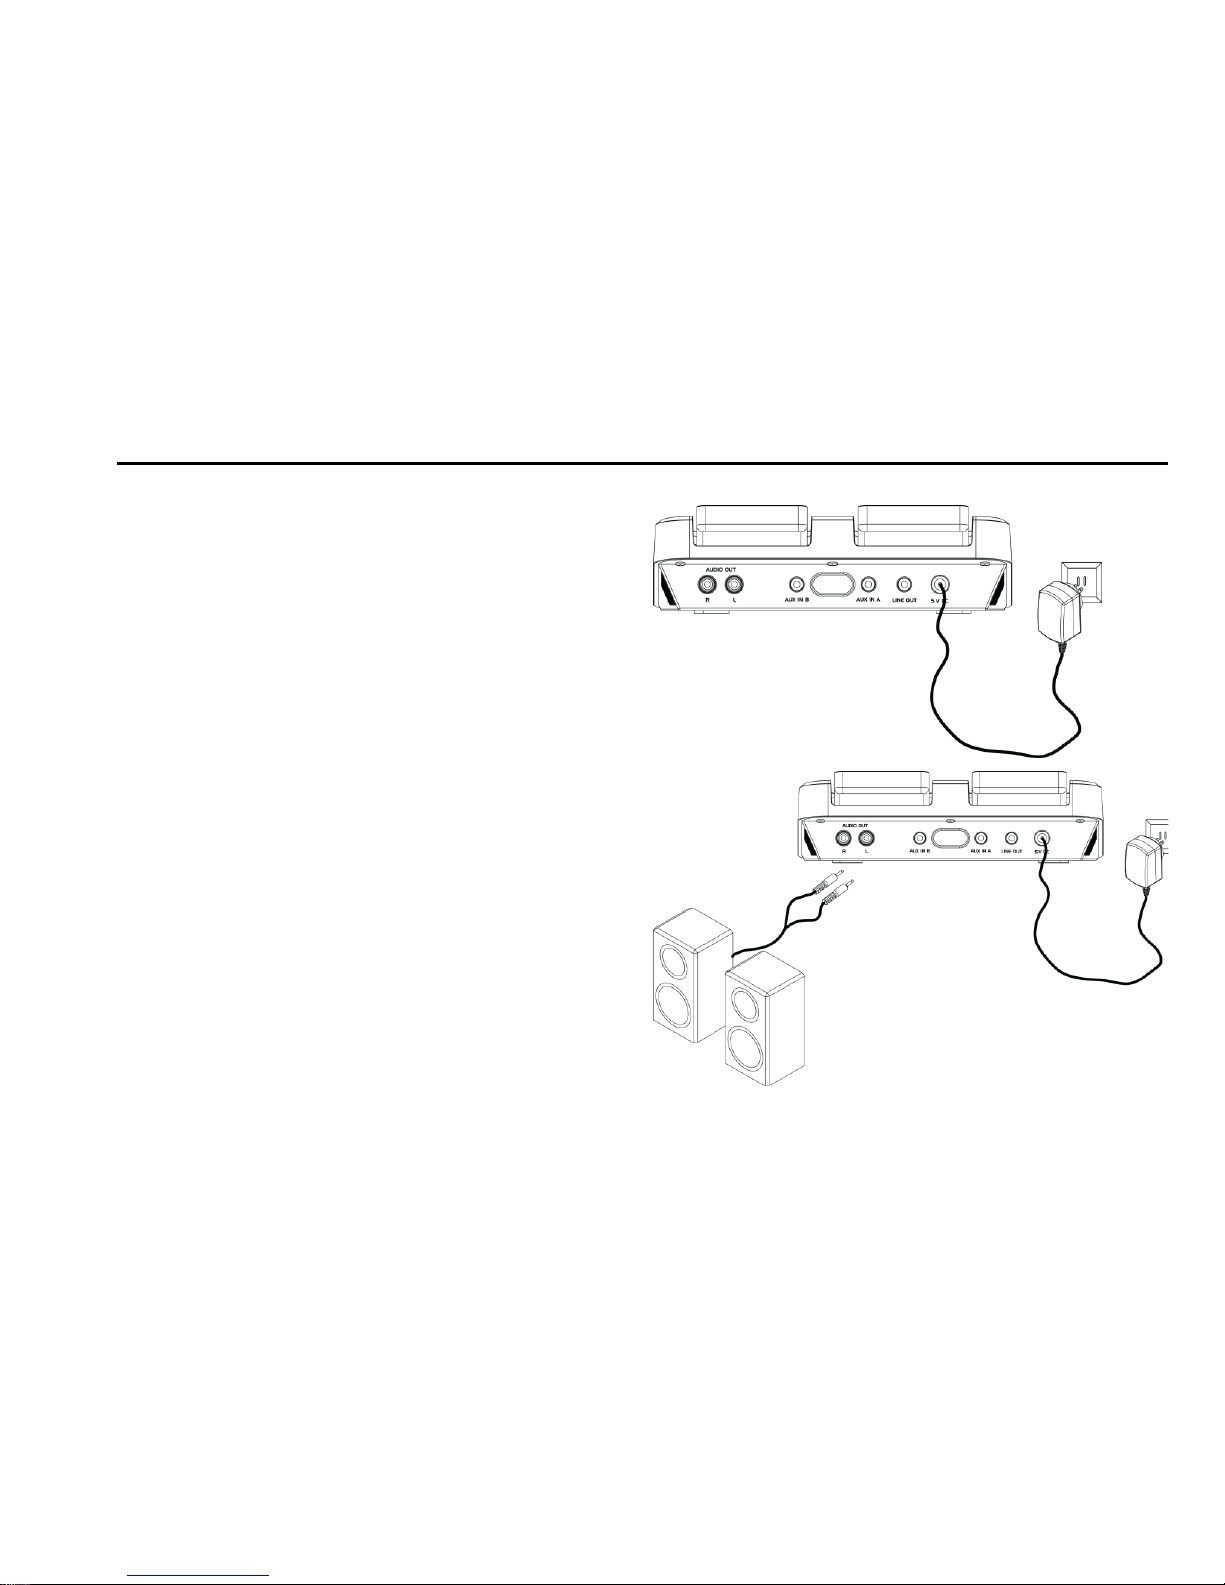
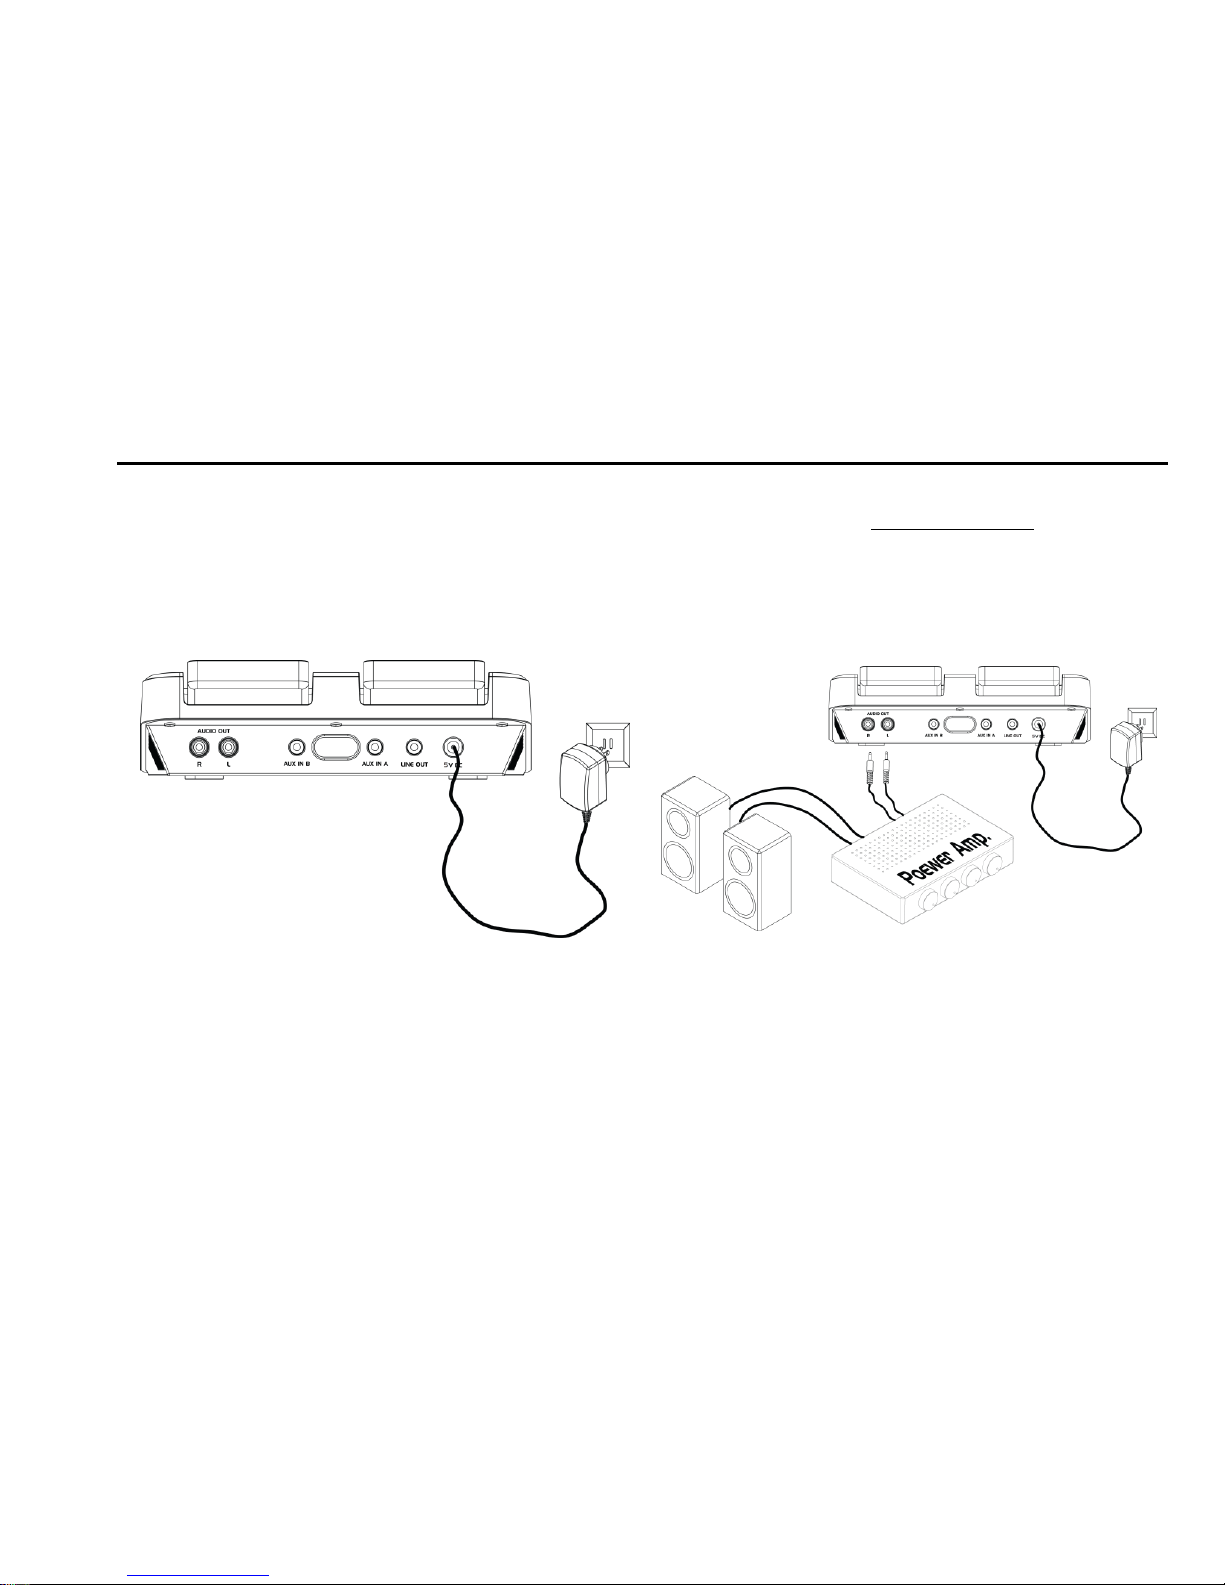
Wiring Diagrams
For Your Speakers
Plug in one end of an audio cable (RCA) into the Main Output (R/L) and the other end to a multimedia speaker set. This could
be a powered speaker system, a professional sound system, or even the audio inputs of a television, just as you would with
a video game.

16
Specification
General
Specification
Power Output
5V Input Jack
Power Input
AC 100 ~ 240 V / 50 ~ 60Hz / 0.4A
Power Consumption (charging)
1. 980mA (Two iPod)
2. 260mA (Two MP3 Players)
Operating Environment Temperature
+5°C - +35°C (+41°F - +95°F)
External Dimension
184mm*200mm*52.3mm
Weight
800g
Recommend Speaker / Subwoofer
Satellite
40 watts (PMPO) *2 (MAX)
Impedance: 4-8 Ω.
Frequency: 165~18KHZ
Recommend Micro Headphone Spec
Microphone
Uni-Directional
Frequency: 30-16KHZ
Impedance:320hms / 1KHZ
Headphone
Frequency: 20-20KHZ
Impedance: 320hm / 1KHZ

17
A Consumer Guide to Product
Consumer Guide to Product Safety
FCC Information
This Device complies part 15 of the FCC Rule. Operation Is subject to the condition that this
device does not cause harmful interference.
This equipment compiles with the limits for a Class B digital device as specified in Part 15 of FCC Rules. These limits provide
reasonable protection against radio and TV interference in a residential area.
CE Information
This Device complies the CE Rule. Operation Is subject to the condition that this device does
not cause harmful interference.
UL Information
The Device has met all of Underwriters Laboratories safety requirements.
1. Water and Moisture: The unit should not be used near water. For example: near a bathtub, washbowl, kitchen sink,
laundry tub, swimming pool or in a wet basement.
2. Ventilation: The unit should be situated so that its location or position does not interfere with its proper ventilation. For
example, it should not be situated on a bed sofa, rug or similar surface that may block ventilation openings.
3. Heat: The unit should be situated away from heat sources such as radiators, heat registers, stoves or other appliances
that produce heat.
4. Power Sources: The unit should be connected to a power supply only of the type described in the operating instructions

18
or as marked on the appliance.
5. Object and liquid Entry: Care should be taken so that objects do not fall and liquids are not spilled into any openings or
vents located on the product.
6. Lightning and Power Surge Protection: Unplug the unit from the wall outlet during the lightning storm or when it is left
unattended and unused for long periods of time. This will prevent damage to the product due to lightning and power-line
surges.
7. Overloading: Do not overload wall outlets, extension cords, or integral convenience receptacles as this can result in a risk
of fire or electric shock.
8. Damage Requiring Service: The unit should be serviced by qualified service personnel when:
A: The power supply cord or plug has been damaged.
B: Objects have fallen into or liquid has been spilled into the enclosure.
C: The unit has been exposed to rain.
D: The unit has been dropped or the enclosure damaged.
E: The unit exhibits a marked change in performance or does not operate normally.

19
Trouble Shooting
Symptom
Possible Problem
Solution
iPod does not
respond to the
unit
iPod is not installed properly
Remove your iPod from the dock and check for obstruction on the
connectors in the dock and on your iPod. Then reseat it in the dock.
Your iPod software is too old
Upgrade software on your iPod. For details visit
http://www.apple.com/iPod/download.
iPod is locked up
Please make sure your iPod is working properly before docking into
the unit. Please refer to your iPod manual for details.
Using 1st or 2nd generation iPod,
iPod Shuffle or other devices
iScratch cannot control those iPod.
iPod doesn‟t
charge
iPod is not installed properly
Remove your iPod from the dock and check for obstruction on the
connectors in the dock and on your iPod. Then reseat it in the dock.
iPod is locked up /frozen
Please make sure your iPod is working properly before docking into
the unit. Please refer to your iPod manual for details.
iPod battery has problem
Sound is distorted
Volume level is set too high
Decrease the volume.
Sound source is distorted
If the iPod original sound source (MP3) is poor quality, distortion and
noise are easily noticed with high-power speakers. Try a different
audio source such as a music CD
If you are using an external sound source like older generation of
Table of contents


