Shelti Wingman NS-Y-AB User manual

Assembly Instructions
Thank you for purchasing a Shelti product. All of us at Shelti want you to be completely satisfied with
your Blue Line Air Powered Hockey game, so feel free to contact us for help with the assembly of your
product, Shelti parts, or other information you may require.
Tools Required:
5mm Hex Wrench
12mm Wrench or Socket
13mm Wrench or Socket
Phillips Head Screw Driver
Level
Step #1
• Lift air hockey table out of the box and flip it upside down on a smooth surface.
• Remove the legs from the shipping board and locate the accessory package.
Contents
Wingman Air Hockey Cabinet
Blower Motor
Universal Leg Assembly
Accessory Package
Wingman Assembly Instructions
Part Number
NS-AHC-0
210-0176-0
NS-ULA-0
NS-ASA-0
210-0218-0
Quantity
1
1
4
1
1
Accessory Package Contents
Score Post
Score Rod
Red Score Bead
Black Score Bead
Score Post Screw—Flat Phillips Head
4¾” Carriage Leg Bolt
5½” Carriage Leg Bolt
Leg Nut
Leg Washer
3¼” Puck
Mallet
5mm Hex Wrench
003-0004-0
205-0007-0
003-0002-0
003-0003-0
301-0036-0
301-0073-0
301-0074-0
203-0023-0
303-0035-0
201-0093-0
201-0094-0
205-0068-0
4
2
5
5
4
12
8
20
20
3
2
1
Step #6—Plug in Power Strip
The plug from the power strip should then be plugged
into a standard 110/120 volt wall socket. Turn power on
and off using the power switch located on the end of the
table.
Step #2—Attach the Legs
Attach the legs using the enclosed carriage bolts, washers
and nuts. The shorter bolt attaches throught the outside of
the apon and requires a 5mm hex wrench for the bolt and a
13mm wrench or socket for the nut. The longer bolt attaches
throught both inside leg supports and requires a 12mm wrench
or socket for the bolt and a 13mm wrench or socket for the
nut. Tighten until bolt heads are snug with the table surface.
Over tightening could damage the side walls.
Step #4—Attach the Manual Scoring Units
Carefully flip the table over. Install the two scoring units
using the phillips head bolts, score posts, score rods, and score
beads. These scoring units should be assembled and installed
in the pre-drilled holes located on the top rail.
Step #5—Level the Table
Level the air hockey game by placing a level across,
lengthwise, and diagonally into the four corners and raise or
lower the appropriate leg leveler.
H5
© Copyright 2001-2005, Shelti Inc., Bay City • Michigan SPECIFICATIONS SUBJECT TO CHANGE WITHOUT NOTICE
Step #3—Attach the Blower Motor
Locate the blower motor, gasket and (3) mounting bolts.
Place the gasket in between the blower and the table surface.
Line up the holes of the blower with the pre-drilled holes and
tighten. The plug from the blower motor should be plugged
into the power strip mounted on the underside of the table.
333 Morton Street
Bay City, Michigan 48706
Phone: 989-893-1739
Fax: 989-893-1809
www.shelti.com
Member of:
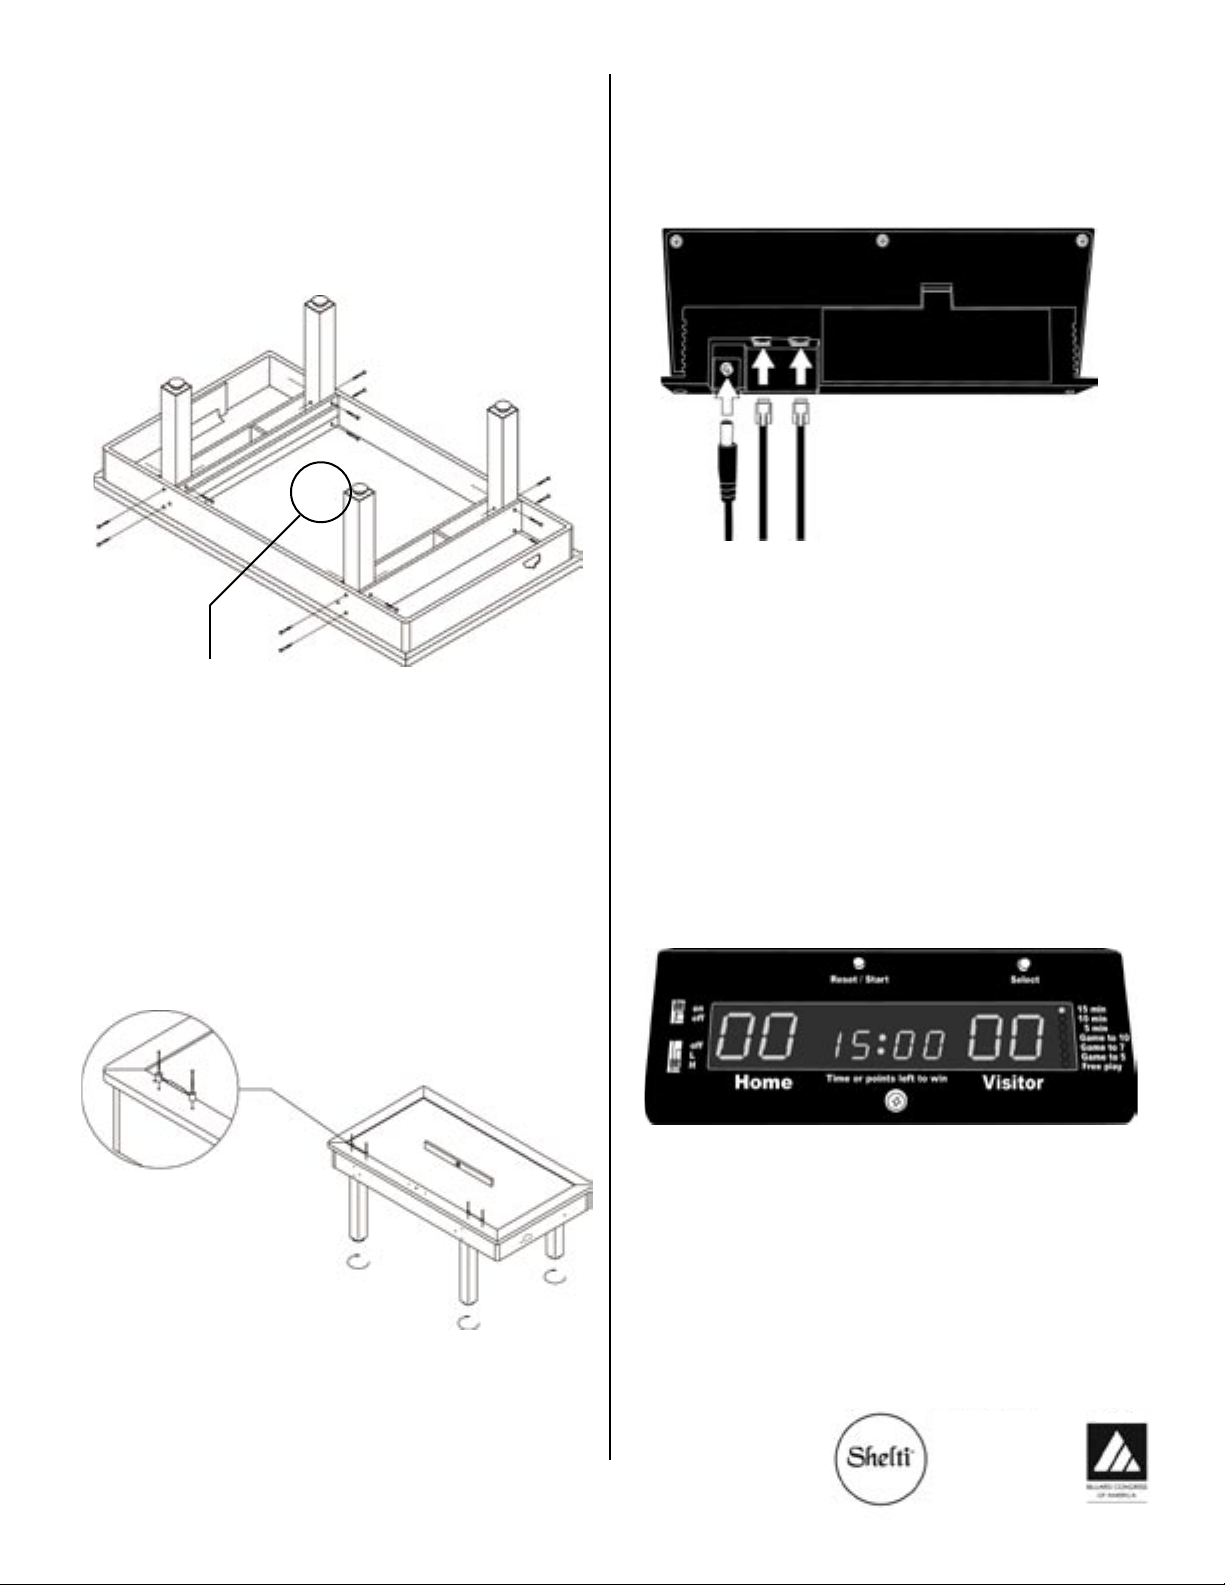
Step #7—Attach the Electronic Scoring Unit
Remove the three plastic caps located on the side of the
table. Thread the two wires from the infrared sensors through
the bigger hole. The AC adapter should plug in to the power
strip attached to the bottom of the table. Thread the smaller
end through the same hole as the other wires. Plug all three
wires into the scoring unit as shown. If scored goals credit
the wrong team, simply switch the two identical wires as they
were plugged into the wrong position.
Line up the holes of the scoring unit with the smaller holes
on the side rail. Fasten with a bolt in each hole with a Philips
head screw driver.
Step #8—Operating the Scoring Unit
Turn the power switch to “on”. Select desired game option. By
default, it begins with the 15 minute game option. To change
the game option, push the “select” button. There are seven
total options including “Free play” which has no time limit or
scoring limit. After choosing a game option, push the “Start”
button to begin. To start over, press the” Reset / Start” button
again. The volume switch has three settings: High, Low and
Off.
Popular Indoor Furnishing manuals by other brands


Lightolier
Lightolier Lytecel LIS9G12PR132 specification

Lightolier
Lightolier FRX Series Specifications

Office Star Products
Office Star Products Accents MAGNOLIA MAG51 operating instructions

Costway
Costway JV11153 manual

Furniture of America
Furniture of America Bridgette CM3325T-5PK Assembly instructions

Mocka
Mocka Inca Three Drawer Assembly instructions