SI Products EC-B130 User manual

SI Products
Centro de servicio
1.888.856.6781
8:30 a.m. – 7:00 p.m.
(Hora del Este) L a V
Dirección postal: SI Products
Consumer Relations
Service Center Dept. 168
3000 Pontiac Trail
Commerce Township, MI
48390
Correo electrónico:
cservice@siproducts.com
Instruction Manual and
Warranty Information EC-B130
AM/FM Clock Radio
Time/Weather Butler
El nombre y logotipo de THE SHARPER IMAGE ® son marcas registradas.
Comercializado y distribuido por SI Products bajo licencia. ©The Sharper Image. Todos los derechos reservados.
iPod®, iPod nano®, nano® y el diseño de iPod® son marcas comerciales de Apple Inc.
IB-ECB130
GARANTÍA LIMITADA POR UN AÑO
SI PRODUCTS vende sus productos con el propósito de que no tengan defectos de fabricación ni de mano
de obra por un plazo de un año a partir de la fecha de compra original, con las siguientes excepciones.
SI PRODUCTS garantiza que sus productos no tendrán defectos de material ni de mano de obra bajo
condiciones de uso y servicio normales. Esta garantía se extiende únicamente a consumidores y no a
distribuidores.
Para obtener servicio para su producto SI PRODUCTS, envíe por correo el producto y su recibo de compra
fechado (como comprobante de compra), con franqueo pagado, a la siguiente dirección:
SI PRODUCTS Consumer Relations
Service Center Dept. 168
3000 Pontiac Trail
Commerce Township, MI 48390
No se aceptarán pagos contra entrega.
SI PRODUCTS no autoriza a nadie, incluyendo entre otros a distribuidores, posteriores consumidores
compradores del producto a un distribuidor, o compradores remotos, a obligar a SI PRODUCTS de
forma alguna más allá de las condiciones aquí establecidas. La garantía de este producto no cubre
daños causados por uso inadecuado o abuso, accidente, conexión de cualquier accesorio no autorizado,
alteración del producto, instalación inadecuada, reparaciones o modificaciones no autorizadas, uso
inadecuado de la fuente de energía/electricidad, cortes de energía, caída del producto, funcionamiento
incorrecto o daño de una pieza de funcionamiento debido al no cumplimiento del mantenimiento
recomendado por el fabricante, daños durante el transporte, robo, negligencia, vandalismo, o condiciones
climáticas, pérdida de uso en el período durante el cual el producto está en una instalación de reparación
o a la espera de piezas o reparación, o cualquier otra condición, sin importar cual sea, que se encuentre
fuera del control de SI PRODUCTS.
Esta garantía es válida únicamente si el producto es comprado y operado en el país en el cual se compró
el producto. Un producto que requiera modificaciones o adaptación para habilitar su funcionamiento
en cualquier país que no sea aquel para el que fue diseñado, fabricado, aprobado y/o autorizado, o la
reparación de productos dañados por estas modificaciones no está cubierto bajo esta garantía.
LA GARANTÍA AQUÍ ESTABLECIDA SERÁ LA ÚNICA Y EXCLUSIVA GARANTÍA. NO HABRÁ NINGUNA OTRA
GARANTÍA EXPRESA NI IMPLÍCITA, INCLUYENDO NINGUNA GARANTÍA DE COMERCIALIZACIÓN O APTITUD
NI NINGUNA OTRA OBLIGACIÓN POR PARTE DE LA COMPAÑÍA CON RESPECTO A PRODUCTOS CUBIERTOS
POR ESTA GARANTÍA. SI PRODUCTS NO TENDRÁ RESPONSABILIDAD ALGUNA POR NINGÚN DAÑO
INCIDENTAL, CONSECUENTE NI ESPECIAL. BAJO NINGÚN CONCEPTO ESTA GARANTÍA REQUERIRÁ MÁS
QUE LA REPARACIÓN O EL REEMPLAZO DE ALGUNA PIEZA O PIEZAS QUE SE HALLEN DEFECTUOSAS
DENTRO DEL PERÍODO DE VIGENCIA DE LA GARANTÍA.
NO SE EFECTUARÁN REEMBOLSOS. SI NO HAY PIEZAS DE REPUESTO DISPONIBLES PARA LOS
MATERIALES DEFECTUOSOS, SI PRODUCTS SE RESERVA EL DERECHO DE REALIZAR SUSTITUCIONES DEL
PRODUCTO EN LUGAR DE REPARARLO O CAMBIARLO.
Esta garantía no se extiende a la compra de productos abiertos, usados, reparados, embalados otra vez
y/o abiertos y vueltos a cerrar, incluyendo entre otras cosas la venta de dichos productos en sitios de
remate por Internet y/o la venta de dichos productos por revendedores o mayoristas. Todas y cada una
de las garantías cesarán y terminarán inmediatamente con respecto a cualquier producto o pieza del
mismo que sean reparados, cambiados, alterados o modificados sin el consentimiento previo explícito y
por escrito de SI PRODUCTS.
Esta garantía le proporciona derechos legales específicos. Es posible que usted tenga derechos
adicionales que pueden variar de un estado a otro. Debido a regulaciones particulares, es posible que
algunas de las limitaciones y exclusiones no se apliquen en su caso. Por más información con respecto a
nuestra línea de productos en los EE.UU., visítenos en: www.siproducts.com
El manual en español empieza
a la página 13

23
Introducing the smartest alarm clock around.
Thank you for purchasing The Sharper Image® ® Clock Radio Time & Weather
Butler. This product, along with the entire The Sharper Image collection, connects
innovation with cutting-edge design to provide you with years of dependability
and enjoyment. Wake up to an alarm clock that’s twice as smart! Get your daily
weather report before you even get out of bed with your personal Weather Butler
on your side.
IMPORTANT SAFETY INSTRUCTIONS:
When using an electrical appliance, basic precautions should always be
followed, including the following:
READ ALL INSTRUCTIONS BEFORE USING
DANGER
- To reduce the risk of electric shock:
•Alwaysunplugtheappliancefromtheelectricaloutletimmediatelyafterusing
and before cleaning.
•Donotreachforanappliancethathasfallenintowater.Unplugitimmediately.
•Donotplaceorstoreappliancewhereitcanfallorbepulledintoatuborsink.
•Donotplaceinordropintowaterorotherliquid.
WARNING
-To reduce the risk of burns, fire, electric shock or injury
to persons:
•Closesupervisionisnecessarywhenthisapplianceisusedbyornearchildren,
invalids or disabled persons.
•Usethisapplianceonlyforitsintendeduseasdescribedinthismanual.Donot
use attachments not recommended by THE SHARPER IMAGE; specifically any
attachments not provided with the unit.
•Neveroperatethisapplianceifithasadamagedcord,plug,cable
or housing. If it is not working properly, if it has been dropped or
damaged, return it to SI Products Service Center for examination
and repair.
•Keepcordawayfromheatedsurfaces.
•Neverdroporinsertanyobjectintoanyopening.
•Donotoperatewhereaerosol(spray)productsarebeingusedor
where oxygen is being administered.
•Donotcarrythisappliancebypowercordorusecordashandle.
•Todisconnect,removeplugfromoutlet.
•Thisapplianceisdesignedforindooruseonly.Donotuseoutdoors.
•Onlysetondrysurfaces.Donotplaceonsurfacewetfromwater
Caution – Please read all instructions carefully before
operating.
•Neverleavetheapplianceunattended,especiallyifchildren
are present.
•Nevercovertheappliancewhenitisinoperation.
•Thisunitshouldnotbeusedbychildrenwithoutadultsupervision.
•Alwayskeepthecordawayfromhightemperatureandfire.
•Donotlift,carry,hang,orpulltheproductbythepowercord.
•Donotsubjecttheunitstoextremelyseveretemperatures
- DO NOT PLACE UNITS INTO OVENS, FREEZERS or
MICROWAVE UNITS.
•Extremetemperatures,shockorareasofunusualvibration
should be avoided to prevent damage to the units.
•Iftheadaptorsustainsdamage,youmuststopusingthis
product immediately and contact the SI Products Service
Center.(SeethewarrantysectionfortheSIProductsaddress.)
SAVE THESE INSTRUCTIONS
Caution: All servicing of this product must be performed by
authorized SI Products Service Personnel only.
Caution: All
servicing of
this product
must be
performed
by
authorized
SI Products
Service
Personnel
only.

Clock Radio Time & Weather Butler Features:
• Indoor&OutdoorTemperatureDisplay
• Malevoiceannouncestimereportingandalarmmode
• Easy-to-readdisplaywithilluminatedLCD/3-levelwhitebacklight(HI/MED/LO)
• AM/FMDigitalRadiotuningwith8presetmemory
• DualAlarmClock–3WakeModes:Radio,BeepToneorMalevoice(report
looping)
• ConvenientSnooze/Napfunction
• DigitalVolume:1-8level
• Speaker:3”diameter
• Operationtemperature:+32°Fto+122°F(0°Cto+50°C)
• Indoortemperaturerange:+32°Fto+122°F(0°Cto+50°C)
• Operatingfrequency:434MHz
• MaximumTransmissiondistance:100feet(30meters)
• Poweradaptor:120Vacinput6Vdc300mAoutput
• Back-upbattery:CR2032(included)
5
4
Fig. 1
EC-B130_Clock Radio Weather ButlPage 1 7/6/09 4:50:10 PM
Outdoor Temperature Remote Sensor Specifications:
• Outdoortemperaturerange:-4°Fto+140°F(-20°Cto+60°C)
• Operatingfrequency:434MHz
• MaximumTransmissiondistance:100feet(30meters)
• Batterypower:2xAAA(notincluded))
Initial Setup
Alarm Clock Battery Installation:
1.Remove battery compartment cover on the bottom of the unit. Insert one
includedCR2032batteryintotheunitaccordingtothepolaritydirection
indicated. Replace cover and snap into place.
2.AttachtheDCendoftheadaptorintotheDCjackonthebaseoftheunitand
inserttheACplugintoa120VACoutlet.
NOTE: In the event of a power outage the battery is designed to provide memory
back-up for the clock radio settings and alarm settings. The time will not be
illuminated on the clock display when there is no AC power available. As soon as
the power supply returns, the display will indicate the correct time.
NOTE: To hold the time, radio settings and alarm time the back-up battery must
be installed.
Outdoor Remote Sensor Battery Installation:
1.Loosenthe4screwssecuringthebatterycoverwithasmallscrewdriver
(included)andremove.
2.Insert2xAAAalkalinebatteriesaccordingtothepolaritydirectionindicated.
3.Placethehomereceiver(ClockRadioTime&WeatherButler)ascloseas
possible to the remote sensor. This will help with synchronization between the
two units.
4.Theremotesensorispresetto°F.Pressthe˚C/˚Fbuttoninsidetheremote
sensortochangebetween°Cand°F.
5.PresstheTXbuttoninsideoftheremotesensortoverifythereception.
6.Replacethecoverandtightenthe4screws.
NOTE: It is recommended to first test the units next to each other to ensure that
both the remote sensor and home receiver are properly synchronized.

6 7
Outdoor Remote Sensor Mounting Instructions
NOTE: Once you are ready to position your remote sensor and home receiver,
ensure that the distance is not more than the effective transmission range of 100
feet. Some building materials and location of the home receiver or remote sensor
canaffecttransmissionqualityandrange.
Try various locations for best results.
The Remote Sensor comes with a table stand or can be wall mounted.
Table Stand
Simply slide out the attached stand from the mounting bracket.
Wall Mounting
Place a screw or nail in the desired hanging location.
A screw and wall anchor have been included for your convenience.
NOTE:Keeptheremotesensoroutofdirectsunlightandrain.Donotmount
on metal surface.
Outdoor Remote Sensor Low Battery Indication
When the battery is almost empty an icon will display on the remote sensor. Re-
place the batteries as necessary and follow the setup procedure.
How to Use
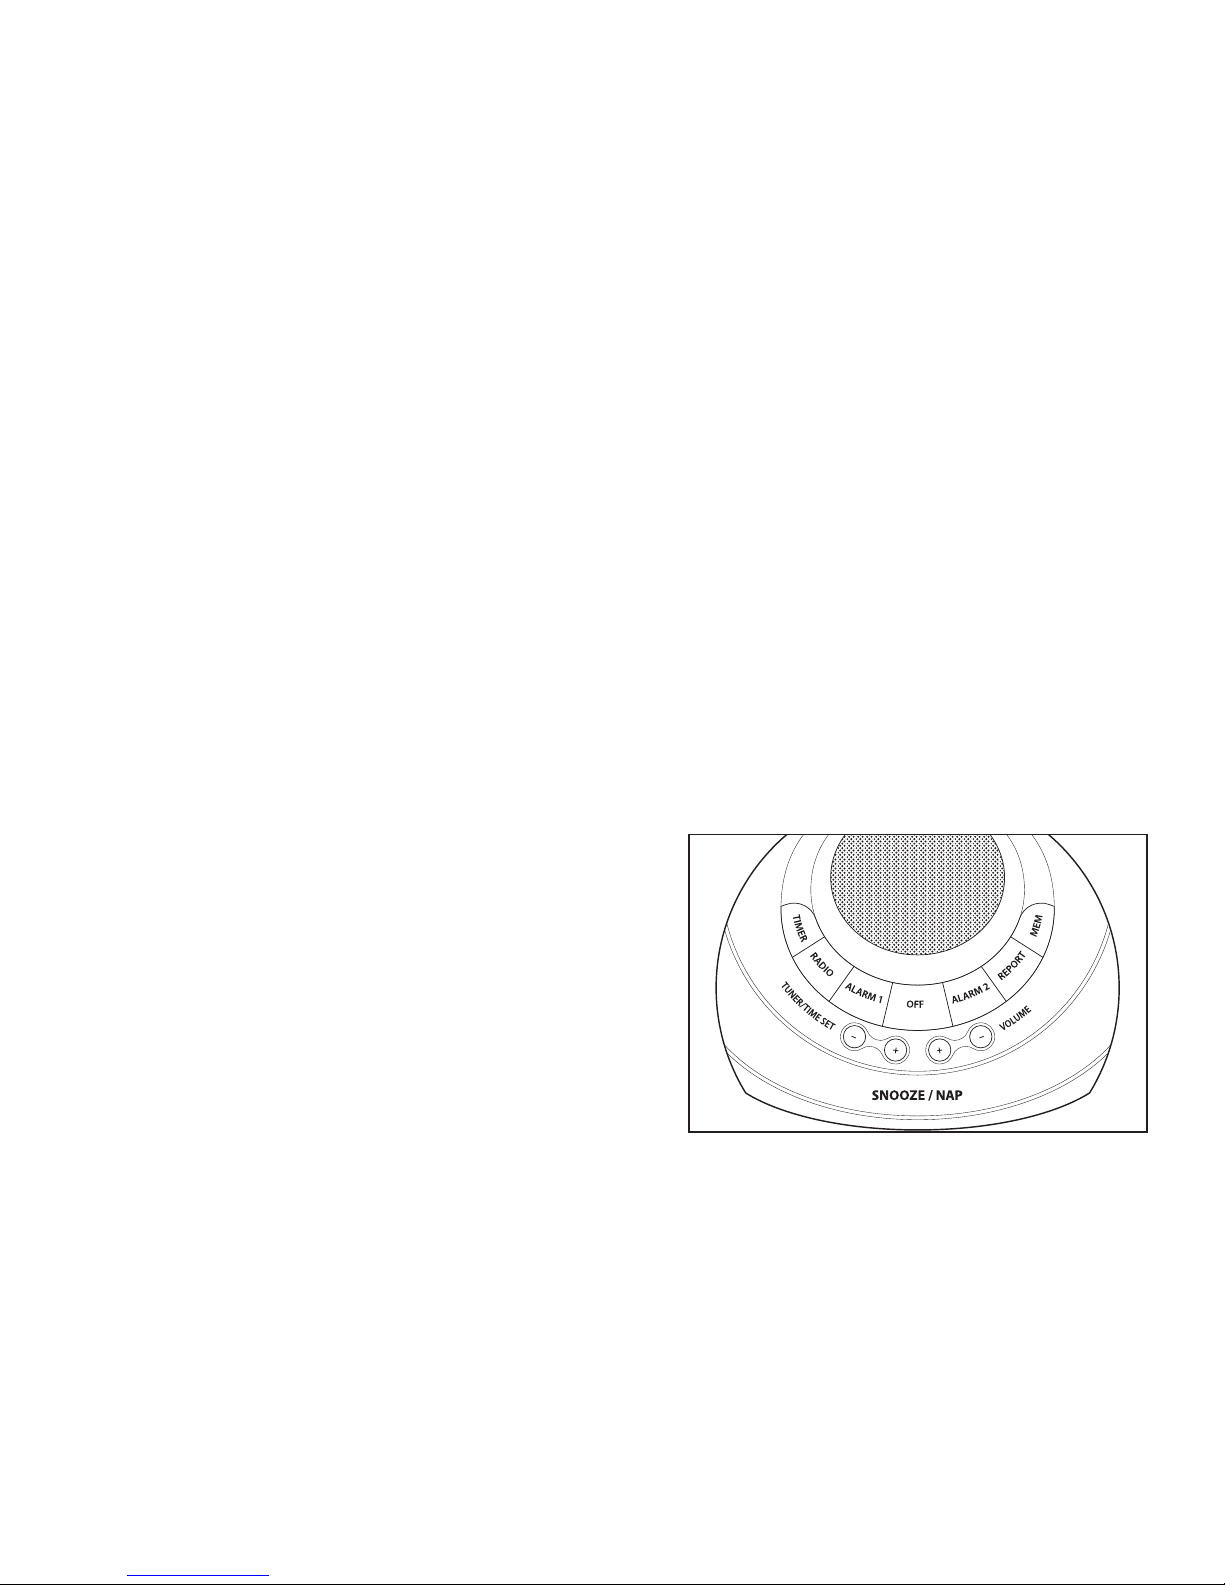
Top Controls:
Radio
Press the RADIO button once for FM. Press the RADIO button again for AM.
If memory is not empty, under radio off status, pressing it once will return to last
memorystationfrequency,butnotinmemorymode.
Timer
Press the RADIO button to turn on the radio.
PressingtheTIMERbuttonwilldisplay15,30,45,60andOFF.Thisfeatureal-
lows you to choose how long you listen.
Volume Control
•Press+buttontoincreasethevolumelevel1-8.
•Press-buttontodecreasethevolumelevel8-1.
Off
PresstheOFFbuttontoturnoffthe“radio”featureor“audio”feature,and“Alarm
OFF”duringalarmmode.
Tuner/Time Set
1.In“DATESET”modeor“ALARMSET”mode,pressthe+buttontoincrease
and press - to decrease digital values.
2.InRADIOmode,shortpressthe+&-buttonstomanuallyadjustthefrequency.
Longpresstoautosearchforward+andforbackward-selection.
EC-B130_Buttons.ai 7/1/09 10:28:39 AM
Fig. 2

Setting the Alarm:
For your convenience, two separate alarms may be set:
Alarm 1 button
Mode Selection
Press Alarm 1 button to cycle through: Beep - Radio - Voice - Off
The display will show the Alarm 1 bell icon next to your selected mode.
Press and hold
1.TimeashingforHH,press+/-buttontochangeHoursetting,pressAlarm1
button to confirm and change to minute setting.
2.TimeashingforMM,press+/-buttontochangeMinutesetting,waitfor
timeout to save and go back to normal mode.
Thedisplaywillshow:Alarm1bellicon:HH:MM(AM/PM)
Alarm 2 button
Mode Selection
PressAlarm2buttontocyclethrough:Beep-Radio-Voice-Off
ThedisplaywillshowtheAlarm2belliconnexttoyourselectedmode.
Press and hold
1.TimeashingforHH,press+/-buttontochangeHoursetting,pressAlarm1
button to confirm and change to minute setting.
2.TimeashingforMM,press+/-buttontochangeMinutesetting,waitfor
timeout to save and go back to normal mode.
Thedisplaywillshow:Alarm2bellicon:HH:MM(AM/PM)
REPORT
Press the REPORT button once and real time data and outdoor temperature read-
ing will be announced.
Memory
TheAM/FMradiostationmemoryrecordsamaximumof8channels.
•Normalmodewithradiooff,PressMEMbuttonquicklytoturnonradioand
automatically return to the last memory radio station.
•Selectastation.PressandholdMEMbuttonmorethan2secondstorecord
new station. The MEM icon will appear and the memory digit will flash.
•PresstheVOL+/-buttontoselectmemorynumber,PressTuner+/-buttontotune
the station, Press the MEM button to confirm current station into memory.
Snooze/Nap
PresstheSNOOZE/NAPbartosnooze.Thiswillautomaticallyactivatesnooze
timefornineminutes.Oryoumaychoosetosetthealarmin15,30,45,60
minutes or OFF for nap.
Bottom Controls:
Backlight - HI/MED/LO
Slide switch to select the brightness level of backlight on display.
˚C/˚F
SlideswitchtointerchangebetweenCelsius(°C)orFahrenheit(°F)for
temperature level.
Daylight Savings Time (DST)
SlideDSTON/OFFswitchtoactivateorinactivatetheDaylightSavingsTimefeature.
Date/Time
1.PressandholdDATE/TIMEbuttonformorethan3seconds,andenterthe
“DATE/TIMESETMODE”setting.
2.PressDATE/TIMEbuttononce,toselectthemode“year->month->day->
hour->minute->exit”
3.Pressthe+or–buttonstoselectthecorrectdateortime.
AUX IN
Tousetheauxiliaryinputtoplaymusicthroughthespeakerinserta3.5mminput
intotheAUXINjack.Theunitwillautomaticallydetecttheinputandplaythemusic.
89

Operationissubjecttothefollowingtwoconditions:(1)thisdevicemaynot
causeinterference,and(2)thisdevicemustacceptanyinterference,including
interference that may cause undesired operation of the device.
FCC wordings:
Thisdevicecomplieswithpart15oftheFCCRules.Operationissubjecttothe
following two conditions:
(1)Thisdevicemaynotcauseharmfulinterference,and(2)thisdevicemust
accept any interference received, including interference that may cause
undesired operation.
NOTE: THE MANUFACTURER IS NOT RESPONSIBLE FOR ANY RADIO OR
TV INTERFERENCE CAUSED BY UNAUTHORIZED MODIFICATIONS TO THIS
EQUIPMENT. SUCH MODIFICATIONS COULD VOID THE USER
AUTHORITY TO OPERATE THE EQUIPMENT.
Maintenance
To Store
You may leave the unit on display, or you can store it in its box in a cool, dry
place. Before storing, remove the battery from the main unit and the Remote
Temperature Sensor.
To Clean
Use only a soft dry cloth to clean the enclosure of the unit.
NEVERuseliquidsorabrasivecleanertoclean.
Modifications not authorized by the manufacturer may void user warranty.
Note: Thisequipmenthasbeentestedandfoundtocomplywiththelimitsfor
aClassBdigitaldevice,pursuanttoPart15oftheFCCRules.Theselimits
are designed to provide reasonable protection against harmful interference in
aresidentialinstallation.Thisequipmentgenerates,usesandcanradiateradio
frequencyenergyand,ifnotinstalledandusedinaccordancewiththeinstructions,
may cause harmful interference to radio communications. However, there is no
guaranteethatinterferencewillnotoccurinaparticularinstallation.Ifthisequipment
does cause harmful interference to radio or television reception, which can be
determinedbyturningtheequipmentoffandon,theuserisencouragedtotryto
correct the interference by one or more of the following measures:
•Reorientorrelocatethereceivingantenna.
•Increasetheseparationbetweentheequipmentandreceiver.
•Connecttheequipmentintoanoutletonacircuitdifferentfromthattowhich
the receiver is connected.
•Consultthedealeroranexperiencedradio/TVtechnicianforhelp.
Troubleshooting
The Indoor temperature is not showing: The unit will begin reading
indoor temperature when it is plugged in. Allow a few minutes for the correct
temperature to register on the LCD display.
If Indoor and Outdoor temperatures do not match when placed next
to each other:Thesensorismanufacturedtobe+/-2degreeinaccuracy
under normal conditions. So it is possible to have up to four degrees difference
shownontheseparatetemperaturesensors(onecouldbe“+2degree”andthe
other“-2degree”.Additionally,thecalibrationcurveisdifferentbetweenthetwo
units because of the greater temperature range of the outdoor sensor. Errors are
usually noted on the extreme ends of the temperature ranges.
If Clock Radio Time & Weather Butler unit is not accepting remote
transmissions: The units may not be properly synchronized or the batteries
may need to be replaced. Be sure the Clock Radio Time & Weather Butler unit is
plugged in prior to the remote sensor battery installation. With the two units next
to each other, attempt synchronization. Remember to always place the remote
sensor within the effective transmission range and away from large metal surfaces.
What is the recommended battery type? We recommend using only alkaline batteries.
Where can I mount the remote sensor? To get accurate readings and to
prolong the life of your sensor, we recommend that you mount it out of direct
sunlight and rain. Fog and mist will not affect the sensor, but large volumes of
soaking rain may. To guard against this, we recommend that you mount it under
the eve of your house, your garage or any other suitable place that will keep it out
of direct sun and rain. Modifications not authorized by the manufacturer may void
users authority to operate this device.
If Outdoor Temperature Reading shows “- -”
This may indicate a low battery or out of transmission range.
10 1 1

SI Products
Service Center
1.888.856.6781
8:30a.m. – 7:00p.m. (EST)
M – F
Mail To: SI Products
Consumer Relations
Service Center Dept. 168
3000 Pontiac Trail
Commerce Township, MI
48390
e-mail:
cservice@siproducts.com
EC-B130
Radio reloj AM/FM
mayordomo de hora/clima
THE SHARPER IMAGE ® name and logo are registered trademarks.
Marketed and distributed by SI Products under license. ©The Sharper Image. All rights reserved.
iPod®, iPod nano®, nano® and the iPod® design are trademarks of Apple Inc.
IB-ECB130
ONE YEAR LIMITED WARRANTY
SI PRODUCTS sells its products with the intent that they are free of defects in manufacture and
workmanship for a period of one year from the date of original purchase, except as noted below.
SI PRODUCTS warrants that its products will be free of defects in material and workmanship under
normal use and service. This warranty extends only to consumers and does not extend to Retailers.
To obtain warranty service on your SI PRODUCTS product, mail the product and your dated sales receipt
(as proof of purchase), postpaid, to the following address:
SI PRODUCTS Consumer Relations
Service Center Dept. 168
3000 Pontiac Trail
Commerce Township, MI 48390
No COD's will be accepted.
SI PRODUCTS does not authorize anyone, including, but not limited to, Retailers, the subsequent
consumer purchaser of the product from a Retailer or remote purchasers, to obligate SI PRODUCTS in any
way beyond the terms set forth herein. This warranty does not cover damage caused by misuse or abuse;
accident; the attachment of any unauthorized accessory; alteration to the product; improper installation;
unauthorized repairs or modifications; improper use of electrical/power supply; loss of power; dropped
product; malfunction or damage of an operating part from failure to provide manufacturer’s recommended
maintenance; transportation damage; theft; neglect; vandalism; or environmental conditions; loss of use
during the period the product is at a repair facility or otherwise awaiting parts or repair; or any other
conditions whatsoever that are beyond the control of SI PRODUCTS.
This warranty is effective only if the product is purchased and operated in the country in which the
product is purchased. A product that requires modifications or adoption to enable it to operate in any
other country than the country for which it was designed, manufactured, approved and/or authorized, or
repair of products damaged by these modifications is not covered under this warranty.
THE WARRANTY PROVIDED HEREIN SHALL BE THE SOLE AND EXCLUSIVE WARRANTY. THERE
SHALL BE NO OTHER WARRANTIES EXPRESS OR IMPLIED INCLUDING ANY IMPLIED WARRANTY OF
MERCHANTABILITY OR FITNESS OR ANY OTHER OBLIGATION ON THE PART OF THE COMPANY WITH
RESPECT TO PRODUCTS COVERED BY THIS WARRANTY. SI PRODUCTS SHALL HAVE NO LIABILITY FOR
ANY INCIDENTAL, CONSEQUENTIAL OR SPECIAL DAMAGES. IN NO EVENT SHALL THIS WARRANTY
REQUIRE MORE THAN THE REPAIR OR REPLACEMENT OF ANY PART OR PARTS WHICH ARE FOUND TO BE
DEFECTIVE WITHIN THE EFFECTIVE PERIOD OF THE WARRANTY.
NO REFUNDS WILL BE GIVEN. IF REPLACEMENT PARTS FOR DEFECTIVE MATERIALS ARE NOT AVAILABLE,
SI PRODUCTS RESERVES THE RIGHT TO MAKE PRODUCT SUBSTITUTIONS IN LIEU
OF REPAIR OR REPLACEMENT.
This warranty does not extend to the purchase of opened, used, repaired, repackaged and/or resealed
products, including but not limited to sale of such products on Internet auction sites and/or sales of such
products by surplus or bulk resellers. Any and all warranties or guarantees shall immediately cease and
terminate as to any products or parts thereof which are repaired, replaced, altered, or modified, without
the prior express and written consent of SI PRODUCTS.
This warranty provides you with specific legal rights. You may have additional rights which may vary from
state to state. Because of individual regulations, some of the above limitations and exclusions may not
apply to you. For more information regarding our product line in the USA,
please visit: www.siproducts.com
Manual de instrucciones
e información de garantía

14 1 5
Presentamos el despertador más inteligente del mercado.
Gracias por comprar el Radio reloj mayordomo de hora y clima The Sharper
Image®. Este producto, junto con toda la colección The Sharper Image, combina
la innovación con diseño de vanguardia para proporcionarle años de confiabilidad
ydisfrute.¡Despierteconundespertadorqueesdosvecesmásinteligente!
Obtenga su informe del clima diariamente incluso antes de salir de la cama con
su mayordomo del clima personal a su lado.
IMPORTANTES INSTRUCCIONES DE SEGURIDAD:
Cuando utiliza un artefacto eléctrico, siempre se deben seguir ciertas
precaucionesbásicas,incluidaslassiguientes:
LEA TODAS LAS INSTRUCCIONES ANTES DE USAR
PELIGRO -
Parareducirelriesgodechoqueeléctrico:
•Desconectesiempreelartefactodelatomadecorrienteinmediatamentedespuésde
usar y antes de limpiar.
•Nointentetomarunartefactoquehayacaídoalagua.Desenchúfelodeinmediato.
•Nocoloqueniguardeunartefactodondepuedacaerseosertiradohaciaunatinaolavamanos.
•Nolocoloquenilodejecaerenaguanienningúnotrolíquido.
ADVERTENCIA
-Parareducirelriesgodequemaduras,incendio,choque
eléctrico o lesiones a las personas:
•Esnecesariaunasupervisiónestrictacuandolousanniñosopersonas
inválidasoincapacitadasocuandoestápróximoaellos.
•Utiliceesteartefactosóloparaelusoparaelcualestádiseñadoycomose
describe en este manual. No use accesorios no recomendados por THE
SHARPER IMAGE®; especialmente si no han sido incluidos con la unidad.
•Nuncahagafuncionaresteartefactositieneelcordón,
el enchufe, el cable o el armazón dañado. Si no trabaja
correctamente, si se ha dejado caer o se ha dañado,
devuélvaloalCentrodeserviciodeSIPRODUCTSparaque
lo examinen y lo reparen.
•Mantengaelcablealejadodesuperficiescalientes.
•Nuncalodejecaerniinserteningúnobjetoenningunaabertura.
•Nolohagafuncionardondeseutilizanproductosderociado
poraerosolodondeseestáadministrandooxígeno.
•Nolleveesteartefactotomadodelcable,niuseelcablecomomanija.
•Paradesconectarlo,quiteelenchufedeltomacorriente.
•Esteartefactoestádiseñadoúnicamenteparausarloen
interiores. No lo use en exteriores.
•Coloqueestaunidadsólosobresuperficiessecas.No
coloqueestaunidadsobresuperficiesmojadasconaguao
solventes para limpieza.
Precaución - Lea todas las instrucciones con atención
antes de poner en funcionamiento.
•Nuncadejeelartefactosinvigilancia,especialmentesihay
niños presentes.
•Nuncacubraelartefactomientrasestáenfuncionamiento.
•Estaunidadnodebeserusadaporniñossinlasupervisióndeunadulto.
•Siempremantengaelcablealejadodelastemperaturasaltasydelfuego.
•Nolevante,lleve,cuelguenitiredelaunidadtomándoladel
cable de corriente.
•Nosometalasunidadesatemperaturasextremadamente
severas - NO COLOQUE LAS UNIDADES EN HORNOS,
CONGELADORES ni UNIDADES DE MICROONDAS.
•Lastemperaturasextremas,lasdescargasolasáreasdevibración
inusualdeberánevitarseparaprevenirdañosalasunidades.
•Sieladaptadorsedaña,debesuspenderelusodeesteaparato
de inmediato y contactar el Centro de servicio de SI Products.
(VerladireccióndeSIProductsenlaSeccióndeGarantía).
GUARDE ESTAS INSTRUCCIONES
Precaución:
Todo el
servicio
de este
producto
debe ser
realizado
únicamente
por Personal
de servicio
autorizado
de SI
Products.
Precaución:
todo el
servicio de
este producto
debe ser
realizado
únicamente
por personal
de servicio
autorizado de
SI Products.

El Radio reloj mayordomo de hora y clima cuenta con:
• Indicadordetemperaturainterioryexterior
• Vozmasculinaqueanunciaelmododeindicacióndelahoraydealarma
• PantallafácildeleerconLCDiluminado/iluminacióndefondocon3niveles(alto/
medio/bajo)
• SintonizadorderadiodigitalAM/FMconmemoriapara8estaciones8
predeterminadas
• Despertadordedoblealarma–3modosdealarma:radio,pitidosovozmas-
culina(repeticióndelinforme)
• Prácticafunciónderepetición/siesta
• Volumendigital:nivelde1a8
• Parlante:3pulg.(7,62cm)dediámetro
• Temperaturadefuncionamiento:de+32ºFa+122ºF(de0ºCa50ºC)
• Rangodetemperaturainterior:de+32ºFa+122ºF(de0ºCa50ºC)
• Frecuenciadefuncionamiento:434MHz
• Distanciamáximadetransmisión:100pies(30metros)
• Adaptadordeenergía:entrada120Vcasalida6Vcc300mA
• Piladerespaldo:CR2032(incluida)
17
16
Fig. 1
EC-B130_Clock Radio Weather ButlPage 1 7/6/09 4:50:10 PM
Especificaciones del sensor remoto de temperatura
exterior:
• Rangodetemperaturaexterior:de-4ºFa+140ºF(de-20ºCa+60ºC)
• Frecuenciadefuncionamiento:434MHz
• Distanciamáximadetransmisión:100pies(30metros)
• Energíadepilas:2xAAA(noincluidas)
Configuración inicial
Instalación de las pilas del despertador:
1. Levante la tapa del compartimiento de las pilas en la parte inferior de la unidad.
IntroduzcaunapilaCR2032incluidaenlaunidaddeacuerdoconladireccióndela
polaridadqueseindica.Vuelvaacolocarlatapaypresiónelahastaquecalceensu
lugar.
2.ConecteelextremodeCCdeladaptadorenelenchufehembradeCCenlabasedela
unidadeintroduzcaelenchufedeCAenuntomacorrientesde120VCA.
NOTA:encasodeuncortedeenergíalapilaestádiseñadaparabrindarrespaldodela
memoriaparalasconguracionesderadiorelojydealarma.Lahoranoseiluminaráenla
pantalladelrelojcuandonoexistaenergíadeCAdisponible.Tanprontovuelvaelsuministro
decorriente,lapantallaindicarálahoracorrecta.
NOTA: La pila de respaldo debe estar instalada para mantener la hora, las configuraciones
de radio y la hora de la alarma.
Instalación de la pila del sensor remoto exterior:
1.Aojelos4tornillosqueaseguranlatapadelcompartimientodelaspilasconun
destornilladorpequeño(queseincluye),yretírela.
2.Introduzca2pilasalcalinasAAAdeacuerdoaladireccióndelapolaridadqueseindica.
3.Coloqueelreceptorinterior(radiorelojmayordomodehorayclima)tancercadelsensor
exteriorcomoseaposible.Estoayudaráalasincronizaciónentrelasdosunidades.
4.ElsensorremotoestápreconguradoenºF.PresioneelbotónºC/ºFdentrodelsensor
remotoparacambiarentreºCyºF.
5.PresioneelbotónTXdentrodelsensorremotoparavericarlarecepción.
6.Vuelvaacolocarlatapayajustelos4tornillos.
NOTA: se recomienda probar primero las unidades una junto a la otra para
asegurarsedequeambas,elsensorexterioryelreceptorinterior,estén
sincronizadas de manera adecuada.
18 1 9
Instrucciones de instalación del sensor
remoto exterior
NOTA:unavezqueestélistoparacolocarsusensorexteriorysureceptor
interiorenellugar,asegúresedequeladistancianoseamayorquelazonade
transmisiónefectivade100pies/30m.Algunosmaterialesdeconstrucciónyla
ubicación del receptor interior o del sensor exterior pueden afectar la calidad y el
ámbitodelatransmisión.
Para obtener mejores resultados, pruebe con varias ubicaciones.
El sensor remoto viene con un soporte de pie o puede montarse en la pared.
Soporte de pie
Simplemente deslice hacia fuera el soporte adjunto de la ménsula de montaje.
Instalación en la pared
Coloqueuntornillooclavoenellugardondedeseacolgarlo.
Se incluyen un tonillo y un anclaje de pared para su comodidad.
NOTA: mantenga el sensor exterior protegido de la luz solar directa y de la lluvia.
Noloinstalesobresuperciesmetálicas.
Indicación de pilas descargadas del sensor
remoto exterior
Cuandolaspilasesténcasiagotadasapareceráuníconoenelsensorremoto.
Vuelvaacolocarlaspilassegúnseanecesarioysigaelprocedimientode
configuración.
Modo de uso
Controles superiores:
Radio
Presione el botón de RADIO una vez para FM. Presione el botón de RADIO otra
vezparaAM.Silamemorianoestávacía,conlaradioapagada,presionarlouna
vezharáquevuelvaalaúltimafrecuenciaderadioenlamemoria,peronoenel
modo de memoria.
Temporizador
Presione el botón de RADIO para encender la radio.
Alpresionarelbotóndetemporizador(TIMER)semostrarán15,30,45,60y
OFF.Estafunciónlepermiteelegircuántotiempoescuchará.
Controles de volumen
•Presioneelbotón+parasubirelniveldevolumen,de1a8.
•Presioneelbotón-parasubirelniveldevolumen,de8a1.
Apagado
Presioneelbotóndeapagado(OFF)paraapagarlafunciónde“radio”ode
“audio”y“AlarmOFF”duranteelmododealarma.
Sintonizador/configuración de la hora
1.Enelmododecongurarlafecha“DATESET”odecongurarlaalarma
“ALARMSET”,presioneelbotón+paraaumentaryelbotón–paradisminuir
los valores digitales.
2.EnelmododeRADIO,presionebrevementelosbotones+y–paraajustar
manualmentelafrecuencia.Presionedeformaprolongada+parabuscar
automáticamentehaciaadelantey–paralaselecciónhaciaatrás.
EC-B130_Buttons.ai 7/1/09 10:28:39 AM
Fig. 2

Configuración de la alarma
Para su comodidad, pueden establecerse dos alarmas separadas:
Botón de alarma 1
Selección del modo
Presione el botón de alarma 1 para cambiar entre: pitido, radio, voz, apagado
Lapantallamostraráelíconodecampanadelaalarma1juntoalmodoque
seleccionó.
Presione y mantenga presionado
1.Losnúmerosparpadeanparalahora(HH),presioneelbotón+/-paracambiar
la configuración de la hora, presione el botón de Alarma 1 para confirmar y
cambiar a la configuración de minutos.
2.Losminutos(MM)parpadearán,presioneelbotón“-/+”paracambiarla
conguracióndelosminutos,espereunmomentoparaqueseguardeyvuelva
al modo normal.
Lapantallamostrará:ÍconodecampanadelaAlarma1:HH:MM(AM/PM)
Botón de alarma 2
Selección del modo
Presioneelbotóndealarma2paracambiarentre:pitido,radio,voz,apagado
Lapantallamostraráelíconodecampanadelaalarma2juntoalmodoque
seleccionó.
Presione y mantenga presionado
1.Losnúmerosparpadeanparalahora(HH),presioneelbotón+/-paracambiar
la configuración de la hora, presione el botón de Alarma 1 para confirmar y
cambiar a la configuración de minutos.
2.Losminutos(MM)parpadearán,presioneelbotón“-/+”paracambiarla
conguracióndelosminutos,espereunmomentoparaqueseguardeyvuelva
al modo normal.
Lapantallamostrará:ÍconodecampanadelaAlarma2:HH:MM(AM/PM)
INFORME
Presioneelbotóndeinforme(REPORT)unavezyseanunciarálalecturadehora
real y datos de temperatura en el exterior.
Memoria
LamemoriadeestacionesderadioAM/FMregistraunmáximode8canales.
•Enelmodonormalconlaradioapagada,presioneelbotóndememoria
(MEM)brevementeparaencenderlaradioyvolverautomáticamentealaúltima
estación de radio de la memoria.
•Seleccióndeunaestación.PresioneprolongadamenteelbotónMEMdurante
másde2segundosparagrabarunanuevaestación.Apareceráelíconode
memoria(MEM)yeldígitodememoriaparpadeará
•Presioneelbotóndevolumen(VOL+/-)paraseleccionarelnúmerodememoria.
Presioneelbotóndelsintonizador(Tuner+/-)parasintonizarlaestación.Presioneel
botóndememoria(MEM)paraconfirmarlaestaciónactualenlamemoria.
Repetición/siesta
PresionelabarraSNOOZE/NAPpararepetición.Deestamanera,seactivará
automáticamentelarepeticióndelaalarmaparaquesuenealosnueveminutos.
Opuedeelegirjarlaalarmaen15,30,45,60minutosoapagarla(OFF)para
tomar una siesta.
Controles inferiores:
Iluminación de fondo - HI (alta)/ MED (media)/ LO (baja)
Deslice el interruptor para seleccionar el nivel de brillo de la iluminación de fondo
en la pantalla.
˚C/˚F
DesliceelinterruptorparacambiarentreCelsius(ºC)oFahrenheit(ºF)paraelnivelde
temperatura.
Horario de verano (DST)
DesliceelinterruptorDSTON/OFF(horariodeveranoencendido/apagado)para
activar o desactivar la función de horario de verano.
Fecha/hora
1.Presioneprolongadamenteelbotóndefecha/hora(DATE/TIME)durantemás
de3segundoseingreselaconguracióndelmododeconguracióndefecha/
hora(DATE/TIMESETMODE).
2.PresioneelbotónDATE/TIMEunavezparaseleccionarelmodo“year(año)->
month(mes)->hour(hora)->minute(minuto)->exit(salir)”
3.Presionelosbotones+o-paraseleccionarlafechauhoracorrectas.
Entrada auxiliar
Parausarlaentradaauxiliarparaponermúsicacoloqueunaentradade3,5mm
enelenchufehembraauxiliar(AUXIN).Launidaddetectaráautomáticamentela
entradayreproducirálamúsica.
20 2 1

Elfuncionamientoestásujetoalassiguientesdoscondiciones:(1)Este
dispositivonopuedecausarinterferenciasy(2)estedispositivodebeaceptar
cualquierinterferencia,incluyendolainterferenciaquepuedacausarun
funcionamiento no deseado del aparato.
Información de FCC:
Estedispositivocumpleconlasección15delasreglasdelaFCC(Comisión
FederaldeComunicaciones).Elfuncionamientoestásujetoalassiguientesdos
condiciones:
(1)Estedispositivonopuedecausarinterferenciasnocivasy(2)estedispositivo
debeaceptarcualquierinterferenciaquereciba,incluyendolainterferenciaque
pueda causar un funcionamiento no deseado.
NOTA: EL FABRICANTE NO ES RESPONSABLE DE NINGUNA INTERFERENCIA
DE RADIO O TELEVISIÓN PROVOCADA POR MODIFICACIONES NO
AUTORIZADASAESTEEQUIPO.DICHASMODIFICACIONESPODRÍANANULAR
LA AUTORIDAD DEL USUARIO PARA UTILIZAR EL EQUIPO.
Mantenimiento
Para almacenar
Puede dejar la unidad en exhibición o puede guardarla en su caja en un lugar
fresco y seco.
Para limpiar
Para limpiar la carcasa de la unidad use sólo un paño suave y seco.
NUNCAuselíquidosolimpiadoresabrasivosparalimpiarlaunidad.
Lasmodificacionesnoautorizadasporelfabricantepuedenanularlagarantíadel
usuario.
Atención:Esteequipohasidoensayadoyprobadoysehacomprobado
quecumpleconloslímitesdelosdispositivosdigitalesdelaClaseB,segúnla
Sección15delasNormasFCC.Estoslímitesestándiseñadosparaproporcionar
una protección razonable contra interferencias dañinas en una instalación
residencial.Esteequipogenera,usaypuedeirradiarenergíaderadiofrecuencia
y,sinoseinstalayusasegúnlasrecomendaciones,puedecausarinterferencias
dañinasalascomunicacionesderadio.Sinembargo,nohaygarantíasdeque
noseproduzcainterferenciaenunainstalaciónenparticular.Siesteequipo
causarainterferenciasdañinasalarecepciónderadiootelevisión,loquepuede
determinarseencendiendoyapagandoelequipo,sesugierealusuarioquetrate
decorregirlainterferenciaconunoomásdelossiguientesprocedimientos:
•Vuelvaaorientaroubicarlaantenaderecepción.
•Aumenteladistanciaentreelequipoyelreceptor.
•Conecteelequipoauntomacorrienteeléctricodeuncircuitodiferentede
aqueldondeestáconectadoelreceptor.
•Consulteconelrepresentanteoconuntécnicoexpertoderadio/TVpara
recibir ayuda.
Diagnóstico y resolución de problemas
Si no se muestra la temperatura interior: launidadcomenzaráaleerlatemperatura
interiorcuandoestéenchufada.Dejepasarunosminutosparaqueseregistrela
temperatura correcta en la pantalla LCD.
Si las temperaturas interiores y exteriores no coinciden cuando se
colocan una junto a la otra:Elsensorestáfabricadoparatenerunatoleranciade+/-2
gradosenlaprecisión,bajocondicionesnormales.Porlotantoesposiblequehayahasta
cuatrogradosdediferenciaenlosdistintossensoresdetemperatura(unopuedetener“+
2grados”yelotro“-2grados”).Además,lacurvadecalibraciónesdiferenteentrelasdos
unidades debido a la mayor variación de temperatura del sensor exterior. Generalmente se
ven los errores en los extremos de las variaciones de temperatura.
Si el Radio reloj mayordomo de hora y clima no acepta transmisiones remotas:
puedequelasunidadesnoesténsincronizadasdemaneraadecuadaoqueseanecesario
cambiarlaspilas.AsegúresedequeelRadiorelojmayordomodehorayclimaesté
enchufando antes de la instalación de la pila del sensor remoto. Con las dos unidades
cerca una de otra, intente la sincronización. Recuerde colocar siempre el sensor exterior
dentrodelámbitodetransmisiónefectivoylejosdesuperciesmetálicasgrandes.
¿Cuál es el tipo de pila recomendado? Recomendamosqueúnicamenteutilicepilasalcalinas.
¿Dónde puedo instalar el sensor exterior? Para obtener lecturas precisas y para
extenderlavidaútildesusensor,sugerimosqueloinstaledondequedeprotegidode
laluzsolardirectaydelalluvia.Lanieblaylabrumanoafectaránalsensor,peropuede
quesíloafectengrandesvolúmenesdelluvia.Paraprotegerlodeesto,recomendamos
queloinstalebajoelalerodesucasa,sucocheraocualquierotrolugaradecuadoque
lo mantenga al reparo del sol directo y la lluvia. Las modificaciones no autorizadas por el
fabricante pueden invalidar la autoridad del usuario para utilizar este producto.
La lectura de la temperatura exterior indica “- - ”
Estopuedeindicarunabateríabajaofueradeladistanciaefectivadetransmisión.
22 2 3
Table of contents
Languages:


