LEMEGA LIFE & ALOUD CR6 User manual

1. Read these instructions.
2. Keep these instructions.
3. Heed all warnings.
4. Follow all instructions.
5. WARNING – To reduce the risk of fire or electric
shock, do not expose this apparatus to rain or
moisture.
6. Clean only with a dry cloth.
7. Only use attachments/accessories specified by the
manufacturer.
8. Unplug this apparatus during lightning storms or
when unused for long periods of time.
9. Keep this product a safe distance away from naked
flame, such as alit candle.
10. Apparatus shall not be exposed to dripping or
splashing and no objects filed with liquids, such
as vases, shall be placed on the apparatus.
11. Put the remote controller in the fuselage when it is
not in use.
12. Don't press more than one key at the same time.
13. In the event that the unit malfunctions, unplug it for
1
1 Power adapter
1 Remote Control [Battery installed]
1 Owner's manual
1 Warranty Card
2 FM wire antenna clips
Packed with your CR6 you should find:
Important Safety Instructions

2
LCD Display
12 3 4 5 6 7
1. Switching between different modes: Soothing Music
mode, Bluetooth and FM.
2. Set the sleep timer from 15mins / 30mins / 60mins /
Sleep Off in turn
3. Clock display
4. Alarm 1 setting
5. Alarm 2 setting
6. Soothing music mode
7. Switch between AM and PM
[Note: When you set the Alarm, please note the time is
AM or PM]
3
1 2 3 4 5 6 7 8
9 10
/
1. [Standby/ MODE]: Plug in the main power
supply to power on and enter Soothing sleep music
directly. Briefly Press M to switch Bluetooth / FM mode.
Press and hold [Long Press] go to Standby mode.
2. : In Bluetooth / Soothing sleep music mode, briefly
press to previous track.
In FM mode, briefly press to move backward
0.1MHz frequency. Press and hold 2 seconds to
auto-scan the backward stations.
3. : In Bluetooth / Soothing sleep music mode,
briefly press to next track.
In FM mode, briefly press to move forward 0.1MHz
frequency. Press and hold 2 seconds to auto-scan
the stations.
/
/
Guide To Features (Top touch buttons):

4
4. VOL- / : Press and hold button to
decrease the volume quickly. Briefly press to
decrease the volume one step by one step.
5. VOL+ / : Press and hold button to
increase the volume quickly. Briefly press to
increase the volume one step by one step.
6. DIM: Press this button to adjust the LCD brightness:
High/Mid/Off in turn.
7. Soothing sleep music: Press once to enter
“Soothing sleep music” source, Press again to change
the Soothing sleep music: frog croaks, Ocean Waves,
Thunder & Rain, Campfire, White noise, Running Water,
Insect Sound, Birds chirping and Lullaby in turn.
8. Sleep : In FM/BT/Soothing sleep music mode,
Press to set the time interval 15mins /30mins/
60mins/Sleep Off in turn.
9. Wireless charging area: Put your phone that supports
wireless charging on the charging area until the mobile
phone is prompted to charge.
10. Remote control holder: Put your remote control to
the remote control holder to avoid missing.
11. Snooze: After the alarm activates, press any of the
buttons on the top of the units or on remote control to
temporarily mute the alarm for 5 minutes, or briefly press
the Alarm/Sleep button to cancel activation.
5
Back Overview
1
2
3
4
5
6
7
8
9
10
11
12
13
14
15
16
17
Remote Control
[Remove clear tab over battery before use]

6
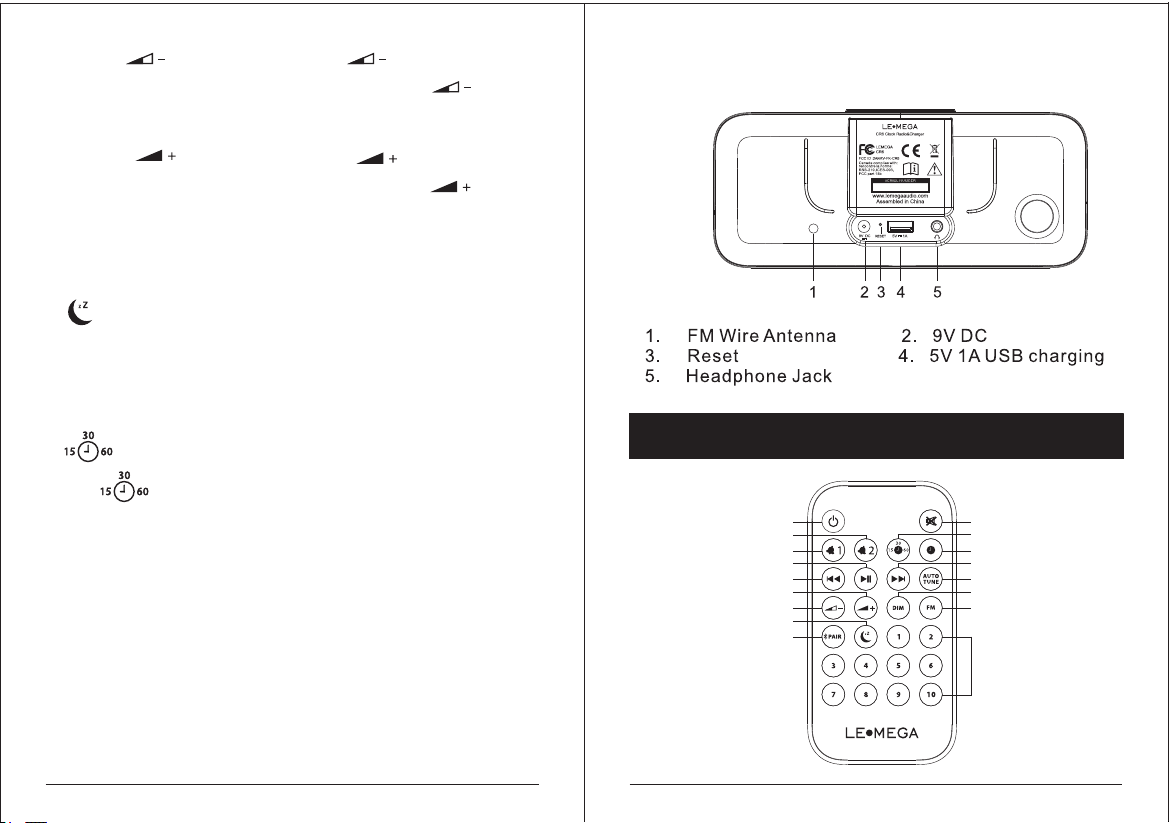
1. /Standby: Long Press to Power on / Standby mode.
2. ALARM 2: Press ALARM 2 button to activate or
deactivate alarm. Alarm2 icon will appear when Alarm is
activated.
Press and hold Alarm2 to start Alarm Setting.
When the hours flash, press / to set the hours,
press Alarm2 to confirm and continue.
When the minutes flash, press / to set the
minutes, press Alarm2 to confirm and continue.
Volume Level: press / to set the minutes
Alarm mode [Default]: Birds chirping soothing sleep
music.
3. ALARM 1 : Same operation as Alarm 2.
4. : Press to select Play/Pause under Bluetooth
mode.
In FM mode,after AUTOTUNE full scanning the stations,
press the button to switch the saved stations from low
frequency to high frequency.
5. : In Bluetooth and Soothing music mode, Briefly
press to previous track.
In FM mode, Briefly press to move forward 0.1MHz
frequency. Press and hold to auto-scan the forward
stations.
6. VOL+/ : Press and hold button to increase
the volume quickly. Briefly press to increase the
volume one step by one step.
7. VOL- / : Press and hold button to decrease
7
8. Soothing music: Press once to enter “Soothing
music” source, Press again to change the Soothing
music: frog croaks, Ocean Waves, Thunder & Rain,
Campfire, White noise, Running Water, Insect Sound,
Birds chirping and Lullaby in turn.
9. :In other modes, briefly press the Pair button to
access Bluetooth mode directly. In Bluetooth mode,
Press this button to connect or disconnect BT
connection.
10. / MUTE: Press once to mute the sound when
playing. Press again to un-mute the sound.
11. / SLEEP: In FM/BT/ Soothing music Mode,
Press to set the time interval 15mins/30mins/60mins/
Sleep Off in turn before the unit is set to standby mode.
12. / CLOCK : Press and hold to start the time
setting.
When the hours flash, press / to set the hours,
press CLOCK to confirm and continue.
When the minutes flash, press / to set the
minutes, press to confirm and continue.
Note: If the time stops flashing while setting, repeat the
above steps.
13. : In Bluetooth and Soothing sleep music mode,
briefly press to the next track.
the volume quickly. Briefly press to decrease the
volume one step by one step.

98
In FM mode, Briefly press to move forward 0.1MHz
frequency. Press and hold to auto-scan the forward
stations.
14. AUTO TUNE: Press AUTO TUNE button to auto-
scan the stations under the FM mode and save the
strong signal stations automatically. Play the first
saved station after finishing full scan.
15. DIM: Press DIM to adjust the brightness from
High/Mid/Off in turns.
16. FM: In other mode, Press FM to enter FM mode
directly.
17. 1-10 : In FM mode, Long press number 1 to number
10 to save the favorite stations; Short Press number 1 to
number 10 to select the favorite station or Preset recall.
1. Press “M” button on the unit or press “FM” button on
the remote to enter to FM mode;
2. Briefly press / to move backward /forward
each 0.1MHz frequency to search stations. Or press
AUTOTUNE button on remote control to auto-scan the
active stations and save the strong signal stations
automatically.
FM RADIO
WARNING: DO NOT INGEST BATTERY, CHEMICAL
BURN HAZARD.
The remote control supplied with this product contains a
coin/button cell battery. If the coin/button cell battery is
swallowed, it can cause severe internal burns in just 2
hours and can lead to death.
Keep new and used batteries away from children. If the
battery compartment does not close securely, stop using
the product and keep it away from children. If you think
batteries might have been swallowed or placed inside
any part of the body, seek immediate medical attention.
Turn battery cover left with a coin and remove the
clear film to activate the battery.
Use a brand name CR2025 button cell battery when it
comes time to replace the remote’s battery.Dispose of
the spent battery according to your country’s regulations.

10 11
3. : press the button to switch the saved stations
from low frequency to high frequency.
Noted: To get a good radio signal, fully unwind antenna
and move it around until you get good reception.
1. Turn on CR6, Press “M” button on the unit or press
button on the remote to enter to Bluetooth mode;
2. Select Bluetooth device name “LEMEGA CR6” when
it appears on your device's screen to connect.
3. You can start to play your music files wirelessly. Adjust
the volume level on your device.
4. Press on the remote control to connect or
disconnect Bluetooth.
Model: CR6
Type: Clock Radio &Charger
Drivers: 2 x 1.75"
Power output: RMS 10W
Wireless charging output: 10W [Andriod] & 7.5W[iPhone]
Power Supply: 9V 3A
Dimensions: L 200 X H83 X D111.5 MM
Weight: 580g
SPECIFICATIONS
BLUETOOTH
Specifications are subject to change without notice.
Any Changes or modifications not expressly approved by
the party responsible for compliance could void the
user's authority to operate the equipment. This device
complies with part 15 of the FCC Rules. Operation is
subject to the following two conditions:
(1) This device may not cause harmful interference,
and (2) this device must accept any interference
received,
including interference that may cause undesired
operation.
Note: This equipment has been tested and found to
comply with the limits for a Class B digital device,
pursuant to part 15 of the FCC Rules. These limits are
designed to provide reasonable protection against
harmful interference in a residential installation. This
equipment generates, uses and can radiate radio
frequency energy and, if not installed and used in
accordance with the instructions, may cause harmful
interference to radio communications. However, there is
no guarantee that interference will not occur in a
particular installation. If this equipment does cause
harmful interference to radio or television reception,
which can be determined by turning the equipment off
and on, the user is encouraged to try to correct the
interference by one or more of the following measures:
-Reorient or relocate the receiving antenna.
-Increase the separation between the equipment and
receiver.
-Connect the equipment into an outlet on a circuit
different
from that to which the receiver is connected.
-Consult the dealer or an experienced radio/TV
technician for help.

Correct Disposal of this product. This marking
indicates that this product should not be disposed
with other household wastes throughout the EU.To
prevent possible harm to the environment or human
health from uncontrolled waste disposal, recycle it
responsibly to promote the sustainable reuse of
material resources.To return your used device, please
use the return and collection systems or contact the
retailer where the product was purchased.They can
take this product for environmental safe recycling.
FCC Radiation Exposure Statement:
This equipment complies with FCC radiation exposure
limits set forth for an uncontrolled environment .
This transmitter must not be co-located or operating in
conjunction with any other antenna or transmitter.
12
Table of contents
Other LEMEGA Clock Radio manuals