Sidewinder M-2 User manual

SIDEWINDER MODEL M-2
SOLVENT RECOVERY SYSTEM
INSTALLATION/OPERATION
OWNERS MANUAL

1
Table of contents
TABLE OF CONTENTS ………………………………………………PAGE 1
SPECIFICATIONS/CAUTIONS ……………………………………..PAGE 2
PLACEMENT LOCATION AND INSTALATION ………………PAGE 3
WIRING ………………………………………………………………….PAGE 4
PREPARATION …………………………………………………………PAGE 5
SOLVENTS TO PROCESS ……………………………………………PAGE 6
OPERATING YOUR SIDEWINDER ……………………………….PAGE 7
THINGS TO REMEMBER ……………………………………………PAGE 8
MAINTENANCE ………………………………………………………PAGE 9
TROUBLE SIGNALING PAGE 10
CIRCUIT BOARDS …………………………………………………….PAGE
11
REFRIGERATION SPECIFICATIONS ……………………………PAGE 12
PARTS LIST ……………………………………………………………PAGE 13
WARRANTY …………………………………………INSIDE BACK
COVER

2
Specifications:
This information is also included in a label located on the side panel of the unit.
Sidewinder Model M-2
• 11A, 110-120 V, 1Ph, 60 Hz
• Condensing Unit max. fuse 15 amp at F-1
• For supply connections, use 14 AWG or larger wires suitable for at least 90°C or equivalent.
• See PLACEMENT LOCATION AND INSTALLATION for clearances, do not install closer than 16
inches to a vertical surface.
• Minimum recommended ambient temperature - 50°F (10°C)
• Maximum recommended ambient temperature - 95°F (35°C)
• Capacity 5 US Gallons
• FOR USE ON LEVEL SURFACES ONLY
********************************************************************
CAUTION
To reduce the risk of fire or explosion, install, operate and maintain this equipment in accordance
with the instruction manual. This unit is for use in 35°C (95°F) environment with no forced
ventilation. Under these conditions, the unit shall be spaced a minimum 5 ft. from potential sources
of ignition such as electrical receptacles, switches, pilot lights, fixtures, contacts, and other similar
equipment that can produce sparks. If the equipment is used in higher ambient temperatures, an
increase in spacing to sources of ignition shall be considered. This unit has only been investigated
for use with the solvents indicated in the instruction manual.
CAUTION
Whenever combustible or flammable solvent are present there is a potential for mishap.
Personnel should be trained in the safe and proper handling, use and storage of hazardous
solvents.
Your Sidewinder Solvent Distillation Unit is a safe and reliable hazardous waste management
tool when used as intended and operating personnel are trained in its proper use.
All operating personnel should familiarize themselves with this manual. Keep this manual
readily available to the user.
DANGER! -WARNING!-
DO NOT PROCESS COMPOUNDS OF NITROCELLULOSE,
CELLULOSE NITRATE , ACIDS
OR ANY UNSTABLE REACTIVES
PLACEMENT LOCATION AND INSTALLATION
Do not locate the unit in an area that normally has solvent vapors present, such as a spray booth, mixing area or
solvent storage area. The location should be a well ventilated area away from traffic lanes. Most vapors are heavier
than air, do not locate below ground level or in a basement..
Locate the Sidewinder in a designated NO SMOKING, NO SPARKS, NO FLAMES area. Space the unit a
minimum 5 feet from other potential sources of ignition such as electrical receptacles, switches, pilot lights,
contacts, and other similar equipment that can produce sparks. Post the warning sign conspicuously in the
processing area.
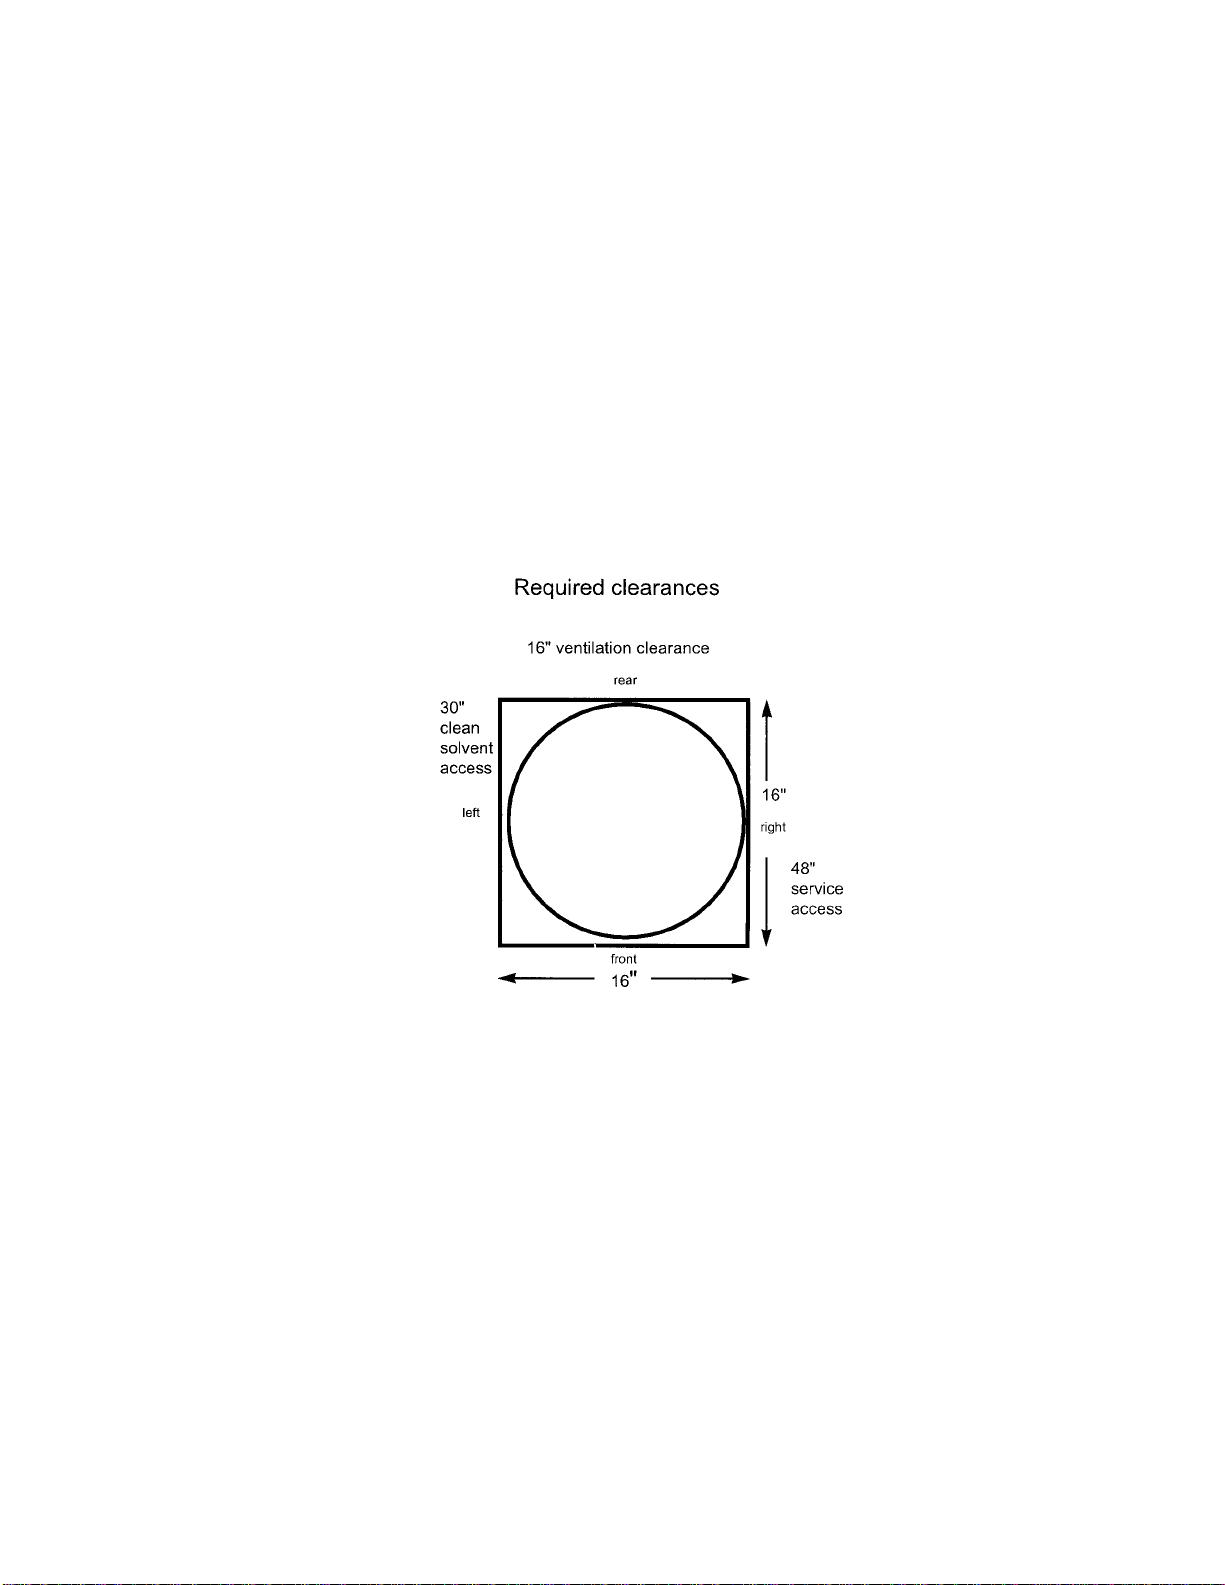
Situate away from traffic and allow for recommended clearances to allow sufficient air flow through the condenser,
to allow access to the clean solvent and to not hinder service access (see clearance diagram). Do not install closer
than 16 inches to a vertical surface at the rear of the unit. Leave 48 inches to the right for service access and at
least 30 inches to the left for access to the clean solvent.
The circuitry responds to temperature changes. Select a well ventilated location out of direct sunlight, under cover
and away from any other source of heat. The Sidewinder is designed for use in ambient temperature from 50°F
(10°C) to 95°F (35°).
Attach securely to the floor using the mounting holes at the base of the unit legs.
The Sidewinder is not intended for outdoor use.
Be sure to post the warning sign conspicuously in the processing area.
3

WIRING
Consult local wiring codes and connect to standard 110/120 VAC, 60 Hz, single phase. For supply connections, use
14 AWG or larger wires suitable for at least 90°C or equivalent with an approved ground. We recommend a
minimum 6 foot length of 1/2” IPS rigid, threaded conduit into the junction box supplied, preferably on its own
dedicated 20 amp circuit (see wiring diagram).
4

5
PREPARATION
A five gallon metal bucket must be used for processing your dirty solvent. The bucket must have unobstructed
openings in the top. Remove all caps and plastic pour spouts, a bucket with the entire top removed also works well.
If a bucket with the entire top removed is used, prepare a space for the internal ground clamp by pinching a space on
the lip with pliers and bending inward; creating a short horizontal lip.
If you choose to use Sidewinder processing bags (see your Sidewinder dealer), you must, nevertheless, still use a
bucket. Just place the Sidewinder processing bag in a clean open top bucket and fold down the sides like lining a
waste can. For best results when using Sidewinder processing bags, start with a clean open top bucket, bags may
stick to dirty buckets with paint or coatings residue.
With all the chemicals available for use and all the different brand names it is impractical to try to list them all here
(see SOLVENTS TO PROCESS ). Always check the material safety data sheet for hazard data. Do not process any
solvent you cannot identify. Always use appropriate gloves, eye protection and respirator when handling solvents.
Fill the prepared metal cooking bucket with the waste solvent to be processed to 4 inches from the top. Do not
overfill. Leave at least 4 inches from the top for expansion.
The clean solvent receiving vessel capacity for a batch style solvent distillation unit must be twice the batch size. A
Sidewinder batch is Approximately five U.S. gallons. Use an empty five gallon metal bucket or an empty five
gallon safety can to collect the clean processed solvent and place it in a secondary collection containment vessel
with a capacity to adequately hold a full bucket of solvent plus five gallons (see your Sidewinder dealer).
Put Teflon®seal tape on the two solvent outlet pipes threads and install the clean solvent outlet tubes provided.
While holding the outlet pipes with a pipe wrench, tighten securely. (Torque to 190 inch pounds)
DANGER! -WARNING!-
DO NOT PROCESS COMPOUNDS OF NITROCELLULOSE,
CELLULOSE NITRATE , ACIDS
OR ANY UNSTABLE REACTIVES

6
SOLVENTS TO PROCESS
• Always check the Material Safety Data Sheet for hazard data.If unsure, check with the
solvent supplier and/or manufacturer for cautions and special instructions pertaining to distillation for
reclaiming.
• Never process any solvent mixtures you cannot identify.
• Do not process solvent mixtures having autoignition points below 500°F.
• Do not process solvent mixtures containing Nitro-Cellulose or Cellulose-Nitrate under
any circumstance. Many lacquers, inks and cements contain Nitro-Cellulose or Cellulose-Nitrate.
• Do not process solvent mixtures containing unstable reactives under any circumstance.
Check MSDS.
• Do not process solvent mixtures for human consumption.
• Do not process solvent mixtures to be used for fuel.
The Sidewinder Model M-2 has been tested and is certified by Underwriters Laboratories, Inc. for the following
solvents only:
Substance *Flash Point
°F *Flash Point
°C *Autoignition
Temp. °F *Autoignition
Temp. °C
acetone -4 -20 869 465
butanol 75-98 24-37 650-761 343-405
diacetone alcohol 148 64 1118 603
diethyl ketone 55 13 842 450
ethanol 55 13 685 363
ethyl acetate 24 -4 800 427
isoamyl alcohol 109 43 662 350
isobutyl acetate 77 25 790 421
isopropyl acetate 61 16 860 460
isopropyl alcohol 53 12 852 399
lacquer thinner -4-109 -20-43 550-984 300-529
methanol 52 11 725 385
methyl cellosolve 115 46 545 285
methyl ethyl ketone 16 -9 759 404
methyl isobutyl ketone 64 18 840 440
methyl n-amyl ketone 120 49 991 533
2-methyl-2-propanol 52-82 11-28 780-892 416-478
mineral spirits 101 38 550 288
n-butyl acetate 72 22 790 421
n-propyl acetate 54 12 842 450
naphtha (light aliphatic) 50 10 500 260
naphtha (petroleum spirits) 107 42 550 300
paint thinner 0 -18 550 288
propanol 53-74 12-23 750-775 399--413
stoddard 105 41 500 260
* These figures come from sources deemed reliable and are believed to be accurate, however, since temperatures can be affected by the test
method, the exactness of the figures is not guaranteed and should be used only as a general guide.

7
OPERATING YOUR SIDEWINDER
The red LED on the front panel, beside the on/off button, will be illuminated when “POWER” is supplied to the
unit. The green LED on the front panel, beside the on/off button, will be illuminated when the unit is “READY” to
begin a new batch.
Position the clean solvent collection vessel (see PREPARATION) in position to receive the clean solvent from the
clean solvent outlet tubes. Do not allow the free ends of the clean solvent outlet tubes to protrude bellow the full
bucket liquid level, only 1 inch into the bucket is sufficient. Do not attempt to seal the clean solvent outlet tubes in
any way. They must be allowed to breathe at atmospheric pressure.
Remove the lid. Prior to each batch, the metal to metal seal on the heating vessel and the lid must be wiped free of
any dust or grit and then lubricated with a film of petroleum jelly (Vaseline®or equal) to avoid buildup from
spillage.
Carefully lower the prepared metal cooking bucket with the solvent to be processed (see PREPARATION) into the
heating vessel. Always check the material safety data sheet for compatibility. Do not process any solvent you
cannot identify. Always use appropriate gloves, eye protection and respirator when handling solvents. Do not
overfill. Leave at least 4 inches from the top for expansion.
Clamp the internal grounding clamp onto the prepared metal cooking bucket. If a bucket with the entire top
removed is used, prepare a space for the internal ground clamp by pinching a space on the lip with pliers and
bending inward; creating a short horizontal lip. Clamp to the lip. If you are using Sidewinder processing bags,
bunch the bag at this lip so that you are clamping to the metal bucket directly. On a bucket that has had the pour
spout removed, clamp on the edge of the pour spout hole.
Place the lid on the heating vessel so that the arrow on the lid aligns with the “line mark” on the rim of the heating
vessel. With the lid level first tighten any two opposite wing nuts slightly. Continue to tighten opposite wing nuts
until all are finger tight (torque: 25 inch pounds). Check that lid is level and straight on the heating vessel to insure
a firm seal.
The red square button on the front panel is an on and off button. Press the button once to turn on. The red switch
will be illuminated when the machine is on.
Allow the machine to process the solvent. It will turn itself off automatically. When the red switch is no longer
illuminated the process is finished. When the green LED is illuminated you may proceed with another batch.
Always allow adequate cool down before opening the unit. Allow the green LED to illuminate before loading
another batch. Never add solvent to hot solvent. Never add solvent to a hot cooking bucket. Never add solvent to a
hot heating vessel.
The process can be stopped manually by pushing the on/off button and, thereby, turning off the illuminated red
switch. The refrigeration unit will continue to operate while cool down is in progress. Be aware that if you shut
down early additional cooling time should be allowed for.

8
THINGS TO REMEMBER
The Sidewinder was designed to recycle dirty solvents, not water. Water contaminated solvent should be separated
before recycling. Over 95% of our customer inquiries regarding long processing times or early unfinished shut
down can be traced back to water in the solvent mix. The most common evidence of water in the solvent mix is a
yellowish, oil-like puddle at the bottom of the clean solvent.
Units are set at the factory for the anticipated use within the anticipated user type category. Occasionally, a new
installation may require some adjustments to process an untypical solvent or perform properly at your elevation and
climate condition. Contact your dealer or call the factory.
For best results, a unit should be dedicated to a single type of solvent whenever possible. If more than one solvent
is to be processed a machine should be dedicated to each one and processed in the vicinity of where the waste is
produced, thereby, reducing handling and eliminating hauling hazardous waste from site to site.
Use an empty five gallon metal bucket or an empty five gallon safety can to collect the clean processed solvent.
Place it in a secondary collection containment vessel with a capacity to adequately hold a full bucket of solvent plus
five gallons (see your Sidewinder dealer).
You must still use a bucket if you choose to use Sidewinder processing bags. Just place the Sidewinder processing
bag in a clean open top bucket and fold down the sides like lining a waste can. For best results when using
Sidewinder processing bags, start with a clean open top bucket, bags may stick to dirty buckets with paint or
coatings residue.
Prior to each batch, the metal to metal seal on the heating vessel and the lid should be wiped free of any dust or grit
and then lubricated with a film of petroleum jelly (Vaseline®or equal). At times the lid may need assistance to
break its seal. Apply gentle pressure with a pry tool between the pot and lid latch ears. Do not force, pull or twist
the handle.
Place the lid on the heating vessel so that the arrow on the lid aligns with the “line mark” on the rim of the heating
vessel.
First tighten any two opposite wing nuts slightly. Continue to tighten opposite wing nuts until all are tight. Check
that the lid is level and straight on the heating vessel to insure a firm seal.
It is not unusual for a small amount of solvent to condense and remain in the heating vessel after shut down. This
can be wiped dry or left alone. It will not affect the next batch nor will it accumulate.
Don’t overfill the cooking bucket. The liquid expands and could contaminate your clean batch. Leave at least 4
inches from the top of the bucket. Do not seal the cooking bucket, it must be an open container.
Position the clean solvent outlet tubes above the clean solvent full line or upon cool down it can vacuum a bit of
clean solvent back up the tubes into the heating vessel. Leave air space to avoid this.
Do not attempt to seal the clean solvent outlet tubes in any way. It must be free to breathe.
Routinely check the clean solvent outlet tubes and keep free of any accumulated build-up or obstructions.
For your protection always use appropriate gloves, eye protection and respirator.

9
MAINTENANCE
Prior to each batch:
• Make a general inspection of the unit for defects or unusual conditions. Do not use the unit with any defects or
if in doubt about any conditions.
• Clean up any spills immediately upon occurrence.
• Remove any slop or build-up within the heating vessel.
• Lubricate the metal to metal seal of the heating vessel and lid with petroleum jelly.
• Check that debris is picked up and not allowed to accumulate around the unit. Be sure that debris is not
allowed to restrict air flow through the condenser fins.
• Use a short, low pressure blast (25 psi) of compressed air into one of the clean solvent outlet tubes, while the
unit is empty and the lid is off and air is restricted through the other clean solvent outlet tube. Use proper eye
protection. There should be no restriction of air flow between the clean solvent outlet tube and the hole(s) on
the walls inside the heating vessel. Repeat with the other clean solvent outlet tube. Do not use the unit if there
are any obstructions.
Routine weekly:
• Check the safety relief valve. Use a short, low pressure blast (5 psi) of compressed air into one of the clean
solvent outlet tubes, while the unit is empty and the lid is in place and while air is restricted through the other
clean solvent outlet tube, it should relieve pressure at less than 5 psi. If not, remove and clean or replace the
safety relief valve. Be careful excess pressure can cause damage. Always use proper eye protection.
• Clean the condenser fins using a wire brush and a blast of compressed air. Always use proper eye protection.
• Make a general inspection of the unit for defects or unusual conditions. Do not use the unit with any defects or
if in doubt about any conditions.
Routine monthly:
• Disconnect from power, remove the access panel on the units left side (opposite the outlet tubes, your right
facing the front logo panel) and carefully wipe any accumulation of dirt and debris that may have accumulated
on the fan blades.
• Make a general inspection of the unit for defects or unusual conditions. Do not use the unit with any defects or
if in doubt about any conditions.

10
TROUBLE SIGNALING
The control system in your Sidewinder is always monitoring to be sure the system is functioning properly. The
circuitry will signal if there is a problem. If signaling occurs please familiarize yourself with these signals.
NO ILLUMINATION OF THE ON/OFF SWITCH
Be sure the unit is wired in correctly and check to see if the power indicator (Red LED) next to the on/off button is
illuminated. Power to the unit is faulty or Fuse F1 or F2 may need replacing.
STEADY BEEP TONE AND BLINKING ON/OFF SWITCH
This condition indicates a loose, missing or faulty thermal sensor or that the machine is in an ambient temperature
too cold to operate properly. The Sidewinder is designed for use in ambient room temperature from 50°F (10°C) to
95°F (35°C). Otherwise, check the connection of the double white, blue, red and black wire thermal sensors where
they connect to the control board. If the connection is sound and the temperature is proper, a thermal sensor may
need replacing.
INTERMITTENT BEEP TONE WITH BLINKING ON/OFF SWITCH THAT, TOGETHER, REPEATEDLY
PAUSE AND START AT ONE SECOND INTERVALS
This condition indicates a cautionary safety shut down has occurred. Check unit for visual signs of problems. It
could be that the machine is in an ambient temperature too hot to operate properly. The Sidewinder is designed for
use in ambient room temperature from 50°F (10°C) to 95°F (35°C). Additionally or alternatively, it may be a
reaction to positioning too close to a wall, not sufficient ventilation, untimely power interruption, low refrigerant
levels, dirty or blocked condenser fins or dirty or faulty condenser fan. Fuse F4 will need replacing. If the
condition occurs check for technical support from your dealer or the factory.
INTERMITTENT BEEP TONE WITH BLINKING ON/OFF SWITCH WITHOUT PAUSE
This condition indicates a cautionary safety shut down has occurred. Check unit for visual signs of problems. It
could be thermostat sensing circuit failure. The red thermal sensor may need replacing. Call for technical support
from your dealer or the factory, a simple check with an multi-meter can determine the trouble . Fuse F3 will need
replacing.
ALWAYS DISCONNECT FROM THE POWER SOURCE BEFORE ACCESSING THE ELECTRONIC
CIRCUITRY
USE FUSE PULLER WHEN REPLACING FUSES
BE SURE NOT TO BEND OR DAMAGE FUSE CLIP MOUNTS WHEN REPLACING FUSES

11

12

SKIN
INSULATION
TFE VAPOR TUBE *
TFE FILL TUBE *
HOUSING FRAME
a. top
b. left side w/legs
c. right front leg
d. right rear leg
e. front logo panel
f. right access panel
g. rear panel
g. rear panel
100100 EVAPORATOR
ASSEMBLY *
INSULATED PAN
AS0103 BAKELITE
TOP HANDLE W/SCREWS
* not shown
AS0104 BAKELITE KNOB WING
AS0105 CLAMP BOLT
LID
AS0106 PIN FOR CLAMP BOLT
AS0107 RETAINING CLAMP
HEATING VESSEL
300300 HEATER ASSEMBLY
COMPLETE
AS0108 ROUND SLOTTED
RETAINING CLAMP SCREW *

14
PERSYST ENTERPRISES, INC.
SIDEWINDER MODEL M-2 LIMITED ONE YEAR WARRANTY
Warranty Policy
Every Sidewinder Model M-2 unit is thoroughly inspected and tested before leaving the factory. It is warranted to
be free of defects from workmanship and materials for a period of ONE YEAR from the date of original purchase.
Should any trouble develop during this one-year period, return the COMPLETE unit, freight prepaid, to Persyst
Enterprises, Inc. or an authorized Service Center. If inspection shows the trouble is caused by defective
workmanship or material, Persyst Enterprises, Inc. will repair (or at our option, replace) without charge. All
decisions as to the cause of failure are the sole determination of Persyst Enterprises, Inc.
This warranty does not apply where:
•repairs have been made or attempted by others,
•repairs are required because of normal wear and tear,
•the unit has been abused, misused or improperly maintained,
•incompatible chemicals cause corrosion,
•alterations have been made to the unit.
IN NO EVENT SHALL PERSYST ENTERPRISES, INC. BE LIABLE FOR ANY INDIRECT, INCIDENTAL OR
CONSEQUENTIAL DAMAGES FROM THE SALE OR USE OF THE PRODUCT. THIS DISCLAIMER
APPLIES BOTH DURING AND AFTER THE TERM OF THIS WARRANTY.
PERSYST ENTERPRISES, INC. DISCLAIMS LIABILITY FOR ANY IMPLIED WARRANTIES, INCLUDING
IMPLIED WARRANTIES OF “MERCHANTABILITY” AND “FITNESS FOR SPECIFIC PURPOSE,” AFTER
THE ONE-YEAR TERM OF THIS WARRANTY.
This warranty gives you specific legal rights, and you may also have other rights which vary from state to state.
Some states do not allow the exclusion or limitation of incidental or consequential damages, so the above limitations
or exclusion may not apply to you. Some states do not allow limitation on how long an implied warranty lasts, so
the above limitation may not apply to you.
DANGER! -WARNING!-
DO NOT PROCESS COMPOUNDS OF NITROCELLULOSE,
CELLULOSE NITRATE , ACIDS
OR ANY UNSTABLE REACTIVES
PERSYST ENTERPRISES, INC. 4695 MELVIN STREET, LAS VEGAS, NV 89115 (702) 362-9432
Table of contents


