siem WT7U48C1FG User manual


NL
Refer to the Digital User's Guide for more
information.
Table of contents
1 Safety................................................ 4
1.1 General instructions .................. 4
9 Programs ................................ 25
9.1 Automatic programs ..... 25
9.2 Time programs................................ 261.2 Destination of the device
rate .................................. 4
1.3 Restriction of users ...... 4
1.4 Safe installation................................. 5
1.5 Safer use ................................... 7
10 Accessories................................ 28
11 Laundry................................ 29
11.1 Preparing the laundry.......... 29
1.6 Safe cleaning and maintenance
hold .................................. 10 12 The Ministry in its essence.......... 29
12.1 Switching on the device .... 29
12.2 Set program .................. 29
2 Avoiding material damage ...... 11
3 Environmental protection and saving
ring................................................. 11
12.3 Adjust program
settings ................................ 29
3.1 Disposing of the packaging .... 11
3.2 Saving energy ....................... 11
3.3 Energy Saving Mode ........ 12
12.4 Saving program
settings ................................................ 30
12.5 Filling the drum with detergent
good .................................. 30
4 Set up and connection .................. 12
4.1 Unpacking the device .................. 12
4.2 Scope of delivery ..................... 12
12.6 Starting the program ... 30
12.7 Refilling the laundry .................. 30
12.8 Program cancel.................. 30
12.9 Taking out the laundry ............... 30
12.10 Switching off the appliance ..... 30
12.11 Fluff filter ......................... 31
12.12 Condensate tank ........ 32
4.3 Installation site
requirements ................................... 13
4.4 Water drain hose...................... 13
4.5 Adjusting the device .......... 16
4.6 Connecting the appliance
electrically................................................. 16 13 Child Lock ................................ 33
13.1 Activating child lock ........... 33
13.2 Deactivating the child lock.......... 33
5 Getting to know your device.......... 17
5.1 Device ................................... 17
5.2 Control panel..................... 18 14 Basic Settings .................. 34
6 Display ................................... 19
7 Buttons .................................. 21
15 Device maintenance.................. 34
15.1 Preparing the device for
device maintenance
den .................................. 34
8 Drying target ................................ 24
8.1 Change dryness target................ 24
8.2 Adjust drying target................ 24
15.2 Condensate container for
the appliance
keep preparing .................. 34
2

NL
15.3 Starting device maintenance ... 35
15.4 Performing simple device
maintenance on the
device................................................. 35
15.5 Intensive device
maintenance on the device
preparing ................................ 37
15.6 Intensive device maintenance
hold run ....................... 37
15.7 Intensive device maintenance
hold end .................. 39
16 Cleaning and maintenance .......... 40
16.1 Tips for cleaning and
maintenance.................. 40
16.2 Bottom unit .................. 40
16.3 Humidity sensor ............... 42
16.4 Filter of the condensed water
tank ......................... 43
17 Troubleshooting ................................ 44
18 Transporting, Storing and
dispose of.................................. 49
18.1 Preparing the device for
transport ................................... 49
18.2 Disposal of your old
appliance ..................................... 49
19 Customer Service............................ 50
19.1 Product number (E no.) and
production number (FD) ........... 50
20 Consumption values .................. 51
21 Technical data.............. 52
3

NL Safety
1 Safety
Observe the following safety instructions.
1.1 General instructions
s Read this manual carefully.s Keep the operating instructions and
product information for future reference.
for use or for subsequent owners.
s Do not connect the device in case of transport damage.
1.2 Destination of the device
Only use the device:s to use dryer-safe and water-washed textiles
dry and refresh.
s for domestic use and in enclosed spaces within the
sly environment.
s to an altitude of 4000 m above sea level.
1.3 Restriction of users
This appliance can be used by children aged from 8 years and above
and persons with reduced physical, sensory or mental capabilities or
lack of experience and/or knowledge if they have been given
supervision or instruction concerning use of the appliance in a safe
way and understand the resulting hazards. understood. Children must
not play with the appliance.
Cleaning and user maintenance shall not be made by children
unless they are supervised.
Make sure that children up to 3 years old and pets cannot reach the
device.
4

Safety NL
1.4 Secure installation
Observe the safety regulations when installing the device.
WARNING ‒ Risk of electric shock!
Improper installations are dangerous.
▶
Only connect and use the device in accordance with the
information on the type plate.
▶
Only connect the device to a mains supply with alternating
current via a properly installed earthing socket.
▶
The protective earth system of the electrical house installation must be
installed in accordance with the electrical engineering regulations. The
installation must have a sufficiently large conductor diameter.
▶
When using an earth leakage circuit breaker, only use a type
marked with .
▶
Never power the device via an external switching device, e.g. a
time switch or remote control.
▶
Never connect the appliance to a circuit that is regularly turned
on and off by the utility.
▶
When the device is installed, the mains plug of the mains
connection cable must be freely accessible or, if free access is not
possible, an all-pole disconnecting device must be installed in the
permanently installed electrical system in accordance with the
installation instructions.
▶
When setting up the device, make sure that the power cord is
not pinched or damaged.
Damaged power cord insulation is dangerous.
▶
Never bring the connecting cable into contact with hot
appliance parts or heat sources.
▶
Never bring the power cord into contact with sharp points or
edges.
▶
Never kink, pinch or alter the power cord.
5

NL Safety
WARNING ‒ Risk of fire!
Using an extended power cord and unauthorized adapters is
dangerous.
▶
Do not use extension cords or multiple sockets.
▶
If the power cord is too short, contact customer service.
▶
Only use adapters approved by the manufacturer.
WARNING ‒ Risk of injury!
The heavy weight of the device can cause injuries when lifted.
▶
Do not lift the device alone.
If this appliance is installed incorrectly in a washer-dryer column,
the installed appliance may fall.
▶
Only stack the dryer on top of a washing machine with the dryer
manufacturer's connection kit
→
"Accessories", Page 28
Another placement method is
not allowed.
▶
Do not install the appliance in a washer-dryer column if the dryer
manufacturer does not offer a suitable connection set.
▶
Do not install appliances from different manufacturers and with
different depths and widths in a washer-dryer column.
▶
Do not set up a washer-dryer column on a platform, the
devices can tilt.
WARNING ‒ Risk of suffocation!
Children can pull packing material over their head and become
entangled and suffocate.
▶
Keep packaging material away from children.
▶
Do not let children play with packaging material.
CAUTION ‒ Risk of injury!
The device may vibrate or move during operation.
▶
Set up the device on a clean, flat and solid surface.
6

Safety NL
▶
Level the appliance using the appliance feet and a spirit level.
There is a tripping hazard with incorrectly laid hoses and mains
connection cables.
▶
Lay the hoses and connection cables in such a way that they cannot
be tripped over.
If the appliance is moved by protruding parts, such as the loading
door, the parts can break off.
▶
Do not move the appliance by protruding parts.
CAUTION ‒ Risk of cutting!
Sharp edges on the device can cause cuts if touched.
▶
Do not touch the device on sharp edges.
▶
Use protective gloves when installing and transporting the
device.
1.5 Safer use
WARNING ‒ Risk of electric shock!
A damaged appliance or power cord is dangerous.
▶
Never use a damaged device.
▶
Never pull on the power cord to disconnect the device from the
power supply. Always pull the plug on the power cord.
▶
If the appliance or the mains cable is damaged, immediately
unplug the mains cable from the socket or switch off the fuse in
the fuse box.
▶
Contact customer service. →
Page 50
Penetrating moisture can cause an electric shock.
▶
Only use the device in closed rooms.
▶
Never expose the device to excessive heat and humidity.
▶
Do not use a steam cleaner, pressure washer, hoses or nozzles
to clean the appliance.
7

NL Safety
WARNING ‒ Risk of health hazard!
Children can lock themselves in the appliance and endanger
their lives.
▶
Do not install the appliance behind a door that blocks or
prevents the opening of the appliance door.
▶
In the case of discarded appliances, remove the plug of the
mains cable from the socket, then cut the mains cable and
damage the lock of the appliance door so that the appliance door
no longer closes.
WARNING ‒ Risk of suffocation!
Children can inhale or swallow small parts and choke.
▶
Keep small parts away from children.
▶
Do not allow children to play with small parts.
WARNING ‒ Risk of explosion!
Coal dust or flour in the vicinity of the device can cause explosions.
▶
Keep the area around the device clean during use.
WARNING ‒ Risk of poisoning!
The condensed water from this appliance is not drinking water and may be
contaminated with fluff.
▶
Do not drink or continue to use the condensed water from the
device.
Detergents and care products can lead to poisoning if ingested.
▶
In case of accidental ingestion, seek medical advice.
▶
Keep detergents and care products out of the reach of children.
8

Safety NL
WARNING ‒ Risk of fire!
The refrigerant R290 in this appliance is environmentally friendly
but flammable and can ignite on contact with open flames or
ignition sources.
▶
Open flames and other ignition sources away from the
hold device.
WARNING ‒ Risk of explosion!
Residues in the fluff filter can ignite during drying.
▶
Clean the fluff filter regularly.
Highly flammable items, such as lighters or matches, can ignite
during drying.
▶
Before drying, remove all easily flammable objects from the
pockets of the laundry.
If unwashed laundry has come into contact with solvents, oil, wax,
wax remover, paint, grease or stain remover, it can ignite during
drying.
▶
Do not dry unwashed laundry in this appliance.
▶
Rinse the laundry thoroughly with hot water and detergent
before drying.
▶
Do not use the appliance if the laundry is previously cleaned
with industrial chemicals.
WARNING ‒ Risk of fire!
The laundry was not cooled sufficiently if drying was interrupted
prematurely and could ignite.
▶
Do not interrupt the drying program prematurely.
▶
Remove and spread out the laundry immediately if drying is
interrupted prematurely.
CAUTION ‒ Risk of injury!
The cover plate may break when climbing or clambering on the
device.
▶
Do not climb or scramble on the device.
9

NL Safety
The appliance may tip over when sitting or leaning on the open
door.
▶
Do not sit or lean on the appliance door.
▶
Do not place any objects on the appliance door.
Reaching into the rotating drum can cause injury to hands.
▶
Wait for the drum to come to a complete stop before reaching inside the
drum with your hand.
1.6 Safe cleaning and maintenance
Observe the safety instructions when cleaning and maintaining the
device.
WARNING ‒ Risk of electric shock!
Improper repairs are dangerous.
▶
Only trained specialist personnel may carry out repairs on the
device.
▶
Only original spare parts may be used to repair the device.
▶
If the power cord of this appliance is damaged, it must be
replaced by the manufacturer, its service agent or a similarly
qualified person in order to avoid a hazard. Penetrating
moisture can cause a shock.
▶
Do not use a steam cleaner, pressure washer, hoses or nozzles
to clean the appliance.
WARNING ‒ Risk of injury!
The use of non-original spare parts and non-original accessories
is dangerous.
▶
Only use original spare parts and original accessories from the
manufacturer.
WARNING ‒ Risk of poisoning!
Toxic fumes can be generated when using solvent-based cleaning
agents.
▶
Do not use solvent-based cleaning agents.
10

Avoid material damage NL
m2
avoid material damage ▶ Do not use strong alcohol-based
cleaning agents.
▶ Do not use hard scouring or
dishwashing sponges.
▶ Clean the device only with water
and a soft, damp cloth.
▶ Remove all detergent residues,
spray mist or residues immediately
upon contact with the appliance.
Material damage
avoid
mhuh
avoid material damage
use this instruction to
avoid damage and damage to the
device.
PAY ATTENTION!
Incorrect dosage of fabric softeners,
detergents, care products and
cleaning agents can affect the
functioning of the appliance.
▶ Follow the manufacturer's dosing
recommendations.
Exceeding the maximum load
quantity affects the operation of the
appliance.
▶ Observe and do not exceed the
maximum load for each
programme.
→
"Programs", Page 25
Overheating of the device can affect
the operation of the device.
▶ Keep the air inlet of the device
clear during operation.
▶ Provide adequate ventilation in
the room.
Light objects, such as hair and fluff,
can be drawn into the air inlet of the
device during operation and affect the
function of the device.
▶ Keep the environment clean while
using the device.
▶ Keep light objects away from the
device.
Foam or foam rubber may deform
or melt when dried.
▶ Do not dry foam or foam rubber
laundry.
Unsuitable cleaning agents can
damage the surfaces of the device.
▶ Do not use sharp or abrasive
cleaning agents.
m3 Environmental protection and
savings
environmental protection and savings
Environmental protection and saving
3.1 Disposal of the packaging
The packaging materials are
environmentally friendly and can be
reused.
▶ Dispose of the individual components
separately according to type.
3.2 Saving energy
If you follow these directions, your
device will use less power.
Use the device in a well-ventilated
area and keep the air inlet of the
device clear.
a A hindered air exchange
extends the program duration and
increases energy consumption.
Before drying, spin the laundry in
the washing machine.
a Wetter laundry extends the
program duration and increases
energy consumption.
11

NL Set up and connect
Observe the maximum load for the
programmes.
→
"Programs", Page 25
1. Completely remove packaging
material and protection from the
device.
a Exceeding the maximum
male load quantity extends the
program duration and increases
energy consumption.
→
"Disposal of the packaging",
Page 11
.
2. Check the device for visible
damage.
3. Open the appliance door.
→
"The Ministry in essence",
Page 29
Clean the fluff filter after drying →
Page 31
.
a A contaminated fluff filter
reduces the airflow in the
appliance, extends the program
duration and increases energy
consumption.
4. Remove the accessories from the
drum.
5. Close the appliance door.
4.2 Scope of delivery
3.3 Energy Saving Mode After unpacking, check all parts for
transport damage and the
completeness of the delivery.
If you do not operate the device for a
longer period of time, the device
automatically switches to energy-
saving mode. All clues disappear and
flash.
Energy-saving mode is exited when
you operate the device again, e.g.
open or close the door.
If you do not operate the device for a
long time in energy-saving mode,
the device switches off
automatically.
PAY ATTENTION!
Use with incomplete or defective
accessories may impair the operation
of the device or cause material
damage and damage to the device.
▶ Do not use the device with
incomplete or defective accessories.
▶ Replace the accessories before
using the device.
→
"Accessories", Page 28
Delivery amount- Description
catch
O4
set up and connect
Set up and connect Clothes dryer
Set up and connect
4.1 Unpacking the device
PAY ATTENTION!
Objects that remain in the drum and
that are not intended for use with the
device can lead to material and device
damage.
▶ Before use, remove all these items
and the supplied accessories from
the drum.
Accompanying
documents
Water drain hose
with connection
brave, confirm
going material
12

Set up and connect NL
delivery amount
catch
Description installation site To demand
in a laundry
drying column
The device al-
borrow with the
original connection
set of the drug
ger manufacturer in
a washer-dryer
to set up a column.
→
"Accessories",
Page 28
and bend.
→
"water drainage
feeding hose",
Page 13
4.3 Installation site
requirements
PAY ATTENTION!
If the device is tilted more than 40°,
residual water can run out of the
device and cause material damage.
▶ Carefully tilt the device.
▶ Transport the device upright.
Freezing residual water in the device
can damage the device.
▶ Do not place and use the device in
frost-sensitive places or outdoors.
If the device is used immediately after
transport, the refrigerant in the
device may cause damage to the
device.
▶ Let the device rest for two hours
immediately after transport before
using it for the first time.
→
"Accessories",
Page 28
This device al-
borrow a washing
machine from the-
same manufacturer
place. The
depth and width
use of this
appliance with
the measurements
of the washing machine
china match
man.
The washer-dryer column
do not place on
a platform.
on a wall no snakes
between wall and
device clamping
man.
installation site
On the floor
To demand
The device on
a clean, ef-
fen and fixed on
place surface.
The device
set
→
Page 16
.
4.4 Water drain hose
During drying, condensation is
created that your appliance uses for
automatic cleaning. Use the
13
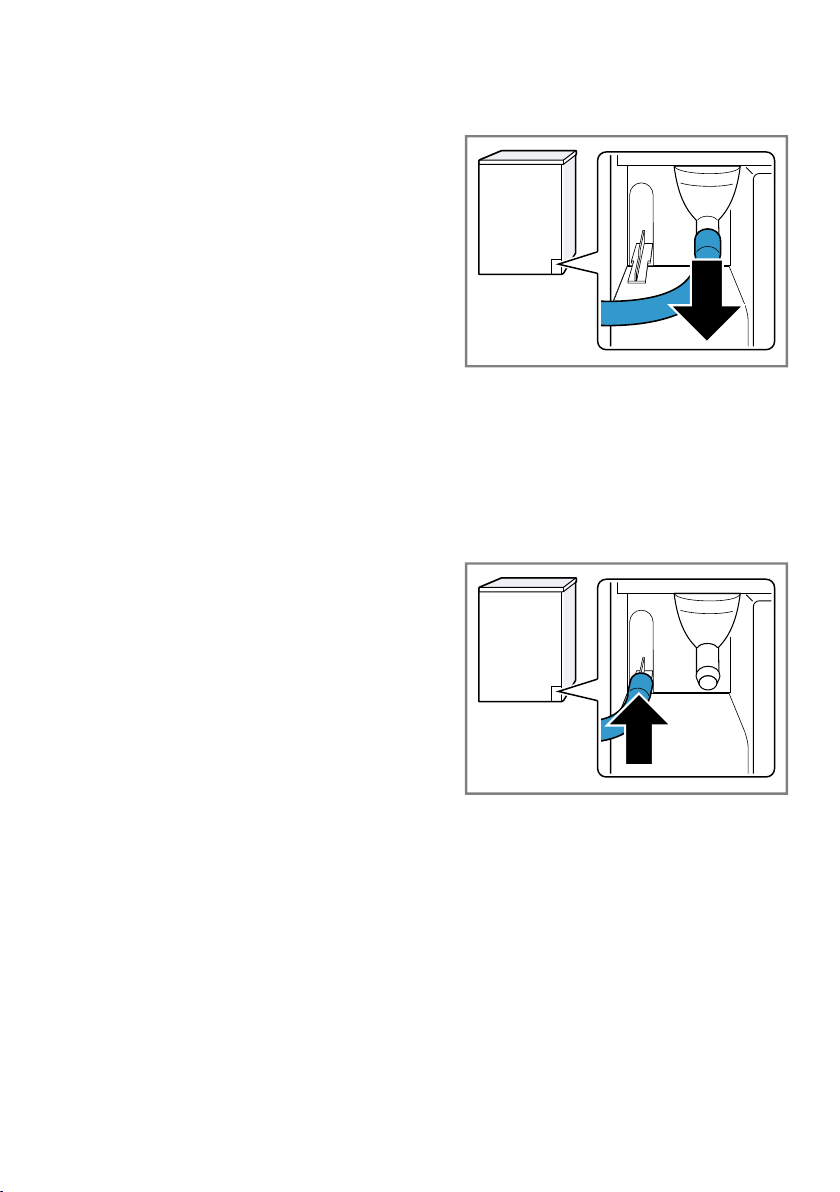
NL Set up and connect
water drain hose to direct excess
condensation water into the
wastewater.
1. Pull the condensate hose from
the connection.
Remarks
s Use this device with the
supplied water drain hose. When you
connect the water drain hose
→
Page 14
, you do not need to
empty the condensed water container
moderately →
Page 33
.
s You can use this optional
→
"Accessories", Page 28
at the
order service.
Connect water drain hose The condensate hose is connected to
the connection at the factory.
If you do not wish to empty the
condensed water container of the device
regularly, connect the water drain hose.
Remark: When removing the
condensed water hose, liquid
may escape from the
connection.
PAY ATTENTION!
If the device is used without a
properly connected condensation
water hose or water drain hose, liquid
may leak from the connection piece.
▶ Before using the device, connect the
condensate hose or the drain hose
in a professional manner.
2. Push the condensate hose onto the
holder.
Requirements
s The device and its accessories
are unpacked.
→
"Unpacking device", Page 12
s The appliance is on the installation
place set up.
→
"Requirements regarding the
installation site", page 13
14

Set up and connect NL
3. Push the water drain hose onto
the connection as far as it will go.
6. Insert the stopper into the recess
in the top.
7. Push in the condensed water
container →
Page 33
.
4. Emptying the condensed water container
→
Page 33
.8. Connect the appliance to the
water outlet.
→
"Connection types for water drainage",
Page 15
Tip: To collect the condensed water
again in the condensed water
container (e.g. if the location of the
device is changed), undo these steps
in reverse order.
Water drainage connection types
5. Remove the stopper from the
bottom. PAY ATTENTION!
A clogged or closed drain can allow
accumulated waste water to flow back
into the unit.
▶ Before using the device, ensure
that the waste water drains quickly
and clears blockages.
Drain in a
siphon.
The connection position
tie with a
hose clamp
(12-22 mm) bore
gene.
the water drainage
feeding hose with
a hose guide
thing on minimum
80 cm and maximum
15

NL Set up and connect
times 100 cm
height confirmation
gene.
4.5 Adjusting the device
To reduce noise and vibration, level
the device.
▶ To adjust the appliance, turn the
appliance feet. Check the horizontal
adjustment of the appliance with a
spirit level.
Remark: Of
the Y-divider
→
Page 28
can you replace the
water drain hose from
an additional device
rate like e.g.
a washing machine
on the same
connect feed from
the siphon.
Drain in a
sink.
the water drainage
feed hose com-
crack through the
slide bend
and with the
settlement material
fix eel.
Up the bend
maximum 100
cm height
settle.
2
1All appliance feet must be firmly
planted on the floor.
4.6 Connecting the appliance
electrically
Drain in a
ditch.
the water drainage
feed hose com-
crack through the
slide bend
and with the
settlement material
fix eel.
The bend on the
gutter.
1. Insert the mains plug of the
appliance's connecting cable into
a socket in the vicinity of the
appliance.
The connection data of the device
can be found in the technical data
→
Page 52
.
2. Check the mains plug for tightness.
16

Getting to know your device NL
YOU5 Getting to know your device
get to know your device
Getting to know your device
5.1 Device
Here you will find an overview of the components of your device.
6
5
4
3
2
1
Depending on the device type, details in the image may differ, e.g. color and
shape.
1
2
Air intake 4
5
Door
Service valve of the
bottom unit →
Page 40
Condensate tank
→
Page 32
3Fluff filter →
Page 31
6Control panel
→
Page 18
17


Display NL
d6
isplay
Display
dO
isplay
p the display shows the current
setting values, options or instruction
texts.
Example display indication
Indication
0:40 1
name Description
Program duration /
remaining time of
the program
Approximate expected program duration
or remaining time of the program.
00:00 Time program Time program is set.
→
"Time programs", page 26
00:45 1Ready in time →
"Buttons", Page 23
+ 1
+ 2
+ 3
Drying target set
suits
The custom drying target is activated.
→
"Buttons", Page 22
→
"Buttons", Page 22
→
"Buttons", Page 22
Condensate tank
server
Emptying the condensed water container
→
Page 33
.
Push in the condensed water container
→
Page 33
.
fluff filter Cleaning the fluff filter →
Page 31
.
1 Example
19

NL Display
Indication
CArE
name Description
Just device-
maintenance
Run regular device maintenance program.
→
"Easy device maintenance on the
run device", page 35
hot cooling process The laundry is cooled with a rotating drum
to avoid damage to the laundry. The
process can be interrupted by opening the
door.
Remark: Do not change the program.
Automatic self-
cleaning
The automatic self-cleaning flushes the
heat exchanger from the device.
Remark: Do not remove the condensed
water container and do not interrupt the
programme.
Basic settings
To dry
Change basic settings.
Program status
Program statusDrying purpose iron
dry
Drying purpose cabinet-
dry
Program status
Drying purpose cabinet-
dry Plus
Program status
Anti wrinkle
Pause
Program end
Program status
Program status
Program statusend
1 Example
20
Table of contents
Popular Dryer manuals by other brands


Whirlpool
Whirlpool FFT M11 8X1WS GCC quick guide

Zanussi
Zanussi ZI 935 Instructions for the use and care

Miele
Miele T 4123 operating instructions

Alliance Laundry Systems
Alliance Laundry Systems ZE1010-1502 Service manual

Mediclinics
Mediclinics Speedflow manual

Whirlpool
Whirlpool Gold Resource Saver YGEW9877JQ1 Use & care guide