Siemens CHM 604 MP3 User manual


2
PRECAUTIONS
INTRODUCTION English
GENERAL
CDC603A Aug.06-03
This CD changer is designed for use only with car radios which have CD changer controls based
on either the DIGITAL (SPDIF) or ANALOG standard. Consult your dealer for suitable types of
car radio.
The functions of the CD changer are described in the operating instructions for the car radio.
General
Precautions ........................................................................................................................................................................ 2
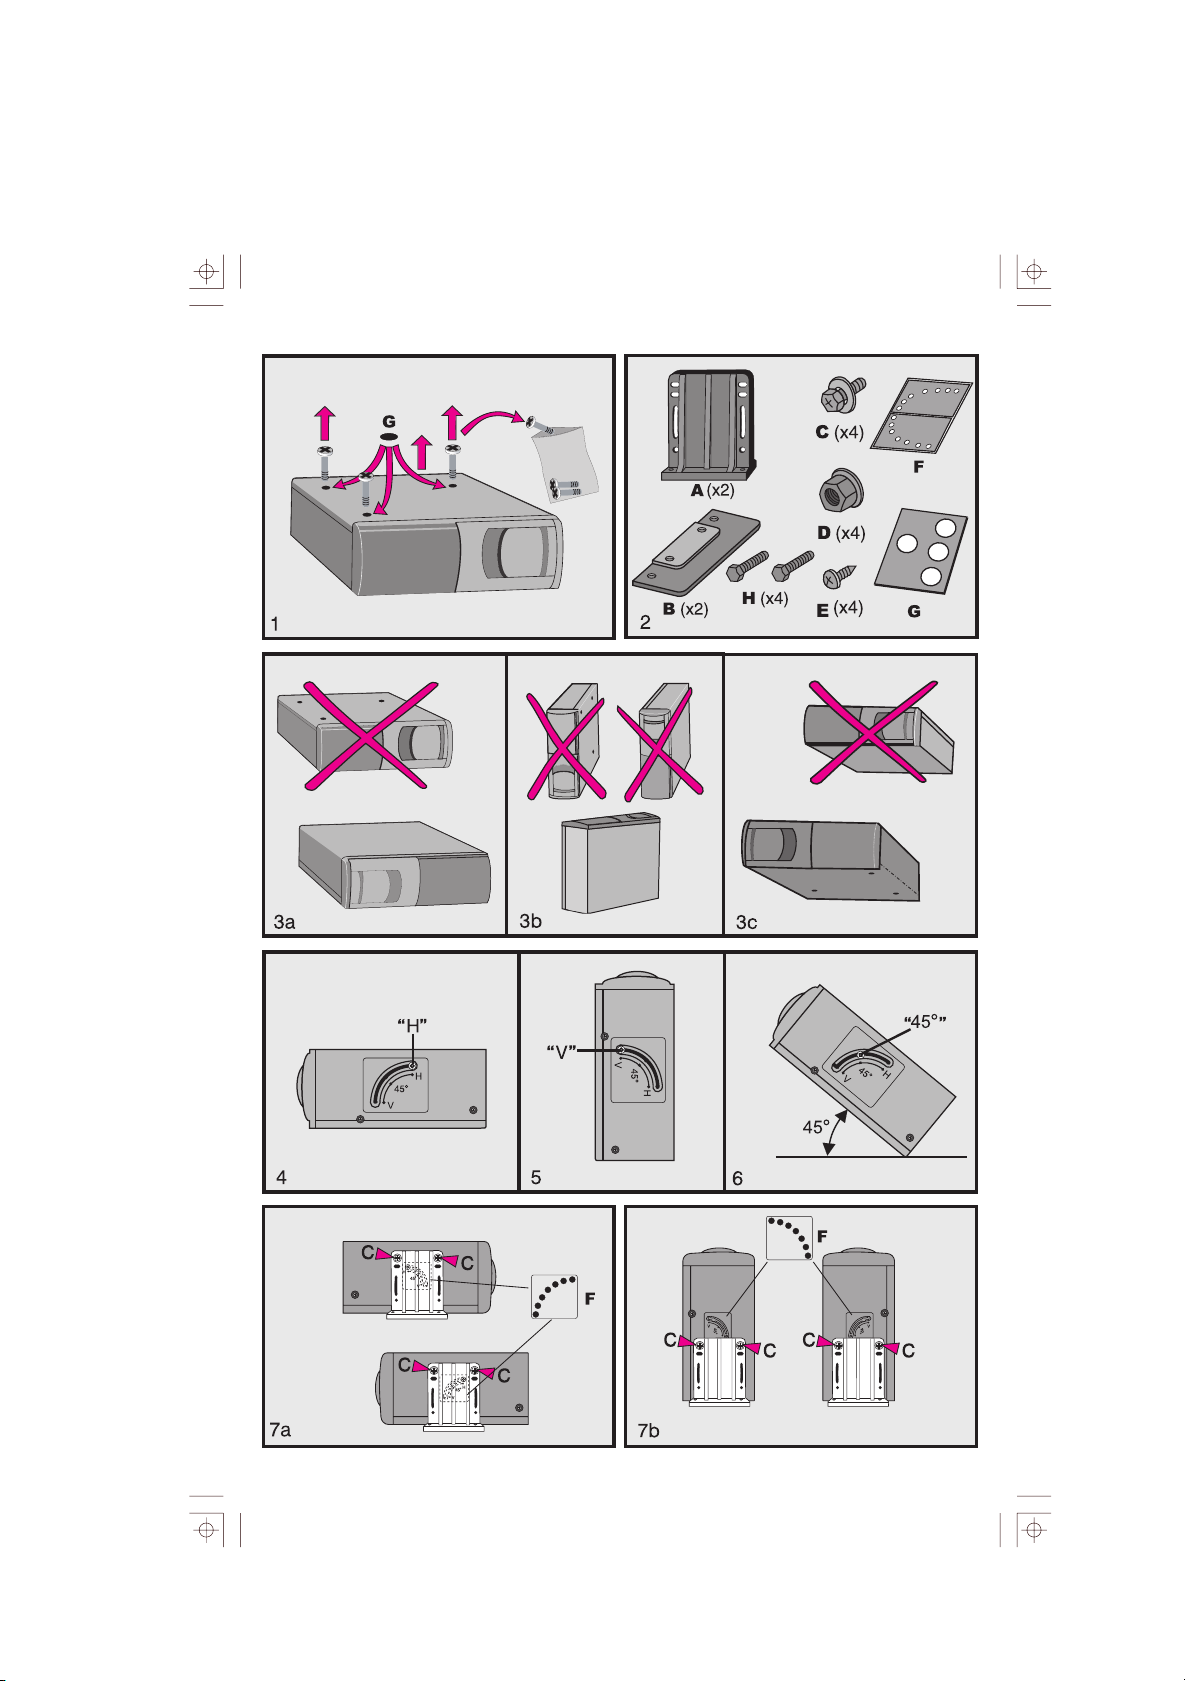
Installation
Preparation ....................................................................................................................................................................... 3
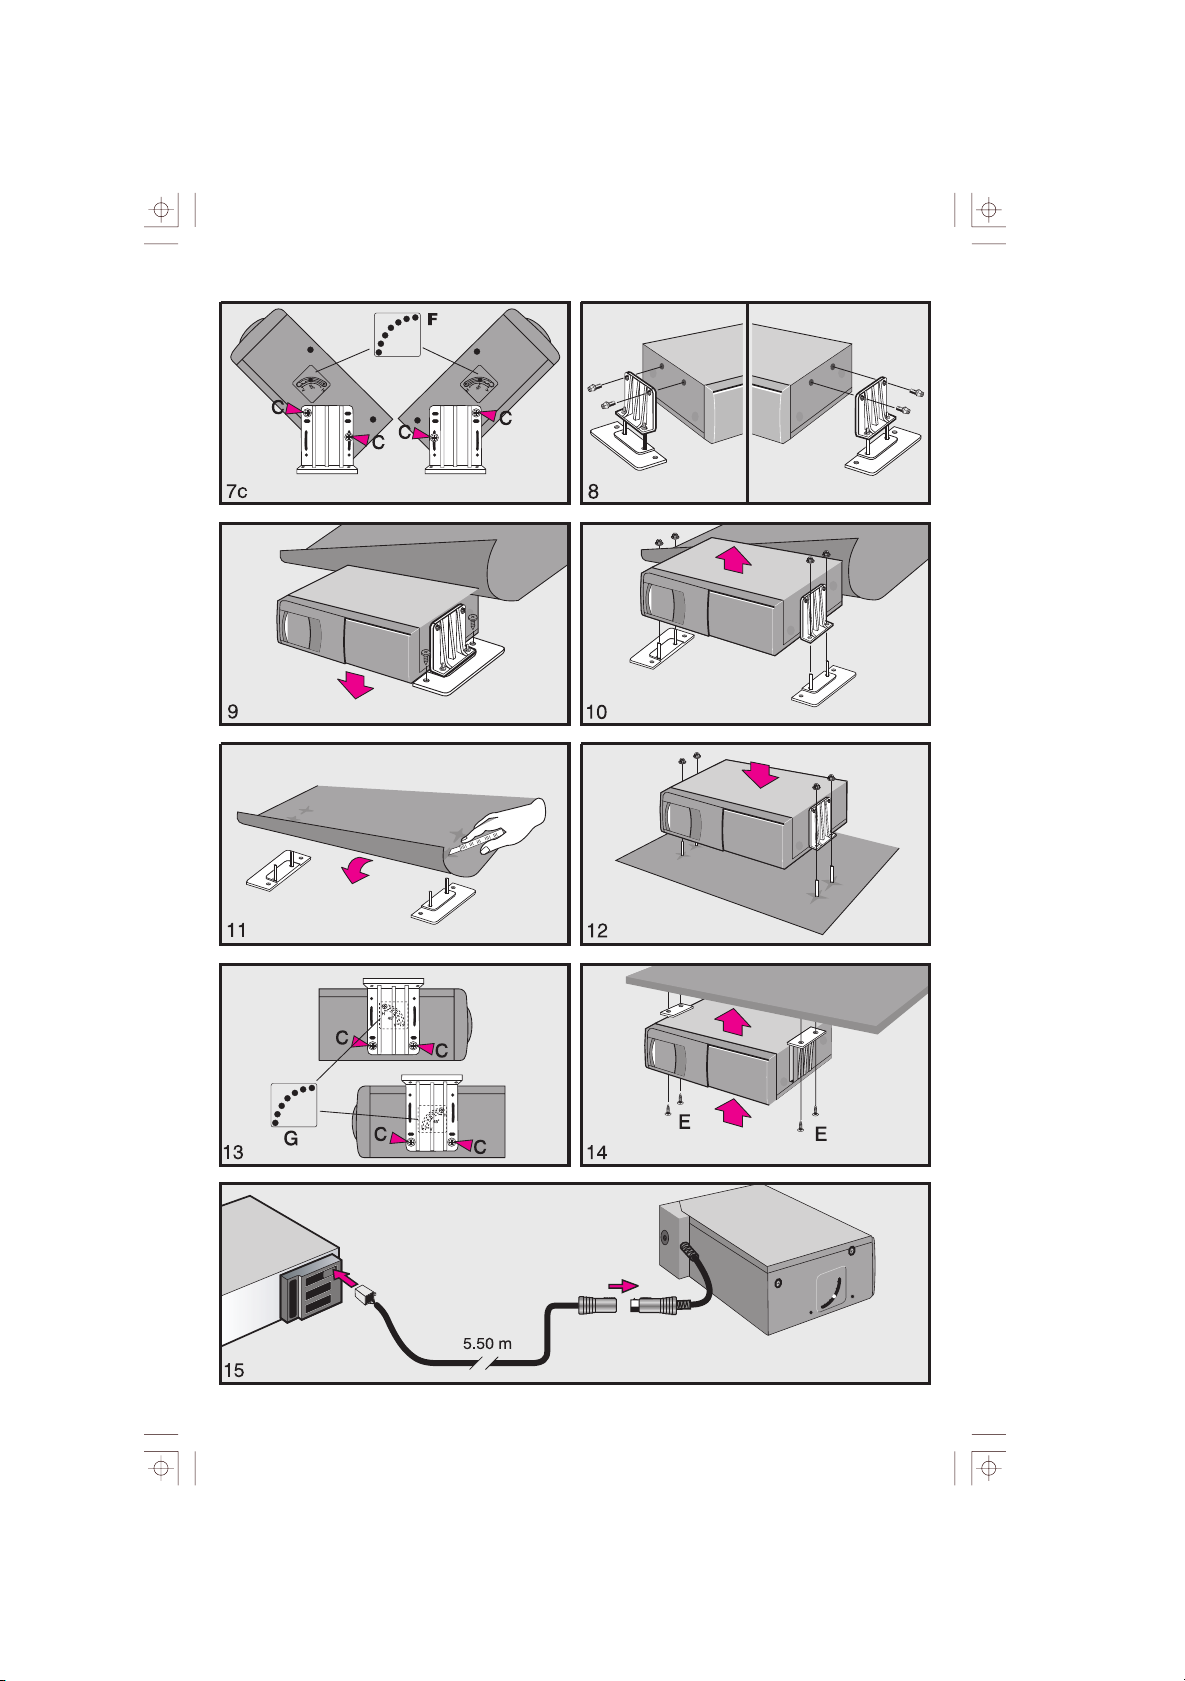
Mounting........................................................................................................................................................................... 5
Operation........................................................................................................................................................................... 7
Troubleshooting............................................................................................................................................................. 9
Specifications................................................................................................................................................................... 10
Laser Product Class 1.................................................................................................................................................. 10
WARNING: To prevent short-circuiting, disconnect the negative car battery terminal until the
whole system has been mounted and connected.
Voltage and polarity: 12 V, negative earth.
• Do not attempt to repair or service the CD changer yourself. Return the unit, plus cartridge
with the transport screws in place, to your dealer or an authorised Service Agency (see
addresses at the end of this booklet).
•Temperatures inside the parked car will fluctuate considerably during summer and
winter.They should not exceed +70°C or –20°C when operating the CD changer.
•To avoid too high temperature, never install the changer on top of the dashboard or on the
rear parcel shelf.
- If the temperature is too high, a built-in protection mechanism prevents the CD changer
from operating until the temperature reaches a safe level.

GB
3
FIXING MATERIAL SUPPLIED Fig. 2
Only use screws and fixing material supplied!
A 2 L-shape brackets
B 2 base-plate
C 4 washer screw
D 4 nut
E 4 tapping screw
F 2 dust protection sticker
G 4 adhesive label
REMOVING TRANSPORT SCREWS Fig. 1
Remove the three transport screws from the underside of the CD changer.
Clean around the three holes on the CD changer.
Glue the supplied round stickers G over the holes to prevent dust entering the CD changer.
Store the three transport screws in the supplied plastic bag.
■DETERMINE THE MOUNTING POSITION FOR THE CD CHANGER
Possible locations are:
- in the luggage boot (trunk),
- in the glove compartment,
- under the seats or,
- behind the seats of a pick-up truck.
The installation must not interfere with the legroom or influence the safe driving of the
vehicle.
If the CD changer is to be mounted in the luggage boot, first install the extension cable (
Fig. 15) between the dashboard and the luggage boot.
•Ensure that the plug at the dashboard side correctly fits the connector of the car radio adapter
cable (or the cable already fitted to certain types of car radio).
• If you have to drill holes for the extension cable, ensure that the edges of the holes are free
from swarf. Provide the holes with a grommet or piece of tape.
• Ensure that the cable is not bent at sharp angles and cannot be damaged by any moving
parts in the vehicle.
• Determine the mounting position for the CD changer. Ensure that the CD cartridge can easily
be inserted and removed!
• Do not mount the unit upside-down if mounted horizontally or at an angle of 45°(Fig. 3a or 3c),
or on its side if mounted vertically (Fig. 3b).
•The opening for the CD cartridge must face upwards in case of vertical mounting (Fig. 3b).
4
3
2
1
INSTALLATION
PREPARATION
CDC603A Aug.06-03
H 4 bolt

4
SHOCK ABSORBER ADJUSTMENT
Be sure to adjust Mounting Angle Setting Lever to appropriate angle(Fig.4,5,6);
0° for horizontal, 22.5° angle, 45° angle, 67.5° angle, 80° angle,or 90° angle for vertical.
After setting the position of the shock absorbers, glue the supplied sticker F over the holes of
the setting mechanisms. Change the position of the setting mechanisms at both sides of the
CD changer.
CDC603A Aug.06-03

GB
shelf.
Caution: Take care not to drill into the fuel tank, the exhaust pipe system, the catalytic
converter or the cables laying behind or below any drilled holes!
MOUNTING IN THE LUGGAGE BOOT
MOUNTING IN SUSPENDED POSITION
The CD changer can also be mounted on the underside of a flat surface, e.g. the rear parcel
6
4
2
1
4
3
2
MOUNTING
Fix bracket A on the side of the CD changer using the washer screw C(Figs. 7a-c).
Fix the base plate with the long bolts H to the bracket using the nut D(Fig.8).
If present, lift the carpet covering the floor of the luggage boot(Fig.9).
Fix the base plate X2 to the chassis using tapping screw E.The base plate must be
fixed to a flat surface.
Fix bracket A to the sides of the CD changer using the washer screw C(Fig.13).
Place the CD changer in the mounting position (Fig.14).
Mark positions for four mounting holes (with a felt-tip pen).
Drill holes of 3.6 mm diameter in the marked positions.
Check that the three transport screws have been removed from the underside of the
CD changer!
Hold the CD changer in place and attach it with the tapping screws E
Remove the nuts D. Lift up the CD changer (Fig. 10).
Lay the carpet over the base-plates (or the wooden mounting board) and cut four
smallcrosses in the carpet. Press the long bolts through.(Fig.11).
Check that the three transport screws have been removed from the underside of the
CD changer!
Mount the CD changer using the nuts D (Fig. 12).
1
If there is no flat surface in the luggage boot, a wooden mounting board (approx. 10 mm
thick) under the carpet should be used instead of the base plates. (Fix the wooden
mounting board to the car using three screws). In that case fix the brackets to the board
(laying under the carpet) using screws.
1
2
4
3
5
3
5
CDC603A Aug.06-03

6
MOUNTING
Ensure that the negative car battery terminal is disconnected.
Connect the car radio as described in the car radio's mounting instructions.
Connect the blue plug C3 of the extension cable to the rear of the car radio (socket C3')
(fig.15). If your car radio does not already have a socket for the suitable connector,
consultyour dealer for an adapter cable.
Connect the extension cable to the fly lead cable of the CD changer.
Reconnect the negative car battery terminal. Installation is now complete.
CONNECTING THE CABLES (Fig.15)
Only use the cables supplied to connect the CD changer to the car radio!
5
4
3
2
1
CDC603A Aug.06-03

GB
OPERATION
FILLING THE CARTRIDGE
Pull the tab on the cartridge's disc tray to remove one
of the trays.
INSERTING THE CARTRIDGE
Open the sliding door.
TAKING OUT THE CARTRIDGE
4
3
2
1
4
3
2
1
3
2
1
Place the disc on the tray with the label side up
Each tray can accommodate only one disc.
The CD changer will not function if the discs are placed
upside down.
Press the tab on the disc tray to store the tray back in the
cartridge.
Hold the cartridge the correct way up with the narrow side
facing the opening of the CD changer as shown.
Gently push the cartridge into the opening of the CD
changer(until you hear a click).
Close the sliding door to prevent dust and dirt from entering
the CD changer.
Fully open the sliding door.
Press the EJECT button.
-The cartridge is partially ejected.
Carefully take out the cartridge.
Close the sliding door.
7
CDC603A Aug.06-03
1
2
3

OPERATION
1
2
8
CDC603A Aug.06-03
MANU AL EJECT
HANDLING DISCS
Do not drop discs.
Keep discs free from dirt and fingerprints.
Scratched discs may cause skipping of music parts.
Do not glue paper or labels on discs.
Do not write on discs.
Do not play damaged or deformed discs.
Never expose discs to heat or direct sunshine.
Wipe a dirty disc surface clean with a soft cloth;
move from the centre to the edge.
Never use publicity CDs!
EMERGENCY EJECT OF THE CARTRIDGE
ATTENTION: Under no circumstances use this function when:
the CD changer is connected to the power supply,
a magazine is in the changer and the power supply is still
connected.
If you have inserted a CD cartridge without the CD changer
connected to the power supply, you can unlock and remove
the magazine:
Fully open the sliding door.
Through the slit of the transparent sticker on the
underside of the CD changer slide the plastic lever to the
side with a screwdriver.
The CD cartridge is partially ejected and you can remove
it.
OPERATION
SELECTING AUDIO OUTPUT FORMAT
The default setting of the audio output format is digital
(SPDIF).
To select 2-channel analogue output format, use a pen or
screw driver to set the switch accordingly.
Position "D" for digital output and "A" for analogue
output.
The changer should be reset after selecting "D" or "A", to
reset the CD changer;
(1) Press the eject button for more than 3 seconds or
(2) Unplug the DIN cable for more than 3 seconds then
re-plug the cable.

9
TROUBLESHOOTING
GB
* Scan-time adjustments made at the headunit are not supported. This changer will always
use a 10-second scan-time.
An error made in operation or in the connections is sometimes mistaken for a failure or
breakdown. Perform the checks described in the following table before calling a Service
Agency.
Symptom Cause Remedy
CD-Changer does not react. Improper connection. Check connections.
Blown fuse in the car. Replace with a fuse of
the correct type and
amperage (consult car radio
instructions).
If fuse blows again, consult
a Service Agency.
Cartridge cannot Direction in which it is Insert in correct direction.
be inserted. inserted is wrong. Pay attention to the printing
on the magazine.
CD is not played. Disc has been loaded upside Place the disc on the tray
down. with the label side up.
Large scratches on disc or Insert disc without scratches
warped disc. or which is not warped.
Noise is heard during Scratches on disc. Compare sound with
playback or sound is another disc. If sound from
intermittent. second disc is acceptable,
first disc is defective.
Extremely dirty disc. Clean disc.
Transport screws still Remove screws (x3) on
in place. bottom of unit and then use.
Setting mechanisms of shock Adjust setting mechanisms
absorbers are adjusted in in proper direction (refer
the wrong direction. to "Installation" in
Operating Instructions).
CD player does not function. If the weather is cold there Wait for about 5 minutes for
may be some condensation the moisture to evaporate.
on the laser.
If you cannot solve the problem and you still have to send your CD changer for service, always
send the complete set with cartridge and the transport screws in place. Do not try to open
the changer to service it yourself.
CDC603A Aug.06-03

10
SPECIFICATIONS
LASER PRODUCT CLASS 1
CDC603A Aug.06-03
CHM 604 MP3
Compatible CD types: 12cm CD, CD-R and CD-RW
Compressed digital audio: MPEG 1/2 layer 3 (MP3), ID3 Tag v1.0 and 2.0
Microsoft Window Media Audio up to v8.0 (WMA), WMA text
* Protected WMA files are not be supported.
DAC: 1 bit DAC per channel
Oversampling: 4 times
Channels: 2-channel stereo or SPDIF (select via a switch)
Frequency Response: 20 – 20,000 Hz ±3 dB
Wow and Flutter: Below measurable limits
Total Harmonic Distortion: 0.03dB
Signal-to-Noise ratio: > 90 dB
Channel separation: > 70 dB (at 1 kHz)
Power requirement: 14.4 V DC(11-16V)
Output Voltage: 700 mV/10 kohms
Weight: 1.9 kg
Dimensions (W x H x D): 254 mm x 63 mm x 157 mm
WARNING: If the appliance is used in a way differing from that which
is specified in the instructions for use, the user may be exposed to
invisible laser radiation exceeding the limit of laser class 1.
CLASS 1
LASER PRODUCT
Table of contents