Sigtronics BT-888Pro User manual
Basic operation and attention of wireless microphone
Common simple faults and guidance for operation and repair
● Open the battery compartment correctly and install the battery. Attention shall be paid to the cathode and anode of the
battery.
● Turn the power switch on microphone to “ON”. If the power indicator lamp does not flash or always lights, inspect
whether the battery voltage is insufficient or the polarity of battery is installed oppositely.
● Adjust the microphone volume knob on the audio amplifier and its position according to the sound volume when singing
to reach the ideal effect.
● If you use wireless microphone temporarily during the singing process, you can put the microphone switch in mute
status; once using is stopped, you can turn the microphone switch in off status. The microphone will pick up sound to
amplify it and input to the horn of the audio amplifier no matter it is in mute or off status.
● The effective using distance of wireless microphone is within 30m, please do not use it beyond the effective range in
order to avoid inferior effect; when the electricity quantity of battery is reduced or the wireless interference signal of the
using environment is too strong, the using distance shall be shortened accordingly.
● To reach the best singing effect, the distance between mouth and microphone shall be 5-15CM and the best angle is
45degrees.
● After the microphone is used for a very long time and lacks of electricity, the indicator lamp for electricity insufficiency
will light. Please timely change the battery in order not to affect the singing effect.
● Please do not use the two microphones of the same frequency point for singing within short distance since it may cause
silence or interference noise.
● If you have purchased more than two sets of active audio amplifiers matched with wireless microphone from the
company and intend to use them together, please select the varieties in different standard frequencies. If the frequency is
identical, two sets machines can not be used until they are separated from each other for 100m to avoid mutual
interference and other unnecessary troubles! Never get the machine to VCD/CD/DVD and other equipments with strong
interference frequency when they are used to avoid mutual interference between the same frequencies, which will affect
the wireless signal receiving of the microphone.
The power switch is turned on
The speaker is out of battery
Audio input is not correctly selected.
The audio cable is not connected properly
to the line input.
Main volume is switched to minimum.
No sound when playing U-disk.
No sound when playing by line input
Poor contact or damage of external audio
cable
Change the audio input by pressing the
mode button.
Reconnect the audio cable.
Properly adjust the volume knob.
Check the U-disk or the mode switch button.
Change the audio source of line input.
Readjust or change audio cable.
External microphone is not fully inserted
in the jack
The external microphone switch is not
turned on
The volume knob of microphone is off
Totally insert the microphone to the jack
Turn on the switch of wireless microphone
Properly adjust the volume knob of
microphone
The switch of wireless microphone is not
turned on
The wireless microphone is not Installed
with batteries
The sound of wireless microphone is in
distortion
microphone has
External
no sound
Use power adaptor to charge the battery
Turn on the power switch
Turn on the switch of wireless microphone
Install the batteries in the wireless
microphone
Change the battery of wireless microphone
Problems with
wireless
microphone
Speaker not power on
No sound
Fault description Possible causes Troubleshooting
If the above solution did not solve the issue, please contact the nearest local maintenance department. The
product technology of our company is upgraded continuously, the product descriptions in this manual are
subject to change without notice.
Professional Mobile Karaoke Speaker
Operating Instructions
Please carefully read the operating instruction before using our product
1
2
34
long press for 3 seconds to eliminate/
return original sound.
SINGTRONIC.COM
5
6
7 8
10
12
11
19
20
21
22
23
24
13
14
15
16
17
18
9
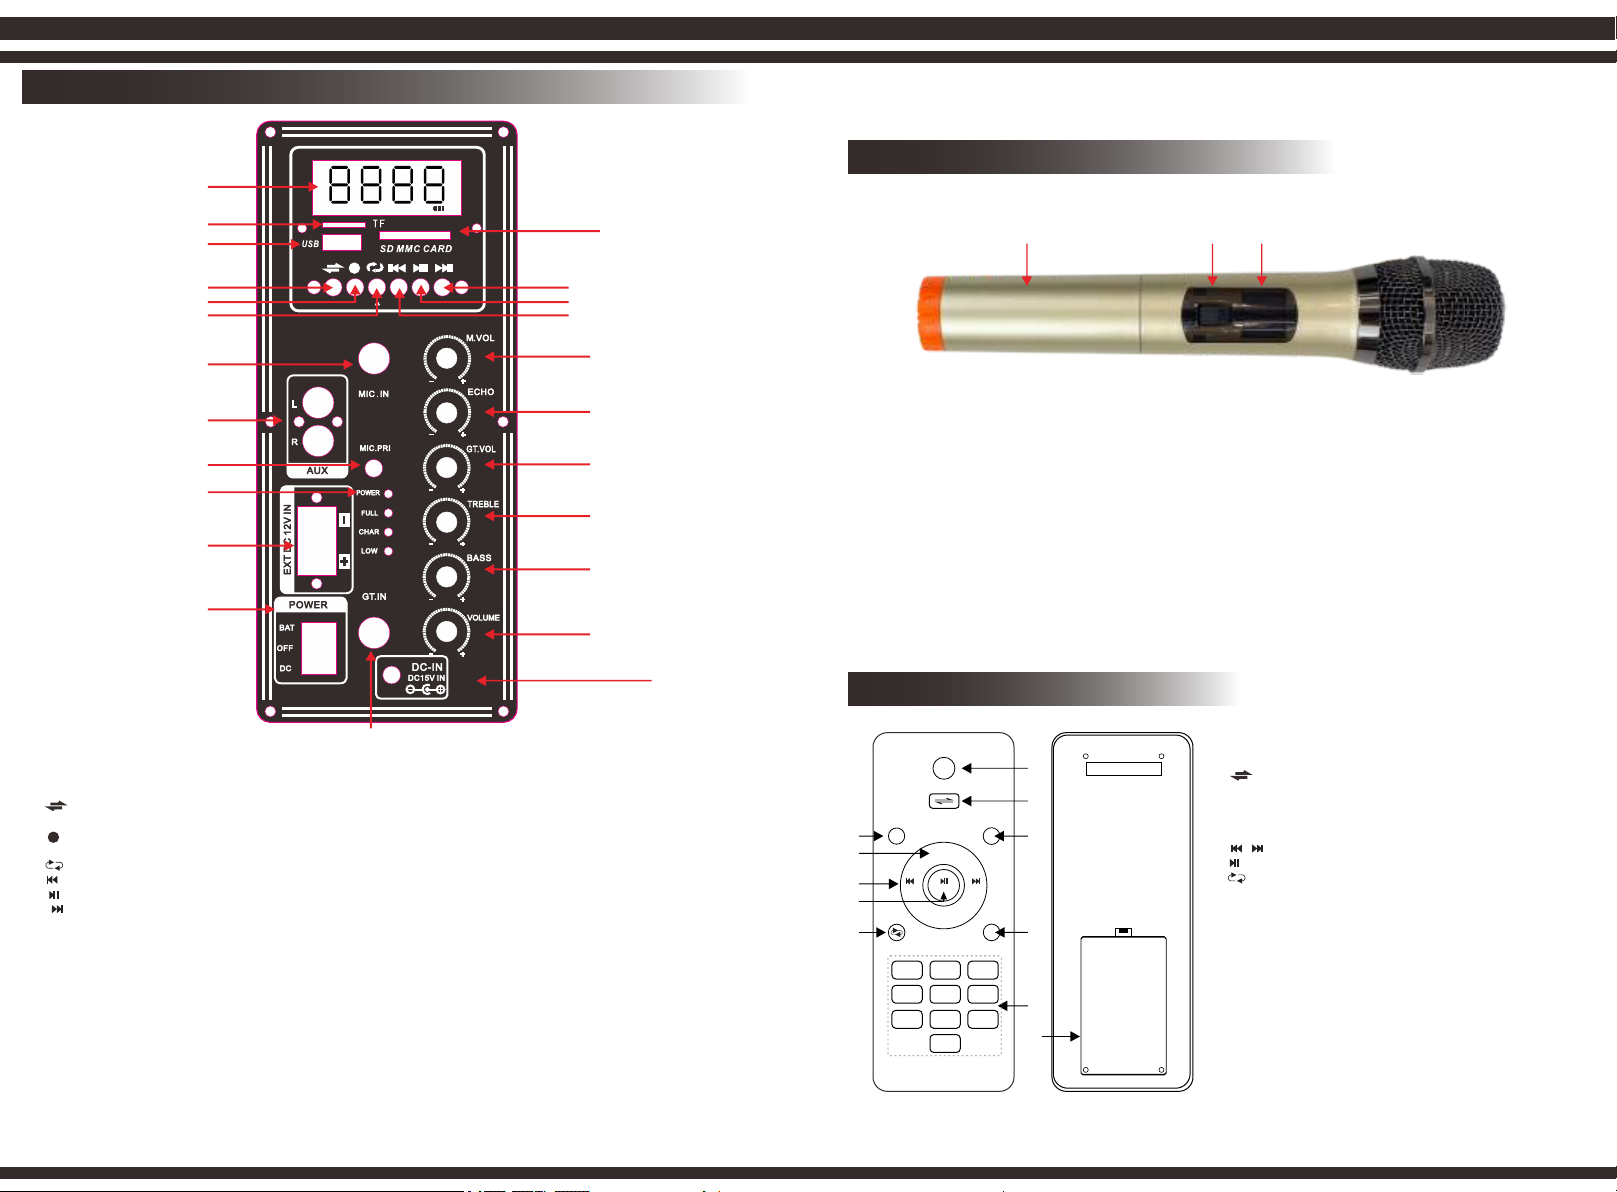
USB storage device, SD memory card, Line input or
2.- :Allows you to select between different audio sources:
Bluetooth.
3.- Start recording.
1.- MUTE: Press to mute the speaker.
11.- Battery cover: Unscrew this cover to access the battery
8.- : Set the loop mode of the songs to repeat one or repeat
10.- 0-9: Select the song by number.
When inserting the batteries, make sure that the polarity is
5.- VOL +/-: USB/SD/MP3 player module volume controls.
6.- / : Play the previous song or next song.
9.- EQ: Allows you to select between different equalizations.
holder. Use two batteries type LR6-AAA, preferably alkaline.
correct.
all.
7.- : Start and pause playback.
4.- Play the recording.
1
4
7
2
5
8
0
3
6
9
EQ
REC
CH- SCAN
VOL-
VOL+
CH-
MUTE
REC
PLAY
1
2
34
5
6
7
89
10
11.- MIC IN: Micro level input, 6.3 mm jack connector.
1.- Information screen
9.- : Start and pause in playback.
2.- Connection port of TF memory cards.
receiver.
8.- : Play the previous song.
10.- : Play the next song.
4.- Connection port of SD memory cards.
5.- : Allows you to select between different audio sources: USB storage device, SD memory card, Line input or Bluetooth
6.- : Long press to start recording; short press playback the recording files. Recording function only works when the U-disk is
3.- Connection port of USB storage devices.
inserted.
7.- : Set the loop mode of the songs to repeat one or repeat all. Long press for 3 seconds to eliminate/return original sound.
13.- ECHO: Decrease or enhance the echo effect.
attenuated automatically when a signal is detected in the wireless microphone or the mic input.
18.- DC IN 15 V: Power input for the supplied power adapter.
17.- VOLUME: General volume control.
14.- GT. VOL:Volume control for the guitar input.
16.- BASS: Adjust the bass of the music.
internal or external power supply.
20.- MIC PRI: Enable or disable the microphone priority function. When it is in the ON position, the rest of the entries will be
- LOW: This indicator will glow when the battery level is low. Please charge the speaker immediately.
- CHAR: The indicator will glow when the speaker is charging.
- FULL: This indicator will glow when the battery is fully charged.
19.- AUX INPUT: Line level auxiliary input, 2 x RCA connector.
21.- POWER: Turn on the power, the power indicator light will be on, regardless of that the speaker uses an
12.- MIC VOL: Volume control for the handheld microphone.
15.- TREBLE: Adjust the treble of the music.
23.- POWER: On/Off switch of the portable amplifier.
24.- GT. IN: Entrance for guitar connection, connector jack 6.3 mm.
22.- DC INPUT: Connection terminals for DC 12V.
indicator light will turn green. When the batteries are low, the indicator light will turn red. Proceed then
2.- Operation switch: 3 positions, ON, STANDBY (center position) and OFF. Put it in the ON position for
microphone will turn on immediately when it is turned ON. Before turning the microphone on or off, be
sure to set the amplifier and receiver volume to a minimum to avoid damaging the speakers due to
1.- Operating indicator: When the switch is set to the ON position or the central position (STANDBY), the
to replace the batteries with new ones.
its operation. Set the switch to the center position (STANDBY) to save battery power and the
excessive volume spikes.
preferably alkaline. When inserting the batteries, make sure that the polarity is correct.
3.- Battery cover: Unscrew this cover to access the battery holder. Use two batteries type LR6-AA,
Panel/rear plate/MP3 function and operation
Handheld/Headset Microphone
Remote Control
12
3
11
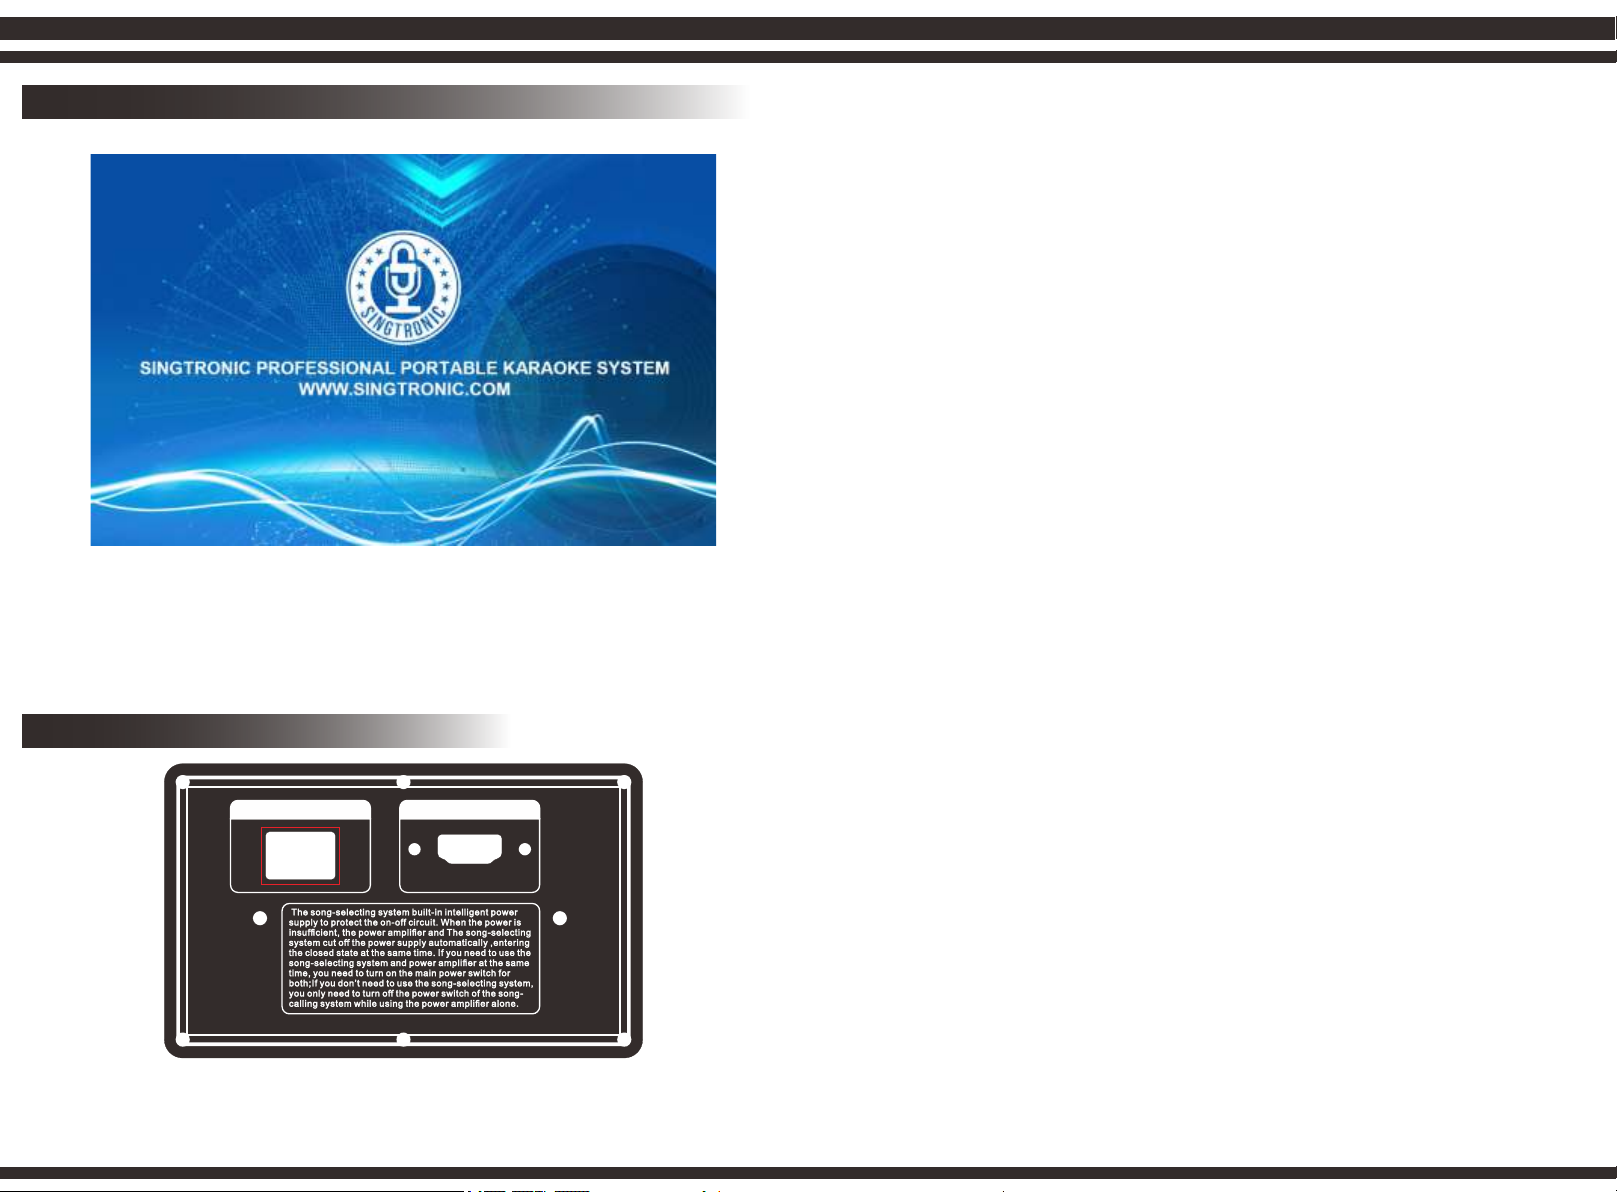
SCREEN UI WHEN TURNING ON SPEAKER
BACKSIDE TURNER BOARD
When turn on the speaker, please also turn on the power control of screen at the backside, then the
screen will appear the UI as above picture show. It takes 30-60 second to power on, please wait patiently.
Attention: Please turn off the power control of the screen first before power-off; or the screen will be
running slower and slower.
POWER: The switch ON/OFF power is applicable to the power control of screen.
HDMI OUTPUT JACK: HDMI can be applicable in set-top boxes, DVD players, personal computers, TVs,
game consoles, integrated amplifiers, digital audio.
POWER
ON OFF
HDMI OUTPUT.


