Simba Instruments Flute Guide
Important
Before attempting to return to store, call 800-811-0109 to arrange for exchange, repair parts or information on
warranty work. The retailer cannot give refunds for damaged or used instruments. Simba Instruments reserves the
right to determine if the instrument is in its original condition and if it warrants a full or partial refund as defined by
the warranty.
FLUTE CARE
Welcome
Expert craftsmen construct your flute from the highest-grade materials. This fine instrument will give years of
service if a small amount of time is spent on proper care. Because of extreme close tolerances on the moving parts,
proper maintenance and cleaning procedures are very important.
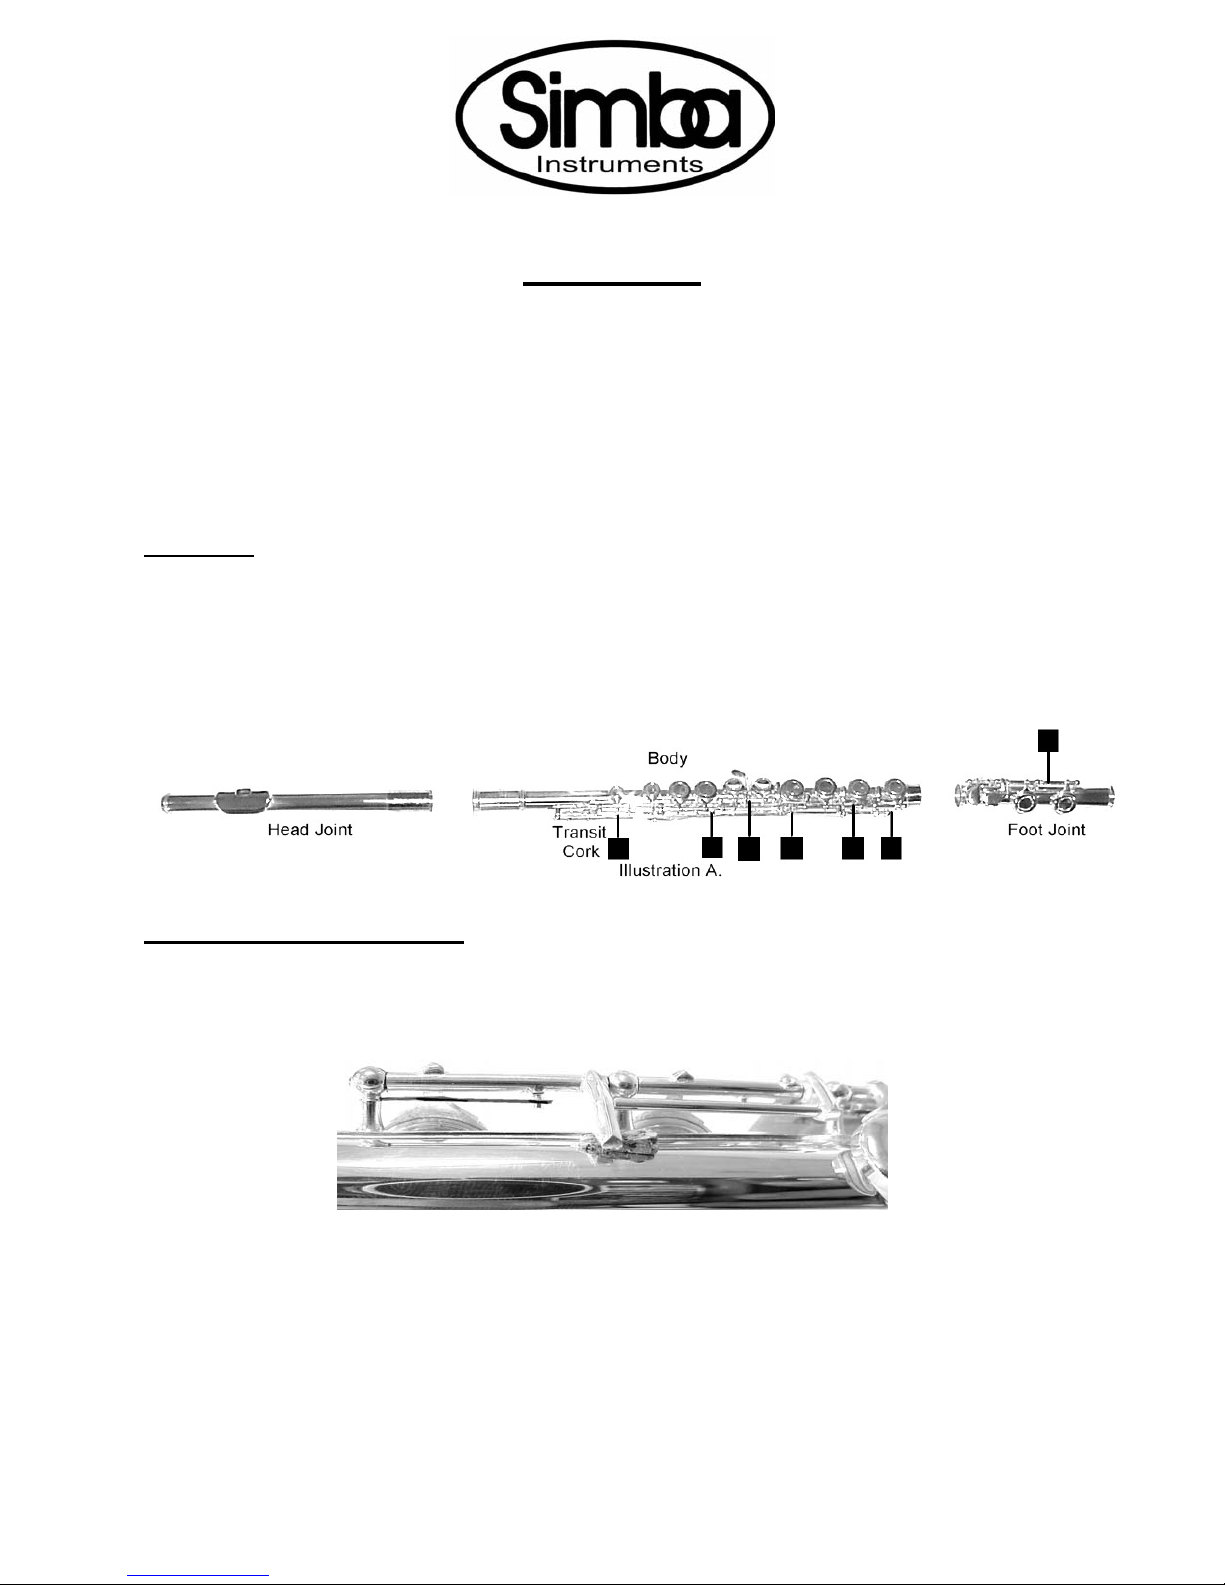
Putting your flute together
When you first receive your flute, it comes packed with the keys in the down position. You must first carefully
remove the transit packing cork pieces to free the key mechanisms (Illustration B). Pull the wedge shaped pieces
out from under the arms very carefully.
Illustration B.
If the arms get bent, the keys will not close at the proper times or at all. The flute will then need to be readjusted for
proper action. Do not remove the thin slices of cork that are glued to the back of the arms. These are bumpers to
cushion the arm and quiet the mechanism when you let up on the keys. If all the larger wedge pieces are removed,
then all the keys should move freely.
Wipe the tenons (ends) clean. Avoid ever grabbing a section by the delicate key mechanisms. If any mechanism is
bent, the flute will not work. Hold the body of the flute by the barrel (head-joint-socket) and the head-joint by the
tubing below the lip plate. Insert the head-joint into the barrel very carefully using a twisting motion, never a

rocking motion. Make sure that both parts are held in a straight line to avoid any damage to the joint. Remember
that under normal circumstances, slight scratches on the tenons will appear after time since metal is rubbing against
metal. Align the lip plate (embouchure) hole with the first (closest) key on the front of the main body.
Join the foot joint (shortest section with keys) to the main body in the same manner. Align the rod on the foot joint
exactly in the center of the last key on the main body.
Never grease or oil joints or sockets. If your joints are too tight, clean the tenon and socket with a polishing cloth.
If this fails, seek a specialist in flute repair. If your joints are too loose, seek a specialist in flute repair.
Each day before use, the pivot screws and rods need to be checked to see that they are not backing out. They
should be flush with the metal post that they are going through. It is normal for some of them to work there way
out. It is no fun having keys come off while playing because you forgot to check all of the screws.
Tuning
The head-joint may need to be pulled out slightly (1/16th inch) to tune the instrument but can be adjusted to your
preference.
The head-joint has a cork assembly at the end to both seal and allow a degree of flexibility in tuning the instrument.
To check its position, carefully insert the handle end of your cleaning rod into the head-joint assembly as far as it
will go. The ring mark on the rod should be in the center of the lip plate hole. If the mark is to the left of center,
loosen the crown by turning counter-clockwise a small amount and pushing it into the head-joint. If it is right of
center, gently tighten the crown until the mark is in the center.
Cleaning the instrument
WARNING: Silver polish should be used sparingly on your flute! They will ruin your keypads and badly damage
the metal of your key system if too much is used. Wright’s silver polishing cream works well.
Perspiration and body acids can have detrimental effect on the silver and silver plate. Also, dust left on the
instrument can begin to clog the moving parts. Polish the instrument using a soft cloth paying particular attention to
the areas that come in contact with your skin. Avoid any strain on the key mechanism and make sure that the cloth
does not snag any moving parts. By putting pressure on the keys, you may accidentally change the key alignment,
causing air leaks when you play.
The inside of the flute should be cleaned after each playing session. This will help keep the pads from swelling and
debris from accumulating in the mechanisms. These will both cause air leaks, resulting in poor intonation,
articulation and sound quality.
Push a corner of a lint-free cloth through the slot in your cleaning rod and wrap the cloth over the tip and around the
rod. Push the rod through the instrument rotating as you go. Do the same for each section of the flute.
Pad care
Pads will get sticky and dirty even when you do your best to keep them clean. Pads may be cleaned using a small
amount of rubbing alcohol on a cloth or Q-tip. Do not use water because it will cause the pads to swell and ruin
proper pad seating. If you have pads that stick as you play, take a piece of cigarette paper (available at most drug or
grocery stores) and place beneath the sticky pad. Gently push down the key. You want to wick the moisture out of
the pad and into the paper. Repeat if necessary. Be careful not to push down too hard or the pad may be torn.
Storing your instrument
When not using your instrument, keep it in its case to help protect the finish from unnecessary exposure to
impurities in the air and help prevent the possibility of damage by dropping it accidentally. Do not store the
instrument in areas of extreme temperature changes like near radiators or windows where direct sunlight can cause
extreme heat.

Service
If a problem develops that cannot be resolved by the maintenance procedures outlined above, the instrument should
be taken to a qualified repair shop. Any good repair shop can make repairs and adjustments to this instrument. If
they can work on one brand, they can work on this instrument. Parts can be ordered from Simba Products, Inc. the
same as any other brand.
If local service is not available, you may send the instrument to Simba Products, Inc. along with $7.00 for return
freight to have the instrument repaired. If parts are required, you will be notified of the additional cost for repairs.
For repairs:
Simba Products, Inc.
431A Richard Blvd
Tipton, MO 65081
1-800-811-0109
Table of contents


