Simeon Audita II User manual

User manual - Page 1
Manuel de l’utilisateur - Page 21
Manual de Usuario - Pagina 41


1
Your new Audita II system provides convenient and portable wireless soundeld
amplicaon with a choice of dual FM or digital transmission plaorms. The system
requires no installaon, can be set up in any classroom or meeng room and is easy
to transport. It can be used with a Simeon Omnipanel accessory speaker (oponal),
giving the portable system even more ecient performance for use in larger spaces.
• Wireless receiver / speaker unit with dual receiver module
• Wearable pendant transmier
• Wireless handheld transmier / microphone
• Direconal boom (headset) microphone 625
• Charging cradle 604 for two transmiers
• Rechargeable baeries
The Audita II system includes the following components:
• Totebag for complete Audita II system
• Folding tripod stand for receiver
• Wall-mounng bracket for receiver
• Connector cables for peripheral audio devices
• Omnipanel at-panel loudspeaker for larger rooms
• Tripod stand for Omnipanel at-panel speaker
Oponal accessories for your system include:
2
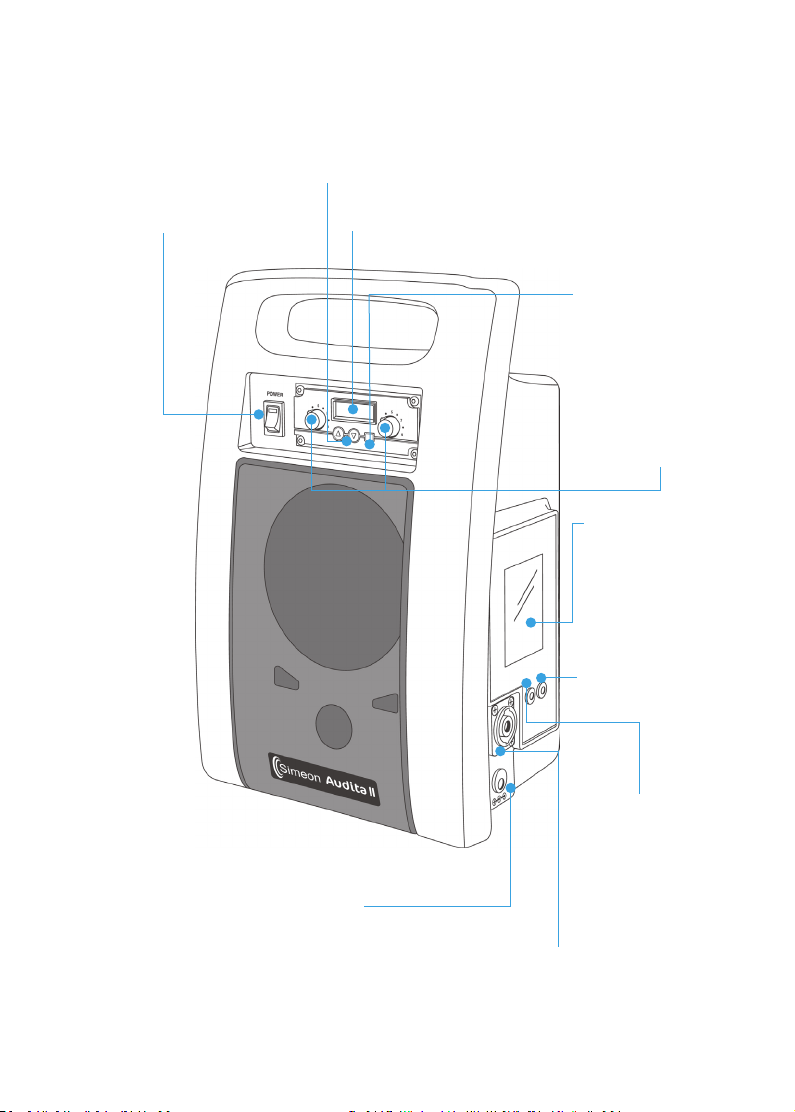
Setting up your Audita II
Fig. 1
5. Cursors
4. SET buon
2. Receiver module display screen
1. Power ON / OFF switch
3. Volume controls
6. Touchscreen
7. Auxiliary output
(3.5mm connector)
8. Auxiliary input
(RCA connector)
10. Charging jack (20V DC)
9. External speaker port
(Speakon® connector)
3
Audita II portable receiver / speaker
It is recommended that you charge the receiver fully before its inial use. Idenfy
the correct power adapter for the receiver. Cauon: do not use non-standard
power adapters to charge your system. Plug in the receiver to charge the baery
[10]. Make sure the receiver is OFF while it is charging [1]. It takes up to 15 hours to
fully charge the receiver. The baery status indicator will scroll through a sequence
of coloured lights during charging. A connuous green light indicates when charging
is complete.
The transmier and receiver channels will have been assigned before shipping. It
should only be necessary to change the channels if the preassigned channels conict
with other FM or digital systems in your facility.
Fig. 2
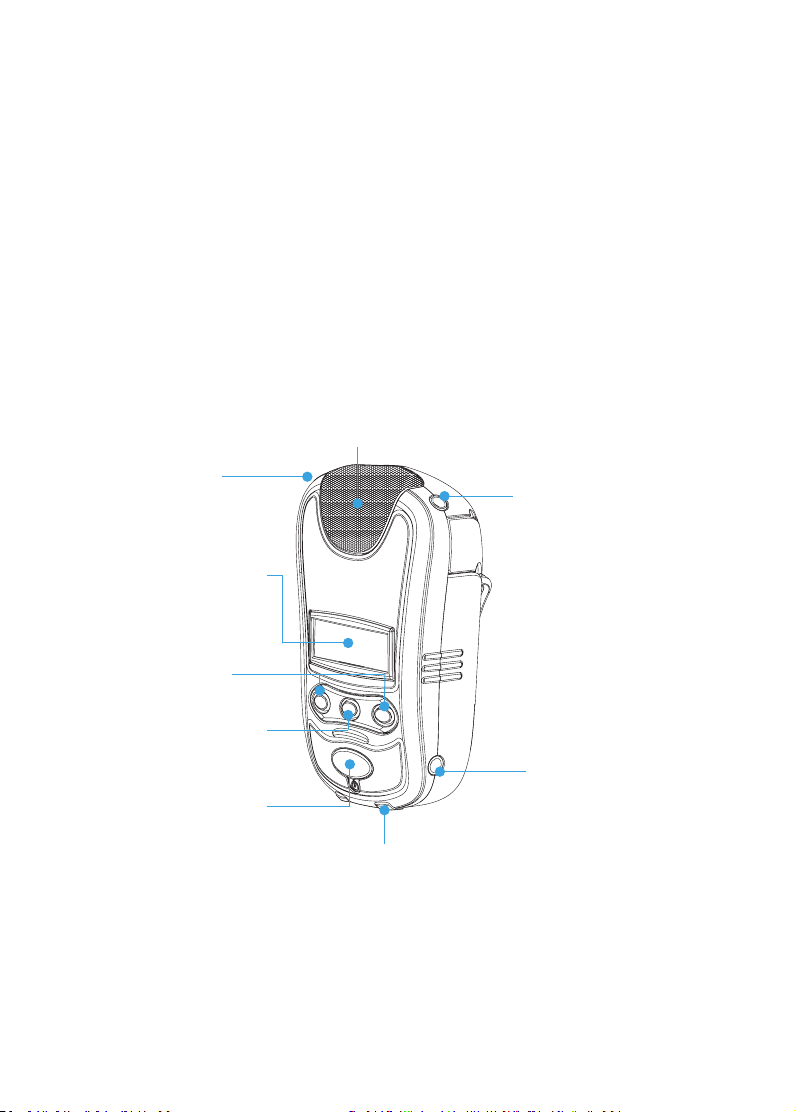
Pendant transmitter models 5.1T and 6T
The 5.1T FM transmier operates within 96 separate UHF channels, oering
excellent sound quality and performance. The 6T digital transmier operates within
16 high denion digital audio channel groups, each with two posions (A & B) that
allow concurrent pairing of two transmiers.
11. Microphone capsule
12. Microphone
input jack 13. Auxiliary input jack
14. Display screen
15. Cursors
16. SET buon
17. ON / OFF and
TALK / MUTE buon
19. Charging cradle contacts
18. Charging jack (5V DC)

7
76
4
The pendant transmier can be used with its built-in mic, with a boom (headset)
mic, or it can be connected to other audio inputs. The pendant transmier may
be worn around the neck or at the waist when used in conjuncon with a boom
(headset) mic. It is recommended that you charge the transmier fully before its
inial use. Pendant transmiers 5.1T and 6T use an internal rechargeable lithium
baery. Use only with the recommended Simeon charger supplied with the
transmier.
Handheld transmitter / microphone models 5.1M and 6M
The standard Audita II delivery package includes a handheld wireless pass-
around transmier. The handheld is supplied with two AA size NiMH baeries.
It is recommended that you charge the baeries fully before use. The handheld
transmier should be charged only with the charging cradle included with your
system. Place the baeries into the baery compartment [22], taking care to
observe the correct baery polarity. Never use disposable (alkaline) baeries in
combinaon with the charging system.
Inside the 6M digital transmier baery compartment there is a Main (M) and
Secondary (S) mode switch. When used in the S posion, the handheld microphone
can be controlled remotely from the pendant transmier. If you wish to use
microphone 6M digital handheld transmier independently from the pendant
transmier, this switch must be in the M posion.
Fig. 3 & 4
20. Microphone capsule
21. TALK / MUTE switch
22. Baery compartment
23. Charging contacts
24. Cursor / SET wheel
26. Display screen
25. Power ON / OFF switch
5
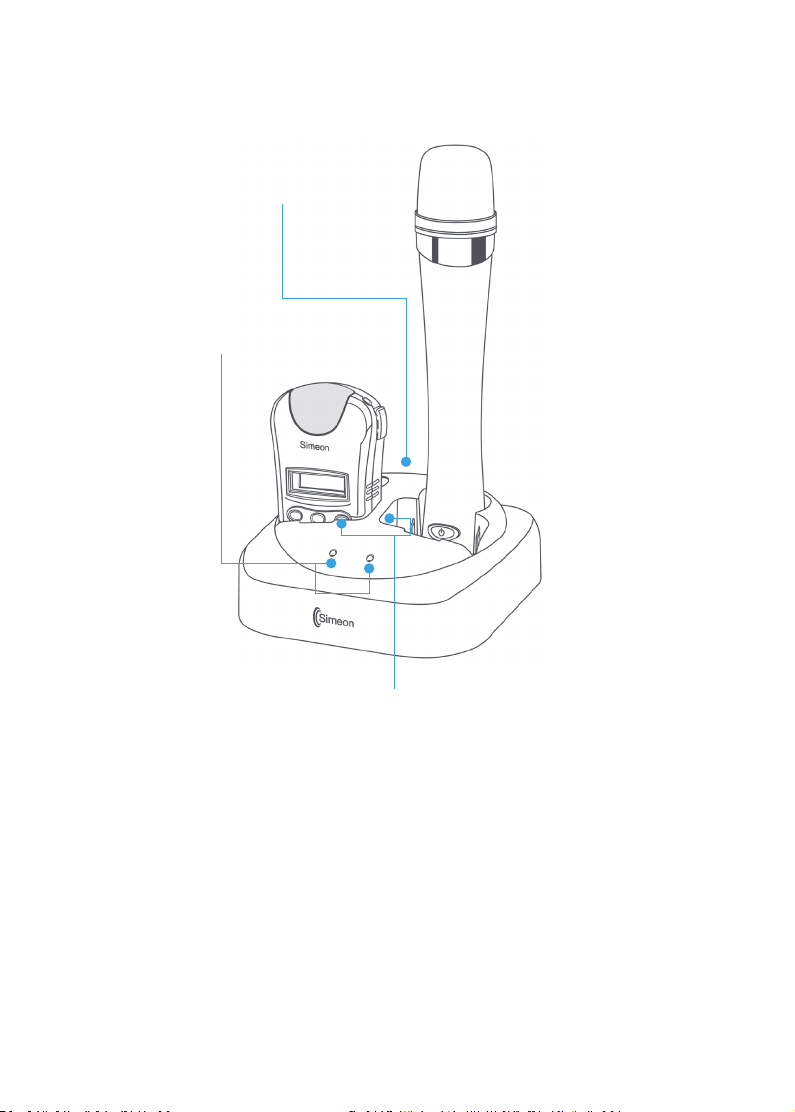
Fig. 5
Charger 604 transmitter charging cradle
The charging cradle will accept any combinaon of two Audita pendant or handheld
transmiers. Connect the power adapter to the charging cradle [27]. Place the
transmiers into the charging pockets [28], facing forward. The transmiers will
turn o automacally when they are placed in the charging cradle. A steady red ON
charging indicator will light during charging; a steady green indicator will light once
charging is complete [29]. Internal charging circuitry will sense when charging is
complete and will terminate charging automacally.
Flashing red indicates a failure to charge. This may occur if the baeries are already
fully charged or if the wrong or defecve baeries are used.
29. Charging indicator lights
28. Transmier charging pockets
27. Power supply jack (5V DC)

6
Fig. 6 & 7
Accessory Omnipanel at-panel loudspeaker (optional)
The oponal Omnipanel speaker can be used to enhance acousc performance for
larger rooms and provides outstanding speech intelligibility. The lightweight at-
panel speaker can be wall-mounted easily or set up on a tripod stand. A Speakon
cable connects the Omnipanel speaker to the Audita II receiver. Connect the
Speakon connector into back of the Omnipanel [31] and rotate it to the right to lock
it in place. Do the same on the side panel of the Auda II receiver [9]. Important:
select the External Speaker seng on the Audita touchscreen (press icon for 2
secs) to transfer sound from the internal speaker to the Omnipanel.
To disconnect the Speakon cable, pull back on the connector latch and rotate the
connector to the le to remove it. Be sure to cancel External Speaker (press the icon
on the touchscreen) to reacvate the Audita internal speaker when the external
Omnipanel speaker is no longer connected.
30. Omnipanel speaker surface 31. Speakon® cable connector
32. Tripod / wall bracket mount

7
Operating the system
Using the Audita II portable receiver / speaker
Check the posion of the two volume controls [3] on front of the receiver. There are
two independent volume controls - one for each transmier. If you are using your
system for the rst me, set at a low volume level before turning the system on. Turn
the receiver ON at the master power switch on the front of the speaker [1]. A green
light indicates that the receiver is on and ready to use.
Your Audita II is delivered with channels already assigned and the system is ready to
use. The pre-assigned channels should not usually need to be changed. However, it
is important that separate channels are selected for each system that is used in the
same locaon.
With the Audita II digital system, the transmiers will pair automacally to the
channel group selected on the receiver. With Audita II FM, channels are manually
selected, with a separate channel assigned to each of the transmiers.
Using the pendant transmitter
To turn the pendant transmier ON, press the power buon [17] for 2 seconds.
The display will show the transmier channel selecon and the baery status.
By pressing the power buon briey, you can conveniently mute / unmute the
transmier. The power buon will be lit by a blue indicator when the transmier
is in TALK mode, and by a red indicator when the transmier is muted. To turn the
transmier OFF, press and hold the power buon for 2 seconds.
The pendant transmier has a built-in direconal microphone [11]. When wearing
the transmier around your neck, adjust the lanyard length so that the pendant
microphone is in the best posion to pick up your voice - usually about 20cm below
the mouth. If you would prefer to wear the transmier at waist level, you will need
to use the 625 boom (headset) accessory microphone supplied with your system.
The pendant transmier has a microphone input jack [12] for connecng the
boom mic. Note that there is also an auxiliary input jack [13], which is used only for
connecng to external audio devices to the transmier.
As an alternave to using the transmier charging cradle, the pendant transmier
can be charged directly by plugging the charging adapter into the charging jack [18].
Use only the recommended charging adapter for direct charging of the pendant
transmier.

8
Using the boom microphone accessory
A direconal boom (headset) microphone is supplied with your system as a
standard accessory. The boom microphone picks up speech very closely, improving
performance in noisy environments, and will help to avoid any acousc feedback.
Plug the microphone into the 3.5mm microphone input jack on the top of the
transmier [12]. Note that if the microphone is inserted into the auxiliary input
jack speech will not be amplied. Place the frame earhooks [33] over your ears and
adjust the boom arm to posion the mic capsule [35] to point to the corner of your
mouth. It is not necessary to place the microphone in front of your lips and doing so
may diminish sound quality. The boom microphone frame can be adjusted to rest
comfortably over both ears, with no other contact or pressure points against the
head or face.
Using the handheld transmitter / microphone
To turn the handheld transmier ON, press the power buon [25] for 2 seconds.
The display will show the transmier channel selecon and the baery status. To
turn the transmier OFF, press and hold the power buon for 2 seconds. There is
a separate MUTE buon [21] located on the back of the handheld transmier. The
mute buon will be lit by a green indicator when the transmier is in TALK mode,
and by a red indicator when it is muted.
The microphone capsule of the handheld transmier [20] is highly direconal. Hold
the microphone close and poinng directly towards the mouth for best acousc
performance.
Fig. 8
34. Replaceable cable
33. Over-the-ear earhooks
35. Unidireconal microphone capsule

9
Assigning channels
Your Audita II will have been assigned channels before shipping. It should only be
necessary to change the channels if the preassigned channels conict with other FM
or digital systems in your facility.
The Audita II FM system allows manual selecon between 96 UHF channels. To
assign a new channel, press the SET buon unl the displayed channel ashes. Use
the up and down cursors to select the new channel. Press SET again to conrm
the new channel selecon. Make sure that the transmier channel matches the
corresponding receiver channel. Do not set two FM transmiers to the same channel
or they will interfere, resulng in a noisy signal.
Audita II digital features a simple-to-use menu that allows selecon among 16 digital
channel groups. To assign a new channel group, press the SET buon on the DR6
receiver module on the front of the speaker [4] for 2 seconds, unl the displayed
channel group number ashes. Use the up and down cursors [5] to select the new
channel group. Press SET again to conrm the new selecon. The receiver display
screen will show the word “On” to conrm the successful change.
The digital transmiers will automacally pair with the nearest available Audita
digital receiver they detect. For this reason, always turn the Audita digital receiver on
before turning on your transmier(s). When the transmiers pair with receiver, they
will occupy an A or B posion within the channel group selected on the receiver.
Digital receiver module DR6 will also display the signal strength and baery status for
each of the paired transmiers.
External connections
The side panel of the Audita II receiver has three audio connectors of dierent types
- each has a specic funcon:
• Speakon port for aaching an external accessory loudspeaker (Simeon
Omnipanel).
• RCA connector for input of audio devices, such as computers, into the Audita II
receiver.
• 3.5mm mini jack for sending audio from your Audita II system to other devices,
such as personal FM systems or to audio recorders.
All of the external connecons for the receiver are controlled through the
touchscreen menus.
10
Audita II touchscreen controls
Basic Settings menu
You do not require a PIN number to access the Basic Sengs menu.
Auxiliary Audio IN level will adjust the volume for any device, such as a computer,
that is connected into the RCA connector.
Voice Priority feature gives your transmier microphones priority over the audio
input from a computer etc. This feature allows you to be clearly audible when you
are giving commentary on an audio-visual presentaon, or for Q & A. Press the icon
once to acvate / cancel Voice Priority.
External Speaker seng is used whenever an accessory speaker (Simeon
Omnipanel) is connected to the Speakon port. Press the icon for 2 seconds to
acvate the external speaker connector. The icon will ash to alert you that External
Speaker is acve and the Audita II speaker is muted. To cancel External Speaker,
press the icon briey.
Advanced Sengs icon accesses a secondary menu, which is PIN protected.
Voice Priority
External Speaker connecon
(press for 2 secs to acvate)
Enter Advanced Sengs
Auxiliary Audio IN level

11
Advanced Settings
To enter the Advanced Sengs menu, you require a PIN.
Factory default PIN: 0000
To set your own PIN or change PIN:
• Press and hold C for 3 secs to enter Reset
• Enter current PIN (0000 for rst me use) + OK
• Enter your new PIN (example: 1234) + OK
• Re-enter your new PIN to conrm + OK
If you forget your custom PIN contact your service center to obtain a reset PIN
number.
Advanced Settings Menu
Auxiliary Audio OUT equalizer
(eight bands - 65Hz to 8KHz)
Speaker Tone Control
(bass / treble)
Auxiliary Audio
OUT level
Exit Advanced
Sengs

12
Auxiliary Audio OUT equalizer provides eight-band frequency adjustment (65Hz
to 8KHz) for the auxiliary output signal. The equalizer is useful for making ne
adjustments to any peripheral device, for example a personal FM system, that
is connected to the 3.5mm mini jack output of the Audita II receiver. Note that
equalizer adjustment will not aect the loudspeaker sound.
Auxiliary Audio OUT level adjusts the overall gain of the 3.5mm mini jack output of
the Audita II receiver. Adjustment of the auxiliary audio OUT level will not aect the
loudspeaker volume.
Speaker Tone Control adjusts the treble and bass tone of the Audita II loudspeaker.
Exit Advanced Sengs will return you to the Basic Sengs menu.
Battery care and charging
The pendant transmier uses a lightweight lithium rechargeable baery. This is not
user-replaceable and must be changed at your service center.
Use only Nickel Metal-Hydride (NiMH) rechargeable AA size baeries in the handheld
transmier. Never use disposable (alkaline) baeries in the charging system.
Charge the transmiers aer each day of use. The transmiers will automacally
power o when placed into the charging cradle. The charging indicator lights [29]
will show charging progress - red during charging and green when complete. If the
transmier baeries are already fully charged when placed in the charging cradle, a
ashing red indicator light may show.
The Audita II receiver has an internal rechargeable lithium baery pack, allowing for
approximately 7 hours of normal operaon on baery power. When the baery pack
is depleted, the receiver can sll be used with the power adapter. Full recharging
of the receiver baery takes approximately 15 hours. Replace the receiver baery
pack only with the recommended type, available from your Simeon service
center.
Before storing your system for prolonged periods, charge the transmier and
receiver baeries fully and remember to turn the equipment o.

13
Microphone care
The boom (headset) microphone is the most delicate component of your
soundeld system. Protect the microphone cable from strain and excessive
force. A spare microphone cable is included with boom microphone model
625 for your convenience. Clean the pin of the microphone plug regularly and
replace microphone cable if it becomes damaged. The boom microphone has a
unidireconal pick-up paern. The p of the mic capsule must be pointed towards
the corner of the mouth for proper performance.
Useful tips
• For best performance, use the boom (headset) accessory microphone with the
pendant transmier.
• Adjust the boom mic headset for comfort and ensure that the p of the
microphone is posioned correctly at the corner of your mouth.
• When using the pendant transmier without the boom microphone, adjust the
lanyard strap so the transmier is approx. 20cm from your mouth to pick up
your speech eecvely.
• Avoid excessive amplicaon - the speaker will make speech clearly audible at a
comfortable listening level.
• By selecng the Secondary (S) posion for the switch inside the baery
compartment of the 6M digital handheld transmier, the handheld can be
controlled remotely from the pendant transmier (this feature does not apply
to the 5.1M FM handheld transmier).
• If you have forgoen to charge the Audita II receiver and the internal baery is
low, it may be operated from an AC outlet via the charging power adapter.
• Use the Voice Priority feature to be heard more eecvely over any audio or
music you are playing through your Audita II receiver.
Five-year limited warranty
The Audita II soundeld main system components (transmiers, charging cradle
and receiver / speaker) are covered by a ve-year parts and labour warranty,
eecve from the date of purchase. Simeon microphones, adapters and baeries
are warranted for one year. The manufacturer’s warranty provides for repair or
replacement of defecve components or workmanship. Expressly not covered
are damages resulng from water emersion, physical damage or unapproved
substuon of components, baeries or accessories. Extended warranty coverage
may be purchased under the Simeon Service Plus extended full service program.

14
Troubleshooting
No sound
Check that the transmiers and receiver are ON, and that the transmiers are not
set to MUTE. Check that the receiver volume controls are set to an audible level.
Check that Internal Speaker is selected on the touchscreen menu; if External Speaker
is selected (ashing icon) the internal Audita speaker will be muted. If using the
boom (headset) microphone, check that it is plugged into the microphone input jack
of the pendant transmier.
No FM signal
Check that the Audita II FM transmiers and receiver are set to matching channels
and are within transmission range. Check transmier is turned ON. Make sure the
volume controls on the DR5.1 FM dual receiver module are not locked in the OFF
posion.
No digital signal
Check that the Audita II digital transmiers and receiver are within pairing range on
power-up. Check transmier is turned ON. If using 6M digital handheld transmier
on its own, make sure the mode switch is set to the M posion.
Dead baeries
First, check the baery level meter on transmier display to conrm baery status.
Check that the transmier is making contact in the pocket of the charging cradle and
that you are using the correct power adapter. Remove any tape, sckers or debris
that may prevent the transmier making good contact with the charger. Replace the
transmier baeries if necessary.
Charger 604 ashing red light
This indicates that the charger is refusing to charge the transmier - the baeries
may already be fully charged and do not require further charging. Flashing red
indicator light on the charger may also indicate defecve baeries or that the
wrong baery type has been installed. Check and replace transmier baeries as
necessary.
Weak sound
Check and adjust the volume seng. Adjust the microphone posion. Check or
replace the microphone. Check that the correct power adapter is connected to the
Audita receiver.

15
Noise or distoron
Check for possible sources of radio interference (e.g. nearby computers, other FM or
digital systems) and try dierent FM or digital channels. If using the boom (headset)
microphone, check the integrity of microphone cord and plug.
Acousc feedback (squealing sound from the speaker)
Check and adjust the volume sengs. Ensure that the microphone is posioned
correctly. Avoid approaching too close to the speaker with the microphone turned
on. To guard against feedback, avoid poinng the microphone directly towards
the speaker. The boom (headset) microphone accessory, when correctly worn, will
minimize the likelihood of acousc feedback.
Intermiency
Make sure transmiers and receiver are within normal operang range. Check for
any nearby interfering radio signals. If using the boom (headset) microphone, check
the mic cable and the plug connecon to the pendant transmier.

Output power 40W (RMS)
Speaker types 5in neodymium, 1in tweeter
Audio control Gain, Tone Control, 8-Band Equalizer
(Auxiliary Output)
Auxiliary input Single RCA connector, input sensivity
350mV
Auxiliary output 3.5mm mini plug, output level 1V
Speaker control Internal Speaker / External Speaker select
switch
External speaker output Single Speakon connector, 4Ohm
Power requirements 100 ~ 240VAC / 20VDC, 3.25A switching
power supply
Speaker baery type 14.4V, 5.3Ah (lithium-ion) rechargeable
baery, user replaceable
Speaker baery meter 4 LEDs to indicate baery status
Autonomy ~ 7 hours at typical gain seng
Charging me 15 hours
Dimensions 162 x 202 x 326mm (6.5 x 8.0 x 13in)
Weight 2.51kg (5.5lb) including baery
UHF frequency range 514 ~ 544MHz (Canada & USA)
Number of channels 96 UHF
Squelch adjust OFF -100 ±3dBm
Total harmonic distoron < 1%
Signal / noise rao > 65dB
Audio frequency response 70Hz ~ 17kHz
Operang transmission range 50 ~ 70m (160 ~ 230)
Transmission latency Real me
Operang temperature -10°C ~ +60°C (14°F ~ 140°F)
Cercaons Industry Canada, FCC
16
Audita II technical specications
Overall system specications
With dual FM receiver module DR5.1

Frequency range 2.4 ~ 2.5GHz
Number of channels 16 channel pairs
Squelch adjust OFF -90 ±3dBm
Total harmonic distoron < 1%
Signal / noise rao > 60dB
Audio frequency response 40Hz ~ 18kHz
Operang transmission range 25m (> 80); 15m (50) to establish pairing
Transmission latency ≤ 6mS
Operang temperature -10°C ~ +60°C (14°F ~ 140°F)
Cercaons Industry Canada, FCC, CE
Internal microphone type Electret condenser
UHF frequency range 514 ~ 544MHz (Canada & USA)
Number of channels 96 UHF
Radio signal power High: 10dBm; low: 3 ±2dBm
Operang range 50 ~ 70m (160 ~ 230)
Max modulaon ±40KHz with level liming
Baery type 3.7V 1200mAh (lithium-ion) rechargeable,
replaceable at service centre
Autonomy High: 12 hours; low: 16 hours
Charging me 4 ~ 6 hours
External microphone input 3.5mm mini plug connector
Auxiliary input 3.5mm mini plug connector
LED indicators Mute / Talk funcon, charging status
LCD display Channel number, baery status
Wearing opons Safety-release lanyard, belt clip
Dimensions 33 x 52 x 88mm (1.3 x 2 x 3.5in)
Weight 77g (2.7oz) including baery
Cercaons Industry Canada, FCC
17
With digital dual receiver module DR6
Pendant FM transmitter 5.1T

Microphone capsule
UHF frequency range
Number of channels
Radio signal power
Operang range
Max modulaon
Baery type
Autonomy
Charging me
LED indicators
LCD display
Dimensions
Weight
Cercaons
Condenser
514 ~ 544MHz (Canada & USA)
96 UHF
High: 10dBm; low: 3 ±2dBm
50 ~ 70m (160 ~ 230)
±40KHz with level liming
AA Nickel Metal Hydride (NiMH)
rechargeable, user replaceable
11 hours
4 ~ 6 hours
Mute / Talk funcon, charging status
Channel number, baery status
37 x 200mm (1.5 x 8in)
143g (5oz) including baeries
Industry Canada, FCC
18
Handheld FM transmitter 5.1M
Table of contents
Languages:
Other Simeon Microphone manuals


