Simeon Audita User manual

User Manual
Simeon Audita
Portable
Soundfield System

Notice:
The changes or modifications not expressly approved by the party responsible for
compliance could void the user’s authority to operate the equipment.
IMPORTANT NOTE:
To comply with the FCC RF exposure compliance requirements, no change to the
antenna or the device is permitted. Any change to the antenna or the device could result
in the device exceeding the RF exposure requirements and void user’s authority to
operate the device.
This device complies with part 15 of the FCC Rules. Operation is subject to the following
two conditions: (1) This device may not cause harmful interference, and (2) this device
must accept any interference received, including interference that may cause undesired
operation.
FCC INFORMATION
The Federal Communication Commission Radio Frequency Interference
Statement includes the following paragraph:
The equipment has been tested and found to comply with the limits for a
Class B Digital Device, pursuant to part 15 of the FCC Rules. These limits are designed
to provide reasonable protection against harmful interference in a residential
installation. This equipment generates, uses and can radiate radio frequency
energy and, if not installed and used in accordance with the instruction, may cause
harmful interference to radio communication. However, there is no grantee that
interference will not occur in a particular installation. If this equipment dose cause
harmful interference to radio or television reception, which can be determined by
turning the equipment off and on , the user is encouraged to try to correct the
interference by one or more of the following measures:
--Reorient or relocate the receiving antenna.
--Increase the separation between the equipment and receiver.
--Connect the equipment into an outlet on a circuit different from that to which the
receiver is connected.
--Consult the dealer or an experienced radio/TV technician for help.
The user should not modify or change this equipment without written approval
form Supportive Hearing Systems Inc. Modification could void authority to use this
equipment.

1
Simeon Audita
Portable Soundeld System
Your new Simeon Audita portable soundeld system provides convenient and
portable amplicaon with a choice of dual FM or digital transmier formats.
The system can be set up in any classroom or meeng room and is easy to
transport. It also interfaces simply with a Simeon OmniPanel setup, giving the
portable system the power of a permanent installaon. The system includes:
•A Simeon Audita Portable Soundeld Receiver (with Power Adapter)
•A Simeon 623 direconal boom microphone (or oponal alternate
microphone model)
•A Simeon 602 Transmier Charging Cradle (with Power Cable)
•Transmier Belt Clip and Lanyard
•Rechargeable Baeries
The Simeon Audita FM System includes the following components:
•A Simeon FM Dual-Receiver Module (built into the Receiver)
•A Simeon 5T Pendant FM Transmier
•An OPTIONAL Simeon 5M Handheld FM Transmier
OR
A second Simeon 5T FM Pendant Transmier
The Simeon Audita Digital System includes the following components:
•A Simeon Digital Dual-Receiver Module (built into the Receiver)
•A Simeon 6T Pendant Digital Transmier
•An OPTIONAL Simeon 6M Handheld Digital Transmier
OR
A second Simeon 6T Digital Pendant Transmier
Oponal Accessories:
•Folding Tripod for the Simeon Audita
•Wall-mounng bracket for the Simeon Audita
•Tote bag for the Simeon Audita
•Connector cables for peripheral audio devices
•A Simeon Omnipanel 900 Flat Panel Loudspeaker (with Speakon Cable)
•Folding Tripod for the Omnipanel
2
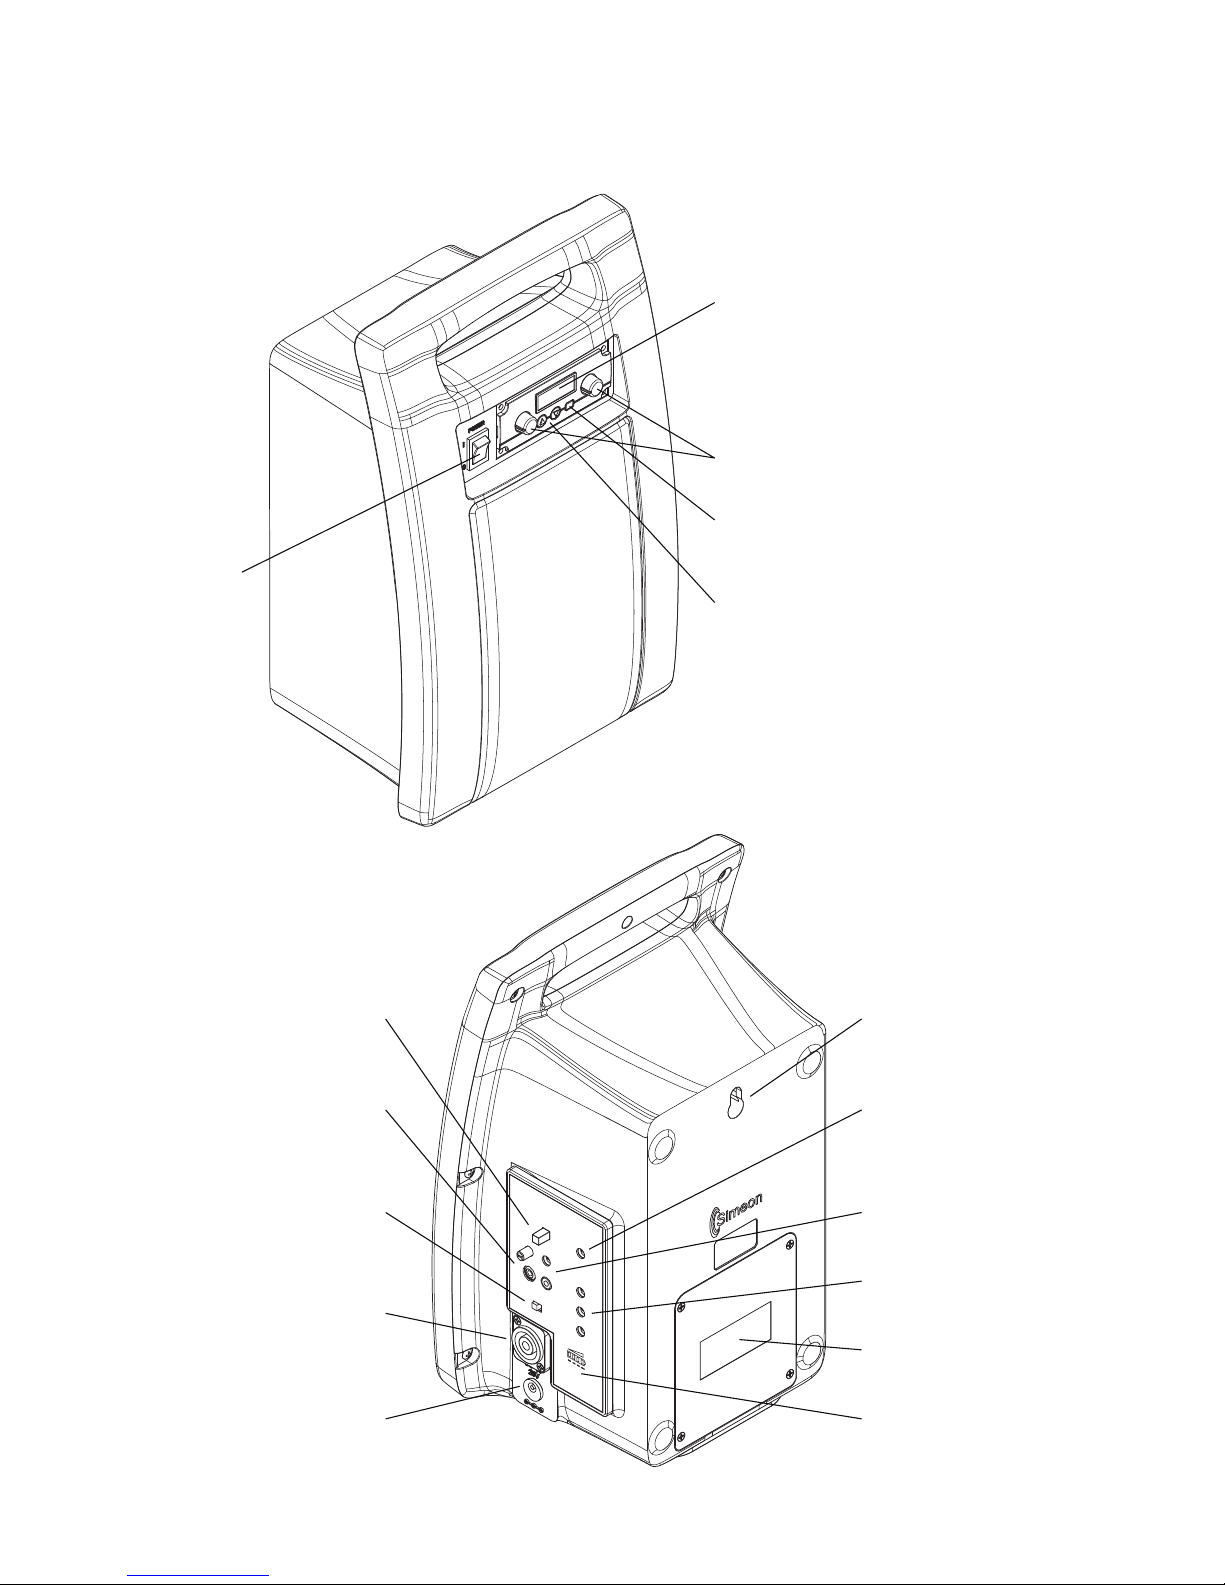
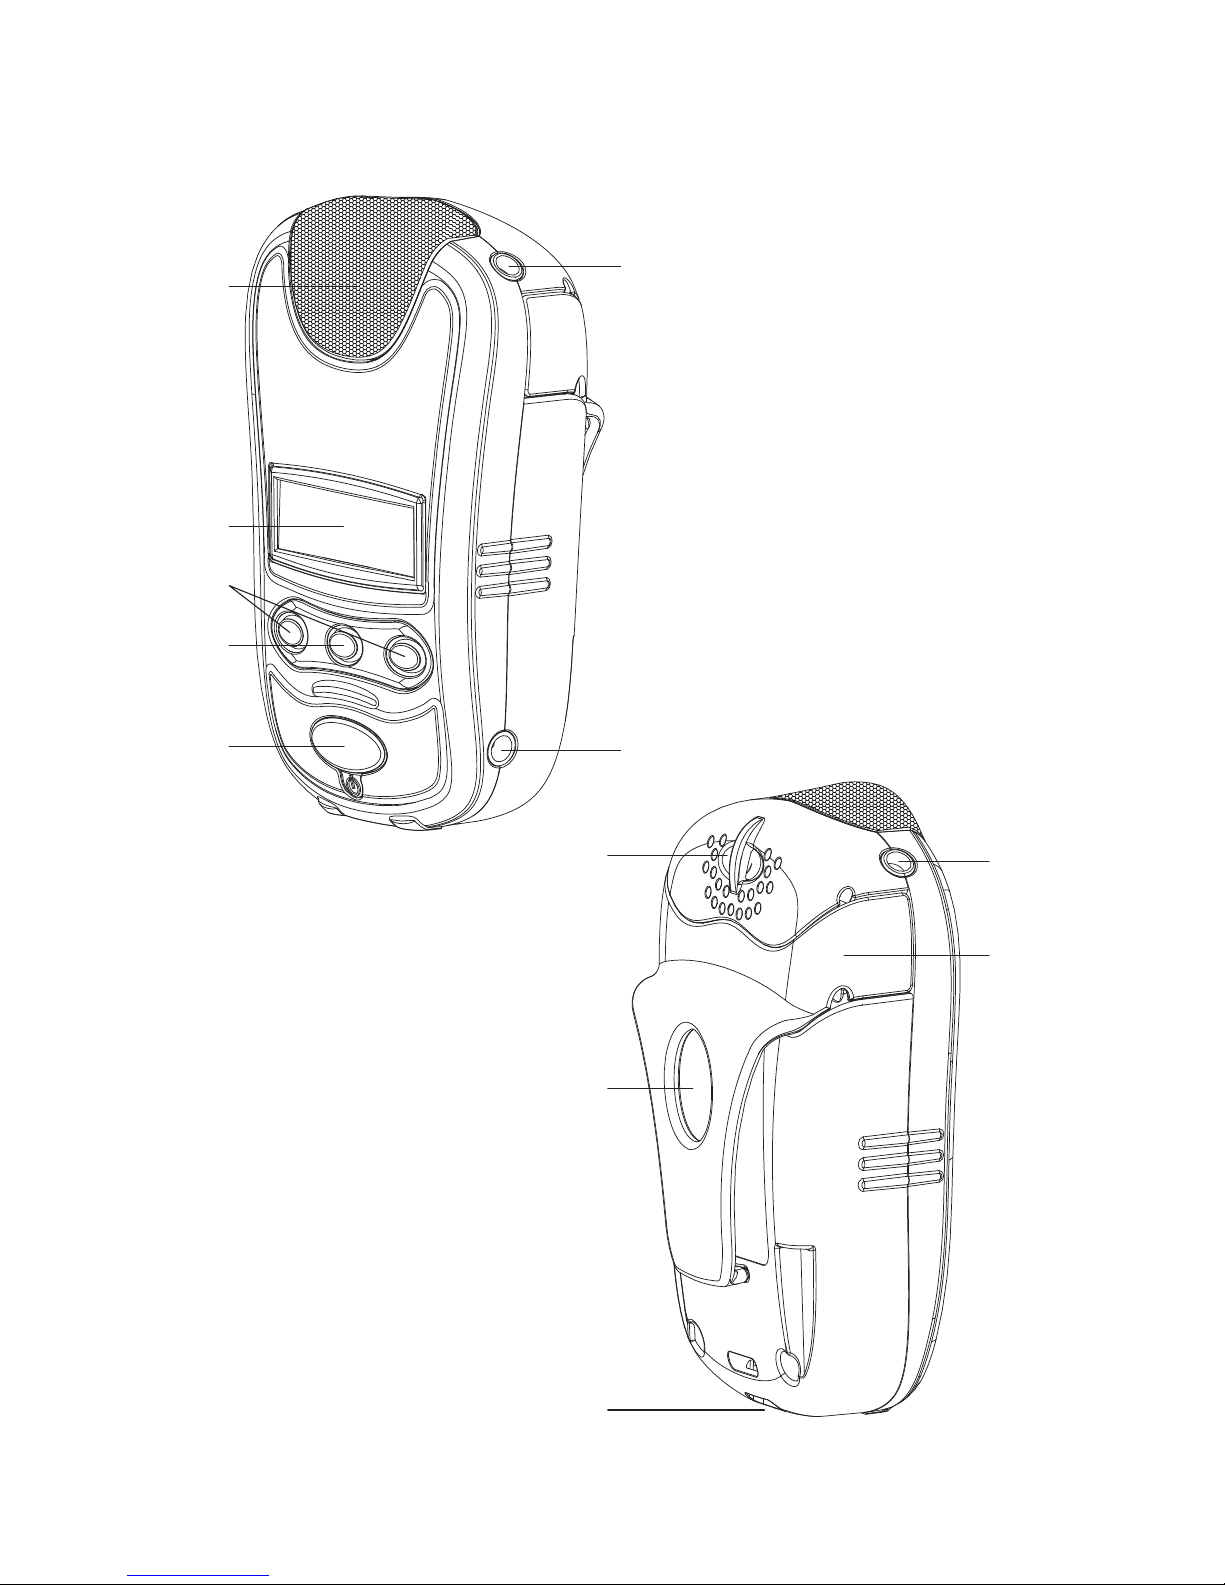
1. Power ON/OFF switch
with power indicator
2. Display Screen
3. Volume Control
4. Set Buon
5. Cursors
6. Power adapter plug
(20V)
7. Speaker Output
8. Speaker Switch
9. Auxiliary RCA Input with
gain control
10. Voice Priority Buon
11. Wall mount keyhole
12. Tone Control
13. AUX Out Gain
14. AUX Out Equalizer
15. Baery Housing
16. Baery Status Indicator
Simeon Audita Portable Soundeld Receiver
Figures 1 & 2
1
2
3
4
5
6
7
8
9
10 11
12
13
16
14
15
20% 50% 80% 100%

3
Setup
Carefully unpack the soundeld system and separate its components.
Simeon Audita Portable Soundeld Receiver
Your Simeon Audita System includes either a dual-digital and a dual-FM
receiver module, to be used with the corresponding Simeon transmiers. It also
includes an integrated speaker, and mulple inputs and outputs. It is at the core
of the enre sound system.
It is recommended that you charge the receiver fully before its inial use.
Idenfy the correct power adapter for the receiver. Cauon: never use non-
standard power adapters to charge your system. Plug in the receiver to charge
the baery [6]. Make sure the receiver is OFF while it is charging [1]. It takes
about 10 hours for the receiver to charge. The baery status indicator [15]
will scroll through its coloured lights during charging. A connuous green light
indicates when charging is complete.
The transmier and Receiver channels on both the Audita Digital and Audita
FM Systems will have been assigned before shipping. It will only be necessary to
change the channels if the preassigned channels conict with other FM or Digital
systems in your facility.
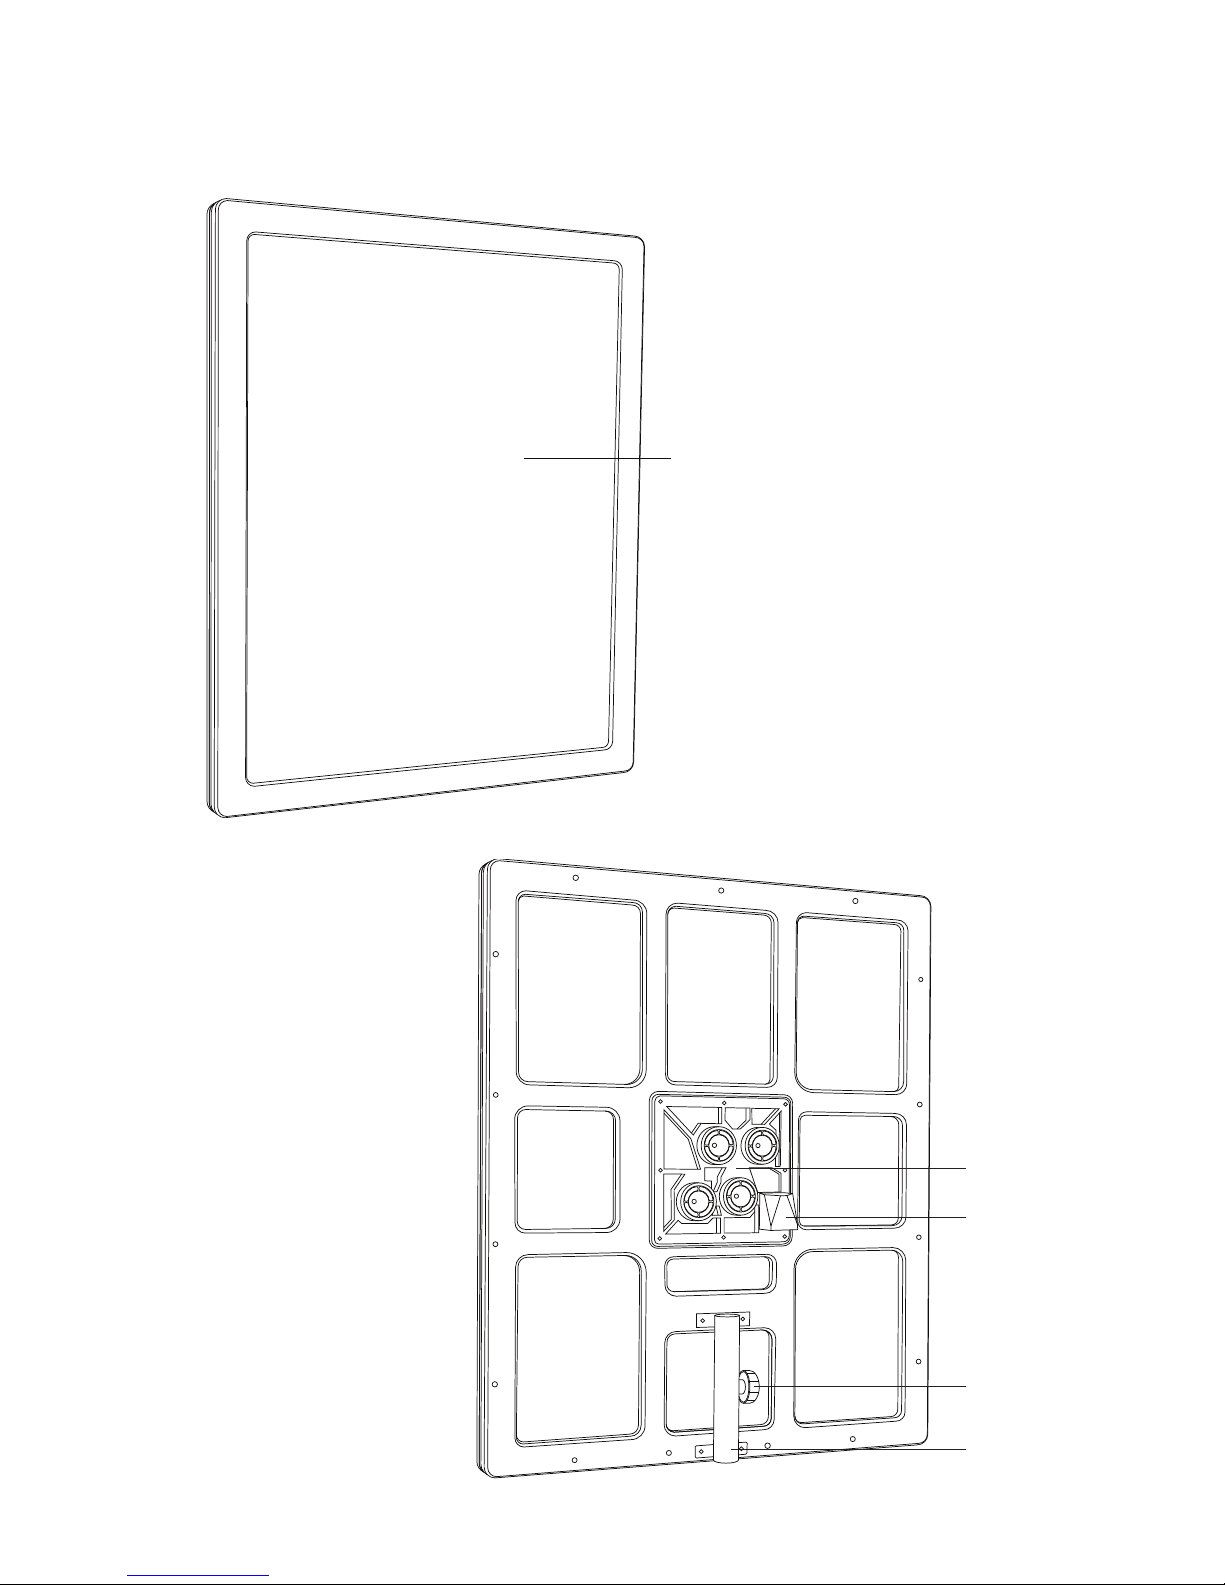
OPTIONAL Omnipanel 900 Flat Panel Loudspeaker
The oponal Omnipanel 900 gives great acousc performance and outstanding
speech intelligibility in a small, ecient format. The at panel speaker can be
mounted almost anywhere, and be easily connected to the system when you
need the addional performance of an installed system..
The Omnipanel 900 can either be set up on a tripod oor stand or it can be
wall mounted. Simply slot the Speaker Mount [19] onto the top of either the
Floor Stand or the Wall Mount aer they are in place. Tighten the Fastening Knob
[20] to ensure the safety of the Omnipanel. Make sure not to over-fasten the
knob, as this may cause damage to the Floor Stand or the Wall Mount. Use only
the included Speakon cables to connect the Omnipanel to the receiver. Connect
the cable into back of the Omnipanel [17] and rotate it to the right to lock it in
place. Do the same on the side of the receiver [7]. Move the Speaker Switch [8]
to the “External Speaker” seng to transfer sound from the internal speaker to
the Omnipanel. To unplug the cables pull down on the Speakon “Quick Lock,”
rotate the cable to the le and disconnect it. Be sure to move the Speaker Switch
back to the “Internal Speaker” seng when you no longer want to output sound
through the Omnipanel.
4
17
18
19
21
20
17. Speaker Panel
18. Exciters (Piezoelectric
Drive Elements)
19. Receiver Input
20. Fastening Knob
21. Mount
Simeon Omnipanel 900 Flat Panel Loudspeaker
Figures 3 & 4

5
Simeon 5T and 6T Pendant Transmier
The Simeon 5T Transmier has 96 channels available over an UHF frequency
band to allow for the best possible sound quality and performance. The Simeon
6T Transmier oers 16 high denion digital audio channels, each with two
posions (A & B) that allow for easy setup of two transmiers side by side, and
can be used in any country. Your transmier can be interfaced with a boom
(headset) mic, as well as other audio inputs. They can either be used hand-held,
or worn around the neck or at the waist in conjuncon with a boom (headset)
mic. It is recommended that you charge the transmier fully before its inial use.
It is possible to adjust you transmier microphone sensivity to accommodate
non-standard microphones and other special requirements. If you need to
change the microphone sensivity please contact your point of sale for advice.
The Simoen 5T and 6T come with high capacity rechargeable baeries
preinstalled. They should be charged with the Simeon 602 Charging Cradle.
Simeon 5M and 6M Hand-held Transmier/Microphone
The Simeon 5M and 6M are hand held pass-around microphones.
Open the transmier baery compartment [42] and insert two NiMH
baeries (supplied), taking care to observe the correct baery polarity. Never
use disposable (alkaline) baeries in combinaon with the charging system.
It is recommended that you charge the transmier fully before its inial use.
The Simeon 5M and 610TM should be charged with the Simeon 602. Inside
the Simeon 6M baery compartment there is a Main (M) and Secondary (S)
mode switch. In normal operaon, this switch should be in the M posion. For
addional control over the hand-held microphone from the pendant transmier,
the switch can be put in the S posion. It is possible to adjust you transmier
microphone sensivity to accommodate non-standard microphones and other
special requirements. If you need to change the microphone sensivity please
contact your point of sale for advice.
Simeon 602 Transmier Charging Cradle
The Simoen 602 Transmier Charging Cradle allows for the easy simultaneous
charging of any two Simeon 5T, 6T, 5M, or 6M Transmiers, in any combinaon.
Idenfy the correct power cable for the charging cradle. Plug in the cradle [44].
Place the transmiers into the Charging Pockets [45]. When inserng the 5T and
6T transmiers, make sure the front of the receiver is facing towards the centre
of the charging cradle. The Simeon 5T, 6T, 5M and 6M will turn o automacally
when they are placed in the charging cradle. A steady red ‘ON’ charging indicator
will light during charging; a steady green indicator will light once charging is
complete [46]. Internal charging circuitry will sense when charging is complete
and will terminate charging automacally. Flashing red indicates a failure to
charge. check and replace baeries as necessary.
6
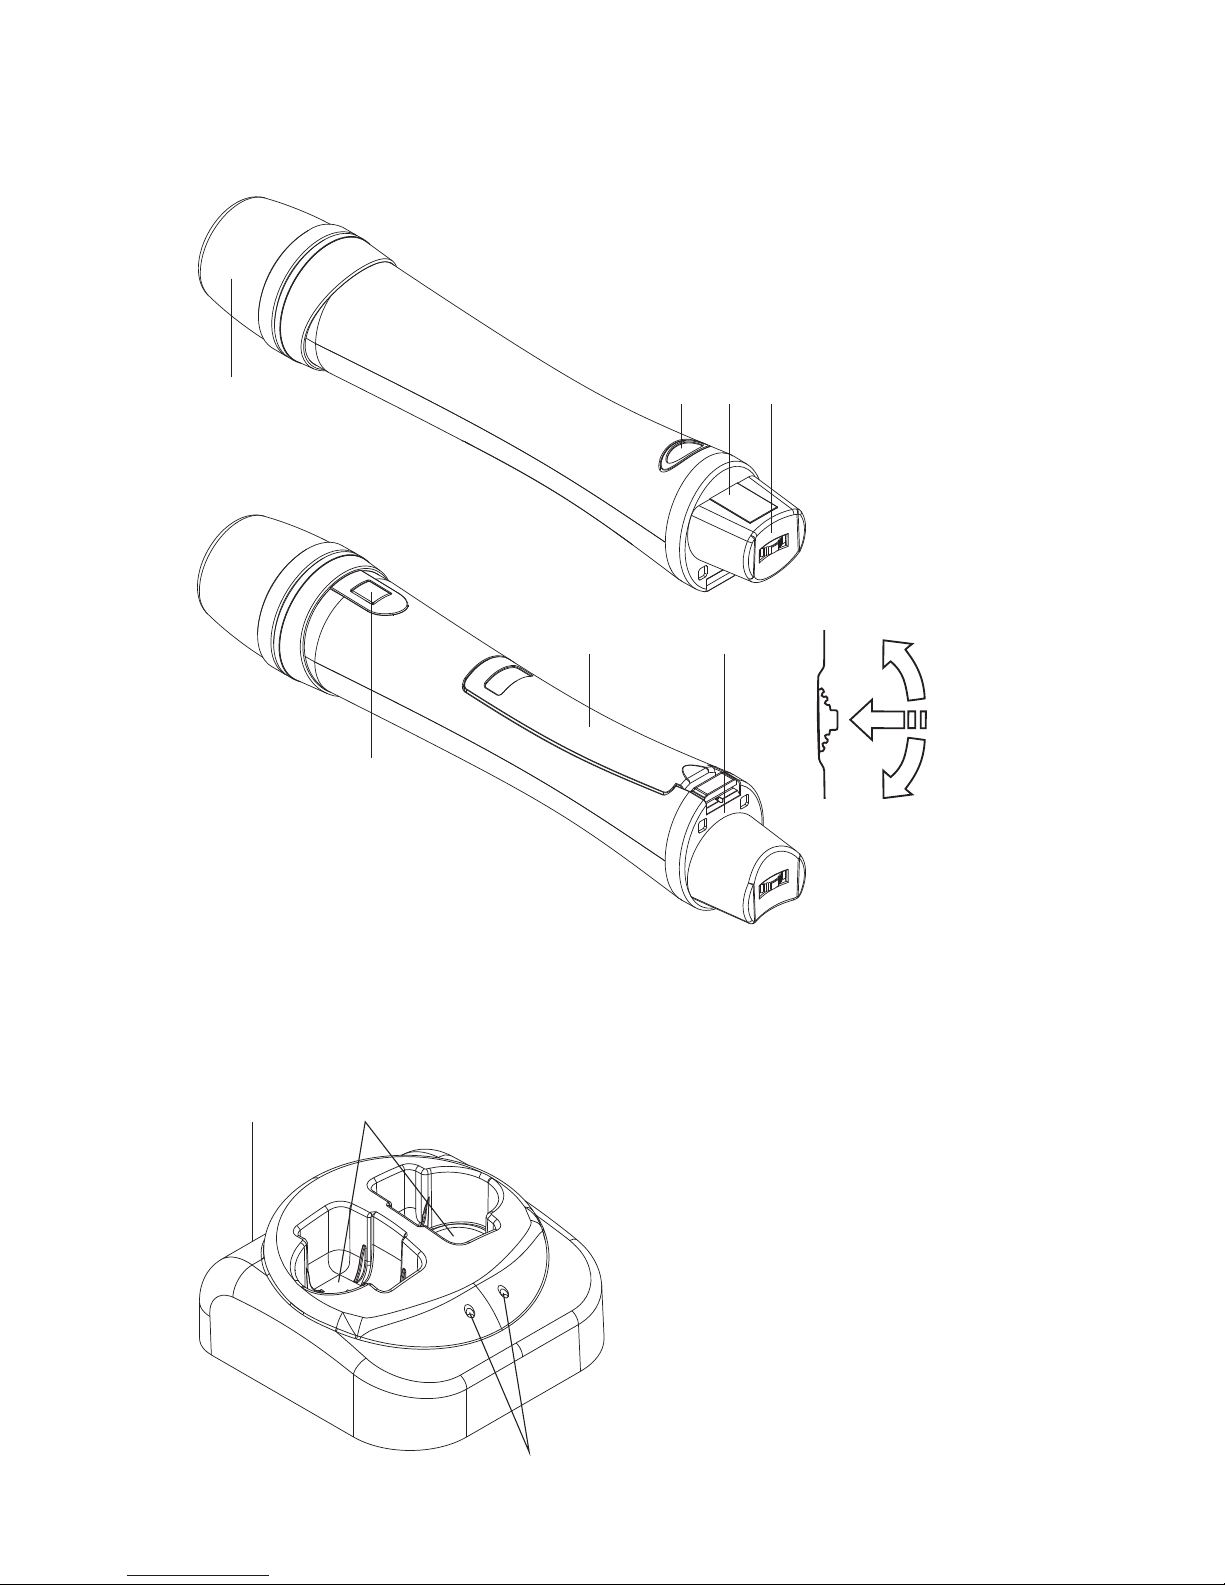
22 23 24 25
Figures 5, 6 & 7 22. Microphone
Capsule
23. Power ON/OFF
Buon
24. Display Screen
25. Control Wheel
26. Talk/Mute Buon
27. Baery Housing
28. Charging Dock
Connector
Simeon 5M and 6M Hand-held Transmier/Microphones
26
27 28
Simeon 602 Transmier Charging Cradle
29. Power Cable Plug
30. Charging Pockets
31. Charging Indicator Lights
44 45
46
Figure 8
Cursor
SET
Cursor
7
Operaon
Check that the transmiers and receiver modules are set to matching channels.
With the Simeon Audita FM System, make sure that the selected channel
frequencies do not conict with other FM equipment nearby. It is important that
separate channels are selected for each system in one locaon. With the Simeon
Audita Digital System, make sure that the receiver and both transmiers are set
to the same channel group, and that the selected group does not coincide with
other Digital soundeld systems where you are.
Simeon Audita Portable Soundeld Receiver
Flick the Power ON/OFF switch onv the front of the receiver to the “ON”
posion [1]. A steady green light indicates that the receiver is on and ready to
use. A ashing red light means the receiver is low on baeries and should be
recharged. On the front of the receiver are two volume controls [3], one for each
of the paired transmiers. Your Simeon Audita is delivered with channels already
assigned and the system is ready to use.
Simeon 5M and 6M Hand-held Transmier/Microphones
To turn the Simeon 5M and 6M on, hold the power buon on the front of the
transmier for two (2) seconds [38], unl the display screen reads “On”. This
screen shows both the channel selecon and the baery status. The capsule
of the hand-held transmiers [37] is highly direconal - point the top of the
transmier directly towards the mouth for best performance. The clicking
the talk/mute buon on the back of the transmier [41] allows for the easy
interrupon of the audio signal. The mute buon will be lit by a blue indicator
when the transmier is in talk mode, and by a red indicator when the transmier
is muted. To turn the transmier o, simply hold the power buon for two (2)
seconds, unl the display screen reads “O”.
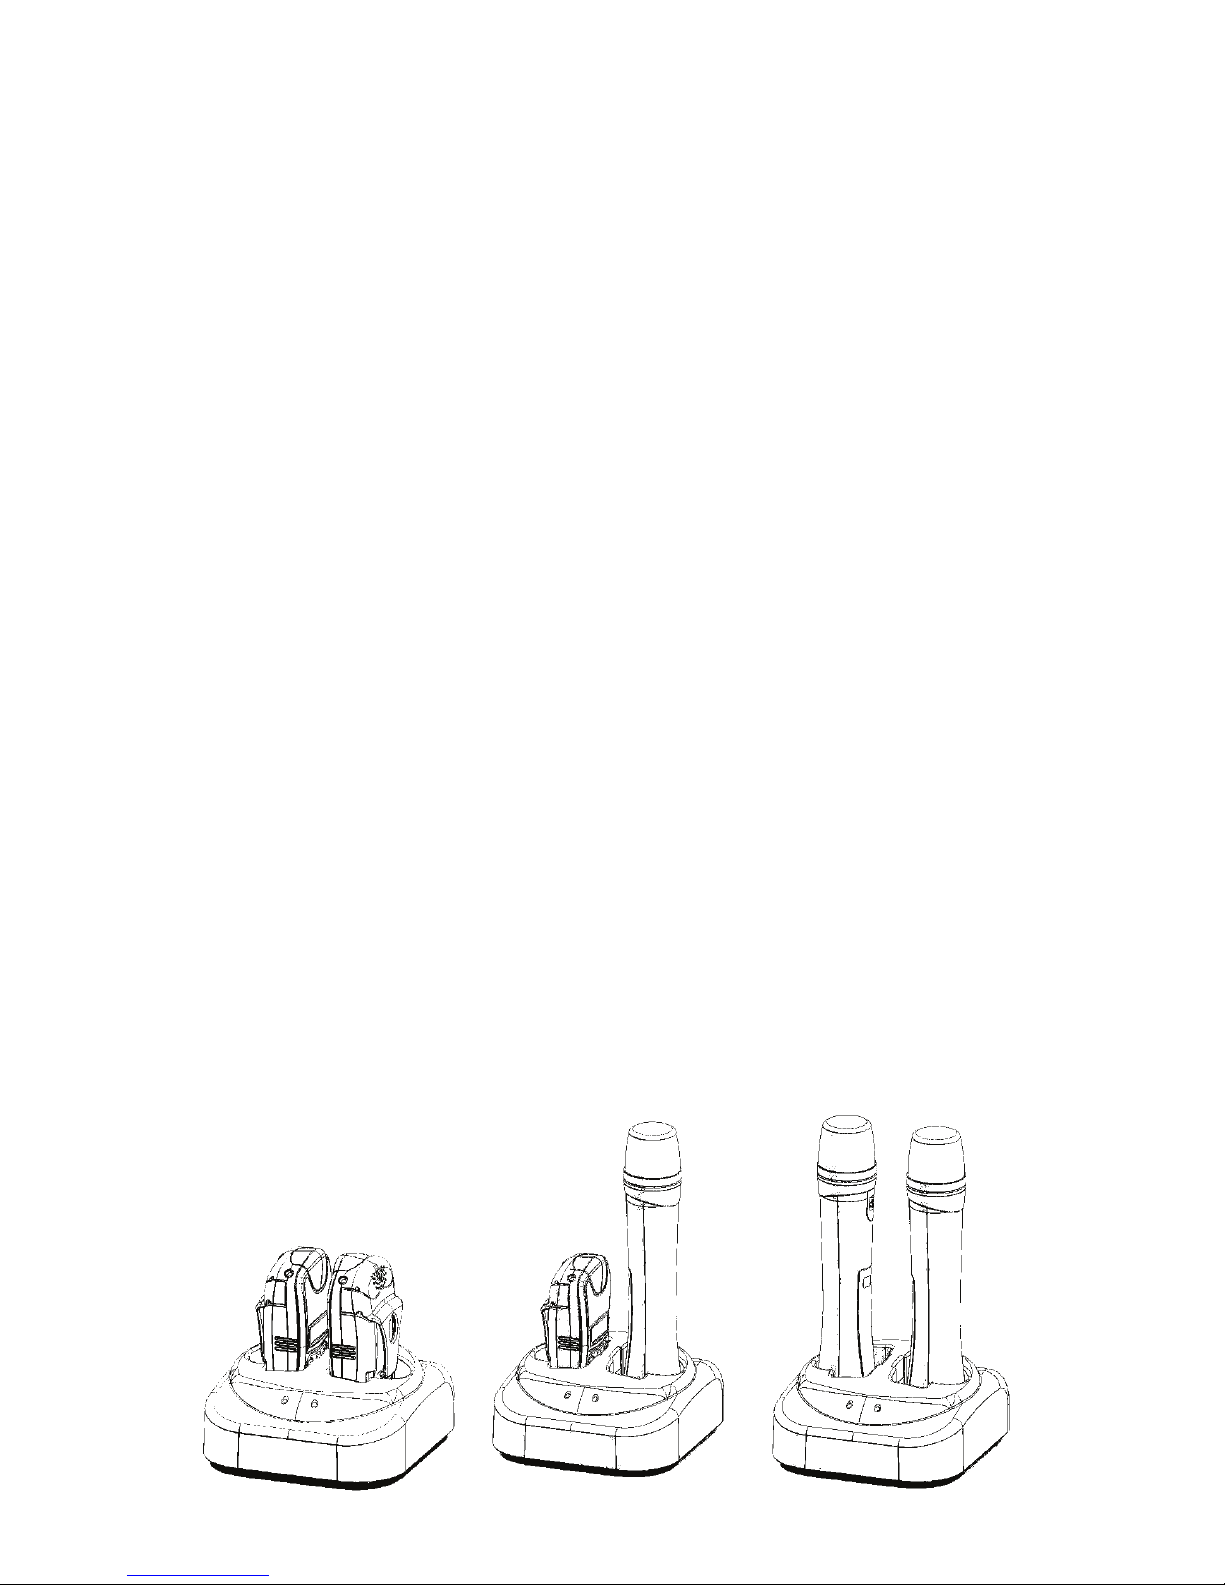
Simeon 602 Charging Combinaons
Figure 9, 10 & 11
8
32
33
34
35
36
37
38
Simeon 5T and 6T Pendant Transmiers
Figures 12 & 13
39
40
41 42
43
32. Power ON/OFF and Talk/Mute
Buon
33. Set Buon
34. Cursors
35. Display Screen
36. Microphone Capsule
37. Auxiliary Input Jack “Aux In”
38. Alternate Charging Plug
39. Charging Dock Connectors
40. Belt Clip
41. Lanyard Hook
42. Microphone Input Jack “Mic In”
43. Neck Strap Hooks

9
Simeon 5T and 6T Pendant Transmiers
To turn the Simeon 5T or 6T on, hold the power buon on the front of the
transmier [21], unl the display screen reads “On”. This screen shows both the
channel selecon and the baery status. Adjust the volume control corresponding
to the Digital posion (A or B) or FM channel (1-96) displayed on your transmier.
The capsule of the Pendant Transmiers [25] is highly direconal - point the top
of the transmier directly towards the mouth for best performance. By quickly
pressing the talk/mute buon on the front of the transmier, the same one you
used to turn the transmier on [21], the easy interrupon of the audio signal is
possible. The power buon will be lit by a blue indicator when the transmier is
in talk mode, and by a red indicator when the transmier is muted. To turn either
of the transmiers o, simply hold this same power buon unl the display
screen reads “O”.
Simeon 623 Direconal Boom Microphone
The Simeon 623 microphone and its alternaves are great addions to the
Simeon Audita system, improving its performance and ease of use. Using it in
conjuncon with the Simeon 5T and 6T transmiers frees up your hands and
allows the transmier to be worn either around the neck or at the waist.
Plug the microphone into the 3.5mm microphone input jack MIC IN on the top
of the transmier [31]. The 5T and 6T will automacally adjust sound levels to
account for microphone or auxiliary input feeds. Please Note: If the microphone
is inserted into the AUX IN jack speech will not be amplied. If you are using
a Simeon headset (boom) microphone, place the frame [34, 35] over your ears
and adjust the boom arm [33] to posion the mic capsule to point to the corner
of your mouth. It is not necessary to place the microphone in front of your lips
and doing so may diminish sound quality. The boom microphone frame must be
adjusted to rest comfortably over both ears, with no other contact or pressure
points against the head or face. Ensure that the 5T or 6T are not muted [21] and
are turned ON. The auxiliary input jack AUX IN can be used for connecng to
external audio feeds, including laptops and iPods.
Simeon 623 Direconal Boom Microphone
Figures 14 & 15
45
44
46 47
3
0
˚
44. Microphone Direconal Capsule
45. Earhooks
46. Spring Metal Frame
47. Connector Cable

10
Assigning Channels
FM Transmiers 5T and 5M, and the Simeon FM Dual-Receiver Module, all
part of the Simeon Audita FM System, feature a simple-to-use menu that allows
selecon between 96 UHF channels. To assign a new channel, press the SET
buon unl the displayed channel ashes. Use the up and down cursors to select
the new channel. Press SET again to conrm the new channel selecon. Make
sure that the transmier channel matches that of the corresponding receiver
module.
Digital Transmiers 6T and 6M will automacally pair themselves with the
nearest available Simeon Audita Receiver. Before they are paired, the transmier
display screen [24, 39] will show two dashes. Once they are paired, the screen
will show the channel group number and a leer, either A or B. The rst
transmier to be turned on will be on Channel A, as shown on the transmier
display screen, and will correspond to the le volume dial on the reciever [3]. The
receiver display screen [2] will conrm the connecon to channel A by displaying
the signal strength of transmier A on the far le of the screen. The second
transmier to be turned on will be on Channel B, as shown on the transmier
display screen, and will correspond to the right volume dial. The receiver display
screen will conrm the connecon to channel B by replacing the two dashes
on the right side of the screen with the channel group number, and displaying
the signal strength of transmier B on the far right of the screen. Note that the
digital transmiers will not display a channel unl they pair themselves with a
Simeon Audita Receiver. The Simeon Digital Dual-Receiver Module features a
simple-to-use menu that allows selecon between 16 digital channels. To assign
a new channel, press the SET buon [4] for two seconds, unl the displayed
channel group number ashes. Use the up and down cursors [5] to select the
new channel group. Press SET again to conrm the new channel group selecon.
The receiver display screen will show the word “On” to conrm the successful
change.

11
External Connecons
The side panel of the Simeon Audita has several external connectors. These
can be used to connect devices other than the two transmiers to the receiver.
In the le of the side panel there is an auxiliary RCA input jack with gain control
[9]. This can be used for connecng external audio sources, such as computers
and iPods to the receiver with the appropriate cable.
On the right of the side panel there is a 3.5mm auxiliary output jack [13].
This can be used for direct connecons to special equipment such as perAudital
FM systems. To make advanced sengs adjustments, connect the perAudital
FM transmier to the port on the side of the receiver. Screw-adjust gain and
equalizer controls adjust the output for the FM transmier independently of the
speaker volume. The equalizers allow adjustment at 100, 1,000 and 10,000 Hz.
At the boom of the side panel on the Simeon Audita there is a Speakon cable
jack [7]. This can be used to connect the receiver to a Simeon Omnipanel when
larger amplicaon soluons are needed. To set this up, connect the cable into
back of the Omnipanel [17] and rotate it to the right to lock it in place. Do the
same on the side of the receiver [7]. Move the Speaker Switch [8] towards the
front of the receiver to the “External Speaker” seng to transfer sound from
the internal speaker to the Omnipanel. To unplug the cables pull down on the
Speakon “Quick Lock,” rotate the cable to the le and disconnect it. Be sure to
move the Speaker Switch back to the “Internal Speaker” seng, towards the
back of the receiver, when you no longer want to output sound through the
Omnipanel.
The 5T and 6T Transmiers are ed with an auxiliary input jack [26] to allow
for connecon and transmission of external audio feeds. To set these up, connect
them to the port on the top of the transmier. The pendant transmiers will
automacally mute the microphone when an auxiliary feed is connected.

12
Seng Gain Level
Check the volume posion of both channels before turning the system on!
Turn the Simeon Audita ON at the master power switch on the front of the
system [1]. The Simeon Audita comes with two independent volume controls
– one for each transmier. With the transmiers turned ON and microphone
posioned correctly, slowly increase the volume controls to a comfortable
listening level. Avoid excessive amplicaon – speech should be comfortably
audible throughout your listening area.
On the top right of the side panel of the Simeon Audita there is a screw-adjust
bass and treble control [12]. This will change the tone quality of the Simeon
Audita’s built in speaker.
Baery Care and Charging
For best performance, use only the included Nickel Metal-Hydride (NiMH) size
AA rechargeable baeries in the 5M and 6M transmiers. Never use disposable
(alkaline) baeries in combinaon with the charging system.
Do not aempt to open or change the baeries in the 5T and 6T transmiers.
These are special lithium baeries and must be changed at your service centre.
Charge the transmiers aer each day of use. The transmiers will
automacally power o when placed in the charging cradle. The charging
indicator lights [46] will show charging progress: red during charging and green
when complete.

13
Useful Tips
• Wear the pendant transmiers with the belt clip or lanyard and boom mic
for comfort and ease of usability.
• Adjust the boom mic headset for comfort, and ensure that the microphone
is posioned correctly.
• By selecng the Secondary (S) posion for the switch inside the 5M and 6M
baery compartment, the handheld can be controlled remotely from the
pendant transmier.
• Consider hanging the Simeon Audita receiver from its keyhole, wall mounng
it, or using a tripod oor stand to ensure it is placed opmally.
• Avoid approaching too close to the Receiver or Omnipanel with the
transmiers turned on – this may cause a squeal or feedback from the
speakers.
• Avoid excessive amplicaon – soundeld will make speech clearly audible
at a comfortable listening level.
• Use the tone control on the side of the Simeon Audita to ne-tune the
speaker’s sound. Your audiologist or sound professional may assist you with
this adjustment.
• Use only the recommended baeries for the transmiers. Use only the
correct power adapter for the receiver and charging cradle.
• If you have forgoen to charge the receiver and the internal baery is low, it
may be operated from an AC outlet via the charging power adapter.
• Serial numbers are located on the back of the Simeon Audita, on the back of
the Omnipanel, on the boom of the 602, on the back of the 5T and 6T, and
inside the 5M and 6M baery compartments.

14
Microphone care
The microphone is the most delicate component of your soundeld system.
Protect the microphone from strain and excessive force. Clean the pin of the
microphone plug regularly and replace damaged or missing windscreens and
protect the microphone capsule from moisture.
The Simeon 623 boom (headset) microphone has a unidireconal pick-up
paern. The p of the mic capsule must be pointed towards the corner of the
mouth for proper performance.
Five Year Limited Warranty
The Simeon Audita Portable Soundeld main system components (the
transmier and receiver) are covered by a FIVE year parts and labour warranty,
eecve from the date of purchase. Simeon microphones, chargers, adapters
and baeries are warranted for ONE year.
The manufacturer’s warranty provides for repair or replacement of defecve
components or workmanship. Expressly not covered are damages resulng
from abuse, neglect, and unapproved substuon of components, baeries or
accessories. Extended warranty coverage may be purchased under the Simeon
Service Plus extended full service program.

15
Troubleshoong
No Sound
Check the Speaker Switch on the side of the receiver. Check that the transmiers and
receiver are both turned on, and that the transmiers are not set to MUTE. Verify that
the Simeon Audita receiver baery is charged, or else plugged into an AC supply with
the correct power adapter. Check or replace transmier microphone. Check that the
transmier baeries are charged. Check that the hand-held transmier baeries are
correctly inserted, observing the correct polarity, and that the baery terminals are
making rm contact inside the baery housing.
No FM Signal
Check that the transmiers and receivers are set to matching channels and are within
transmission range. Check or replace baeries. Check transmier is ON posion. Make
sure the volume controls on the FM Dual-Receiver Module are not locked in the OFF
posion.
No Digital Signal
Check if Receiver and Transmier are within transmission range. Make sure 6M mode
switch is set to the M posion.
Dead Baeries
Check that the transmier baeries are correctly inserted, observing the correct polarity,
and that the baery terminals are making rm contact inside the baery housing. Ensure
that the transmier has been turned o before charging.
Baeries not Charging
Check that the transmier is making contact in the pocket of the charging cradle and that
the charger is connected to the correct power supply. Remove any tape or sckers from
the transmier that may impede contact with the charger. To reset the transmier baery
indicator in case of an unexpected reading, turn the transmier OFF and then ON again.
Flashing Charging Cradle Light
The transmier is refusing to charge. Check and replace transmier baeries as necessary.
Weak Sound
Check and adjust volume seng. Adjust microphone posion. Check or replace
microphone. Check that the correct power adapter is connected to the receiver.
Noise or Distoron
Check for possible sources of radio interference (e.g. nearby computers, other FM or
Digital systems) and try dierent FM or Digital channels. Check the microphone and the
integrity of microphone cord and plug. Clean microphone plug pin with swabbing alcohol
or other solvent to maintain noise-free connecon. Turn the other volume dial on the
Dual-Receiver all the way to the OFF posion.
Feedback
Check and adjust volume sengs. Ensure that the microphone is posioned correctly.
Avoid approaching too close to the portable receiver with the microphone on. To guard
against feedback, avoid poinng the microphone directly towards the portable receiver.
Intermiency
Check microphone, mic cable and the plug connecon with the transmier. Replace
microphone if necessary.

16
System Technical Specicaons
Simeon Audita Overall System Speccaons
Output power 40W (RMS)
Speaker types 5” Neodymium, 1” tweeter
Audio control Gain, Tone control, 3-band on auxilary output
Auxiliary input Single RCA connector. Input sensivity 350mV
Auxiliary output 3.5mm mini plug. Output level 1V
Speaker control Internal Speaker / External Speaker select switch
External speaker output Single Speakon Connector, 4 Ohm
Power requirements 100 ~ 240VAC / 20VDC, 3.25A switching power supply
Speaker baery type 14.4 V, 4.4Ah (Lithium-ion) rechargeable baery, user replaceable
Speaker baery meter 4 LEDs to indicate baery status
Autonomy ≥ 7 Hours at typical gain seng
Charging me 10 Hours
Dimensions 162 x 202 x 326mm (6.5 x 8.0 x 13 inches)
Weight 2.51kg (5.5lB) Including baery
Notes Operaon of this device is subject to the following two
condions:
1) This device may not cause interference
2) This device must accept any interference, including
interference that may cause undesired operaon of the
device
Certain nocaons or licensing may apply to infrared
equipment in your jurisdicon. Contact the local radio
equipment regulang authority for your area for specic
requirements.
© 2013 Supporve Hearing Systems Inc.

17
Receiver Module Technical Specicaons
With RD6 Digital Dual Receiver Module
Frequency range 2.4 ~ 2.5GHz
Number of channels 16 Channel pairs
Squelch Adjust OFF - 90 ± 3dBm
Total harmonic distroon < 1%
Signal /noise rao > 60dB
Audio frequency response 40Hz ~ 18kHz
Operang Transmission
range
25m (>80); 15m (50) to establish pairing
Transmission Latency ≤ 6mS
Operang temperature -10°C ~ +60°C (14°F ~ 140°F)
Cercaons Industry Canada, FCC, CE
With RD5 FM Dual Receiver Module
UHF Frequency range 640~664MHz (Canada & USA); 863~865MHz (Europe)
Number of channels Canada & USA frequencies: 96; European frequencies: 16
Squelch Adjust OFF - 100 ± 3dBm
Total harmonic distroon < 1 %
Signal /noise rao > 65dB
Audio frequency response 70 Hz ~ 17kHz
Operang Transmission
range
50 ~ 70m (160 ~ 230)
Transmission Latency Real me
Operang temperature -10°C ~ +60°C (14°F ~ 140°F)
Cercaons Industry Canada, FCC, CE

18
Simeon 5T FM Transmier
Internal microphone type Electret condenser
UHF Frequency range 640~664MHz (Canada & USA); 863~865MHz (Europe)
Number of channels Canada & USA frequencies: 96; European frequencies: 16
Radio signal power High: 10dBm; Low: 3 ± 2dBm
Operang range 50 ~ 70m (160 ~ 230)
Max modulaon ± 40KHz with level liming
Baery type 3.7V 1200mAh (Lithium ion) rechargeable, replaceable at service centre
Autonomy High: 12 hours; Low: 16 hours
Charging me 4 ~ 6 hours
Ext. microphone input 3.5mm mini plug connector
Auxiliary input 3.5mm mini plug connector
LED indicators Mute / Talk funcon; Charging status
LCD display Channel number; Baery status
Wearing opons Safety-release lanyard, belt clip.
Dimensions 33 x 52 x 88mm (1.3 x 2 x 3.5 inches)
Weight 77g (2.7 Oz) Including baery
Cercaons Industry Canada, FCC, CE
Simeon 5M FM Wireless Microphone
Microphone capsule Condenser
UHF Frequency range 640~664MHz (Canada & USA); 863~865MHz (Europe)
Number of channels Canada & USA frequencies: 96; European frequencies: 16
Radio signal power High: 10dBm; Low: 3 ± 2dBm
Operang range 50 ~ 70m (160 ~ 230)
Max modulaon ± 40KHz with level liming
Baery type AA Nickel Metal Hydride (NiMH) rechargeable, user replaceable
Autonomy 11 Hours
Charging me 4 ~ 6 hours
LED indicators Mute / Talk funcon; Charging status
LCD display Channel number; Baery status
Dimensions(DxH) 37 x 200mm (1.5 x 8 inches)
Weight 143g (5 Oz) Including baeries
Cercaons Industry Canada, FCC, CE
Radio Frequency Transmier Technical Specicaons
Other manuals for Audita
1
Table of contents


