PSB 760IMGNT User manual

Owner's Guide
Thank
you
for
your
purchase.
Our
speakers
are
designed
to
make
high-performance
sound
easy
to
bring
into
your
life.
They
have
the
wide
frequency
and
dynamic
range,
natural
tonal
balance,
and
precise
spatial
imaging
needed
to
make both
music
and
movies
powerfully
lifelike
and
enjoyable.
All
of
our
models
match
closely
in
tonal
balance
to
allow
easy
mixing
in
home
theater
systems.
The
quick-start
instructions
below
will
get
you
going.
But
we
hope
you
will
read
through
this
booklet
to
help
assure
your
maximum
enjoyment.
I.
QUICK-START
GUIDE
A.
Be
sure
power
to
your
amplifier/receiver
and
other
electronics
is
off
before
making
connections.
B.
Install
bumpers
or
feet
with
adjustable
levelers
or
spikes.
1.
Bumpers
and
Support
Bars
(Bookshelf
and
Center
Channel
Speakers)
Attach
the
adhesive-backed
bumpers
near
the
corners
of
bookshelf
and
center
channel
speakers,
to
protect
the
finish
of
the
speaker
and
the
finish
of
the
furniture
beneath.
For
centre
channel
speakers
supplied
with
support
bars,
position
the
bar
to
aim
the
speaker
toward
the
listening
position.
2.
Molded
Feet
and
Stabilizers,
Adjustable
Rubber
Levelers
and
AdJustable
Spikes
(Tower
Speakers)
If
not
already
attached,
screw
the
supplied
moulded
feet
into
the
threaded
inserts
located
in
the
corners
of
the
speaker
bottom.
In
some
models,
speaker
spikes
for
carpet
use
or
threaded
rubber
isolation
levelers
for
hard
floor
use
can
be
inserted
into
the
feet.
In
other
models,
spikes
or
levelers
go
directly
into
the
threaded
inserts
in
the
pedestal
base
on
the
bottom
of
the
speaker
rather
than
into
feet.
SPEAKERS

a)
Carpet
Use
Screw
four
spikes
with
four
lock
nuts
into
the
inserts
located
in
the
four
corners
of
the
speaker
bottom,
Locate
the
speakers
and
adjust
to
the
desired
height
(higher
for
thicker
carpet)
and
tighten
the
lock
nuts
with
the
wrench.
b)
Hard
Floor
Use
Screw
four
threaded
rubber
isolation
bumpers
with
four
lock
nuts
into
the
inserts
located
in
the
four
corners
of
the
speaker
bottom.
Adjust
and
tighten
the
lock
nuts
with
nut
wrench.
C.
Position
your
main
speakers,
as
symmetrically
as
possible,
at
a
comfortable
listening
distance-slightly
closer
to
each
other
than
they
are
to
you.
(For
surround
speakers,
see
later
instructions.)
D.
Using
standard
18
gauge
(1.0mm
dia)
lamp
wire
or
better,
connect
the
Red
(positive)
terminal
on
each
channel
of
your
amp/receiver
to
a
Red
terminal
post
on
that
channel's
speaker,
and
the
Black
(negative)
terminal
to
a
Black
terminal
post
on
the
speaker.
E.
Setting
the
volume
low
beforehand,
turn
on
your
associated
equipment,
find
a
comfortable
listening
volume-and
enjoy
your
favourite
audio
and/or
video
selections.
F.
After
you
have
settled
in
with
your
speakers,
read
through
this
booklet.
Be
sure
to
read
jfProtecting
Your
Investment'
II.
ADDITIONAL
DETAILS
ON
CONNECTING
YOUR
SPEAKERS
A.
Important:
Always
tum
off
your
electronic
equipment
before
connecting
speakers.
If
you
don't,
severe
damage
to
equipment
and/or
your
ears
may
result.
B.
Selecting
Speaker
Wire
We
recommend
the
following
gauge
of
standard
two-conductor
wire
for
the
wiring
distances
specified;
if
you
prefer,
you
can
use
thicker
(lower-gauge)
wire.
Under
25ft
(7.5
m):
25-50
ft
(7.5-15
m):
50-100ft
(15-30
m):
Over
100ft
(>30m):
C.
Connecting
In
Phase
18-gauge
or
1.0
mm
dia
(lamp
cord)
16-gauge
or
1.3
mm
dia
(heater
cord)
14-gauge
or
1.6
mm
dia
12-gauge
or
2.0
mm
dia
Connect
speakers
identically
to
your
amplifier
or
receiver
on
each
2

channel-Red
amp/receiver
terminal
to
Red
speaker
terminal,
Black
to
Black.
This
will
ensure
that
the
diaphragms
of
the
speakers
on
both
channels
move
forward
and
backward
together
("in-phase"),
rather
than
in
opposition
("out-of-phase").
In-phase
connection
provides
maximum
clarity
and
bass,
while
out-of-phase
connection
results
in
frequency
cancellations
and
produces
thinner
and
less
distinct
sound-with
less
bass,
vague
vocal
quality,
and
no
solid
centre
image.
To
help
insure
the
proper
connection,
the
two
separate
conducting
wires
in
a
standard
two-
conductor
speaker
cable
are
coded
in
one
way
or
another
to
be
distinguishable
from
each
other.
(The
jacket
of
one
wire
may
be
ribbed
or
marked
with
"+"
signs,
or
one
wire
under
the
insulation
may
be
a
different
colour
from
the
other.)
Use
this
wire-coding,
together
with
the
amp/receiver
and
speaker
colour-coding,
to
be
sure
you
are
connecting
the
same
wire
of
a
given
pair
to
a
like-coded
terminal
at
both
ends
of
your
connection.
D.
Be
sure
all
wiring
terminals,
are
tightened
firmly
secure,
but
be
careful
not
to
overtighten
and
damage
the
connectors.
Ri
ght
Speaker
+ -
[Q][]
I
I I
---------.
Amp
l
ifier
Outpu
t
I
I
I
[Q]C
o•
+
Right
Left
Speake
r
Left
Figure
1:
Wiring
in
Phase
Between
Speakers
and
Amplifier
E.
Bi·wiring
and
Bi-amping
The
metal
jumper
strap
that
connects
the
two
sets
of
terminals
on
some
of
our
speakers
is
removable.
This
allows
you
to
connect
either
separate
cables
to
the
separated
woofer
and
tweeter
terminals
("bi-wiring")
or
separate
amplifiers
("bi-amping").
With
Bi-Amp
hookup
you
must
use
either
identical
amplifiers
or
amplifiers
adjusted
to
have
the
same
voltage
gain.
Consult
your
PSB
dealer
for
further
information.
(Illustrations
are
for
one
speaker
hookup
only).
With
single
cable
inputs,
the
jumper
straps
3

must
be
in
place
and
both
sets
of
terminals
tightened
firmly.
81-WIRE
HOOKUP
81-AMP
HOOKUP
SPEAKER SPEAKER
AMP
+
00{"'
+Mid/High
OUTPUT
-
~
Mid/High
-
AMP
+
+
Woofer
#2
+
Woofer
-
{labeled)
OUTPUT
--
{labeled)
Figure
2:
Bi-wire
and
Bi-amp
Wiring
Between
Speakers
and
Amplifier
Ill.
SPEAKER
PLACEMENT-MAXIMIZING
YOUR
ENJOYMENT
The
positioning
of
your
main
left-right
speakers
for
stereo
or
home
theatre
can
play
a
major
role
in
their
performance.
We
hope
you
will
read
through
the
placement
discussion
on
these
next
few
pages,
beginning
with
these
basics:
A.
The
optimum
placement
height
for
main
speakers
is
normally
with
their
tweeters
at
about
the
same
height
as
your
ears
when
you
are
seated.
Our
tower
speakers
are
designed
for
optimal
listening
when
seated.
For
our
compact
monitors,
we
recommend
using
generally
available
accessory
speaker
stands
to
achieve
the
right
height
if
you
are
not
using
existing
shelves
or
furniture.
You
may
prefer
to
tilt
the
speakers
towards
ear
level
if
the
proper
height
is
not
possible.
B.
You
will
generally
get
the
best
imaging
and
other
spatial
qualities
if
your
speakers
and
your
usual
seating
position
form
an
almost
equilateral
triangle,
with
the
speakers
not
quite
as
far
apart
from
each
other
as
they
are
from
you.
If
you
must
sit
closer
to
one
speaker
than
the
other,
use
the
Balance
control
on
your
electronics
(or
the
individual
level
controls
on
home
theatre
channels)
to
give
the
more
distant
speaker
a
balancing
boost
in
volume.
C.
The
best
high-frequency
dispersion,
producing
the
widest
"sweet
spor
in
which
you
and
others
can
sit
and
enjoy
optimum
high-frequency
definition,
will
result
when
your
speaker
enclosures
are
positioned
vertically
rather
than
horizontally.
If
you
need
to
place
compact
monitor
enclosures
horizontally,
the
speakers
will
still
perform
very
well,
but
the
seating
area
where
you
will
enjoy
optimum
sound
will
become
more
narrow.
We
suggest
you
position
the
tweeters
to
the
outside
away
from
the
centre
line.
4

D.
If
you
sit
equally
distant
from
both
speakers,
angling
the
speakers
inward
crtoeing
them
in')
about
5
to
10
degrees
usually
produces
the
best
convergence
of
high
frequencies
where
you
listen.
Different
listening
positions
may
require
different
toe-in.
E.
To
go
beyond
these
basics
and
experiment
with
positioning
for
optimum
performance,
please
read
the
placement
guidelines
that
follow.
They
are
about
the
speakers,
the
room,
and
you.
1.
The
Speakers
in
Relation
to
Room
Boundaries
The
position
of
your
speakers
with
respect
to
the
walls,
floor,
and
ceiling
of
your
listening
room
will
often
affect
their
sound
in
major
ways.
a)
The
closer
you
place
speakers
to
the
boundary
surfaces
of
your
room,
the
greater
the
proportion
of
bass
in
their
overall
sound.
This
is
due
to
the
enclosing,
"focusing"
effects
of
nearby
surfaces
on
longer-wavelength
(lower)
frequencies.
Positioning
the
speakers
near
the
intersection
of
two
surfaces
(wall
and
wall,
wall
and
floor,
or
wall
and
ceiling)
will
produce
more
apparent
bass
than
placement
near
a
single
surface.
The
greatest
proportion
of
bass
is
delivered
by
placement
near
three
intersecting
surfaces-in
a
room
comer
near
the
floor
or
ceiling,
where
the
convergence
of
the
two
walls
and
the
floor/ceiling
produces
an
amplifying
effect
that
is
a
bit
like
that
of
a
megaphone.
And
the
least
bass
comes
from
placing
a
speaker
away
from
all
boundaries.
Your
own
tastes
should
decide
what
proportion
of
bass
response
seems
right
in
your
room.
b)
The
combination
of
the
three
dimensions
of
your
room
generally
will
produce
at
least
three
points
in
the
room
where
the
frequency
response
you
experience
related
to
a
given
position
(of
either
the
speaker
or
you)
will
either
greatly
increase
or
almost
disappear.
The
most
obvious
effects
are
on
low
frequencies,
but
mid-frequency
effects,
while
usually
subtler,
are
also
often
present.
Keep
in
mind,
then,
that
very
small
changes
in
positioning
(of
the
speakers
or
you)
may
produce
major
or
subtle
changes.
c)
Distances
of
speakers
from
the
walls
can
make
great
differences
in
the
number,
strength,
and
particular
frequencies
of
secondary
reflections--changing
frequency-
balance,
sonic
spaciousness,
and
definition.
Most
listeners
prefer
their
speakers
at
least
a
few
inches
from
all
walls,
but
the
choice
is
yours
to
determine
by
listening.
5

2.
You
in
Relation
to
the
Speakers
Where
you
sit
in
relation
to
your
speakers
obviously
makes
a
difference
too.
The
proportions
of
the
particular
triangle
formed
by
your
speakers
and
you
matter.
(You
may
need
to
send
more
power
to
the
more
distant
speaker
to
compensate
if
you
get
much
further
from
one
speaker
than
the
other.)
The
overall
distances
involved
also
matter.
As
you
get
further
from
the
speakers,
more
sound
reflected
from
your
room•s
surfaces
(in
contrast
to
the
sound
coming
directly
from
the
speakers)
reaches
your
ears,
and
the
original
spatial
relationships
in
a
recording
are
changed
as
your
room
"takes
over."
Sometimes
the
result
is
a
mellower,
more
"integrated"
sound.
Other
times,
it•s
a
more
strident
or
annoyingly
"echoey·
-or
other-quality.
Once
again,
the
particular
dimensions
of
your
room
play
a
part.
And
depending
on
what
seems
more
realistic
and/or
enjoyable
to
your
ears,
you
may
choose
to
sit
at
a
great
distance
or
have
close-up,
"near-field"
sound.
Keep
in
mind
that
the
right
••toe-in,"
the
right
speaker
height,
and
a
reasonably
symmetrical
distance
from
the
speakers
all
tend
to
work
together
to
deliver
the
best
high-frequency
definition
and
imaging.
3.
You
in
Relation
to
Room
Boundaries
Changing
your
own
position
with
respect
to
a
room•s
boundaries
may
also
bring
a
big
effect,
sometimes
for
a
small
change.
Getting
further
from
the
wall
behind
you
may
make
sound
more
precise
and
localized.
Getting
closer
may
make
sound
more
"mellow"
and
integrated.
Coming
too
close-to
back
wall,
side
wall,
or
(especially)
a
corner-may
trigger
a
major
sonic
peak
or
cancellation
of
a
certain
band
of
frequencies.
It
depends
on
factors
we
can't
cover
fully
here
but
do
get
into
on
our
web
site
-
www.psbspeakers.com.
Remember
too,
with
respect
to
your
own
positioning,
that
it
may-or
may
not-be
easier
to
change
your
own
seating
location
than
to
move
your
speakers.
As
with
so
much
else
in
life,
the
one
certain
rule
is
that
you
shouldn•t
fix,
or
worry
about,
what
isn't
broken
(audibly
in
this
case),
especially
if
it
means
moving
heavy
furniture.
As
you
consider
the
three
relationships
we
have
outlined,
the
idea
is
to
manipulate
whatever
variable
is
easiest
and
most
productive
for
improving
your
listening
experience.
Be
sure
to
base
your
judgements
on
listening
to
a
good
variety
of
recordings
of
vocals,
and
acoustic
instruments,
soloists,
different
movies
and
musical
instruments
to
most
easily
recognize
tonal
balance
shifts.
6
IV.
POSITIONING
SURROUND
SPEAKERS
Your
surround
speakers
and
how
they
are
positioned
will
determine
the
sonic
realism
of
movies
and
multi-channel
audio.
Most
surround
sound
is
meant
more
to
create
greater
depth
and
overall
ambience
than
to
localize
effects
as
coming
from
a
particular
spot.
This
is
especially
true
of
Dolby
Pro-Logic
surround
sound,
in
which
both
surround
channels
carry
the
same
(monophonic)
information
and
can't
be
differentiated
from
each
other.
With
Dolby
Digital
and
DTS
surround
sound,
there
is
very
definite
localization
of
some
surround
effects.
How
much
you
prefer
these
localized
effects
vs.
overall
sonic
depth
and
diffusion
is
up
to
your
listening
preferences.
If
you
are
listening
to
multi-channel
music,
you
may
want
the
maximum
localization
of
instruments.
But
if
your
main
concern
is
the
surround
effects
in
movies,
they
tend
to
depend
more
on
front-to-back
movement
than
on
specific
localization.
You
can
locate
and
aim
your
surround
speakers
to
produce
the
effects
you
prefer,
whether
precisely
pinpointed
or
pleasantly
diffused.
Although
some
people
prefer
to
have
their
surround
speakers
behind
them
on
stands
at
ear
height,
most
find
it
easiest
and
best
to
mount
compact
monitors
on
the
walls,
at
least
two
feet
above
your
ear
height
when
you
are
seated.
If
your
listening
room
is
small,
aiming
the
speakers
to
diffuse
their
sound
somewhat
may
produce
the
best
overall
surround
illusion.
They
can
be
mounted,
for
instance,
on
the
side
walls
and
aimed
to
bounce
sound
off
the
rear
walls,
or
vice
versa.
If
you
opt
for
localization
of
sound
from
the
surrounds,
the
speakers
should
face
your
listening
spot,
aimed
at
or
slightly
above
your
seated
position.
Speakers
mounted
on
the
side
walls
generally
will
sound
best
when
placed
a
foot
or
two
behind
your
seating
area.
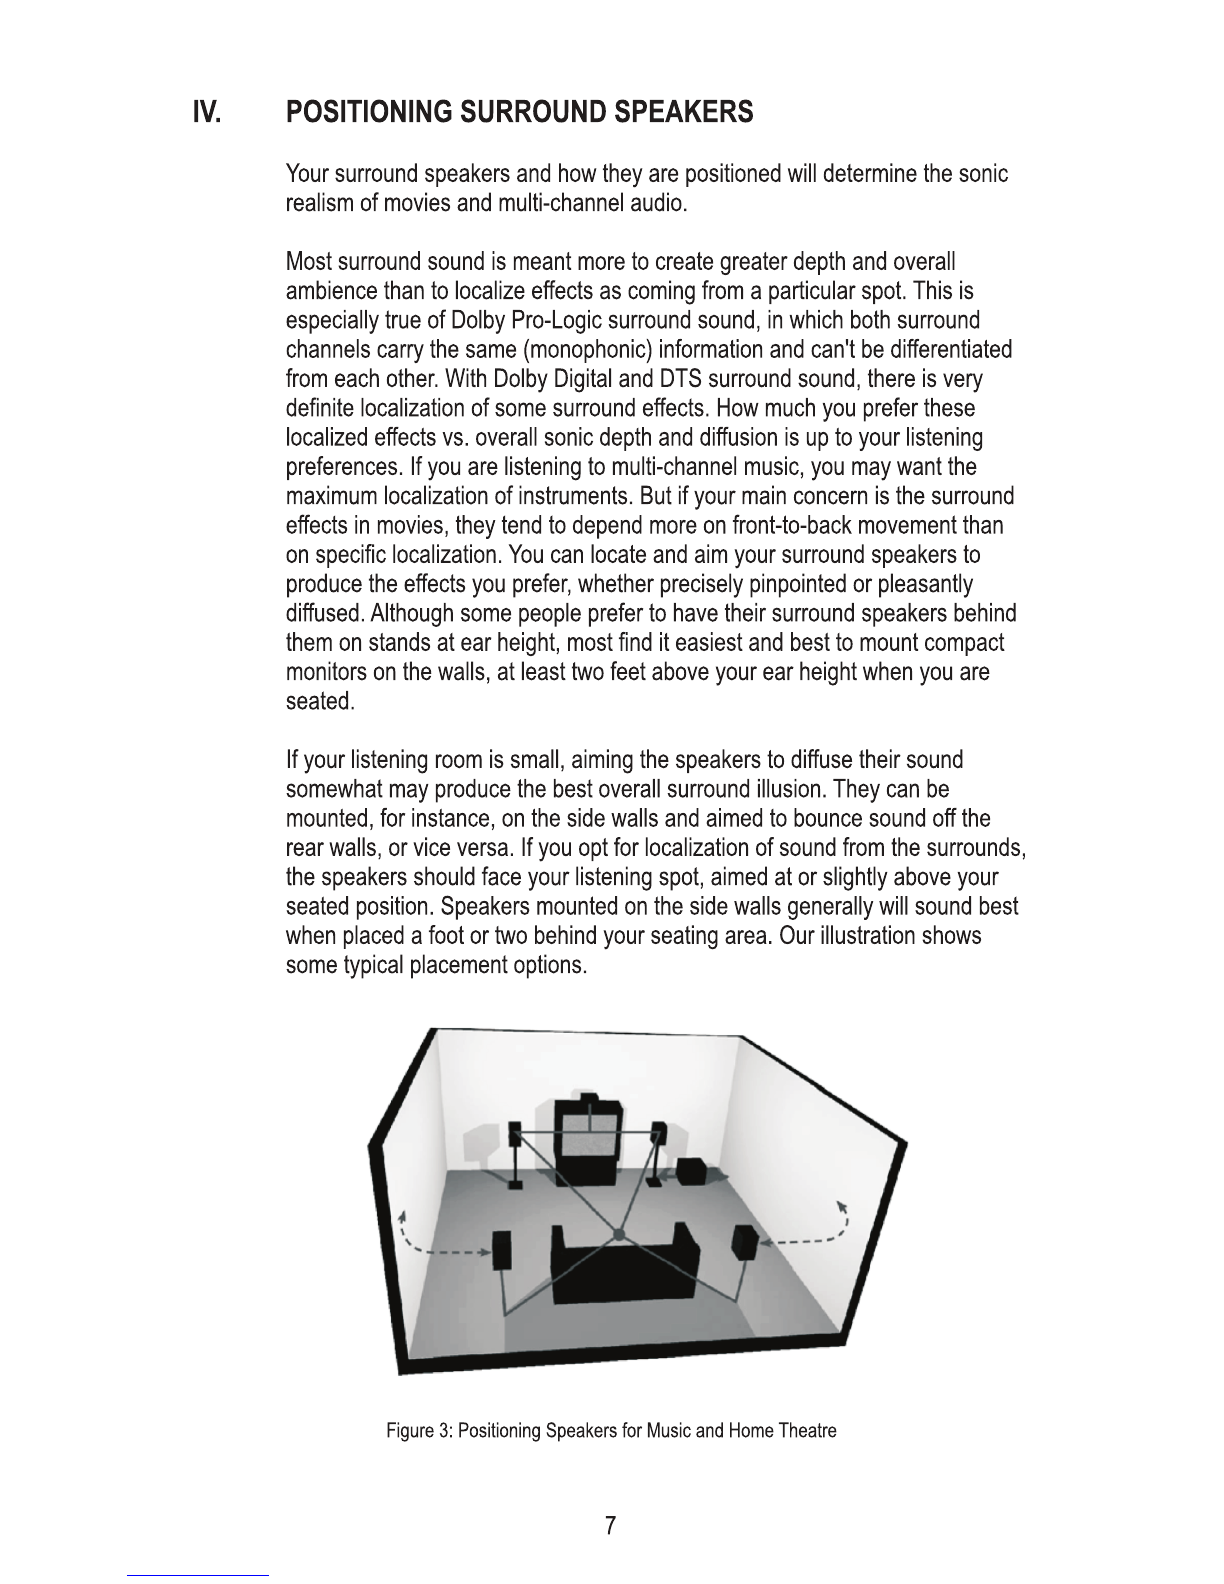
Our
illustration
shows
some
typical
placement
options.
"
\ "
....
.,.
__
_
Fi
gure
3:
Positioning
Speakers
for
Music
and
Home
Theatre
7
V.
PROTECTING
YOUR
INVESTMENT
A.
For
full,
year-after-year
enjoyment
from
your
speakers,
you
should
respect
their
limits.
They
will
produce
room-filling
volume
in
average-
sized
rooms-and
handle
peak
momentary
levels
at
those
volumes
without
audible
strain.
But
avoid
louder-than-life
playback
of
music
or
movies,
especially
in
large
rooms.
Even
the
most
"bulletproor
speakers
can
be
damaged
by
excessive
volume
levels,
especially
for
long
periods.
B.
When
listening
to
music
or
movies
at
very
loud
volume,
you
shouldn't
tum
up
bass
or
treble
all
the
way
or
close
thereto.
This
sends
tremendously
increased,
disproportionate
power
into
the
speakers,
and
may
well
damage
them.
Some
loudness
compensation
("Loudness")
controls,
which
boost
both
bass
and
treble,
can
also
be
troublesome
at
high
volume.
They
are
intended
only
for
low-volume
listening.
C.
Finally,
you
should
be
aware
that
when
amplifiers
and
receivers
are
pushed
to
their
limits
to
produce
excessive
volume
levels,
they
are
driven
into
"clipping"
and
can
do
severe
damage-especially
to
tweeters.
Often,
the
damage
is
done
by
underpowered
amplifiers,
which
may
reach
their
limits
very
soon.
When
such
units
begin
to
"clip"
the
audio
waveform,
they
may
generate
high-frequency
"spikes"
of
tremendous
power.
More
tweeters
have
probably
been
destroyed
by
this
phenomenon
than
any
other.
If
using
your
speakers
at
loud
levels,
listen
carefully
for
any
sign
of
harsh,
garbled
midrange
and
diminishing
intelligibility-and
tum
the
volume
down
right
away
if
you
detect
it.
NEVER
TURN
UP
THE
VOLUME
ALL
THE
WAY
TO
SEE
HOW
LOUD
YOUR
SYSTEM
WILL
PLAYI
D.
Recommended
Power
We
recommend
amplifiers
and
receivers
rated
from
a
range
of
20-150
watts
with
our
compact
systems,
20-200
watts
with
our
tower
models.
For
playing
at
consistently
room-filling
volume,
a
minimum
of
50
watts
is
usually
a
good
idea.
As
just
indicated
in
the
paragraph
above,
be
wary
of
driving
low-powered
amplifiers
to
their
limits.
We
recommend
a
maximum
of
80-150
watts
for
sustained
program
material-as,
for
instance,
with
organ
pedal
tones
of
long
duration,
or
minutes-long
subterranean
special
effects
in
movies.
Be
aware
amplifiers
with
equal
power
rating
may
not
play
equally
loud.
Those
with
higher
dynamic
power
ratings,
better
satisfy
the
power
requirements.
Some
have
protective
circuitry
that
curtails
power
available
in
demanding
situations.
8

E.
Cabinet
Care
Cabinets
have
varying
materials
and
finishes,
including
wood
veneers,
vinyl,
anodized
aluminum
and
high
gloss
"poly
lacquers"
and
should
be
treated
as
you
would
furniture
with
similar
finishes.
Dust
lightly
with
a
soft
cloth;
avoiding
abrasives.
If
necessary,
wipe
carefully
with
a
cloth
slightly
dampened
with
glass
cleaner
to
remove
heavy
soil.
F.
Grilles
and
Ports
A
lint
brush
does
a
good
job
of
cleaning
grilles.
Removable
grilles
can
be
taken
off
and
vacuumed
if
you
prefer.
If
need
be,
you
can
use
a
lint
brush
to
clean
ports.
Avoid
touching
speaker
diaphragms.
Particularly,
pushing
in
the
domes
will
permanently
damage
tweeters.
VI.
IN
CASE
OF
PROBLEMS
A.
Lower
power
ifa
speaker
begins
to
sound
distorted,
or
seems
to
be
missing
certain
frequencies,
to
check
first
to
see
whether
playing
at
somewhat
lower
volume
seems
to
clear
up
the
problem.
As
we
noted
under
"Recommended
Power,"
it
can
be
especially
important
to
tum
down
the
volume
right
away
if
you
have
pushed
a
low-powered
amplifier
or
receiver
past
its
comfortable
limits.
B.
Isolate
the
problem
to
the
electronics
or
the
speakers
and,
if
the
speakers,
to
specific
speakers.
Interchange
the
speaker
wire
connections
on
your
amplifier
or
receiver
between
channels,
so
that
the
left
speaker
is
connected
to
the
right
channel,
or
vice
versa.
If
the
problem
shifts
to
the
other
speaker,
the
problem
is
not
in
the
speaker
but
in
the
electronics.
C.
Another
component-or,
very
often,
a
cable
or
connection
problem
between
components-may
be
at
fault.
If
the
problem
stays
in
the
same
speaker,
irrespective
of
the
channel
to
which
it's
connected-and
after
changing
the
connecting
wire--chances
are
the
speaker
itself
probably
needs
service.
D.
See
your
dealer
if
you
require
service.
PSB
dealers
are
equipped
to
handle
almost
all
problems.
If
you
have
moved
since
your
purchase,
the
nearest
authorized
PSB
dealer
should
be
able
to
help
you.
If
the
problem
is
not
resolved,
please
contact
us,
providing
the
Model
name,
Serial
Number,
date
of
purchase,
dealer
name,
and
a
full
description
of
the
problem.
We
appreciate
your
purchase,
and
hope
this
owner's
guide
helps
you
enjoy
the
exceptional
satisfaction
that
PSB
speaker
systems
have
to
offer.
We
wish
you
many
years
of
enjoyable
listening!
9
Notes
on
environmental
protection
At
the
end
of
its
useful
life,
this
product
must
not
be
disposed
of
with
regular
household
waste
but
must
be
returned
to
a
collection
point
for
the
recycling
of
electrical
and
electronic
equipment.
The
symbol
on
the
product,
use~s
manual
and
packaging,
point
this
out.
The
materials
can
be
reused
in
accordance
with
their
markings.
Through
re-use,
recycling
of
raw
materials,
or
other
forms
of
recycling
of
old
products,
you
are
making
an
mportant
contribution
to
the
protection
of
our
environment.
Your
local
administrative
office
can
advise
you
of
the
responsible
waste
disposal
point.
10

PSB
Speakers
633
Granite
Court
Pickering,
Ontario
L
1W
3K1
CANADA
www.psbspeakers.com
888-772-0000
(905)
831-6555
Fax:
905-837-6357
PSB
OM-200
Rev
B
0916
Imagine
EN
ES
FR
0 Port Cover (Figure 1)
A Port Cover accessory is supplied with each towerand center channel speaker. The
port cover can be used to adjust the bass tuning
of
the Imagine models where room
problems at low frequencies (in the
1OOHz
region) occur. It is well knowthat the room
can dominate the performance
of
the lowfrequencies below 200Hz and the added
flexibility
of
a port cover can tweak/improve the performance in problem room setups.
The use
of
the port coveris not limited to only closing one
of
the ports in the case
of
the tower. We invite the listener to try plugging
any
one
or
multiple ports
to
better
integrate the system in theirroom because any adjustment
of
the bass balance could
be a welcome improvement in a given system setup. Please experiment;
it
will be
worth the effort in manycases. It's impossible
to
predictwhat type
of
room
or
whatthe
system setupwill be, therefore we thinkthe flexibility
of
multiple ports allows the
speakerto be integrated better in a widervariety
of
situations. Sometimes tweaking
like this can be used to really help "dial in" the best possible sound in your room.
Additional Port Covers can be acquired
for
a nominal fee in cases where multiple
ports need to be covered to achieve the proper bass balance in a given setup. One
can also experimentwith the Port Cover on the bookshelf model to tame the bass in
some setups.
0 Couvercle d'event (Figure 1)
Un accessoire de couvercle d'eventestfourni avec chaque tour et pour le haut-
parleur
de
Ia voie centrale. Les couvercles d'event peuvent servir aregler l'accord des
graves des modeles Imagine lorsque des anomalies
se
produisent dans le local
d'ecoute dans le registre des graves (auteur de
100Hz).
II
est bien connu que Ia
piece peutdeterminerles performances en basses frequences en dessous
de
200
Hz, et le fait d'ajouter un couvercle d'event peut harmoniserau ameliorer les
performances des installations des locaux aproblemas.
L'utilisation du couvercle d'event ne
se
limite pas aboucher l'un des events dans le
cas des tours. Nous invitons l'auditeuraessayer d'obstruer l'un quelconque des
events afin de mieux integrer le systeme ason local d'ecoute, parce que tout reglage
de l'equilibre des graves peut constituer une amelioration bienvenue dans une
installation donnee. Veuillez done essayer; cela vaut le coup dans de nombreux cas.
II
est impossible de predire le type de local
et
quelles seront les installations. Par
consequent, nous pensons que le fait de disposer
de
plusieurs events permet de
mieux integrerle haut-parleurdans une grande diversite de situations. Parfois, un tel
reglage peut contribuer reellement a«tirer » le meilleurson possible
de
votre local.
Des couvercles d'event supplementaires peuvent egalementetre achetes aprix
nominal dans le cas au plusieurs events devraient
~tre
obstrues afin d'obtenirle
meilleurequilibre des gravesdans une installation donnee.
0 Tapas del tunel de graves (Figura 1)
Se suministra una tapa del tunel de graves como accesorio de cada terre y para los
Canales del canal central. Las tapas pueden usarse para ajustar Ia sintonra
de
bajos
de estes modelos, en case que
se
produzcan problemas ambientales
en
las
frecuencias bajas (alrededor de los 100 Hz). Es bien sabido que Ia sala tiene un papel
predominante en Ia audici6n de lasfrecuencias per debajo de los 200 Hz, y una tapa
del tunel de graves puede ayudar a mejorarel desempelio en ciertos ambientes.
El
usc
de
Ia tapa
nose
limita a cerrar una de las bocas en el case de las torres. Le
invitamos a cubrir una o varias bocas para integrarmejorel sistema en Ia sala,
porque esto podrra mejorar mucho esa instalaci6n en particular. No tenga miedo a
experimentar: en muchos cases,
el
esfuerzo valdra Ia pena. Como
es
imposible
2

predecir en que tipo
de
sala o instalaci6n trabajaran los sistemas, creemos que Ia
presencia de varias tuneles
de
graves permitiran integrarlos mejoren una varied
ad
de
situaciones. Suele sucederque un ajuste
de
este tipo permite obtener el mejor
sonido posible en una sala dada.
Se
pueden comprar mas tapas porun precio muy medico si hubiera necesidad de
cubrirvarias bocas para obtener un correcto equilibria de bajos.
@ Port-Abdeckung (Abb. 1)
JederTower- und Center-Kanai-Lautsprecherwird mit einerPort-Abdeckung geliefert.
Die Port-Abdeckung kann bei Raumproblemen bei niedrigen Frequenzen (im 100-Hz-
Bereich)
zur
Basseinstellung
der
lmagine-Modelle verwendet werden. Es ist bekannt,
dass der Raum die Leistung von niedrigen Frequenzen unter
200Hz
dominieren
kann. Die zusatzliche Flexibilitat einer Port-Abdeckung kann die Leistung bei
Einrichtungen in problematischen Raumen justieren/verbessem.
Die Verwendung der Port-Abdeckung ist im Fall des Tower-Lautsprechers nicht
auf
dasAbdecken von nureinem Port beschrankt. Der Zuhorer sollte versuchen, einen
odermehrere Ports abzudecken, urn das System besser im Raum zu integrieren, da
jede Einstellung des Bassausgleichs eine willkommene Verbesserung in einer
Systemeinrichtung sein kann. DerVersuch ist in vielen Fallen die
MOhe
wert. Da man
unmoglich die
Art
des Raums oderdie Systemeinrichtung vorhersagen kann,
ermoglicht unserer Meinung nach die Flexibilitat von mehreren Ports eine bessere
Integration des Lautsprechers in einerVielzahl von Situationen. Justierungen wie
diese konnen manchmal verwendetwerden, urn den bestmoglichen Sound in lhrem
Raum zu erzielen.
Zusatzliche Port-Abdeckungen sind gegen eine nominale GebOhrerhaltlich, wenn
mehrere Ports abgedecktwerden mussen, urn den richtigen Bassausgleich in einer
Einrichtung zu erzielen. Man kann ebenfalls mit der Port-Abdeckung am Regalmodell
experimentieren,
urn
den Bass in bestimmten Einrichtungen zu
~bi:fmdigen~.
Figure 1I Figura 1
3

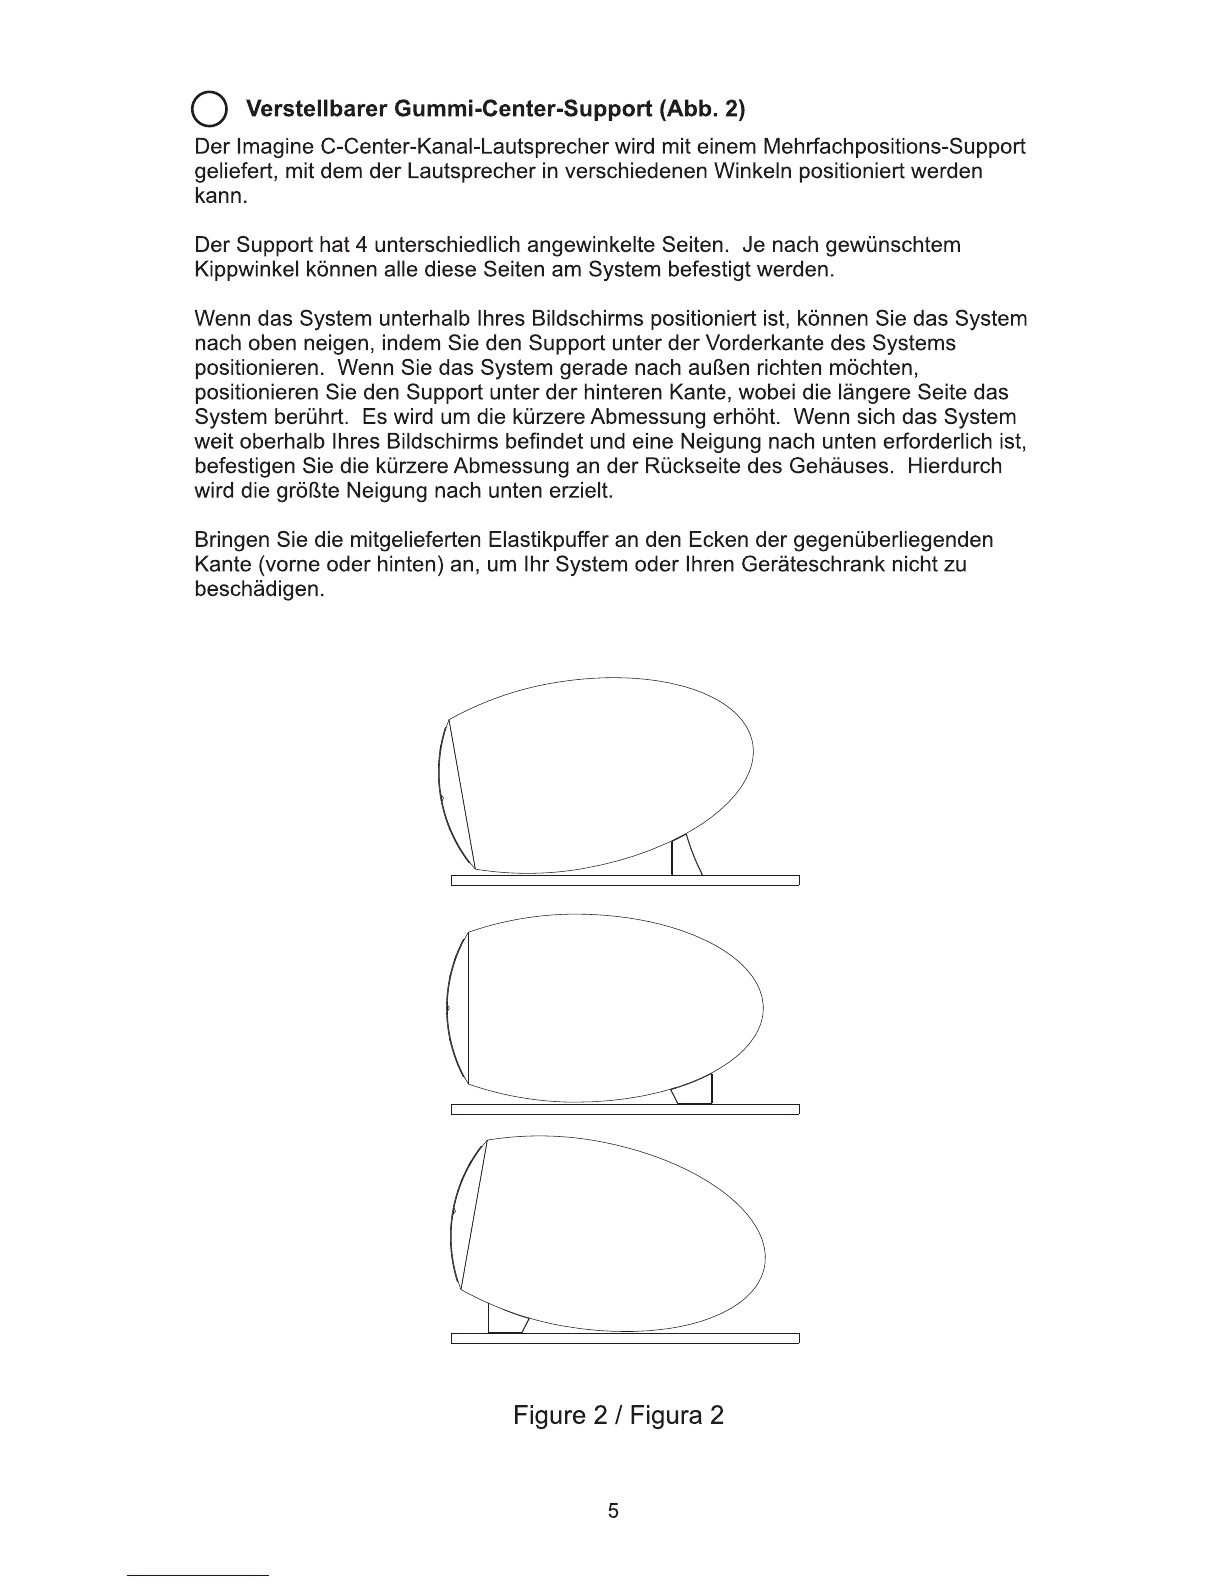
~
Adjusting
Rubber Center
Support
(Figure
2)
The Imagine C center channel speakercomes supplied with a multi-position support
that allows it to be placed at a variety
of
angles.
Notice that the support has fourdifferent angled sides. All
of
these sides may be
attached
to
the system depending on the angle
of
tilt required.
When placed below yourviewing screen you can tilt the system upwards
by
placing
the support under the front edge
of
the system. To aim the system straight outward,
place the support underthe rearedge with the longerside in contact with the system.
Itwill be raised bythe shorter dimension.
If
the system is well above
your
viewing
screen and a downward tilt is required, then attach the shorter dimension
to
the back
of
the cabinet. This will give the maximum rise
for
the greatest downward tilt.
Apply the provided rubber bumpers
to
the comers
of
the opposite edge (front
or
back)
to
prevent marring your system orequipment cabinet.
e Supporten caoutchouc
pour
haut-parleurde canal central (Figure
2)
Le haut-parleur de canal central Imagine C comporte un support multiposition
permettant
dele
placeraune foule d'angles.
Notez que le support comporte quatre cotes inclines differents. Utilisez le
rote
approprie avec le systeme en fonction
de
l'angle d'inclinaison requis.
Lorsque place sous un ecran, vous pouvez incliner le systeme vers le haut en placant
le support sous le bord avant du systeme. Pourorienter le systeme droit devant,
placez le supportsous le bord arriere, avec le
cOte
le plus long en contact avec le
systeme.
II
sera leve parson
cOte
le plus court.
Si
le systeme est place bien au-dela
de l'angle de visionnement
et
qu'une inclinaison vers le bas est requise, installez alors
le cote le plus court au dos du support. Cela permettra de realiser un angle
d'inclinaison maximal vers le bas.
Posez les protecteurs en caoutchoucfoumis sur les coins du bord oppose (avant ou
arriere) pour prevenir le marquage de votre systeme ou du support.
@ Soporte
de
goma para el sistema deAltavoz del canal central (Figura 2)
El altavoz del canal central viene con un soporte de multiposici6n que permite colocar
el altavoz
en
unavariedad
de
angulos.
El soporte tiene cuatro lados angulares diferentes. Puede utilizarcualquiera de estos
lados dependiendo de como desea inclinar
el
sistema.
Cuando coloca el sistema debajo de Ia pantalla, puede inclinarlo hacia arriba si coloca
el soporte debajo del borde delantero del sistema. Para inclinar el sistema hacia
adelante, coloque
ellado
mas largo del soporte pordebajo del borde trasero. En esta
posici6n el sistema queda inclinado ligeramente hacia adelante. Si el sistema esta
ubicado muy porencima
de
Ia pantalla y desea una inclinaci6n mayor, entonces
coloque
ellado
mas corto del soporte en
Ia
parte trasera del sistema. De esta manera
obtiene
Ia
maxima inclinaci6n hacia abajo.
Coloque los paragolpes de goma en las esquinas del borde contrario {adelante o
atras) para evitar
el
deterioro del sistema o del mueble
de
su equipo.
4
DE
Q Verstellbarer Gummi-Center..Support (Abb.
2)
Der Imagine C-Center-Kanai-Lautsprecherwird mit einem Mehrfachpositions-Support
geliefert, mitdem
der
Lautsprecher
in
verschiedenen Winkeln positioniertwerden
kann.
Der Support hat4 unterschiedlich angewinkelte Seiten.
Je
nach gewunschtem
Kippwinkel konnen aile diese Seiten am System befestigtwerden.
Wenn das System unterhalb lhres Bildschirms positioniert ist, konnen Sie das System
nach eben neigen, indem Sie den Support unterder Vorderkante des Systems
positionieren. Wenn Sie das System gerade nach aullen richten mochten,
positionieren Sie den Support unter
der
hinteren Kante, wobei die langere Seite das
System beruhrt. Es wird urn die kurzere Abmessung erhoht. Wenn sich das System
weitoberhalb lhres Bildschirms befindet und eine Neigung nach unten erforderlich ist,
befestigen Sie die kurzere Abmessung an
der
Ruckseite des Gehauses. Hierdurch
wird die grollte Neigung nach unten erzielt.
Bringen Sie die mitgelieferten Elastikpuffer an den Ecken dergegenuberliegenden
Kante (verne oder hinten) an, urn
lhr
System oder lhren Gerateschrank nichtzu
beschadigen.
Figure 2 I Figura 2
5

Bipole
or
direct
radiating
surround
mode
Mode
ambiophonique
bipolaire
ou
a
radiation
directe
Modalidad
sonido
envolvente
bipolar
o
radiaci6n
directa
Bipol·
oder
Direktstrahler-Surround-Modus
Black
From
amp
left
SURROUND
channel
Nair
De
l'ampli,
canal
gauche
AMBIOPHONIQUE
Negro
del
canal
ENVOLVENTE
Izquierdo
del
amplilicador
Schwarz
von
Verstarker,
linker
SURROUND-Kana!
Red
From
amp
left
SURROUND
channel
Rouge
De
l'ampli,
canal
gauche
AMBIOPHON
I
QUE
Raja
del
canal
ENVOLVENTE
izquierdo
del
amplilicador
Rot
von
Verstiirkar,
linker
SURROUND-Kana!
Front
Avant
F
ren
te
Vorderseite
Dipole
surround
mode
Mode
ambiophonique
dipolaire
Modalidad
de
sonido
envolvente
dipolar
Dipoi·Surround·Modus
Wire
Jumpers
Les
courroies
Precintas
de
alambre
Kabelbrucken
Black
From
amp
@
left
SURROUND
channel
Noir
De
l'ampli,
canal
gauche
AMBIOPHONIQUE
Negro
del
canal
ENVOLVENTE
Izquierdo
del
amplificador
Schwarz
von
Verstiirker,
linker
SURROUND-Kana!
@
Front
Avant
Freide
Vordll'll8i!e
Rouge
De
l'ampli,
canal
gauche
AMBIOPHONIQUE
Raja
del
canal
ENVOLVENTE
izquierdo
del
ampliflcador
Rot
von
Verstarker,
linker
SURROUND-Kana!
Black
From
amp
right
SURROUND
channel
Nair
De
l'ampli,
canal
droit
AMBIOPHONIQUE
Negro
del
canal
ENVOLVENTEde~o
del
amplilicador
Schwarz
von
Verstiirker,
rechler
SURROUND-Kana!
Black
From
amp
right
SURROUND
channel
Nair
De
l'ampli,
canal
droit
AMBIOPHONIQUE
Negro
del
canal
envolvente
derecho
del
amplilicador
Schwarz
von
Verstarker,
rechter
SURROUND-Kana
Red
From
amp
right
SURROUND
channel
Rouge
De
l'ampli,
canal
droit
AMBIOPHONIQUE
Raja
del
canal
ENVOLVENTEde~o
del
amplificador
Rot
von
Verstirker,
~r
SURROUND-Kana!
Red
From
amp
right
SURROUND
channel
Rouge
De
l'ampli,
canal
droit
AMBIOPHONIQUE
Raja
del
canal
envolvenle
derecho
del
amplificador
Rot
von
Verstiirker,
rechter
SURROUND-Kana!
First,
remove
jumpers
En
premier,
retirer
les
bandes
de
liaison
Primero,
quite
las
precintas
de
puente
Zuerst
Briicken
enttemen.
Replace
gold-plated
jumpers
with
supplied
wire
jumpers
and
connect
c~sscrossed
as
shown.
Remplacaz
las
coumias
de
liaison
plaqulles
or
par
las
coumias
incluses
et
raccordez-las
an
las
entraacisanl,
tel
qu'il
ast
illuslrll.
Reemplace
las
precintas
de
puente
enchapadas
en
oro
usando
las
precintas
de
alambre
y
com!clelas
en
furma
de
cruz
tal
como
se
mueslra
en
Ia
ilustraci6n.
Vergoldete
Briicken
durch
die
mitgelieferten
Drahtbriicken
ersetzen
und
wie
abgebildet
liber
Kreuz verbinden.
6
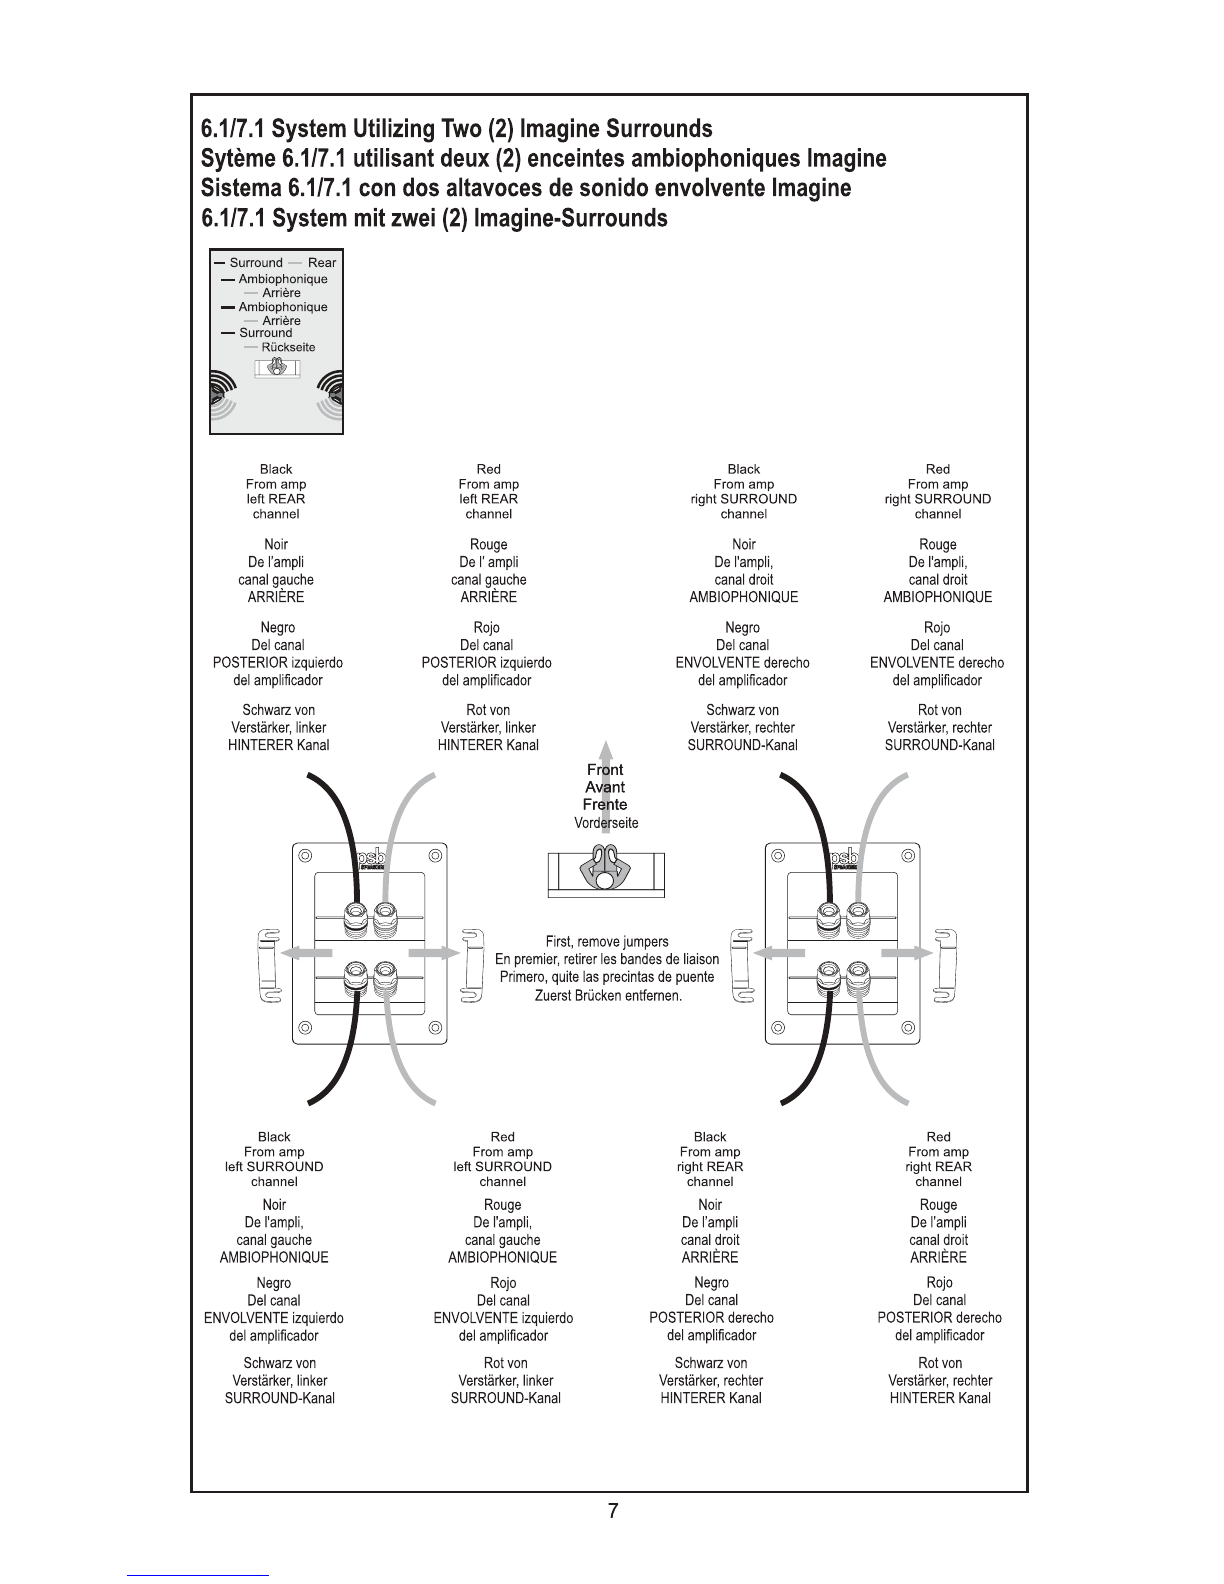
6.1/7.1
System
Utilizing
Two
(2)
Imagine
Surrounds
Syteme
6.1/7.1
utilisant
deux
(2)
enceintes
ambiophoniques
Imagine
Sistema
6.1n.1
condos
altavoces
de
sonido
envolvente
Imagine
6.1/7.1
System
mit
zwei
(2)
Imagine-Surrounds
-
Surround
Rear
-Ambiophonique
Arriilra
-Ambiophonique
Arriera
-Sunound
ROc:kseite
~
Black
From
amp
left
REAR
channel
Noir
Del'ampli
canal
gauche
ARRIERE
Negro
Del
canal
POSTERIOR
izquierdo
del
amplificador
Schwarz
von
Verstiirlter,
linker
HINTERER
Kanal
Black
From
amp
left
SURROUND
channel
Nair
Del'ampli,
canal
gauche
AMBIOPHONIQUE
Negro
Del
canal
ENVOLVENTE
izquierdo
del
amplificador
Schwarz
von
Verstarkar,
linker
SURROUND-Kana!
Red
From
amp
left
REAR
channel
Rouge
Del'ampli
canal
gauche
ARRIERE
Rojo
Del
canal
POSTERIOR
izquierdo
del
amplificador
Rot
von
Verstiirlter,
linker
HINTERER
Kanal
Red
From
amp
left
SURROUND
channel
Rouge
Del'ampli,
canal
gauche
AMBIOPHONIQUE
Rojo
Del
canal
ENVOLVENTE
izquierdo
del
amplificador
Rot
von
Verstarkar,
linker
SURROUND-Kana!
Black
Red
From
amp
From
amp
right
SURROUND
right
SURROUND
channel channel
Noir
Rouge
Del'ampli, Del'ampli,
canal
droit
canal
droit
AMBIOPHONIQUE
AMBIOPHONIQUE
Negro
Rojo
Del
canal
Del
canal
ENVOLVENTEde~ho
ENVOLVENTE
derecho
del
amplificador
del
amplificador
Schwarz
von
Rot
von
Verstiirlter,
rechter
Verstiirlter,
rechter
SURROUND-Kenai SURROUND-Kenai
Black
Red
From
amp
From
amp
right
REAR
right
REAR
channel
channel
Noir
Rouge
Del'ampli Del'ampli
canal
droit
canal
droit
ARRIERE ARRIERE
Negro
Rojo
Del
canal
Del
canal
POSTERIOR
derecho
POSTERIOR
derecho
del
amplificador
del
amplificador
Schwarz
von
Rot
von
Verstiirlter,
rechter
Verstarkar,
rechter
HINTERER
Kanal
HINTERER
Kanal
7

6.1/7.1
System
Utilizing
Three
(3)
Imagine
Surrounds
Syteme
6.1/7.1
utilisant
trois
(3)
enceintes
ambiophoniques
Imagine
Sistema
6.1/7.1
con
tres
altavoces
de
sonido
envolvente
Imagine
r---su_noo_n_d_Re_a..,r
-Arnbiophonique
6.1/7.1
System
mit
drei
(3)
Imagine-Surrounds
Amere
-Arnbiophonique
Arri6re
-Surround
Rilclaleilll
~
Black
Red
Black
Red
From
amp
From
amp
From
amp
From
amp
left
SURROUND
left
SURROUND
right
SURROUND
right
SURROUND
channel
channel channel channel
Noir
Rouge
Nair
Rouge
Del'ampli, Del'ampli,
De
l'ampli,
Del'ampli,
canal
gauche
canal
gauche
canal
droit
canal
droit
AMBIOPHONIQUE
AMBIOPHONIQUE AMBIOPHONIQUE AMBIOPHONIQUE
Negro
Rojo
Negro
Rojo
Del
canal
Del
canal
Del
canal
Del
canal
ENVOLVENTE
izquierdo
ENVOLVENTE
izquierdo
ENVOLVENTE
derecho
ENVOLVENTE
derecho
del
amplificador
del
amplificador
del
amplificador
del
amplificador
Schwarz
von
Rot
von
II~
II
Schwarz
von
Rot
von
Verstiirbr,
linker
Verstiirk.er,
linker
Verstarker,
rechter
Verstiirk.er,
rechter
SURROUND-Kana!
SURROUND-Kana! SURROUND-Kana!
SURROUND-Kana!
First,
remove
jumpers
Black
From
amp
right
REAR
channel
Noir
De
l'ampli
canal
droit
ARRI~RE
Negro
del
canal
POSTERIOR
derecho
del
amplificador
Schwarz
von
Verstiirker,
rechter
HINTERER
Kanal
En
premier,
ratirer
las
bandes
de
liaison
Primero,
quite
las
precintas
de
puente
Zuerst
BrOcken
entremen.
Black
From
amp
left
REAR
channel
Nair
De
l'ampli
canal
gauche
ARRI~RE
Negro
del
canal
POSTERIOR
izquierdo
del
amplificador
Schwarz
von
Verstiirbr,
linker
HINTERER
Kanal
Red
From
amp
right
REAR
channel
Rouge
De
l'ampli
canal
droit
ARRIERE
Rojo
del
canal
POSTERIOR
derecho
del
amplificador
Rot
von
Verstark.er,
nechter
HINTERER
Kanal
Red
From
amp
left
REAR
channel
Rouge
De
l'ampli
canal
gauche
ARRIERE
First,
remove
jumpers
En
premier,
retirer
las
bandes
de
liaison
Primero,
quite
las
precintas
de
puente
Zuerst
Brucken
entremen.
Rojo
del
canal
POSTERIOR
Izquierdo
del
amplificador
8
Rot
von
Verstiirk.er,
linker
HINTERER
Kanal

6.1n
.1
System
Utilizing
Four
(4)
Imagine
Surrounds
Syteme
6.1n.1
utilisant
quatre
(4)
enceintes
ambiophoniques
Imagine
Sistema
6.1/7.1
con
cuatro
altavoces
de
sonido
envolvente
Imagine
,....----
.....
6.1n
.1
System
mit
vier
(4)
Imagine-Surrounds
-
Surround
Rear
-Ambiophonique
Black
Red
From
amp
From
amp
left
SURROUND
left
SURROUND
channel channel
Noir
Rouge
Del'ampli, Del'ampli,
canal
gauche
canal
gauche
AMBIOPHONIQUE
AMBIOPHON
I
QUE
Negro
Rojo
Del
canal
Del
canal
ENVOLVENTE
Izquierdo
ENVOLVENTE
Izquierdo
del
amplificador
del
amplificador
Schwarz
von
Rot
von
Verstiirter,
linker
Verstarker,
linker
II~
II
SURROUND-Kana!
SURROUND-Kana!
Black
Red
Black
From
amp
From
amp
From
amp
left
REAR
left
REAR
right
REAR
channel channel channel
Nair
Rouge
Noir
Del'ampli
Del'ampli
Del'ampli
canal
gauche
canal
gauche
canal
droit
ARRI~RE
ARRI~RE
ARRiffiE
Negro
Rojo
Negro
Del
canal
Del
canal
Del
canal
Black
From
amp
right
SURROUND
channel
Noir
Del'ampli,
canal
droit
AMBIOPHONIQUE
Negro
Del
canal
ENVOLVENTEde~ho
del
amplificador
Schwarz
von
Verstiirker,
rechiBr
SURROUND-Kana!
Red
From
amp
right
REAR
channel
Rouge
De
l'ampli
canal
droit
ARRI~RE
Rojo
Del
canal
Arrl6re
-Ambiophonique
Arriere
-Surround
RiickseiiB
UltJI
Red
From
amp
right
SURROUND
channel
Rouge
De
l'ampli,
canal
droit
AMBIOPHONIQUE
Rojo
Del
canal
ENVOLVENTE
deracho
del
amplificador
Rot
von
Verstiirker,
rech!Br
SURROUND-Kana!
POSTERIOR
Izquierdo
POSTERIOR
Izquierdo
POSTERIOR
derecho
POSTERIOR
derecho
del
amplilicador
del
amplificador
del
amplilicador
del
amplificador
Schwarz
von
Rot
von
Schwarz
von
Rot
von
Verstiirker,
linker
Verstiirter,
linker
Verstiirter,
rechter
Verstiirker,
rech!Br
HINTERER
Kanal
HINTERER
Kanal
HINTERER
Kanal
HINTERER
Kanal
9
Table of contents
Other PSB Speakers manuals

PSB
PSB the CustomSound Series User manual

PSB
PSB SYNCHRONY Series User manual

PSB
PSB Platinum Series User manual

PSB
PSB Synchrony Series User manual

PSB
PSB CustomSound CW88R User manual

PSB
PSB VisionSound VS300 User manual

PSB
PSB CW160R User manual

PSB
PSB GB1 User manual

PSB
PSB CHS212 User manual

PSB
PSB ALPHA PS1 User manual

PSB
PSB CustomSound series C-LCR User manual

PSB
PSB CW600E User manual

PSB
PSB THECUSTOMSOUND SERIES User manual

PSB
PSB Alpha B1 User manual

PSB
PSB ALPHA AM5 User manual

PSB
PSB imagine XA User manual

PSB
PSB CustomSound CW60R User manual

PSB
PSB the CustomSound Series User manual

PSB
PSB the CustomSound Series User manual

PSB
PSB CHS212 User manual


