Simfer AFM 1660 User manual

16" stand fan
User Manual
AFM 1660

CONTENTS
SAFETY INSTRUCTIONS .................................................................................................................................2
PART FIGURE.................................................................................................................................................2
ASSEMBLY.....................................................................................................................................................3
OPERATING INSTRUCTIONS...........................................................................................................................4
OVERHEAT PROTECTION OF THE MOTOR......................................................................................................5
MAINTENANCE INSTRUCTION.......................................................................................................................5
2
SAFETY INSTRUCTIONS
Read Rules for Safe Operation and Instructions Carefully.
Warning
1. Do not leave the fan running unattended.
2. Keep electrical appliances out of reach from Children or infirm persons. Do not
let them use the appliances without supervision.
. Ensure that the fan is switched off from the supply mains before removing the
guard.
4. If the supply cord is damaged, it must be replaced by manufacturer or its service
agent or a similarly qualified person in order to avoid a hazard.
5. This appliance is not intended for use by persons (including children) with
reduced physical, sensory or mental capabilities, or lack of experience and
knowledge, unless they have been given supervision or instruction concerning
use of the appliance by a person responsible for their safety.
6. Children should be supervised to ensure that they do not play with the appliance.
R les For Safe Operation
1. Never insert fingers, pencils, or any other object through the grille when fan is
running.
2. Disconnect fan when moving from one location to another.
. Disconnect fan when removing grilles for cleaning.
4. Be sure fan is on a stable surface when operating to avoid overturning.
5. DO NOT use fan in window, rain may create electrical hazard.
6. Indoor use only.
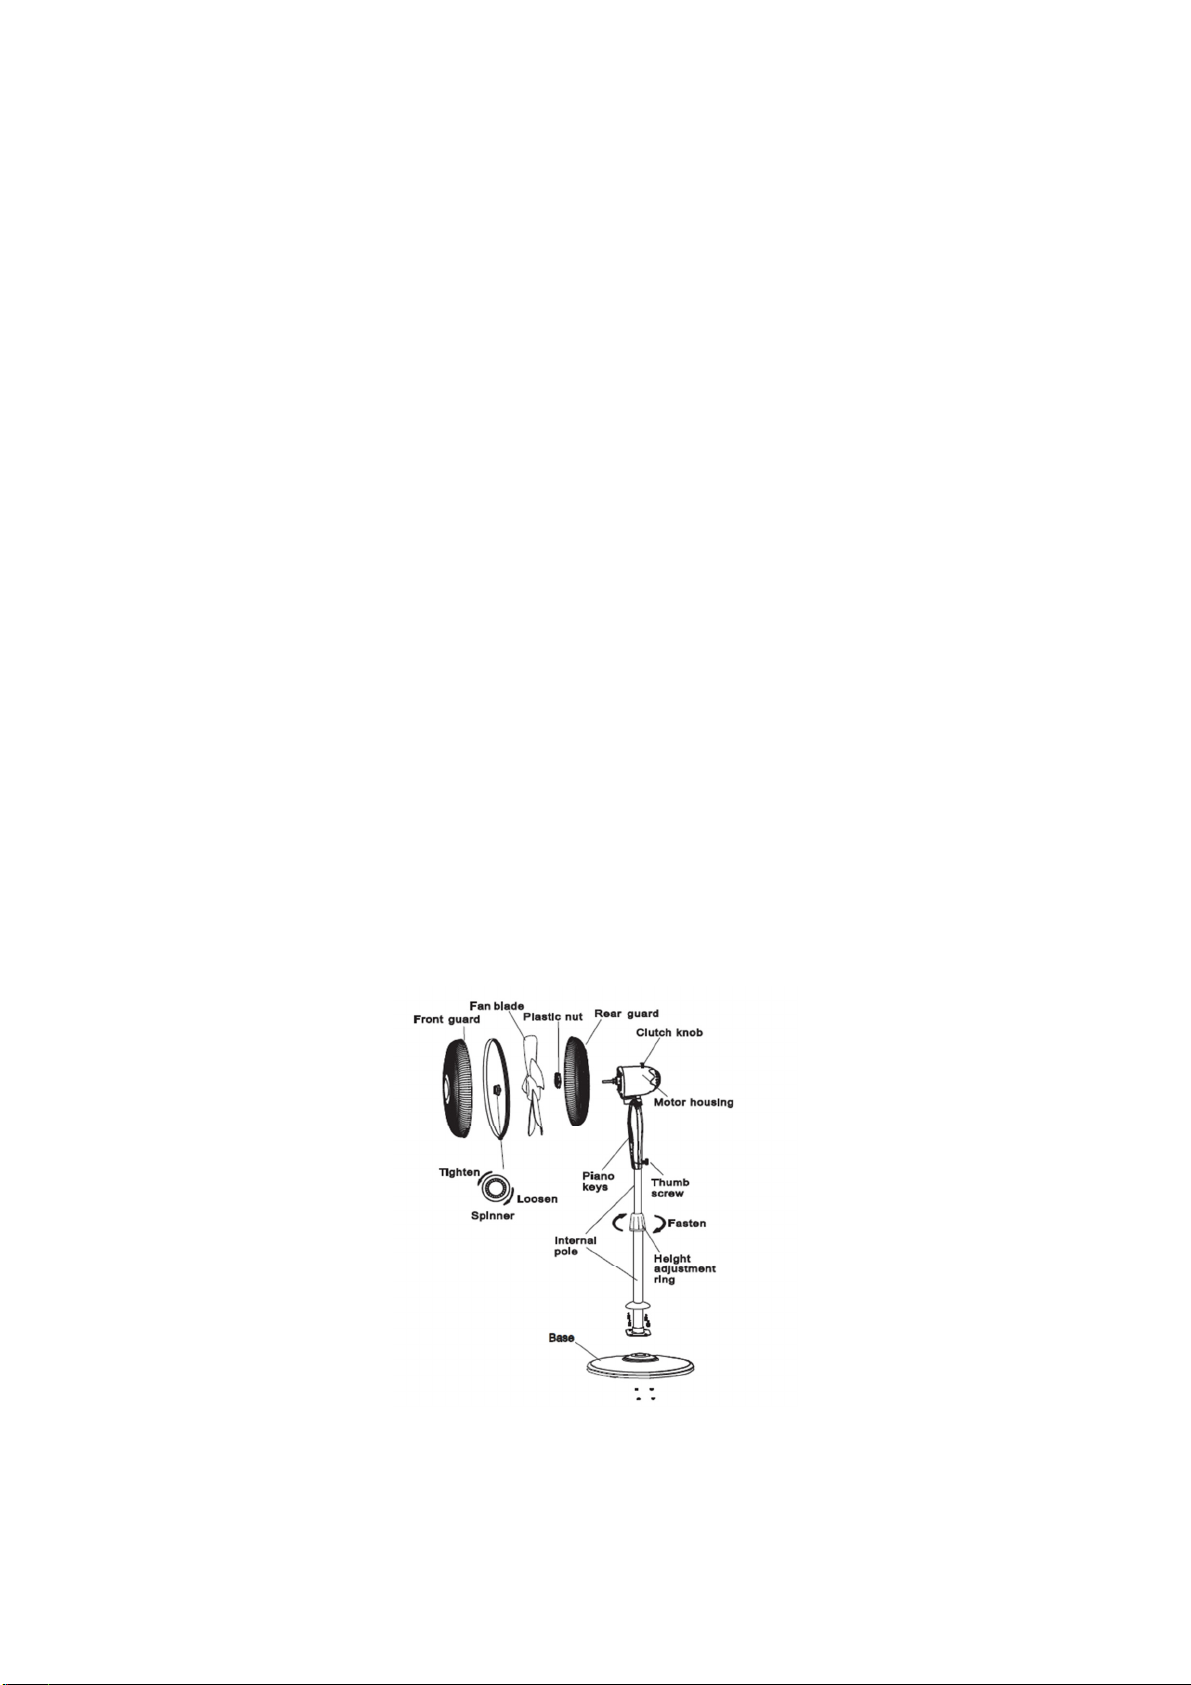
PART FIGURE
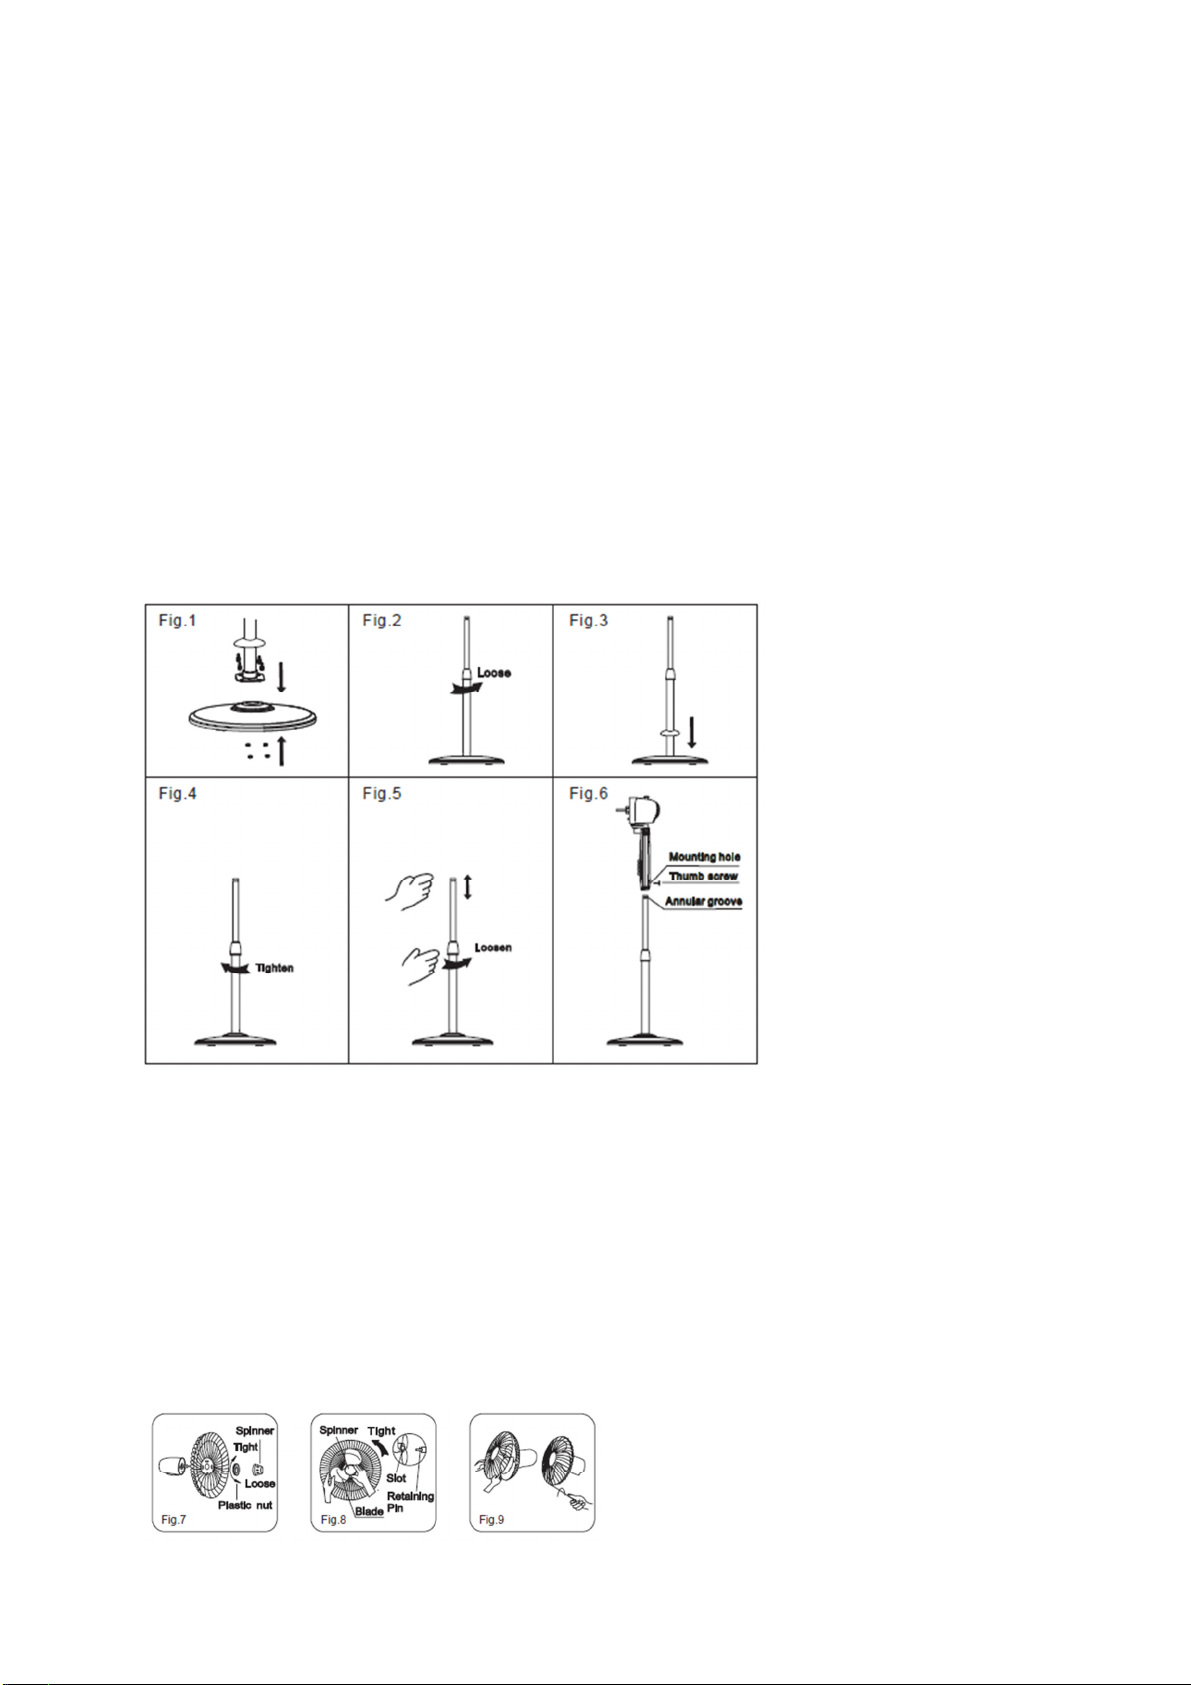
ASSEMBLY
Assembly of Base
1. Loose 4 sets of screws, washers and spring washers which are beforehand fitted
in the center section on the base and assembly the extension pole onto the base
enclosure with these fastenings. (Fig.1)
2. Loose the height adjustment ring, lift the internal pole to the max height and
prevent the internal pole from slipping into the extension pole, then screw out the
height adjustment ring. (Fig.2)
. To attach the decorating cover (cover for the base enclosure), slide the decorating
cover down the extension pole. (Fig. )
4. Reattach the height adjustment ring. (Fig.4)
5. From the extension pole loosen the height adjustment ring and adjust the internal
pole to the desired height. (Note: If you can’t find the internal pole, it slides inside
the extension pole. You can pull it out from the extension pole.) (Fig.5)
6. To attach the head unit to the extension pole, loosen the thumb screw on the
bottom of the head unit. Place the head unit on the extension pole and tighten the
thumb screw in alignment with the groove on the internal pole. (Fig.6)
Assembly Of Blade Of Grilles
1. Unscrew the spinner clockwise (or take the spinner out from the bag) and the
plastic nut counter clockwise to remove both of them. Fix the rear guard to the
motor then tighten the plastic nut again. (Fig.7)
2. Discard PVC sleeve on shaft. Insert the blade into shaft, and make sure the rotor
shaft pin is fitted into groove of the blade. Turn the spinner counter clockwise to
tighten the blade. (Fig.8)
. Fix the front guard and the rear guard with circlip and then use the fasten clip to
tighten the fan guard. (Fig.9)

4
OPERATING INSTRUCTION
I. Control Panel
On the control panel, there are five keys and nine indicator lights. (See Fig.10)
1. KEY
The key is for switching on the fan. The fan will be started at low speed.
Press this key secondly if the fan starts at the middle speed.
Press this key thirdlyat the high speed and press this key if the fun has being off.
2. “ ” KEY
This key is touched repeatedly or in pressed state. The time to be set for one hour, two hours and four hours.
Do not press the timer key when the fan will be required to operate continuously. At the moment all timer led don’t light.
II. Remote Control (Fig.11)
On the remote control, there are three keys. (See Fig.11)
1. “ ” KEY
After the fan has started, this key serves as a speed selector in the sequence from “low-medium-high-low” when this
key being touched repeated or continuously.
III. Oscillation Control
To make the fan oscillate, press the clutch knob located on the top of the motor housing. To get the directional airflow,
pull the clutch knob up to its initial position.
IV. Tilt Adj stment
To adjust the air flow upward or downward, push the guards lightly to the desired direction.
V. Height Adj stment
The height of the fan can be adjusted by loosening the locknut carefully raising or
lowering the fan and firmly re-tightening the locknut.
5
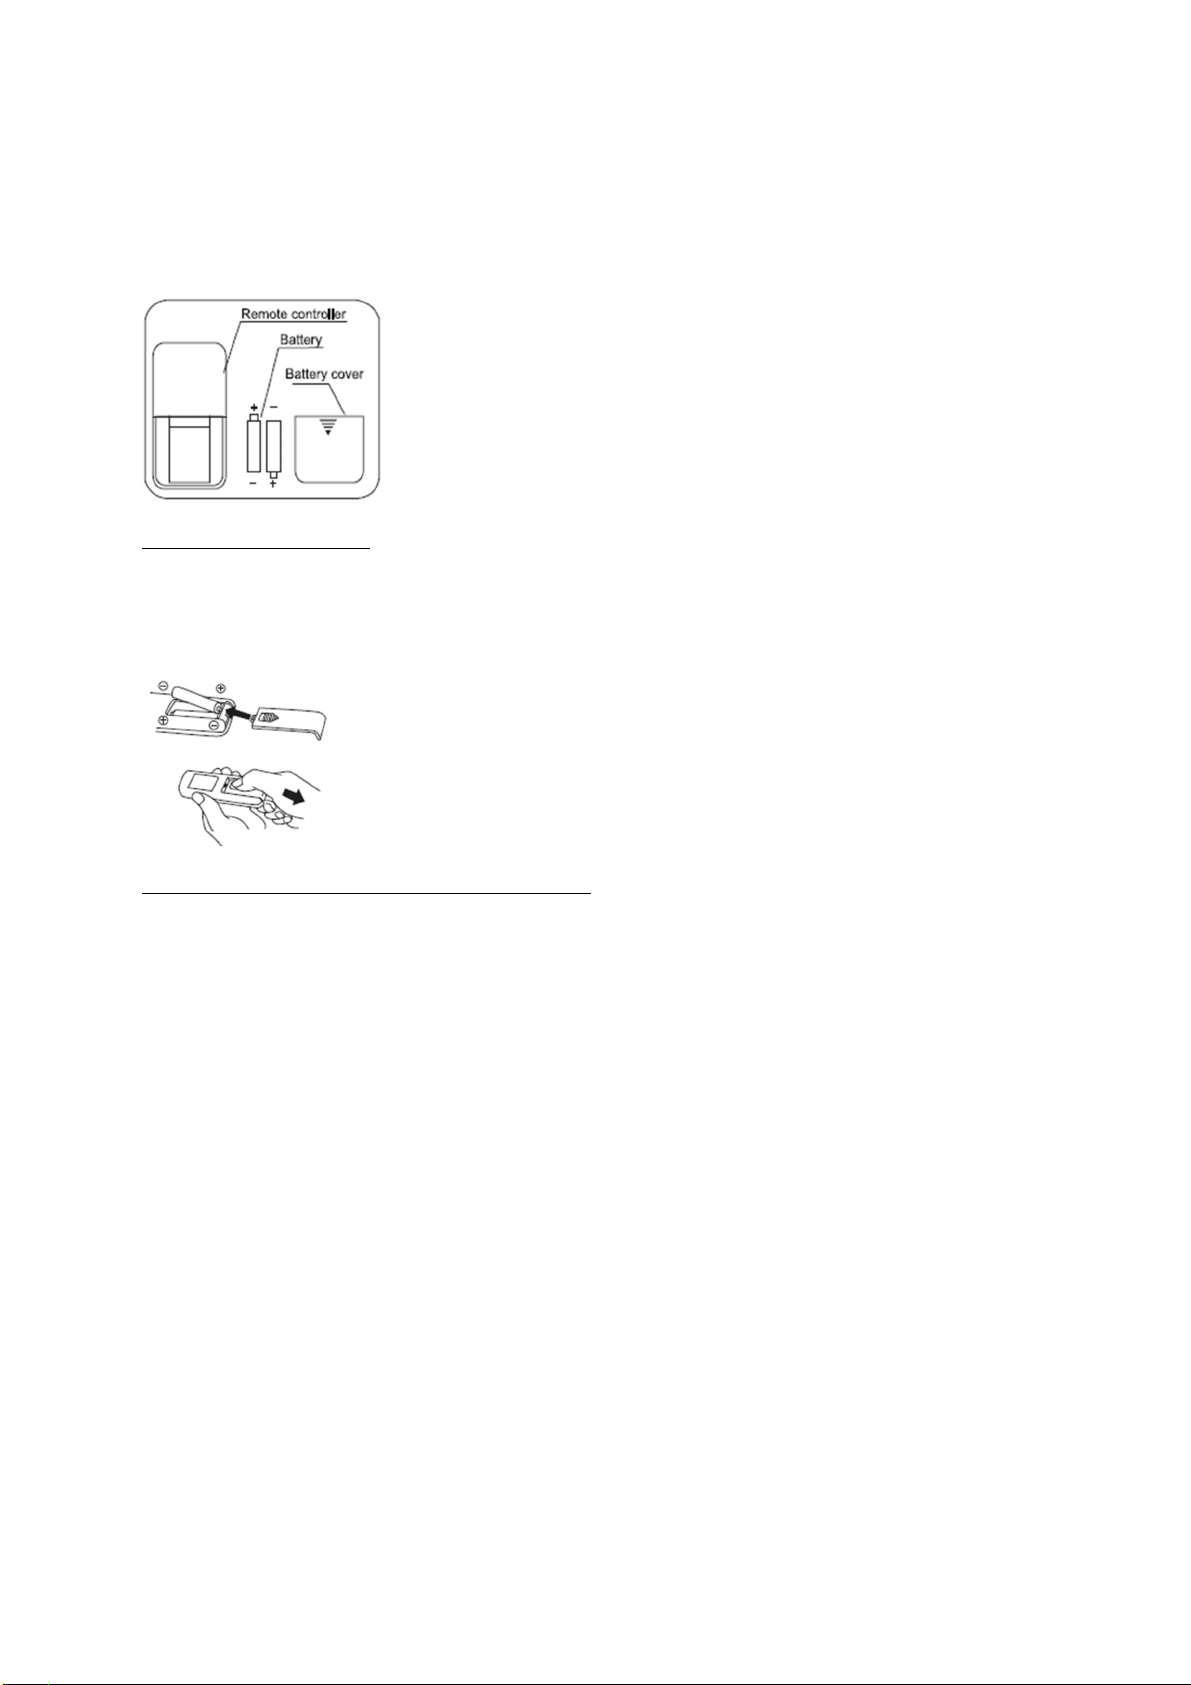
Batteries Instr ctions
1. Press dawn on the battery compartment cover
and slide it out.
2. Insert the batteries, making sure that the positive terminals are facing the proper way.
. Replace the cover.
Battery Warnings as below :
1. “Do not dispose of batteries in fire, batteries may explode or leak.”
2. -Do not mix old and new batteries.
. -Do not mix alkaline, standard (carbon-zinc) or rechargeable (nickel-cadmium) batteries.
HOW TO USING THE REMOTE CONTROLLER CORRECTLY
Point the remote controller at the receptor on body of the fan and press the desired
button. The remote controller will work at distances of up to roughly six meters and
the angle of 60 degree included between right and left from the receptor.
The batteries must be removed from the remote controller before it is scrapped and
that they are disposed of safely.
OVERHEAT PROTECTION OF THE MOTOR
The windings of the motor have a thermal-fuse that burns out and the fan switches
off and temperature of the motor is no longer going up so that plastic parts of the fan
don’t subject to deformation so far so to be burned by the overheat if the motor is
overheat for any unexpected reason.
MAINTENANCE INSTRUCTION
The fan requires little maintenance. Do not try to fix it by yourself. Refer itto qualified
service personnel if service is needed.
1. Before cleaning and assembling, fan must be unplugged.
2. To ensure adequate air circulation to the motor, keep vents at the rear of the
motor free of dust. Do not disassemble the fan to remove dust.
. Please wipe the exterior parts with a soft cloth soaking a mild detergent.

Table of contents
Popular Fan manuals by other brands


Ebmpapst
Ebmpapst S3G800-BT21-01 operating instructions

Ebmpapst
Ebmpapst AP68-35 operating instructions

Casa Fan
Casa Fan Eco Volare 116 Mounting and operating manual

Ebmpapst
Ebmpapst R3G355-AM08-32 operating instructions

HAMPTON BAY
HAMPTON BAY TITAN 52 Use and care guide

Ebmpapst
Ebmpapst R3G500-RA28-02 operating instructions