Slate Media Technology Raven MTi User manual

RAVEN Version 3.5.0
Updated 02/02/2018
User Guide
Pro Tools
RAVEN 3.6 for Windows
MTi

If you don’t have an Ilok 2 or 3 dongle, you will need to order one to use the Raven. You can
purchase from a dealer or a local music technology store. This iLok dongle is required for the
RAVEN software and touch driver to be licensed.
Users can report any passcode issues here: https://slatemt.zendesk.com/hc/en-us/requests/new
REGISTRATION / LICENSING SETUP
iLok Licensing
Copy the iLok redeem code from the registration email
and paste it into the redeem tab of the iLok License
Manager More info can be found in the video here:
https://youtu.be/4lGNGsAiX4g
RAVEN Passcode
Every RAVEN will contain a passcode inside the box,
users need to register this passcode in order to create
the RAVEN product Page in their Slate account, as well as
generate the iLok license needed to unlock the software.
After registering the Passcode an email will be sent with
a iLok Redeem code.
Downloads and Videos:
After registering the passcode, users will be
automatically logged in to their Slate account
where the RAVEN downloads and videos can be
found. Navigate to the RAVEN MTI tab in your
Slate account and go to the downloads section
to access the installers for the type of system
being used.

If users don’t set the Taskbar to autohide
alignment.
DISPLAY SETTINGS
Set Main Display:
Navigate to display preferences and set the RAVEN
MTi as the display on the left. Then check the box to
make the RAVEN the main display and hit Apply.
Users also need to set the size of the text to %100 so
the RAVEN application will open to the correct size.
1920X1080
Auto-Hide Taskbar:
Right-click your Taskbar and select “Properties.”
Make sure all of the options here are unchecked,
the Taskbar location is set to “Top or Right” and the
Taskbar buttons should be set to, “Always Combine,
Hide Labels.” Now, close the window.
3

FIREWALL
User Account Controllers:
Go to the home screen and type in “change user account control settings”. In the window turn the slider
all the way down to “never notify”. This will stop Windows from asking permission every time the Raven
Application and DAW are opened.
Firewall Settings:
If experiencing communication errors between V control and Raven, go to your home menu and type in
app through Windows Firewall” tab. Check the box for Raven and V Control.
4

MTI-1 CALIBRATION
Multi-Touch Platform:
Launch the MultiTouch Platform application. This can be found in Program Files(x86)/Multitouch Folder.
Press the Calibration Position button and follow the prompts on the screen and touch the center of each
“+” as it appears. For More infomation watch the video here: https://youtu.be/JxzC-R0mYCc
Multi-Screen Mapper:
Press and hold the left display and then release. Then repeat the press, hold and release for the
right display.
5

Users will need to purchase an additional $99 license for
the 2nd DAW as Raven only comes with 1 DAW passcode.
This extra DAW can be purchased within your Slate account
in the Raven tab or buy hitting the BUY button.
RAVEN DASHBOARD
GENERAL TAB:
The General Tab of the RAVEN Dashboard shows all
of the available DAW’s installed on the system as well
as the iLok License available for these DAWs. If the
to instantly open the DAW and the RAVEN software.
If the DAW is currently open users can hit the
“launch” button to open the RAVEN toolbars. To close
the RAVEN and the DAW, simply quit the DAW and
the RAVEN will automatically close the toolbars and
Save, Load, and Close:
The buttons on the bottom are used to Save As,
Save, Load, and Close the RAVEN toolbars. To close
the Dashboard hit the “red” RAVEN button on the
far right.
6
Tutorials:
The Tutorial tab of the Dashboard will show all the
setup and quick start guides for the DAW’s installed
on the users system.
Manuals:
The Manual tab of the Dashboard will show all
the manuals for the DAW’s installed on the users
system.
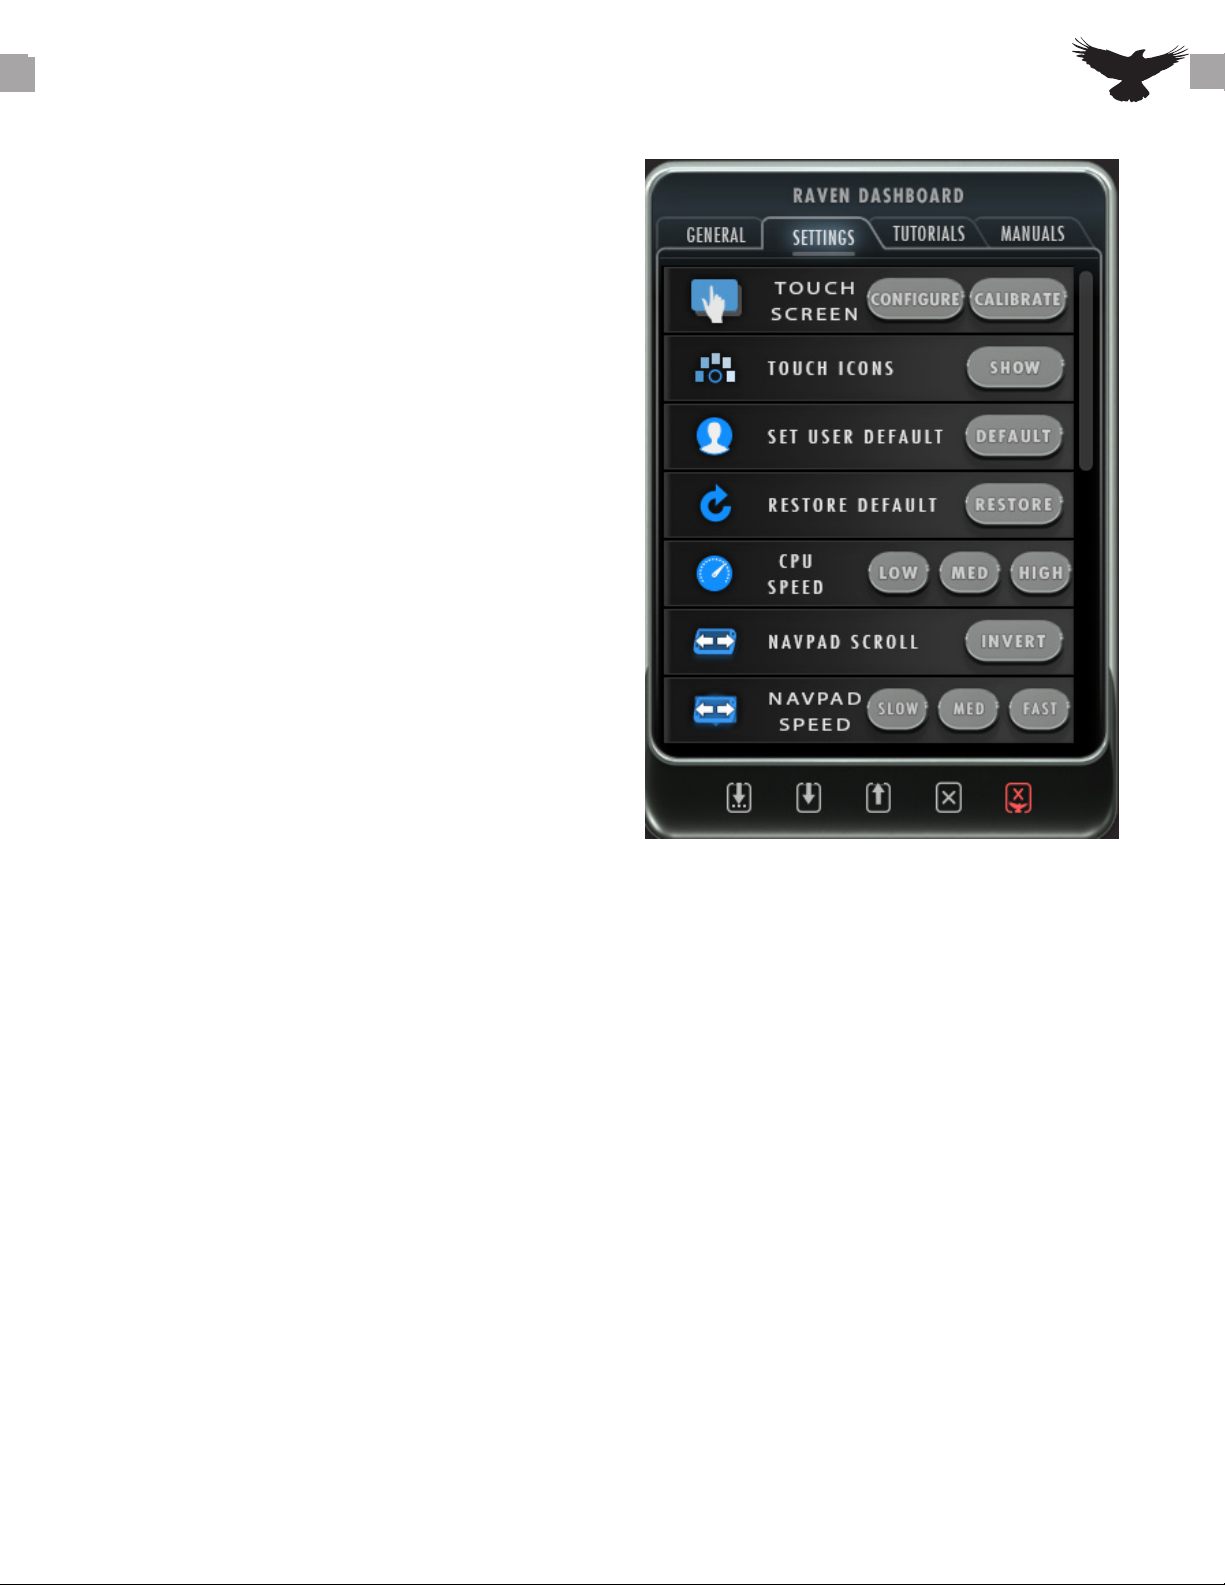
RAVEN DASHBOARD
Settings:
The Settings tab of the RAVEN Dashboard has all
of the settings needed to get the RAVEN up and
the touch screens on the system. Next hit the
Calibrate button to calibrate the display.
Mixer Lock
The RAVEN Internal Mixer is setup to follow
whichever Window is open on the DAW. For
users who prefer to keep the edit window on
another monitor will want to enable “MixerLock”
so the RAVEN faders stay on the screen and don’t
follow the most front window of the DAW.
NAVPAD Scroll
Toggle the NavPad scroll option between
prefered scrolling method.
NAVPAD Speed
Set the Navpad speed depending on the
7
Set User Default:
RAVEN automatically launches in RAVEN Factory
saved the layouts. The user can set the current
layout to launch at default by touching the “Set
User Default” button.
Restore Default:
To reset all the launch prefs and default layout
settings, hit the “restore” button to set the RAVEN
back to the factory settings.
CPU Speed
The RAVEN graphics are always set a max fo r the
fastest performace, but for certain processors
this may be too fast. Select a lower CPU setting if
there is graphical errors happening in the RAVEN
application.
Help:
Use the help tab to open the Slate Board Forum
to ask question and share layouts. If there is an
issue with the RAVEN touch screen or software
use the Support button to create a support
ticket.
Displays:
If the RAVENs dynamic display detection is not
syncing properly, Turn on the Manaul detection
routine for the RAVEN.
Touch Icons
To save space in the menu bar press the “hide”
touch icons button to hide all the UPDD touch
driver icons.

MTI2 CALIBRATION
8
UPDD Status:
Click the UPDD “Hand icon”
in the system tray and
select “Status”. The status of
the USB connection of the
displays will be shown here,
all touch displays should say
1 if using single RAVEN or
Display 1 and 2 when using
Dual.
1. UPDD Daemon:
well as checking the status of the display and running tests and
diagnostics. To open this applicaiton, click the hand icon from the
system tray. After installing the RAVEN software users will need to
2. UPDD TUIO:
This application is required for all Multi-Touch applications including
the RAVEN MTi application. Be sure this application is running at login
or there will be no touch on the RAVEN MTi application.
3. UPDD Gestures:
This application is required for all single touch and mouse
actions to function. This application also allows users to perform
gesture actions such as rotate left/right, pinch zoom, and three
touch applications that are all required for Multi-Touch to function. For more infomation watch
the video here: https://youtu.be/72LsuJaW_Vw

MTI2 CALIBRATION
9
Navigate to the “Control Panel” and select “Tablet PC Settings” and select “calibrate for pen or touch.”
In the “Tablet PC Settings” windows, choose the touch screen from the drop menu and select “Setup”
Follow the prompts on the screen by touching the RAVEN and hitting “Enter” on the keyboard. Then hit
“enter” on the non touch display.
V-Control Pro is using the computer http ports to
Virus software is not blocking V-Control Pro from accessing the
You don’t need a license to use Raven with V-control.
Be advised that this version of V-Control Pro is unlicensed
since V-control Pro doesn’t need a license to work with Raven.
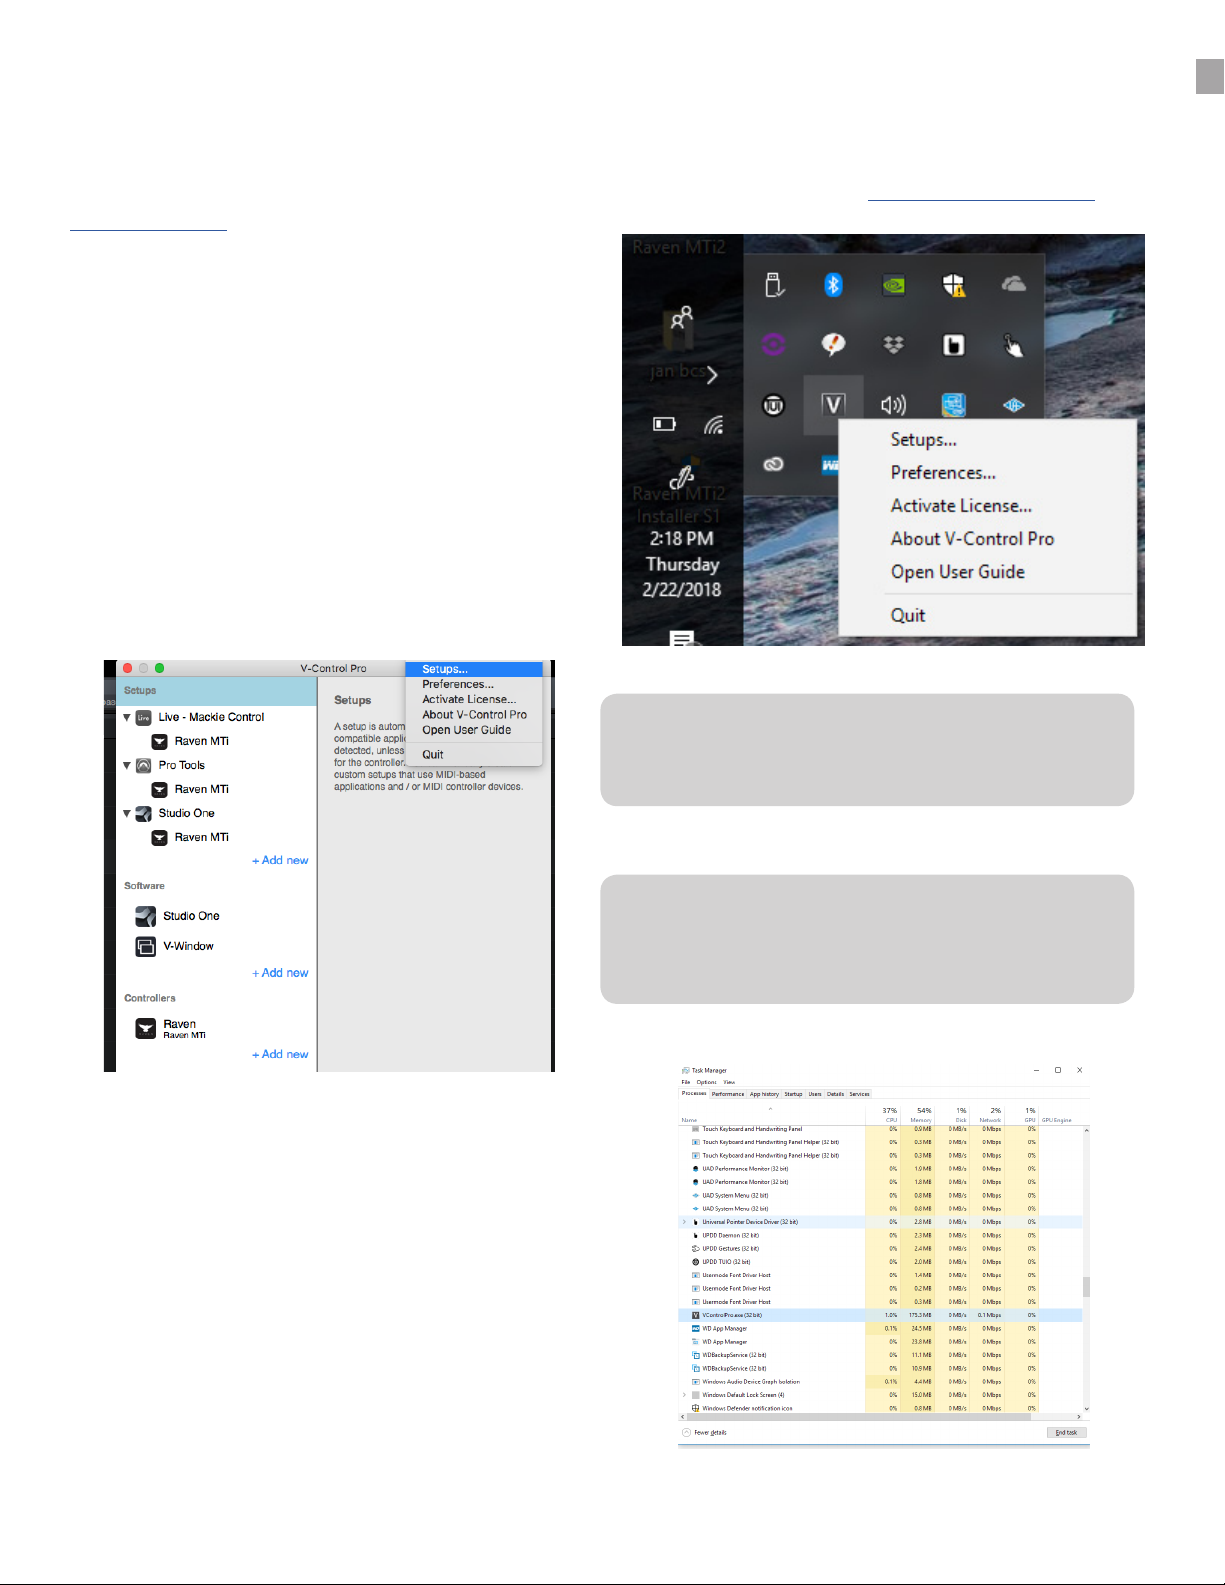
User will notice that V-Control Pro is not shown
in the “Force Quit” applications window. If
V-Control Pro freezes, open Activity Monitor and
stop the process then relaunch V-Control Pro.
Quitting V-Control Pro
User will notice that V-Control Pro is not shown
in the “Force Quit” applications window. If
V-Control Pro freezes, open Activity Monitor and
stop the process then relaunch V-Control Pro.
V-CONTROL PRO
V-Control Pro
The RAVEN installer will also install V-Control Pro which will be needed to send the HUI communication
data from the DAW to the RAVEN. For more information watch the video here:https://youtu.be/M_G-
U9uqRFc?t=42s
to the DAW for RAVEN to work correctly, double
check the “V” for V-control is showing in the
system tray of the Windows taskbar.
To check V-Control Pro is syncing with the DAW,
open the V-Control Pro settings window and
notice the current application is showing and
users should notice the DAW showing in the
“Software” tab and the RAVEN MTi showing in
the “Controllers” tab. Finally, in the “Setups” tab,
the DAW and RAVEN should be lit up.
10

PRO TOOLS PREFERENCES
In order for V-Control Pro to show in the MIDI
controller tab, V-Control Pro must be setup as
a MIDI input device. Navigate to the “Setup” tab
and go to the MIDI drop menu and select MIDI
Input Devices. In the MIDI INPUT DEVICES select
V-Control, V-Control XT2, and V-Control XT3.
For Pro Tools to respond to touch and
Batch Commands, it must be set to open as
Administrator. Right click the Pro Tools.exe or
the Pro Tools application shortcut and select
“Properties” then under compatibility check the
box for “Run this program as Administrator”
11
Controllers” tab. Under the drop-down menu, select HUI control for “Type” and set “Receive From” to
V-Control, then set “Send To” to V-Control.
Repeat for the next two HUI controllers sections in the MIDI Controllers tab, selecting V-Control XT2 and
V-Control XT3 in the “Receive From” and “Send To” sections.
For more information watch the quickstart video here: https://youtu.be/M_G-U9uqRFc?t=3m51s

For Dual RAVEN users, it maybe preferable to uncheck “Edit Window Follow Bank Select”.
This way users will not loose their selection in the edit window when banking in the RAVEN
Internal Mixer.
PRO TOOLS PREFERENCES
12
For banking to work correctly, navigate to
the Pro Tools drop-down menu and select
“Preferences”, then click the “Mixing” tab
and check the box for “Always Fill Channel
Strips when Banking”
To access plugins easier and allow some
Batch Commands to work correctly, users
will want to switch the plugin view to
category and manufactor.
Since some Batch Commands use the
Pro Tools key command for the selected
tracks, it will help to have “link timeline
and edit window selection” enabled.
Setup the Pro Tools edit window settings
like below” for best performance.
In order for Pro Tools to respond to the
key commands of many Batch Commands,
the edit window.
To use the Batch Commands for custom
plugins chains and adding favorite plugins
and click on the favorite plugin. This plugin
will now appear at the top of the list in the
pro tools insert browser
In the “Mixing” tab, setup the default
EQ and Dynamics plugins. Adding these
default plugins will be necessary for the
instant plugin Batch Commands to work

For the “Show Comments” button to work correctly, users will want to hide the “Delay
Compensation” option to leave room for the cut out to show the comments.
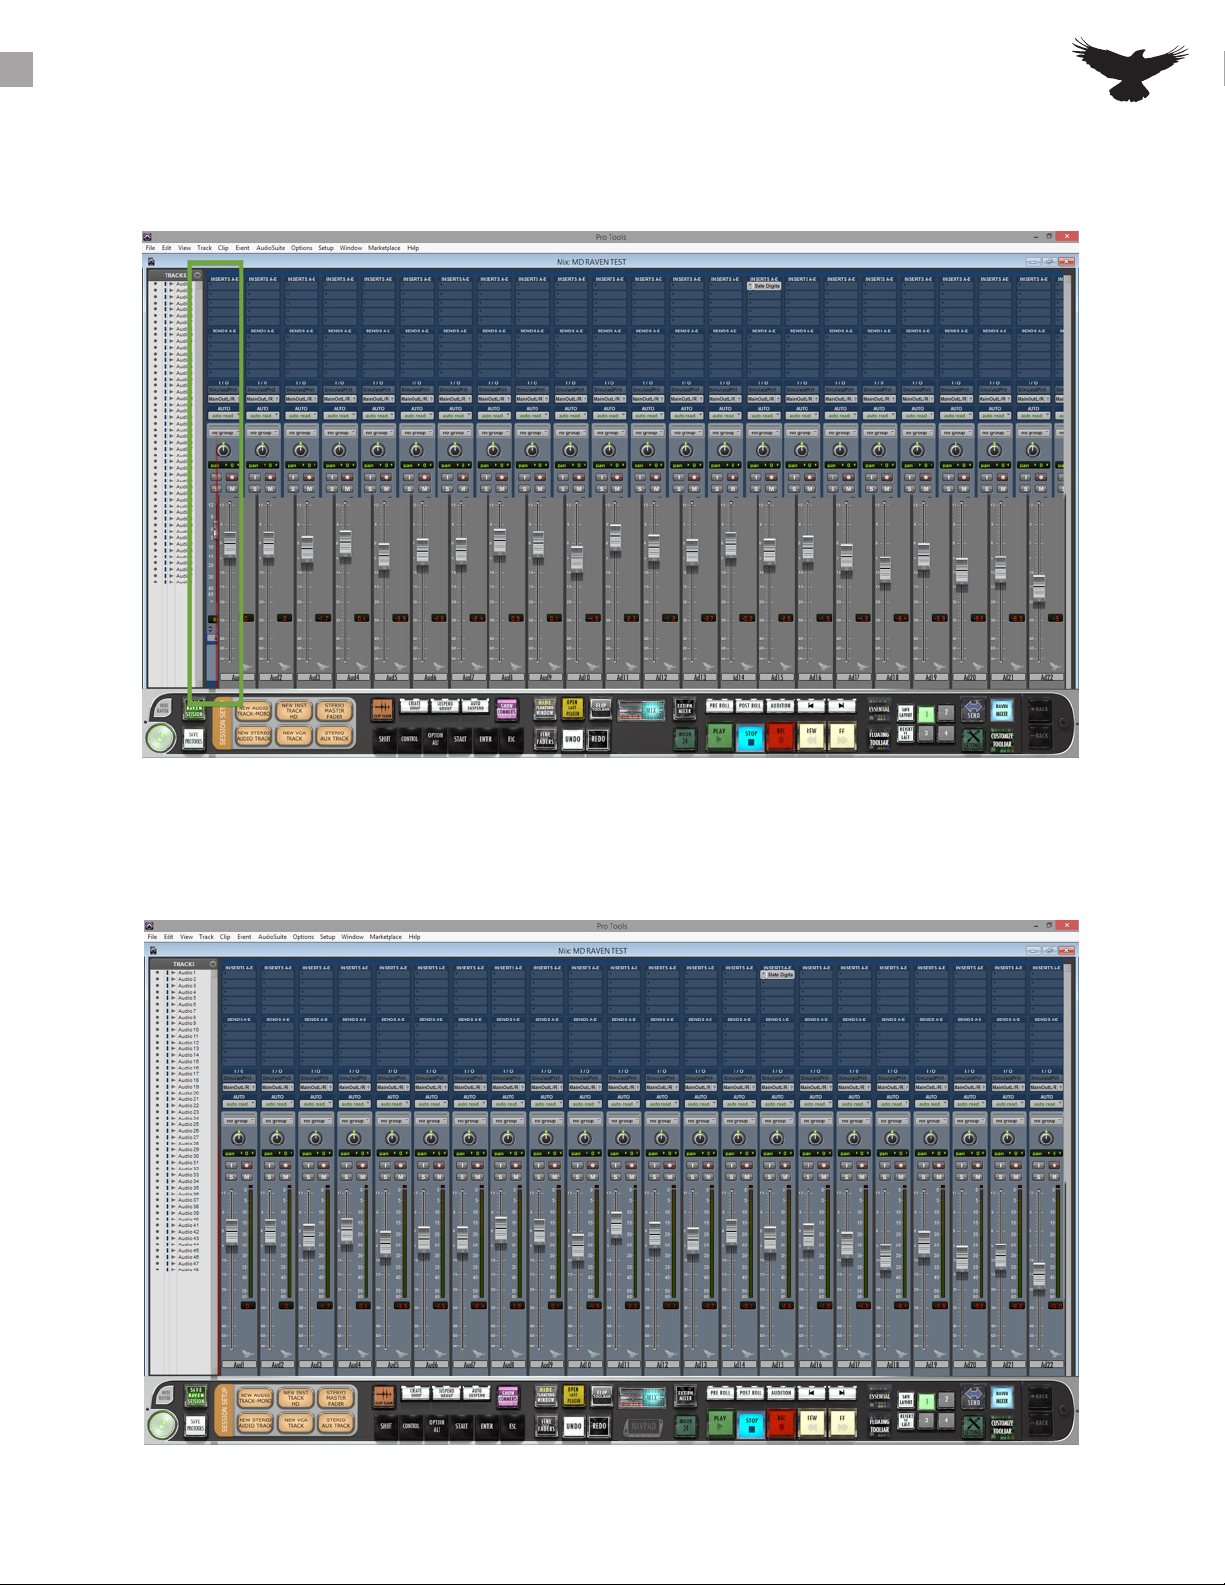
The RAVEN Internal Mixer requires the Pro Tools mixer window to be setup precisely in order for the
RAVEN Multi Touch faders to sync with the Pro Tools faders. Check the Mix Window is maximized by
clicking the maximize button on the top right and be sure that the Pro Tools Mix Window is scrolled all the
way left, so track 1 is showing. Then drag the track list width to match the red line of the RAVEN.
MANUAL INTERNAL MIXER ALIGNMENT
For the Internal Mixer to align properly only
the following UI Elements can be checked in
the Mix Window Views drop menu.
Utilize the Toggle “Insert F-J” Batch
Commands or customize some Windows
project.
The Raven Internal Mixer faders will sync better if track colors are on, so check the Mix Windows
Views and the Color Palette and be sure the Track Colors are active.
For more information view the quickstart video here: https://youtu.be/M_G-U9uqRFc?t=7m23s
1. Inserts A-E
2. Sends F-J
3. Meters and Faders
4. Track Color
5. Comments
The “grey notch” and the “redline”
that runs from the top left of the
Raven Toolbar to the bottom is there
to show where the Pro Tools “Tracks
List Window” should be aligned. If
Mixer faders will not sync with the Pro
Tools Mix Window. If the “grey notch”
will not sync and users won’t be able
to see the cut out for the Pro Tools
meters.
11
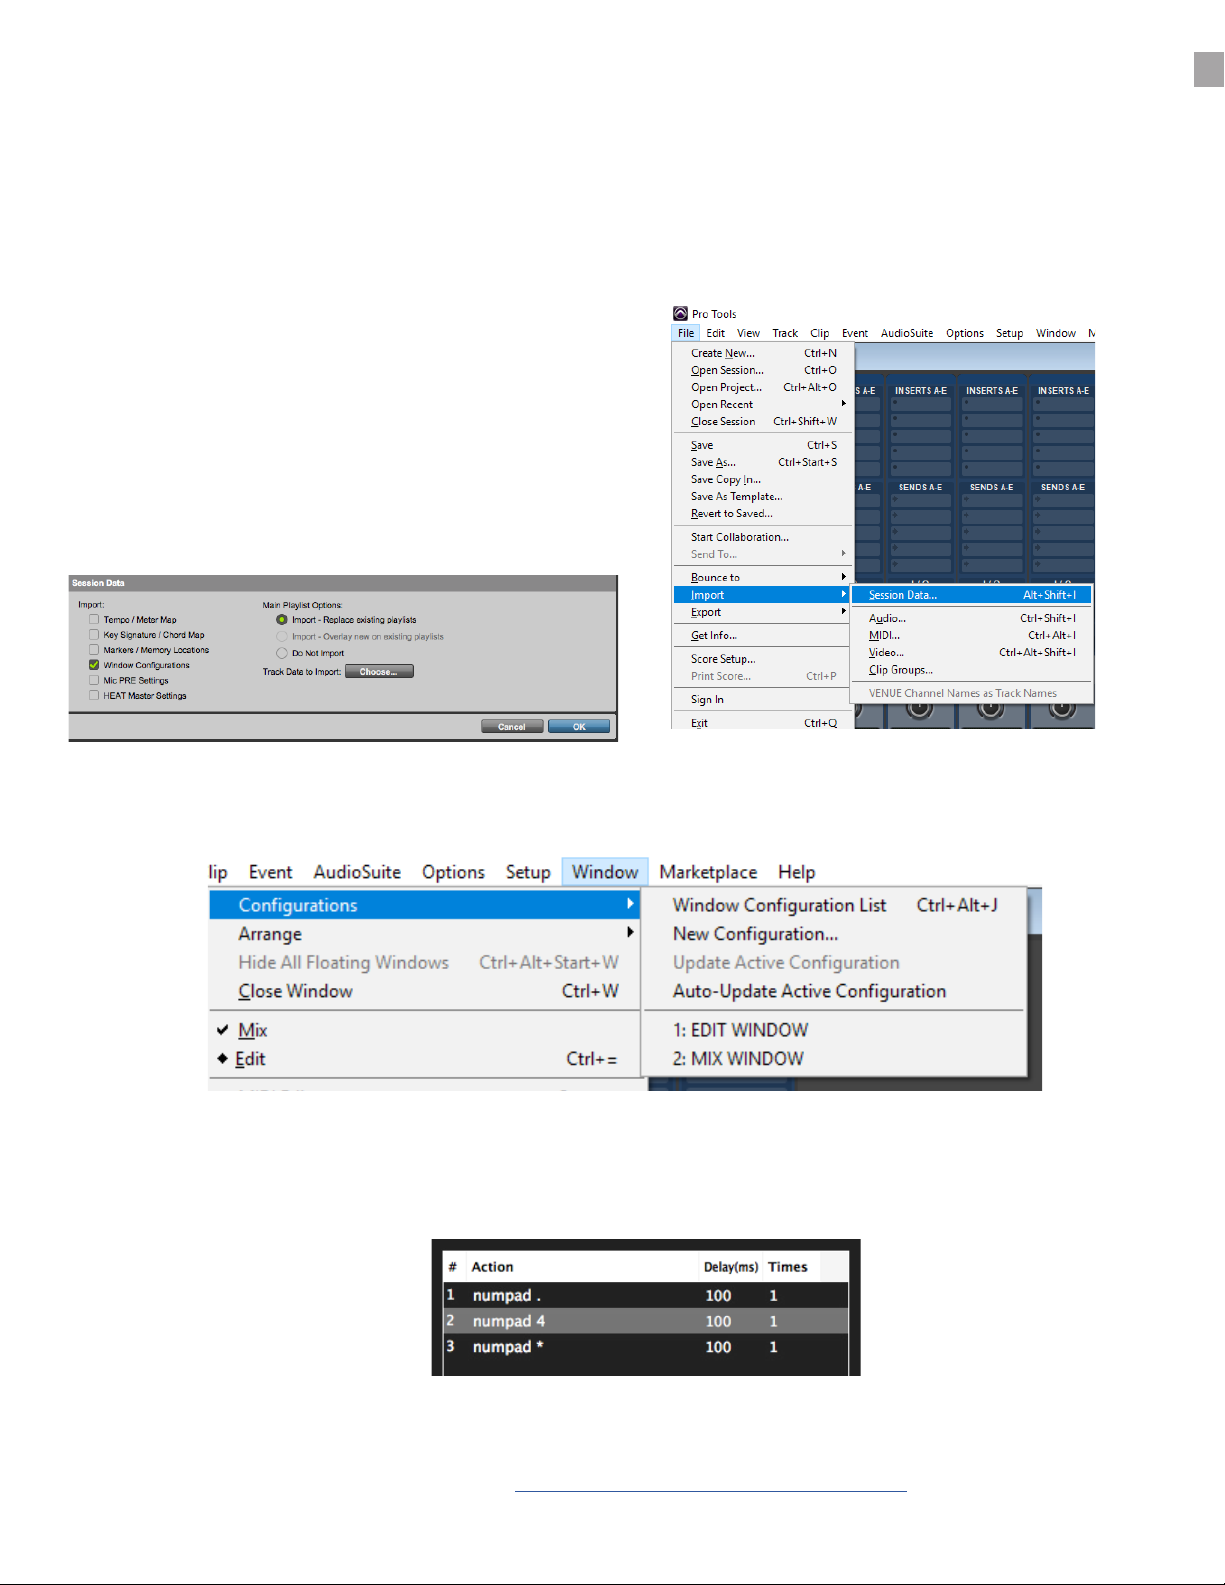
To import the default RAVEN Template Windows
choose “import session data”. Then open the Raven
name/Documents/Pro Tools/Session Templates/Raven
Templates.
utilize all the displays of the computer. For instance, if you using 3 displays, users may want the MIDI
Tools to recall the window layout.
Decimal .
Numpad 2
Numpad *
If there is no Numpad on the keyboard, open up the Batch Command Quick List and search for Window
For more information watch the video here: https://youtu.be/liCE0r2Dlu4?t=12m9s
AUTO INTERNAL MIXER ALIGNMENT
RAVEN INTERNAL MIXER ALIGNMENT
This is an example of misalignment due to the mix window not being maximized and the tracks
list not in the correct location relative to the “Red Line” of the RAVEN Internal Mixer.
the RAVEN fader colors are syncing with the color of the Pro Tools tracks and meters.

DUAL RAVEN INTERNAL MIXER ALIGNMENT
In order to allow the Mix and Edit window to appear on two separate displays, the Pro Tools “Parent”
window will have to be streched over both displays. First click the “Restore Down” button in the Pro
Tools screen.
Then drag the bottom right corner of the (now smaller) screen across to the second monitor so that
the grey Avid background is now showing on both screens. Users are now able to move the Mix or Edit
window to the second monitor.
Now, open the RAVEN application and the RAVEN Internal Mixer will show on the left and the RAVEN
Editing toolbar will show on the right.
To move Batch Commands from one RAVEN to the other, open the Floating Palette and add the desired
Batch Command Panel on to the palette. Then drag the Floating Palette over to the second display and
add the Panel back on to the main toolbar.
The RAVEN mixer is only supported on the left screen for Windows at this time.

RAVEN SOFTWARE
Open the RAVEN software
The RAVEN application is needed for full Multi-
Touch and Batch Command integration with the
touch screen and DAW. The setup videos can be
found here https://youtu.be/6gNEUvUb3pc and the
quick setup can be found here. https://youtu.be/
liCE0r2Dlu4
Users must have an iLok2 or iLok3 and a valid RAVEN
license to run the RAVEN software.
Launch the RAVEN software from the Applications
folder and in the Dashboard select the open button
next to the desired DAW. If the DAW is already
open, users can select the “Launch” button to open
the RAVEN toolbars.
should be pushed down, meaning it is now acting as a controller for the DAW.
Hide RAVEN:
provided a quick an easy Hide RAVEN button above the RAVEN
Power button on the RAVEN Tool-bar. Touch or Click with your
mouse to Hide your RAVEN software almost entirely except for
the RAVEN on the bottom left hand side displaying the text,
“Show.” Touch or click the RAVEN Logo “Show” on the bottom
left hand side of the screen and the RAVEN software will again
appear.
To Add or Remove Racks press the + to show more racks in your tool-bar or – to
show less racks. RAVEN Racks can be customized to show as many or few tools as
you would like.
room for the Raven External Mixer.
17
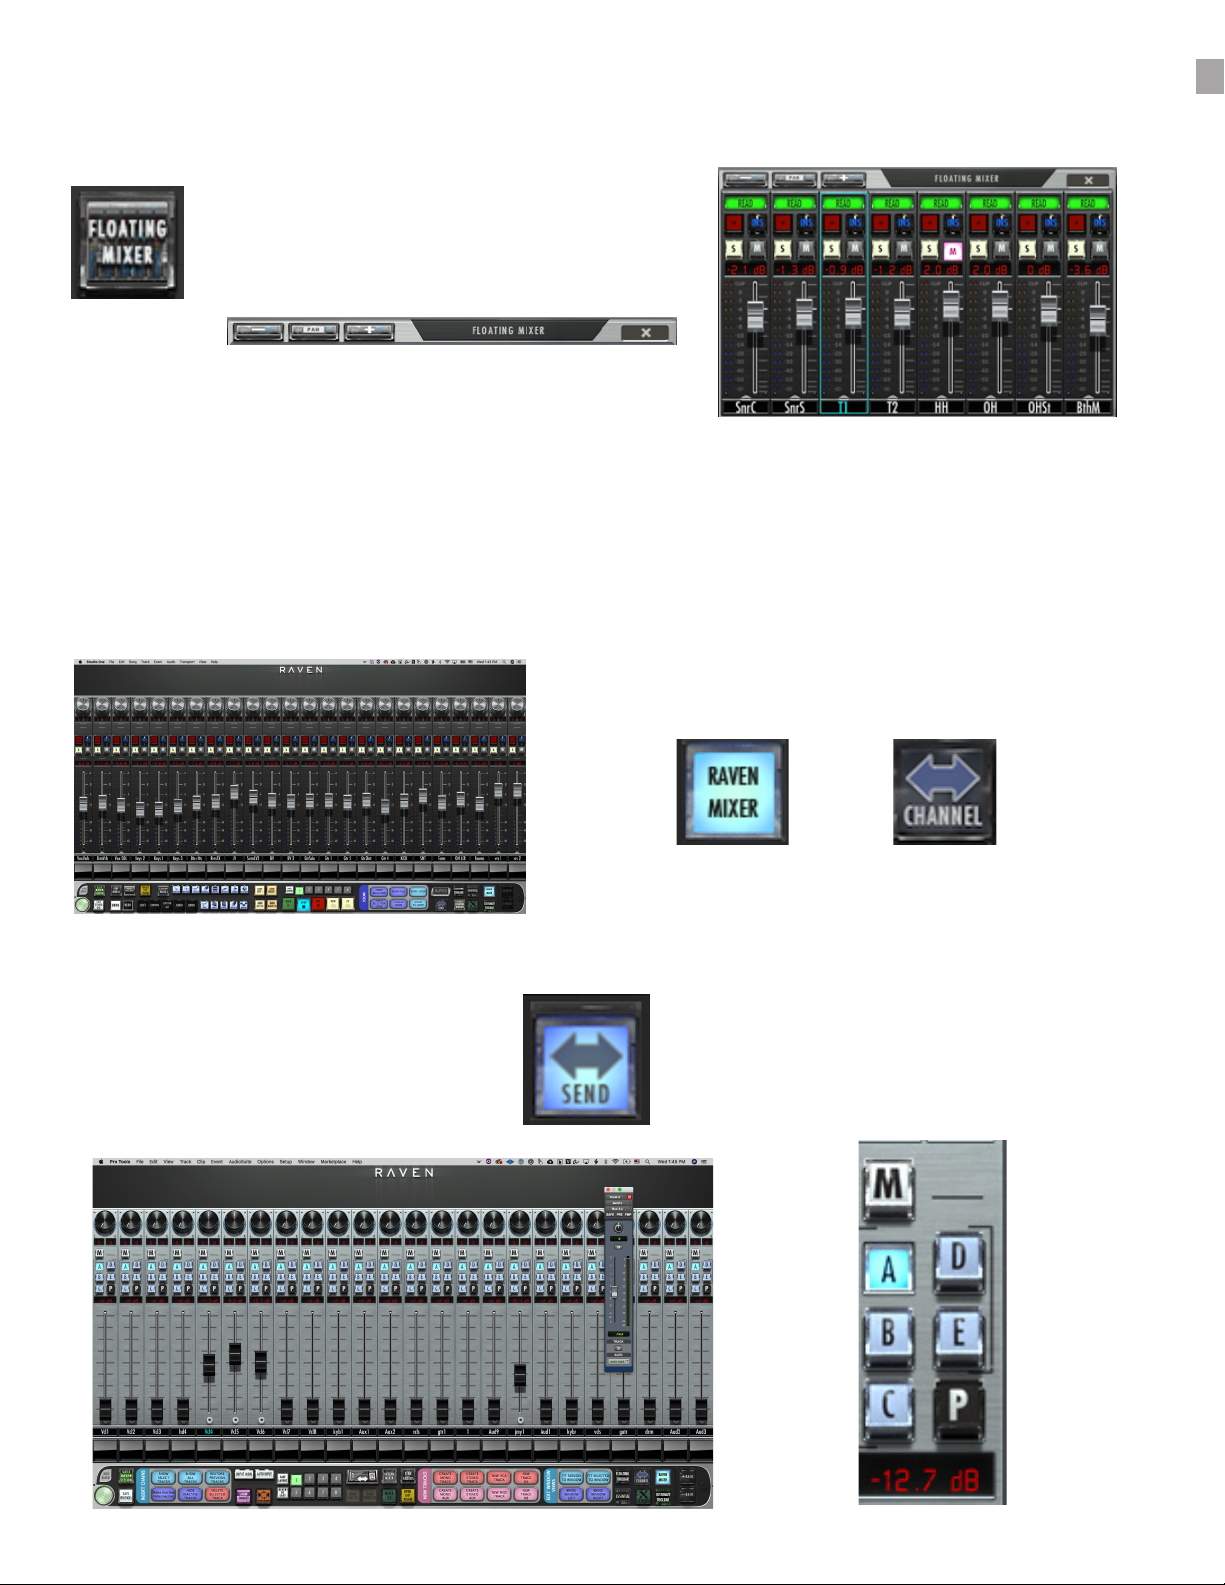
RAVEN MULTI-TOUCH MIXERS
Floating Mixer
The Floating Mixer buttons brings up a bank
and moved anywhere on the screen.
The mixer can be viewed as 8, 16 or 24 channels.
External Mixer
Pressing the RAVEN MIXER or will open the
External free-standing Mixer.
Here users can open inserts, adjust pans, solos/
mute, and automation status.
Sends Mixer
The Channel/Sends button is only
accessible in the RAVEN Internal Mixer or
RAVEN External Mixer mode, and if active
users can touch the Channel button to
corresponding faders.
Sends Selection
Use the Sends A-E button to toggle between
the 5 sends setup in the Pro Tools Mixer.
These are relative to the send insert and
can control any bus assigned to send A-E.
the faceplate of the fader tracks and swipe left or right to bank by 24-tracks at a time. Pressing the
pan button will switch the top section of the mixer from automation modes to pan modes.
18

Power:
When the Power button is pressed and held for 3 seconds, users will be prompted
to save a raven session. If you wish to save your RAVEN session, press yes. If not,
press no. Pressing cancel will keep the current RAVEN session running.
Banking:
would like to move. The tracks will move one track at a time in this scenario.
right on the lower half of the fader plates.
Users may choose to bank tracks by 1 or 24 tracks. To switch between the two
modes, simply press and hold the banking buttons and they will switch between
24 and 1.
Modiers:
unlatch 1 second after the a touch ccurs. To use
and touch the desired location where the click with
Open/Close Last Plug-in:
Use this button to close plug-in windows or to show the last
open plug-in once the plug in window is closed.
Hide Floating Windows:
windows showing including their sends, automation window
and even multiple plug-ins at once.
Users may feel they’ve reached the end of their project but are missing tracks. This is not the case, RAVEN will only
recognize full sets of 24 Tracks. If there are remaining tracks after the user has reached the last set of 24 tracks, the user
should then switch to single track banking to reach the last tracks on the Raven Mixer.
19
RAVEN MTI SOFTWARE CONT:
Navpads and Zooming:
window, and one built into the tool-bar. Both have the same
functionality. Within RAVEN Settings we have included the
NAVPAD Response Button. When touched, users are able
to adjust the NAVPAD sensitivity of their touch from levels 1
through 20. 1, being the slowest response and 20 being the
fastest. Within RAVEN Settings we have included the NAVPAD
Response Button. When touched, users are able to adjust the
NAVPAD sensitivity of their touch from levels 1 through 20. 1,
being the slowest response and 20 being the fastest.
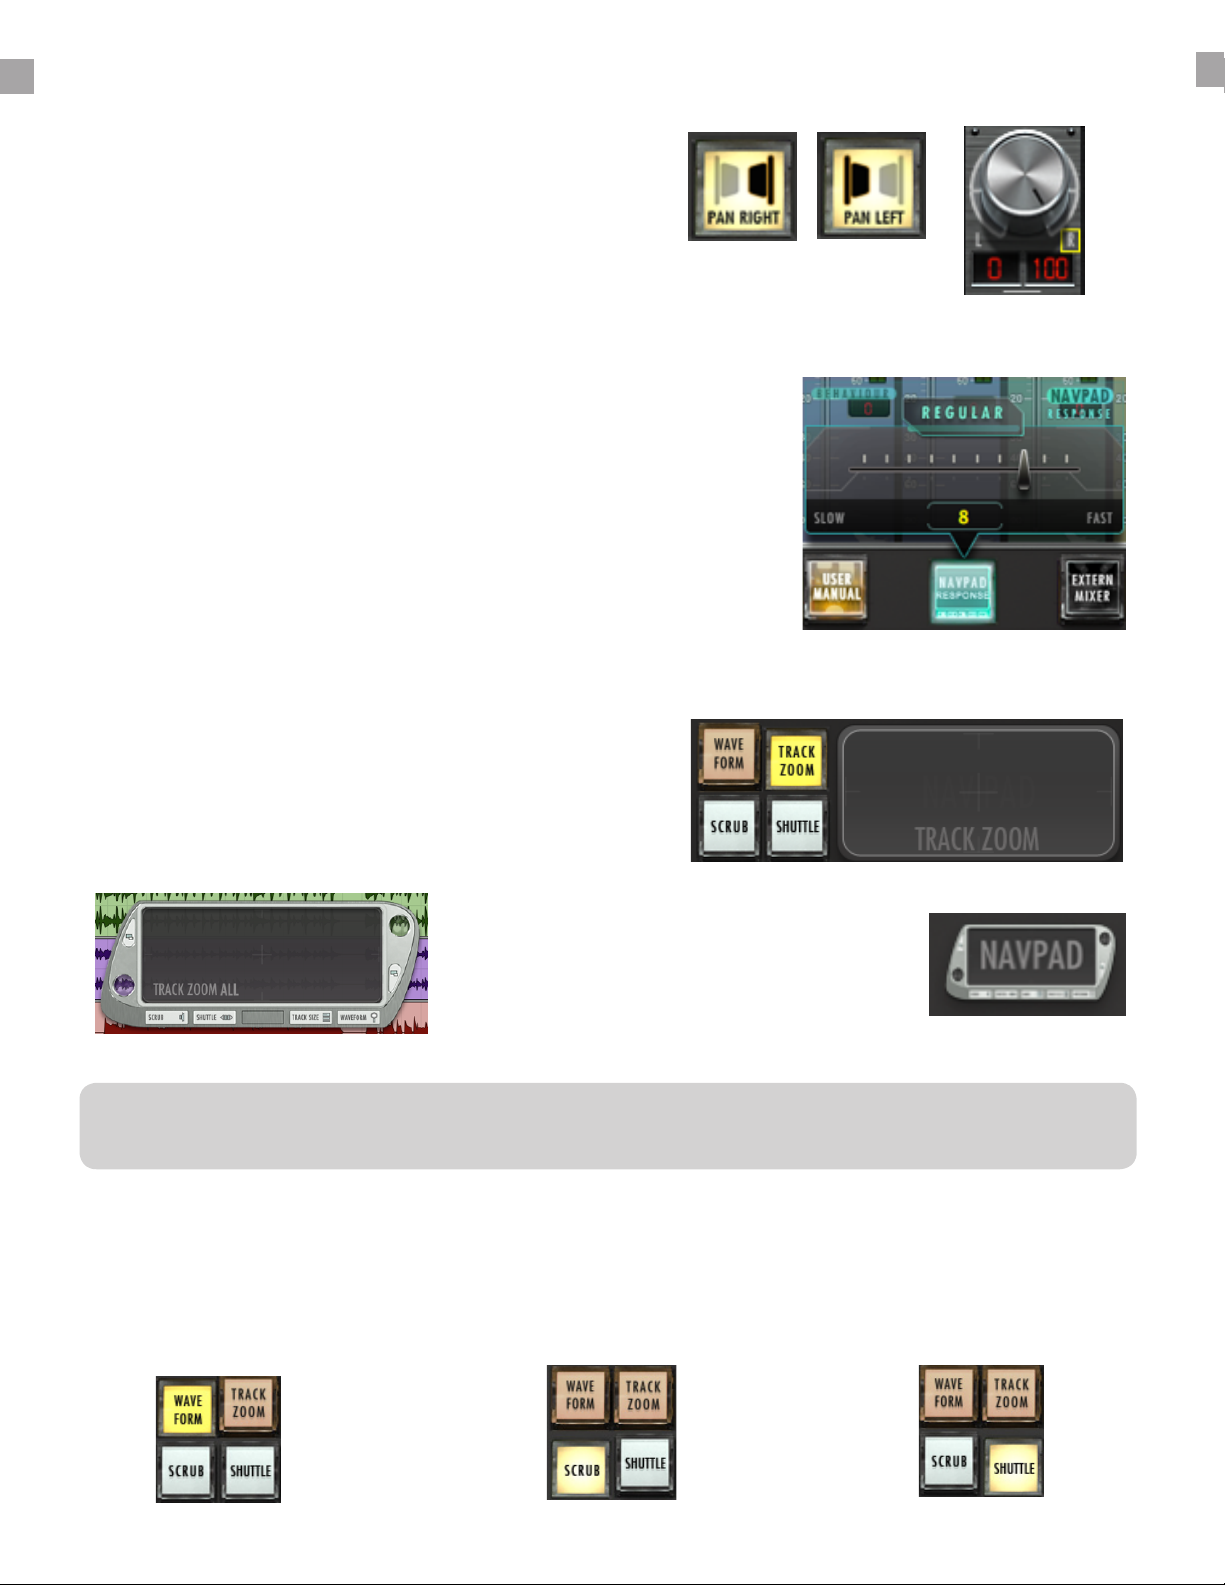
Pan Left/pan Right:
This button shows the Right side of any stereo
track. To see stereo tracks, touch the button so that
it reads “PAN RIGHT” the only track visible will be
the right side of any stereo track in your session.
Touch the button again to see left panners and
Floating Navpad:
window where you can Zoom,
Scroll, Shuttle and Scrub.
Waveform Zoom:
Touch the “Waveform” button
on the Navpad to adjust the
size of the waveform drawn
Scrub Zoom:
Touch the “Scrub” button
to scrub back and forth
through the session
Shuttle Zoom:
Touch the “Shuttle” button to
fast forward and rewind in the
session
Tool-bar Navpad:
Navpad located directly on the
RAVEN Tool-bar.
The NAVPAD uses an X, Y-axis to control zooming. Use only a single touch to control zooming. The NAVPAD is not designed
20
Table of contents


