SleepFans 18-SF-WI User manual

INSTRUCTION MANUAL
PLA13072501用PLA12070301改可销库存但要贴标 SIZE:140x216mm 12P 128g双铜纸 单黑色 骑马钉
第 1 页,共 12 页2013-10-25

SleepFans™
Instruction Manual
Model #’s: 18-SF-WI, 18-SF-CB, 18-SF-VB
IMPORTANT:
READ AND SAVE
THESE INSTRUCTIONS
...when you lie down, your sleep will be sweet.
- Proverbs
PLA13072501用PLA12070301改可销库存但要贴标 SIZE:140x216mm 12P 128g双铜纸 单黑色 骑马钉
第 2 页,共 12 页2013-10-25

Thank you for choosing SleepFans!
We appreciate your business and hope that this will be the beginning of a
long and fullling relationship. Our desire is that you nd your SleepFan to
be a beautiful, easy-to-use addition to your home, and that you experience
many years of peaceful nights and improved sleep.
Remember to allow yourself at least two weeks to become fully accustomed
to your new SleepFan.
We here at SleepFans are proud of our products and stand behind our work.
We are also committed to continually improving our products and our care for
you. We take sleep seriously.
Here’s to a great night’s sleep!
The SleepFans Team
1
PLA13072501用PLA12070301改可销库存但要贴标 SIZE:140x216mm 12P 128g双铜纸 单黑色 骑马钉
第 3 页,共 12 页2013-10-25

SAFETY AND WARNINGS
• Please read all instructions before operating this fan.
• DO NOT operate fan until fully assembled.
• Use fan only for intended household use as described in this manual. Any other
use not recommended by the manufacturer may cause re, electric shock, or injury
to persons.
• DO NOT operate fan without fan grills properly in place.
• Always use on a dry, stable, level surface.
• Avoid contact with moving parts. NEVER insert ngers, pencils or any other objects
through the fan grill during operation.
• To avoid re or shock hazard, plug the appliance directly into a 120V AC electrical
outlet. Connect only to properly polarized outlets.
• Always insert or remove plug from the outlet by grabbing the plug by hand. DO
NOT pull on the electrical cord.
• Keep the cord out of heavy trafc areas to avoid accidental tripping or contact. DO
NOT let the cord hang over the edge of a table or counter. To avoid re hazard,
NEVER put the cord under rugs, near heat registers, radiators, stoves or heaters.
• Always unplug fan before moving it, putting on or taking off parts, cleaning, or
whenever the fan is not in use.
• DO NOT operate fan with a damaged cord or plug, if fan motor fails to rotate, after
the fan malfunctions, or if it has been dropped or damaged in any manner. Take
your fan to qualied personnel for examination, electrical or mechanical adjustment,
or repair.
• To reduce the risk of re or electric shock, DO NOT use this fan with any solid-state
speed control device.
• DO NOT attempt to repair or adjust any electrical or mechanical functions on this
unit. Doing so will void your warranty. The inside of the unit contains no user
serviceable parts. All servicing should be performed by qualied personnel only.
• DO NOT operate the fan directly adjacent to curtains, plants, window coverings,
etc. to avoid accidental entanglement.
• DO NOT use outdoors.
• DO NOT expose your fan to excessive heat or humidity, as this can cause damage
to the electrical components.
• DO NOT operate in the presence of explosive and/or ammable fumes.
• Keep unit away from heated surfaces and open ames.
• To protect against electrical hazards, DO NOT immerse in water or other liquids.
DO NOT use near water.
• Keep your fan out of the reach of children and pets.
• DO NOT expose infants or seniors to prolonged periods of direct cold air.
• Close supervision is necessary when any appliance is used by or near children.
2
PLA13072501用PLA12070301改可销库存但要贴标 SIZE:140x216mm 12P 128g双铜纸 单黑色 骑马钉
第 4 页,共 12 页2013-10-25

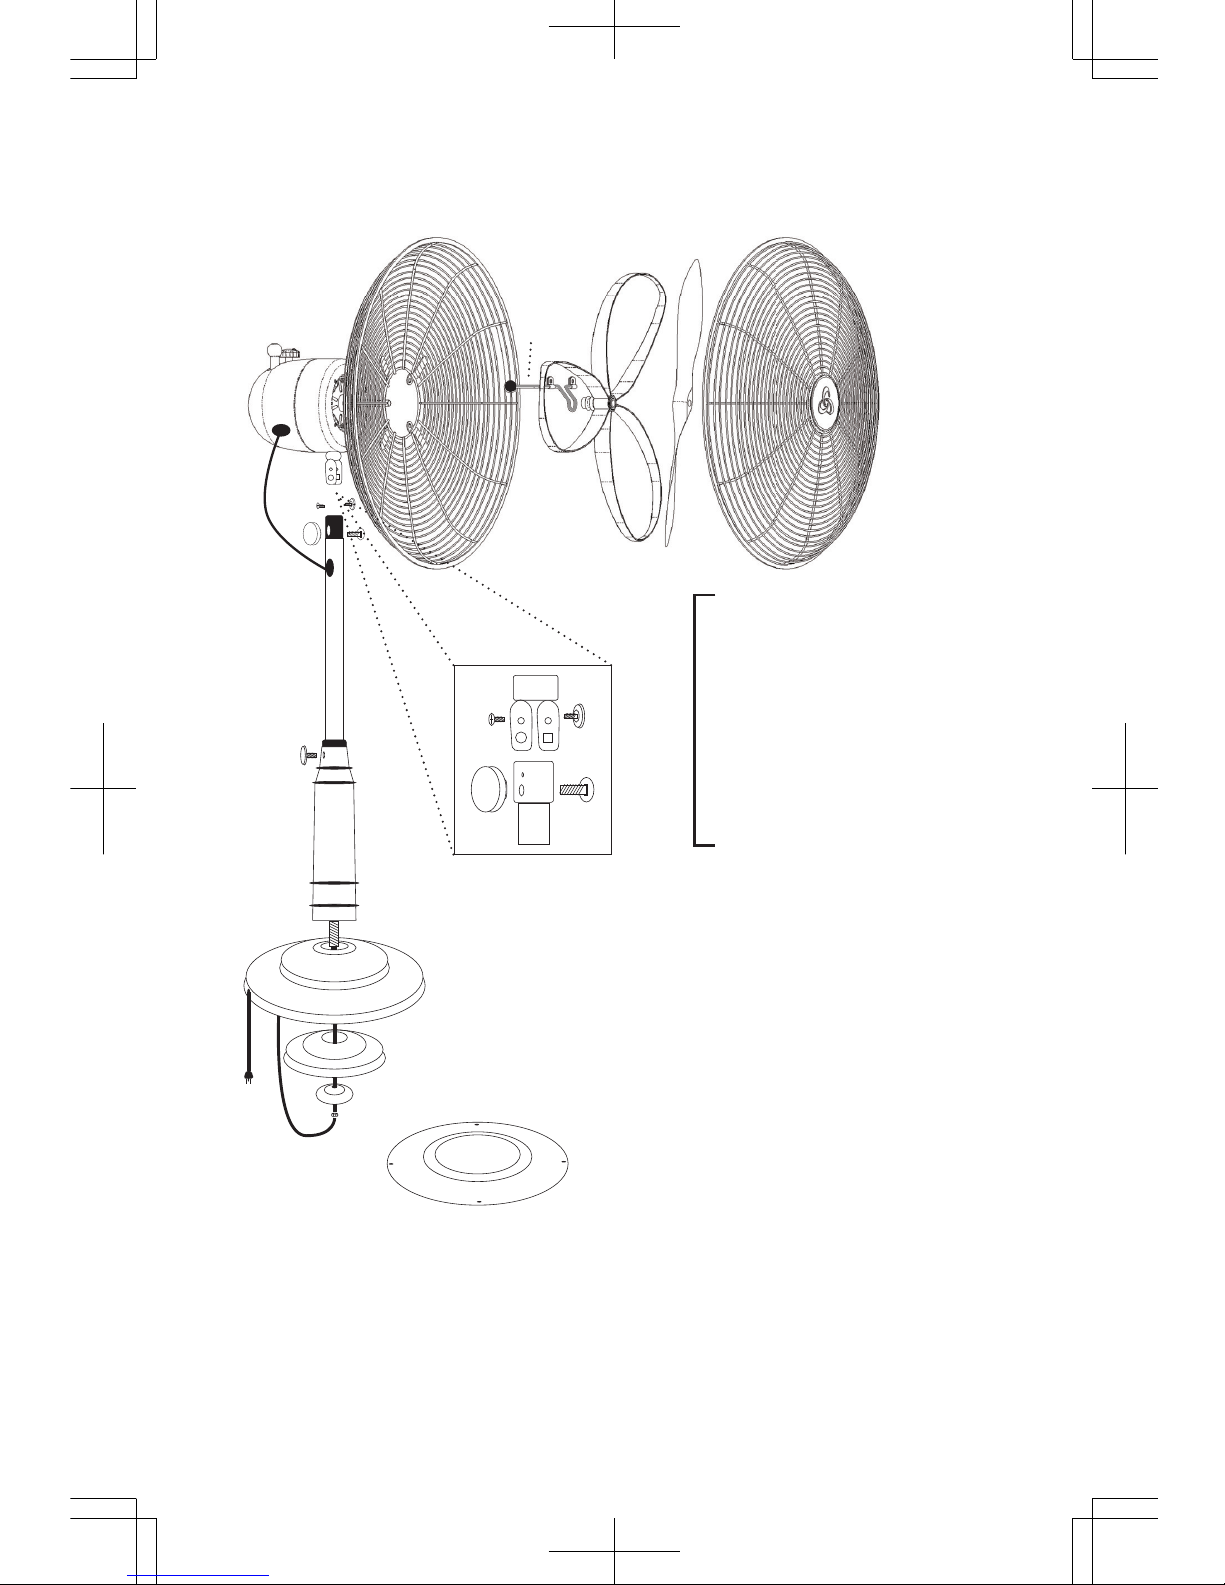
FAN DIAGRAM & PARTS DESCRIPTION
A Front grill
B Fan blade
C Fan petals
D Back grill
E Volume actuator lever
F Speed control knob
G Oscillation knob
H Motor housing
I Fan head neck
J Inner pole
K Height adjustment knob
L Decorative pole
M Fan base
N Weight
O Washer
P Nut
Q Tilt adjustment knob
R Range of motion screw
S Carriage bolt
T Securing knob
AA Base cover
3
WARNING
This fan has a grounded three-pronged plug, intended to t into a three-slot outlet. An
adapter is available for connecting three-pronged plugs into two-slot outlets. When
doing so, the green grounding tab extending from the adapter must be fastened under
the wall plate’s mounting screw. The adapter should not be used if a three-slot outlet
is available.
DO NOT DEFEAT THE SAFETY PURPOSE OF THE GROUNDED PLUG.
A
BC
D
EFG
H
I
J
K
L
M
N
O
P
Q
R
S
T
Fan head assembly
AA
PLA13072501用PLA12070301改可销库存但要贴标 SIZE:140x216mm 12P 128g双铜纸 单黑色 骑马钉
第 5 页,共 12 页2013-10-25

4
2. Align the decorative pole with the
center opening of the fan base and push
in place.
1. Remove the sleep fan from
the poly foam.
3. From the underside of the base, slide
the weight, washer and nut into place.
4. Secure the weight to the base with the
washer and nut.
ASSEMBLY INSTRUCTIONS
PLA13072501用PLA12070301改可销库存但要贴标 SIZE:140x216mm 12P 128g双铜纸 单黑色 骑马钉
第 6 页,共 12 页2013-10-25

5
5. Locate the base cover.
6. Note the screw tabs on the base.
7. Align the base cover with the screw
tabs and secure the base cover with the
screws.
PLA13072501用PLA12070301改可销库存但要贴标 SIZE:140x216mm 12P 128g双铜纸 单黑色 骑马钉
第 7 页,共 12 页2013-10-25

OPERATING INSTRUCTIONS
• Once assembled, set the fan on a dry, stable, level surface.
• Adjust the speed control knob (G) for the desired airow setting.
0: Off
I: Hig Speed
II: Medium Speed
III: Low Speed
• Move the volume actuator lever (E) up or down for the preferred amount of
sound.
• The fan can operate in oscillatory or stationary mode. Press the oscillation knob
(F) down to activate the oscillating mode. To stop oscillation, pull knob up.
• Turn fan off before adjusting fan height or fan head tilt angle.
• To raise or lower fan, loosen height adjustment knob (K) by turning counter-
clockwise. Grasp inner pole (J) and maneuver up or down for desired height
while re-tightening height adjustment knob.
• To adjust the fan head angle, grasp the fan head and slightly loosen the securing
knob (T) then loosen the tilt adjustment knob (S). Tilt the fan head up or down
and hold in the desired position while re-tightening the securing knob (T) and the
tilt adjustment knob (S).
• Unplug the fan when not in use.
6
Fan head neck -
Q Tilt adjustment knob
R Range of motion screw
S Carriage bolt
T Securing knob
Q
R
S
T
E
G
F
PLA13072501用PLA12070301改可销库存但要贴标 SIZE:140x216mm 12P 128g双铜纸 单黑色 骑马钉
第 8 页,共 12 页2013-10-25

CLEANING & MAINTENANCE
CLEANING THE FAN
• Set the speed control knob to off and unplug the unit.
• Clean the fan head, base, and pole using a clean, soft cloth, slightly dampened,
if necessary. Make certain that all surfaces are completely dry before resuming
use.
• NEVER use abrasive cleaning agents or solvents. This may cause damage or
deterioration to the surface of the unit.
• DO NOT immerse the fan in any form of liquid. DO NOT allow water to drip on or
into the fan motor housing.
CLEANING THE BLADES AND PETALS
• Make certain the fan is unplugged. Unlock the metal clips on the fan grill and
remove the front grill by lifting slightly to detach the top alignment tab from the
back grill.
• The fan blade, petals, and grill may be cleaned with a soft cloth, slightly
dampened, if necessary. A small, soft, clean brush, (a small paintbrush will do),
may also be used to remove dust in hard-to-reach places.
• NEVER use abrasive cleaning agents or solvents on the blades, petals or grill.
This may cause damage or deterioration to the surfaces.
• Reattach the front grill to the fan after all parts have dried completely. To do so,
secure the top alignment tab to the back grill. Align the front grill against the rear
grill and snap the grill clips closed. DO NOT plug the fan into an electrical outlet
until it is fully reassembled.
7
PLA13072501用PLA12070301改可销库存但要贴标 SIZE:140x216mm 12P 128g双铜纸 单黑色 骑马钉
第 9 页,共 12 页2013-10-25

REPLACING THE OVERLOAD PROTECTION FUSE
This fan employs an overload protection (fuse). A blown fuse indicates an overload
or short-circuit situation. If the fuse blows, unplug the fan from the electrical
outlet. Replace the fuse per the instructions below and check the product. If the
replacement fuse blows, a short-circuit may be present and the product should be
discarded or taken to an authorized service facility for examination and/or repair.
• Unplug the fan from the electrical outlet. Place the plug on a rm, at surface.
Open the fuse cover, located on the top of the plug, using your thumb or a
athead screwdriver to slide the cover towards the prongs.
NOTE: Ensure that the fuse cover is completely open before attempting to
remove the fuse.
• Remove the fuse carefully by using a small screwdriver to pry the fuse out of the
compartment by the metal ends of the fuse.
• Insert a new 5 Amp, 125 Volt fuse (provided with product) into the fuse
compartment, making sure that the fuse is securely in place.
• Slide the fuse cover closed completely. If the fuse cover is difcult to close, make
sure the fuse is properly secured in place by pressing down on the metal ends of
the fuse.
CAUTION: Risk of re. DO NOT replace the attachment plug. It contains a safety
device (fuse) that should not be removed. DO NOT use the product if the attachment
plug is damaged.
To avoid a risk of re, only replace with a 5 Amp, 125 Volt fuse. For your
convenience, check at your local hardware store for a replacement fuse.
8
PLA13072501用PLA12070301改可销库存但要贴标 SIZE:140x216mm 12P 128g双铜纸 单黑色 骑马钉
第 10 页,共 12 页2013-10-25

LIMITED WARRANTY
SleepFans extends this warranty to the original retail purchaser of this fan against
defects in materials and workmanship for a period of one year from the date of
purchase. At the seller’s option, SleepFans will replace or repair the defective part or
component or replace the entire product. In the event no replacement part or product
can be provided, the full purchase price may be refunded to the original purchaser.
Please contact our Customer Care Department to initiate a warranty repair or return.
The purchaser should retain the original sales slip and include a copy with the
returned product. The repaired/replaced product will be returned to the purchaser,
freight prepaid by SleepFans.
This warranty does not apply if the damage is caused due to abuse, accident,
improper handling, shipping damage, misuse, or if the product is used in ways other
than that for which it was designed. Any unauthorized repairs made or attempted to
this product will cause this warranty to be void.
THIS WARRANTY DOES NOT COVER INCIDENTAL OR CONSEQUENTIAL
DAMAGES FOR ANY CAUSE WHATSOEVER. Some states DO NOT allow
limitations on how long an implied warranty lasts or the exclusion or limitation of
incidental or consequential damages so the above limitation may not apply to you.
This warranty gives you specic legal rights and you may also have other rights which
may vary from state to state.
9
PLA13072501用PLA12070301改可销库存但要贴标 SIZE:140x216mm 12P 128g双铜纸 单黑色 骑马钉
第 11 页,共 12 页2013-10-25

PRINTED IN THE USA.
Copyright © 2012 SleepFans™. All Rights Reserved.
Exclusively Distributed by
IMPORTANT: READ AND SAVE THESE INSTRUCTIONS
PLA13072501
PLA13072501用PLA12070301改可销库存但要贴标 SIZE:140x216mm 12P 128g双铜纸 单黑色 骑马钉
第 12 页,共 12 页2013-10-25
This manual suits for next models
2
Table of contents
Popular Fan manuals by other brands

Vortice
Vortice LINEO 100 Q ES Instruction booklet

SOLIS
SOLIS CHARGE & GO DF-EF0516D user manual

Westinghouse
Westinghouse ETL-ES-Comet-WH09 owner's manual

Atlas fan company
Atlas fan company DIANE owner's manual

Airius
Airius SAPPHIRE Series PRODUCT INFORMATION & INSTALLATION GUIDE

enervent
enervent Salla eAir installation instructions

Home Decorators Collection
Home Decorators Collection BECKFORD Use and care guide

U.S. FAN
U.S. FAN UVQL100 quick start guide

Modern Forms
Modern Forms Roboto XL installation instructions

HOFFEN
HOFFEN FS40-14M instruction manual

Klarstein
Klarstein Sonnenwind Series manual

Airius
Airius PEARL S1 OPERATING AND INSTALLATION Manual