Smart Brand SB4032 User manual

Instruction manual
Refrigerator SB4032 EN
Read and retain these instructions for future reference

2
Contents
Introduction ………………………………………….………………………………………………………..3
Important safety instruction ……………………………………………………………………………..4
Installation…………………………………………………………………………………………………...…6
Re ersing the door…………………………………………………………………………………………...7
Description of the appliance………………………………………………………………………………8
Starting up and temperature regulation.……………………………………………………..……….9
Interior accessories………………………………………………………………………………………..10
Defrosting…………………………………………………………………………………………………….11
Energy sa ing tips…………………………………………………………………………………………13
Trouble shooting ……………………………………………………………….………………………….14
Changing the light bulb…………………………………………………………………………………..17
Noises during operation………………………………………………………………………………….18
Warranty……………………………………………………………………………………………………….19

3
Introduction
Before placing your new refrigerator/freezer into operation please read this operating
instruction carefully. It contains important information for safe use, for installation and for
care of the appliance. Please eep this operating instructions for future reference. Pass them
on to possible new owners of the appliance.
Notes which are important for your safety or for the proper functioning of the appliance are
stressed with a warning triangle and! or with signal words (Warning!,Caution!,lmportant! ).
Please observe the following carefully.
Supplementary information regarding operation and practical applications of the appliance
appear after this symbol.
Tips and notes concerning economical and environmentally use of the appliance are mar ed
with the cloverleaf.
The operating instructions contain instructions for the correction of possible malfunctions by
the user in the section Trouble shooting. If these instructions should not be sufficient,
contact your local Service Force Centre.

4
Important Safety Instructions
These warnings are provided in the interests of your safety. Ensure you fully understand
them before installing or using the appliance. If you are unsure about the meaning of these
warnings contact the Customer Care Department for assistance.
Intended use
•The refrigerator is intended for use in the home.lt is suitable for the storing of food
at low temerature.If the appliance is used for purposes other than those intended or
used incorrectly, no liability can be accepted by the man ufactuer for any damage
that may be caused.
•Alter cations or changes to the refrigerator are not permitted for ressons of safety.
If you use the refrigerator in a commercial application or for purposes other than the
cooling of foods, the manufacturer accepts no liability for any damages which may
occure.
Prior to initial start-up
•Chec the appliance for transport damage. Under no circumstance should a damaged
appliance be plugged in. In the event of damage, please contact your supplier.
Refrigerant
•The refrigerant isobutane (R600a) is contained within the refrigerant circuit of the
appliance, a natural gas with a high level of environmental compatibility, which is
nevertheless flammable.
•During transportation and installation of the appliance, be certain that none of the
components of the refrigerant circuit become damaged.
If the refrigerant circuit should become damaged:
avoid open flames and sources of ignition;
•thoroughly ventilate the room in which the appliance is situated.
Safety of children
•Pac aging (e.g. wraps, polystyrene) can be dangerous for children. There is a ris of
suffocation! Keep pac aging material away from chi Id ren!
•Ma e old appliances unusable prior to disposal. Puil out the mains plug, cut off the
mains cable, brea or remove spring or bolt catches iffitted. By doing this you ensure
that children cannot loc themselves in the appliance when playing (there is ris of
suffocation!) or get themselves into other dangerous situations.
•Often children cannot recognise the hazards present in household appliances. It is
therefore important that you ensure adequate supervision and never let children play
with the appliance!
Daily Operation
•Containers with flammable gases or liquids can lea at 10w temperatures. There is a
ris of an explosion! Do not store any containers with flammable materials such as
spray cans, fire extinguisher refili cartridges etc in the refrigerator and/or freezer.

5
•Do not operate any electrical appliances in the refrigerator and/or freezer (e.g.
electric ice cream ma ers, mixers etc.).
•Before cleaning the appliance, always switch off the appliance and unplug it, or pulI
the house fuse or switch off the circuit brea er.
•When unplugging always pulI the plug from the mains soc et, do not pulI on the
cable.
In case of malfunction
•1f a malfunction occurs on the appliance, please loo first in the Trouble Shooting
section of these instructions. 1f the information given there does not help, please do
not perform any further repairs yourself.
•Under no circumstance should you attempt to repair the appliance yourself. Repairs
carried out by unexperienced persons may cause injury or serious malfunctioning.
Contact your local Service Force Centre.
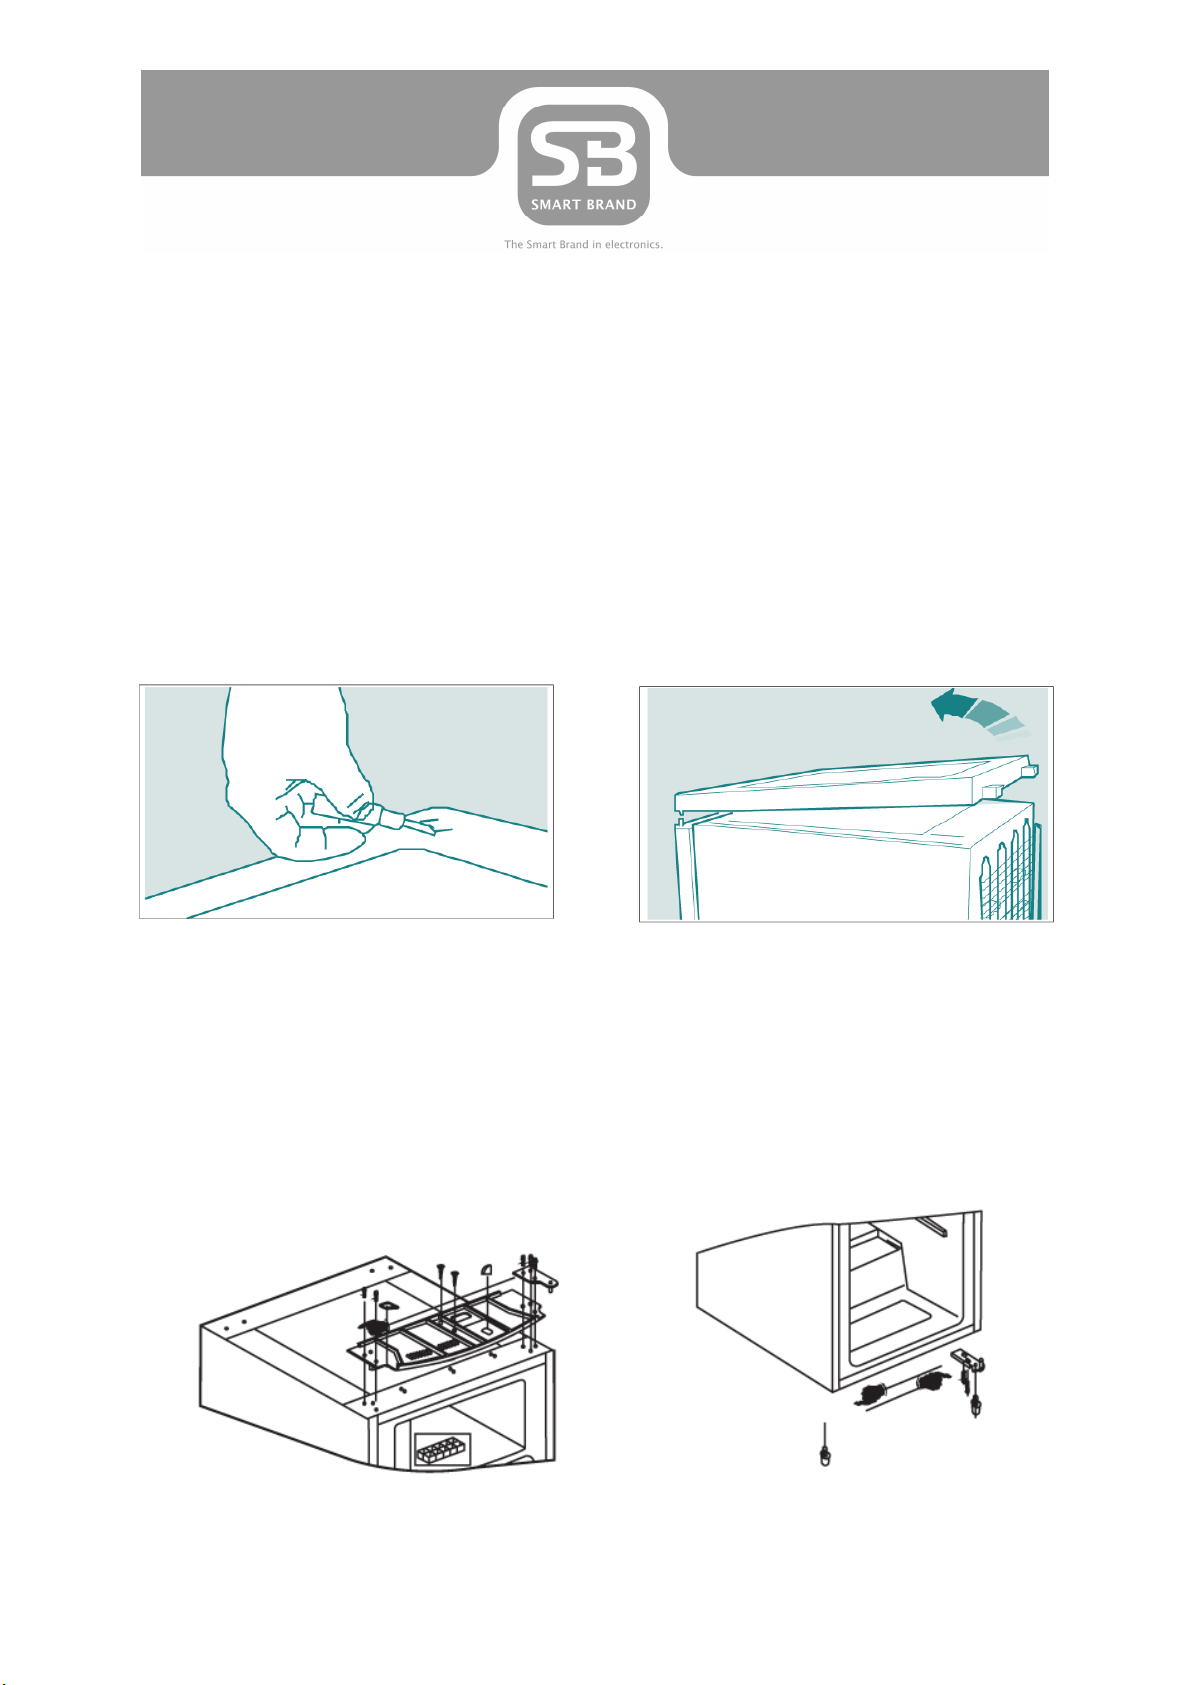
Remo e transport packaging
The appliance and the interior fiffings are protected for transport. Pull off the adhesive tape
on the left and right side of the door.
You can remove any remnants of adhesive using white spirit. Remove all adhesive tape and
pac ing pieces from the interior of the appliance.

6
Installation
Installation Location
The appliance should be set up in a well ventilated, dry room. Energy use and efficient
performance of the appliance is affected by the ambient temperature.
The appliance should therefore:
•not be exposed to direct sunlight;
•not be installed next to radiators, coo ers or other sources of heat; only be installed
at a location whose ambient temperature corresponds to the climate classification,
for which the appliance is designed.
The climate classification can be found on the serial plate, which is located at the left on the
inside of the appliance.
The following table shows which ambient temperature is correct for each climate
classification:
Climate classification for an ambient temperature of
SN 10° to + 32°
N 16° to + 32°
ST 16° to + 38°
T 16° to + 43°
Gently push into place until the top panel rear ventilation grille touches against the wall.
When in positon a 5Omm dear space above the appliances should be maintained. If space
above the appliance is not available, clearance of 25mm should be maintained on both sides.
Your refrigerator needs air
For correct operation this appliance must be located in a dry atmosphere, away from heat
sources, e.g. coo ers, radiators, boilers and direct sunlight.
You should also ensure that air can circulate freely around the bac and the top of the
cabinet. There should be 100mm between the top of the cabinet and any overhanging
itchen furniture. Alternatively allow 50mm between the top of the cabinet and any
overhanging itchen furniture and a gap of 25mm on either side of the appliance.
7
Re ersing the door
The side at which the door opens can be changed from the right side (as supplied) to the left
side, if the installation site requires.
When changing the side at which the door opens, the appliance must not be connected to
the mains. Remove plug from the mains beforehand.
Remo e the lid
Use a flat bladed screw driver to remove the 2 screw covers at the rear of the freezer lid.
Unscrew and lift the lid of the freezer from the rear and remove it. Put it in a safe place.
•Tilt the appliance slightly towards the rear and prop it securely. Unscrew the door
hinge screws and remove the hinge pin brac et.
•Open the door a little way and ta e it out downwards.
•Screw the upper pin and screw it into place on the opposite side
•Fit the door into the upper pin and close it
•Screw the hinge pin brac et seorely into ace on the opposite side using the screws
8
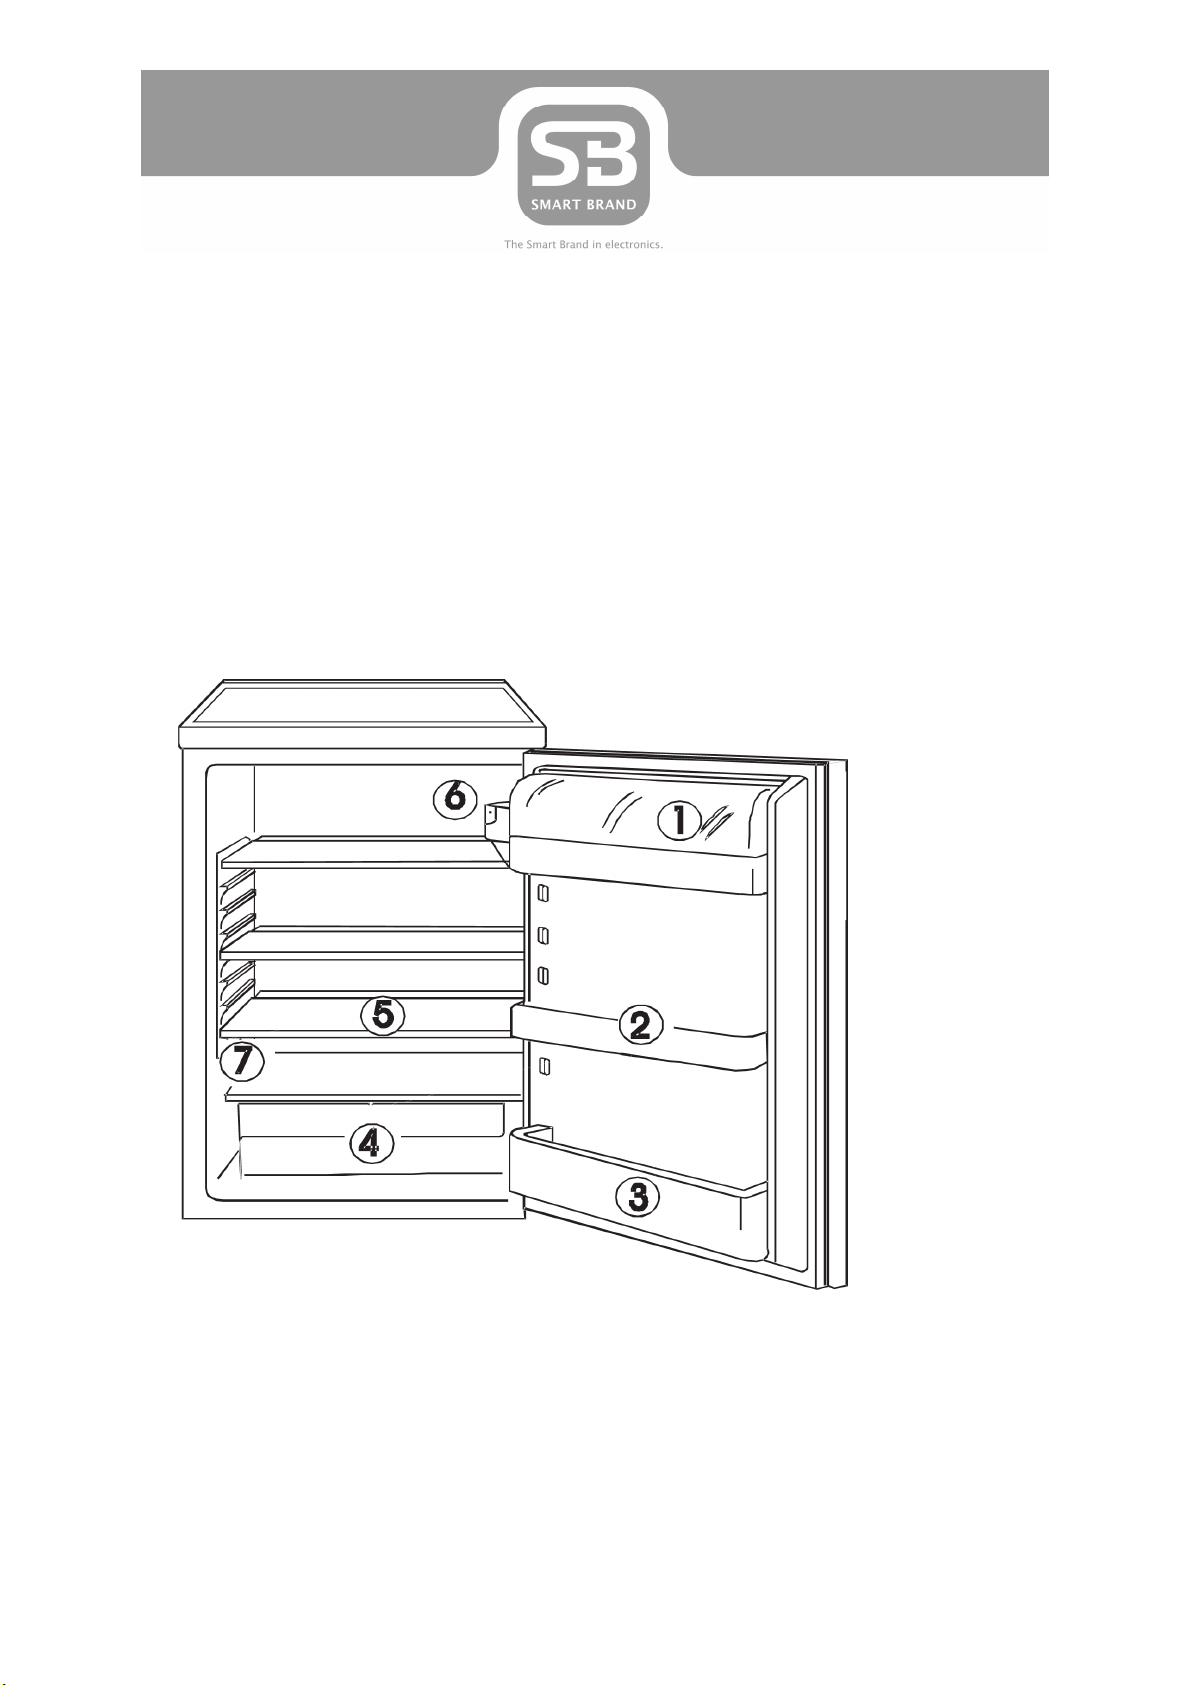
Description of the appliance
View of the appliance
1. Butter/cheese compartments with flap and egg storage insert
2. Door storage compartment
3. Bottle shelf
4. Vegetable drawers
5. Storage shelves
6. Temperature regulator and light switch
7. Rating plate
9
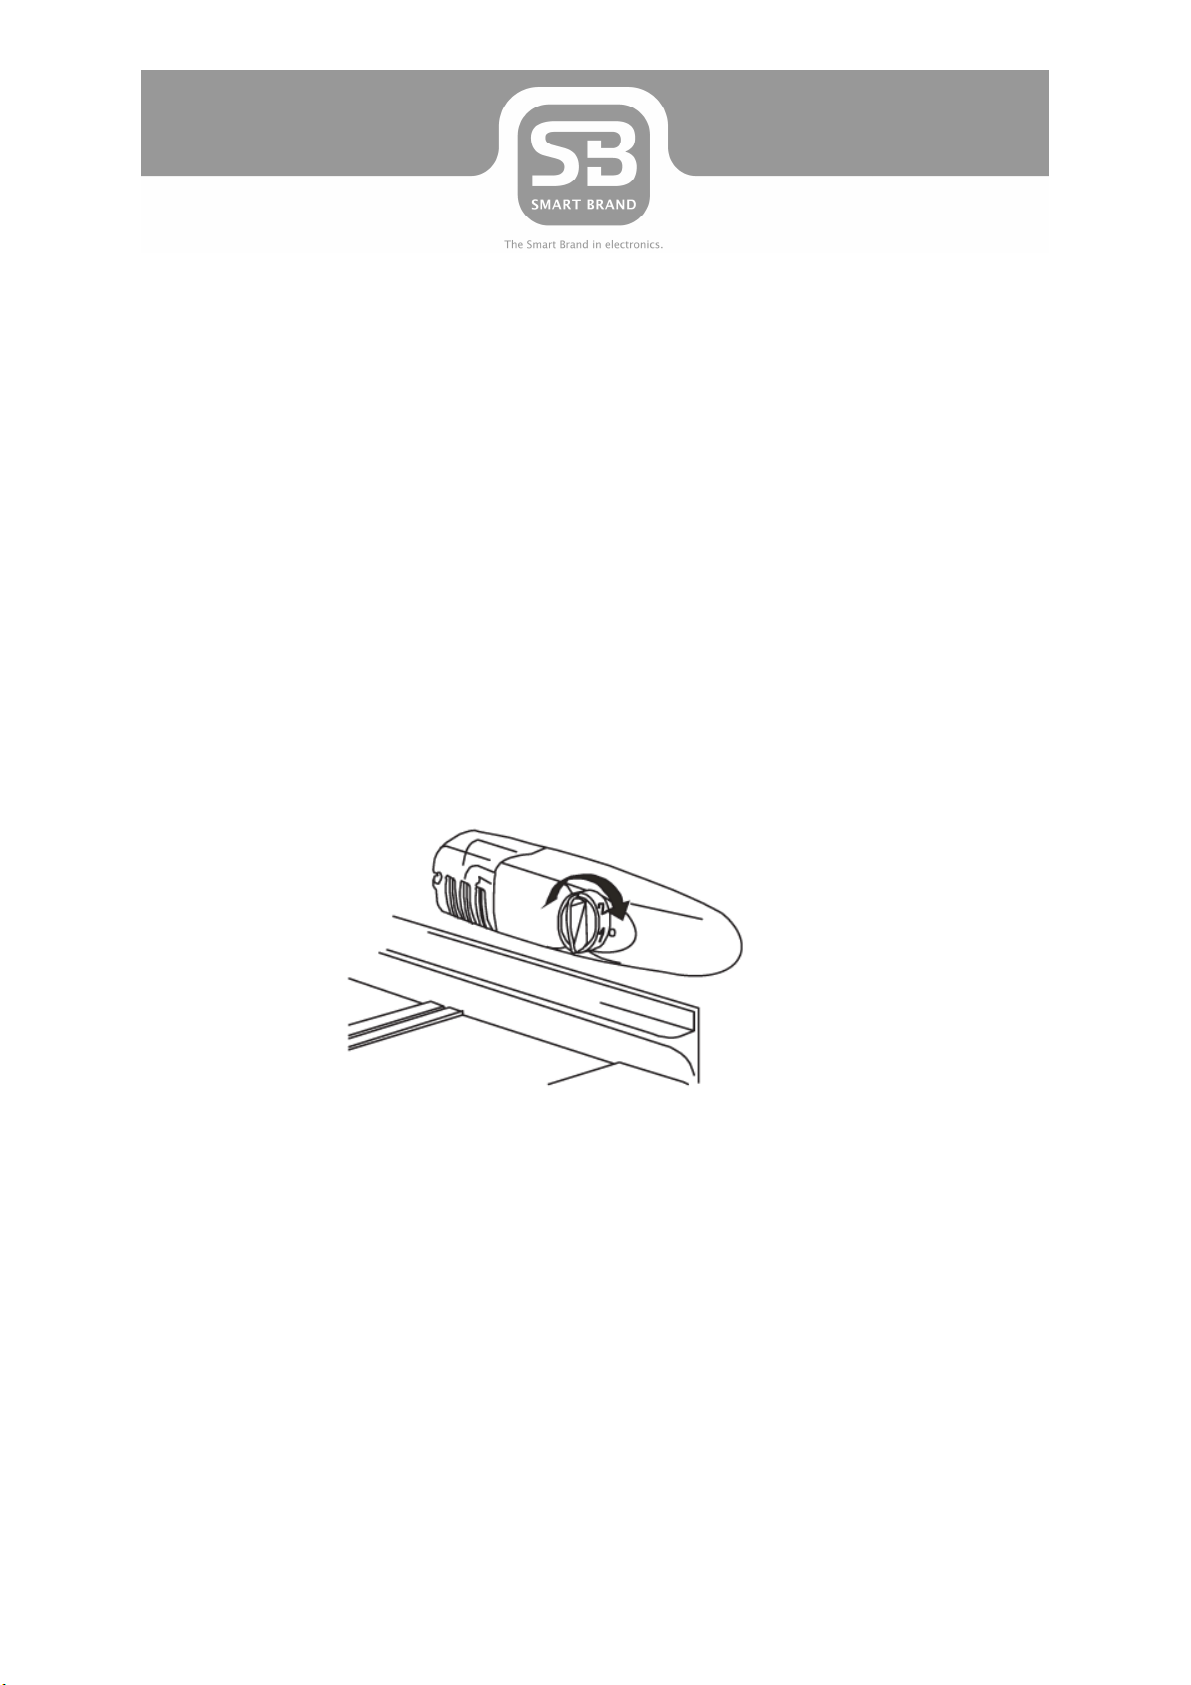
Starting up and temperature regulation
Insert the plug of the connection lead into the plug soc et with protective earth contact.
When the refrigerator compartment door is opened, the internal lighting is switched on.
The temperature selector switch is located on the RH side of the refrigerator compartment.
•Setting “0” means: Off.
•Turning cloc wise in direction Refrigerating unit on, the latter then operating
automatically. Setting 1 means:
Highest temperature, warmest setting.
•Setting 7 (end-stop) means:
Lowest temperature, coldest setting.
•At a low ambient temperature of around 16 C, setting1 should be selected. At
ambient temperatures of around 25 C, select setting 2 if you require a lower
temperature, select setting 3 or 4.
Important
High ambient temperatures ( e.g. on hot summer days ) and a cold setting on the
temperature regulator ( position 6 to 7) can cause the compressor to run continuously.
Reason: when the ambient temperature is high, the compressor must run continuously to
maintain the low temperature in the appliance. The fridge will not be able to defrost since
automatic defrosting of the fridge is only possible when the compressor is not running ( see
also ‘Defrosting’ section ). The result is the build up of a thic layer of frost on the fridge
rear wall.
It this happens, turn the temperature regulator bac to a warmer setting ( position 3 to 4 ).
At this selling the compressor will be switched on and off as usual and automatic defrosting
recommenced.

10
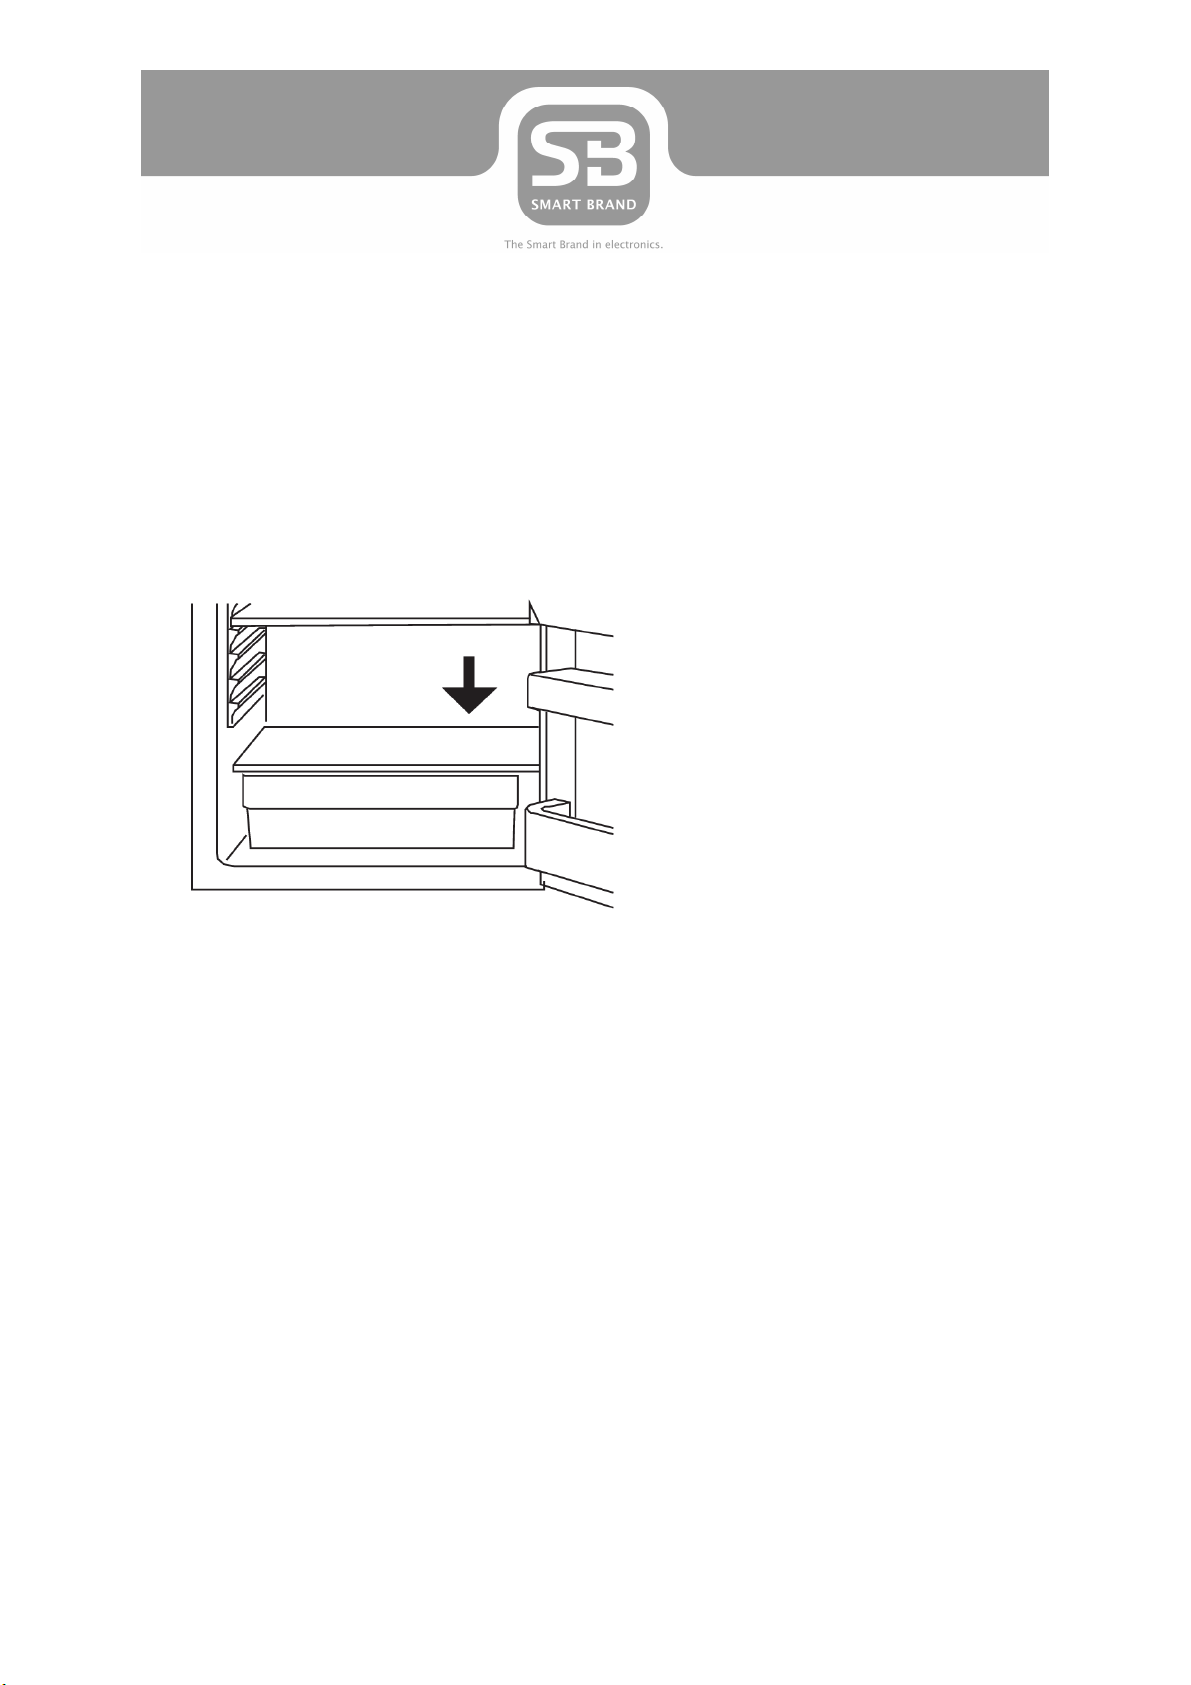
Interior accessories
Various glass or plastic storage shelves and wire trays are included with your appliance -
different models have different combinations. You should always slide one of the full size
glass storage shelves into the lowest set of guides, above the fruit and vegetable containers,
and eep it in this position.
The height of the storage shelves can be adjusted:
To do this, pulI the storage shelf forward until it can be swivelled upwards or downwards and
removed.
Please do the same in reverse to insert the shelf at a different height.
Correct storage
1. Butter and cheese
2. Preserves
3. Drin s
4. Cheese storage, fruit, and vegetables
5. Meat, salami, cold cuts, dairy produce
6. Ready meals, pastries, preserves
Tip
Food in the fridge should always be covered or pac aged, to prevent drying and tainting of
other food.
The following are suited for pac aging:
•Polyethylene airtight bags and wraps
•Plastic containers with lids
•Special plastic covers with elastic; aluminium foil.

11
Defrosting
The fridge defrosts automatically.
The rear wall of the fridge covers with frost when the compressor is running, and defrosts
when the compressor is off. The water from the thawing frost evaporates by itself.
Switching off the appliance
To switch off the appliance, turn the temperature regulator to position “0”.
If the appliance is not going to be used for an extended period:
Remove all refrigerated pac ages.
Switch off the appliance by turning the temperature regulator to position “0”.
Remove the main plug or switch off or disconnect the electricity supply.
Clean thoroughly (see section: cleaning and care)
Leave the door open to avoid the build up of odours.
Cleaning and Care
For hygienic reasons the appliance interior, including interior accessories, should be cleaned
regularly.
Warning
The appliance may not be connected to the mains during cleaning.
Danger of electrical shoc !
Before cleaning switch the appliance off and remove the plug from the mains, or switch off
or turn out the circuit brea er or fuse.
Never clean the appliance with a steam cleaner.Moisture could accumulate in electrical
components, danger of electrical shoc ! Hot vapours can lead to the damage of plastic parts.
The appliance must be dry before it is placed bac into service.
Important
Ethereal oils and organic solvents can attac plastic parts, e.g. lemon juice or the juice from
orange peel, butyric acid, cleanser which contain acetic acid.
Do not allow such substances to come into contact with appliance parts.
Do not use any abrasive cleansers.
Remove the food from the refrigerator. Store it in a cool place, well covered.
Switch the appliance off and remove the plug from the mains, or switch off or turn out the
circuit brea er or fuse.
Clean the appliance and the interior accessories with a cloth and lu ewarm water.
Commercially available dish washing detergents may also be used.
12
After cleaning wipe with fresh water and rub dry
Accumulation of dust at the condenser increases energy consumption.For this reason
carefully clean the condenser at the bac of the appliance once a year with a soft brush or a
vacuum cleaner.
Chec the water drain hole on the rear wall of the fridge.
After everything is dry place appliance bac into service.

13
Energy sa ing tips
Do not install the appliance near coo ers, radiators or other sources of warmth. High
ambient temperatures cause longer, more frequent operation of the compressor.
Ensure sufficient air circulation and exhaust at the appliance base and at the bac wall of the
appliance. Never cover air vent openings.
Do not place warm foods into the appliance. Allow warm foods to cool first.
Only leave door open as short as necessary. Do not set temperature any colder than
necessary.
Keep the heat emitting condenser, the metal grille on the rear wall of your appliance, always
clean.

14
Trouble shooting
Correcting Malfunctions
Spare parts:
The following spare parts can be ordered from your local Service Force Centre. You can fit
these yourself without any special s ill or training:
•Butter / cheese compartment,
•Egg holders,
•Door rac s,
•Fruit and vegetable drawers,
•Storage rac s
A malfunction may be caused by only a minor fault that you can rectify yourself using the
following instructions. Do not perform any other wor on the appliance if the following
information does not provide assistance in your specific case.
Important
Repairs to refrigerators / freezers may only be performed by competent service engineers.
lmproper repairs can give rise to significant hazards for the user. If your appliance needs to
be repaired, please contact your specialist dealer or your local Service Force Centre.

15
Symptom Possible Cause
Remedy
Appliance is not switched on.
Switch on the appliance.
Appliance does not wor .
Mains plug is not plugged in or
is loose. Fuse has blown or is
defective
Insert mains plug.
Chec fuse, replace if
necessary
Appliance cools too much.
Temperature is set too cold.
Mains malfunctions are to be
corrected by an electrician.
Turn the temperature
regulator to a warmer setting
temporarily.
Please loo in the Initial Start
Up section. Open the door
only as short as necessary.
Turn the temperature
regulator to a colder setting
temporarily.
The food is too warm.
Temperature is not properly
adjusted.
Door was open for an extended
period.
A large quantity of warm food
was placed in the applicance.
Within the last 24 hours.
The appliance is near a heat
source.
Please loo in the section on
page 9.
Interior lighting does not
wor .
Light bulb is defective.
Please loo in the changing
The light bulb sections.
Heavy build up of frost
possibly also 0fl the door
seal.
Door seal is not air tight
(possibly after reversing the
door).
Carefully warm the lea ing
sections of the door seal
with a hair dryer (on a cool
selling). At the same time
shape the warmed door seal
by hand such that it sits
correctly
16
Symptom
Possible Cause Remedy
Appliance is not level.
Readjust the feet
Appliance is touching the
wall or others.
Move the appliance slightly.
Unusual noise.
A component, e.g. a pipe on
the rear of the appliance is
touching another part of the
appliance or the wall.
If necessary, carefully bend
the component out of the
way.
The compressor does not
start immediately after
changing the temperature
setting.
This is normal, no error has
occurred.
The compressor starts after
a period of time.
Water on the floor or on
storage shelves.
Water drain hole is bloc ed
See the cleaning and care
section

17
Changing the light bulb
Warning
There is a ris of electric shoc s! Before changing the light bulb, switch off the appliance and
unplug it, or pull the fuse or the circuit brea er.
Light bulb data: 220-240V, max. 15 W
•To switch off the appliance, turn the temperature regulator to position “0”•
•Unplug the mains plug.
•To change the light bulb, undo the screw.
•Press the light bulb cover as shown and slide it bac wards.
•Change the defective light bulb. Refit the light bulb cover and the screw.
•Put the refrigerator bac into operation.

18
Noises during operation
The following noises are characteristic of refrigeration appliances:
•Clic s whenever the compressor switches on or off, a clic can be heard.
•Humming as soon as the compressor is in operation, you can hear it humming.
•Bubbling/ when refrigerant flows into thin tubes, you can hear splashing bubbling or
splashing noises.
Even after the compressor has been switched off,
this noise can be heard for a short time.
Regulations, Standards, Guidelines
CE
This appliance is in accordance with the foliowing EU guidelines:
•73/23/EEC low voltage
•891336/EEC EMC Directive

19
Warranty
You have 2 years warranty on technical defects after purchase
Not included in warranty:
•Other than normal domestic use (this appliance is for normal domestic use only).
•Causes not being related directly to the appliance such as:
damage occurring during transport or because of wrong usage such as dents,
scratches, bro en parts.
•Installation errors (such as wrong voltage).
•Malfunctioning because of improper usage, dust/fluff in and on the appliance,
amongst others bloc ing of air circulation, as well as brea ing of plastics, rubber,
glass which other than by normal use has gone defect, such to be judged by the
service man and or importer.
You have 2 year warranty on technical defects on the appliance after date of purchase,
warranty is only valid if a valid notice of purchase/invoice can be shown.
Warranty rights are not transferable.
1f appliance is offered for servicing it needs to be clean, otherwise service can be refused.
Table of contents
Popular Refrigerator manuals by other brands


Beko
Beko B1RMLNE444XB user manual

U-Line
U-Line U-3024RS-00B User guide & service manual

Silver King
Silver King SKTTR7FG/CEU3 Technical manual and replacement parts list

Silver King
Silver King SKRCB97H/CFG1 Technical manual and replacement parts list

Beko
Beko BRS3682 user manual

JUNO
JUNO JKI 2435 operating instructions


