Smart-eye Digital Electronics 637JBU User manual

1080P HD Wireless Cloud IP Camera
Quick Installation Guide
EN DE FR IT JP
FCC WARNING
This device complies with part 15 of the FCC Rules.
Operation is subject to the following two conditions: (1) this
device may not cause harmful interference, and (2) this
device must accept any interference received, including
interference that may cause undesired operation.
Any changes or modifications not expressly approved by the
party responsible for compliance
could void the user's authority to operate the equipment.
NOTE: This equipment has been tested and found to comply
with the limits for a Class B digital device, pursuant to Part 15
of the FCC Rules. These limits are designed to provide
reasonable protection against harmful interference in a
residential installation. This equipment generates, uses and
can radiate radio frequency energy and, if not installed and
used in accordance with the instructions, may cause harmful
interference to radio communications. However, there is no
guarantee that interference will not occur in a particular
installation.
If this equipment does cause harmful interference to radio or
television reception,
which can be determined by turning the equipment off and
on, the user is encouraged to try to correct the interference
by one or more of the following measures:
-- Reorient or relocate the receiving antenna.
-- Increase the separation between the equipment and
receiver.
-- Connect the equipment into an outlet on a circuit different
from that to which the receiver is connected.
-- Consult the dealer or an experienced radio/TV technician
for help.
To maintain compliance with FCC’s RF Exposure guidelines,
This equipment should be installed and operated with
minimum distance between 20cm the radiator your body:
Use only the supplied antenna.

Warm note: Please make sure your router
is connected to Internet.
Camera StatusLight Status
Camera is powered on
Waiting to connect now
Red and blue light
DOWHUQDWHO\þDVKLQJ
Camera is connecting Wi-Fi
Succeeded to connect Wi-FiBlue light solid
1.Reset camera to factory setting
Red light on
INDICATOR LIGHTS STATUS
·········· ··········
Reset button
Photosensor
Microphone
Lens
Micro SD Card Slot
Infrared LED
Speaker
Indicator lights
Power port
1
2
3
4
5
6
7
8
9
1×quick installation guide
1×camera
1×power adapter
mounting accessories
IN THE BOX
1
3
1
2
45
23
4
5
6
7
8
9
6
78
9
FRONT
FRONT
BACK
BACK
EN 01 EN
02
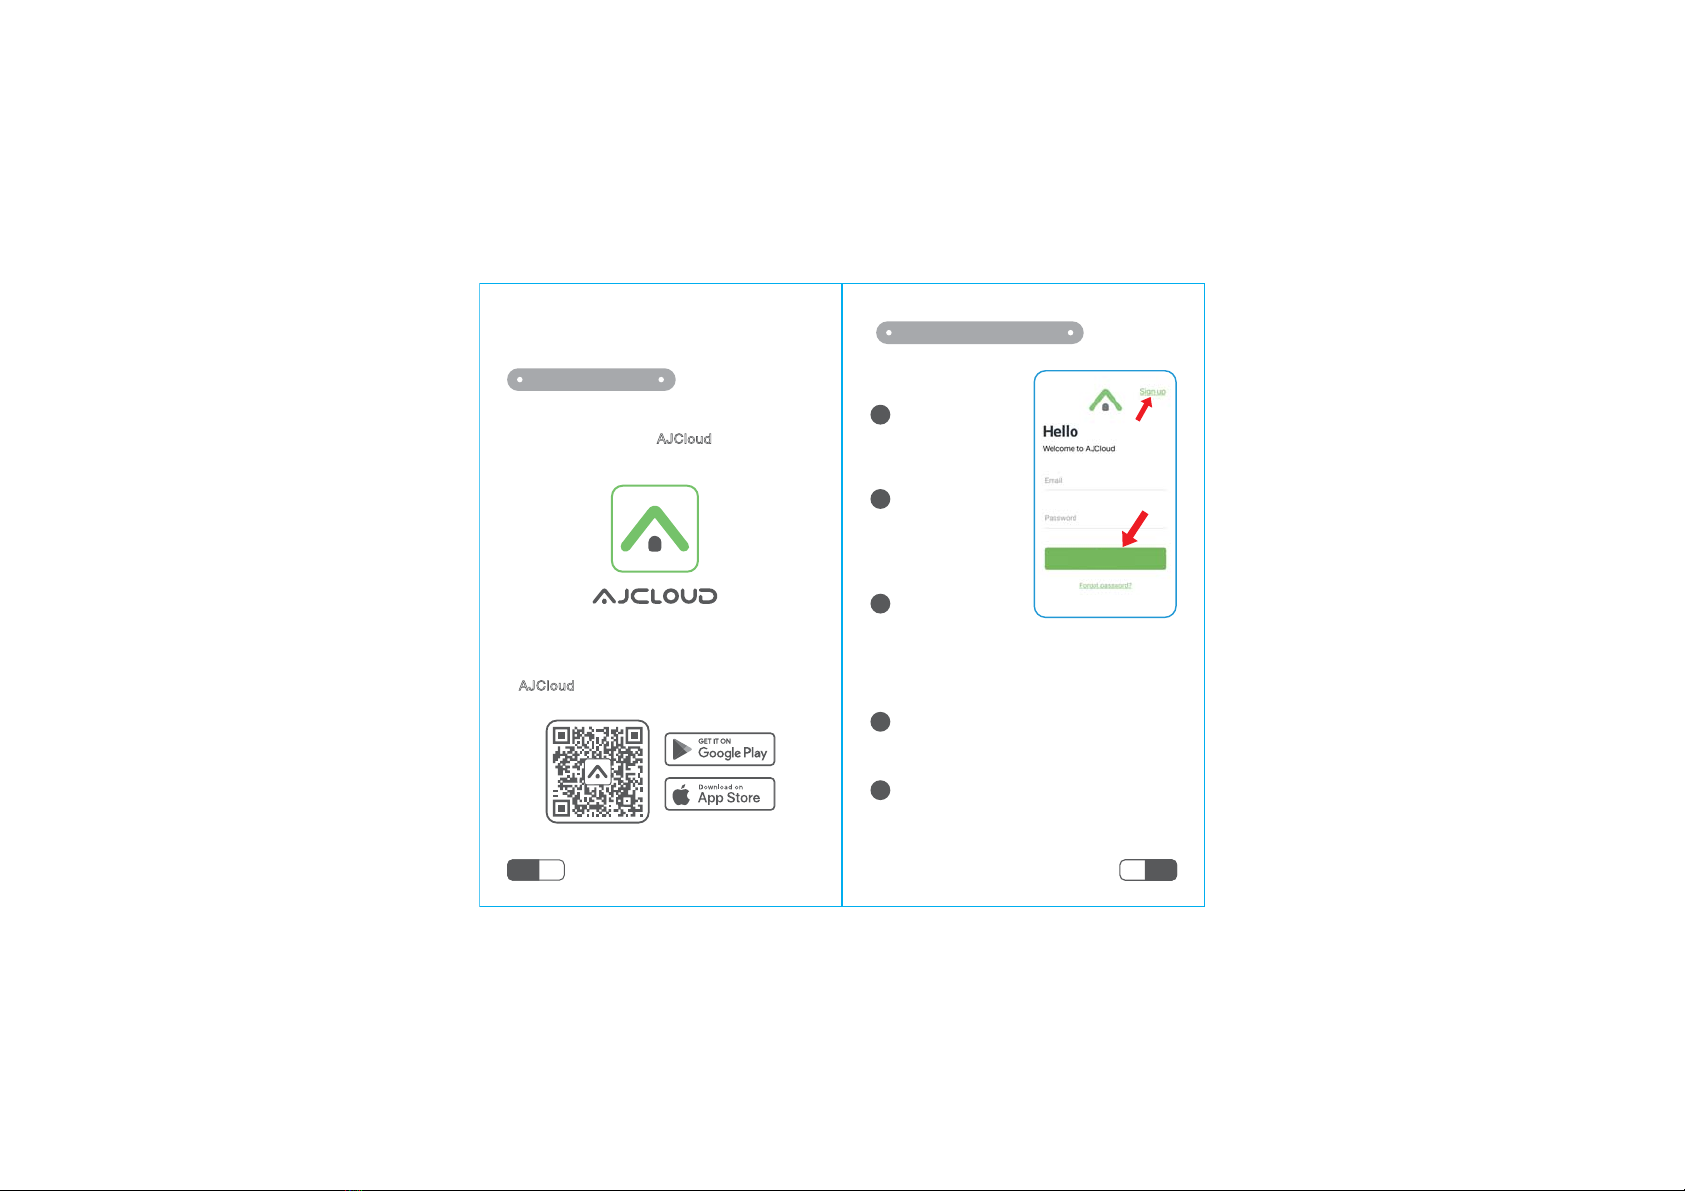
EASY SET UP
Go to the App Store or Google Play to
search and download “AJCloud” APP
to your supported devices.
AJCloud APP icon
Step 1 Download
··················· ···················
Or please scan below QR code to download
“AJCloud” to your Android or Apple device.
Enter your email.
3
·At least one uppercase letter · At least one
lowercase letter· At least one number
Step 2 Account Register
Create a password
at least 8 characters
long. Your password must include three
of the following:
You will receive an email with your
Activation Link.Open the link to activate
your account.
Go back to login your account after activation
successful.
Open AJCloud App,
then select Sign up.
1
2
3
4
5
Sign in
EN 03 EN
04
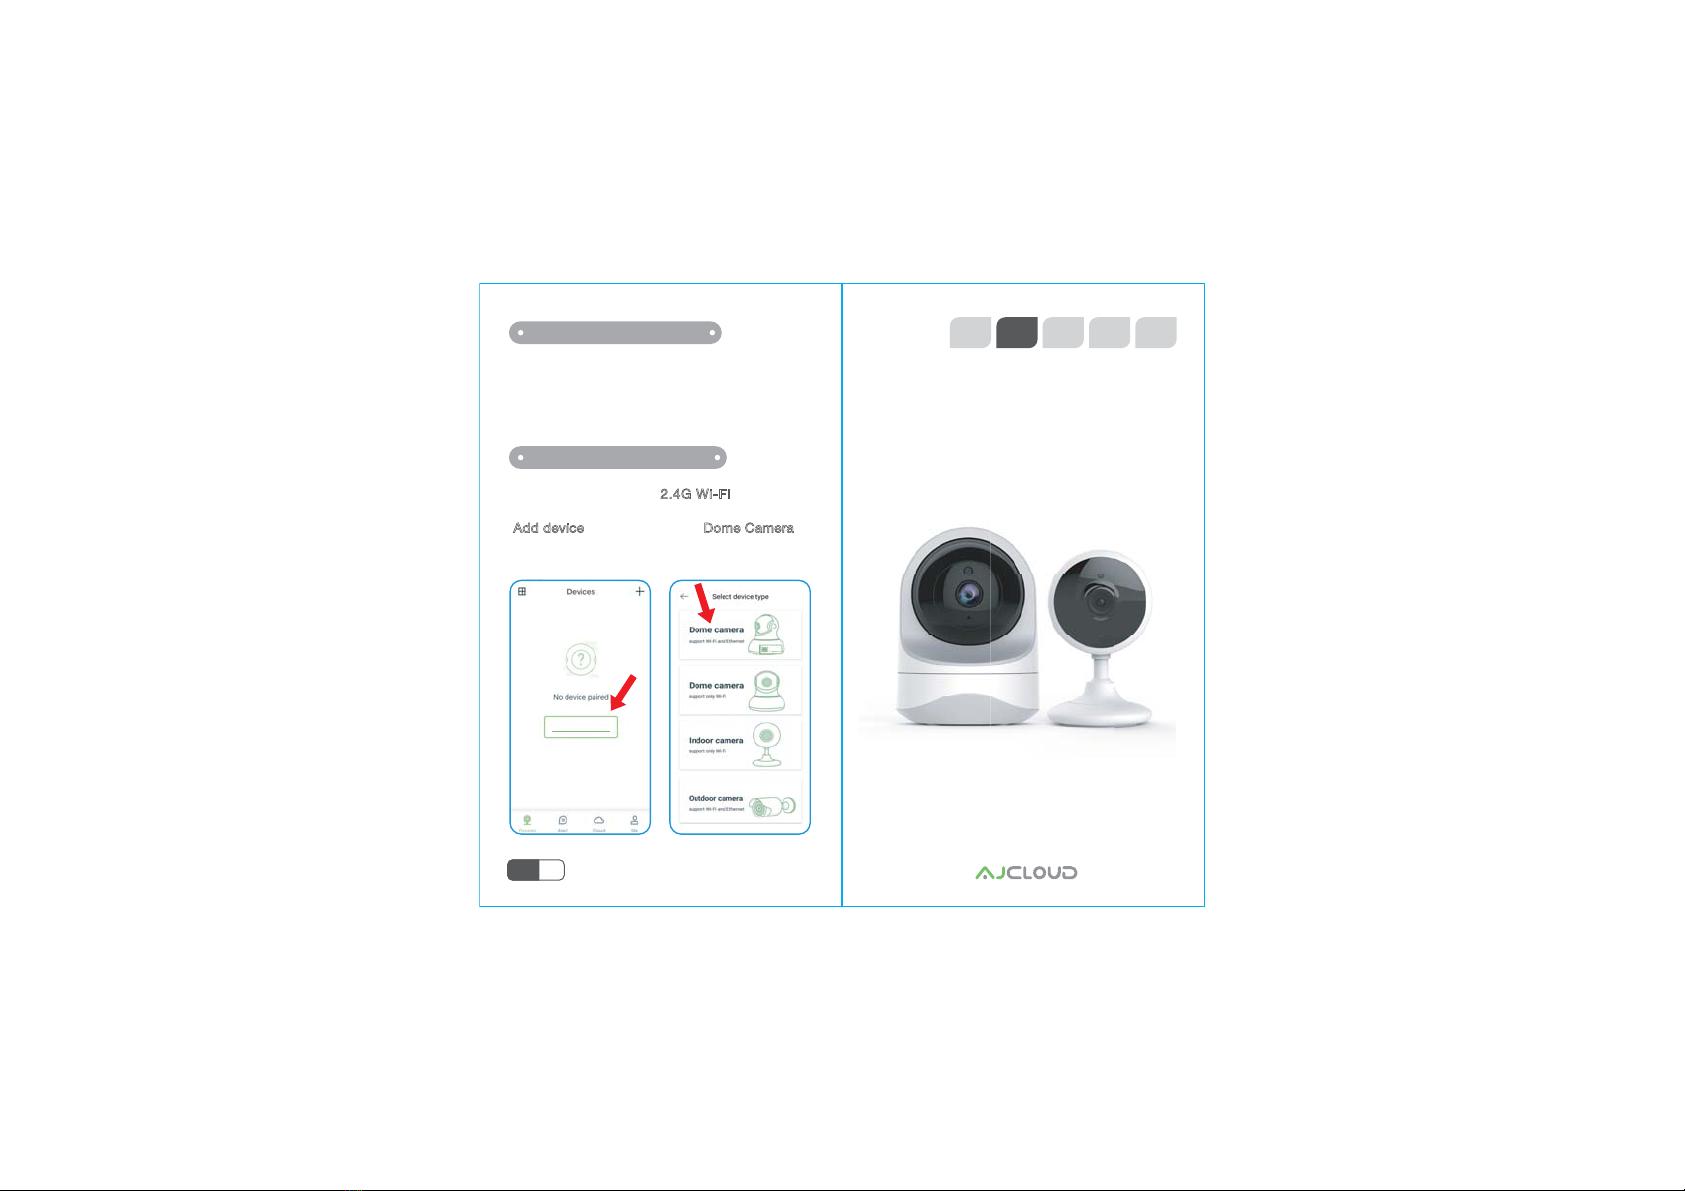
Connect your phone to 2.4G Wi-Fi (5G is not
supported). Open the AJCloud app. Please tap
[ Add device ],and choose the “Dome Camera”
to connect.
Power on the camera with the supplied power cord
and put the camera near to router. If you see the blue
DQGUHGOLJKWVþDVKLQJFDPHUD:DLWLQJWRFRQQHFW
Step 3 Power on camera
Add device
Step 4 Connect to network 1080P HD Wireless Cloud IP Kamera
EN DE FR IT JP
Schnelle Installation Anleitung
EN 05

Hinweis: Stellen Sie sicher, dass Ihr Router
mit dem Netzwerk verbunden ist.
Kamera StatusLichts Status
Kamera hat eingeschalcht
Warten auf der WLAN verbinden
Rotes und Blaues Licht
blinken abwechselnd
Kamera verbindet WLAN
Erfogreich mit WLAN verbundenBlaues Licht blinkt stabil
Rotees Licht blinkt schnelle
Blaues Licht blinkt
1.Auf der Werkseinstellung zurücksetzen
2.Kamera aktualisiert Firmware
Rotes Licht an
STATUS DER INDIKAOR LICHTS
·········· ··········
Reset Knopf
Fotowiderstand
Mikrofon
Linse
Kartenslot
Infrarot LED
Lautsprecher
Indicator Lamp
Strom Port
1
2
3
4
5
6
7
8
9
1x Installation Anleitung
1x Kamera
1x Netzteil
1x Montage Material
In der Box
1
3
1
2
45
23
4
5
6
7
8
9
6
78
9
Vorderseite
Vorderseite
Rücken
Rücken
DE 07 DE
08
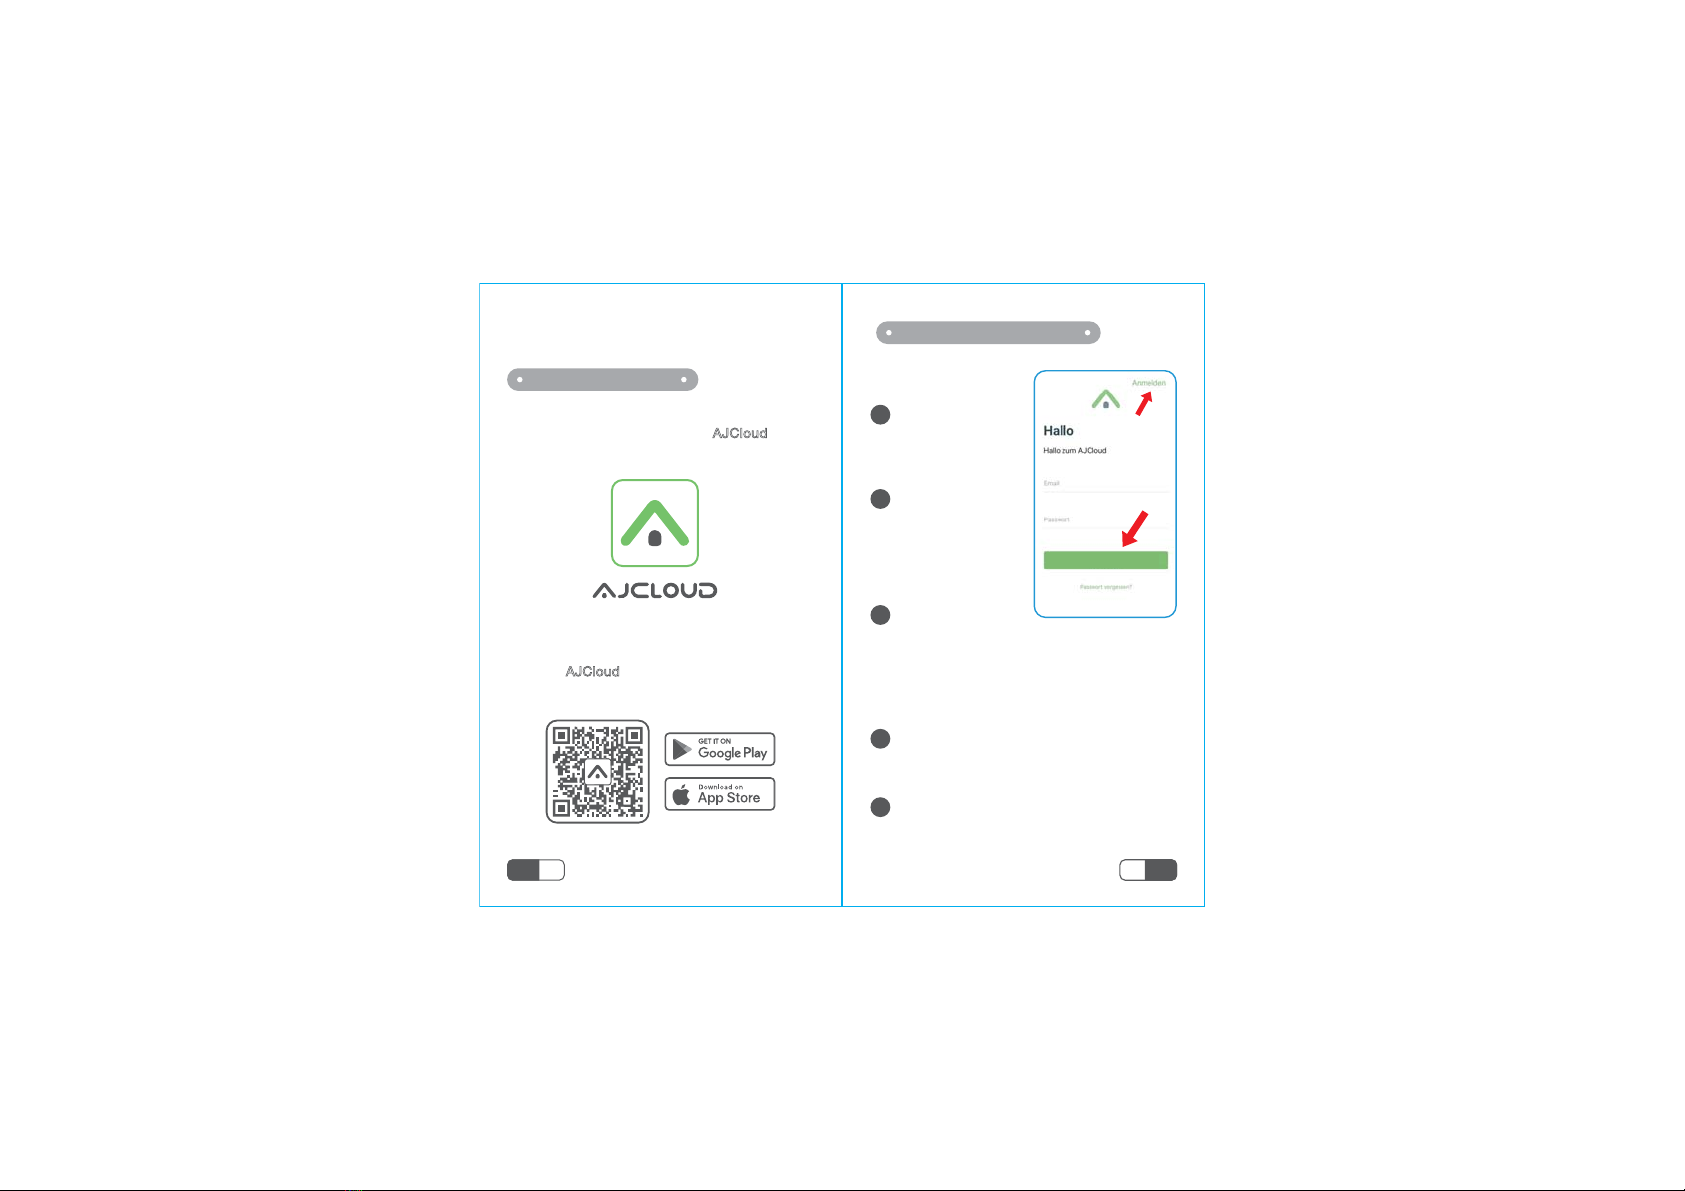
Einfache Einstellung
Gehen Sie bitte zum App Store oder zu
Google Play und laden Sie die “AJCloud”
App auf Ihr Smartphone oder Tablet.
AJCloud APP icon
Schritt 1 Downloaden
·············· ··············
Oder bitte scannen Sie den QR Code,
um die “AJCloud” auf Ihr Android oder
Apple Gerät herunterzuladen
Geben Sie bitte
Ihre Email ein.
·Mindestens ein Großbuchstabe ·Mindestens ein
Kleinbuchstabe ·Mindestens eine Zahl.
Schritt 2 Konto Registrieren
Erstellen Sie ein
Passwort mit mindestens 8 Zeichen.
Ihr Passwort muss drei der folgenden
Elemente enthalten:
Sie werden eine E-Mail mit Ihrem Aktivierungslink
erhalten . Öffnen aktivieren.Sie bitte den Link,
um Ihr Konto zu aktivieren.
Melden Sie sich nach erfolgreicher
Aktivierung wieder bei Ihrem Konto an.
Öffnen Sie die
AJCloud App, und
wählen Sie dann
Anmelden.
1
2
3
4
5
Einloggen
DE 09 DE
10
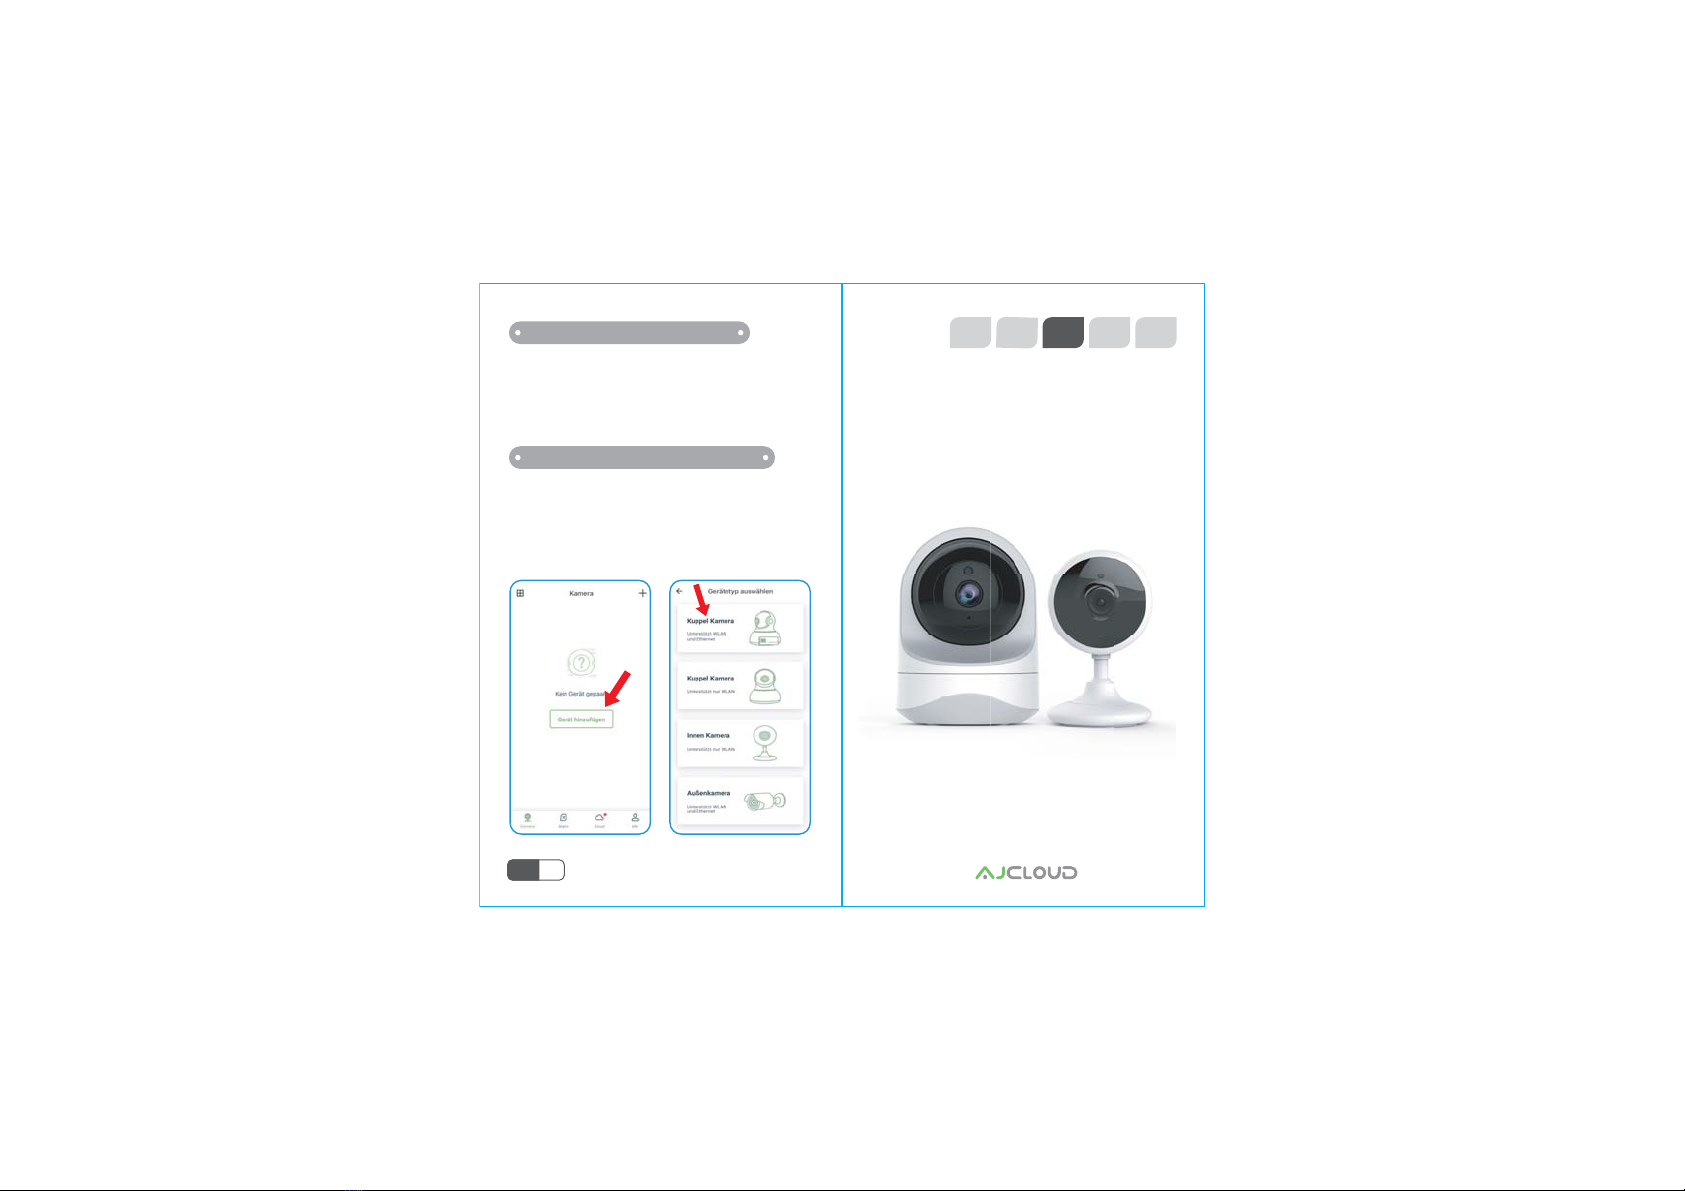
Verbinden Sie Ihr Mobiltelefon mit 2.4 Ghz WLAN
(5G wird nicht unterstützt).Öffnen Sie bitte die
AJCloud APP.Klicken bitte [Gerät hinzufügen],
und wählen Sie [Kuppel Kamera] zu verbinden.
Schalten Sie die Kamera mit dem mitgelieferten
Netzkabel ein und liegen Sie die Kamera in die
Nähe des Routers .
Wenn Sie Rotes und Blaues Licht blinken abwechselnd
gesenhen haben,warten bitte auf der WLAN verbinden.
Schritt 3 Schließen Kamera an
Schritt 4 Verbinden zum Netzwerk 3+'&DP«UD,3&ORXG6DQVýO
EN DE FR IT JP
Guide d’Installation Rapide
DE 11

N. B: Assurez-vous que votre routeur est
connecté au réseau
État de la caméraÉtat des voyants
La caméra est déjà alimentée
En attente de connexion maintenant
Les voyants rouge et bleu
clignotent en alternance
La caméra se connecte au Wi-Fi en cours
Connectée au Wi-Fi avec succèsLe voyant bleu est stable
La voyant rouge clignote rapidement
La voyant bleu clignote
La caméra est réinitialisée aux réglages d’usine
Le voyant rouge s’allume
ÉTAT DES VOYANTS
················· ·················
Bouton Reset
Capteur de Photo
Microphone
Lentilles
Fente pour Carte Micro SD
LED Infrarouge
Haut-parleur
Lumières d’Indicateur
Port d’alimentation
1
2
3
4
5
6
7
8
9
1x Guide d’Installation Rapide
1x Caméra
1x Adaptateur d’alimentation
Accessoires de montage
DANS LA BOÎTE
1
3
1
2
45
23
4
5
6
7
8
9
6
78
9
DEVANT
DEVANT
DOS
DOS
FR 13 FR
14
/DFDP«UDPHW¢MRXUOHýUPZDUH

INSTALLATION FACILE
Aller sur l’App Store ou Google Play pour
rechercher et télécharger l’application
‘‘AJCloud’’ sur votre smartphone.
AJCloud APP icon
Étape 1: Télécharger
··········· ···········
Ou scanner le code QR ci-dessous pour
télécharger ‘‘AJCloud’’ sur votre smartphone
Android ou iOS.
Entrer votre email.
-Au moins une lettre majuscule -Au moins une lettre
miniscule -Au moins un numéro
Étape 2: Inscription du Compte
Créer un mot de
passe d’au moins 8 caractères. Votre mot de
passe doit contenir trois éléments suivants:
Vous receverez un email avec votre lien
d’activation. Ouvrir le lien pour activer
votre compte.
Retourner à la connexion de votre compte
après avoir réussi à activer.
Lancer l’application
AJCloud, et puis
choisissez [Inscrivez
-vous].
1
2
3
4
5
Se connecter
FR 15 FR
16

Connecter votre smartphone au 2.4Ghz Wi-Fi
( 5G n’est pas supporté ). Lancer l’application
AJCloud, et taper sur [Ajouter Appareil],
choisir [Caméra Dôme] pour connecter.
Alimenter la caméra avec l’alimentation fournie et
placer la caméra près du routeur.
Si vous voyez les voyants rouge et bleu clignotent
HQDOWHUQDQFHFHODVLJQLýHTXHODFDP«UDHVWWUDLQ
de connecter.
Étape 3 Alimenter la caméra
Étape 4: Se connecter au réseau 1080P HD Cloud IP Camera senza Fili
EN DE FR IT JP
Guida di Rapida Installazione
FR 17
NB: Assicurati che il router sia connesso
a Internet.
Stato di cameraStato di luce
È alimentata
In attesa di connessione
Luci rosso e blu lampeggiano
alternativamente
FROOHJDWDDOZLý
&ROOHJDPHQWRDOZLýULXVFLWR/XFHEOXýVVD
Luce blu lampeggia
velocemente
Luce blu lampeggia
1.La camera viene ripristinata
,OýUPZDUHYLHQHDJJLRUQDWR
Luce rossa accesa
STATO DI LUCI INDICATRICI
············ ············
Pulsante di reset
6HQVRUHIRWRJUDýFR
Microfono
Obiettivo
Slot Micro SD
LED infrarossi
Altoparlante
Luci indicatrici
Porta di alimentazione
1
2
3
4
5
6
7
8
9
1x guida di rapida installazione
1x alimentatore
1x camera
Accessori di montaggio
Confezione
1
3
1
2
45
23
4
5
6
7
8
9
6
78
9
Anteriore
Anteriore
Posteriore
Posteriore
IT 19 IT
20

INSTALLAZIONE FACILE
Scarica la app AJCloud da App Store o da
Google Play sui tuoi dispositivi supportati.
icona di App AJCloud
Passo 1 Scarica
·············· ··············
O esegui scansione del codice QR per scaricare
AJCloud sul tuo dispositivo Android o Apple.
Inserisci il tuo
indirizzo email.
·Almeno una lettera maiuscola ·Almeno una lettera
minuscola ·Almeno un numero
Passo 2 Registra un account
Crei una password
con almeno 8 caratteri che ha almeno i
seguenti:
Riceverai una mail con un link di attivazione.
Apri il link per attivare il tuo account.
Ritorni ad accederti dopo aver attivato
l’account con successo.
Apri AJCloud App e
seleziona Registrati
1
2
3
4
5
Accedi
IT 21 IT
22

&RQQHWWLLOWXRWHOHIRQLQRD*:Lý*QRQª
compatibile). Apri la App AJCloud, clicca su
[Aggiungi dispositivo] e seleziona Dom Camera
per collegarla.
Alimenta la camera con l’alimentatore nella
confezione e mettila vicino al router. Mentre
vedi che le luci blu e rossa lampeggiano,
la camera comincia a collegarsi.
Passo 3 Alimenta camera
Passo 4 Collega alla rete wifi 1080P HD ワイヤレスクラウド IP カメラ
EN DE FR IT JP
クイック取扱説明書
FR 23
暖かい注:お使いのルーターがインターネットに
接続されていることを確認してください。
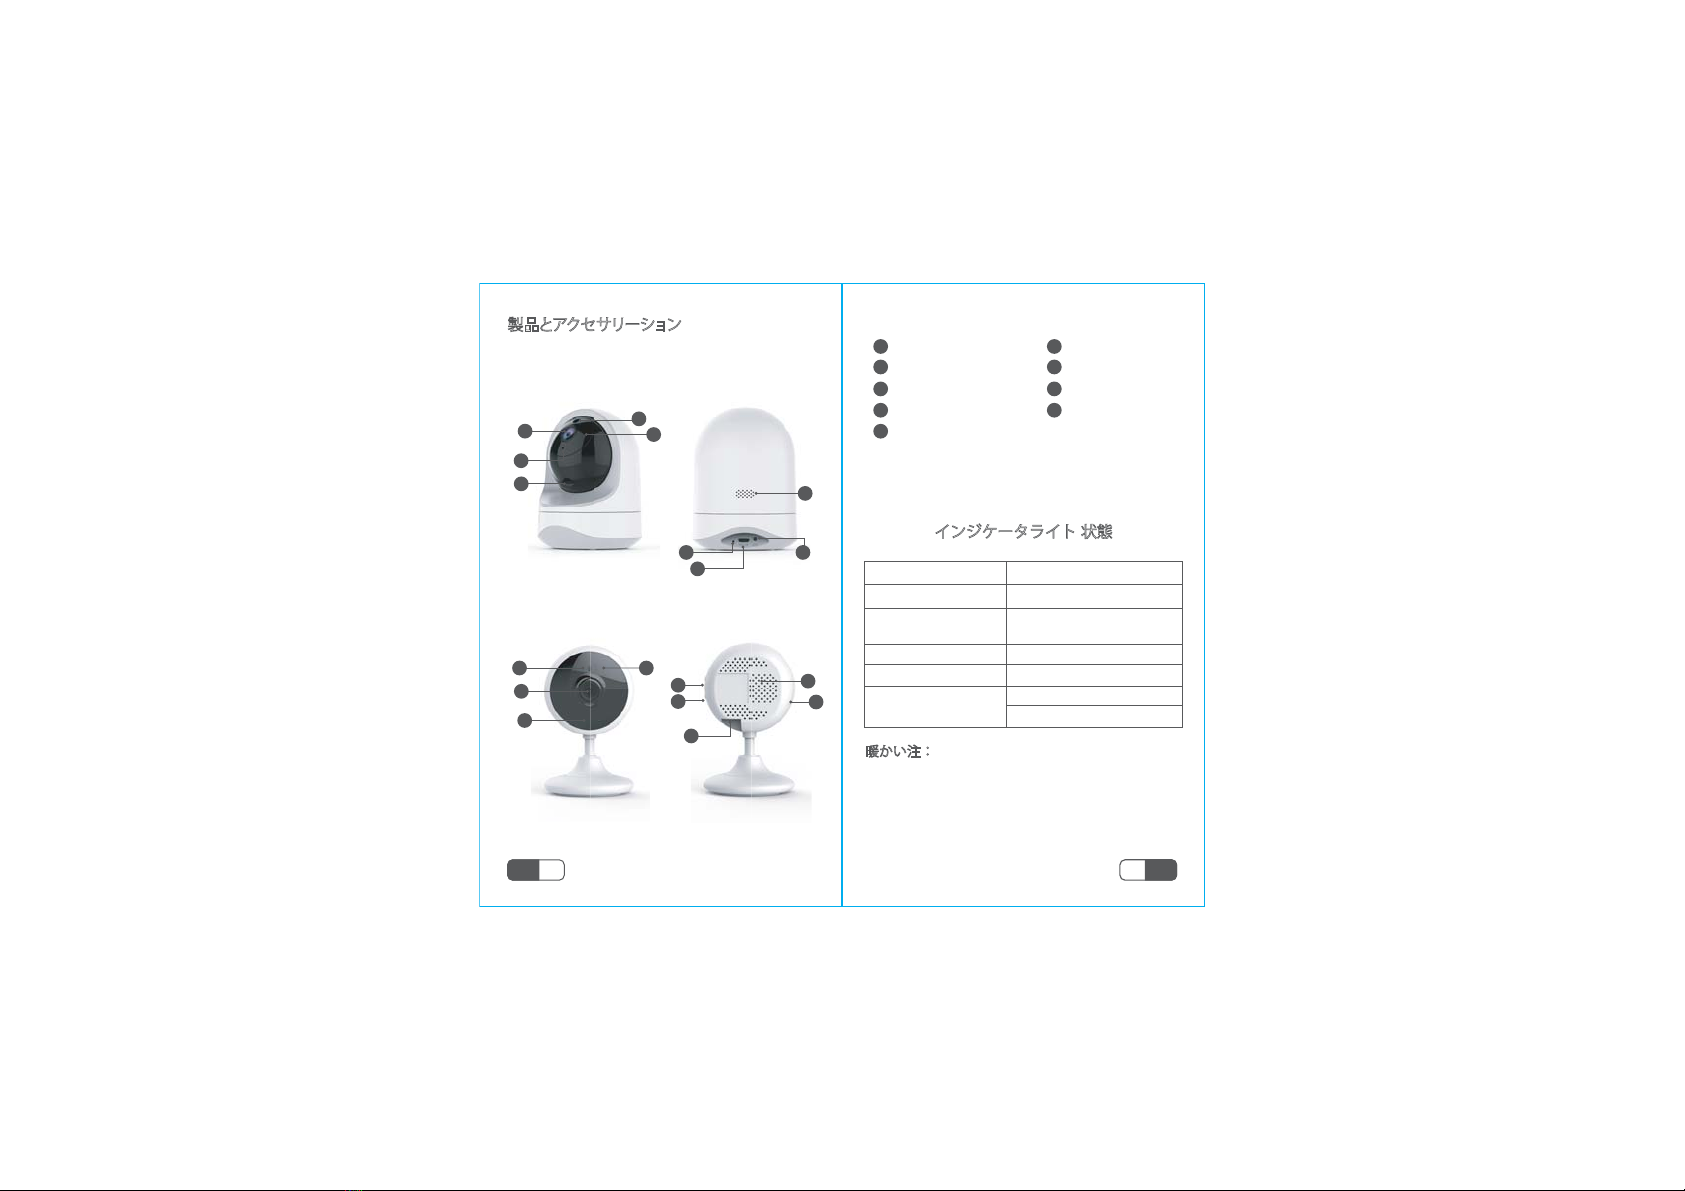
カメラ状態ライト 状態
電源が入った状態で起動中
接続の準備中
赤色ランプと青色ラン
プが交互に点滅
WiFiに接続中
WiFiへの接続成功青色ランプが点灯中
赤色ランプが早く点滅
青色ランプが点滅
1.工場出荷時の設定にリセット
赤色ランプが点灯中
インジケータライト 状態
·············· ··············
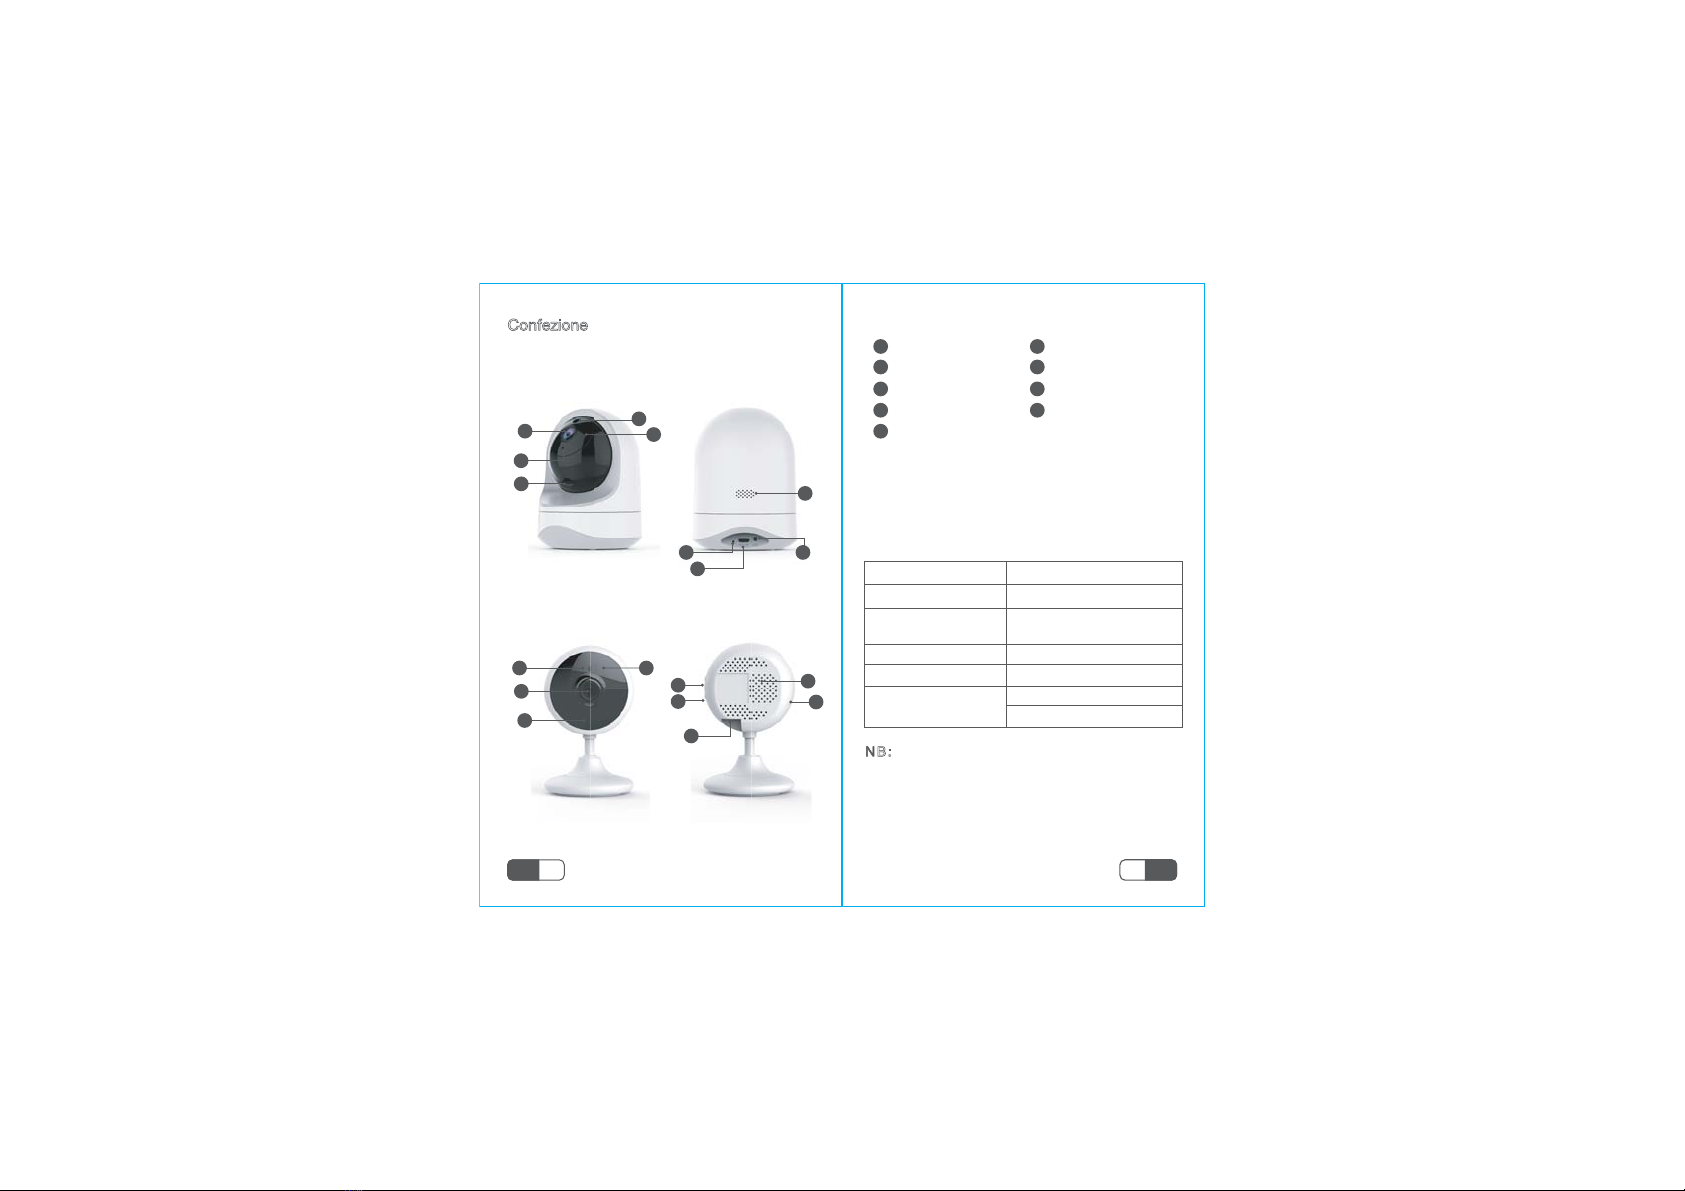
リセットボタン
感光センサー
マイクロフォン
レンズ
SDカットスロット
赤外線灯
スピーカー
インジケータライト
電源ポート
1
2
3
4
5
6
7
8
9
1×カメラ
1×取扱説明書(日本語付き)
1×電源
1×取付用部品
製品とアクセサリーション
1
3
1
2
45
23
4
5
6
7
8
9
6
78
9
正面
正面
背面
背面
JP 25 JP
26
2.カメラはファームウェアをアップグレード中

簡単なセットアップ
IOSシステムはApp Storeで、Androidシステムは
Google Playでアプリ「AJ Cloud」を検索、 アプ
リをダウンロードしてください。
AJCloud アプリアイコン
1.ダウンロード
·············· ··············
もしくは以下のQRコードを読み、「AJ Cloud」
をダウンロードできます。
メールアドレスを
入力。
·少なくとも1つの大文字·少なくとも1つの小文字
·少なくとも1つの数字
2.アカウント登録
8文字以上のパスワ
ードを作成してください。 パスワードには、
次の3つのを含める必要があります。
アクティベーションリンクが記載されたメー
ルが届きますので、リンクを開いてアカウン
トをアクティベートしてください。
アクティベートに成功した後、アカウントに
ログインします。
AJCloud アプリを
開き、「サインアッ」
を選択します。
1
2
3
4
5
JP 27 JP
28
スキャンしてダウンロード
スキャンしてダウンロード
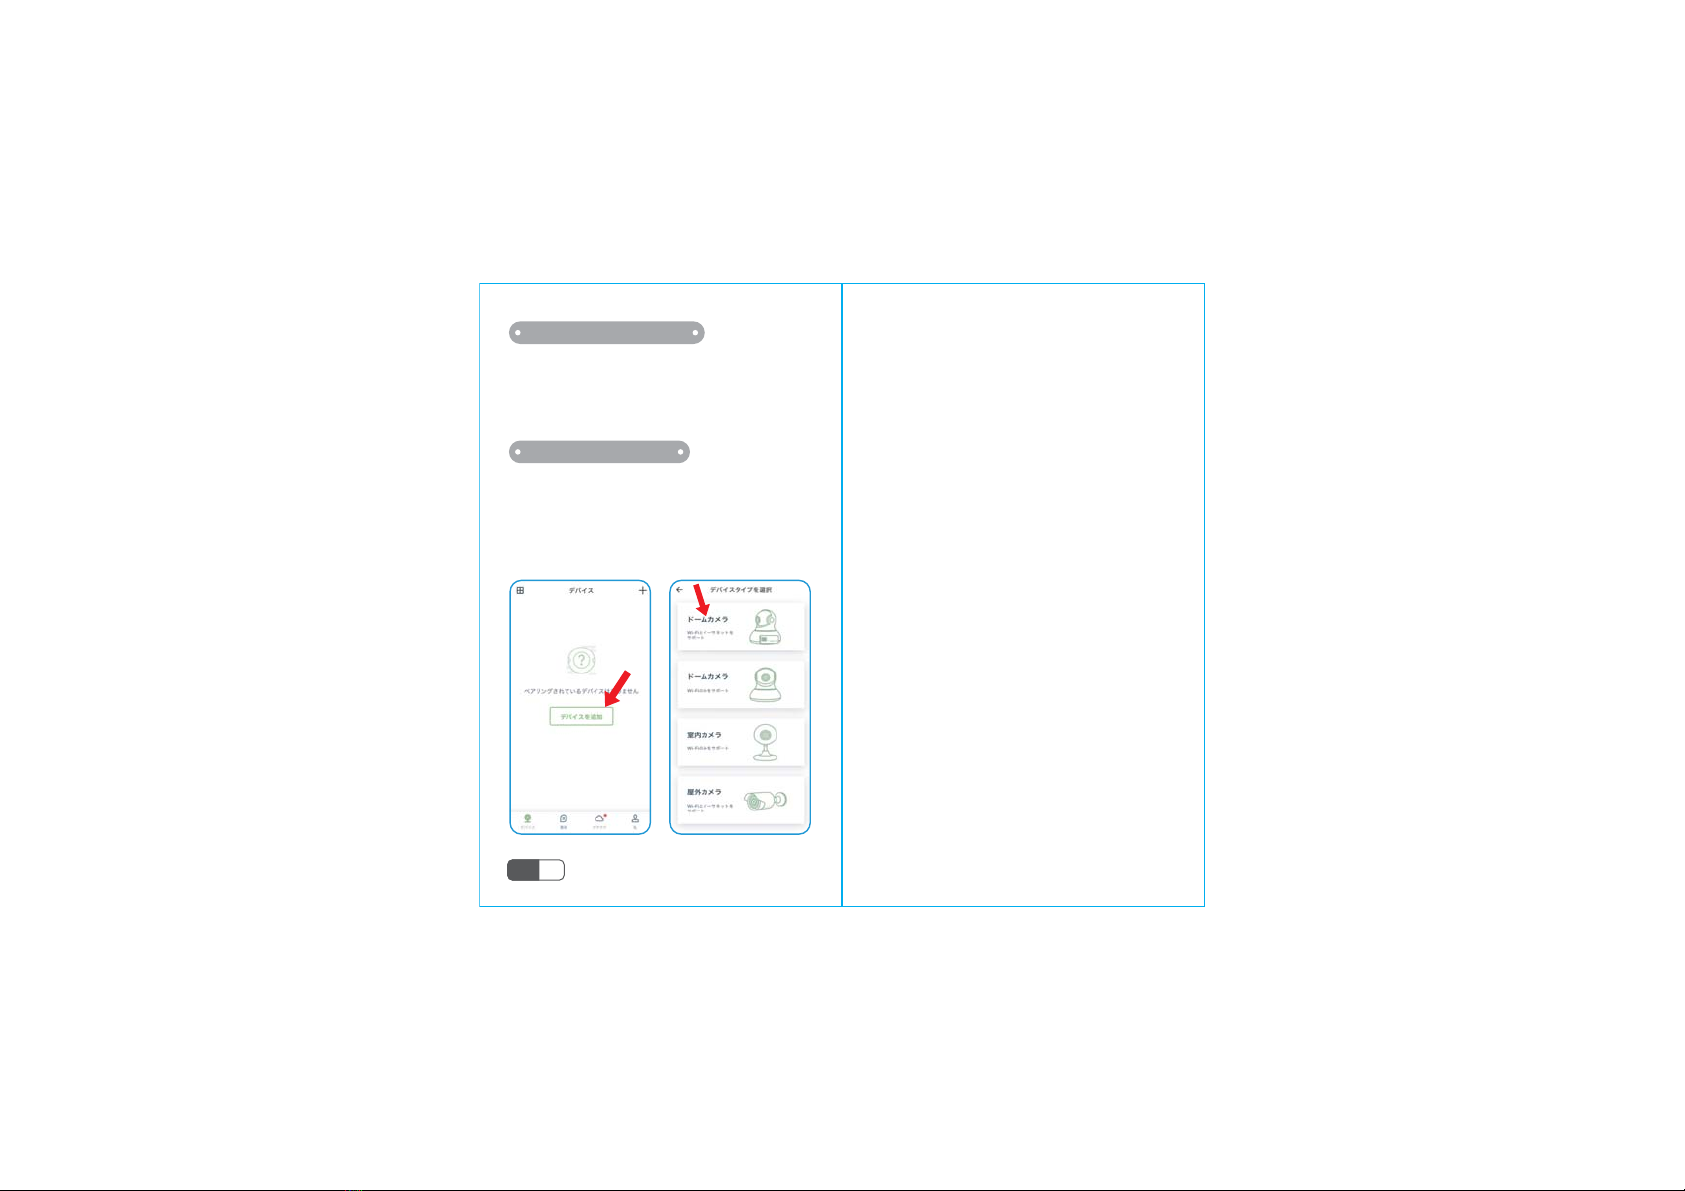
スマホを2.4G Wi-Fi「この製品は2.4Ghzにのみ対
応して、5Ghzに対応できません」に接続します。
そして、AJCloudアプリを開いて、「デバイスを
追加」をタップして、「ドームカメラ」を選択し、
WIFIを接続します。
カメラをルーターの近くに置いて、付属の電源コ
ードでカメラの電源を入れます。もし青色ランプ
と赤色ランプが点滅していたら、カメラをWIFIに
接続できることを意味します。
3.カメラの電源を入れる
4.ネットワークに接続
JP 29
Manufacturer's Name: Shenzhen Smart-eye Digital
Electronics Co., Ltd
Sample Description: IP Camera
Model number: Q6(637JBU)
Operating Temperature: ‐10° C to 40° C
This product is a fixed location. To comply with RF exposure
requirements, a minimum separation distance of 20cm must
be maintained between the user’s
body and the device, including the antenna. Use only the
supplied or an approved antenna.
This device in compliance with the essential requirements
and other relevant provisions of
Directive 2014/53/EU. All essential radio test suites have
been carried out.
1. CAUTION : RISK OF EXPLOSION IF BATTERY IS
REPLACED BYAN INCORRECT TYPE. DISPOSE OF
USED BATTERIES ACCORDING TO THE INSTRUCTIONS
2. The device complies with RF specifications when the
device used at 20cm from your body
CE NB
RF specification
operation frequency range: 2412-2472MHz
max. conducted power: 13.73 dBm E.I.R.P
support 802.11B/G/N(HT20/40)
modulation type: DSSS, OFDM
antenna type: PIFA antenna with 1.73 dBi

DECLARATION OF CONFORMITY
I hereby declare that the product
Product name: IP Camera
Model name: 637JBU(Q6)
Series model : 706JBU, 634JBU, 638JBU(Q7), 639JBU(Q8), 640JBU, 754JA, 758JCQ(W5S),
759JCQ(W7), 791JA(W6)
Trademark: N/A
HW: 25-0636JBU103
SW: V1.0
(Name of product, type or model, batch or serial number)
satisfies all the technical regulations applicable to the product within the scope of Council
Directives 2014/53/EU, 2014/35/EU and 2014/30/EU: and declare that the same application has not
been lodged with any other notified body.
EN 300 328 V2.1.1 (2016-11)
(Draft) EN 301 489-1 V2.2.2 (2019-09)
(Draft) EN 301 489-17 V3.2.0 (2017-03)
EN 55032:2015+AC:2016
EN 55035:2017
EN 61000-3-2:2014
EN 61000-3-3:2013
EN 60950-1: 2006+A11: 2009+A1: 2010+A12: 2011+A2: 2013
EN62311: 2008
(Title(s) of regulations, standards, etc.)
All essential radio test suites have been carried out.
NOTIFIED BODY: MiCOM Labs Inc
Address:
575 Boulder Court,
Pleasanton, California 94566
USA
Identification Number: 2280
MANUFACTURER or AUTHORISED REPRESENTATIVE:
Address:
Shenzhen Smart-eye Digital Electronics Co., Ltd
#6 Northern Zone, Shangxue S&T City, Bantian,
Longgang District, Shenzhen, China
This declaration is issued under the sole responsibility of the manufacturer and, if applicable, his authorised
representative.
Point of contact:
Company: Shenzhen Smart-eye Digital Electronics Co., Ltd
Telephone : +86-755-89390391
Fax: +86-755-89390380
(Name, telephone and fax number)
#6 Northern Zone, Shangxue S&T City,
Bantian, Longgang District, Shenzhen,
China
(Place, date of issue) (Signature)
Bella Zheng Engineer
(Name and title in block letters)
Table of contents
Languages:


