smart things Linear Compressor Operating instructions
23
HOW TO USE
ENGLISH
HOW TO USE
Before use
Clean the refrigerator.
Clean your refrigerator thoroughly and wipe off all dust that accumulated during
shipping.
NOTE
Remove adhesive residue by wiping it off with your thumb or dish detergent.
CAUTION
Do not scratch the refrigerator with a sharp object or use a detergent that
y
contains alcohol, a flammable liquid or an abrasive when removing any tape
or adhesive from the refrigerator,.
Do not peel off the model or serial number label or the technical information
y
on the rear surface of the refrigerator.
Connect the power supply.
Check if the power supply is connected before use.
Read the “Turning On The Power” section.
CAUTION
Running the automatic icemaker before connecting it to the water
supply may cause the refrigerator to malfunction.
Turn off the icemaker if the refrigerator is not yet connected to the
water supply.
Turn off the automatic icemaker and then plug the power plug of the refrigerator
into the grounded electrical outlet.
(This applies only to models with icemakers.)
CAUTION
Putting food in the refrigerator before it has cooled could cause the
food to spoil, or a bad odor could linger inside the refrigerator.
Wait for the refrigerator to cool.
Allow your refrigerator to run for at least two to three hours before putting food in
it. Check the flow of cold air in the freezer compartment to ensure proper cooling.
The refrigerator makes a loud noise after initial operation.
This is normal. The volume will decrease as the temperature decreases.
Open refrigerator and freezer doors to ventilate the interior.
The inside of the refrigerator may smell like plastic at first. Remove any adhesive
tape from inside the refrigerator and open the refrigerator and the freezer doors for
ventilation.
24 HOW TO USE
ENGLISH
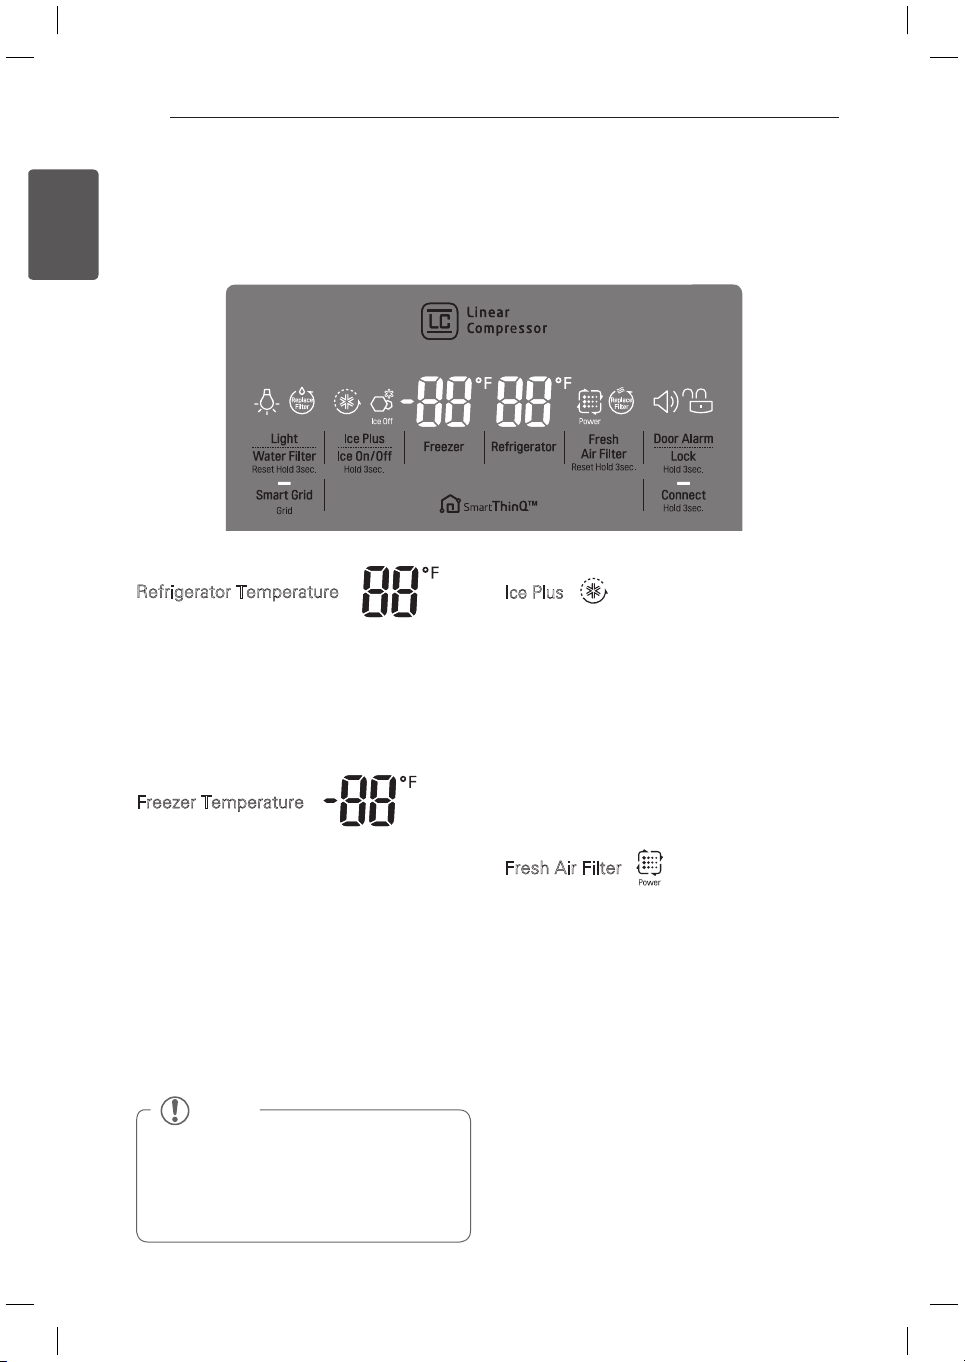
Control Panel
Depending on the model, some of the following functions may not be available.
NOTE
The displayed temperature is the target
temperature, and not the actual temperature
of the refrigerator. The actual refrigerator
temperature depends on the food inside the
refrigerator.
Control Panel Features
Ice Plus
This function increases both ice making and
freezing capabilities.
When you press the Ice Plus button, the
y
graphic will illuminate in the display and
will continue for 24 hours. The function will
automatically shut off after 24 hours.
You can stop this function manually by pressing
y
the button one more time.
Refrigerator Temperature
Indicates the set temperature of the refrigerator
compartment in Celsius (°C) or Fahrenheit (°F).
The default refrigerator temperature is 37°F (3°C).
Press the Refrigerator temperature button
repeatedly to set a new target temperature from
33–46°F (1–8°C).
Freezer Temperature
Indicates the set temperature of the freezer
compartment in Celsius (°C) or Fahrenheit (°F).
The default freezer temperature is 0°F (-18°C).
Press the Freezer temperature button repeatedly
to set a new target temperature from -6 to 8°F
(-21 to -13°C).
To change the temperature mode from °F to °C (or
vice versa) press and hold the Refrigerator and
Freezer temperature buttons simultaneously until
the temperature indication on the display window
switches between Celsius and Fahrenheit.
Fresh Air Filter
The Fresh Air Filter helps remove odors from the
refrigerator. The Fresh Air Filter has two settings,
Auto and Power(PWR). In Auto mode, the Fresh
Air Filter will cycle on and off in increments of
ten minutes on and 110 minutes off. If set to the
Power(PWR) mode, the Fresh Air Filter will stay
on continuously for four hours, cycling on and off
in increments of ten minutes on and five minutes
off. After four hours, the Fresh Air Filter will
switch back to Auto mode.
Press the Fresh Air Filter button once for
y
Power(PWR) mode.
Press the Fresh Air Filter button again to
y
switch back to Auto mode.

25
HOW TO USE
ENGLISH
Replace Filter
When the Replace Filter icon turns on, the air
filter needs to be replaced. After replacing the
air filter, press and hold the Fresh Air Filter
button for three seconds to turn the icon light
off. Changing the air filter approximately every
six months is recommended.
Control Panel Features (continued)
Light
When you press the Light button, the
dispenser light will turn on and the indicator
will appear on the LED display.
Replace Water Filter
When the Water Filter indicator turns on,
replace the water filter. After changing the
water filter, press and hold the Replace Filter
button for three seconds to turn the indicator
light off. Replace the water filter approximately
every six months.
Lock
The Lock function disables every other button
on the display.
When power is initially connected to the
y
refrigerator, the Lock function is off.
If you want to activate the
yLock function
to lock other buttons, press and hold the
Lock button for three seconds until the Lock
icon is displayed. The Lock function is now
enabled.
To disable the
yLock function, press and hold
the Lock button for approximately three
seconds.
CAUTION
Display Mode (For Store Use Only)
The Display Mode disables all cooling in the
refrigerator and freezer sections to conserve
energy while on display in a retail store. When
activated OFF will display on the control panel
and the display will remain on for 20 seconds.
To deactivate / activate:
With either refrigerator door opened, press
and hold the Refrigerator and Ice Plus buttons
at the same time for five seconds. The control
panel will beep and the temperature settings
will display to confirm that Display Mode
is deactivated. Use the same procedure to
activate the Display Mode.
Ice On/Off
Press the Ice On/Off button for three seconds to
turn the icemaker On/Off.
Door Alarm
When power is connected to the refrigerator,
y
the door alarm is initially set to ON. When you
press the Door Alarm button, the display will
change to OFF and the Door Alarm function will
deactivate.
When either the refrigerator or the freezer
y
door is left open for more than 60 seconds, the
alarm tone will sound to let you know that the
door is open.
When you close the door, the door alarm will
y
stop.
26 HOW TO USE
ENGLISH
Connect
The Connect button, when used with the LG
Smart Refrigerator smart phone app, allows
the refrigerator to connect to your home’s Wi-
Fi network. Refer to the following page for
information on the initial setup of the application.
The Connect LED allows you to check the status
of the refrigerator’s network connection. When
the refrigerator is connected to the network, the
Connect LED is illuminated.
Press and hold the Connect button for 3 seconds
to connect to the network. The LED will blink
while the connection is being made, then turn
on once the connection is successfully made. To
disconnect, press and hold the button again.
Smart Grid
Press the Smart Grid button to turn the Smart
Grid function On/Off. When the function is on,
the LED will illuminate. The Smart Grid function
automatically turns on when the refrigerator is
connected to the Wi-Fi network.
When the refrigerator is responding to a Demand
Response (DR) message from the electric
company, the Grid text will illuminate.
Power Saving Mode
When the refrigerator is in the Power Saving
y
Mode, the display will remain off until a door
is opened or a button is pressed. Once on, the
display will remain on for 20 seconds.
CAUTION
Display Mode (For Store Use Only)
The Display Mode disables all cooling in the
refrigerator and freezer sections to conserve
energy while on display in a retail store. When
activated, OFF will display on the control panel
and the display will remain on for 20 seconds.
To deactivate / activate:
With either refrigerator door opened, press
and hold the Refrigerator and Ice Plus buttons
at the same time for five seconds. The control
panel will beep and the temperature settings
will display to confirm that Display Mode
is deactivated. Use the same procedure to
activate the Display Mode.

27
HOW TO USE
ENGLISH
Smart Features
To use the Smart Features on your refrigerator, you will need the following devices and apps:
1. a wireless router and home Wi-Fi network
2. the LG Smart Grid refrigerator
3. an Android-based smart phone
4. the LG Smart Refrigerator app from the Google Play Store.
Setting Up the Smart App and Connecting the Refrigerator
1Create an account at Smart ThinQ.
https://us.smartthinq.com/
You will use the ID and password from this
account in the smart phone application.
2Download the smart phone app from the
Google Play Store. (LG Smart Refrigerator
app)
3In the app, select the Smart Model.
4Log in to the app using the Smart ThinQ ID
and password created in step 1.
5When prompted, select the Non-Touch
Screen Model.
6Choose your home wireless router
from the list of routers in the app. Your
refrigerator and smart phone must both be
connected to the same Wi-Fi network.
7If necessary, enter the password for your
router and click the connect button in the
app.
8Make sure the refrigerator display is active
by pressing any button. Press and hold
the Connect button on the refrigerator for
three seconds. The Connect LED should
blink while the connection is being made.
9The app will automatically go through the
process of registering your product on
the network, using the information you’ve
provided. This may take some time, and
the Connect LED will continue to blink
during this process. After the registration
process is completed, a message is
displayed and the app will proceed to the
Home screen.
10Check that the Connect LED is illuminated
to confirm that the Wi-Fi network is
connected. You can now use the app
to control the Smart Features on your
refrigerator.
NOTE
To use the Smart Grid feature, you must also register for the Smart Grid (Demand Response)
service with your local electric utility company. The company must provide Demand Response
service.
NOTE
You must connect the refrigerator to the
internet using a wireless router on your
home network. Tethering to a mobile phone,
hotspot, or an unsecured network, for
example, will cause unstable functionality.

28 HOW TO USE
ENGLISH
Smart Features (continued)
LG Smart Refrigerator App - What’s
Included
Food Manager
Allows you to keep track of items in your
refrigerator and freezer, so you can be alerted
when they are near their use-by dates, generate
grocery lists, and link to related recipes.
Recipes
Features recipes from the Food Channel,
searchable by ingredient, course, cuisine, total
time required, and the food in your refrigerator
(if entered in the Food Manager). Automatically
makes grocery lists from chosen recipes.
Grocery
Makes and manages grocery lists from items in
the refrigerator or recipes.
Refrigerator Manager
Allows you to control the refrigerator and freezer
temperature settings, air filter, water filter, Ice
Plus, Smart Saving, and Energy Monitoring from
your smart phone.
Smart Diagnosis
Allows you to diagnose and troubleshoot
problems with the refrigerator.
Settings
Allows you to set various options on the
refrigerator and in the app.
Smart Grid Function
When the refrigerator operates in Smart Grid
mode, the Smart Grid function can control energy
usage or delay the operation of some functions to
save energy during peak usage periods.
You can override the Smart Grid function at
y
any time (using the Smart Grid button or the
smartphone application).
To use the Smart Grid function, you need to
y
register your appliance with your electric utility
company.
Using the Smart Grid Function
This feature responds to notification events
from your utility company to run high energy-
consuming tasks during off-peak periods when
demand is lower. These notification events are
known as Demand Response signals.
If the refrigerator receives a Demand Response
signal from the utility company, the refrigerator
will turn on the Grid LED on the refrigerator
display and control its power consumption
according to the signal.
The refrigerator will respond to the signals
received from the utility company as long as
product performance is maintained.
If the refrigerator receives a Demand Response
signal, the refrigerator will operate in Delay
Appliance Load (DAL) or Temporary Appliance
Load Reduction (TALR) mode.
Delay Appliance Load (DAL): The refrigerator
responds to a DAL signal by providing a moderate
load reduction for the duration of the delay period.
This mode controls functions that consume a lot
of energy such as adjusting the cooling system,
running the defrost cycle, and making ice.
- When the refrigerator operates in DAL mode,
the Grid LED is illuminated on the refrigerator
display.
- DAL mode is automatically deactivated after it
lasts for the amount of time stipulated by the
DAL signal (max. 4 hours) or when you override
the Smart Grid function.
Temporary Appliance Load Reduction (TALR) :
The refrigerator responds to a TALR signal by
aggressively reducing the load for a short time
period, typically 10 minutes. This mode reduces
energy consumption by stopping the compressor
and controlling the functions that consume a lot
of energy such as the defrost cycle and fan.
- When the refrigerator operates in TALR mode,
the Grid LED is illuminated on the refrigerator
display.
- TALR mode is automatically deactivated after it
lasts for the received duration (max. 10 minutes),
or when you override the Smart Grid function.
The mode is immediately deactivated and the
refrigerator returns to its normal state when the
door is opened or closed, or the dispenser is
used.

29
HOW TO USE
ENGLISH
Override Smart Grid Mode
If you want the refrigerator to ignore the Demand
Response signal from the utility company, you
can override the Smart Grid function by pushing
the Smart Grid button while the refrigerator is in
Smart Grid mode.
When you override the Smart Grid function, the
refrigerator ignores the Demand Response signal
and is no longer controlled by the utility company
until the next Demand Response signal is sent.
You can also override the Smart Grid function
using the smart phone app.
Open API
LG Open API
You can manage Smart Grid features for the LG
Smart Refrigerator.
Please check the detailed specifications on the
notice page on us.smartthinq.com.
API list :
Demand response
- Send demand response signal
Power saving
- Set saving mode
- Get schedule of DR/Delay Defrost
Energy monitoring
- Get setting temperature
- Get door open event
- Get energy consumption
Delay defrost capability
- Insert a delay defrost schedule event
- Update a delay defrost schedule event
- Delete a delay defrost schedule event
- Get the delay defrost schedule
Smart Grid Application Features
1Smart Saving_Demand Response
You can lower energy usage based on
Demand Response (DR) signals from the
utility company.
If the refrigerator is operating in Smart
Saving mode according to the DR signal,
you can see a pop up.
Smart Saving_Delay Defrost
Lower energy usage based on time period.
2Energy monitoring
The refrigerator can check number of door
openings and power consumption.
3Remote Control
You can control the Refrigerator
Temperature, Fresh Air Filter and Ice Plus
from the smart phone app.
4Push messages.
- When the door is open over ten minutes,
you will receive a push message.
- When Ice Plus is finished, you will receive
a push message.
Open Source Software Notice
Information
To obtain the source code that is contained
in this product, developed under GPL, LGPL,
MPL, and other open source licenses, visit
http://opensource.lge.com. In addition to the
source code, all referred license terms, warranty
disclaimers and copyright notices are available for
download.
LG Electronics will also provide open source code
on CD-ROM for a charge covering the cost of
performing such distribution (such as the cost
of media, shipping, and handling) upon email
valid for three (3) years from the date on which
you purchased the product.
Wireless module (LCW-004) Specifications
Frequency Range 2412 to 2462 MHz
Output Power
(max.)
IEEE 802.11 b : 22.44 dBm
IEEE 802.11 g : 24.68 dBm
IEEE 802.11 n : 24.11 dBm
30 HOW TO USE
ENGLISH
FCC Notice
(for transmitter module contained in
this product)
This equipment has been tested and found to
comply with the limits for a Class B digital device,
pursuant to Part 15 of the FCC Rules. These limits
are designed to provide reasonable protection
against harmful interference in a residential
installation. This equipment generates, uses,
and can radiate radio frequency energy and, if
not installed and used in accordance with the
instructions, may cause harmful interference
to radio communications. However, there is no
guarantee that interference will not occur in a
particular installation. If this equipment does
cause harmful interference to radio or television
reception, which can be determined by turning
the equipment off and on, the user is encouraged
to try to correct the interference by one or more
of the following measures:
- Reorient or relocate the receiving antenna.
- Increase the separation between the equipment
and the receiver.
- Connect the equipment to an outlet on a circuit
different from that to which the receiver is
connected.
- Consult the dealer or an experienced radio/TV
technician for help.
This device complies with part 15 of the FCC
Rules. Operation is subject to the following two
conditions:
1) this device may not cause harmful interference
and
2) this device must accept any interference
received, including interference that may cause
undesired operation of the device.
Any changes or modifications in construction of
this device which are not expressly approved by
the party responsible for compliance could void
the user’s authority to operate the equipment.
FCC RF Radiation Exposure Statement
This equipment complies with FCC radiation
exposure limits set forth for an uncontrolled
environment. This transmitter must not be co-
located or operating in conjunction with any other
antenna or transmitter.
This equipment should be installed and operated
with minimum distance 20 cm (7.8 inches)
between the antenna and your body. Users must
follow the specific operating instructions for
satisfying RF exposure compliance.
Industry Canada Statement
(for transmitter module contained in
this product)
This device complies with Industry Canada’s
licence-exempt RSSs. Operation is subject to the
following two conditions:
1) this device may not cause interference; and
2) this device must accept any interference,
including interference that may cause undesired
operation of the device.
IC Radiation Exposure Statement
This equipment complies with IC radiation
exposure limits set forth for an uncontrolled
environment. This equipment should be installed
and operated with a minimum distance of 20 cm
(7.8 inches) between the antenna and your body.
NOTE
The manufacturer is not responsible
for any radio or TV interference caused
by unauthorized modifications to this
equipment. Such modifications could
void the user’s authority to operate the
equipment.
31
HOW TO USE
ENGLISH
Ice-detecting
sensor
CAUTION
When handling the ice bin,
keep hands away from
the icemaker tray area to
avoid personal injury.
In-Door Ice Bin
Depending on the model, some of the
following functions may not be available.
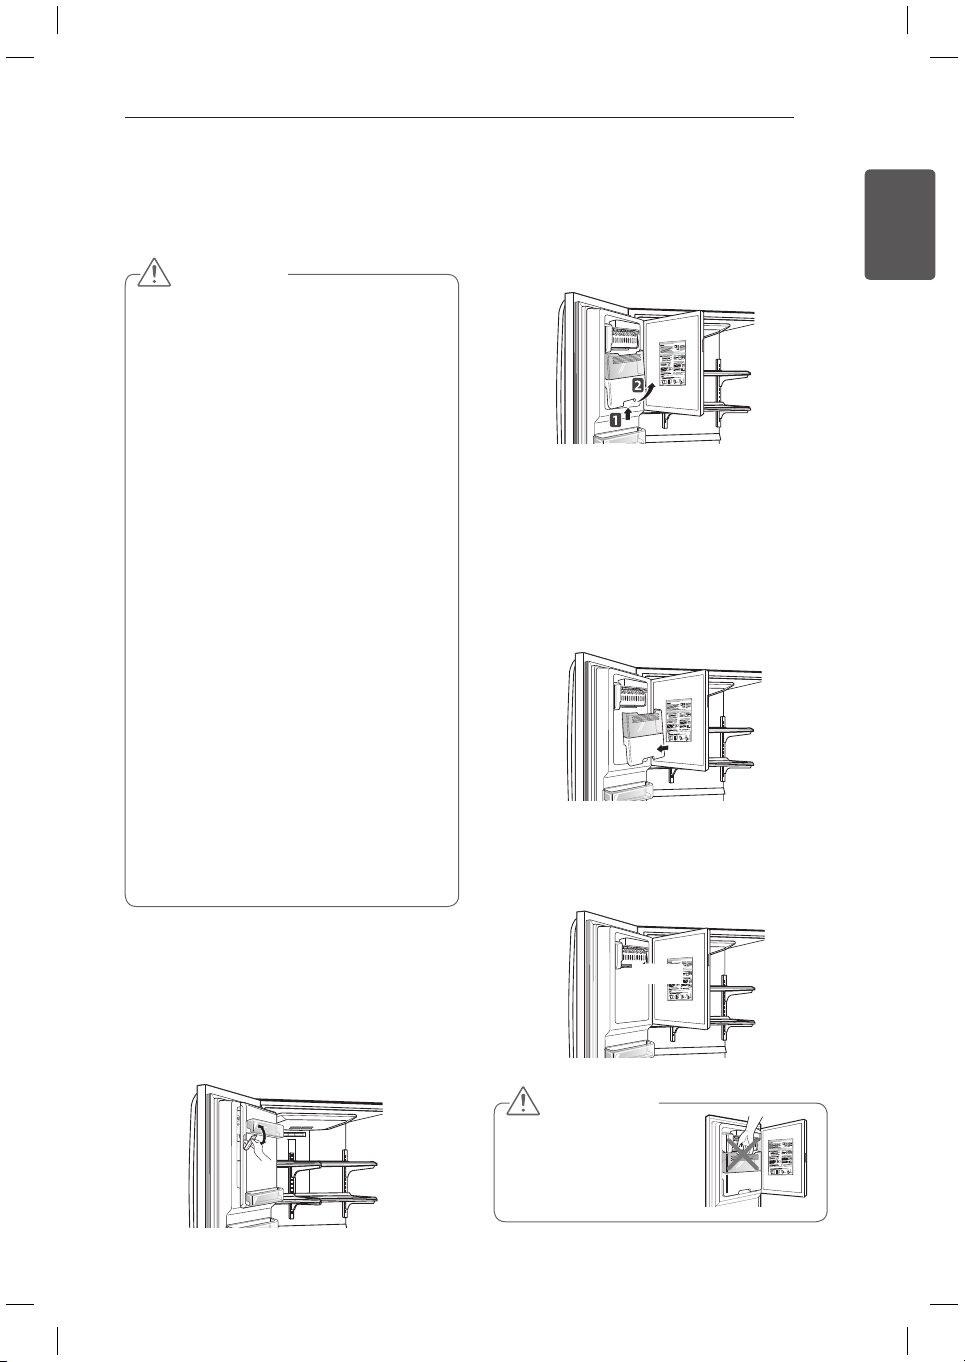
Detaching the In-Door Ice Bin
1Gently pull the handle to open the ice
compartment.
2To remove the in-door ice bin, grip the
front handle, slightly lift the lower part,
and slowly pull out the bin as shown.
Assembling the In-Door Ice Bin
1Carefully insert the in-door ice bin while
slightly slanting it to avoid contact with the
icemaker.
2Avoid touching the ice-detecting sensor
when replacing the ice bin. See the label
on the ice compartment door for details.
CAUTION
Keep hands and tools out of the ice
y
compartment door and dispenser chute.
Failure to do so may result in damage or
personal injury.
The icemaker will stop producing ice when
y
the in-door ice bin is full. If you need more
ice, empty the ice bin into the extra ice bin
in the freezer compartment. During use,
the ice can become uneven causing the
icemaker to misread the amount of ice
cubes and stop producing ice. Shaking the
ice bin to level the ice within it can reduce
this problem.
Storing cans or other items in the ice bin will
y
damage the icemaker.
Keep the ice compartment door closed
y
tightly. If the ice compartment door is not
closed tightly, the cold air in the ice bin will
freeze food in the refrigerator compartment.
This could also cause the icemaker to stop
producing ice.
If the icemaker is turned OFF for
y
an extended period of time, the ice
compartment will gradually warm up
to the temperature of the refrigerator
compartment. To prevent ice cubes from
melting and leaking from the dispenser,
ALWAYS empty the ice bin when the
icemaker is set to OFF for more than a few
hours.
32 HOW TO USE
ENGLISH
Automatic Icemaker
Depending on the model, some of the
following functions may not be available.
Ice is made in the automatic icemaker and sent
to the dispenser. The icemaker will produce
50-80 cubes in a 24-hour period, depending
on freezer compartment temperature, room
temperature, number of door openings and
other operating conditions.
It takes about 12 to 24 hours for a newly
y
installed refrigerator to begin making ice. Wait
72 hours for full ice production to occur.
Ice making stops when the in-door ice bin
y
is full. When full, the in-door ice bin holds
approximately 6 to 8 (12-16 oz) glasses of ice.
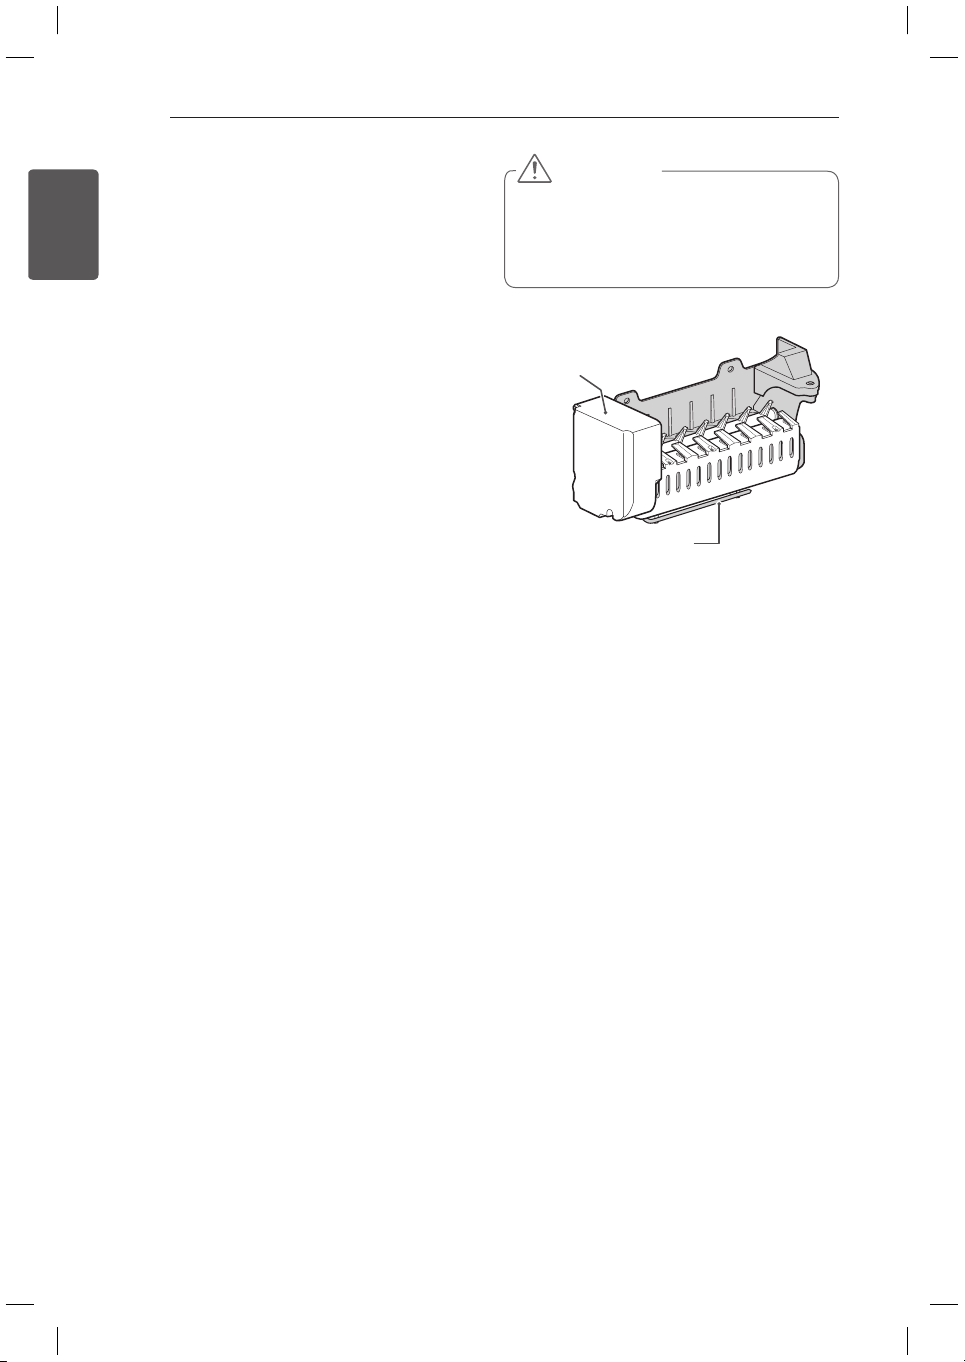
Foreign substances or frost on the auto shutoff
y
(feeler arm) can interrupt ice production. Make
sure the feeler arm is clean at all times for
proper operation.
To increase ice production, use the Ice Plus
y
function. The function increases both ice
making and freezing capabilities.
Auto shutoff (feeler arm)
Icemaker
Turning the Automatic Icemaker
On or Off
To turn the automatic icemaker On/Off, press
and hold the Ice On/Off button on the control
panel for 3 seconds.
WARNING
Personal Injury Hazard
DO NOT place fingers or hands on the
automatic ice making mechanism while the
refrigerator is plugged in.
33
HOW TO USE
ENGLISH
Automatic Icemaker
(continued)
The first ice and water dispensed may
y
include particles or odor from the water
supply line or the water tank.
Throw away the first few batches of ice.
y
This is also necessary if the refrigerator has
not been used for a long time.
Never store beverage cans or other items in
y
the ice bin for the purpose of rapid cooling.
Doing so may damage the icemaker or the
containers may burst.
If discolored ice is dispensed, check the
y
water filter and water supply. If the problem
continues, contact a qualified service
center. Do not use the ice or water until the
problem is corrected.
Keep children away from the dispenser.
y
Children may play with or damage the
controls.
The ice passage may become blocked with
y
frost if only crushed ice is used. Remove the
frost that accumulates by removing the ice
bin and clearing the passage with a rubber
spatula. Dispensing cubed ice can also help
prevent frost buildup.
Never use thin crystal glass or crockery to
y
collect ice. Such containers may chip or
break resulting in glass fragments in the ice.
Dispense ice into a glass before filling it
y
with water or other beverages. Splashing
may occur if ice is dispensed into a glass
that already contains liquid.
Never use a glass that is exceptionally
y
narrow or deep. Ice may jam in the ice
passage and refrigerator performance may
be affected.
Keep the glass at a proper distance from
y
the ice outlet. A glass held too close to the
outlet may prevent ice from dispensing.
To avoid personal injury, keep hands out of
y
the ice door and passage.
Never remove the dispenser cover.
y
If ice or water dispenses unexpectedly, turn
y
off the water supply and contact a qualified
service center.
CAUTION
When You Should Turn the
Icemaker Off
When the water supply will be shut off
y
for several hours.
When the ice bin is removed for more
y
than one or two minutes.
When the refrigerator will not be used
y
for several days.
Normal Sounds You May Hear
The icemaker water valve will buzz as
y
the icemaker fills with water. If the Ice
on/off button is set to On, the icemaker
will buzz even if it has not yet been
hooked up to water. To stop the buzzing,
press the Ice on/off button to set it to
the Off position.
You will hear the sound of cubes
y
dropping into the bin and water running
in the pipes as the icemaker refills.
Preparing For Vacation
Set the Ice On/Off button to Off and shut off
the water supply to the refrigerator.
If the ambient temperature is expected to drop
below freezing, have a qualified technician
drain the water supply system to prevent
serious property damage due to flooding
caused by ruptured water lines or connections.
NOTE
The ice bin should be emptied when
the Ice On/Off button is set to the Off
mode.
NOTE
Keeping the icemaker on before the
water line is connected can damage the
icemaker.
NOTE
The ice bin should be emptied any time
the Ice On/Off button is turned Off.
34 HOW TO USE
ENGLISH
Ice and Water Dispenser
Depending on the model, some of the
following functions may not be available.
CAUTION
Keep children away from the dispenser
to prevent them from playing with or
damaging the controls.
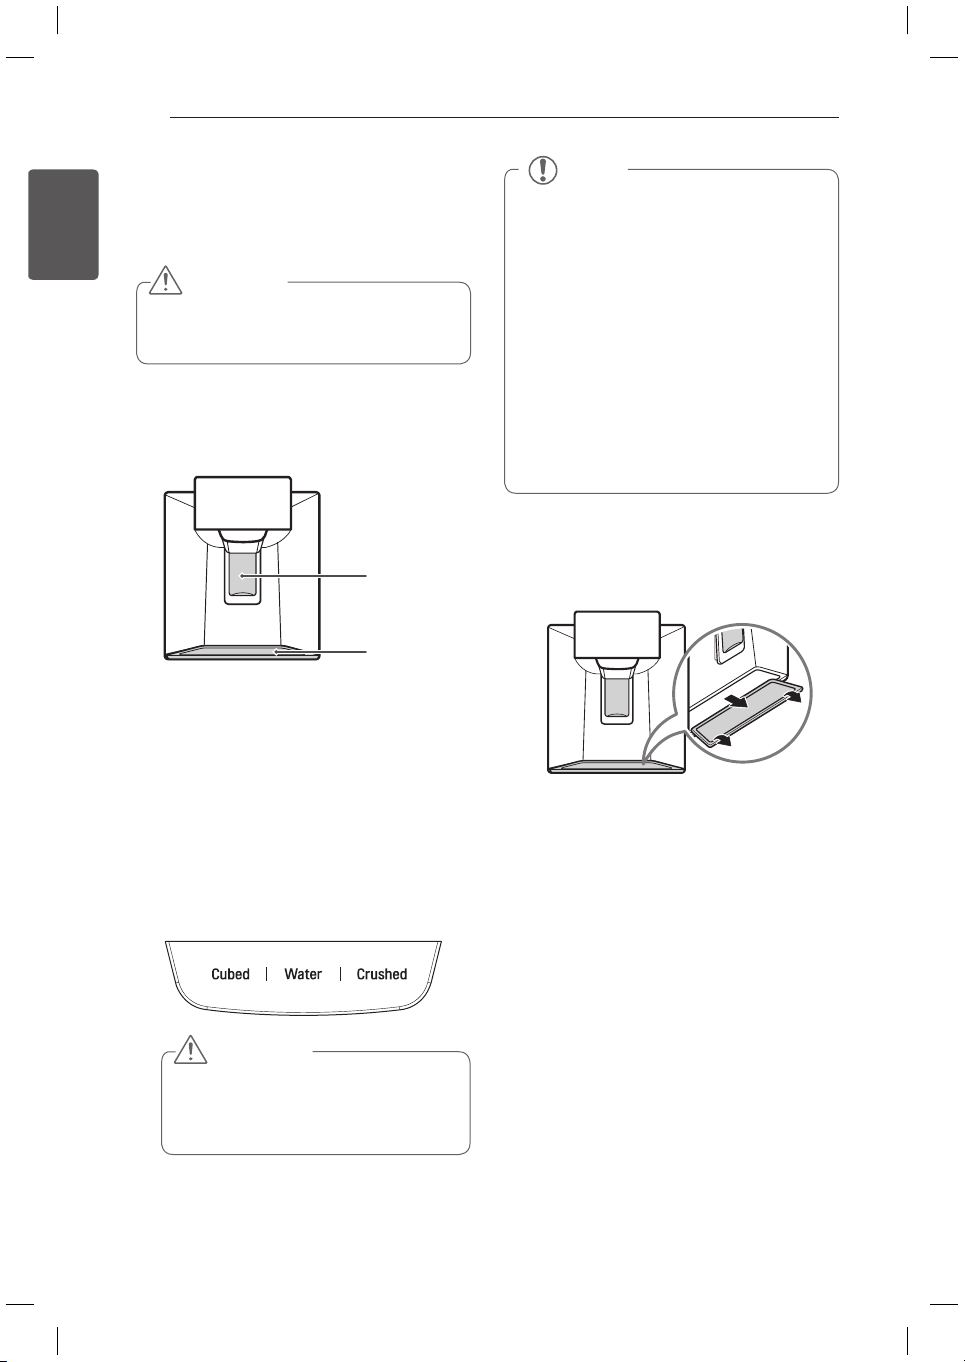
Dispenser
Support
Using the Dispenser
1Press on the Water, Cubed, or Crushed
text above the dispenser switch to select
from water, cubed ice, or crushed ice.
2Press a glass against the ice and water
switch to start dispensing.
NOTE
If discolored ice is dispensed, check
y
the water filter and water supply. If the
problem continues, contact a qualified
service center. Do not use the ice or
water until the problem is corrected.
The dispenser will not operate when
y
either of the refrigerator doors are open.
If dispensing water or ice into a container
y
with a small opening, place it as close to
the dispenser as possible.
Some dripping may occur after
y
dispensing. Hold your cup beneath
the dispenser for a few seconds after
dispensing to catch all of the drops.
CAUTION
Throw away the first few batches of ice
(about 24 cubes). This is also necessary
if the refrigerator has not been used for
a long time.
Cleaning the Dispenser Tray
1Pull the tray forward until it stops.
2Place hands underneath the tray and
gently pull the tray forward to pop it off the
support.
3The dispenser tray and support can easily
become wet or dirty. Remove the tray
periodically and clean it and the support
with a damp dishcloth. Dry off the tray and
the support before reinstalling the tray.
Ice and Water
switch
Locking the Dispenser
Press and hold the Lock button for three
seconds to lock the dispenser and all of the
control panel functions. Follow the same
instructions to unlock.
35
HOW TO USE
ENGLISH
NOTE
If you are leaving home for a short period of time, like a short vacation, the refrigerator should be left
y
on. Refrigerated foods that are able to be frozen will stay preserved longer if stored in the freezer.
If you are leaving the refrigerator turned off for an extended period of time, remove all food and unplug
y
the power cord. Clean the interior, and leave the door open to prevent fungi from growing in the
refrigerator.
CAUTION
Do not store food with high moisture content towards the top of the refrigerator. The moisture could
y
come in direct contact with the cold air and freeze.
Wash food before storing it in the refrigerator. Vegetables and fruit should be washed, and food
y
packaging should be wiped down to prevent adjacent foods from being contaminated.
If the refrigerator is kept in a hot and humid place, frequent opening of the door or storing a lot of
y
vegetables in the refrigerator may cause condensation to form. Wipe off the condensation with a
clean cloth or a paper towel.
If the refrigerator door or freezer drawer is opened too often, warm air may penetrate the refrigerator
y
and raise its temperature. It can also increase the cost to run the appliance.
Do not overfill or pack items too tightly into door bins. Doing so may cause damage to the bin or
y
personal injury if items are removed with excessive force.
The temperature inside the EasyReach™ is slightly lower than in the shelf or door bin area.
y
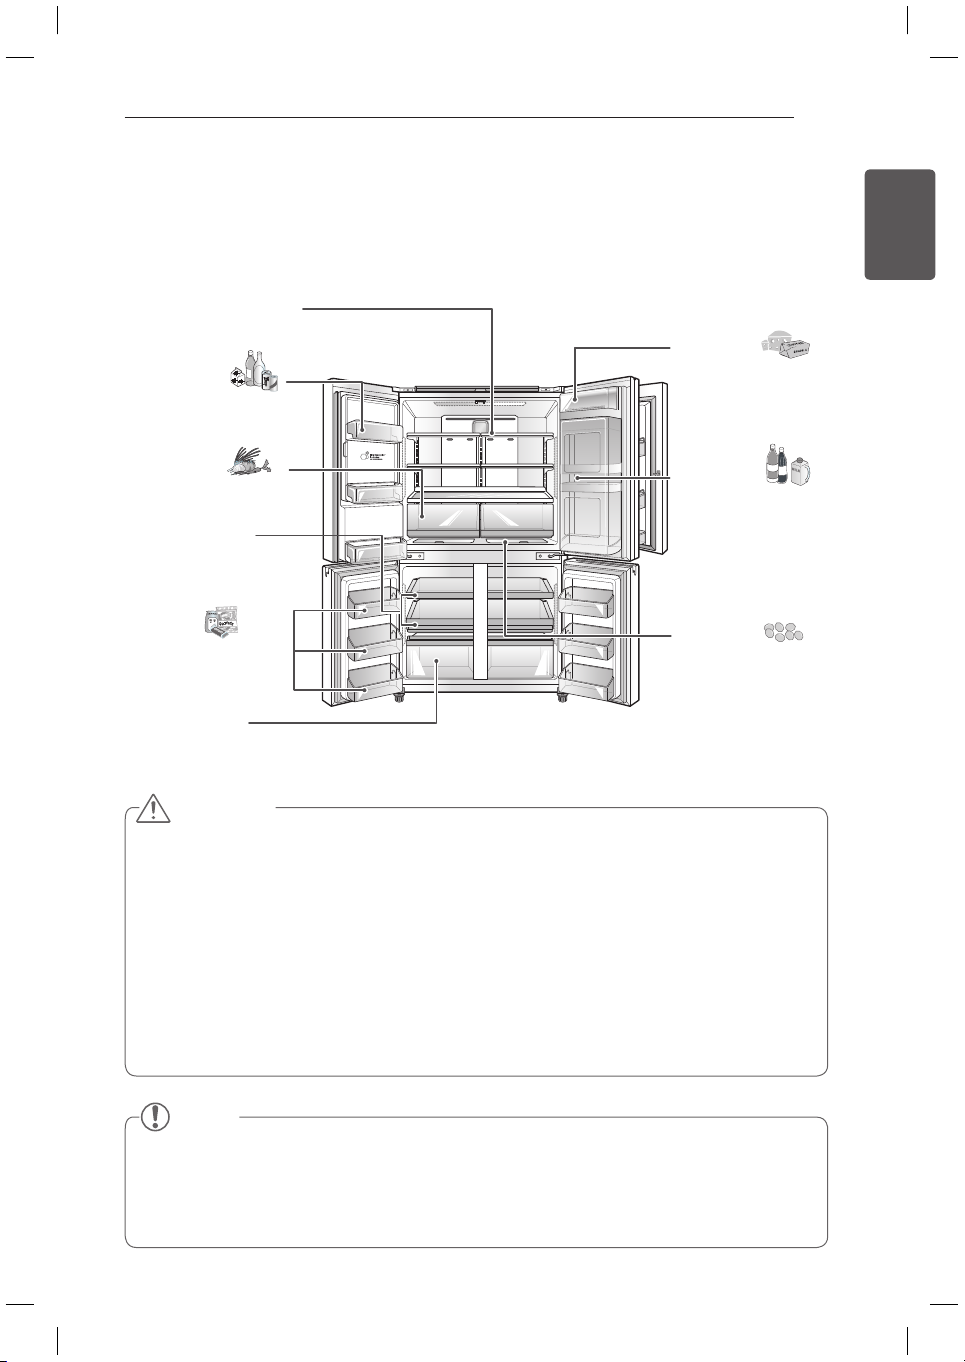
Storing Food
Food Preservation Location
Each compartment inside the refrigerator is designed to store different types of food.
Store your food in the optimal space to enjoy the freshest taste.
Adjustable refrigerator shelf
Adjustable shelves to meet your individual storage needs.
EasyReach™
Store small items or
defrost a frozen item.
Door-In-Door
Store frequently used
food items such as butter,
margarine, cream cheese,
peanut butter, ketchup,
mustard, relish, etc.
Dairy Corner
Store dairy foods such as
butter, cheese, etc.
Big Fresh Zone
Preserve vegetables and
fruits.
Freezer Bin
Preserve small packaged
frozen food or frequently-
used foods.
Refrigerator Bin
Store beverages, water, etc.
Freezer Drawer (1)
Preserve small packaged
frozen food or frequently-used
foods.
Freezer Drawer(2)
Preserve frozen food for longer storage.
36 HOW TO USE
ENGLISH
Food Storage Tips
The following tips may not be applicable
depending on the model.
Wrap or store food in the refrigerator in airtight
and moisture-proof material unless otherwise
noted. This prevents food odor and taste transfer
throughout the refrigerator. For dated products,
check date code to ensure freshness.
Food How to
Butter or
Margarine
Keep opened butter in a covered
dish or closed compartment.
When storing an extra supply,
wrap in freezer packaging and
freeze.
Cheese
Store in the original wrapping
until you are ready to use it.
Once opened, rewrap tightly in
plastic wrap or aluminum foil.
Milk Wipe milk cartons. For coldest
milk, place containers on
interior shelf.
Eggs Store in original carton on
interior shelf, not on door shelf.
Fruit Do not wash or hull the fruit
until it is ready to be used. Sort
and keep fruit in its original
container, in a crisper, or store
in a completely closed paper
bag on a refrigerator shelf.
Leafy
Vegetables
Remove store wrapping and
trim or tear off bruised and
discolored areas. Wash in cold
water and drain. Place in plastic
bag or plastic container and
store in crisper.
Vegetables
with skins
(carrots,
peppers)
Place in plastic bags or plastic
container and store in crisper.
Fish Store fresh fish and shellfish
in the freezer section if they
are not being consumed the
same day of purchase. It is
recommended to consume
fresh fish and shellfish the
same day purchased.
Leftovers
Cover leftovers with plastic wrap
or aluminum foil, or store in
plastic containers with tight lids.
Storing Frozen Food
Freezing
Your freezer will not quick-freeze a large
quantity of food. Do not put more unfrozen
food into the freezer than will freeze within
24 hours (no more than 2 to 3 lbs. of food per
cubic foot of freezer space). Leave enough
space in the freezer for air to circulate around
packages. Be careful to leave enough room at
the front so the door can close tightly.
Storage times will vary according to the quality
and type of food, the type of packaging or wrap
used (how airtight and moisture-proof) and
the storage temperature. Ice crystals inside a
sealed package are normal. This simply means
that moisture in the food and air inside the
package have condensed, creating ice crystals.
NOTE
Check a freezer guide or a reliable cookbook
for further information about preparing food
for freezing or food storage times.
NOTE
Allow hot foods to cool at room temperature
for 30 minutes, then package and freeze.
Cooling hot foods before freezing saves
energy.

37
HOW TO USE
ENGLISH
Storing Frozen Food (continued)
Packaging
Successful freezing depends on correct
packaging. When you close and seal the
package, it must not allow air or moisture in or
out. If it does, you could have food odor and
taste transfer throughout the refrigerator and
could also dry out frozen food.
Packaging recommendations:
Rigid plastic containers with tight-fitting
y
lids
Straight-sided canning/freezing jars
y
Heavy-duty aluminum foil
y
Plastic-coated paper
y
Non-permeable plastic wraps
y
Specified freezer-grade self-sealing plastic
y
bags
Follow package or container instructions for
proper freezing methods.
Do not use
Bread wrappers
y
Non-polyethylene plastic containers
y
Containers without tight lids
y
Wax paper or wax-coated freezer wrap
y
Thin, semi-permeable wrap
y
Adjusting the Refrigerator
Shelves
The shelves in your refrigerator are adjustable
to meet your individual storage needs. Your
model may have either glass or wire shelves.
Adjusting the shelves to fit items of different
heights will make finding the exact item you
want easier. Doing so will also reduce the
amount of time the refrigerator door is open
which will save energy.
Detaching the Shelf
Tilt up the front of the shelf and lift it straight
up. Pull the shelf out.
Assembling the Shelf
Tilt the front of the shelf up and guide the rear
shelf hooks into the slots at the desired height.
Then, lower the front of the shelf so that the
hooks drop into the slots.
CAUTION
Make sure that shelves are level from
one side to the other. Failure to do so
may result in the shelf falling or food
spilling.

38 HOW TO USE
ENGLISH
Using the Folding Shelf
You can store taller items, such as containers
or bottles, by simply pushing the front half of
the shelf underneath the back half of the shelf.
Pull the front of the shelf firmly toward you to
return to a full shelf.
When Closing the Door
CAUTION
Do not clean glass shelves with
y
warm water while they are cold.
Shelves may break if exposed to
sudden temperature changes or
impact.
Glass shelves are heavy. Use special
y
care when removing them.
CAUTION
To reduce the risk of door scratches
y
and breaking the center door mullion,
make sure that the refrigerator door
mullion is always folded in.
The door alarm will sound every 30
y
seconds if the door remains open
longer than one minute. Ensure that
the folding mullion is folded in before
closing the left-hand door.

39
HOW TO USE
ENGLISH
CAUTION
Always empty the drawers before
y
removing them, and use both hands
when removing and assembling them.
Make sure that the refrigerator doors
y
are fully open before removing and
assembling the drawers.
Big Fresh Zone
Removing the Big Fresh Zone Drawer
1Open both refrigerator doors fully. Pull the
drawer out to full extension and remove all
contents from the drawer.
2Lift the front of the drawer to remove it
from its guides and pull straight out.
Assembling the Big Fresh Zone
Drawer
1Slightly tilt up the front of the drawer and
insert the rollers on the sides into the
guides.
2Gently push the drawer in while lowering it
into place.
40 HOW TO USE
ENGLISH
CAUTION
Use two hands when removing or
y
assembling the Fresh Zone compartment.
Open both refrigerator doors completely
y
and empty and remove the Door-in-
Door case and bins before removing or
assembling the Fresh Zone compartment.
Removing/Assembling the
Fresh Zone Compartment
(Model Name : LNXC23766*)
Removing the Fresh Zone
Compartment
1Open the refrigerator doors all the way.
Empty and remove the Door-in-Door
case and bins. Clear off and remove all
refrigerator shelves. Remove all contents
from the Fresh Zone cover and drawers.
2Lift the Fresh Zone drawers with both
hands and gently pull them toward you.
3Grabbing the back of the Fresh Zone
compartment with one hand, tilt the
compartment up, and then remove it while
tilted.
Assembling the Fresh Zone
Compartment
1Hold the Fresh Zone compartment at an
angle and place it into the refrigerator
compartment.
2Lift the Fresh Zone compartment to a
horizontal position, lower it to its original
position, and gently push it back into place.
3If there is a gap behind the drawer, as
seen below, slightly lift the Fresh Zone
compartment and push it backward.

41
HOW TO USE
ENGLISH
CAUTION
Remove items from on top of glass cover
y
before removing cover.
Take care when handling the glass cover.
y
There is still a risk of injury if the glass is
broken, even though it is tempered glass.
Take care when removing or assembling
y
the cover not to catch hands between the
cover and the drawers.
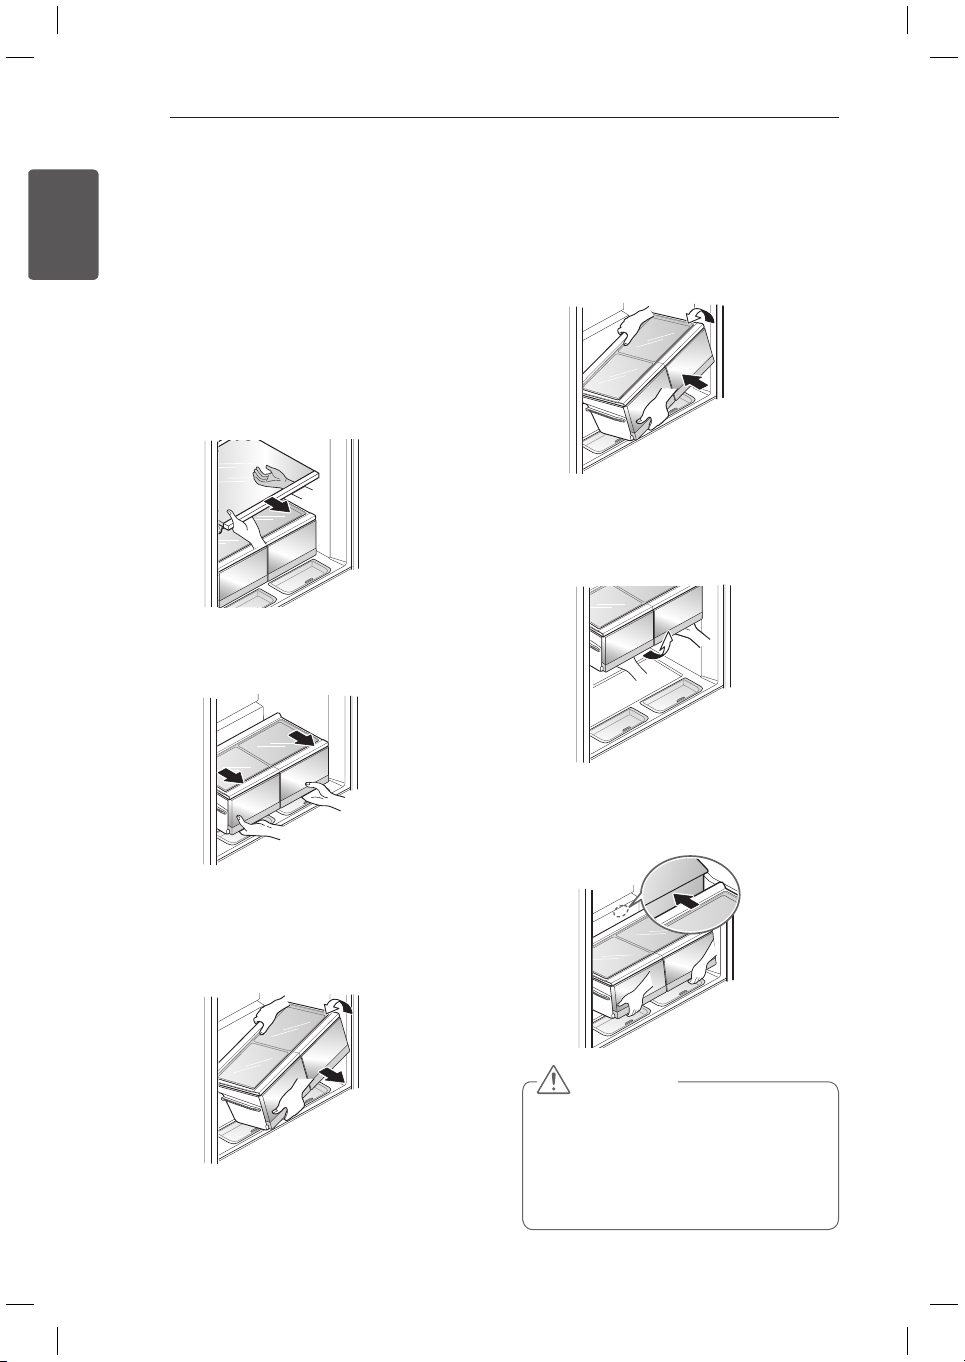
Removing/Assembling the
Fresh Zone Compartment
(Model Name : LNXS30866*)
Removing the Fresh Zone
Compartment
1Open both refrigerator doors completely
and empty and remove the Door-in-Door
case and bins. Empty contents from glass
cover and drawers.
2Lift the front of one drawer to remove
it from its guides and pull straight out.
Repeat to remove the second drawer.
3Support underneath the glass cover with
one hand while lifting the front of the
cover with the other hand. Push up from
underneath to release the cover from the
guides, then tilt the cover 45 degrees, and
pull it forward to remove it.
Assembling the Fresh Zone
Compartment
1Hold the cover at a 45-degree angle and
insert it into the refrigerator.
2Supporting the cover with one hand, bring
the cover to a horizontal position and lower
it onto the guides. Push the cover back
into place.
3Tilt up the front of one drawer and insert
the rollers into the side guides. Lower the
drawer and push it in. Repeat with second
drawer.
42 HOW TO USE
ENGLISH
Door-in-Door
The Door-in-Door compartment allows for easy
access to commonly used beverages and food
items.
The inner Door-in-Door includes two door bins,
the Cheese & Butter and Condiment bins, that
are specially designed for these items.
Butter stored here will be easier to spread,
cheese will be easier to slice, and condiments
ready to use.
To access the Door-in-Door compartment,
lift the lever under the right side door. The
compartment opens with a click.
The Door-in-Door compartment allows you
y
more room to store food.
With the increased storage space, you can
y
also organize drinks and snacks better.
CAUTION
Be careful when handling and storing
y
larger eggs. They can be broken if the
cover is not completely closed and the
drawer above is pushed in.
Store foods like tofu, celery or lettuce
y
which have high water content or freeze
easily on the interior shelves at the front.
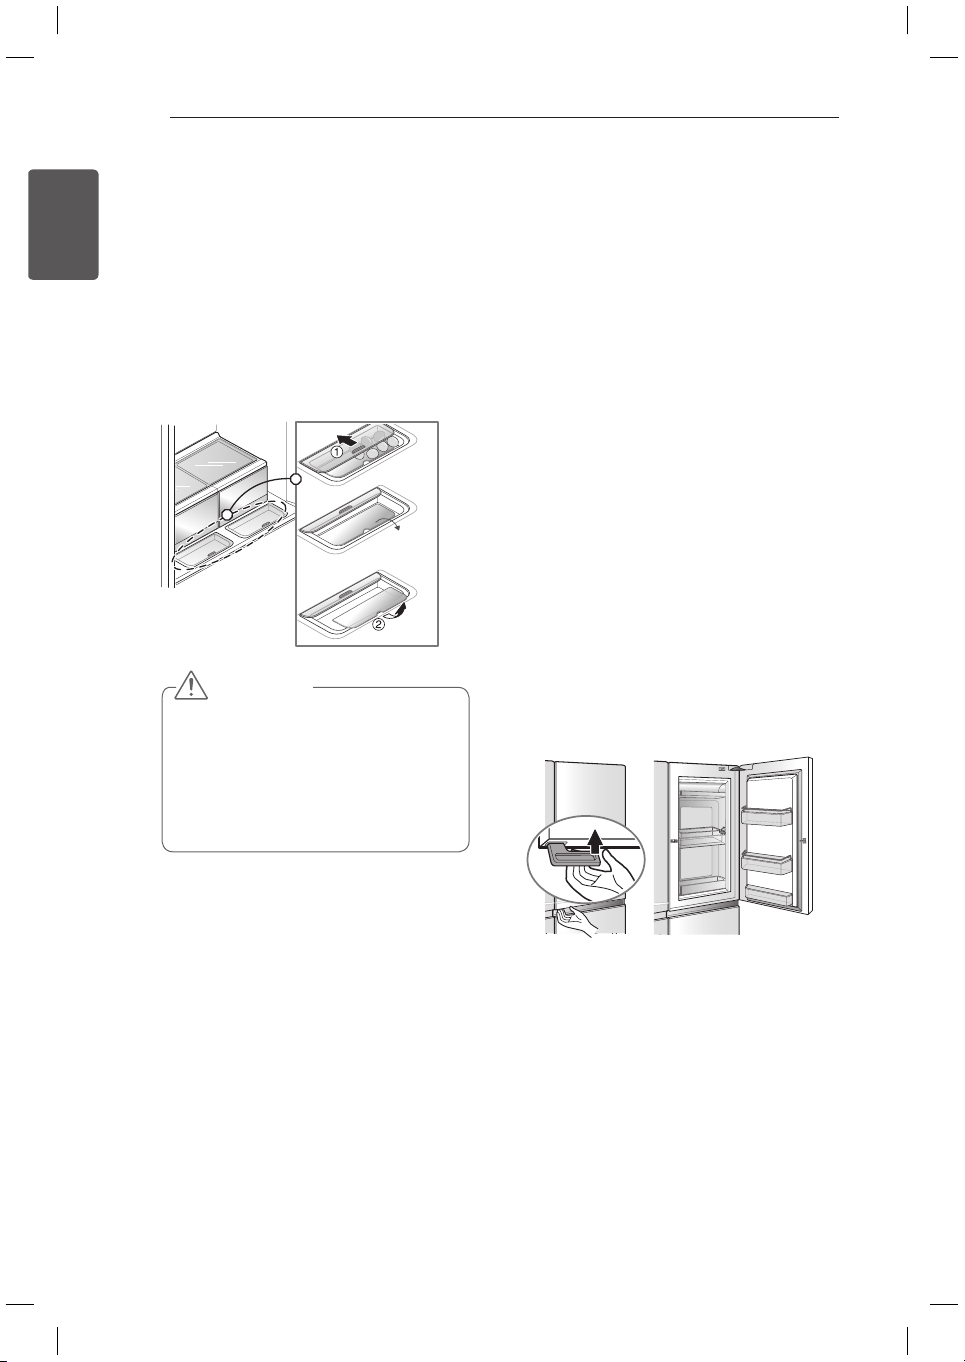
Dairy Corner
Use the Dairy Corner to store items such as
butter and cheese.
EasyReach™
The EasyReach™ compartments are slightly
cooler than the shelf or door bin areas. They
are a convenient place to store dairy snacks or
other small items you want to keep especially
cold. They are also a handy place to defrost
meat.
Open and close by pulling the handle.
To clean the EasyReach™ compartments,
open the cover, empty the bin, and lift out the
bottom tray.
Table of contents
Popular Refrigerator manuals by other brands


Whirlpool
Whirlpool EL87TRRRQ - on 35.3 Cu. Ft. SideKicks owner's manual

GE
GE TURBOCOOL 23 Owner's manual and installation

Fisher & Paykel
Fisher & Paykel RB2470BRV user guide

Fisher & Paykel
Fisher & Paykel RS7621WR installation guide

Samsung
Samsung RS2533SW Owner's manual and installation

Westinghouse
Westinghouse IK009 installation manual