SMART G830 User manual

G830/G831 Touch Screen Phone
User’s Manual

2
About this manual
Welcome to the G830/G831 Phone. This Phone comes with two parts.
‘Before you start’
‘Operation Instruction’
Before using your G830/G831 Phone, read the ‘Before you start’ for overview of features, basic setup,
and other important details.
After you have become familiarized with its basic functionality, refer to the operation Instruction for
detailed features, less common tasks, and for maintaining your G830/G831 Phone.
These manuals can also serve as a source of information if you have problems operating your
G830/G831 Phone.

3
I. Before you start
A. FEATURES
1. Unpacking
2. Phone Layout
3. Display Layout
4. Battery
5. SIM Card
6. T-Flash
7. Headset
8. USB Cable
B. Basic usages
1. Power On/Off
2. Call Function
3. Multimedia Function
4. Text Input mode
5. Phonebook

4
II. Operation Instruction
A. Menu Operation
a. AV Zone
1. Audio Player
2. Video Player
3. Video Recorder
4. Camera
b. PIM
1. Phone Book
2. Messages
3. Call History
4. Organizer
c. Entertainment
1. Fun & Game
2. Services
3. Multimedia
4. Extra
d. System

5
1. Setting
2. User Profiles
3. Shortcuts
4. File Manager
B. Trouble Shooting
C. Safety Information
D. Glossary

6
I. Before you start
G830/G831 Phone

7
A. Features
1. Unpacking
Your package list is as shown below
2. Phone Layout
The following illustration shows the main elements of your phone.
2.1 LCD
The LCD is TFT LCD and has 260K colors.
You can be enjoy the more clear LCD color with your G830/G831 phone
2.2 Camera
You can take a photo with G830/G831’s embedded digital camera. G830/G831 has 1.3 Mega pixels
level camera module, you can enjoy highly qualify digital photo with your G830/G831 phone.
2.3 PDA Touch Screen
G830/G831 is touch screen Phone. You can operate the phone with pen.
Handset Touch Pen Manual Travel Adaptor Earphone USB Cable
(Optional)

8
2.3 Keys Description
How to Use Touch Key
>> This Product’s buttons are touch keys.
>> Be sure to read “Cautions for Touch Keys” before using touch keys.
Cautions for Touch Keys
1. Make sure your hands are clean and dry.
- Remove all moisture from the surface of your hands or the touch keys in a humid environment.
2. You do not need to press hard on the touch keys to make it work normally.
- Keep product from severe impact, as sensors of the touch keys may be damaged.
3. Use the tip of your finger to press exactly on the touch key you want, being careful not to touch the
keys for other functions.
4. When both the touch screen and touch key lights are off, pressing a touch key will not turn on touch
screen lights. Press the side key or touch screen, the touch screen and touch key lights will turn back
on (touch keys do not work when the touch key lights are off).
5. During calls, the Touch key Off function is automatically enabled. (For details, see ‘Touch Keys
Status When Using Mobile Phone’.)
6. Touch keys may not work normally if a mobile phone case or plastic is covering the touch keys. Also,
touch keys may not work normally if you are suing it wearing a glove.
7. Keep metal and other conductive material away from the surface of touch keys, as contact with then
may result in error.
Touch Key Status When Using Mobile Phone
When No button act for a certain duration, to prevent indiscreet action of the touch keys while using
the phone or during calls, the Touch key off function is automatically enabled. (In this case, the touch
keys will not work even if they are pressed)
1. When Idle mode
- To disable Touch key off function, press side keys or touch screen.
- After disabling Touch key off function, if there is no button action for a certain duration( 3 seconds),
Touch key off function is enabled again.
2. During calls
- During Calls, Touch key off function is automatically enabled.
3. Incoming calls
- Incoming calls, Touch off function is automatically enabled.
- To During calls, press the Menu Answer Key. Otherwise, If Answer mode of User Profile menu is

9
Any Key, press Side Keys.
- If Answer mode of User Profile menu is not Any Key. To during calls, press Send Touch key after
press Touch Screen or Camera side key. (default of answer mode is any key)
4. Auto Keypad Lock
- Auto Keypad Lock default option is 10 sec.
- To Keypad unlock, press twice side END key during 1sec.
(For details, see 1.5.3 Auto Keypad Lock in d. System)
SIDE Keys
[Basic Function]
Ends a call. Also switches the phone on or off when Touched and held.
In the menu, returns to the idle mode or cancels your input.
[Idle Mode]
Enter Keypad Lock. (press END Key twice duing 1sec)
Cancle Keypad Lock. (press END Key twice duing 1sec)
[Basic Function]
Enter camera mode
[Camera Mode]
Take a picture
[Basic Function]
move the cursor or selection bar up (Text edit mode or menu mode)
[Idle Mode]
Increase the key-tone volume
[MP3 Mode & MPEG4 Mode]
Increase the volume
[Basic Function]
move the cursor or selection down (Text edit mode or menu mode)
[Idle Mode]
Decrease the key-tone volume
[MP3 Mode & MPEG4 Mode]
Decrease the volume

10
Navigation Keys
[Basic Function]
Connected a Call.
[Idle Mode]
Launch Call Logs menu
[Basic Function]
Ends a call.
[Idle Mode]
In the menu, returns to the idle mode or cancels your input.
[Basic Function]
move the cursor (Text edit mode or menu mode)
[Idle Mode]
Launch Dedicated key Setting menu
[Camera Mode]
Camera Digital Zoom(up, down key),
EV Setting(left, right key) Function
[MP3 Mode]
Play & Pause(up, down key) MP3 file
Forward & Back(right, left key) MP3 file.
[Basic Function]
It is Soft right/left key. Soft key launch soft key area menu in screen.
[Idle Mode]
Right soft Key launch quick search. You can search the phone book
data by name.
Left soft key launch AV Zone menu.
[Basic Function]
OK Key is identical with Left Soft key function.
[Idle Mode]
Launch Alphanumeric touch screen input menu.

11
Alphanumeric Keys
[Touch]
Enter number and string
[Touch and Hold]
: Enter ‘+’ (international call)
: On and Off silent mode

12
3. Display Layout
3.1 Display Screen
3.1.1 Fixed Icon Area:
8 fixed icons are displayed indicating the phone status.
3.1.2 Network Status Area:
Network name registered is displayed.
If there is no GSM network coverage, No Service is displayed.
If you are in the coverage area of a GSM network but you are not allowed to register to the
network, Emergency is displayed.
3.1.3 User Setting Screen Area:
Digital Clock , Analog Clock , Images or User Text is displayed according to the setting of screen
setting menu.
If you set to get the broadcast message from the network, you can see it on the idle screen. For
details of how to activate and deactivate it, please see 2.5 Broadcast Message in b. PIM. In this
case, the User setting screen Area updates the received broadcast messages. If you want to go
back to default screen to touch [END].
! Note: The broadcast message service may not be available on all networks.
3.1.4 Time & Date Area
Current time and date is displayed in the Time & Date Area.
ÅFixed Icon Area
ÅNetwork Status Area
ÅUser Setting Screen Area
ÅTime & Date Area
ÅSoft Key Area
13
3.1.5 Soft Key Area:
The functions assigned to the right and left soft keys.
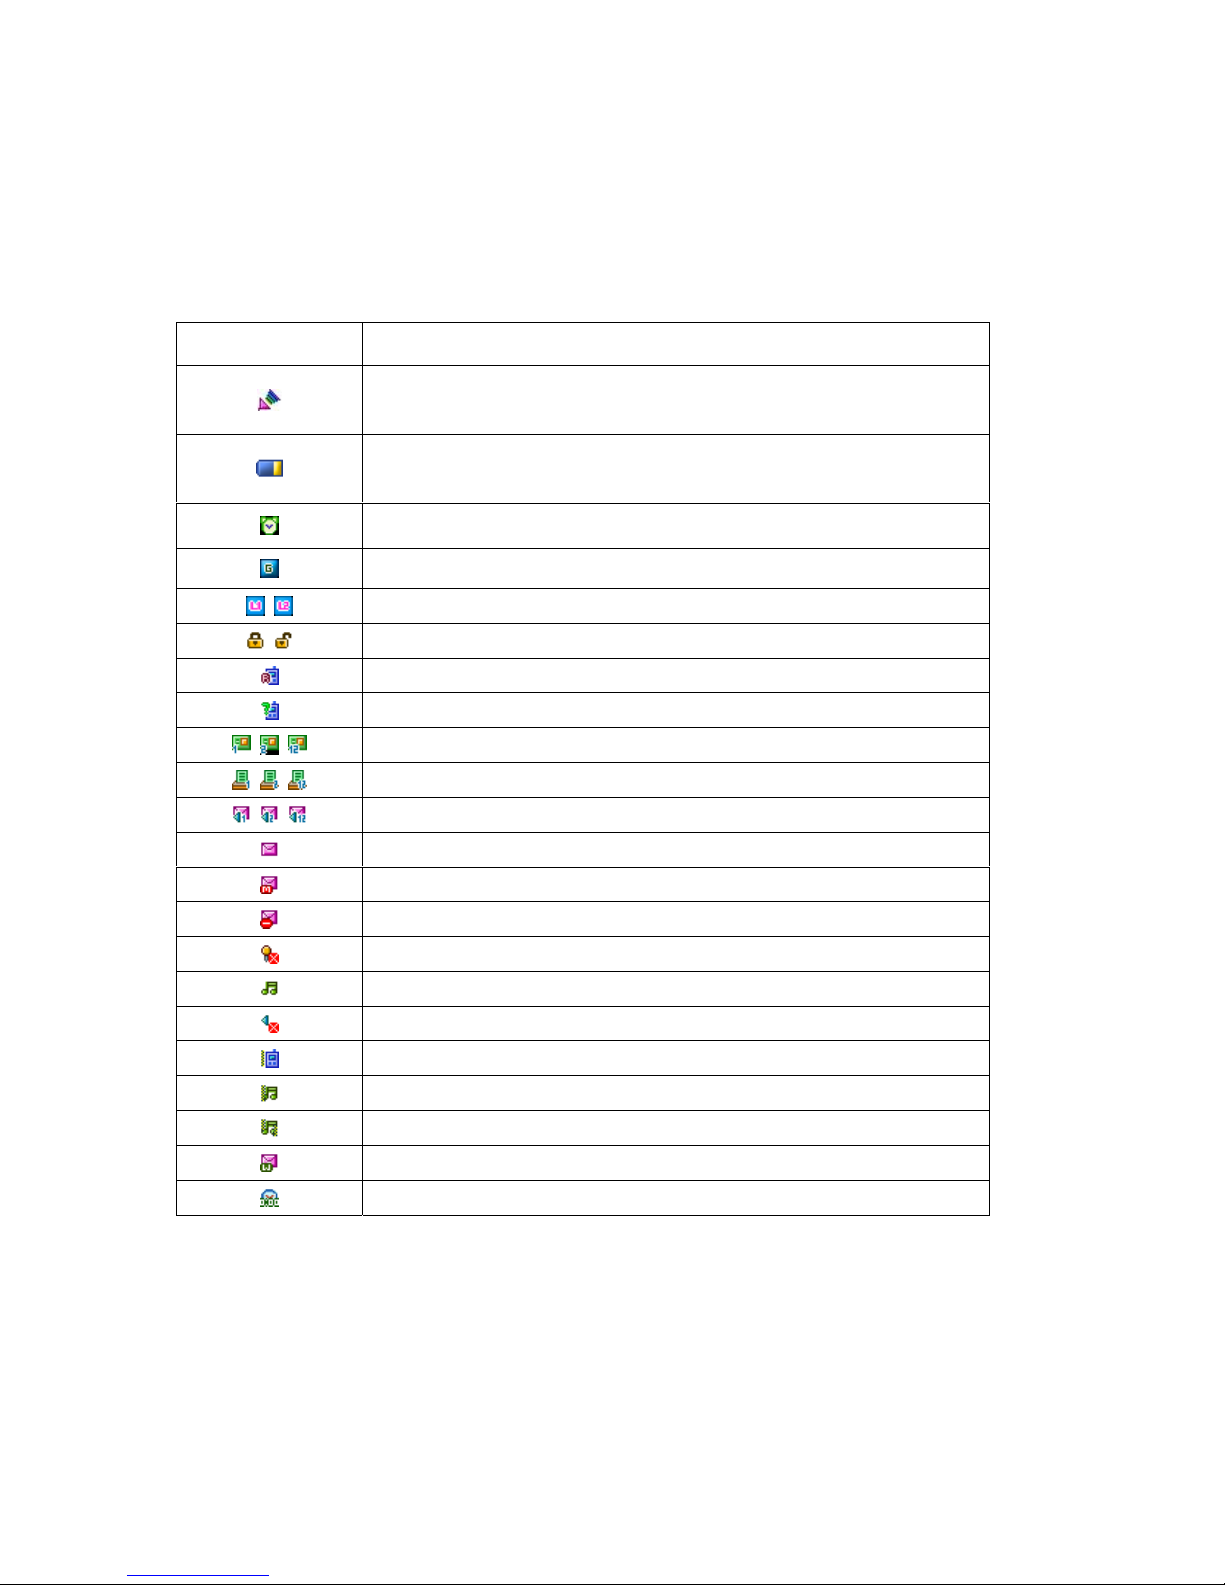
3.1.6 Icons Descriptions
Icon Description
Shows the received signal strength. The greater the number of bars, the
better the signal strength.
Shows the current battery charge level. The green area shows charge
level of battery.
Appears when the alarm clock is set.
Appears GPRS Mode is on
Indicate the phone number line you select
Show Phone Lock/Unlock mode
Roaming
Appears when you miss call
Appear when e-mail has been received
Appear when FAX has been received
Appears when Voice mail has been received
Appears when SMS has been received
Appears when MMS has been received
Appears when MMS client is busy
Appears when phone is mute mode
Appears when alert mode is selected as ring
Appears when alert mode is selected as Silent
Appears when alert mode is selected as Vibrator
Appears when alert mode is selected as Vibration and Ring
Appears when alert mode is selected as Vibration then Ring
Appears when WAP push is arrived
Appears when stopwatch application is undergoing
14
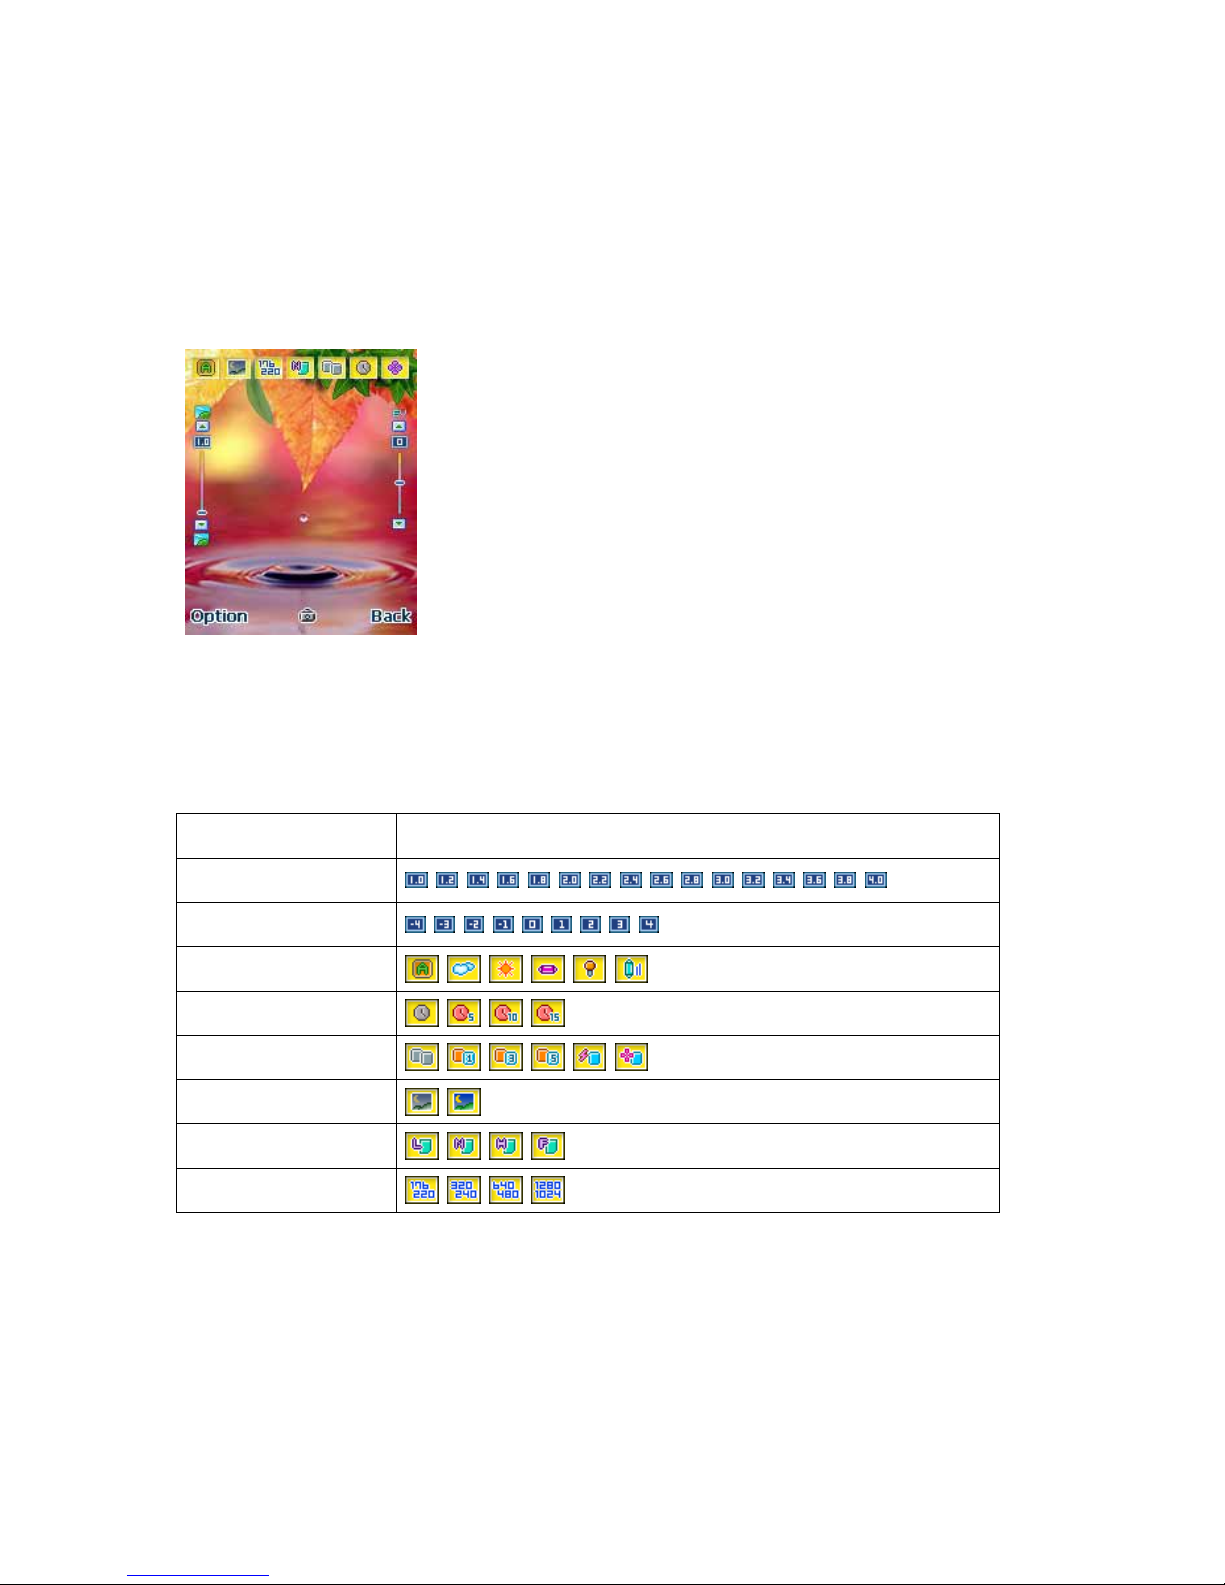
3.2 Photo Mode Screen
3.2.1 Preview Area :
You can see a preview shot before you take a photo.
3.2.2 Control Area:
You can see the status of photo mode setting with this control area. Each icon of control area has
specific functions. The following table describes what the icons mean.
Functions Icons
Zoom
Exposure Value
White Balance
Delay timer
Continuous shot
Night mode
Image quality
Image size
ÅMenu & Control Area
ÅSoft Key Area
ÅPreview Area

15
3.3 MP3 Mode Screen
3.4.1 Icon Description
ÅMP3 File Info Area
ÅMP3 Control Area
ÅSoft Key Area
Icons Description
Play MP3 file
Pause MP3 file
Stop playing MP3 file
Go to Previous MP3 file
Go to Next MP3 file
Show volume strength level
Show phone icon when MP3 file from phone
Show memory card icon when MP3 file from T-Flash

16
4. Battery
4.1 How to attach the battery
a. Align the bottom of the battery with the slot in the bottom of the phone.
b. Then sit the battery on the back of the phone until it clicks into place.
c. close battery cover
4.2 How to remove the battery
a. Turn off your phone first.
b. open battery cover
c. Slowly lift the battery away from the up.
4.3 How to charge the battery
a. Plug your charger in the wall socket.
b. Connect the other end to the interface connector on the bottom of the phone.
! Note
The phone will automatically check the battery status while the charger connector is installed on the

17
phone. Once it detects that the battery level
zFull status, it automatically recharges the battery.
zNormally the phone completes battery charging in one hour.
zFor a new or completely discharged battery, it takes at least 4 hours of charging to achieve
optimum performance.
zYou can make calls while charging your phone.
zDo not charge the phone without the battery in place.
5. SIM Card
SIM Card provides additional services and functions besides making a call.
These functions will only display and work on the menu of the phone if your SIM card supports them.
Some menu may not be shown depending on the SIM card supplied.
The content and the terms of the function lists will depend on your network service provider.
Please contact your network service provider (a network operator or the service provider) regarding
availability of services related to the SIM card, application information and the costs.
5.1 How to place the SIM card
Ensure the phone is powered off and the travel charger is detached first before you start the following
steps.
a. Push the SIM card holder in the direction of the arrow and hold it in this position.
b. Insert a new SIM Card under the two tabs on the right of the phone, ensuring that the beveled
corner is right and the gold contact of the card face downward.
c. Hold the SIM card down and release the holder to lock it into place.

18
5.2 How to remove the SIM card
Ensure the phone is switched off and the travel charger is detached first before you start the
following steps.
a. Remove the battery.
b. Release the SIM card holder by moving the SIM card holder to the top direction.
c. Remove the SIM card from the holder.
! Note: The SIM card is a computer chip containing information about your subscription, security,
phonebook etc. When you register as a subscriber with GSM network operator, you are provided with
the SIM card. Always handle the SIM card with care and insert with the gold contacts facing down.
6. T-Flash
T-Flash provides more big flash memories for MP3 and MPEG4 depend on memory card size.
6.1 How to place the T-Flash
Ensure the phone is powered off and the travel charger is detached first before you start the
following steps.
a. Push the T-Flash holder in the direction of the arrow and hold it in this position.
b. Insert a T-Flash under the two tabs on the right side of the phone, ensuring that the gold contact
of the card face downward.
c. Hold and push the T-Flash left direction and release the rubber into place.

19
6.2 How to remove the T-Flash
Ensure the phone is switched off and the travel charger is detached first before you start the
following steps.
a. Remove the battery.
b. Remove the T-Flash rubber and moving the T-Flash to right direction.
c. Remove the T-Flash from the holder.
7. Headset
Insert the headset plug into the jack on the left side of your phone marked
You can answer or end a call by Touching the hook button on the headset.
When you receive an incoming call while a call is in progress, you can answer the incoming call by
Touching the hook button on the headset. (The first call is automatically put on hold.)
! Note: If the headset is plugged in, your phone’s standby time will be reduced. Therefore, please
remove the headset when not in use.
8. USB cable
Two functions are available via USB connection.

20
8.1 Data transfer with PC
When you connect your phone with PC by USB cable, the following window is shown up on you phone
LCD.
zMass Storage : You can use your phone as external memory
=> MP3 file, Image File, Photo File
zCOM port : You can synchronize your phone data with PC by using ‘Phonesuite’ program
=> Phonebook, SMS message, Image file, i-meldody file
! Note : Refer to additional manual ‘Phonesuite’ regarding Synchronization function.
8.2 Charging
Your phone is on charging status automatically while USB cable connected with PC.
B. Basic Operation
1. Power On/Off
To switch your phone On and Off, make sure that the battery is inserted.
zTo switch your phone on, Touch and hold down [END] until you hear the power-on melody.
zTo switch your phone off, Touch and hold down [END] until you hear the power-off melody.
! Note : Some SIM card may be protected with PIN. If Enter PIN is prompted, enter your PIN and then
Touch [Ok soft key]. For more details, please see Security Setting in ‘Operation – Menu’.
2. Call Function
1. Connect the USB connector to USB port of PC (Desktop or Notebook)
2. Connect the other end to the interface connector on the bottom of the phone
This manual suits for next models
1
Table of contents
Other SMART Cell Phone manuals


