Smeg DI409C User manual

INSTRUCTION MANUAL
G
GU
UI
ID
DE
EF
FO
OR
RU
US
SI
IN
NG
GT
TH
HE
ED
DI
IS
SH
HW
WA
AS
SH
HE
ER
RA
AN
ND
DT
TH
HE
EW
WA
AS
SH
HI
IN
NG
GP
PR
RO
OG
GR
RA
AM
MS
S

Contents
1. Description of the controls________________________________14
2. Troubleshooting _______________________________________20
Thank you for choosing one of our products.
You are advised to read this manual carefully; it contains all the
information you need about the right conditions for the proper, safe use
of your dishwasher.
The individual sections are laid out to provide you with a step-by-step
guide to all your appliance's functions; the texts are easy to understand
and are complete with detailed illustrations.
This user-friendly manual will provide answers to all your questions
about use of the dishwasher.
For any other information about use and maintenance of the dishwasher,
read the enclosed manual carefully.
USER INSTRUCTIONS: useful information is provided for the use of the
washing programs and all the dishwasher's functions.

User instructions
1. Description of the controls
1.1 Upper panel
All the dishwasher controls are grouped on the upper panel. Switch-on,
programming, switch-off etc. procedures are only possible when the door
is open.
1ON/OFF BUTTON
Pressing this button energises the appliance.
2
SELECTED PROGRAM INDICATOR LIGHTS
Illumination of this light denotes the program selected and the occurrence of
a fault (troubleshooting).
3
PROGRAM SELECTION BUTTON
By pressing this button in sequence it is possible to select the desired
program.
4SALT WARNING LIGHT (certain models only)
Illumination of this light signals that salt container is empty.
5RINSE AID WARNING LIGHT (certain models only)
Illumination of this light signals that rinse aid dispenser is empty.
SETTING THE WASHING PROGRAM AND SWITCHING ON
To select the most suitable program for the dishes to be washed refer to
the table below, which indicates the most appropriate program according
to dish type and degree of soiling.

User instructions
After using the table to identify the most appropriate washing program:
•press the
ON/OFF button (1) and wait for the PROGRAM
INDICATOR LIGHT (2) to illuminate;
•keep pressing the
PROGRAM SELECTION button (3) until the
indicator light corresponding to the desired program illuminates;
•close the door; after about 2" the program will start. While it is in
progress, the relative LIGHT will flash (indicating that the program is
being executed).
DURATION CONSUMPTION
PROGRAMME,
NUMBER & SYMBOL
LOAD CROCKERY
AND CUTLERY
PROGRAM
PROGRESS MINUTES
(2)
WATER
LITRES (1)
POWER
KWh (2)
1SOAK
Pans and dishes
awaiting
a further wash
Cold prewash 9' 5_
2DELICATE
Wash immediately
after use for dishes
with light dirt
Wash at 45°C
Cold rinse
Rinse at 68°C
Dry
59' 12 0,90
3BIO (*)
EN 50242
Wash immediately
after use for dishes
with normal dirt
Wash at 50°C
Cold rinse
Rinse at 65°C
Dry
125' 14 0,95
4NORMAL Dishes
with normal dirt
Cold prewash
Wash at 65°C
Cold rinse
Rinse at 68°C
Dry
82' 17 1,25
5INTENSIVE Very dirty pans and
dishes (except
delicate items)
Prewash at 45°C
Wash at 70°C
2 cold rinses
Rinse at 70°C
Dry
105' 20 1,50
Only run the soak program with half loads.
(*) Reference program as per EN 50242 standard.
(–) Not present.
(1) Average power consumption with the softener set on level 2.
(2) The cycle duration and power consumption may vary according to the water and room
temperatures, and the type and amount of dishes.

User instructions
After using the table to identify the most appropriate washing program:
•press the
ON/OFF button (1) and wait for the PROGRAM
INDICATOR LIGHT (2) to illuminate;
•keep pressing the
PROGRAM SELECTION button (3) until the
indicator light corresponding to the desired program illuminates;
•close the door; after about 2" the program will start. While it is in
progress, the relative LIGHT will flash (indicating that the program is
being executed).
DURATION CONSUMPTION
PROGRAMME,
NUMBER & SYMBOL
LOAD CROCKERY
AND CUTLERY
PROGRAM
PROGRESS MINUTES
(2)
WATER
LITRES (1)
POWER
KWh (2)
1SOAK
Pans and dishes
awaiting
a further wash
Cold prewash 9' 5_
2DELICATE
Wash immediately
after use for dishes
with light dirt
Wash at 45°C
Cold rinse
Rinse at 68°C
Dry
59' 12 0,90
3ECO (*)
EN 50242
Wash immediately
after use for dishes
with normal dirt
Wash at 50°C
Cold rinse
Rinse at 65°C
Dry
125' 14 0,95
4NORMAL Dishes
with normal dirt
Cold prewash
Wash at 65°C
Cold rinse
Rinse at 68°C
Dry
82' 17 1,25
5INTENSIVE Very dirty pans and
dishes (except
delicate items)
Prewash at 45°C
Wash at 70°C
2 cold rinses
Rinse at 70°C
Dry
105' 20 1,50
Only run the soak program with half loads.
(*) Reference program as per EN 50242 standard.
(–) Not present.
(1) Average power consumption with the softener set on level 2.
(2) The cycle duration and power consumption may vary according to the water and room
temperatures, and the type and amount of dishes.

User instructions
The washing cycle will not take place if the dishwasher door is left open
or not properly closed.
TABLE FOR CERTIFICATION BODIES
Reference standard EN 50242
Reference program BIO / ECO
Load 9 place-settings
Type of detergent B
Amount of detergent 25 g
Rinse aid setting Depending on the model 3/4 or 4/6
1.2 Washing programs
Before starting a washing program make sure that:
•The water supply tap is open.
•The correct amount of detergent has been added to the
dispenser.
•The baskets have been correctly loaded.
•The spray arms are able to rotate freely and without
obstruction.
•The dishwasher door is securely closed.
CANCELLING THE CURRENT PROGRAM
•To cancel the currently selected program, open the door and hold
down the PROGRAM SELECTION (3) button for a few seconds
until the indicator lights for programs 4and 5illuminate
simultaneously (the word "end" is displayed on the window).
•Close the door.
•After approximately 1 minute the dishwasher will advance to the end
of cycle.
CHANGING THE PROGRAM
To change the program in progress, simply open the door and select a
new program. When the door is closed the dishwasher will automatically
select the new program.

User instructions
ADJUSTING THE WATER SOFTENING SYSTEM
The dishwasher is equipped with an device for the user to adjust the
water softening system according to the hardness of the water supply.
According to the machine model, the selector which acts on the
adjustment may be located:
•inside the plastic locking ring located on the right-hand side, inside
the dishwasher;
•inside the water softener, just below the cap.
Both allow for adjustment to 5settings.
WATER HARDNESS TABLE
WATER HARDNESS
German Degrees (°dH) French Degrees (°dF) SETTING
0 - 4 0 - 7 Setting N. 1 NO SALT
5 - 15 8 - 25 Setting N. 1
16 - 23 26 - 40 Setting N. 2
24 - 31 41 - 60 Setting N. 3
32 - 47 61 - 80 Setting N. 4
48 - 58 81 - 100 Setting N. 5
Contact your local water board for information on the hardness of your
water supply.

User instructions
TO SAVE ON ENERGY! … AND PROTECT THE ENVIRONMENT
•Always try to run the dishwasher fully loaded.
•Do not wash the dishes in running water.
•Use the washing program that is most appropriate for each type of
load.
•Do not carry out any preliminary rinsing.
•If available, connect the dishwasher to a hot water supply up to 60°C.
•When possible, disable the drying cycle and leave the door open at
the end of the washing cycle: the residual air and heat will dry the
dishes perfectly.
TO CUT DOWN ON DETERGENT CONSUMPTION! … AND PROTECT
THE ENVIRONMENT
The phosphates contained in dishwasher detergents are harmful to the
environment. To avoid using excessive amounts of detergent and to save
on electricity, observe the following:
•separate the more delicate items from dishes that are more resistant
to aggressive detergents and high temperatures;
•do not pour the detergent directly on the dishes.
If the door has to be opened while washing is in progress, the program
will be interrupted. The relative light will keep flashing and a beeper will
signal that the cycle has not been completed. You must wait about 1
minute before closing the door to restart the program. When the door is
closed the program will continue from where it was interrupted. This
operation should only be carried out if strictly necessary, because it
might cause problems in execution of the program.
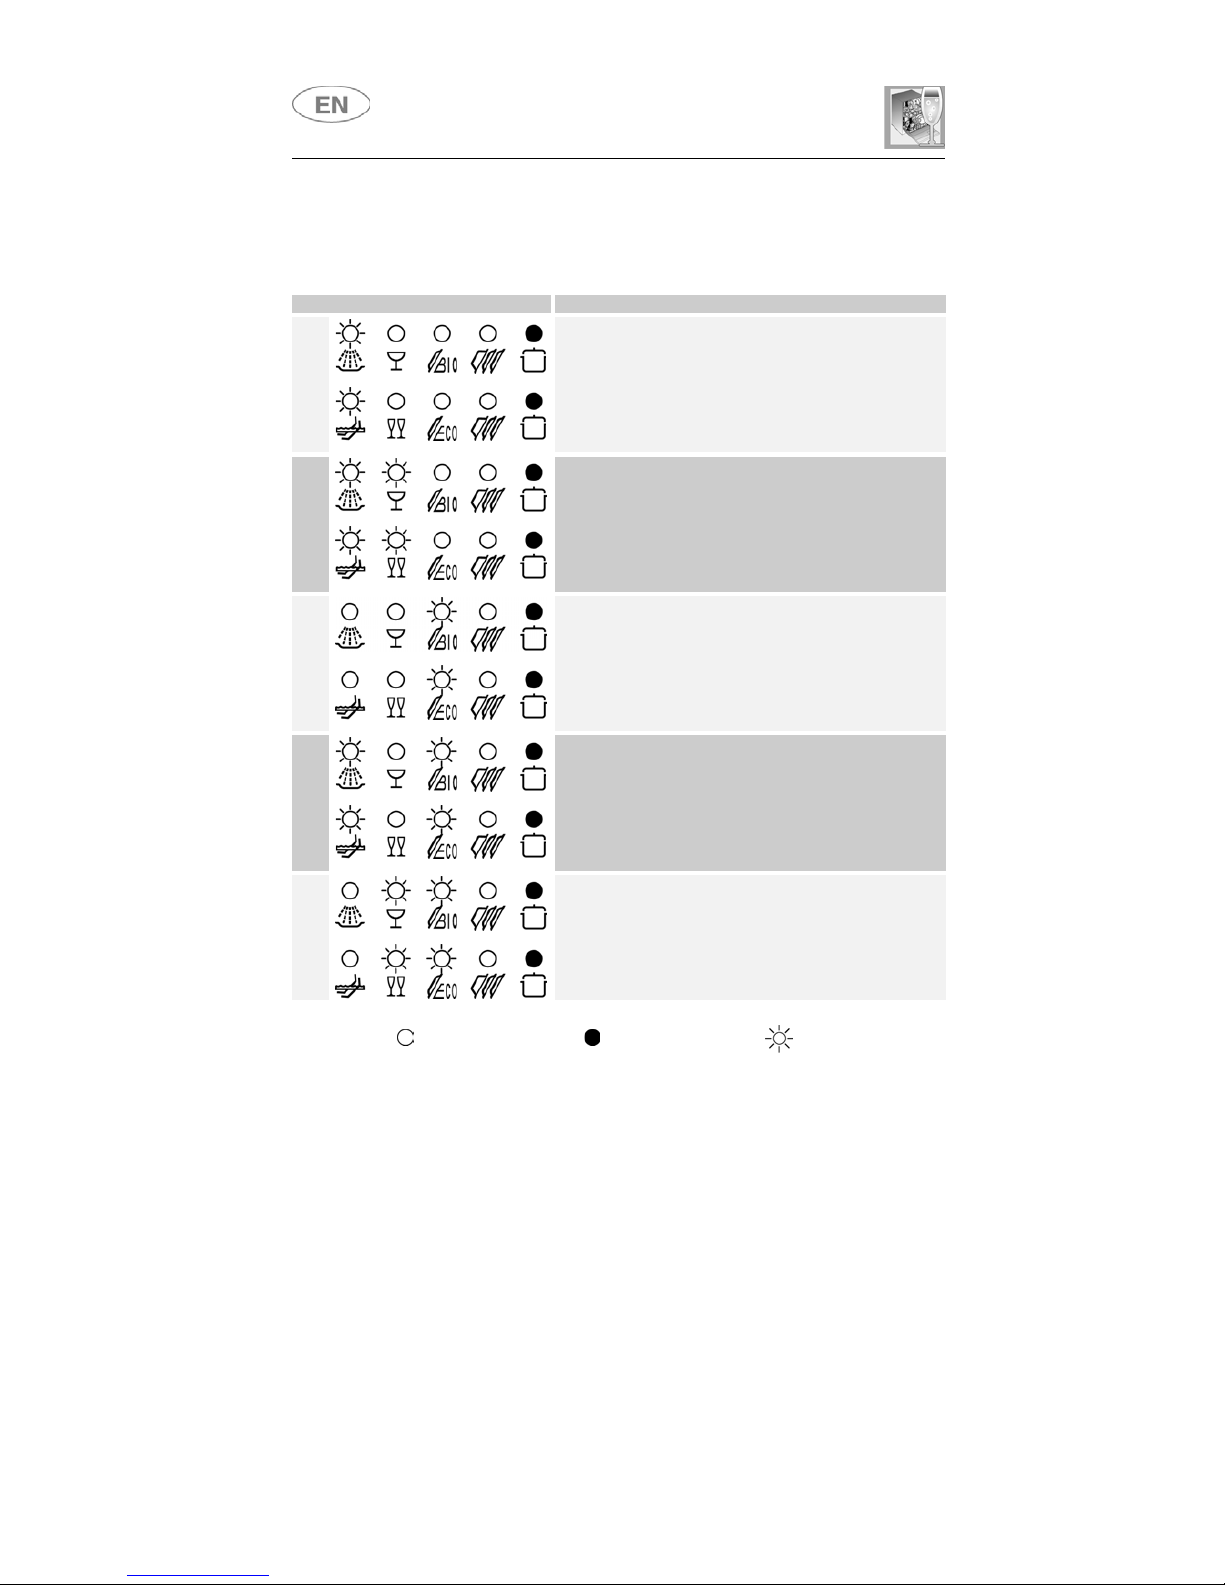
END OF CYCLE
At the end of the washing cycle the dishwasher
gives a short acustic signal and the program
indicators nr 4and 5start blinking (the word
"end" is displayed on the window).
To switch off the dishwasher, open the door
and press the ON/OFF button (1).
REMOVING THE DISHES
At the end of the washing program, wait at least 20 minutes before
removing the dishes, to allow them to cool down. To prevent any water
droplets on the upper basket from falling on the dishes in the lower
basket, it is advisable to unload the lower basket first, and then the
upper basket.

User instructions
2. Troubleshooting
The dishwasher is capable of signalling a number of faults through the
simultaneous illumination of several indicator lights, with the following
meanings:
FAULT DESCRIPTION
E1
Acquastop failure
The anti-flooding system has been activated (for the
relevant models only). The system is tripped in case
of water leaks. Contact the after-sales service.
E3
Water heating malfunction
The water is not heated or the heating parameters
are not correct. Repeat the washing program; if the
problem persists, contact the after-sales service.
E4
Water temperature monitoring malfunction
Interrupt the program and switch off the dishwasher.
Switch the dishwasher back on, program it again and
start the washing cycle. If the problem persists,
contact the after-sales service.
E5
Water intake malfunction
The appliance does not take in water or does not do
so correctly. Check that the water connections are
correct, the water intake tap is turned on and the filter
is not fouled. If the problem persists, contact the
after-sales service.
E6
Water pump-out malfunction
The appliance does not pump out the water or does
not do so correctly. Check that the drain hose is not
kinked or crushed and that the siphon and filter are
not fouled. If the problem persists, contact the after-
sales service.
Light off Light on Light flashing

User instructions
If an alarm occurs the appliance interrupts the program in progress and
signals a fault.
•Alarms
E1, E3, E4 interrupt the current program immediately.
•The
E5,E6 alarms interrupts the running program once the cause is
resolved, it will bring bach the execution of the program.
To “reset” an alarm is necessary:
•Open and close the door, or turn off and on the machine. At this
point is possible to program the dishwasher again.
If the malfunction persists, contact your authorised Service Centre.

INSTRUCTION MANUAL
W
WA
AR
RN
NI
IN
NG
GS
SA
AN
ND
DR
RE
EC
CO
OM
MM
ME
EN
ND
DA
AT
TI
IO
ON
NS
S,
,G
GU
UI
ID
DE
EF
FO
OR
RT
TH
HE
EU
US
SE
EO
OF
FB
BA
AS
SK
KE
ET
TS
S
A
AN
ND
DF
FO
OR
RC
CL
LE
EA
AN
NI
IN
NG
GD
DI
IS
SH
HW
WA
AS
SH
HE
ER
RS
S

Contents
1. Safety and operating instructions __________________________26
2. Installation and hook-up _________________________________29
3. Operating instructions ___________________________________31
4. Cleaning and maintenance _______________________________42
Thank you for choosing one of our products.
You are advised to read this manual carefully; it contains all the
information you need about the right conditions for the proper, safe use
of your dishwasher.
The individual sections are laid out to provide you with a step-by-step
guide to all your appliance's functions; the texts are easy to understand
and are complete with detailed illustrations.
Following the cleaning instructions provided here will keep your
dishwasher's performance at peak levels in the long term.
This user-friendly manual will provide answers to all your questions
about use of the dishwasher.
INSTALLATION INSTRUCTIONS: these are intended for the qualified
technician who must carry out the installation, hook-up and testing of
the appliance.
USER INSTRUCTIONS: useful advice is provided for the use of baskets,
spray arms, containers and filters.

Safety instructions
1. Safety and operating instructions
THIS MANUAL FORMS AN INTEGRAL PART OF THE APPLIANCE: IT MUST
ALWAYS BE KEPT INTACT TOGETHER WITH THE DISHWASHER. BEFORE
USING THE APPLIANCE, CAREFULLY READ ALL THE INSTRUCTIONS
CONTAINED IN THIS MANUAL.
INSTALLATION MUST BE PERFORMED BY A QUALIFIED TECHNICIAN, IN
COMPLIANCE WITH THE REGULATIONS IN FORCE. THIS APPLIANCE IS
INTENDED FOR DOMESTIC USE, AND COMPLIES WITH THE EEC
DIRECTIVES 72/23, 897336 (INCLUDING 92/31) CURRENTLY IN FORCE,
INCLUDING THE PREVENTION AND ELIMINATION OF RADIO FREQUENCY
INTERFERENCE.
THE APPLIANCE IS DESIGNED FOR THE FOLLOWING PURPOSE: WASHING
AND DRYING OF DISHES; ANY OTHER USE SHALL BE CONSIDERED
IMPROPER. THE MANUFACTURER DECLINES ALL RESPONSIBILITY FOR
USES OTHER THAN THOSE DESCRIBED ABOVE.
THE NAME PLATE FEATURING THE TECHNICAL DATA, SERIAL NUMBER
AND MARKINGS IS VISIBLY POSITIONED ON THE INNER EDGE OF THE
DOOR. THE NAME PLATE ON THE INNER EDGE OF THE DOOR MUST
NEVER BE REMOVED.
DO NOT LEAVE THE DISCARDED PACKAGING MATERIALS UNSUPERVISED
WITHIN THE HOME. SEPARATE THE VARIOUS MATERIALS WHICH MAKE
UP THE PACKAGING AND TAKE THEM TO THE NEAREST SORTED WASTE
COLLECTION CENTRE.
THE APPLIANCE MUST BE PROVIDED WITH AN EARTH CONNECTION IN
ACCORDANCE WITH THE ELECTRICAL SAFETY REGULATIONS IN FORCE.
THE MANUFACTURER DECLINES ALL RESPONSIBILITY FOR DAMAGE TO
PERSONS OR PROPERTY RESULTING FROM THE FAILURE TO EARTH THE
APPLIANCE OR FROM A DEFECTIVE EARTH CONNECTION.
THE POWER SUPPLY LEAD PLUG AND THE RELATIVE SOCKET MUST BE
OF THE SAME TYPE AND COMPLY WITH THE RELEVANT REGULATIONS.
CHECK THAT THE MAINS VOLTAGE AND FREQUENCY ARE THE SAME AS
THE VALUES MARKED ON THE NAMEPLATE. DO NOT USE ADAPTERS OR
SHUNTS. NEVER DISCONNECT THE PLUG BY PULLING ON THE POWER
SUPPLY LEAD.

Safety instructions
•AFTER INSTALLATION, THE PLUG MUST REMAIN ACCESSIBLE.
•IN THE EVENT OF DAMAGE TO THE POWER CORD, HAVE IT
REPLACED BY A QUALIFIED TECHNICIAN.
•AFTER CHANGING THE POWER CORD, MAKE SURE THAT THE
BRACKET WHICH SECURES THE CORD IS FIXED SECURELY IN
PLACE.
IF THE APPLIANCE IS INSTALLED ON A CARPETED OR COVERED FLOOR,
ENSURE THAT THE OPENINGS ON ITS UNDERSIDE ARE NOT
OBSTRUCTED.
ALWAYS SWITCH OFF THE DISHWASHER AFTER EACH USE TO AVOID
WASTING ELECTRICITY.
OBSOLETE APPLIANCES MUST BE RENDERED UNUSABLE. CUT OFF THE
MAINS POWER CORD AFTER UNPLUGGING IT FROM THE WALL OUTLET,
AND MAKE SAFE ANY COMPONENTS WHICH MIGHT BE DANGEROUS FOR
CHILDREN (LOCKS, DOORS, ETC.). THE APPLIANCE MUST THEN BE TAKEN
TO A SORTED WASTE COLLECTION CENTRE.
IN THE EVENT OF A FAULT, DISCONNECT THE DISHWASHER FROM THE
ELECTRICAL POWER SUPPLY AND SHUT OFF THE WATER TAP. THEN
CALL IN A QUALIFIED TECHNICIAN.
DO NOT USE APPLIANCES WHICH HAVE BEEN DAMAGED DURING
TRANSIT! IF IN DOUBT, CONSULT YOUR DEALER.
THE APPLIANCE MUST BE INSTALLED AND CONNECTED IN ACCORDANCE
WITH THE INSTRUCTIONS PROVIDED BY THE MANUFACTURER OR BY A
QUALIFIED TECHNICIAN.
THE APPLIANCE IS INTENDED FOR USE BY ADULTS. DO NOT ALLOW
CHILDREN TO COME NEAR OR PLAY WITH THE DISHWASHER. KEEP
CHILDREN AWAY FROM DETERGENTS AND FROM THE OPEN
DISHWASHER DOOR. THE PACKAGING MATERIALS (PLASTIC BAGS,
POLYSTYRENE, METAL BARS, ETC.) MUST NOT BE LEFT WITHIN THE
REACH OF CHILDREN.
KEEP CHILDREN AWAY FROM THE OPEN DISHWASHER. THE APPLIANCE
MAY CONTAIN RESIDUES OF DETERGENT WHICH CAN CAUSE
IRREVERSIBLE DAMAGE TO THE EYES, MOUTH, AND THROAT, AS WELL
AS POSSIBLE DEATH BY SUFFOCATION.
DO NOT INTRODUCE SOLVENTS SUCH AS ALCOHOL OR TURPENTINE
WHICH MAY CAUSE AN EXPLOSION.
DO NOT LOAD DISHES THAT ARE SOILED WITH ASH, WAX OR PAINTS.

Safety instructions
LEANING OR SITTING ON THE DISHWASHER DOOR WHEN OPEN MAY
CAUSE THE APPLIANCE TO OVERTURN, PUTING PEOPLE AT RISK.
DO NOT DRINK THE WATER RESIDUES WHICH MAY BE PRESENT INSIDE
THE DISHES OR DISHWASHER AT THE END OF THE WASHING PROGRAM
AND BEFORE THE DRYING CYCLE.
KNIVES OR OTHER SHARP-ENDED COOKING UTENSILS MUST BE PLACED
IN THE CUTLERY BASKET BLADE-DOWN, OR LAID HORIZONTAL IN THE
TOP BASKET. TAKE CARE NOT TO CUT YOURSELF AND ENSURE THAT
THEY DO NOT PROJECT FROM THE BASKET.
AQUASTOP MODELS
THE AQUASTOP DEVICE PREVENTS FLOODING IN THE EVENT OF A
WATER LEAK. WHEN THE AQUASTOP DEVICE IS TRIPPED, CALL IN A
QUALIFIED TECHNICIAN TO IDENTIFY AND REPAIR THE FAULT.
IN MODELS EQUIPPED WITH THE AQUSTOP DEVICE, THERE IS A
SOLENOID VALVE INSIDE THE WATER INTAKE HOSE. DO NOT CUT THE
HOSE AND DO NOT ALLOW THE SOLENOID VALVE TO DROP INTO
WATER. IN THE EVENT OF DAMAGE TO THE WATER INTAKE HOSE,
DISCONNECT THE APPLIANCE FROM THE ELECTRICAL POWER SUPPLY
AND FROM THE WATER SUPPLY.
IMMEDIATELY AFTER INSTALLING THE DISHWASHER, PERFORM A QUICK
TEST OF THE APPLIANCE FOLLOWING THE INSTRUCTIONS BELOW. IF
THE DISHWASHER FAILS TO OPERATE CORRECTLY, DISCONNECT IT
FROM THE ELECTRICAL POWER SUPPLY AND CALL THE NEAREST
TECHNICAL SERVICE CENTRE. DO NOT ATTEMPT TO REPAIR THE
APPLIANCE.
THE DISHWASHER MEETS ALL THE REQUIREMENTS SET OUT BY THE
REGULATIONS IN FORCE CONCERNING SAFETY AND ELECTRICAL
EQUIPMENT. ANY TECHNICAL CHECKS SHOULD BE CONDUCTED
EXCLUSIVELY BY A TRAINED AND AUTHORISED TECHNICIAN: REPAIRS
CARRIED OUT BY UNAUTHORISED PERSONS WILL INVALIDATE THE
WARRANTY, AS WELL AS POSING A POTENTIAL HAZARD TO THE USER.
The manufacturer declines all responsibility for damage to persons or property
resulting from failure to observe the above precautions, from tampering with
even a single component of the appliance, or from the use of non original
spare parts.

Installation instructions
2. Installation and hook-up
Remove the polystyrene basket retainers. Position the appliance in the
desired place of installation. The back or sides of the dishwasher may be
placed up against walls or other furniture units. If the dishwasher is
installed near a heat source, fit the special insulating panel to prevent
overheating and malfunction of the appliance. To ensure stability, install
integrated or built-under dishwashers only under continuous worktops,
and screw them to the adjacent units. To facilitate the installation
procedure, the intake and drain hoses can be positioned in any direction;
make sure that the hoses are not kinked, crushed or pulled too tightly.
Make sure to tighten the locking ring-nut once the pipes have been
placed in the direction required. A hole at least 8 cm in diameter is
required to allow the power supply cable and pipes to pass.
Level the appliance on the floor using its adjustable feet. This operation
is essential for ensuring correct operation of the dishwasher.
Installing a hob on top of a free-standing dishwasher is absolutely
forbidden. Building-in a dishwasher underneath a ceramic hob is
absolutely forbidden.
A dishwasher can be built-in underneath a conventional hob provided
there is no break in the kitchen worktop, and the dishwasher and hob
are installed and secured correctly, so that no hazards are
generated.
For free-standing models only: if the appliance is not built-in and is
therefore accessible on one side, the door hinge area must be covered
for safety reasons (injury hazard).
The covering fixtures are available as an accessory from specialist
dealers or the After-Sales Service.
Some models are equipped with only one adjustable foot at the rear,
which can be adjusted by turning the screw on the lower front part of the
appliance.
2.1 Water supply connection
Preventing the risk of clogging or damage: if the water pipe is new or
has not been used for a long time, before connecting to the water supply
check that the water is clear and free of impurities, to prevent damage to
the appliance.
The dishwasher must always be connected to the water system
with new hoses; old or used hoses must never be reused.

Installation instructions
CONNECTING TO THE WATER SUPPLY
Connect the intake hose to a cold water supply with ¾”
gas thread, inserting the filter Asupplied with the
dishwasher. Take care to screw the hose firmly into
place with your hands and then complete by
tightening about ¼ of a turn with pliers.
In dishwashers equipped with the ACQUASTOP
device, the filters is already fitted inside the threaded
ring.
The dishwasher can also be connected to a hot water supply not
exceeding 60°C. Supplying the appliance with hot water cuts down the
washing time by approximately 20 minutes, but slightly reduces its
effectiveness. Make the connection to the domestic hot water supply using
the same procedure described for connecting to the cold water supply.
DRAIN CONNECTION
Insert the dishwasher’s drain hose
into a drain pipe having a diameter
of at least 4 cm, or alternatively,
place it inside the kitchen sink
using the plastic support provided,
taking care not to crush or
excessively bend the hose. It is
important to prevent the hose from
coming loose and falling. For this
purpose, the plastic support is
equipped with a hole for tying it to
the wall or water tap.
The free end should be positioned at a height of between 30 and 100
cm, and should never be submerged in water. If a horizontal drain
extension hose is used (for a maximum of 3 m) the drain hose can be
placed at a maximum height of 85 cm from the ground.
2.2 Electrical connection
Plug the power cord into a suitable electrical outlet, according to the
instructions given in chapter "1. Safety and operating instructions".

User instructions
3. Operating instructions
Once the dishwasher has been correctly installed, prepare for use as
follows:
•Adjust the water softening system;
•Add the regenerating salt;
•Add the rinse aid and detergent.
3.1 Using the water softening system
The amount of scale contained in the
water (water hardness index) can cause
whitish staining on the dry dishes, which
tend to become dull over time. The
dishwasher is equipped with an automatic
softening system which uses a special
regenerating salt to reduce the hardness
of the water.
The dishwasher is factory set for water
hardness level 3(average hardness
41-60°dF –24-31°dH).
When using water of medium hardness, the regenerating salt container
should be refilled after approximately 20 washing cycles. The salt
container can hold approximately 1.5 Kg of salt in grains. Some models
are equipped with an optical no-salt indicator. In these models, the cap
of the salt container contains a green float which descends as the salt
concentration in the water drops. When the green float can no longer be
seen through the transparent cap, the container must be topped up with
regenerating salt. The container is situated at the bottom of the
dishwasher. After removing the lower basket, unscrew the salt container
cap by turning it anticlockwise and pour in the salt using the funnel
supplied with the dishwasher. Before replacing the cap, remove any salt
residues from around the opening.
•When using the dishwasher for the first time, in addition to the salt it
is also necessary to add one litre of water to the container.
•Each time the salt container is refilled, make sure that the cap is
securely closed. The mixture of water and detergent must never
penetrate the salt container, as this would compromise the operation
of the regeneration system. In the event of this occurring, the
warranty will be invalidated.
•Only use regenerating salt specially formulated for domestic
dishwashers. If using salt tablets, do not fill the container
completely.
SALT

User instructions
•Do not use table salt as it contains insoluble substances which,
over time, may damage the water softening system.
•When necessary, refill the regenerating salt container before
starting the washing program. In this way, the excess saline
solution will be immediately removed by the water; the prolonged
presence of salt water inside the tank may lead to corrosion.
Be careful not to confuse the salt and detergent packages; adding
detergent to the salt container will damage the water softening system.
3.2 Using the rinse aid and detergent dispensers
The detergent and rinse aid
dispensers are situated on the inner
part of the door: the detergent
dispenser is on the left, and the rinse
aid dispenser is on the right.
With the exception of the SOAK program, before every washing cycle it
is necessary to add the required amount of detergent to the detergent
dispenser. The rinse aid, on the other hand, should only be added as
required.

User instructions
ADDING THE RINSE AID
The rinse aid helps the dishes dry faster and
prevents the formation of scale deposits and
staining; it is automatically added to the water
during the final rinse cycle, from the container
situated on the inner side of the door.
To add rinse aid:
•Open the door.
•Rotate the container cap anticlockwise by ¼ of a turn and remove it.
•Add the rinse aid until the container is full (approximately 140 cc).
The optical level indicator on the side of the cap should be
completely obscured. Refill the rinse aid when the optical level
indicator becomes clear again, or when the rinse aid warning light
illuminates.
•Replace the cover and turn it in a clockwise direction.
•Use a cloth to remove any spillage of rinse aid which might lead to
the formation of excess foam.
ADJUSTING THE RINSE AID DISPENSER SETTING
The dishwasher is factory set for medium water hardness. However it
possible to change the setting by turning the dispenser’s selector to the
desired position: the amount of rinse aid dispensed is proportional to the
selector position.
The setting must be increased when the washed dishes appear dull or
have circular staining.
•To adjust the rinse aid setting, rotate the dispenser cap through a
quarter turn in an anticlockwise direction and remove it.
•Then use a screwdriver to rotate the rinse aid selector to the desired
position.
•Replace the cap, turning it clockwise.
•The amount of rinse aid must be increased if the washed dishes
appear dull or feature circular stains.
•If, on the other hand, the dishes are sticky or have white streaks, it
is necessary to reduce the rinse aid setting.
This manual suits for next models
2
Table of contents
Other Smeg Dishwasher manuals
Popular Dishwasher manuals by other brands

Fisher & Paykel
Fisher & Paykel DishDrawer DD603HDishDrawer DD603I parts manual

Benton Harbor
Benton Harbor Direct wire Models installation instructions

Haier
Haier DW12-EBM 1S owner's manual

Insinger
Insinger Commander 18-6 Technical manual

Gorenje
Gorenje GV30.1 operating instructions

Electrolux
Electrolux GA55GLIBR user manual