Smith Corona PWP System 14 User manual

SMITH
CORONIK
PWPSystem
14
PersonalWordProcessor

©SmithCorona1986

Thefollowinginformation
is
provided
to
youinaccordancewiththerulesandregulations
of
theUnitedStatesFederalCommunicationsCommission.Questionsconcerningthisinformation
canbedirectedtoSmithCoronabywritingorcalling:
SmithCorona
839Route
13
South
Box2020
Cortland,
NY
13045
Toll-freenumber1-800-448-1018
N.Y.
Toll-freenumber1-800-962-3000
NOTE:
Thisequipmentgeneratesandusesradiofrequencyenergyandifnotinstalledand
usedproperly,that
is,
instrictaccordancewiththemanufacturer'sinstructions,maycause
interferencetoradioandtelevisionreception.Ithasbeentypetestedandfoundtocomply
withthelimitsfora Class
B
computingdeviceinaccordancewiththespecificationsinSub-part
JofPart
15
of
FCC
rules,whicharedesignedtoprovidereasonableprotectionagainstsuch
interferenceina residentialinstallation.However,thereisnoguaranteethatinterferencewill
notoccurina particularinstallation.Ifthisequipmentdoescauseinterferencetoradioor
televisionreception,whichcanbedeterminedbyturningtheequipmentoffandon,theuseris
encouragedtotrytocorrecttheinterferencebyoneormoreofthefollowingmeasures:
Reorientthereceivingantenna.
Movethe
PWP
Systemawayfromthereceiver.
Plugthe
PWP
Systemintoa differentoutletsothatsystemandreceiverareondifferent branch
circuits.
If necessary,theusershouldconsultthedealeroranexperiencedradio/televisiontechnician
foradditionalsuggestions.TheusermayfindthefollowingbookletpreparedbytheFederal
CommunicationsCommissionhelpful.
"HowtoIdentifyandResolveRadio-TVInterferenceProblems"
This
bookletisavailablefromthe
U.S.
GovernmentPrintingOffice,Washington,
D.C.
20402Stock
No.
004-00-00345-4.
Foryourconvenienceandprotection,makea recordofthemodelnameandserialnumber.
Theserialnumber
is
locatedon the bottomofthe
PWP
Module.
Usethemwhenordering
suppliesandaccessoriesandforidentificationincaseoftheft.
ModelName
PWPSYSTEM
14
SerialNumber
DateofPurchase
TableofContents
Page
ProductDiagram 4
Spell-Right™. 6
Find 6
List 7
ProgrammableWords 7
Word-Right™AutoSpell 7
Section
I:
GettingStarted 8
SettingUp 8
Tutorial 9
HowtoStartTyping10
HowtoMakeCorrections11
HowtoPrintYourText11
Inserting
A
MicroDisk12
Preparing
A
MicroDisk12
How
To
StoreYourText13
Ejecting
A
MicroDisk13
ClearingMemory14
WP/TYPEKey15
Section
II:
GettingMoreInvolved15
Memory15
CursorControlKeys15
SettingMargins/Tabs/Format16
MarginsandTabs16
CarrierMovementtoAssist When SettingMargins/Tabs17
Pitch18
LineSpacing18
EnteringMargin/Tab/Format ChangesBEFORETyping18
EnteringMargin/Tab/Format ChangesAFTERTyping18
AddingTabsDuringTyping18
AutomaticPagination19
TopMargin,BottomMargin,PaperLength19
ActivatingAutomaticPagination20
RequiredPageEnd21
RequiredReturn21
ManualReturn21
MoreAboutPrinting22
PrintingIndividualPages22
RightMarginJustification22
AutomaticPageNumbering23
EnteringPrintingInstructions24
MoreAboutStoring24
WriteProtection24
MicroDiskDirectory25
How
To
RecallDocumentsFroma MicroDisk25
How
To
EraseDocumentsFroma MicroDisk26

Section
III:
Editing27
Search/SearchandReplace27
Delete/Character29
Delete/CarrierReturnSymbol29
Delete Word 29
BlockDelete30
BlockMove30
BlockCopy31
Insert32
ReformatAfterEditing32
ReplacingAnOriginalDocumentonMicroDiskwiththeEditedVersion33
Section
IV:
MailingList/Merge34
SettingUpToMerge35
How
To
Create
A
MailingList35
How
To
PrinttheMailingListOnly40
How
To
CreateA BasicLetter40
How
To
PrintA BasicLetterOnly41
Merging41
How
To
MergetheMailingLista ndBasicLetter41
EditingtheMailingList44
How
To
Edit
ID
labelsandVariableInformation44
How
To
AddFramestotheMailingList45
How
To
InsertFramesintheMailingList45
How
To
EraseFramesfromtheMailingList47
ErasinganEntireMailingList47
Duplicating
A
MailingList47
EditingandErasingA BasicLetter48
PrintingEnvelopes48
How
To
PrintEnvelopesfromtheMailingList48
Section
V:
MoreFeaturesandFunctions49
StopCode49
PageIndicator49
LineCounter50
AutoReturnIndicator50
MemoryRemaining50
PrintingPartialPages50
Storing Formats 50
UsingtheIndexand ReverseIndexKeys51
KeyboardIICharacters51
ErrorMessages51
WordProcessingTipsa n dRecommendations52
Section
VI:
EnchancedTypewriterFeatureInstructions53
MonitorControls57
Supplies58
SafeOperatingRecommendations58
CareandMaintenance59
RepackingInstructions59
Warranty60
Index61
QuickReferenceGuideBackCover
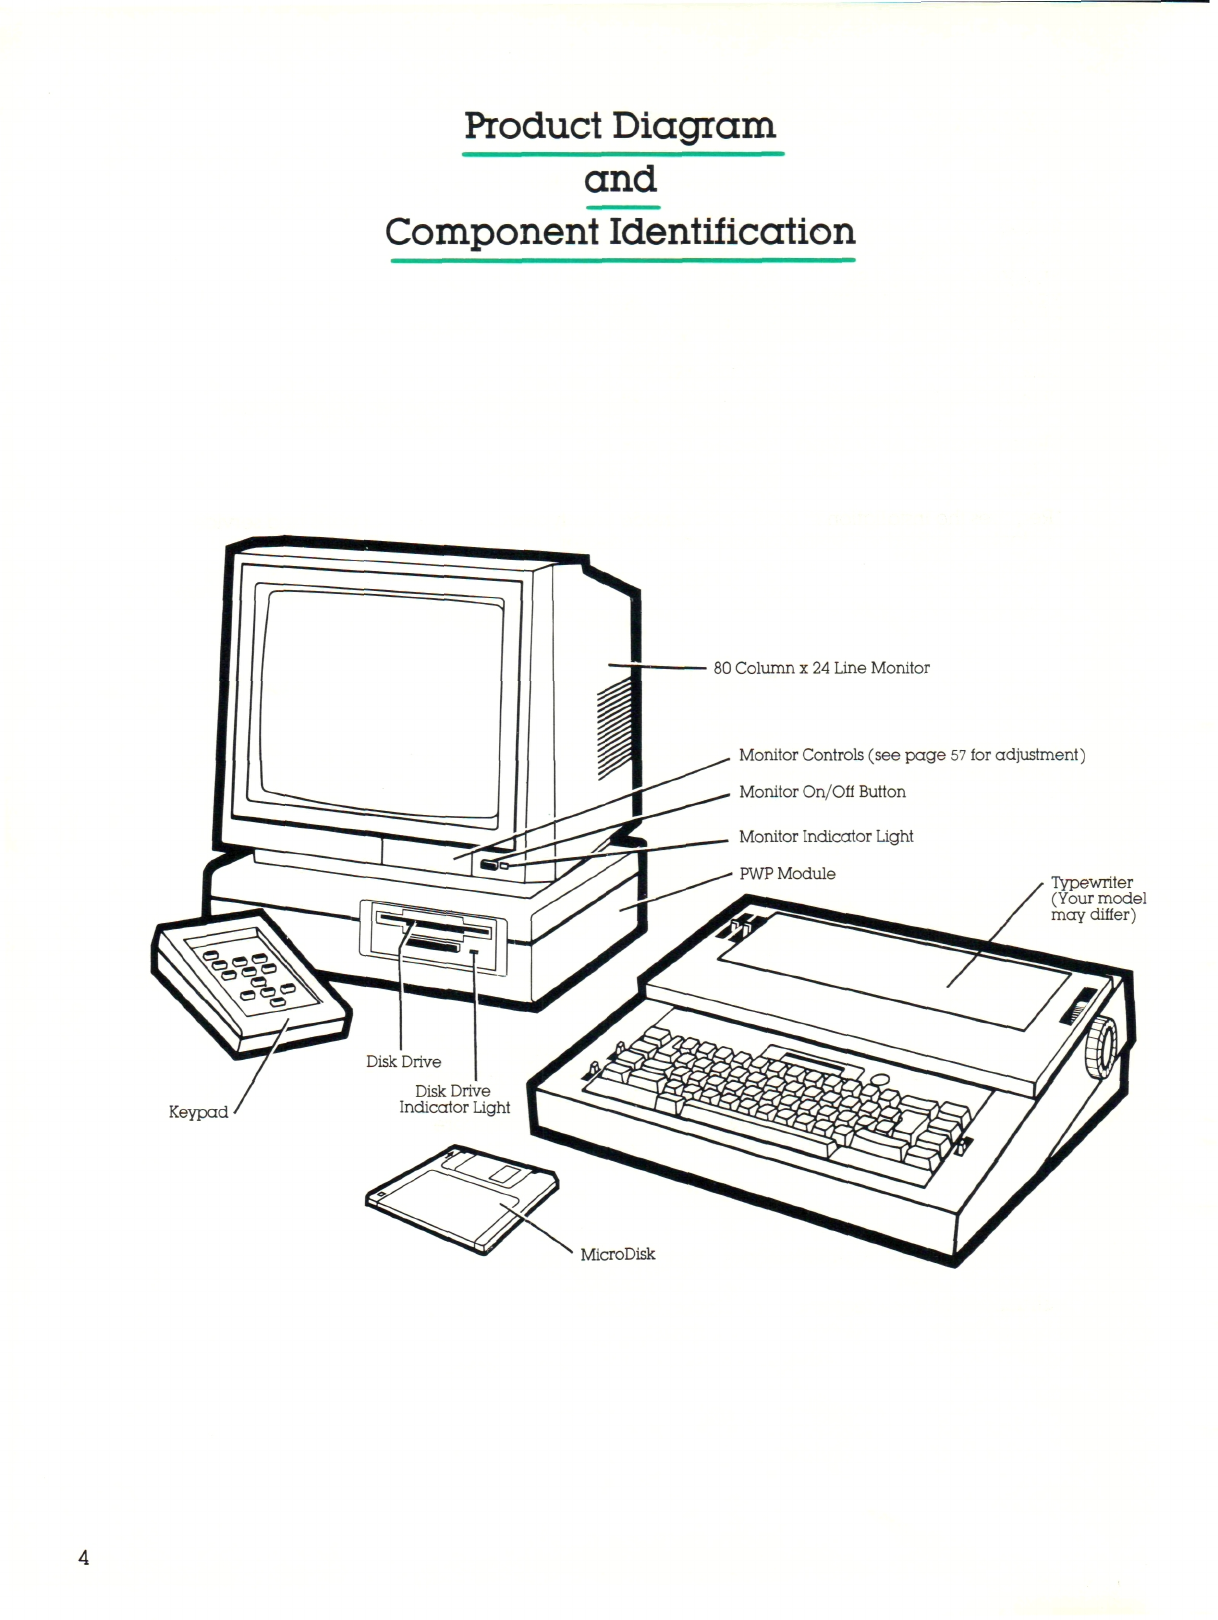
ProductDiagram
and
ComponentIdentification
Keypad
80 Columnx 24LineMonitor
MonitorControls(seepage
57
tor adjustment)
MonitorOn/OffButton
Typewriter
(Yourmodel
maydiffer)
Important—PleaseRead
TheSmithCoronaPersonalWordProcessor
is
compatiblewithanySmithCorona
manufactured portableelectronictypewriterwithinterfacecapability.Thesemodelsareas
follows:
XD8000
XD6500
XE6100
SD400
SD250
SC210
DeVille210
MarkIISR
Mark
VII
SR
XD7000
XE6000
SD300
SE200
MarkII
DeVille200
SterlingElectronic
II**
DeVilleIIIMessenger
sir
Ultrasonic450MessengerMemoryCorrect400MessengerCitation300Messenger
Ultrasonic350MessengerMemoryCorrect300MessengerCitationIIIMessenger
Ultrasonic
250*
MemoryCorrect200*
UltrasonicIIIMessengerMemoryCorrectIIIMessenger
Ultrasonic
III*
MemorycorrectIII*
'Requirestheinstallationofcomponentsinsideyourtypewriter.Forcostofpartsandservice,
contactanAuthorizedSmithCoronaservicingdealerora SmithCoronaservicecenter.
*"OwnersofthismodelshouldcontactSmithCoronaConsumerAffairsDepartmenttollfree1-
800-448-1018
(N.Y.
toll-freenumber
1-800-962-3000)
forfurtherinstructionsonconnectingPWP
to thistypewriter.
Whenconnectedtothe
PWP,
someoftheenhancedtypewriterfeaturesoperatedifferently
thanwhenusingyourtypewriteralone.RefertotheinstructionsinSection
VI
whenusing
your
PWP.
If
youareusingthe
SD
250,
SC
210,
DeVille210,
SD
300,
SE
200,
Mark
II,
DeVille200orSterling
ElectronicIISmithCoronaportabletypewriterwithyourPersonalWordProcessor,thefollowing
typingfeaturesareavailablewhenconnectedtothe
PWP,
inadditiontothosecurrentlyon
yourtypewriter.
SC
210,DeVille210,
SE
200,
Mark
II,
DeVille200and
SD250SterlingElectronicIISD300
TabCenterDecimalTabTabCenter
FlushRightTab ParagraphIndent
If youareusinganyofthefollowingSmithCoronaportabletypewriterswithyourPersonal
WordProcessor, all oftheenhancedtypingfeatureslistedbelowareavailablewhen
connectedtothePWP.
Models Features
MemoryCorrectIII ParagraphIndent
MemoryCorrectIIIMessengerAutoCenter
MemoryCorrect200AutoUnderscore
MemoryCorrect300MessengerTabCenter
UltrasonicIIIDecimalTab
Ultrasonic250FlushRightTab
CitationIIIMessenger
Citation300Messenger
DeVille
III
Messenger
SII
InstructionsforthesefeaturesareincludedinSecion
VI
ofthismanual.
For
yourconvenience,wehaveincludedanoverlaytobeaffixedtothesetypewriters
whichidentifiestheappropriatekeystoactivatetheaddedtypingfeatures.

OwnersofTypewriterModelswitha Spell-Right
ElectronicDictionary
LetSpell-RightProofreadFor
You!
Youcanusethe
FIND
featureto"proof-read"documentstypedonthePersonalWord
Processor.
We recommendthatyou type yourentiredocumentwithoutregardtoerrors,thenactivate
FIND
tolocateerrorsthroughouttheentire
text.
Youca nactivate
FIND
whenyouhave
completedtypinga documenttofinderrorsbackwardtothebeginningofyourtext,oryou
canactivate
FIND
withyourCURSORatthebeginningofyourtextanderrorswillbeidentified
forwardfromthebeginningofthedocumenttotheend.
Example1: CURSOR
is
here
Activate
FIND.
TheCURSORbacksupthroughthetexttothefirsterroritfinds.Continueto
depress
CODE+ F
tolocateallerrorstothebeginningofyourtext.
CURSORishere-
Example2:
Activate
FIND.
TheCURSORmovesforwardthroughthetexttothefirsterroritfinds.Continueto
depressCODE
+ F
tolocate all errorstotheendofyourtext.
Whenconnectedto
PWP,
Spell-Rightwillnotcheckhyphenatedwordsoccurringattheend
of
alineandcontinuedonthenextline.
NOTE:
When
PWP14is
connectedtoanySmithCoronaSpell-Rightmodel,thedictionaryis
automaticallyON.

OwnersofTypewriterModelswitha Display...
UsetheSpell-Right
LIST
Featurewithyoui
PWP.
If
yourtypewriterhasSpell-Rightanda display,youcanusethe
LIST
featurewithyourPersonal
WordProcessor.
LIST
functionsexactlylikeitdoeswithyourtypewriteralone.Whenthecorrectwordis
displayed,depressthe
RETURNKEY
totransferthewordtothe
PWP
Screen,Seeyourtypewriter
instructionmanualforfurtherinformation.
ProgramAdditionalWords
Youca nalsoaddspecializedwordstotheUserProgrammableSectionofthedictionarywhen
usingthePersonalWordProcessor.Thesewouldbeoften-usedwordsnotfoundintheSpell-
Rightdictionary,suchasmedicalortechnicalterms,names,foreign
words,
etc.
WordscanbeenteredintheUserProgrammableSectionofthedictionaryinthreeways.
Depressand
HOLD
theCODE
KEY
whiledepressingthe
"E"
KEY:
1.
Aftera wordhasbeen"beeped"identifyingitasan"error."
2.
Afterthe
FIND
featurehaslocateda wordeventhoughitisspelledcorrectly.
3.
Aftertypinga wordyouwishtoenter.
Seeyourtypewriterinstructionmanualforfurtherinformation.
OwnersofTypewriterModelswithWord-Right™
AutoSpell *
••i
If
yourtypewriterfeaturesSmithCorona'sexclusiveWord-Right™AutoSpellfeature,correctly
spelledalternativewordscanbetransferredfromthetypewriterdisplaytothe
PWP.
AutoSpell
functionsexactlylikeitdoeswithyourtypewriteralone.Whenthecorrectwordisdisplayed,
depresstheReturn/ENTER
KEY
totransferthewordtothe
PWP
screen.Forexample:
1.
WhenSpell-Rightalertsyoutoa typingerror,finishtypingtheincorrectword(ifyou
haven'talready).Donotspaceaftertheword.Iftheerror
is
furtherbackintext,activate
FIND
tolocatetheincorrectword.
2.
DepresstheAutoSpell
KEY.
Thefirstpossiblecorrectspellingisshownonyourtypewriter's
display.Depressthe
INDEXKEY
toviewotheralternative
words.
DepresstheREVERSE
INDEXKEY
toreturntopriordisplayedwords.
3.
Whenthecorrectwordisdisplayed,depresstheReturn/ENTER
KEY.
Theincorrectwordis
erasedandtheselectedwordisenteredinitsplaceonthe
PWP
screen.
Seeyourtypewriterinstructionmanualforfurtherinformation.
Section
I:
GettingStarted
Throughoutthisinstructionmanualweusetheword
"text"
whenreferringtotypedwords
enteredinthebuilt-inmemory.Thereareover65,000charactersofbuilt-inmemory—or
approximately
32
pagesofdouble-spaced
text.
Weusetheword"document"whenreferring
to textstoredtoa MicroDisk.EachSmithCoronaMicroDiskcanstore163,000characters
of
text—orapproximately
81
pagesofdouble-spacedtext.
Settingup
Your
Personal
Word
Processor
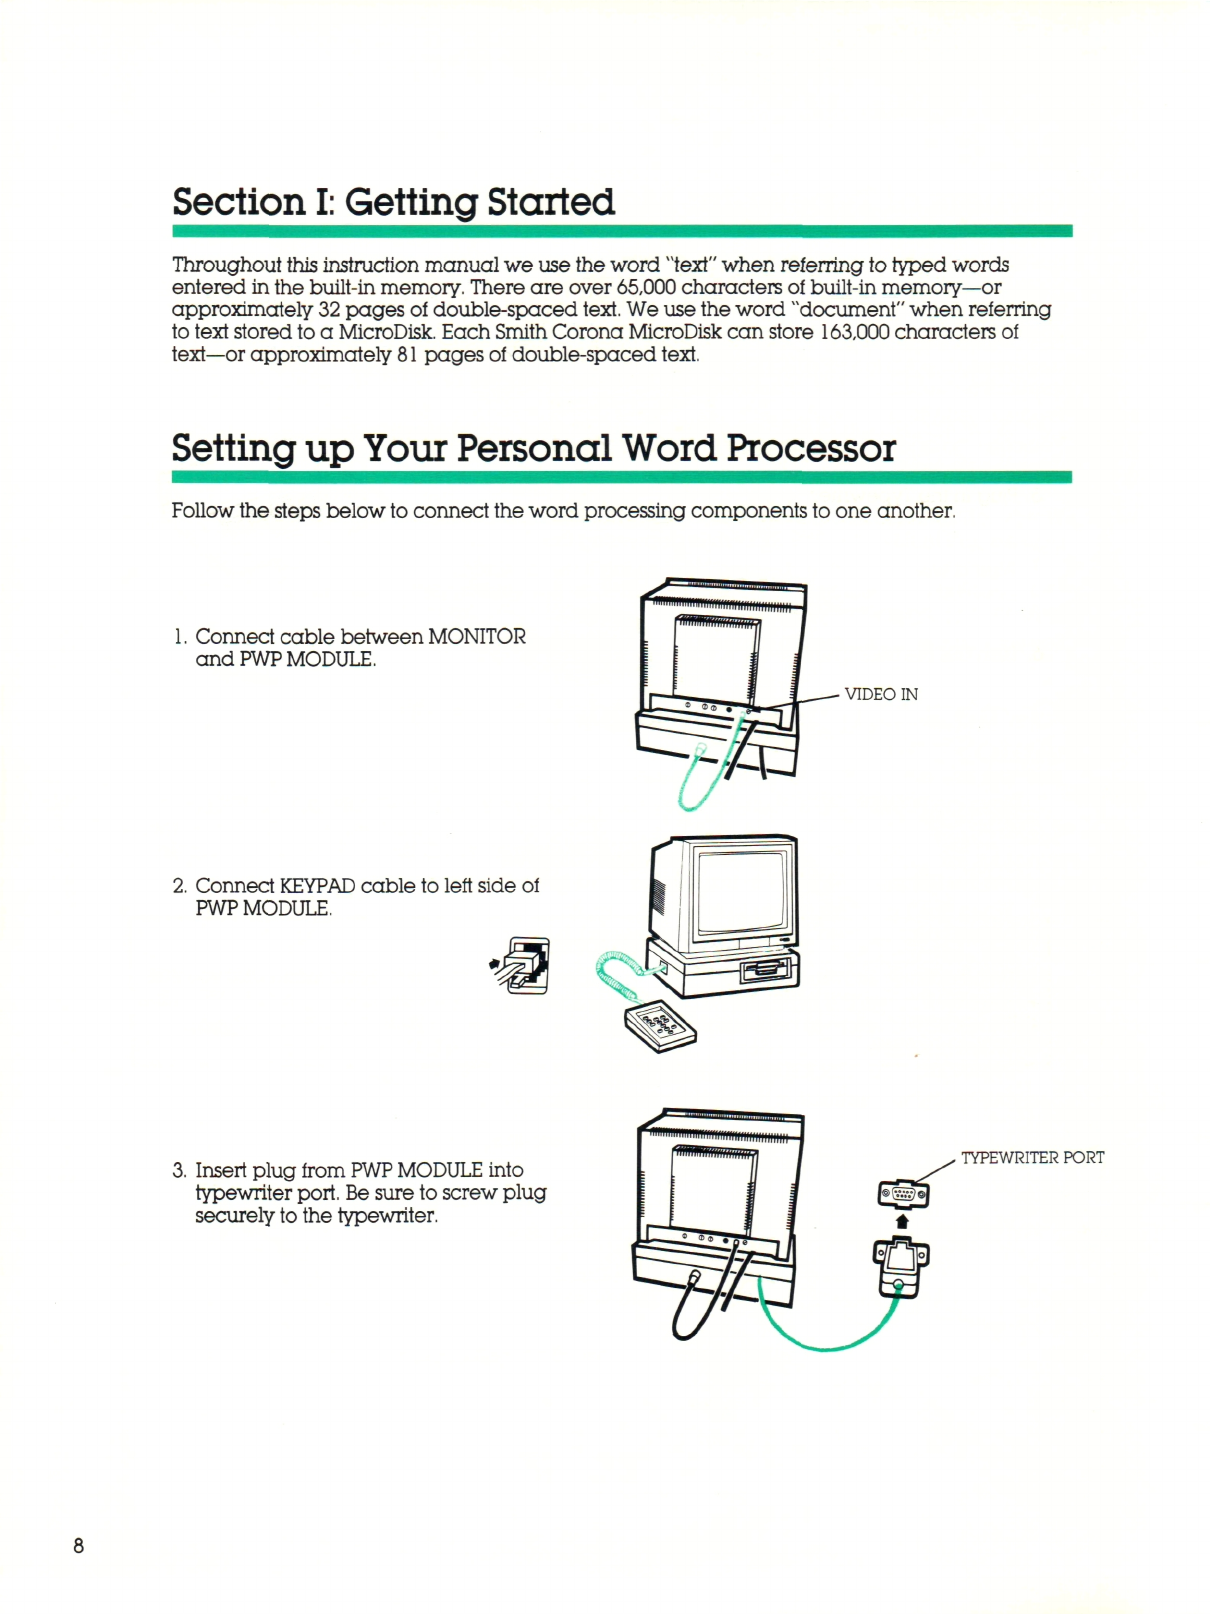
Followthestepsbelow
to
connectthewordprocessingcomponentstooneanother.
1.
ConnectcablebetweenMONITOR
and
PWP
MODULE.
2.
Connect
KEYPAD
cabletoleftsideof
PWP
MODULE.
VIDEOIN
3.
Insertplugfrom
PWPMODULE
into
typewriterport.Besuretoscrewplug
securelytothetypewriter.
TYPEWRITERPORT

4.
PlugintheMONITOR.
5.
PlugintheTypewriter.
6. TurnONtheMONITOR.
'ON/OFBUTTON
MovethePOWERSWITCHonthetypewriterto
ON.
Move
KEYBOARD
ON/OFFLEVER(on
applicablemodels)to
ON.
MoveMODESELECTOR(onapplicablemodels)to
TYPE
position.
Fora fewsecondsyouwillseetheSmithCoronalogoontheSCREEN,followedbythemain
MENU.
Tutorial
If this
is
thefirsttimeyou are usingyourPersonalWordProcessor,werecommendthatyoufirst
go throughtheTutorialwhichwehavestoredtotheMicroDisksuppliedwithyour
PWP.
Thisis a
quickandeasymethodtofamiliarizeyouwiththesystembeforeyoucontinuewiththe
instructionmanual.
HowtoStartTypingonyour
FWP
It'seasytostartusingyour
PWP.
Aftersettingupandturningonyoursystem,youseea list
of
actionchoicesonyour
SCREEN.
Wecallthisthe
MENU
asitlistsalltheactionsyou can perform
withyourPersonalWordProcessor.Youchoosetheoneyouwantbydepressingthe
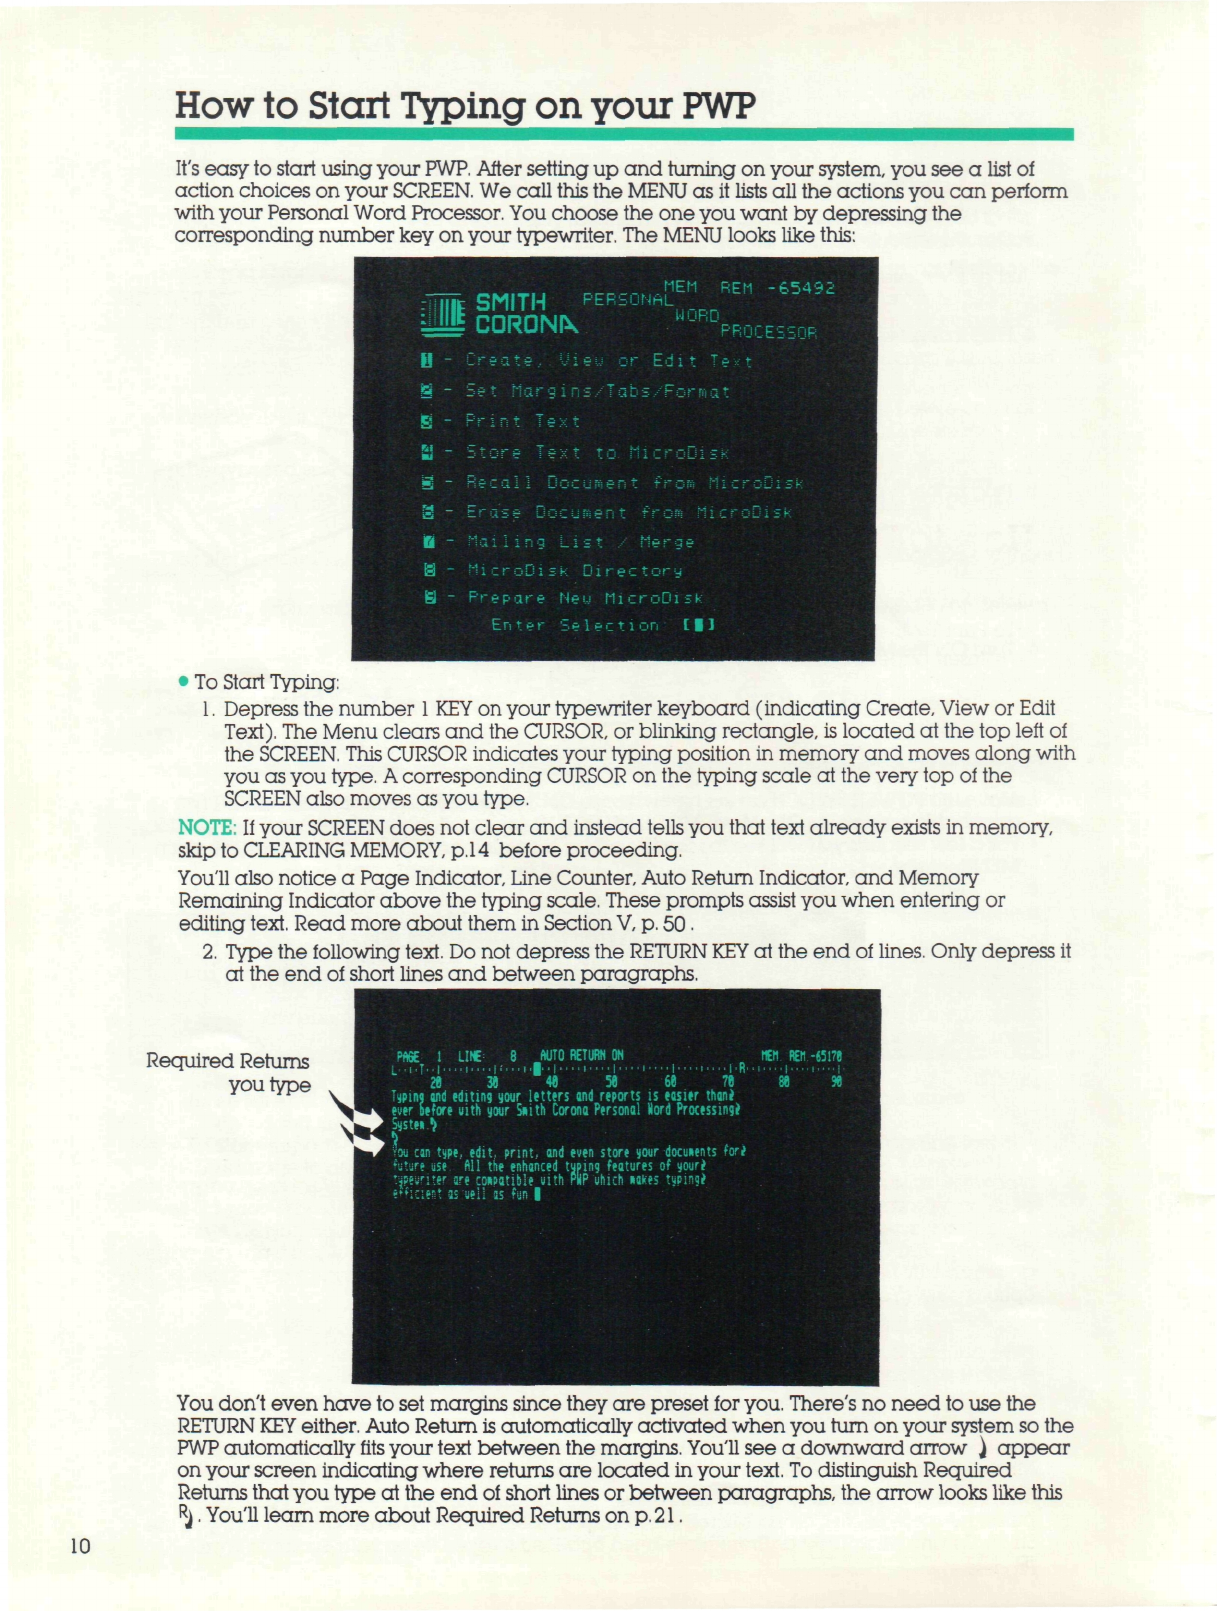
correspondingnumberkeyonyourtypewriter.The
MENU
lookslikethis:
III
:III
U
s-
El -
fii _
m
s-
M _
a-
&-
ei
-
MEMREM -65432
CSMITHPERSONAL
\ CORONAPROCESSOR
r>-eat p .iieuorEditT
*-t
Set Margins/Tabs/Forsat
PrirjtText
StoreTextto MicroDisk
Recal1 DocumentfroR MicroDisk
proq„
n-:-!!r-.c-
* 4-1-,-,-fi
M,.-!-.-n;-k
MailingList/ Merge
MicroDisk Directory
Pr e
p
a r eNeu
M
i
c
r oDisk
Enter Selection[|]
•ToStartTyping:
1.
Depressthenumber
1 KEY
onyourtypewriterkeyboard(indicatingCreate,VieworEdit
Text).
TheMenuclearsandthe
CURSOR,
orblinkingrectangle,islocatedatthetopleftof
the
SCREEN.
This
CURSOR indicates yourtypingpositioninmemoryandmovesalongwith
you as you
type.
A
correspondingCURSORonthetypingscaleattheverytopofthe
SCREEN
alsomovesasyoutype.
NOTE:
If
your
SCREEN
doesnotclearandinsteadtellsyouthattextalreadyexistsinmemory,
skiptoCLEARING
MEMORY,
p.
14beforeproceeding.
You'llalsonoticea PageIndicator,LineCounter,AutoReturnIndicator,andMemory
RemainingIndicatorabovethetypingscale.Thesepromptsassistyouwhenenteringor
editing
text.
ReadmoreabouttheminSection
V,p.
50.
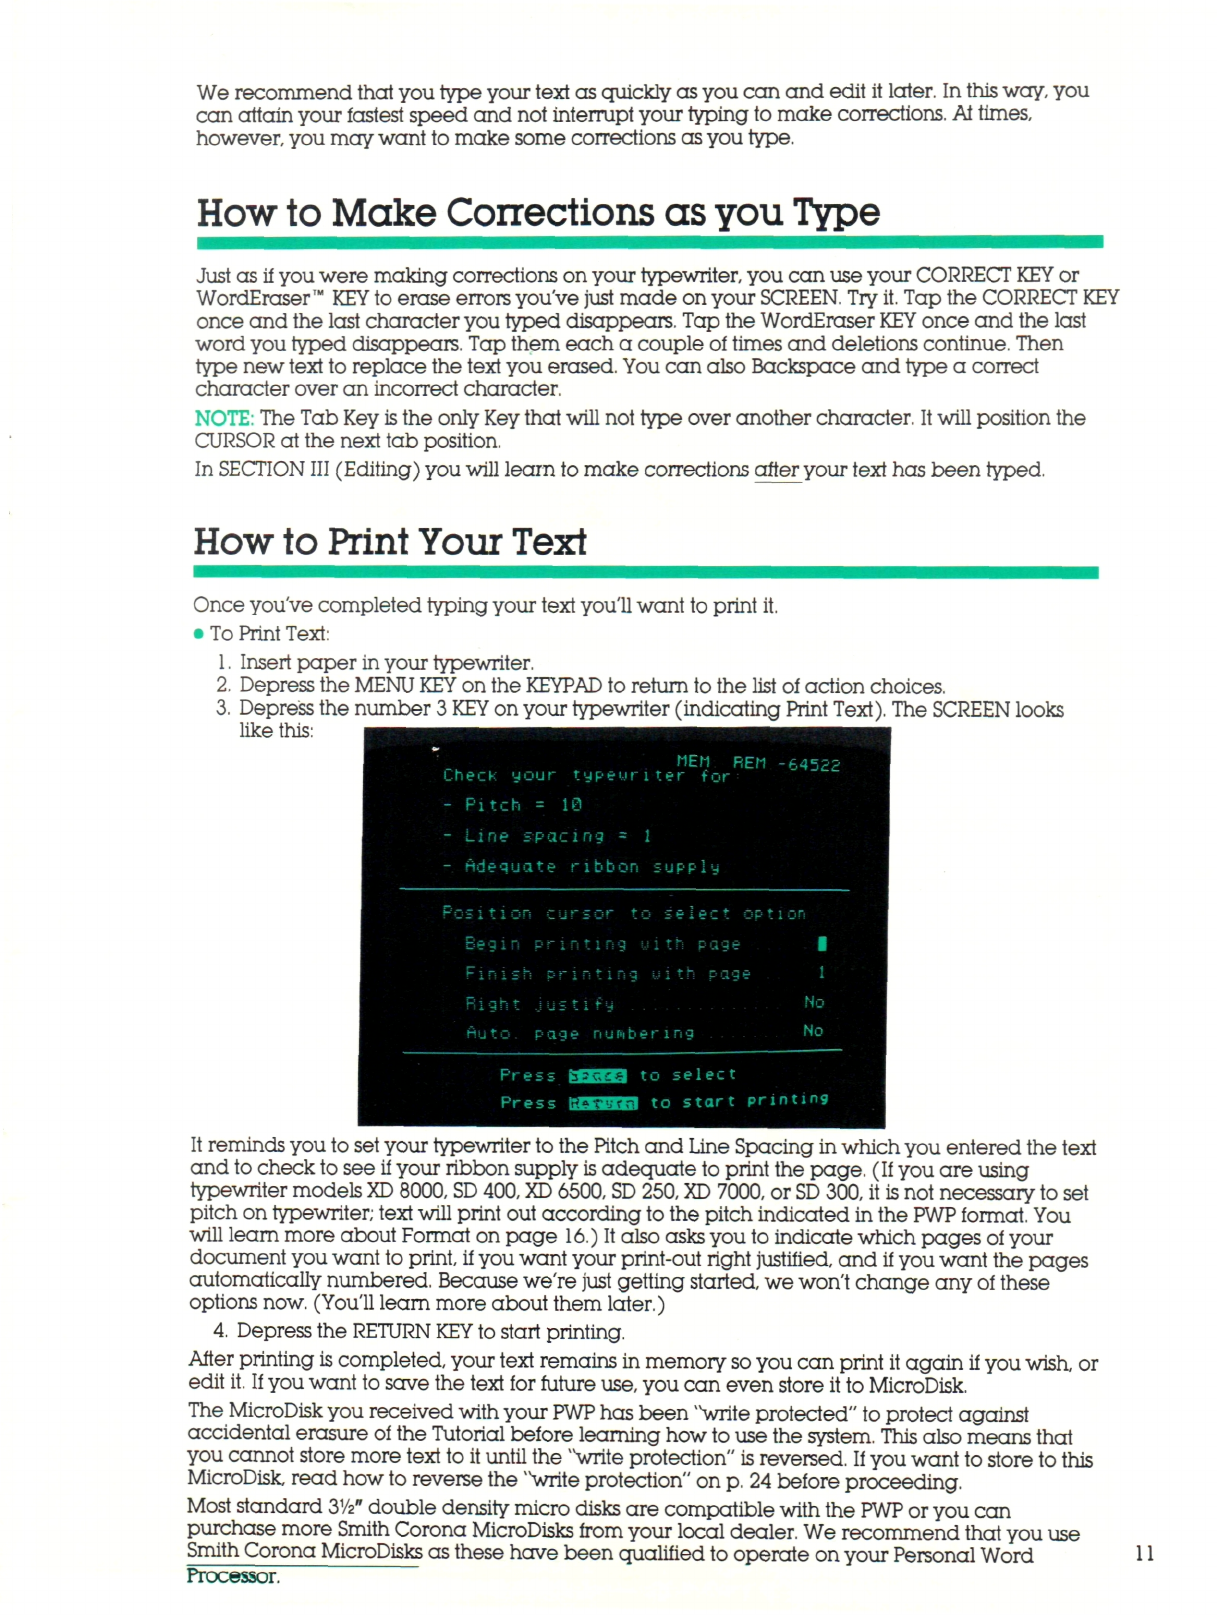
2.
Typethefollowing
text.
Donotdepressthe
RETURN
KEY
attheendof
lines.
Onlydepressit
at theendofshortlinesandbetweenparagraphs.
RequiredReturns
youtype
PAGE
1
LINT
8
AUTORETURNON
Typingand editingyour lettersand reports
is
easier
than!
_ ' C_»•.L__ #•;
»L
r n1IIi ft :-_*
Systen
^
Voucantype, edit, print,andeven storeyourdocuientsfori
''utureuse
Allthe
enhanced typing features
of
your*
immxtr are coipatihleuithPHPuhich»akes
f
MENREI1-6517J
Youdon'tevenhavetosetmarginssincetheyarepresetfor
you.
There'snoneedtousethe
RETURN
KEY
either.AutoReturn
is
automaticallyactivatedwhenyou turn onyoursystemsothe
PWP
automaticallyfitsyourtextbetweenthemargins.You'llseea downwardarrow) appear
on yourscreenindicatingwherereturnsarelocatedinyour
text.
To
distinguishRequired
Returnsthatyoutypeattheendofshortlinesorbetweenparagraphs,thearrowlookslikethis
Rj.
You'lllearnmoreaboutRequiredReturnson
p.21.
10
We recommendthatyoutypeyourtextasquicklyasyou can andedititlater.In
this
way,you
canattainyourfastestspeedandnotinterruptyourtypingtomakecorrections.
At
times,
however,youmaywanttomakesomecorrectionsasyoutype.
HowtoMakeCorrectionsasyouType
Justasifyouweremakingcorrectionsonyourtypewriter,youcanuseyour
CORRECTKEY
or
WordEraser™
KEY
toeraseerrorsyou'vejustmadeonyour
SCREEN.
Try
it.
TaptheCORRECT
KEY
onceandthelastcharacteryoutypeddisappears.TaptheWordEraser
KEY
onceandthelast
wordyou typed disappears.Tapthemeacha coupleoftimesanddeletionscontinue.Then
typenewtexttoreplacethetextyouerased.Youc a nalsoBackspaceandtypea correct
characteroveranincorrectcharacter.
NOTE:
TheTabKey
is
theonlyKeythatwillnottypeoveranothercharacter.
It
willpositionthe
CURSORatthenexttabposition.
In SECTION
III
(Editing)youwilllearntomakecorrectionsafteryourtexthasbeentyped.
How
to
PrintYour
Text
Onceyou'vecompletedtypingyourtextyou'llwanttoprintit.
•ToPrintText:
1.
Insertpaperinyourtypewriter.
2.
Depressthe
MENUKEY
onthe
KEYPAD
toreturntothelistofactionchoices.
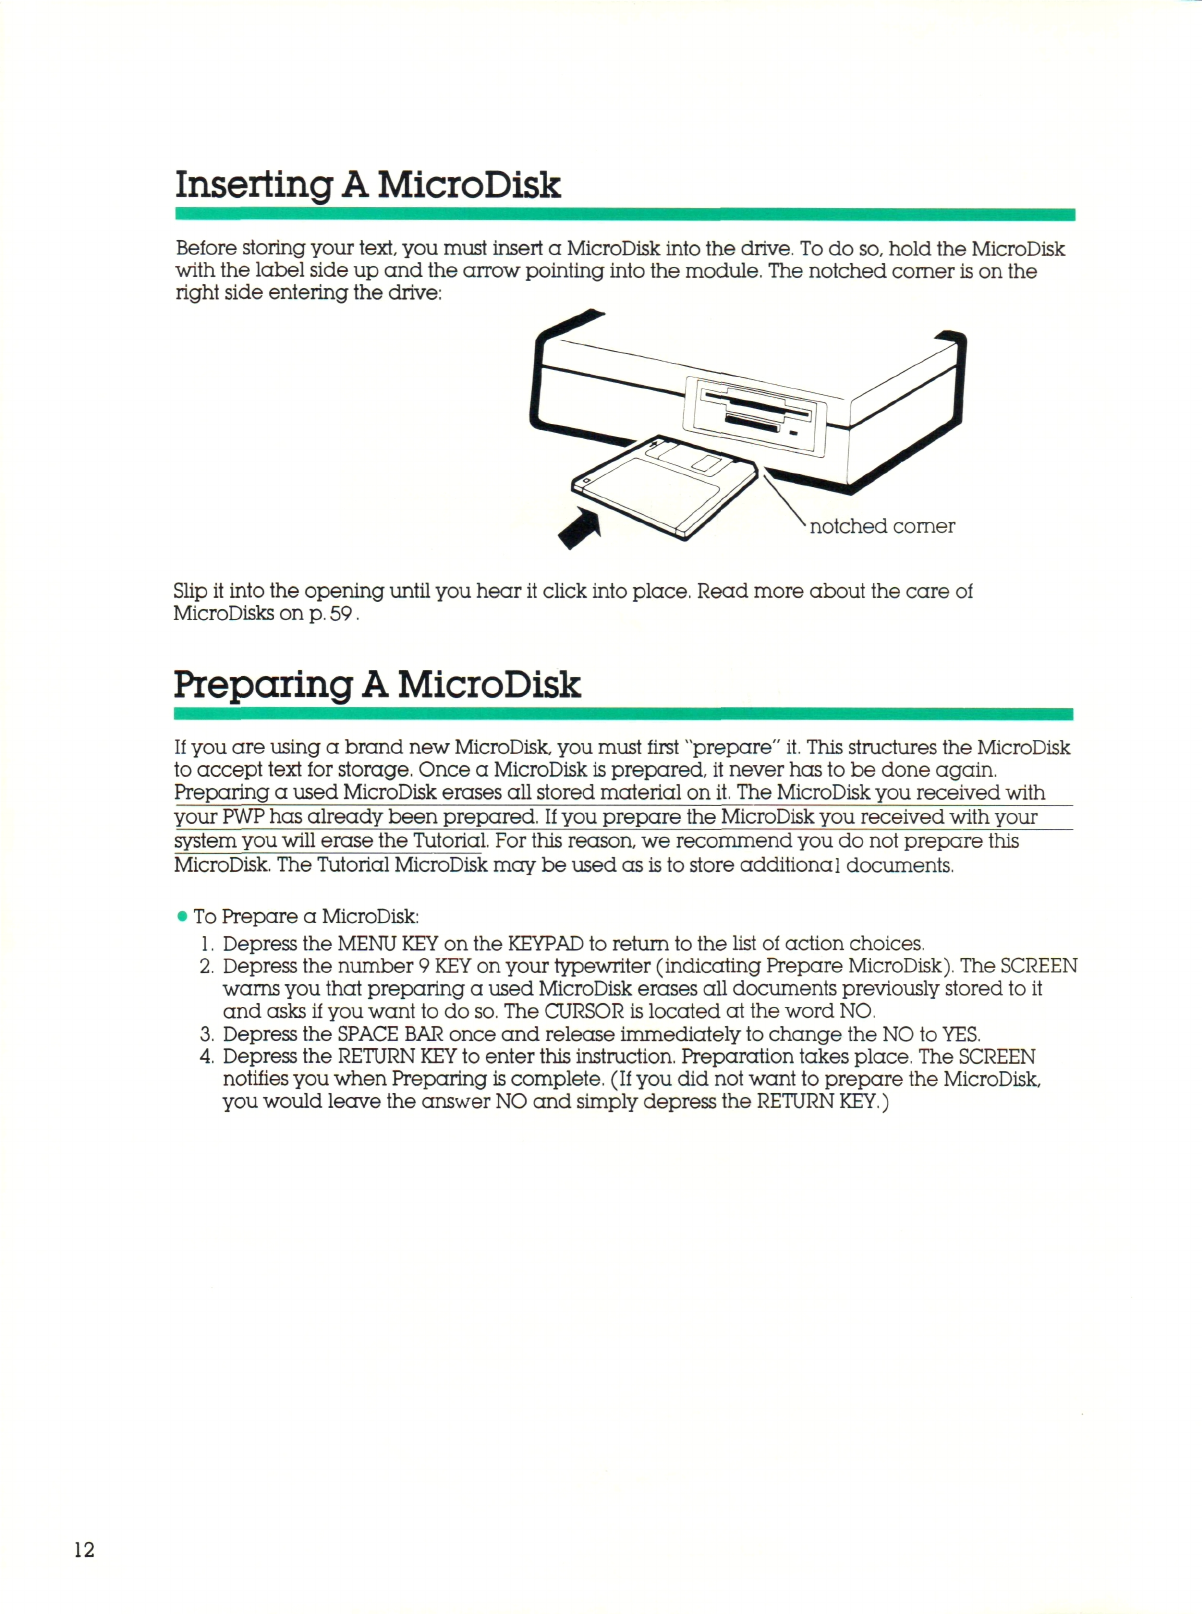
3.
Depressthenumber3
KEY
onyourtypewriter(indicatingPrint
Text).
TheSCREENlooks
likethis:
It remindsyoutosetyourtypewritertothePitchandLineSpacinginwhichyouenteredthetext
andtochecktoseeifyourribbonsupply
is
adequatetoprintthepage.(Ifyouareusing
typewritermodels
XD
8000,
SD
400,
XD
6500,
SD
250,
XD
7000,or
SD
300,itisnotnecessarytoset
pitchontypewriter;textwillprintoutaccordingtothepitchindicatedinthe
PWP
format.You
willlearnmoreaboutFormatonpage16.)Italsoasksyoutoindicatewhichpagesofyour
documentyouwanttoprint,ifyouwantyourprint-out right justified,andifyouwantthepages
automaticallynumbered.Becausewe'rejustgettingstarted,wewon'tchangeanyofthese
optionsnow.(You'lllearnmoreaboutthemlater.)
4,
DepresstheRETURN
KEY
tostartprinting.
Afterprinting
is
completed,yourtextremainsinmemorysoyoucanprintitagainifyou
wish,
or
edit
it.
If
youwanttosavethetextforfutureuse,youcanevenstoreittoMicroDisk.
TheMicroDisky oureceivedwithyour
PWP
hasbeenvv
writeprotected"toprotectagainst
accidentalerasureoftheTutorialbeforelearninghow
to
usethesystem.Thisalsomeansthat
youcannotstoremoretexttoituntilthe'Vriteprotection"isreversed.
If
youwanttostoretothis
MicroDisk,readhowtoreversethe>v
writeprotection"on
p.
24beforeproceeding.
Moststandard
2>Vz"
doubledensity micro disksarecompatiblewiththe
PWP
oryoucan
purchasemoreSmithCoronaMicroDisksfromyourlocaldealer.Werecommendthatyouuse
SmithCoronaMicroDisksasthesehavebeenqualifiedtooperateonyourPersonalWord11
Processor.
Inserting
A
MicroDisk
Beforestoringyour
text,
youmustinserta MicroDiskintothedrive.Todo
so,
holdtheMicroDisk
withthelabelsideupandthearrowpointingintothemodule.Thenotchedcorner
is
onthe
right sideenteringthedrive:
notchedcorner
Slipitintotheopeninguntilyouhearitclickintoplace.Readmoreaboutthecareof
MicroDiskson
p.
59.
Preparing
A
MicroDisk
If
youareusinga brandnewMicroDisk,youmustfirst"prepare"
it.
ThisstructurestheMicroDisk
to accepttextforstorage,Oncea MicroDisk
is
prepared,itneverhastobedoneagain.
Preparinga usedMicroDiskerases all storedmaterialon
it.
TheMicroDiskyoureceivedwith
your
PWP
hasalreadybeenprepared.
If
youpreparetheMicroDiskyoureceivedwithyour
systemyouwillerasetheTutorial.Forthisreason,werecommendyoudonotpreparethis
MicroDisk.TheTutorialMicroDiskmaybeusedas
is
tostoreadditionaldocuments.
To Preparea MicroDisk:
Depressthe
MENUKEY
onthe
KEYPAD
toreturntothelistofactionchoices.
Depressthenumber9
KEY
onyourtypewriter(indicatingPrepareMicroDisk).TheSCREEN
warnsyouthatpreparinga usedMicroDiskerases all documentspreviouslystoredtoit
andasksifyouwanttodo
so.
TheCURSORislocatedatthewordNO
Depressthe
SPACEBAR
onceandreleaseimmediatelytochangetheNOto
YES.
Depressthe
RETURNKEY
toenterthisinstruction.Preparationtakesplace.TheSCREEN
notifiesyouwhenPreparing
is
complete.(Ifyou did notwanttopreparetheMicroDisk,
youwouldleavetheanswer
NO
a n dsimplydepressthe
RETURNKEY.)
12

HowtoStore
Your
Text
1:
Inserta preparedMicroDisk.
2.
Depressthe
MENUKEY
onthe
KEYPAD
toreturntothelistofactionchoices.
3.
Depressthenumber4
KEY
onyourtypewriter(indicatingStoreTexttoMicroDisk).The
SCREENasks
youtonameyourdocumentforfuture reference.
"EMREM -6543;
Store
Documentname
-
L.W.MANOR
-3VEARREPORT
- MEEKLYREPORT
-SALESMEMO
-PARTONE
-PARTTWO
Press
Press
IK
ecu:
•£3il2j
B
t o
t o enter
cancel
Typethedocumentnameyoudesire,upto20charactersincludingspacesbetween
words.
DepresstheRETURN
KEY
toenter
it.
Yourdocument
is
storedunderthatname.The
SCREENdisplays"StoringComplete,"followedbytheMenu.StoringtexttoMicroDiskdoes
notclearthememory,toclearmemory,seep.14.
IMPORTANT
DO
NOTREMOVE
THEDISKORTURN
POWER
OFFWHILETHERED
INDICATORLIGHT
LOCATEDON
THEPWPMODULEIS
ON.
THE
LIGHT
INDICATESTHEDISKIS
ACTIVE.
REMOVING
ITWHILETHE
LIGHT
IS
ON
COULDCAUSELOSS
OFDATA
DONOTTURN
TYPEWRITERONOR
OFFWHILEDISKISINTHEPWP
MODULE.
THISCOULDALSO
CAUSE
LOSS
OFDATA.
Ejecting
A
MicroDisk
Whenstoringiscomplete,ejecttheMicroDiskbypushingthebuttononthefrontofthedrive.
TheMicroDiskisejected;nowsimplypullitout.
13
ClearingMemory
Texttypedremainsinmemoryuntilyouclear
it
(orthetypewriter
is
turnedoff.)Inorderto
createa newtext,you must erasetextcurrentlyinmemory.BesuretoStorecurrenttextto
MicroDiskfirstifyou need tosaveitforfutureuse.
•ToCleartheMemory:
1.
Depressthe
MENUKEY
onthe
KEYPAD
toreturntothelistofactionchoices.
2.
Depressthenumber
1 KEY
(indicatingCreate,VieworEditText).
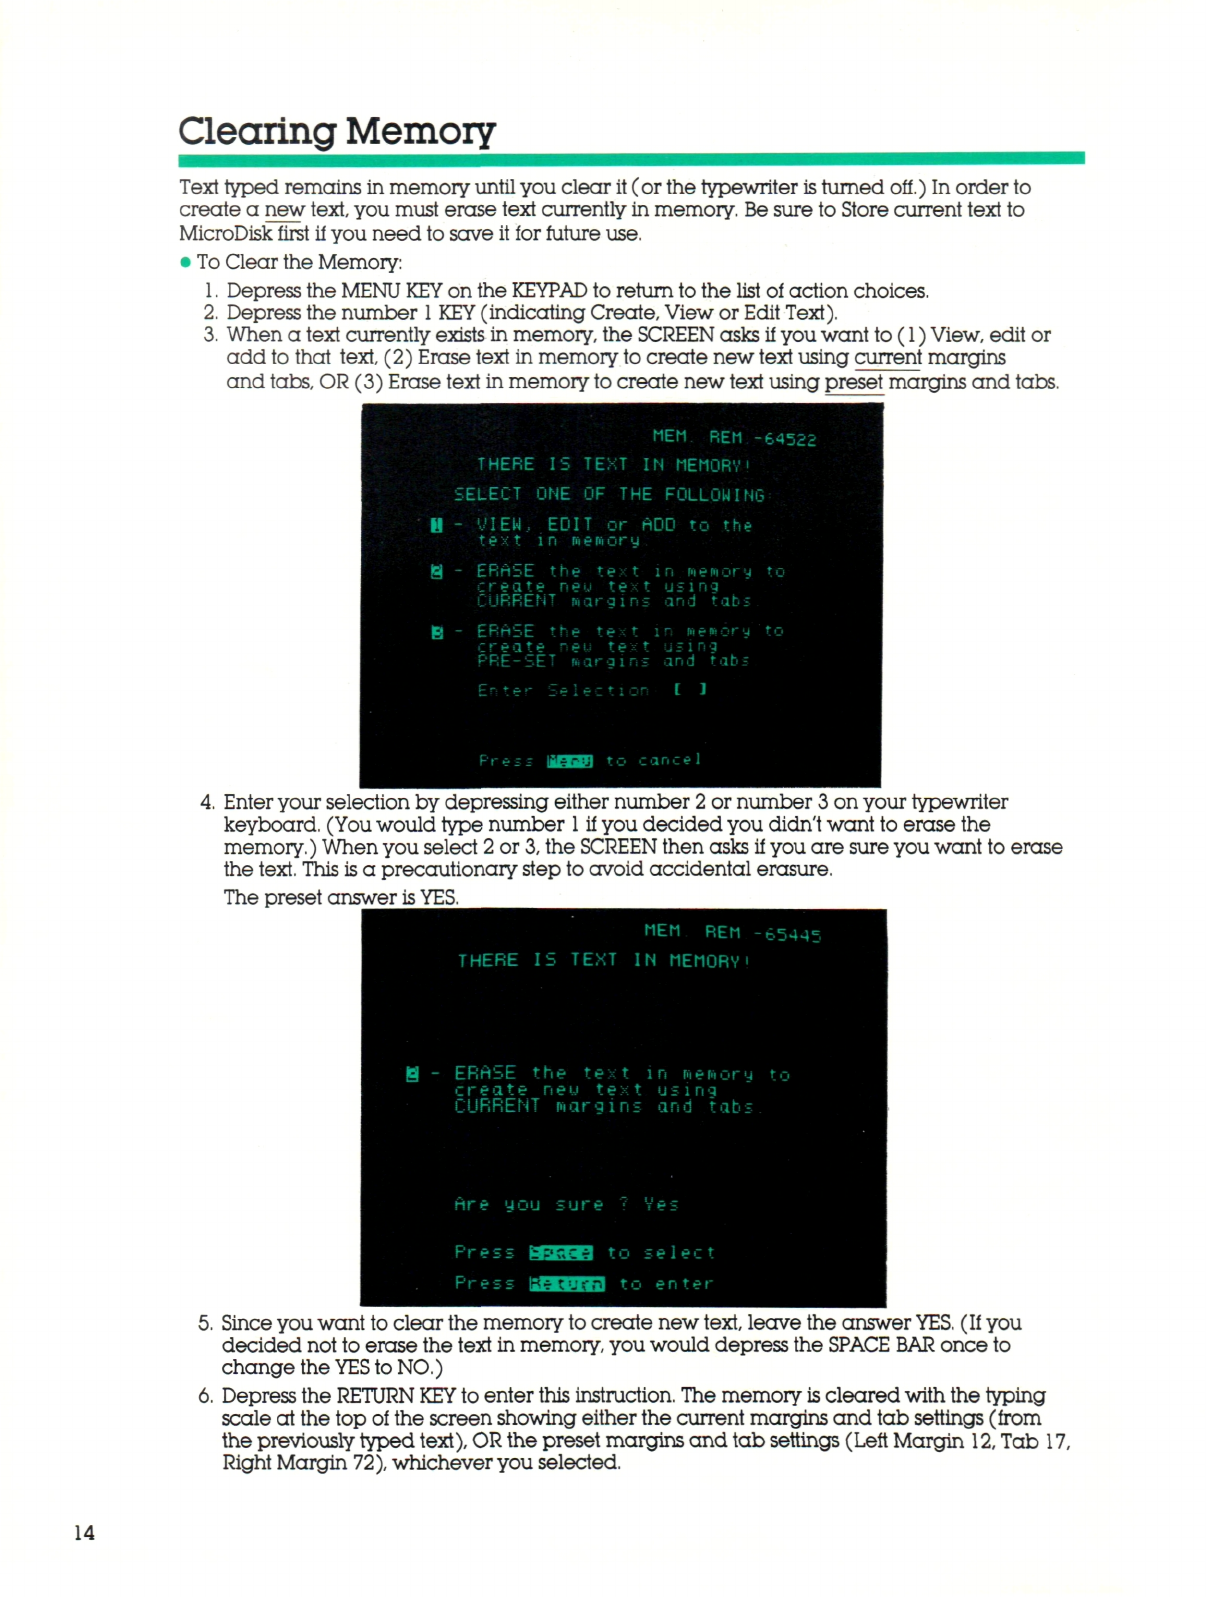
3.
Whena textcurrentlyexistsinmemory,theSCREENasksifyouwantto(1)
View,
editor
addtothattext,(2)Erasetextinmemory
to
createnewtextusingcurrentmargins
andtabs,OR(3)Erasetextinmemory
to
createnewtextusingpresetmarginsandtabs.
-——
H
i
B
MEMREM-
THEREISTEXTINMEMORY!
SELECTONEOFTHEFOLLOWI Ni
- VIEH..EDITorADOtothe
text l
n
Re f to r
y
-ERriSEthetextinmemory
createneut
e x
t using
CURRENT narginsandtats
-ERASEthetextin newery
createneutext using
PRE-SET narginsandtabs
Enter Select!orI]
PressMBMtr,.;
a n
c
e
1
•€4522
i:
t o
to
Enteryourselectionbydepressingeithernumber
2
ornumber3 onyourtypewriter
keyboard.(Youwouldtypenumber
1
ifyou decided youdidn'twanttoerasethe
memory.)Whenyou select 2 or
3,
the
SCREEN
thenasksifyouaresureyouwanttoerase
thetext.Thisisa precautionarysteptoavoidaccidentalerasure.
Thepresetanswer
is
YES.
H-
MEMREM •
THEREISTEXTINMEMORY•
- ERriSEthetextinmemory
cr
e
a.
t e
n
e
u
te
x
t using
CURRENT marginsandtabs
tireyousure?
Ves
Press rUiUMto select
Pres
- bfMJfiii]toente r
-65445
to
Sinceyouwanttoclearthememory
to
createnewtext,leavetheanswer
YES.
(Ifyou
decidednottoerasethetextinmemory,youwoulddepressthe
SPACEBAR
onceto
changethe
YES
toNO.)
Depressthe
RETURNKEY
toenterthisinstruction.Thememory
is
clearedwiththetyping
scaleatthetopofthescreenshowingeitherthecurrentmarginsandtabsettings(from
thepreviouslytyped
text),
OR
thepresetmarginsandtabsettings(LeftMargin
12,
Tab17,
RightMargin
72),
whicheveryouselected.
14
CONGRATULATIONS!
You'vejustfoundouthoweasy
itis
totype,makesimplecorrections,
print,store,a n dclearmemorywiththeSmithCoronaPersonalWordProcessor.Noticehowthe
systempromptedyoualong,actuallytellingyouthenextstep.Nowyou'rereadytogoonto
thenextsection"GettingMoreInvolved."
WP/TypeKey
Thiskey,locatedatthetopofyour
KEYPAD,
allowsyoutoswitchfromusingyourPersonalWord
Processortousingyourtypewriteralonewithoutdisconnectingthecomponents.Simplydepress
theWP/TYPE
KEY
todeactivate
PWP
andactivateyourtypewriter.Depressitagainandthe
PersonalWordProcessorisactivated.Deactivatingthewordprocessordoesnotcauseloss
of
memory.Turningthepowerofthetypewriterofthowever,willcausetextin
PWP
memorytobe
erased.
If
youwantto"save"text,simplystoreittoMicroDiskaspreviouslyexplained.
TurningofftheMONITORdoesnotdeactivatethewordprocessor.
Section
II:
Getting
More
Involved
TherearemanyfeaturesandfunctionsofyourPersonalWordProcessoryou'llwanttoknowto
beginmakingfulluseofthesystem'sbenefits.
Memory
Your
PWP
canretainover65,000charactersinmemorywhich
is
approximately
32
pages
of
doublespacedtext.Textinmemorycanbeedited,printed,orstoredtoMicroDiskforfuture
use.
When400charactersremaininmemory,youhearthreebeepsandthe
MEMORY
REMAINING
INDICATORatthetop right oftheSCREENindicates400charactersleft.Itisrecommended,
however,tostopenteringtextwhenthereareatleast
2,000
charactersremaininginorderto
allowsufficient memoryforeditingoperations.
Textinmemory
is
automaticallyerasedwhenthetypewriter
is
turnedOFForthere
is
a power
failure.Werecommend,therefore,thatyoustoretexttoDiskfrequentlywhentypinglongtexts
or beforeleavingyour
system.
In
this
wayyou
will
protectyourtextfromaccidentallybeing
erased.
TurningofftheMONITORdoesnoterasememory.Deactivatingthewordprocessordoesnot
erasememory.
CursorControlKeys
Clearyourmemory,itnecessary,andtypea fewlinesonyour
PWP.
You'llnoticethatthe
CURSORindicatesyourtypingpositioninmemory.YoucanmovetheCURSORon the screento
makecorrectionsorinsertionsbyusingtheCURSORCONTROL
KEYS
locatedatthebottom
of
your
KEYPAD.
TrypressingthesekeysandseehowtheCURSORmovesaroundthescreen.See
howitskipsoverareaswherethere
is
notext.
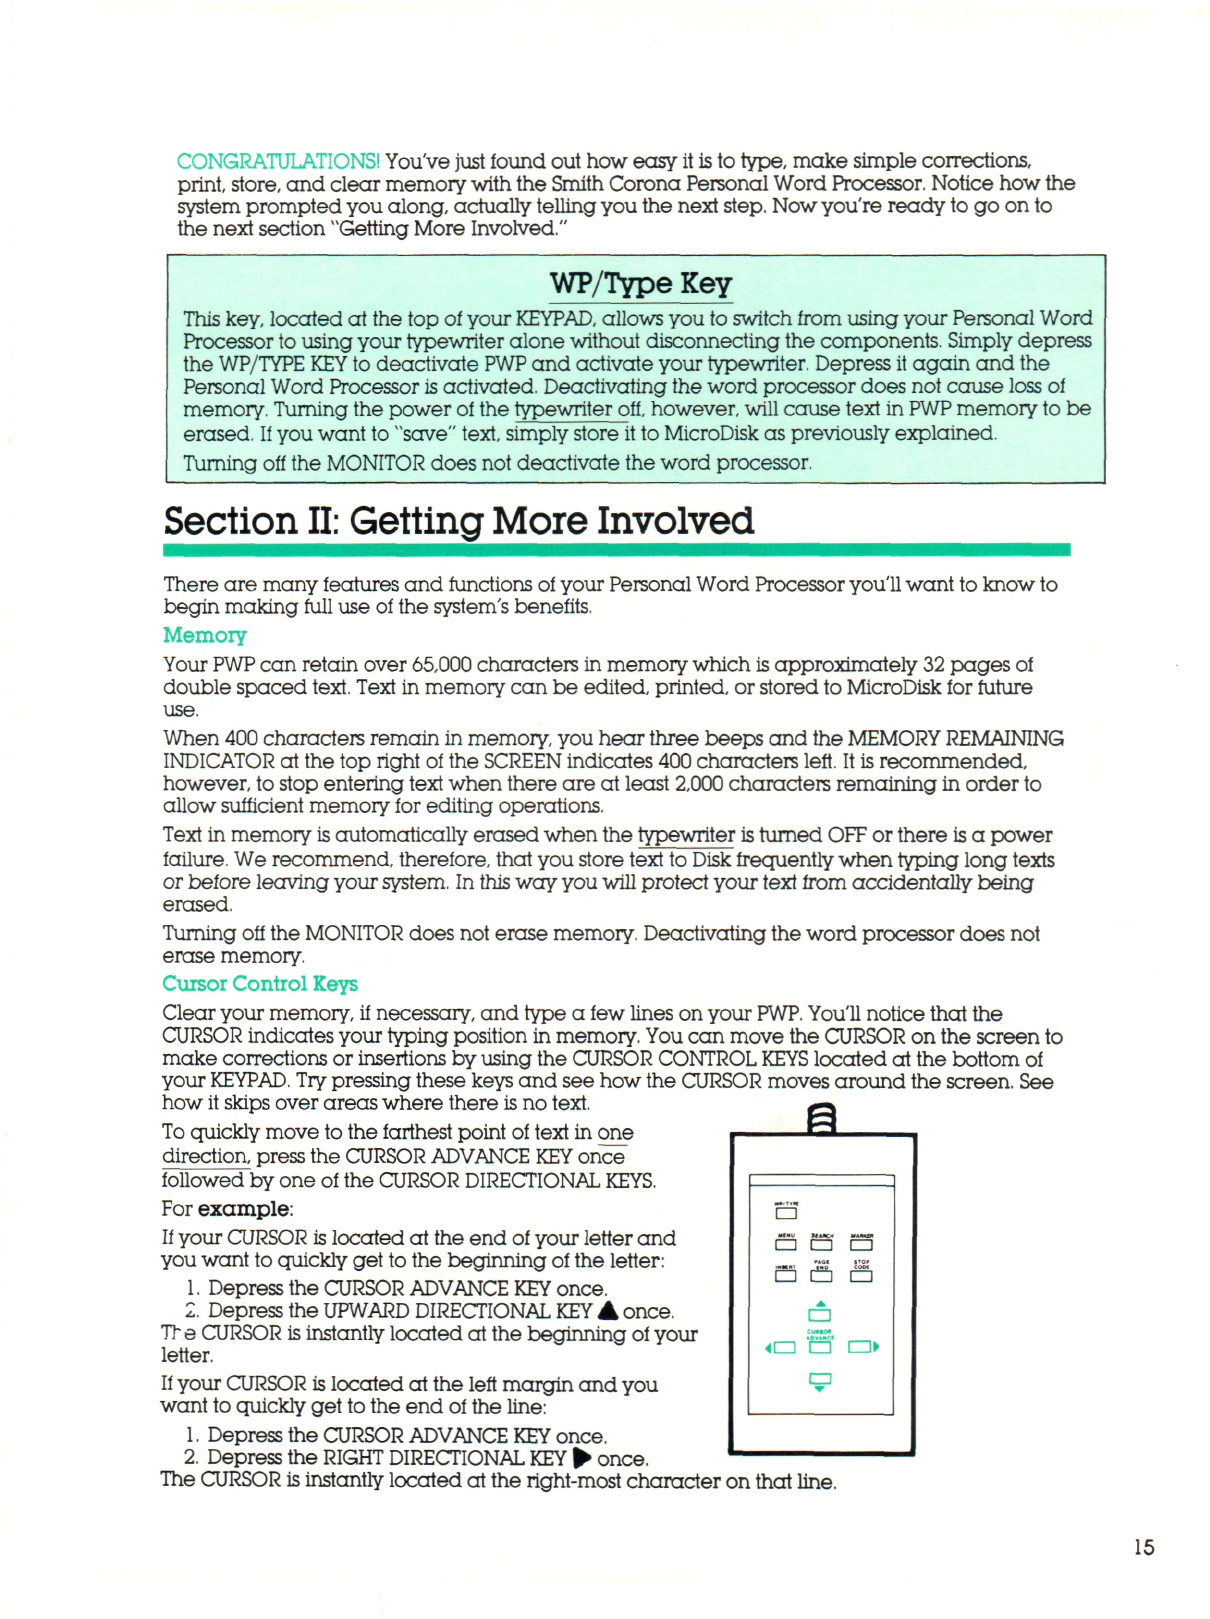
To
quicklymovetothefarthestpointoftextinone
direction,presstheCURSORADVANCE
KEY
once
followedbyoneoftheCURSORDIRECTIONAL
KEYS.
Forexample:
If
your
CURSOR
islocatedattheendofyourletterand
youwanttoquicklygettothebeginningoftheletter:
1.
DepresstheCURSORADVANCE
KEY
once.
2.
Depressthe
UPWARD
DIRECTIONAL
KEY
A once.
Tr e CURSORisinstantlylocatedatthebeginningofyour
letter.
If
yourCURSORislocatedattheleftmarginandyou
wanttoquicklygettotheendoftheline:
1.
DepresstheCURSORADVANCE
KEY
once.
2.
Depressthe
RIGHT
DIRECTIONAL
KEY
• once.
TheCURSORisinstantlylocatedatthe
right-most
characteronthatline.
E.
•
3
•
« •
H
a
C3
Q
• •
15
SettingMargins/Tabs/Format
Your
PWP
hasa presetFormat(includingmarginsandtab,pitchandlinespacing).This
Formatwillbeincorporated
into
yourtypedtextunlessyou change it.
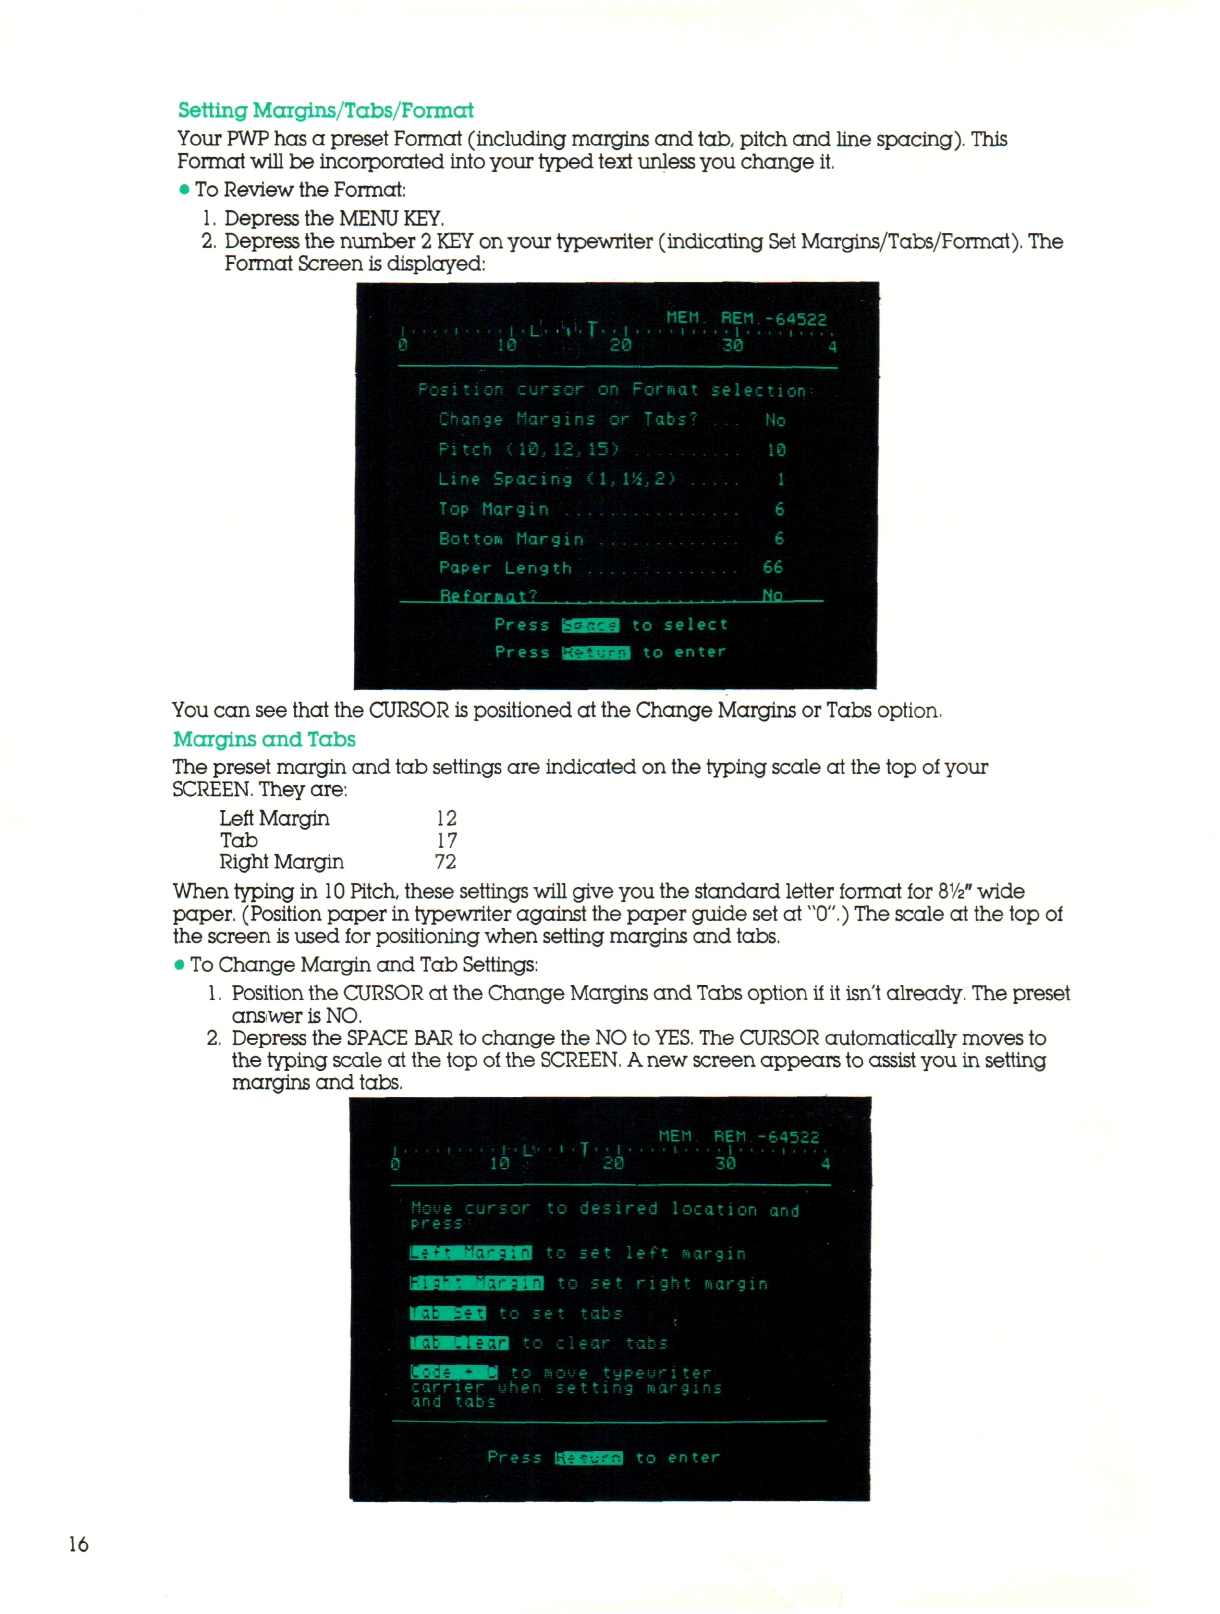
•ToReviewtheFormat:
1.
Depressthe
MENU
KEY.
2.
Depressthenumber
2 KEY
onyourtypewriter(indicatingSetMargins/Tabs/Format).The
FormatScreen
is
displayed:
.;_ MEM.
1• • • •
»
•• • • i -L.'
•''»'•
1• • I
01020
Position cursoron Format
Change Marginsor Tabs'
Pi tch(10,12,15)
Line Spacing (l,l'i,2)..
Top Margin
Bottom Margin
Paper Length
Re forsat
7
REM
i.1.
30
SelPi
Press SEES)to select
Press MMHSfeito enter
-64522
4
:t i on
No
10
1
6
6
66
Nn
Youca nseethattheCURSORispositionedattheChangeMarginsorTabsoption.
MarginsandTabs
Thepresetmarginandtabsettingsareindicatedonthetypingscaleatthetopofyour
SCREEN.
Theyare:
LeftMargin12
Tab17
RightMargin72
Whentypingin
10
Pitch,thesesettingswillgiveyou the standardletterformatfor
8
1
/2n
wide
paper.(Positionpaperintypewriteragainstthepaperguidesetat"0".)Thescaleatthetopof
thescreen
is
usedforpositioningwhensettingmarginsandtabs.
•ToChangeMarginandTabSettings:
1.
PositiontheCURSORattheChangeMarginsandTabsoptionifitisn'talready.Thepreset
answer
is
NO.
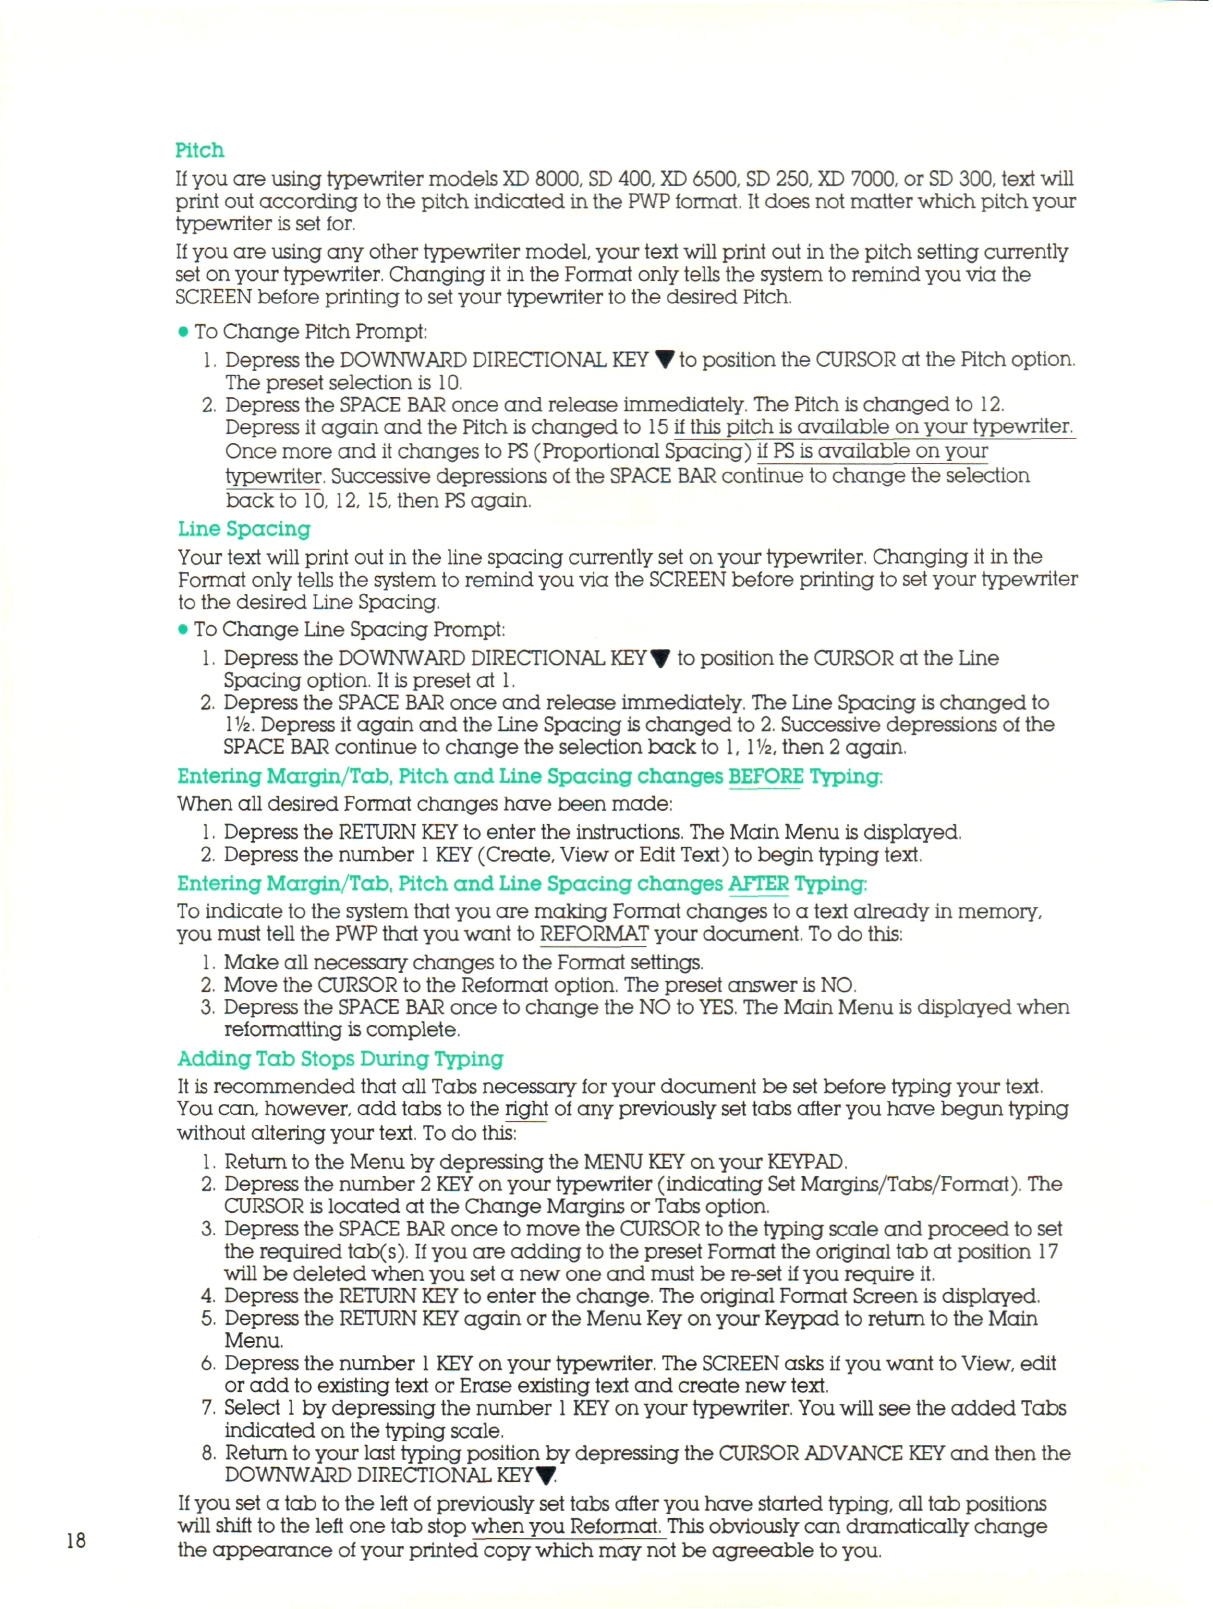
2.
DepresstheSPACE
BAR
tochangetheNOto
YES.
TheCURSORautomaticallymovesto
thetypingscaleatthetopofthe
SCREEN.
A
newscreenappearstoassistyouinsetting
marginsandtabs.
16

3.
PositiontheCURSORatyourdesiredleftmarginbydepressingtheappropriateCURSOR
DIRECTIONAL
KEY.
4.
SettheLeftMarginbydepressingthe
LEFT
MARGIN
KEY
onyourtypewriter.An"L"
appearsontheSCALE.
5.
MovetheCURSORtoyourdesiredfirsttabposition.
6. Depressthe
TABSETKEY
onyourtypewriter.
A
"TappearsontheSCALE.
7.
Setothertabstopsyourequireinthesameway.
8. PositiontheCURSORatyourdesired right margin.
9. SettheRightMarginbydepressingthe
RIGHT
MARGIN
KEY(s)
onyourtypewriter.An"R"
appearsontheSCALE.
10.
Depressthe
RETURN
KEY.
TheFormatScreenisdisplayed.
Youcansetupto
16
tab
positions.
TabscanbeclearedbypositioningtheCURSORata tab
settingandclearingitviayourtypewriterkeyboard.
To assistyouindeterminingcomparablesettingsfor10,12,
15
pitchandProportionalSpaced
typing,pleaserefertothescalebelow.
If you are typingin
10
pitchorProportionalSpacing(notavailableon all typewriters),the
presetmarginsandtab(leftmargin
12,
tab17,
right
margin72)willgiveyoua standardletter
formatfor
8
1
/2"
widepaper,
If
youaretypingin
12
pitch,settingyourleftmarginat
14,
tabat
19,
and right marginat
86
will
giveyouthesamestandardformat.
If
youaretypingin
15
pitch(notavailableon all typewriters),settingyourleftmarginat
18,
tab
at
23,
and right marginat
108
willgiveyou the samestandardformat.
LM TAB LM TAB LM TAB
10 PITCH
orPS12
PITCH
15
PITCH
0102030405060708090100110
10, 1C,
PSl PS
01224364860728496108120132
0153045607590105120135150165r
15 15
CarrierMovementtoAssistwhensettingMarginsandTabs
Whensettingmarginsandtabsitissometimesa helptohavethetypewritercarriermove
alongthepapertodeterminepositioning.This
is
particularlyusefulwhensettingstabsto
accommodatea form.
•ToSelectCarrierMovementwhenSettingMarginsandTabs:
1.
Select
YES
toChangeMarginsand
Tabs.
TheCURSORmovestothetypinglineatthetop
of thescreen.
2.
Depressand
HOLD
theCODE
KEY
whiledepressingthe
"C"KEY
(TheCursorislocatedon
thetypingscale.).
3. If
youaredeterminingpositionon a certainform,inserttheforminyourtypewriter.
4.
ThetypewritercarrierwillmoveasyoudepresstheCursor
Keys.
Setmarginsandtabs
whenpositionsare determined.
17
18
Pitch
If
youareusingtypewritermodels
XD
8000,
SD
400,
XD
6500,
SD
250,
XD
7000,or
SD
300,textwill
printoutaccordingtothepitchindicatedinthe
PWP
format.Itdoesnotmatterwhichpitchyour
typewriter
is
setfor.
If
you are usinganyothertypewritermodel,yourtextwillprintoutinthepitchsettingcurrently
setonyourtypewriter.ChangingitintheFormatonlytellsthesystemtoremindyouviathe
SCREENbeforeprintingtosetyourtypewritertothedesiredPitch.
•
To
ChangePitchPrompt:
1.
DepresstheDOWNWARDDIRECTIONAL
KEY
•
to
positiontheCURSORatthePitchoption.
Thepresetselectionis10.
2.
DepresstheSPACE
BAR
onceandreleaseimmediately.ThePitchischangedto12.
DepressitagainandthePitchischangedto
15
ifthispitch
is
availableonyourtypewriter.
Oncemoreanditchangesto
PS
(ProportionalSpacing)if
PS
isavailableonyour
typewriter.Successivedepressionsofthe
SPACEBAR
continuetochangetheselection
backto10,12,
15,
then
PS
again.
LineSpacing
Yourtextwillprintoutinthelinespacingcurrentlysetonyourtypewriter.Changingitinthe
Formatonlytellsthesystemtoremindyou via theSCREENbeforeprintingtosetyourtypewriter
to thedesiredLineSpacing.
•ToChangeLineSpacingPrompt:
1.
DepresstheDOWNWARDDIRECTIONALKEY• topositiontheCURSORattheLine
Spacingoption.Itispresetat1.
2.
DepresstheSPACE
BAR
onceandreleaseimmediately.TheLineSpacing
is
changedto
l1
/2.DepressitagainandtheLineSpacing
is
changedto
2.
Successivedepressionsofthe
SPACE
BAR
continuetochangetheselectionbackto1,
l1
/2,
then2 again.
EnteringMargin/Tab,PitchandLineSpacingchanges
BEFORE
Typing:
When all desiredFormatchangeshavebeenmade:
1.
Depressthe
RETURNKEY
toentertheinstructions.TheMainMenuisdisplayed.
2.
Depressthenumber
1 KEY
(Create,VieworEditText)tobegintypingtext.
EnteringMargin/Tab,PitchandLineSpacingchanges
AFTER
Typing:
To
indicatetothesystemthatyouaremakingFormatchangestoa textalreadyinmemory,
you must tellthe
PWP
thatyouwantto
REFORMAT
yourdocument.Tod othis:
1.
Make all necessarychangestotheFormatsettings.
2.
MovetheCURSORtotheReformatoption.Thepresetanswer
is
NO.
3.
DepresstheSPACE
BAR
oncetochangetheNOto
YES.
TheMainMenuisdisplayedwhen
reformatting
is
complete.
AddingTabStopsDuringTyping
It isrecommendedthat all Tabsnecessaryforyourdocumentbesetbeforetypingyourtext.
Youcan,however,addtabstothe right ofanypreviouslysettabsafteryou have beguntyping
withoutalteringyour
text.
Todothis:
1.
ReturntotheMenubydepressingthe
MENUKEY
onyour
KEYPAD.
2.
Depressthenumber
2 KEY
onyourtypewriter(indicatingSetMargins/Tabs/Format).The
CURSORislocatedattheChangeMarginsorTabsoption.
3.
DepresstheSPACE
BAR
oncetomovetheCURSORtothetypingscaleandproceedtoset
therequiredtab(s).
If
youareaddingtothepresetFormattheoriginaltabatposition17
willbedeletedwhenyouseta newoneandmustbere-setifyourequireit.
4.
Depressthe
RETURNKEY
toenterthechange.TheoriginalFormatScreen
is
displayed.
5.
Depressthe
RETURNKEY
againortheMenuKeyonyourKeypadtoreturntotheMain
Menu.
6. Depressthenumber
1 KEY
onyourtypewriter.The
SCREEN
asksifyouwantto
View,
edit
or addtoexistingtextorEraseexistingtextandcreatenewtext.
7.
Select
1
bydepressingthenumber
1 KEY
onyourtypewriter.
You
willseetheaddedTabs
indicatedonthetypingscale.
8. ReturntoyourlasttypingpositionbydepressingtheCURSORADVANCE
KEY
andthenthe
DOWNWARDDIRECTIONALKEY^
If
you set a tabtotheleftofpreviouslysettabsafteryou have startedtyping, all tabpositions
willshifttotheleftonetabstopwhenyouReformat.Thisobviouslycandramaticallychange
theappearanceofyourprintedcopywhichmaynotbeagreeabletoyou.
Table of contents


