SNAP Violet3D Manual

SNAP Networks Private Limited.
Regd. Office: 3597, 5th ross, 13G Main, HAL 2nd Stage, Bangalore – 560 008, India
R&D Office: #734, 1st Floor, 12th ross, 22nd Main, J.P Nagar 2nd Phase, Bangalore – 560 078, India
Phone/Fax: +91 80 2658 6459. Email: snap@snap-networks.com. Web: www.snap-networks.com
VIOLET3D-APP NOTE 4
Violet3D 5.1 Learning Procedure
© SNAP Networks Pvt. Ltd 2012. All Rights Reserved.

SNAP Networks Private Limited.
Violet3D 5.1 System Learning Set Up
Set up for Speaker, ransmitter and MIC:
1. Power on the transmitter. If it is in standby mode switch on using
remote control.
2. Make sure that the microphone is connected properly with the
transmitter by observing the mute LED blinking orange.
3. Microphone placement precautions.
a. Place microphone close to listening position.
b. Wing 1 (Red) should point to the front (to TV) of the room.
c. Wing 1(Red), Wing 2(Green) & Wing 3(Yellow) should be inserted
respectively in anti-clockwise direction as shown in the figure.
Red
Green Yellow
4. Height should be around 4 ft .Place both PV tubes with base on the
floor or one PV tube with base on the sofa/couch or a table.
5. All 5 speakers should be in line of sight with the microphone.
6. If the speaker is wall mounted/ceiling mounted, height of speaker
should be maintained 7 to 9 ft from the floor with down firing.
TV

SNAP Networks Private Limited.
Sub Woofer Settings
Qb3 Sub Woofer (Wired or Wireless):
Before starts the process of learn, Qb3 has to be kept in the below default
settings.
1) The Volume knob must be kept at 50% (Half).
2) The Phase knob must be kept at 0 degree (Minimum).
3) ross over frequency knob must be kept at 200Hz (Maximum).
4) Set Stand-by knob to “Force On” (Turned Up).
Note:
After the initial learning process, only the volume settings can be changed as
per the user s convenience.
Hansong Sub Woofer (old Wireless Sub Woofer):
For Hansong subwoofer, connect to power source and the subwoofer is ready
for learning.
SNAP Networks Private Limited.
Learning Procedure:
Step 1:
Make sure all 5 s
Step 2:
Make sure there is no loud noise
Step 3:
Switch off any fans or a
Step 4:
Be prepared for loud tones (Sw
speakers
in 2 or 3 rounds
Step 5:
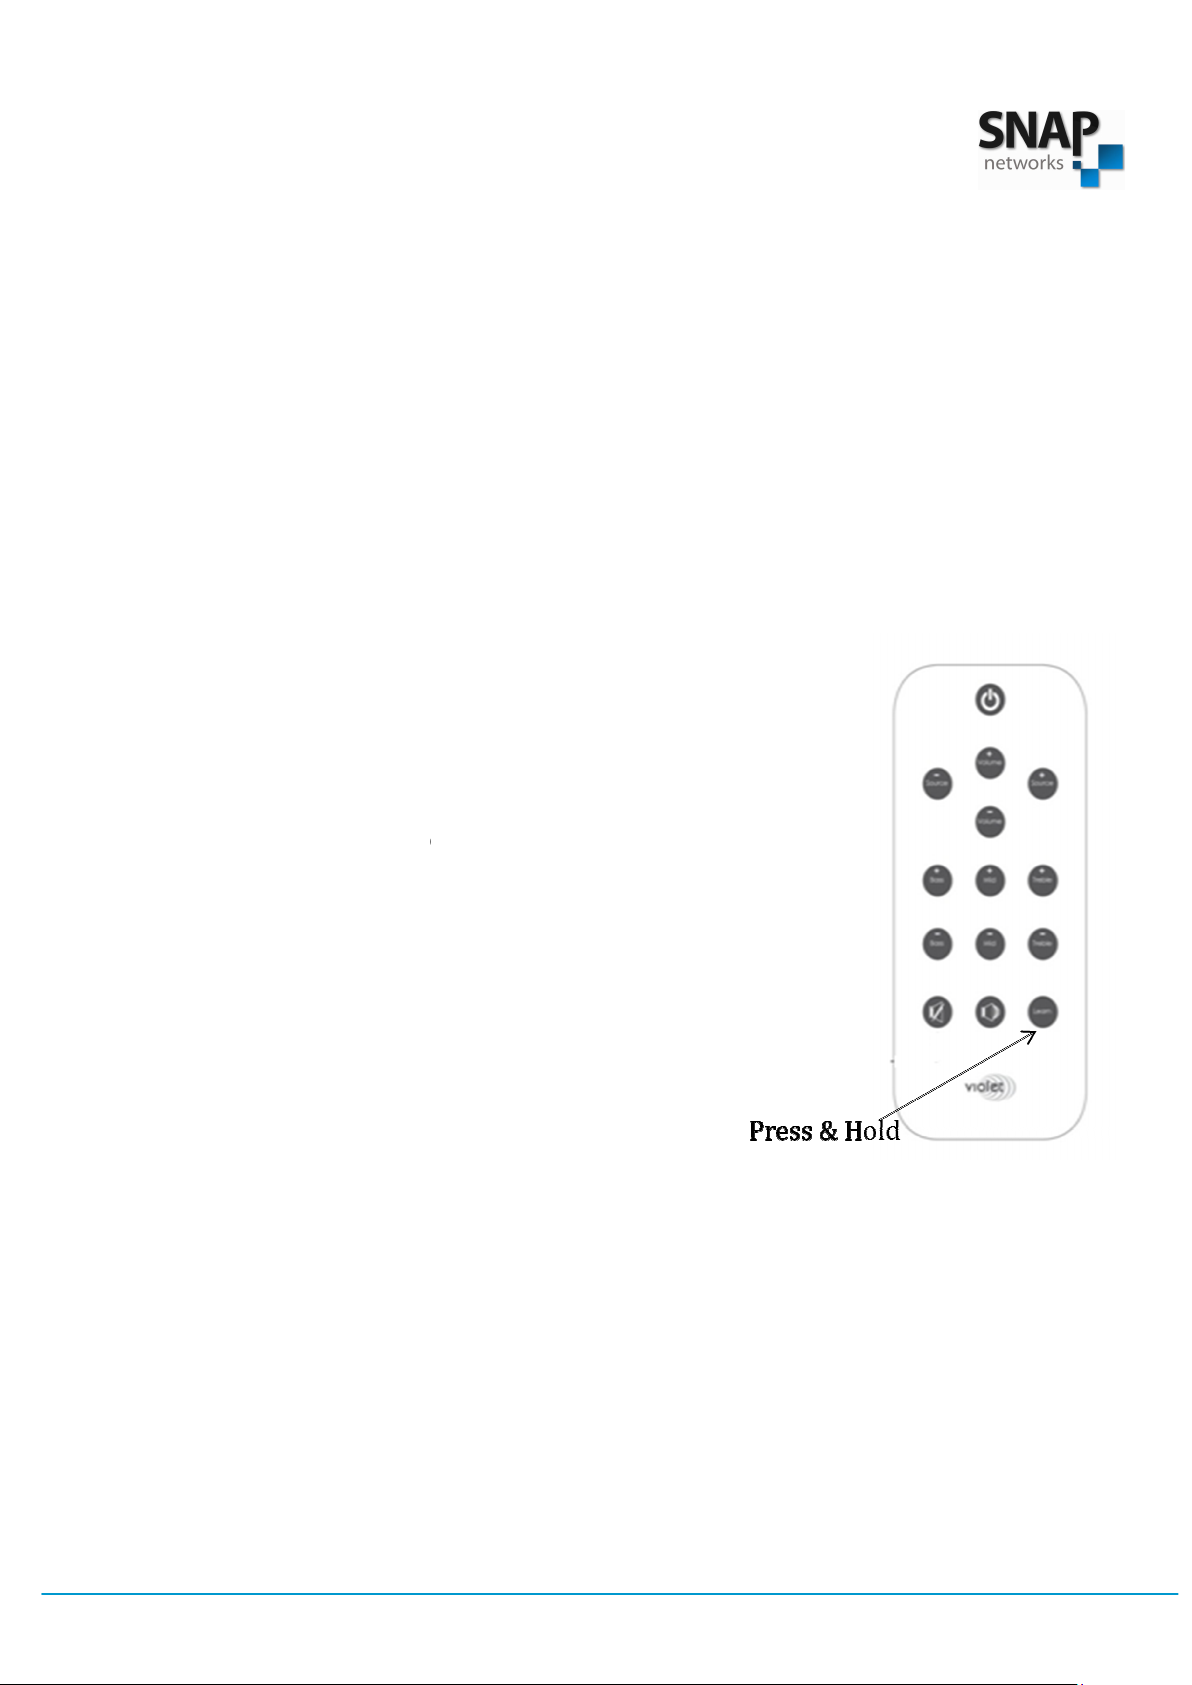
Press and h
status LED
(Right side corner LED)
Step 6:
Step aside s
between any speaker and the m
Step 7: Make
sure you can see the front of t
Step 8:
Maintain silence
stops blinking.
Step 9:
You will hear set of r
all speakers and
the s
Learning Procedure:
Make sure all 5 s
peakers and subwoofer are
powered ON.
Make sure there is no loud noise
in the room.
Switch off any fans or a
ir conditioners.
Be prepared for loud tones (Sw
eep) that will come out of the
in 2 or 3 rounds
.
Press and h
old the “learn” button on the r
emote control
(Right side corner LED)
starts blinking Orange
Step aside s
uch that you are not standing in
between any speaker and the m
icrophone.
sure you can see the front of t
ransmitter.
Maintain silence
until the orange status LED
You will hear set of r
apid tones (sweeps) from
the s
ubwoofer one after the other.
powered ON.
eep) that will come out of the
emote control
till
starts blinking Orange
.

SNAP Networks Private Limited.
• It will take 5 minutes
process, transmi
tter will go to
• Power on the t
ransmitter using R
indicated by s
tatus LED glowing green &
blinking).
•
After the successful learning, d
keep in the box. T
he system is ready for normal usage.
to complete this process.
After completion of the
tter will go to
standby mode.
ransmitter using R
emote control. The succe
ssful learning is
tatus LED glowing green &
glowing
source LED (not
After the successful learning, d
isconnect the MI ,
Release the wings and
he system is ready for normal usage.
After completion of the
ssful learning is
source LED (not
Release the wings and

SNAP Networks Private Limited.
Errors Found During Learning:
Observe the transmitter front panel for the following errors.
a. ERROR
1: Blinking all source LED‘s and red status LED for 10 sec and
going to standby mode. This indicates that the MI is not connected.
Wait until it goes to standby mode, Remove and connect the MI
properly and Repeat the learning process.
b. ERROR 2: Blinking of red status LED and D2 for 10 sec and going to
standby mode indicates that, the MI has damaged.
Select Source ‘6 ’ and Repeat the learning process.
Still problem continues contact Violet3d technical support.
c. ERROR
3: Blinking of red status LED and D1 for 10 sec and going to
standby mode indicates that, the noise in the room is too loud for
learning.
Reduce the room noise by turning OFF Fans, A , etc and Repeat the
learning process.
d. ERROR
4: Source Blue LED blinking indicates that, the learning
procedure did not complete successfully.
Repeat the learning process.
Note:
In case of any error explained above happens repeatedly, Please
contact your service center.
Table of contents


