Snoppa Vmate S191 User manual

Introduction----------------------------------------------------------------------1
Product Maintenance-----------------------------------------------------------3
Power/Record Button-----------------------------------------------------------5
Insert the microSD card--------------------------------------------------------7
Charging------------------------------------------------------------------------9
Rotatable lens-------------------------------------------------------------------10
Operating the Touch Screen-------------------------------------------------11
Swipe Right---------------------------------------------------------------------13
Swipe Up------------------------------------------------------------------------16
Swipe Down--------------------------------------------------------------------19
Controlling camera movement on the touch screen------------------21
Media library management--------------------------------------------------23
Downloading the Vmate App------------------------------------------------24
App Connection----------------------------------------------------------------25
App Interface Introductio---------------------------------------------------27
Updating Firmware-----------------------------------------------------------31
Maintenance Notes-----------------------------------------------------------34
Specifications--------------------------------------------------------------35

Introduction
Snoppa Vmate is a palm-sized handheld 4k camera
integrated with a micro 3-axis stabilizing system. It is
remarkably compact, smart and easy to use—allowing
you to capture any moment with a professional touch.
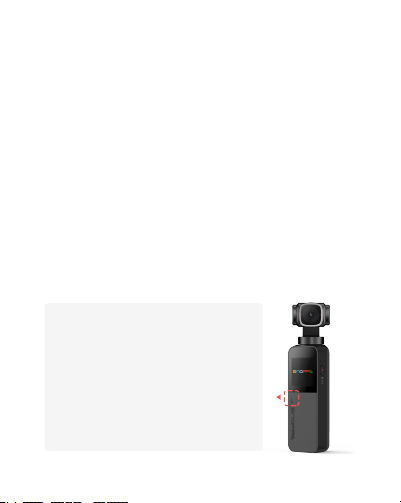
Microphone 1
Tilt Motor
Roll Motor
Power/
Shutter Button
1
Camera
Rotatable lens
Touch Screen
Status LED
Microphone 2
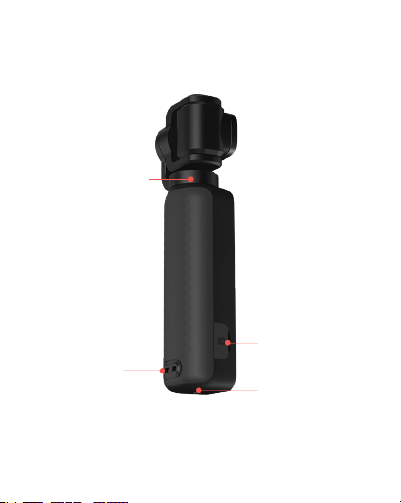
Pan Motor/
Ventilation Area
Lanyard Hole
2
microSD Card Slot
Type-C Port
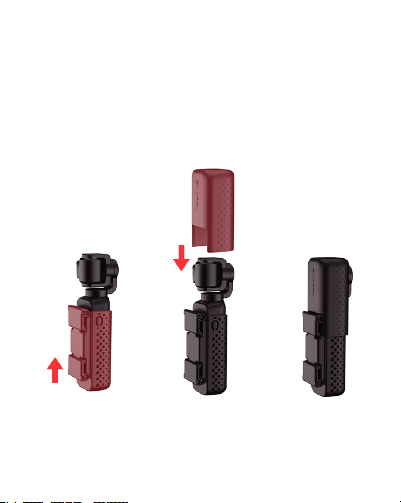
Product Maintenance
Follow the below instructions to put multi-functional
case on the Vmate; pay attention to the camera
orientation to avoid damage.
*Vmate camera will rotate to a certain direction for
15~20s which is easier to put upper cover on.
3
Storage

4
The multi-functional case can be a phone holder while
protecting Vmate, efficiently for one-handed operation.
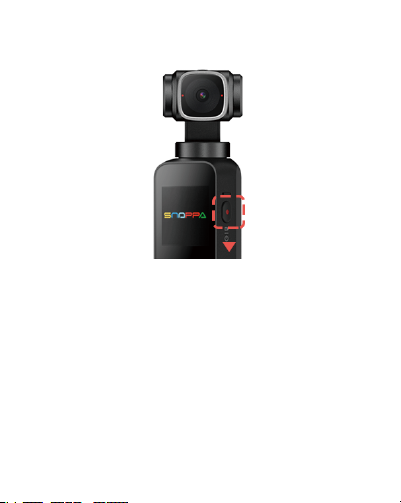
Power/Record Button
1.Power On/Off
Power On: In the off state, press the Power/Record
button for around 1 second.
Power Off: In the power-on state, press and hold
Power/Record button for about 2 seconds.
*If your device isn’t working or won’t turn off/on, as
usual, you can force to restart it. Just press and hold
the Power/Record button for 15 seconds or longer.
5

2. Photo/video
Under the shooting interface, tap the power/record
button to take photos or videos.
3. Back to Camera View on the Touch Screen
On any pages on the touch screen can short press the
power/shutter button go back to camera view page in
an instant (exclude camera view page itself).
6
*There will be movement of Vmate three axes (roll,
pitch, and yaw) for self-test during booting up; Do not
touch the device during the period to avoid affecting
the equipment performance .
*Self-discharge in batteries will happen during storage;
please charge the device before turning it on if the
product cannot boot up normally.
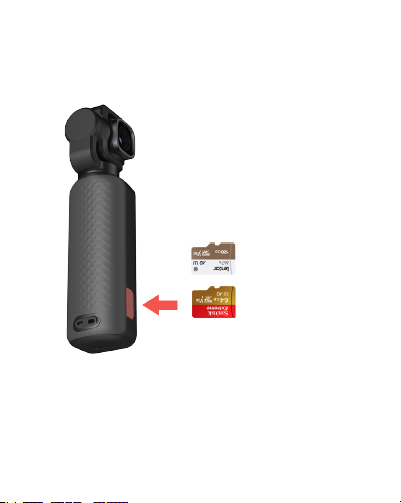
Insert the microSD card
Insert the microSD card (Self-purchase) into the
microSD card slot as shown.
It is recommended to use a microSD card with or over a
UHS-1 Speed Class 3 (U3), the max capacity is 512 GB.
Be sure to format the microSD card via the device at the
first use before recording videos/pictures.
7

*Due to the complexity of SD card parameters, below
SD card brands and models are recommended:
1. SanDisk UHS-1 U3 - 64G and over
2. Lexar 667x and over
*A microSD card is required to update firmware and
Swipe up on the touch screen
to enter gimbal Settings page Tap Settings
Tap Available Tap Format SD
8
Charging
When the battery level is low, the red light is always on if
turned on the device. Charge the device in time in case it
running power out and shut down.
Using the Charger that Came with Your Device
1. Use the USB cable that came with your Vmate to
connect your Vmate and the adapter (User-supplied).
2.Plug the adapter into a power socket.
Charging time: Approx. 100 mins (when using a USB
adapter of 5V/2A).
Refer to the below for status LED instructions.
Status LED
Low battery:Solid red
Charing:Blinks green
Full battery/Normal:Solid green
9

Rotatable lens
·Hold the camera rotatable lens with hand and rotate
the lens 90 degrees counterclockwise to switch to
“landscape filming”.
·Hold the camera rotatable lens with hand and rotate
the lens 90 degrees clockwise to switch to “vertical
filming”.
Landscape Portrait
*Set landscape/portrait mode through Vmate touch
screen at the same time when rotated rotatable lens to
landscape/vertical filming.
10

Operating the Touch Screen
The touch screen displays the camera view after
turned on Vmate, as well as the shooting parameters,
battery level and album etc.
Details as follows:
11
Show current
shooting mode
and parameters.
Media library, tap
to view shot
pictures/videos.

Touch screen camera view:
12
Swipe Right
13
Swipe right on the touch screen to enter the shooting
mode settings page and swipe up or down to select the
desired shooting mode.
The displayed shooting mode will automatically be the
current shooting mode, then tap the screen or swipe left
to back camera view.
Swipe right to enter shooting mode settings page
Swipe up or down to select desired shooting mode

Supported to set the video resolution, frame rate,
and video codec.
·Optional video resolution/frame rate:
1080 24/25/30/50/60; 1080+(1080p downsampled 4K)
24/25/30/50/60; 4K 24/25/30/50/60
·Optional video codec: H.264; H.265
*Swipe up on the camera view page to set shooting
parameters for current shooting mode.
Video
Photo
Panorama(not available in portrait mode)
Supported to set photo format and ratio.
·Optional photo format: JPG; DNG
·Optional photo ratio: 3:2;4:3;16:9
·Supported methods to set panorama: 90°/180°/270°/3×3
90°: four lateral images combine to one picture;
180°: seven lateral images combine to one picture
270°: ten lateral images combine to one picture
3×3: three images above in every three layers combine to
one picture
14

15
Supported to set shooting interval, duration,
and resolution.
·Optional shooting interval: 0.2s/0.5s/1s/2s/4s/8s/10s
·Optional duration time: 10s/30s/1min/2mins/5mins
·Optional resolution: 1080p;1080+;4k
Timelapse
·Optional shooting speed: :×2/×4/×8
·Optional video codec: H.264; H.265
Slow motion
Supported to set exposure time, picture format and ratio
·Optional exposure time: auto; 1×; 2×; 3×; 4×; 5×; 6×; 7×
·Optional photo format: JPG; DNG
·Optional photo ratio: 3:2;4:3;16:9
Night photography
*Must connect Vmate App for panorama shooting; the
shot panorama picture will store in the phone's
album automatically; please tap “Local” in the Vmate
App album if you need to view it via Vmate App.
·Optional photo ratio: 3:2;4:3;16:9

Swipe Up
Swipe up on the touch screen to set parameters of
current shooting mode or enter the gimbal settings
page.
Tap settings icon to enter the gimbal settings page,
swipe left or right to select a setting.
Swipe up to enter settings page
16
Calibration:tap the icon to calibrate the gimbal.
Calibration is used to reduce drift and lens
imbalance issues caused by human error,
surrounding temperature and transportation
conditions, or nearby magnetic interference.
Place Vmate on a steady flat surface and do not
touch during calibration.

17
Space left:Tap the icon to view the remaining
capacity of the microSD card and format the
microSD card option.
Preview:Tap the icon to switch between the full
screen display and normal display.
Landscape/Portrait screen shooting:Must set
landscape/portrait mode through Vmate touch
screen at the same time when rotated rotatable
lens to landscape/vertical filming with the desired
need.
Auto power off:Tap the icon to set auto power-off
timer; available to set 30s/1min/3mins/10mins
without operation will automatically shut down.
Brightness:Tap the icon to switch between the
three brightness levels.
Battery level:Display the battery level of Vmate.
Firmware version:Display the current firmware
version.

Language:Tap the icon the switch device
language.
Factory reset:Tap the icon to reset to default
settings.
Regulatory:Tap the icon to view basic device
information: product name/model/manufactur-
er etc. (swipe left and right to show above
information).
18

Swipe Down
Swipe down on the touch screen to enter gimbal follow
mode settings page, tap to select the desired follow
mode, swipe left and right to view the all follow modes.
Swipe up on the follow mode settings page to back the
camera view page after selecting the desired follow
mode.
Swipe down to enter the follow mode settings page
Swipe left and right to select the desired follow mode 19
Table of contents


