SNOWSOUND DIESIS User manual
MOD.470-A
liv. 2
DIESIS
Design: Alessandro e Francesco Mendini
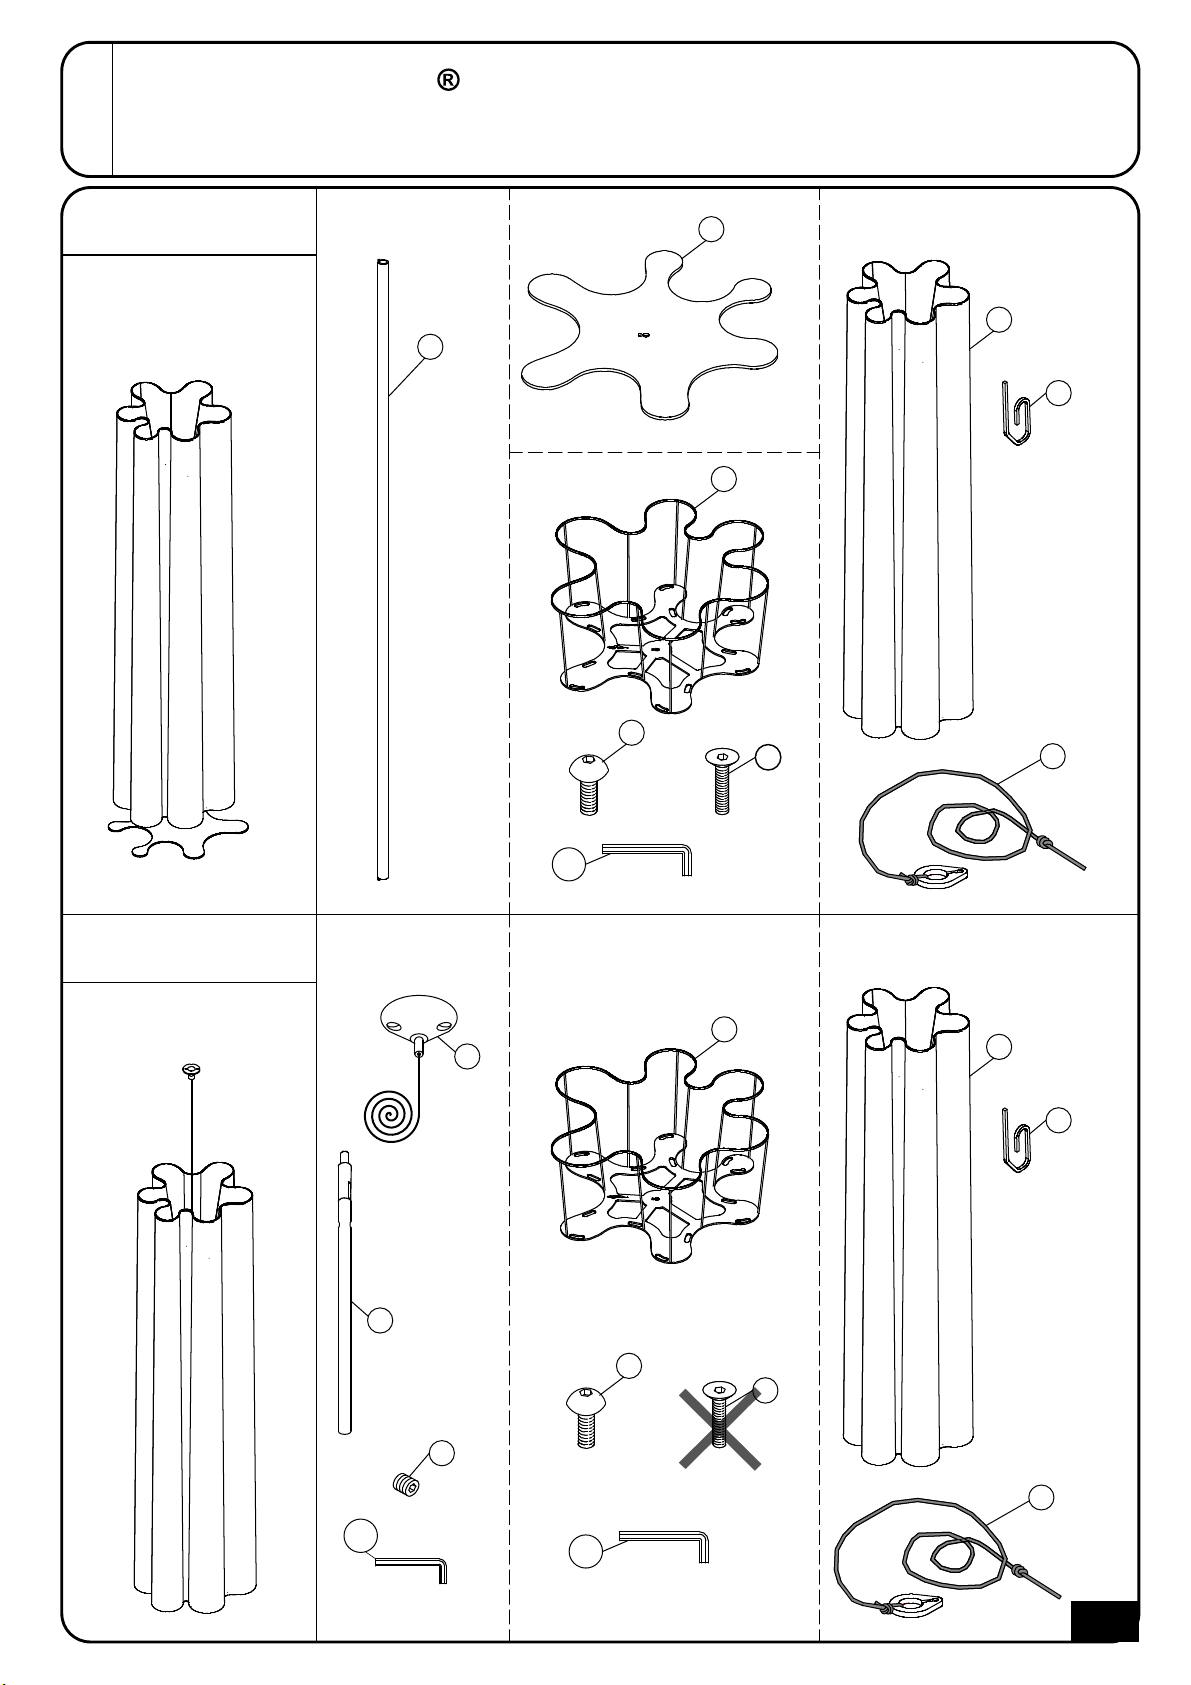
(x = colour alternative, variante couleur, variante color)
x1
x1
40025086
40025088
40025085
x1
40025085
x1
A
B
f
40025083
x1
g
c
x1
e
x1
d
x1
e
x1
d
c
x1
x1
n
h
m
zm x1
ze
x1
ze
400250XX
x14
b
a
x1
x14
b
a
x1
x1
1/8
x1
h
h
SNOWSOUND
Acoustic Panels Distributed by Snowsound USA
400250XX

2/8
1
3
I
II
III
IV
a
a
c
c
cc
a
a
b
b
b
b
*
*
*
*
*
*
*
*
*
*
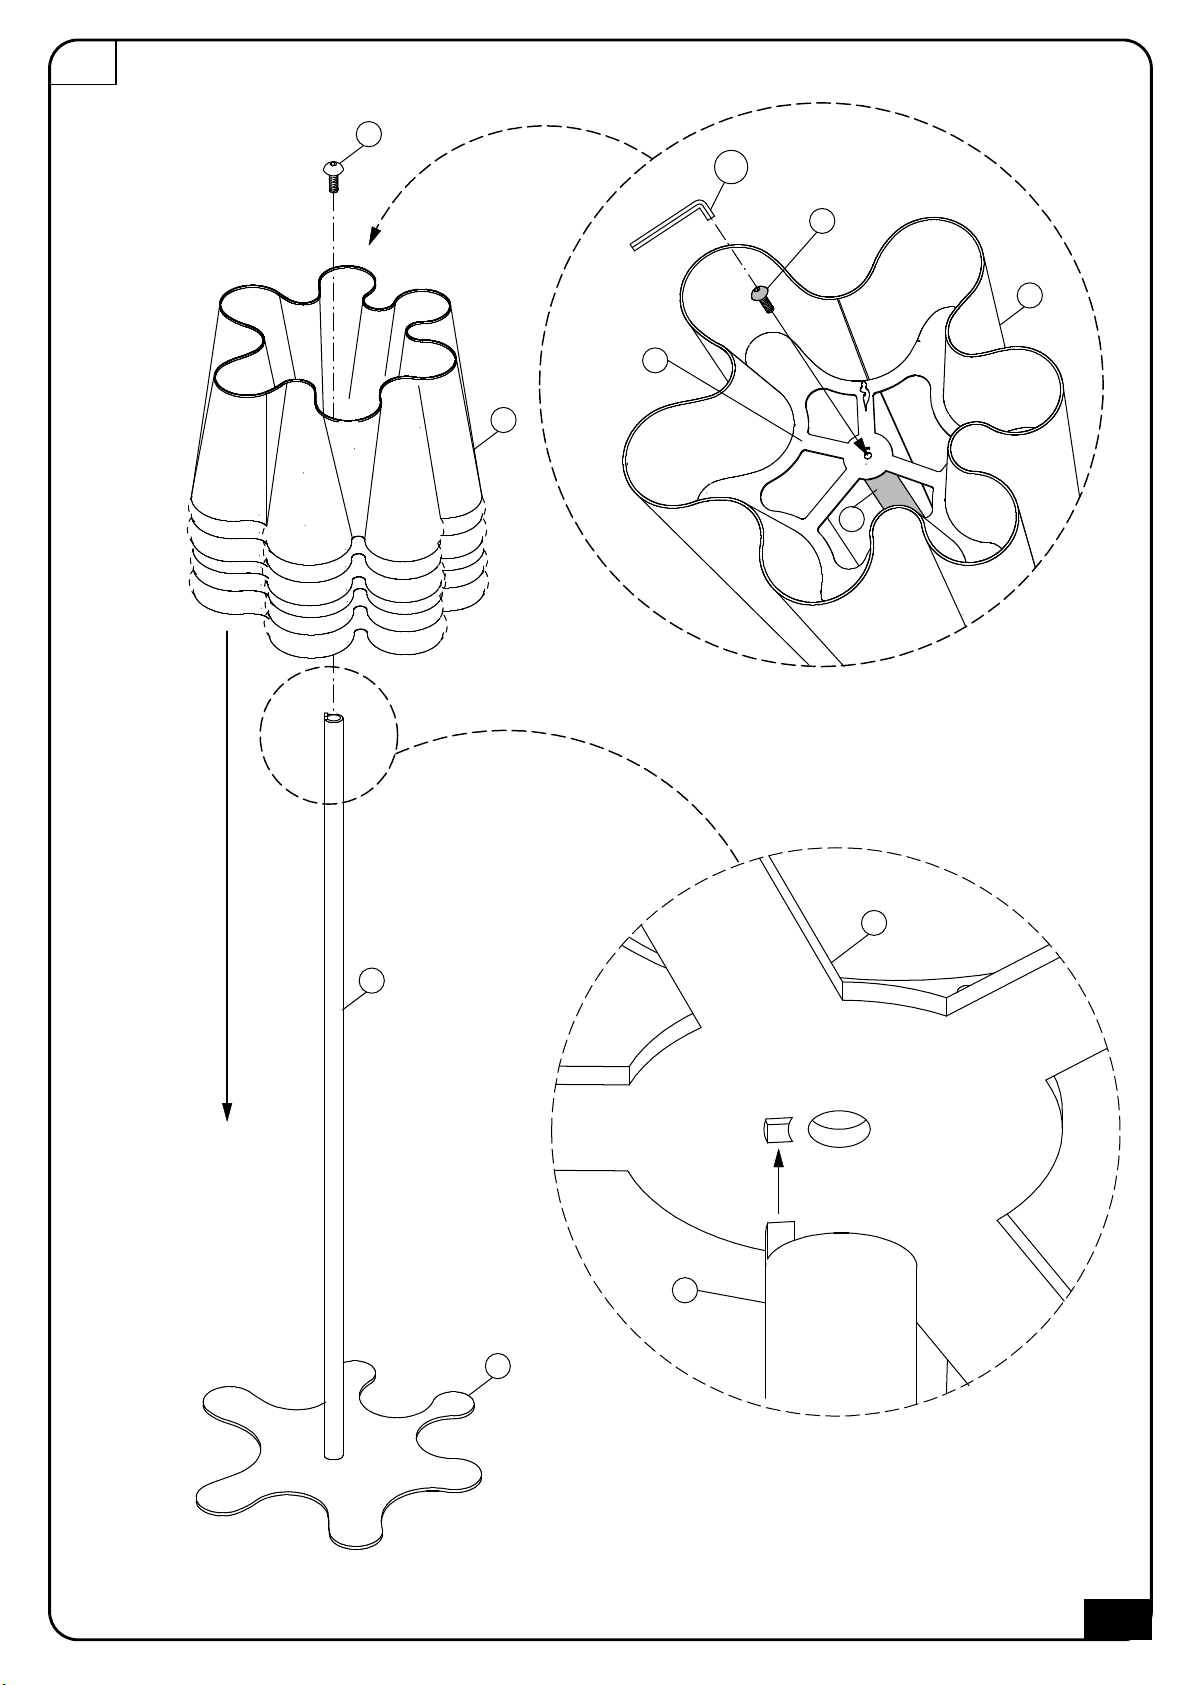
2
When positioning the fabric, please make
sure that the stitching is lined up with the
symbol
Al colocar de la tela,por favor asegúrese
de que la costura quede alineado con el
símbolo
Lors du positionnement du tissu,
assurez-vous que la couture est alignée
avec le symbole c
Please keep the SNOWSOUND
sticker outside
Garder l'étiquette SNOWSOUND
a l'exterieur
Mantener la etiqueta SNOWSOUND
alo exterior
a
c
a
c

A4/A
3/8
f
g
e
g
f
ze
5/A
4/8
f
a
d
a
d
g
c
f
II
ze
f
I
c

B6/B
7/B
5/8
n
h
a
n
m
a
h
d
c
e

6/8
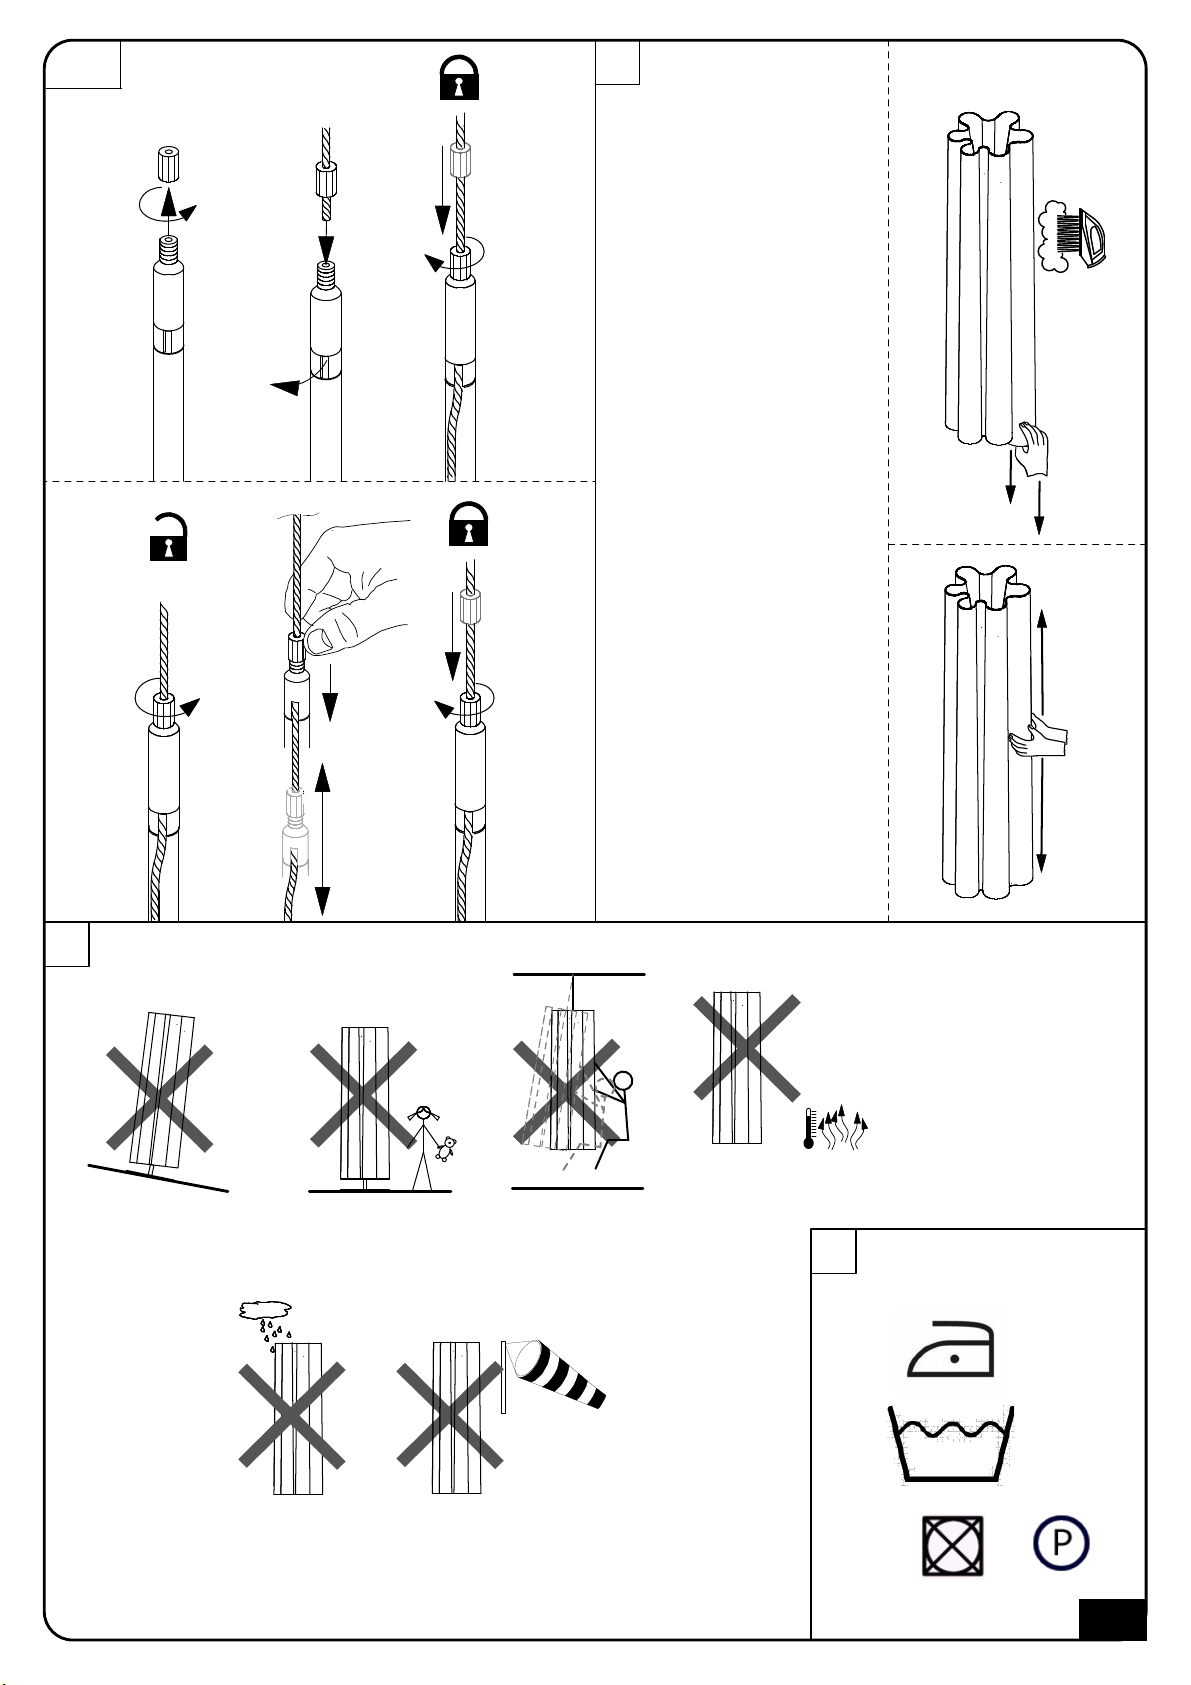
7
-Do not untie the knots indicated by the arrows.
-Ne pas défaire les nœuds indiqués par les flèches.
-No desatar los nudos indicados por las flechas.
8
3
4
5
h
a
2
1
6
I
II
h
h
III
h
7/8
NO
SNOWSOUND-FIBER
MAX 230°F
11
MAX 86°F
NO
NO NO
NO
8/B
II
IV
III
I
III
IV
III
9
I
II
III
To remove possible creases:!
I- Tighten the fabric!
II - Use a steam iron!
III - Shape the fabric
Pour éliminer les plis :!
I- Tendre le tissu
!II - Utiliser un fer à vapeur
!III - Façonner le tissu
Para eliminar los posibles
pliegues :!
I- Tensar el tejido
!II - Utilizar plancha de vapor
!III - Dar forma al tejido
°C
- tenere lontano da fonti di calore
- keep away from heat sources
-tenir loin de sources de chaleur
- mantener alejado de fuentes de calor
- Von Wärmequellen fernhalten
NO
10
86°

8/8
Congratulations on your latest SNOWSOUND purchase. Follow these instructions and you'll have this new product
mounted in no time. If you need any help,or to order replacement/missing parts, please call 1-800-747-2660 or email
"info@snowsoundusa.com"
NOTE!
Prior to assembling and installing the unit please read the following notes carefully.Pay particular attention to
the drawings in the assembly instructions.Please consult these notes every time the product is assembled
and/or installed.
1.The product must only be assembled and installed by qualified contractors. Warning: once the product has been
assembled always check that the structure is suitable for the type of application and/or use to which it will be put.
These products are not suitable for use by children.
2. Prior to installation check the load bearing capacity of the surface on which the product is to be fitted :use suitable
fixtures according to the type of surface which must be able to withstand the forces generated.
3. Warning: if you have any doubts concerning how to install the product and/or the load bearing capacity of the
surface on which it will fitted,do not fit it.4.Do not use detergents to clean the parts that are not in textile fabric.
Use only a cloth damp with water.
5. To clean the panel use only a dry stain removal, carefully following the instructions on the product used.
6. For further information on how to install the product,please contact your dealer.For any use different from the ones
here shown please contact the dealer.
7. To complete the assembling of the products please follow the instructions related to the chosen support
MISES EN GARDE!
Avant de procéder au montage et à l ’installation du produit,lire attentivement les mises en garde ci-dessous
présentées,en faisant particulièrement attention aux dessins explicatifs rapportées dans les instructions de
montage. Consulter ces mises en garde lors de chaque montage successif et/ou installation du produit.
1. Le montage et l ’installation du produit doivent exclusivement être effectués par un personnel technique compétent.
Attention: au terme du montage,toujours vérifier si la structure realisée est appropriée au type d ’usagers et/ou d
’utilisation auxquels elle est destinée. Les produits ne sont pas destinés aux enfants.
2. Avant de procéder à l ’installation,il est nécessaire de vérifier la capacité de charge de la surface sur lequelle le
produit sera installé :en conséquence,utiliser les dispositifs de fixation adaptes au type de surface et qui peuvent
résister aux forces produites.
3. Attention: en cas de doute sur les modalités d ’installation et/ou sur la capacité de charge de la surface sur laquelle
le produit sera installé,ne pas monter le produit.
4. Pour le nettoyage du panneau utiliser seulement un détachant à secen suivant soigneusement les instructions sur
le produit utilisé.
5. Ne pas utiliser de détergents pour nettoyer les pièces qui ne sont pas en tissu. Nettoyer seulement avec un
chiffon humidifié avec de l'eau.
6. Pour toute information complémentaire sur les modalités d ’installation,contacter le revendeur. Pour emploi différent
par rapport à ceux indiqués ici nous vous prions de contacter le revendeur.
7. Pour completer le montage du produit, suivez les instructions concernantes le support choisi
¡ADVERTENCIAS!
Antes de realizar el montaje y la instalación del producto leer atentamente las advertencias que se indican a
continuación, prestando especial atención a los dibujos y a las instrucciones para el montaje. Consultar estas
advertencias cada vez que se monte y/o instale el producto .
1. El montaje y la instalación del producto debe efectuarlo exclusivamente personal técnico competente. Atención:
una vez acabado el montaje,hay que comprobar siempre que la estructura realizada sea apta para el tipo de servicio
y/o uso al que se va a destinar. Los productos no son aptos para niños.
2. Antes de realizar la instalación es necesario controlar la capacidad de carga de la superficie en la que se colocará
el producto :por consiguiente,hay que utilizar dispositivos de fijación adecuados para el tipo de superficie capaces de
resistir las fuerzas generadas. Atención: la superficie del suelo debe en cualquier caso ser horizontal, plana, rígida e
indeformable.
3. Atención: en caso de duda sobre las modalidades de instalación y/o sobre la capacidadde carga de la superficie en
la que se vaya a colocar el producto,éste no deberá instalarse.
4. Para la limpieza del panele utilizar exclusivamente un producto quitamanchasen seco, siguiendo atentamente las
instrucciones que aparecen sobre elproducto utilizado
5. No utilizar detergentes para las partes que no son tejidos.Usar solamente con un tarpo humedesido con agua.
6. Para más información sobre las modalidades de instalación del producto,ponerse en contacto con el vendedor.
Para qualquier otra utilizacion por favor consulte con su distribuidor.
7. Para completar el montaje del producto, siga las instrucciones para el soporte elegido
Popular Speakers System manuals by other brands


Pure Acoustics
Pure Acoustics PX/240 owner's manual

Toa
Toa F-1000W Specifications

APOGEE ACOUSTICS
APOGEE ACOUSTICS Full Range Ribbon Speaker System Owner's manual and assembly instructions

Harman
Harman JBL Professional BRX 300 Series quick start guide

JBL
JBL LX22 instruction manual

LG
LG SN7CY Simple manual


