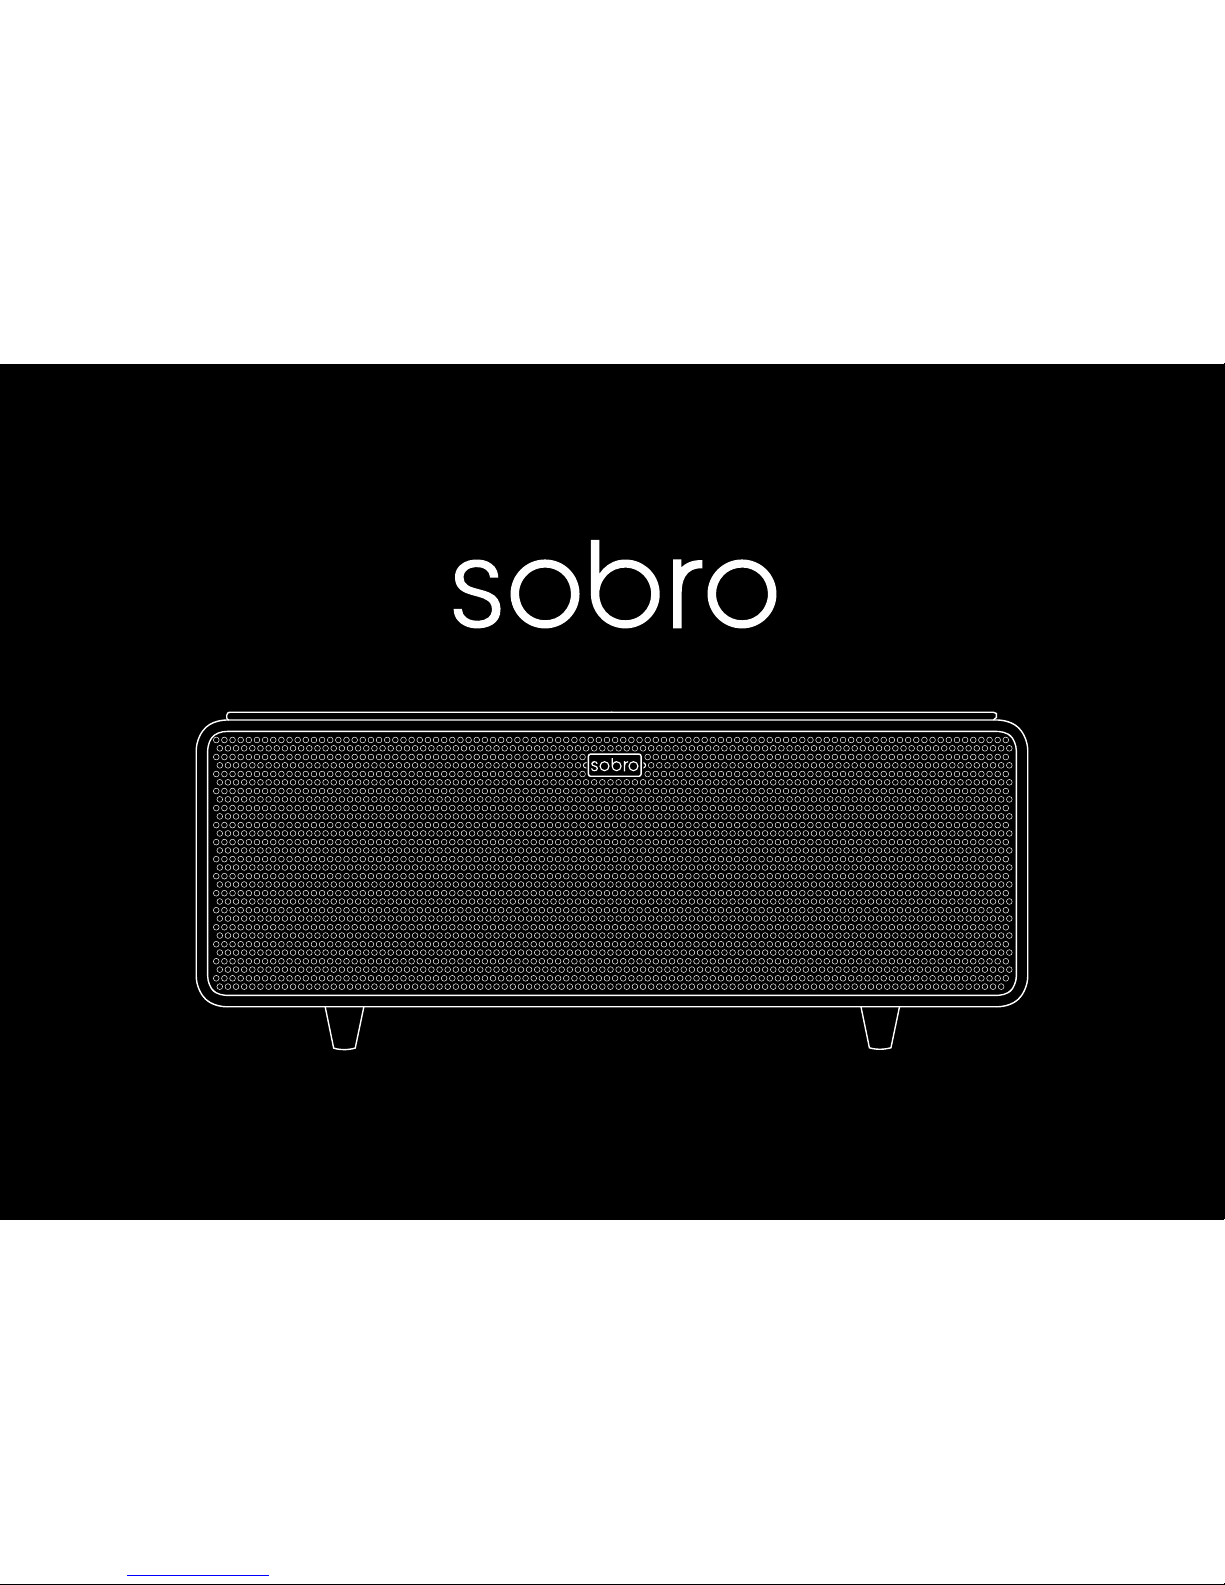
Sobro Coffee Table User manual
page title ∙ 1
Designed in NYC | Patent Pending
Coffee Table Quickstart
Coffee Table User Manual
2 ∙ page title welcome ∙ 3
Congrats on being ahead of the curve and being among
the rst to get the Sobro Coffee Table. You win.
Get ready to experience the sheer bliss of never having to get
up from the couch to get a cold beverage in the middle of a
game, the happiness of charging your phone without crawling
underneath your couch to nd a plug, and the exhilaration of
watching your friends reactions at your next party.
So relax, put your feet up and read these instructions and we’ll
have you up and running in no time.
Without your support, we would not have been able to bring
this amazing product to life.
Show us your Sobro style and post photos to Instagram with
the hashtag #sobrodesign, to our Facebook page Sobro Home
Cheers,
Evan Dash, CEO, and the StoreBound team
4 ∙ page title table of contents ∙ 5
Welcome ......................................................................................... 3
Sobro Timeline ............................................................................6-8
Important Safeguards .................................................................. 10
Choosing your Location .............................................................. 11
Installing Legs and Wheels ................................................... 14-15
Installing the Power Cord ........................................................... 16
Parts and Features ................................................................. 18-19
Control Panel.......................................................................... 20-21
Bluetooth Dongle ........................................................................ 22
Audio Selection ...........................................................................23
Settings .................................................................................. 24-25
Maintenance & Cleaning ............................................................26
Troubleshooting & Support ........................................................ 27
coffee table

Refrigeration
Most post WW2 households
could afford a modern style fridge,
allowing men all over the opportunity
to let food spoil at a slower rate.
Early Bro
Considered to be short
with words but long with
a battle stick, the early
bro most denitely chilled
out after a good hunt.
6 ∙ sobro timeline sobro timeline ∙ 7
Bluetooth
This radio wave based
technology was named for
a Danish King who enjoyed
eating blueberries, and it was
later incorporated into the
gooest tech to ever hang
from your ear.
THE EVOLUTION OF THE SOBRO COFFEE TABLE
The
Loudspeaker
Bass from the rst
loudspeaker wouldn’t exactly
rattle your Prius’ windows.
The design was part of the
rst phone created by
Alexander Graham Bell.
The Table
The earliest incarnation,
believed to be a simple
block of stone, was used by
the egyptians for eating.
Beer Pong came later.
The LED
Light-emitting diodes were
invented by Nick Holonyak, Jr. in
1962 while working for GE.
Dude later went on to win the
Nobel Prize. You could say
he lit things up in life.
page title ∙ 9 8 ∙ sobro timeline
The Sobro
Coffee Table
With a refrigerated drawer, Bluetooth
speakers, charging ports, and LED
lights, the Sobro keeps you powered
up. It could be the greatest living room
innovation since the remote control.
Designed for a digital lifestyle, Sobro is
the furniture of the future. We’ve elevated
the coffee table from a piece of wood that
props up unopened large-format books,
to an all-in-one center that connects your
powered up life.
And the Sobro Coffee Table is just the
start of our smart furniture revolution.
Stay tuned…
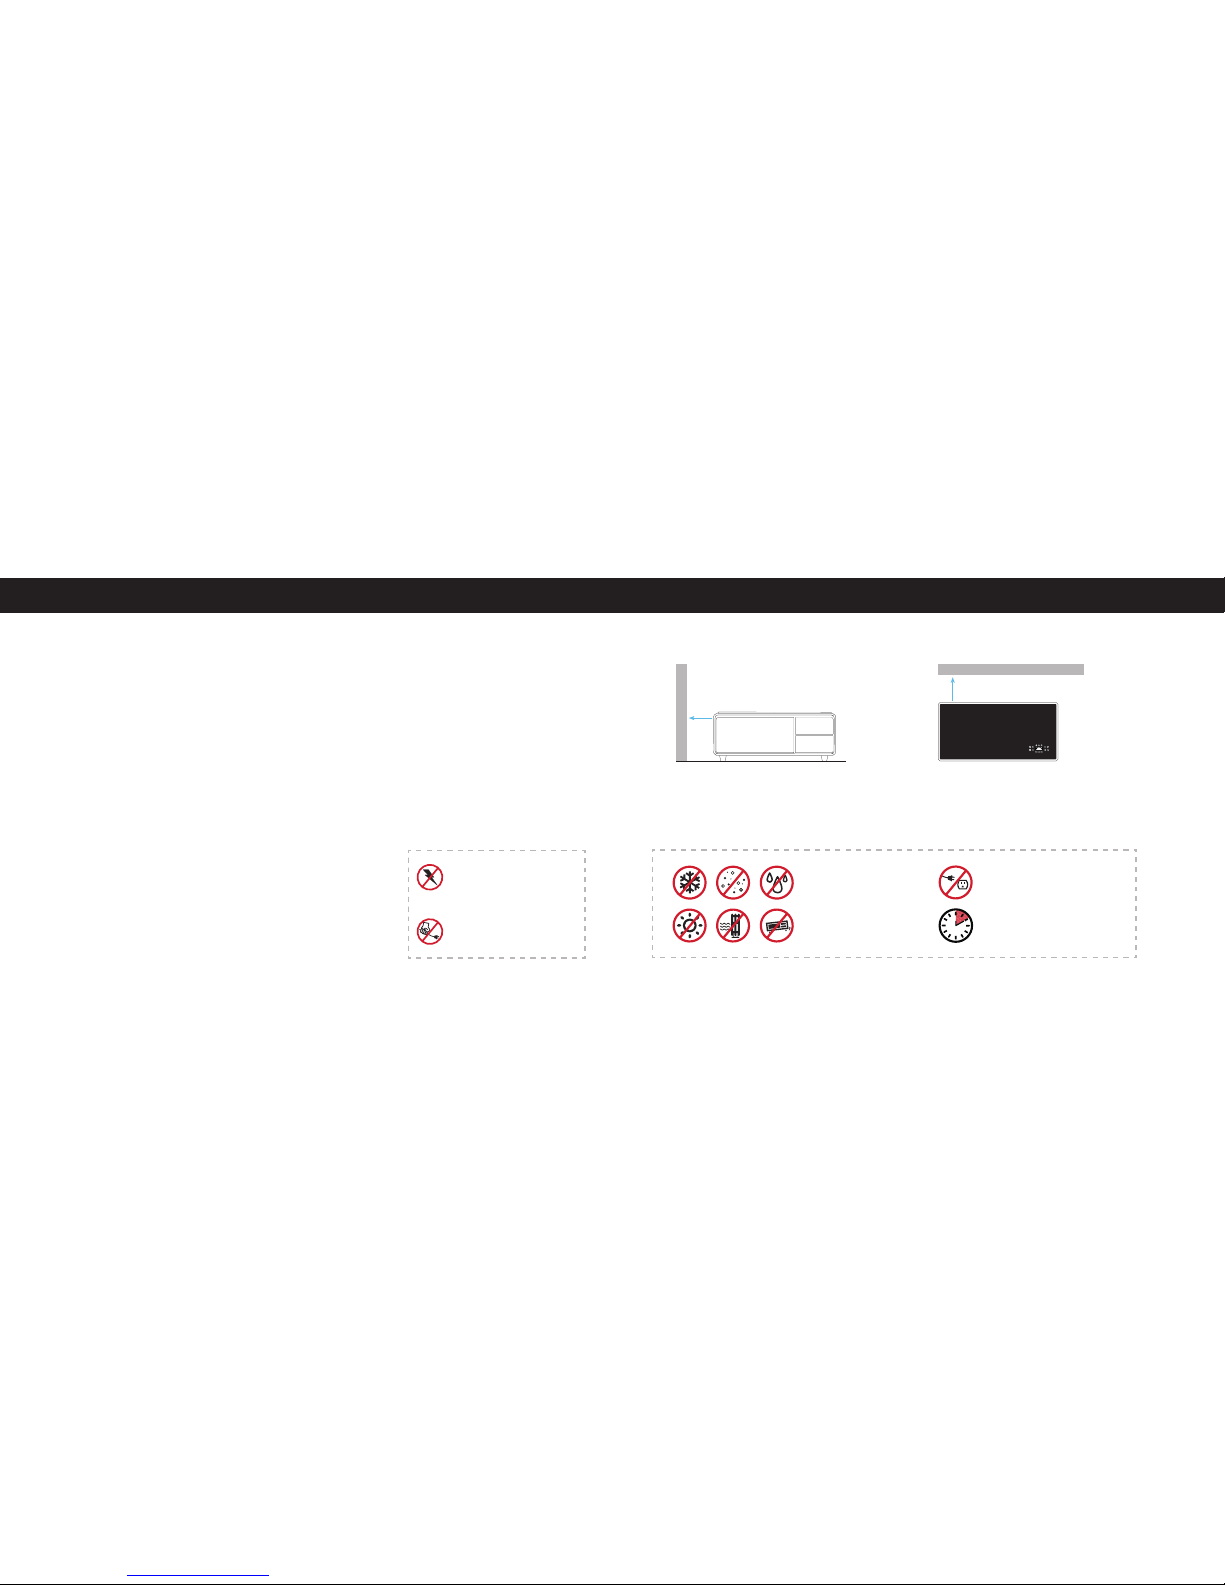
choosing your location ∙ 11 10 ∙ important safeguards
• Read all instructions.
• Make sure the appliance is cleaned thoroughly before using.
• Do not use appliance for other than its intended use. For
household use only. Do not use outdoors.
• CAUTION: ammable refrigerant used! When handling,
moving, and using the refrigerator; make sure to avoid either
damaging the refrigerant tubing which may increase the risk
of a leak.
• Remove all bags and packaging from appliance before use.
• For maintenance other than cleaning, please contact
StoreBound directly at 1-800-898-6970 from 7AM-7PM PST
Monday-Friday or by email at suppor[email protected].
• StoreBound shall not accept liability for damages caused by
improper use of the appliance.
• The safety and operating instructions should be retained for
future reference.
• Heed all warnings. All warnings on this product and in the
operating instruction manual should be adhered to.
• DANGER - Risk of child entrapment. Before throwing away a
refrigerator, remove the doors so that children may not easily
climb inside.
• Refrain from using attachments that are not recommended by
the appliance manufacturer, as this may result in re, electric
shock, or personal injury.
• Do not use the product near water and/or moisture, for
example: near a bathtub, sink, in a wet basement; or near a
swimming pool.
• Clean only with a slightly damp, lint-free cloth. Unplug this
product from the wall outlet before cleaning.
• Do not block any ventilation openings. Install the appliance in
accordance with the manufacturer’s instructions.
• Slots and openings in the cabinet are provided for ventilation
and to ensure reliable operation of the product and to protect
it from overheating.
• This product should never be placed near or above a radiator
or heat source. This product should not be placed in a built-in
installation such as a bookcase or rack unless proper ventila-
tion is provided or the manufacturer’s instructions have been
adhered to.
• This appliance has a polarized plug (one blade is wider than
the other). To reduce the risk of electric shock, this plug will
t in a polarized outlet only one way. If the plug does not
completely t in the outlet, reverse the plug. If it still does not
t, contact a qualied electrician. Do not attempt to modify the
plug in any way.
• A short power supply cord is to be provided to reduce the risk
resulting from becoming entangled in or tripping over a lon-
ger cord. An extension cord may be used if care is exercised
in its use. If an extension cord is used, the marked electrical
rating of the extension cord should be at least as great as the
electrical rating of the appliance. The extension cord should
be arranged so that it will not drape over the countertop or
tabletop where it can be pulled on by children or tripped over
unintentionally.
• Do not operate this appliance with a damaged cord, damaged
plug, after the appliance malfunctions, is dropped, or dam-
aged in any manner. Return appliance to the nearest autho-
rized service facility for examination, repair, or adjustment.
• Always unplug the appliance when not in use for an extended
period of time.
• Safety check - upon completion of any service or repairs to this
product ask the service technician to perform safety checks to
determine that the product is in proper operating condition.
• The product should be operated only from the type of power
source indicated on the marking label. If you are not sure of the
type of power supply to your home, consult your appliance dealer
or local power company. For products intended to operate from
battery power, or other sources, refer to the operating instructions.
• Do not overload wall outlets and extension cords as this can
result in the risk of re or electric shock.
• Object and liquid entry -Never push objects of any kind into
the product as they may touch dangerous voltage points or
short out parts that could result in re or electric shock. Never
spill or spray any type of liquid on the product.
• Do not attempt to service this product yourself. Contact
please contact StoreBound directly at 1-800-898-6970
from 7AM-7PM PST Monday-Friday or by email at
• When replacement parts are required, be sure the service
technician uses replacement parts specied by the appliance
manufacturer, or those that have the same characteristics as
the original part.
• WARNING - Please refer to the information on the inside of the
drawer for electrical and safety information before installing or
operating the appliance.
When using electrical appliances, basic safety precautions should be followed, including:
IMPORTANT SAFEGUARDS:
PLEASE READ AND SAVE THIS INSTRUCTION MANUAL
Before connecting the appliance
to an electrical power supply, let
the Sobro stand unplugged for
about 4 hours in its nal location,
This will reduce the possibility of a
malfunction in the cooling system
due to mishandling or jostling
in transport.
IMPORTANT SAFEGUARDS CHOOSING YOUR LOCATION
Before installing your
Sobro, choose the location
carefully. Avoid placing the
Sobro in direct sunlight
or close to a heat source.
Avoid locations subject to
vibrations and excessive
dust, cold, or moisture.
Do not open the Circuit Board Cabinet
as this will result in damage to the
circuitry or electrical shock. If a foreign
object should get into the appliance,
contact customer service.
When removing the power plug from
the wall outlet, always pull directly on
the plug, never pull the cord.
Ventilation
Make sure that there is ample room around the Sobro Coffee
Table to ensure adequate ventilation for the refrigerator. Do not
place the back of the Sobro Coffee Table against a wall as this
may result in overheating.
3 inch min.
3 inch min.
Wall
Wall
Location
Place the Sobro Coffee Table in a dry and well-ventilated room.
Do not place the appliance near a heat source (e.g. radiators,
water heaters or similar devices) and do not expose the appliance
to direct sunlight.
ATTENTION: it is dangerous to use the same multipurpose power outlet for the Sobro table and other home appliances.
Please do not use the same power outlet for the table along with any other home appliances.

page title ∙ 13 12
“Every once in a
while we come
across an invention
that makes us slap
our foreheads...the
Sobro Coffee Table
is one of those ideas”
---Way Important Reporter

installing the wheels ∙ 15 14 ∙ installing the legs
Step One
When attaching the four legs to your
Sobro, use the foam shipping inserts
or a blanket to serve as a cushion for
the table to rest on.
Have one partner lift one side of the
Sobro table off the ground*. Rest the
opposing side on a foam insert or
cushion for protection.
Step Two
While the corner of the Sobro table
is lifted, the other partner should
attach the leg by screwing it into the
leg nut. Screw in the leg until it is fully
inserted into the Sobro table and is
secure. Do not overtighten.
Step Three
Repeat the process with the other
three legs of the Sobro. Remember
to always protect the corners
without legs by using either one
of the foam inserts or a blanket to
avoid damaging the table.
PLEASE READ: Do not attempt to attach the legs or fully install the Sobro table on your own.
You will need two people or more to completely install the Sobro. Then you can party on.
Step Four
After installing the legs or moving
the Sobro, you must let the
refrigerator coolant settle for a
minimum of 4 hours before plugging
in the Sobro.
WE REPEAT:Do not plug in
the Sobro Coffee Table until
4 hours have passed.
X 4
INSTALLING THE LEGS
X 2
Step One
The Sobro Coffee Table comes
with two wheel attachments for
transportation. The two wheels
attach to one side of the underside
of the Sobro by sliding into the
wheel braces.
Step Two
Have one partner lift one side* of the
Sobro table off the ground while the
other partner slides each wheel into
its corresponding wheel brace.
Step Three
To move the Sobro, after the wheels
are installed, lift one end of the
Sobro and use the wheels to roll it
to the desired location. To remove
the wheels, reverse the procedure
in Step One.
Step Four
After installing the wheels and
moving the Sobro, you must let
the refrigerator coolant settle for
a minimum of 4 hours before
plugging in the Sobro.
WE REPEAT: Do not plug in
the Sobro Coffee Table until
4 hours have passed.
INSTALLING THE WHEELS
SOBRO A GOGO: The two wheels included are intended to be installed to allow you to easily
move the Sobro table to your desired location. WARNING: These are not for wheeling the table
up and down any type of stairs or steps.
*USE PROPER LIFTING TECHNIQUE
(Refer to: webmd.com/back-pain/proper-lifting-technique) If you have a history of back pain or injury, do not attempt to lift table.
Sobro (Storebound, LLC) will not accept responsibility for any injury that may occur during set up process.
*USE PROPER LIFTING TECHNIQUE
(Refer to: webmd.com/back-pain/proper-lifting-technique) If you have a history of back pain or injury, do not attempt to lift table.
Sobro (Storebound, LLC) will not accept responsibility for any injury that may occur during set up process.
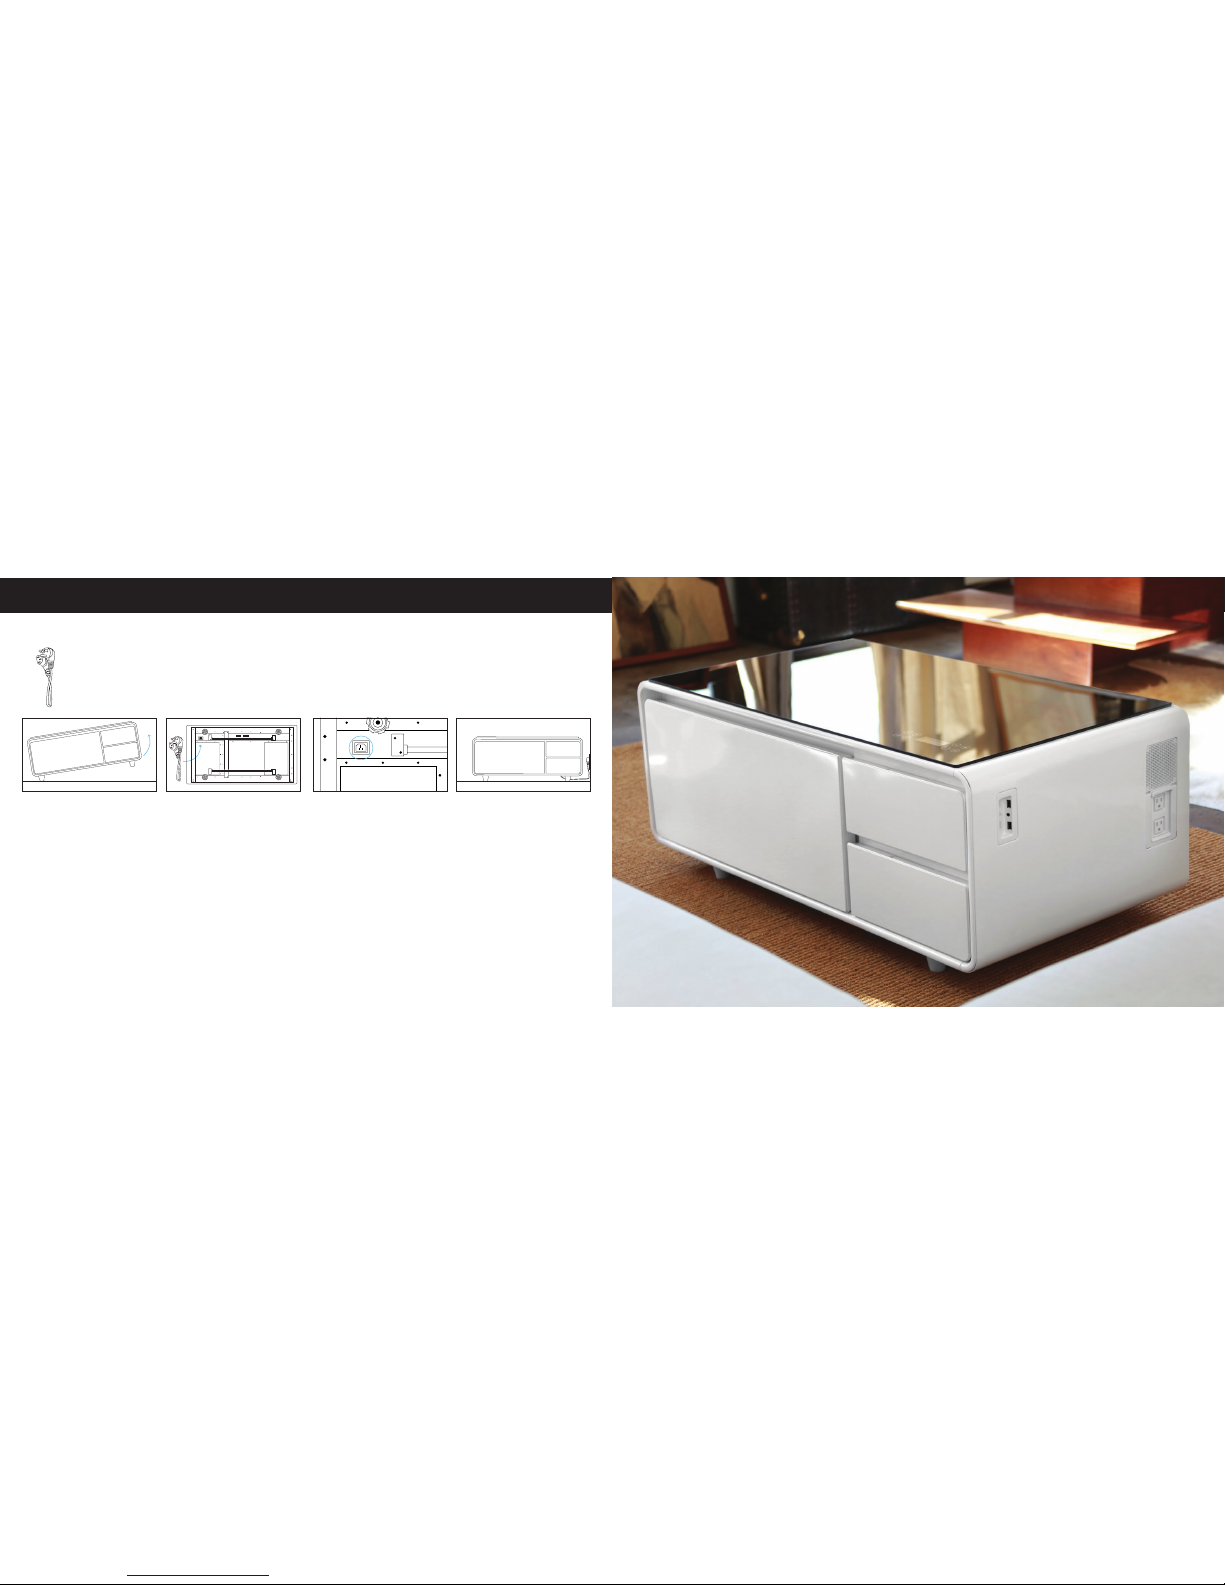
page title ∙ 17 16 ∙ installing the power cord
Step One
WARNING: Do not attempt to install
the power cord until the legs are
installed.
Have one partner lift the right side* of
the Sobro table off the ground. Rest
the opposing side on a foam insert or
cushion for protection.
Step Four
After installing the legs or moving
the Sobro, you must let the
refrigerator coolant settle for a
minimum of 4 hours before plugging
in the Sobro.
WE REPEAT: Do not plug in
the Sobro Coffee Table until
4 hours have passed.
X 1
Step Two
The power socket is located on the
underside of the Sobro Coffee Table
towards the back right corner.
Locate the socket and unwrap the
power cord before attaching.
Grounding Instructions:
This appliance must be plugged into a grounded socket. The power cord that is supplied with the
appliance contains the appropriate grounding conductor and grounding plug.
The plug must be inserted into a wall outlet that has been grounded in accordance with the existing
local codes and ordinances. The required nominal voltage and frequency are indicated on the rating
label. Consult a qualied electrician for other concerns.
Step Three
Plug in the adaptor end of the
cord to the socket in the indicated
location above.
INSTALLING THE POWER CORD
Front - drawers
Back - mesh
*USE PROPER LIFTING TECHNIQUE
(Refer to: webmd.com/back-pain/proper-lifting-technique) If you have a history of back pain or injury, do not attempt to lift table.
Sobro (Storebound, LLC) will not accept responsibility for any injury that may occur during set up process.

parts and features ∙ 19 18 ∙ parts and features
Back Left Side
Tempered Glass TopOptional Wheels Leg
120V Outlets 120V Outlets2 USB Ports
PARTS AND FEATURES
Bluetooth
Speaker
Front Right Side
Refrigerator Storage Drawers AUX IN Bluetooth
Speaker
NOTE: The maximum power draw on the Sobro table is 800 watts
for all the outlets combined. Do not plug in appliances such as
vacuums or blenders into the table to prevent the possibility of
a short. If a short occurs, unplug items that are plugged into the
table and the outlet should reset itself in 1 minute.
NOTE: The USB Ports can be used to charge mobile devices
but are not part of the audio input system.

20 ∙ page title control panel ∙ 21
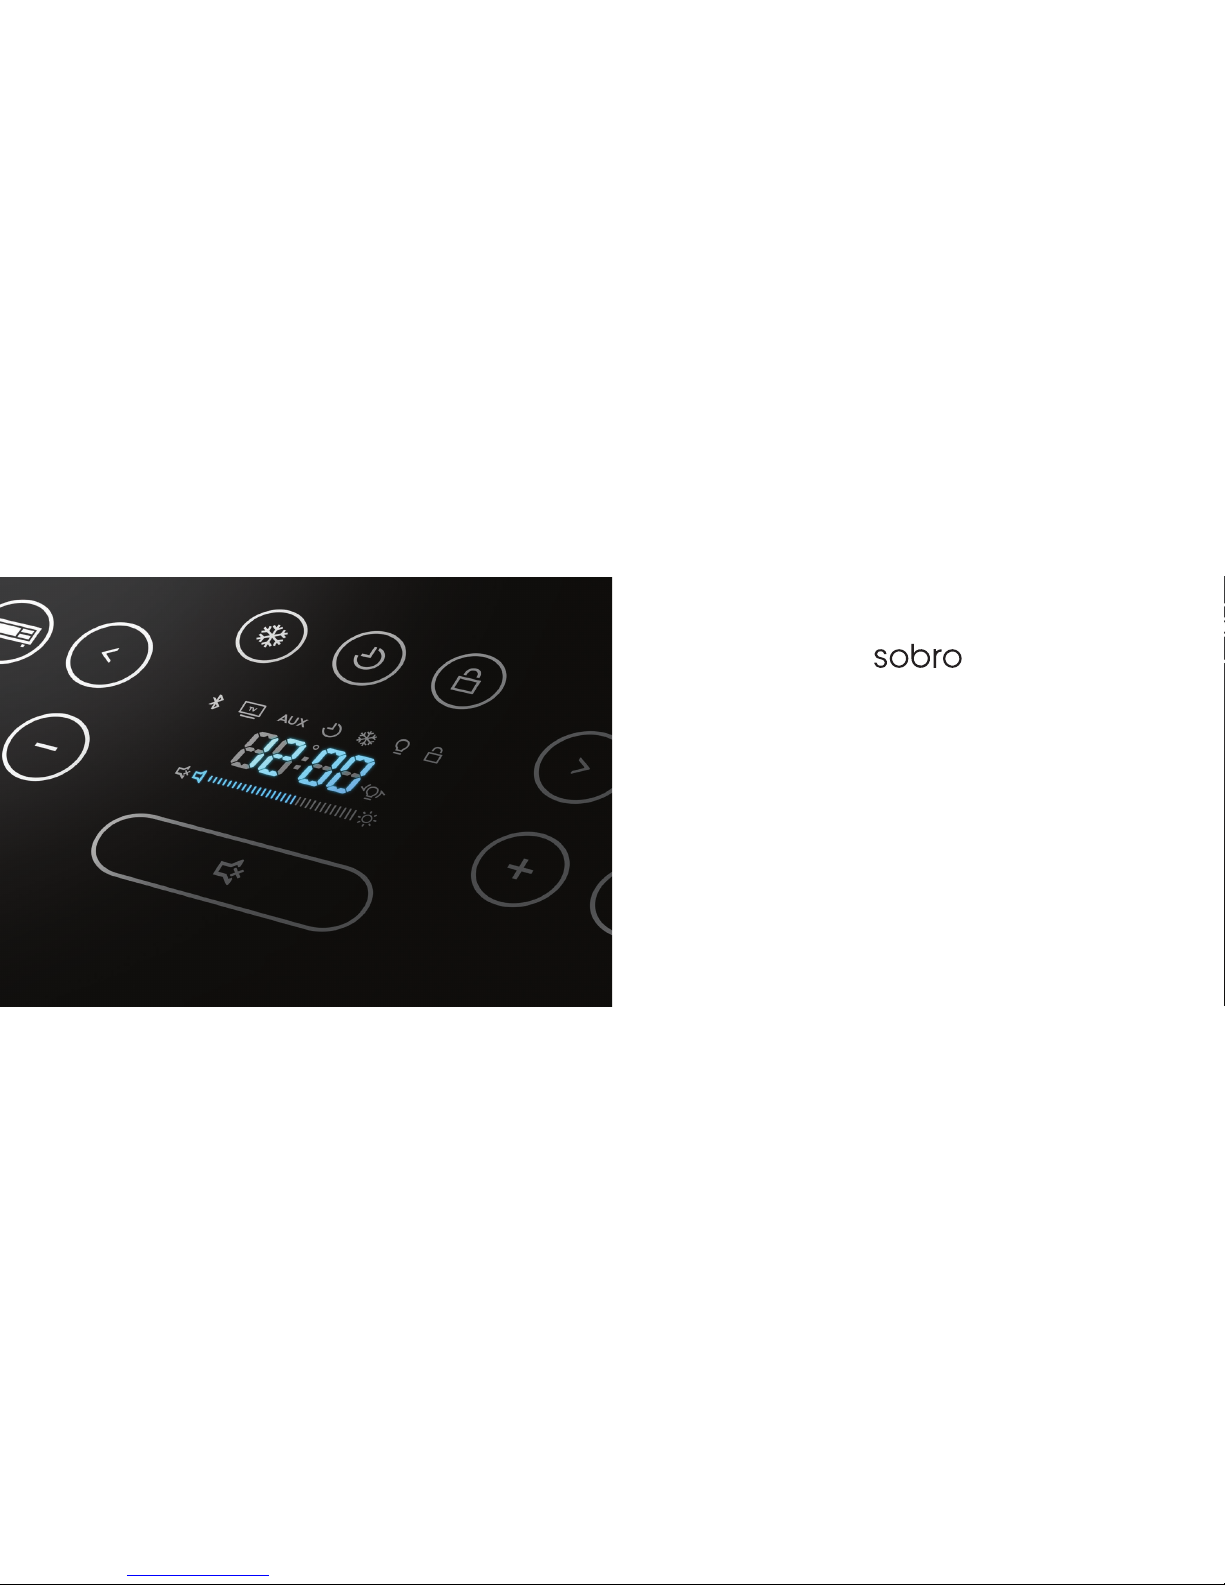
CONTROL PANEL
Power/Lock & Unlock
Hold the button for 2 seconds
to power on the table initially.
Tap the button once to lock or unlock
the panel.
To turn the power off, the table must
rst be unlocked. Then, hold the
button for 2 seconds. The refrigerator
will remain on.
Source
Press repeatedly to change the audio
input source from Bluetooth, TV
Dongle, or AUX-IN.
The table must be unlocked before
using the controls.
Play/Pause
Press once to pause the playback,
press again to resume.
Previous
Press this button to select the
previous song or go back.
Next
Press this button to select the next
song or to skip forward.
Plus
Increase the volume level, set
the time or raise the refrigerator
temperature.
Minus
Decrease the volume level, set
the time or lower the refrigerator
temperature.
LED Lighting Power
Press to turn on the LED lights,
press again to turn off.
LED Lighting Adjust
Press to adjust the LED color and/or
brightness level.
LCD Display
Displays current operations and
the time.
Mute
Press to mute the sound, press again
to resume.
The table must be unlocked before
changing the settings.
Temperature
Press and hold for 2 seconds to
enter the temperature setting.
Time Set
Press and hold for 2 seconds to
enter the time setting.
Primary
Settings
Controls Lights
Display
20 ∙ control panel
Play/PauseSource Previous Temperature NextPower/Lock & UnlockTime Set
LED Lighting
Power
LED Lighting
Adjust
Minus PlusMuteLCD Display
The table must be unlocked to use the control panel. To unlock the control panel, tap the Power/Lock & Unlock button.
The control panel locks automatically after 30 seconds if no operation is performed.
The table must be unlocked before
adjusting the lights

audio selection ∙ 23
TV Mode:
This mode is designed for pairing the table with the Bluetooth dongle.
First, power on the table. To select the TV mode, press the “Source”
button until the TV icon on the display screen lights up.
Audio Input Mode:
When you have selected the AUX input, the “AUX In” logo will illuminate.
Connect a 3.5mm audio cable (provided) between your device and
the Sobro Coffee Table. You can now control the playback with your
connected device. The USB ports do not support audio input.
Press Icon Lights Up
Press Icon Lights Up
AUDIO SELECTION
Bluetooth: Default Mode
After powering on the Sobro table, the Bluetooth icon on the display
will automatically light up and ash. On the device you want to
pair with the Sobro (mobile phone, tablet, Smart TV, etc…) begin
Bluetooth pairing mode. Pair with the device called “SOBRO.” When
paired, the Bluetooth icon will illuminate steadily.
Press Icon Lights Up
Specic procedures for Bluetooth
pairing may vary from device to
device. Check the user manual
of your device for specic
instructions about Bluetooth
pairing. In some cases, you may
need to enter a password on your
mobile device to pair.
If so, type in the password 0000.
Only one Bluetooth-enabled
device can be paired with the
Sobro at a time. To connect a new
Bluetooth-enabled device, unpair
the rst one, or press and hold the
“Source” button to disconnect.
NOTE: Please keep the pairing
range within 10 meters.
BLUETOOTH DONGLE
22 ∙ bluetooth dongle
Setup & Assembly
1. Connect the Micro USB plug to the
Micro USB jack on the back of the dongle.
2. Connect the USB end into the power adapter
and then into a wall outlet to power the dongle.
3. Connect either the 3.5mm cable or RCA cable
to the AUX IN jack on the back of the dongle
based on the outputs of your TV or device.
4. Connect either the 3.5 mm or RCA plugs to
the audio output of your TV or device.
5. Press the Power/Bluetooth button once to
start the dongle.
6. To turn off the dongle, press and hold the
Bluetooth button for 5 seconds.
Connect to the Sobro table:
1. Power on the dongle by pressing the
Bluetooth button and to get ready to pair.
2. Wait for 5 seconds and the dongle will
connect to the Sobro table automatically.
3. Put Sobro in TV mode.
4. When connecting, the blue LED indicator
light will pulse.
5. When the Bluetooth connection is
completed, the LED indicator will stop
ashing.
Bluetooth Button AUX IN Jack
Micro USB
Jack
LED Indicator Light
The Bluetooth dongle provided helps connect your non-Bluetooth enabled TV or device to the Sobro table.
If you have a smart TV with Bluetooth built-in, you may not need the Bluetooth dongle to connect the audio from your TV to the Sobro table.
Front Back

SETTINGS
24 ∙ settings settings ∙ 25
Setting the Temperature:
The Sobro must be powered on and unlocked before
changing the settings. Press and hold the “Temp.” button
to change the temperature settings. The “Temp.” icon
will light up on the display. Use the “Previous” or “Next”
button to switch the temperature between “Degrees
Celsius” and “Degrees Fahrenheit”. Adjust the
temperature level by pressing the “+” or “-” button to
increase or decrease the temperature of the refrigerator.
Note: press the “Temp.” button again to save the settings.
The settings will also be saved automatically if not
changed after 5 seconds.
Setting the Time:
The Sobro must be powered on and unlocked before
changing the settings. Press and hold the “Time” button
to change the time. The “Time” icon on the display
screen will light up. 12:00 p.m. is the default time when
you enter the time settings. Press the “Time” button
again until the display icon ashes. Use the “Previous”
or “Next” buttons to adjust the hours. Press the “+” or
“-” icons to adjust the minutes. Press the “Time” button
again to exit the Time menu and save your settings or
wait 5 seconds and the Sobro table will save your time
settings automatically.
Press Icon Lights Up Select
(Fº) (Cº)
Adjust Temp
Press Icon Lights Up Adjust Hour Adjust Minute
SETTINGS
Control the LED Color:
The Sobro must be powered on and unlocked before
changing the settings. First press the “LED Lighting
Power” button and then press the “LED Lighting Adjust”
button. Once the “LED Lighting Adjust” button is pressed
the light bulb icon on the display will illuminate. This
means you can now adjust the color. Press the “Previous”
button to change the color of the lights. There are 8 color
choices. Press the “Next” button to determine if your
selected color is continuous or pulses. The program will
automatically exit in 5 seconds and save your settings.
Control the LED Brightness:
The Sobro must be powered on and unlocked before
changing the settings. First press the “LED Lighting
Power” button and then press the “LED Lighting Adjust”
button. Once the “LED Lighting Adjust” button is pressed
the light adjust icon on the display will illuminate. This
means you can now adjust the color. Use the “+” or “-”
icons to increase or decrease the brightness level of the
lights. The program will automatically exit in 5 seconds and
save your settings.
Press
Press
Press
Press
Display Shows Color
Numbers 1–8
Display Shows LED
Brightness
Select Color
Select
Continuous
or Pulsing
Adjust Brightness
troubleshooting & customer support ∙ 27
MAINTENANCE & CLEANING
Clean the Sobro regularly to avoid dust accumulation. Wipe the surface of
the table with the included microber cloth.
Use a small handheld vacuum or a soft brush to clean any dust. Do not use
abrasive or sharp tools to clean your Sobro.
If you are powering off the table for an extended period of time, clean and
dry the refrigerator drawer and store them in a clean, dry location. Do not
place any parts outdoors.
Before cleaning the Sobro, please make sure to turn off the table and
remove the plug. Do not submerge or douse any part of the appliance with
water or any other liquid. Do not use abrasive or corrosive cleaning agents
to clean the Sobro.
How To Prevent Odor Build-up:
Foods that may expire easily should not be placed in the refrigerator. Store
foods in sealed plastic bags.
Keep the refrigerator clean and dry. Clean the drawer on a regular basis
Auto Shut-off Function:
The Sobro table has a freezing function that will shut the refrigerator
off automatically if the ambient temperature is too low. If the ambient
temperature is lower than 5℉, the refrigerator will not work.
How To Remove Odors:
If your refrigerator begins to develop an odor, clean the refrigerator with
a non-corrosive or non-abrasive cleaning agent. Dry the refrigerator with a
soft cloth and shut the drawer for 24 hours to remove the smell.
In order to avoid generating an odor in the refrigerator, avoid placing foods
that will expire in the refrigerator for a long period of time.
26 ∙ maintenance & cleaning
TROUBLESHOOTING & CUSTOMER SUPPORT
For product support, warranty, and maintenance related questions, please contact StoreBound directly at: 1-800-898-6970 from
REPAIRS: DANGER! Risk of electric shock! The Sobro is an electrical appliance. Do not attempt to repair the appliance yourself under any circumstances.
Contact Customer Support regarding repairs to the device.
ISSUE SOLUTION
If the Sobro is placed unsteadily. Adjust the placement of the Sobro by adjusting the four legs under the table. Rotate the legs to adjust.
The Sobro table is not chilling ingredients
or beverages in the refrigerator.
The refrigerator may be too full. Remove some of the beverages or food in the refrigerator.
Ensure the drawer is closed properly.
Adjust the temperature to its lowest setting.
Ensure the back of the table is properly vented.
If the table is still not chilling, call customer service.
The refrigerator temperature is high.
Ensure that the refrigerator drawer is always closed tightly.
Do not place hot food in the refrigerator.
Do not overll the refrigerator.
Make sure the Sobro table is properly ventilated.
Odor from refrigerator.
Unit should be cleaned before using for the rst time. This will clear any odors that may have been trapped during shipment.
Clean unit and refrigerator drawer thoroughly.
Any uncovered foods will create a odor. Remove and clean drawer.
The unit does not turn on. Assure that the power cord is attached properly.
Check to make sure the outlet the table is plugged into has power
There is a burning odor during operation. This may occur when you rst turn on the unit as the motor cycles through.
If it continues, unplug the unit and call customer service.

page title ∙ 29 28
We’ve thought about every detail of the
Sobro Coffee Table to make it into the ultimate
convenience. Play music and change the song
from your phone or via touch controls on the
top of the table.
LED lights set the mood or start the party.
And you can connect your Smart TV and run
the audio through the speakers in the table.
With the Sobro coffee table, you may never
have to leave the couch again.
So much more
than furniture...

page title ∙ 31
WARRANTY FCC STATEMENT
SOBRO RESIDENTIAL LIMITED WARRANTY
FOR RESIDENTIAL INDOOR USE ONLY
FULL ONE YEAR WARRANTY*
For one year from the date of original delivery, this Sobro (a division of StoreBound, LLC)
product warranty covers all parts and labor to repair or replace, under normal residential use,
any part of the product that proves to be defective in material or workmanship. All service
provided by StoreBound under the above warranty must be performed by a Sobro factory
certified service, unless otherwise specified by StoreBound. Service will be provided during
normal business hours.
FULL TWO YEAR SEALED SYSTEM WARRANTY*
For two years from the date of original delivery, this Sobro product warranty covers all parts and
labor to repair replace, under normal residential use, these parts that prove to be defective in
materials or workmanship: compressor, condenser, evaporator, drier and all connecting tubing.
All service provided by StoreBound under the above warranty must be performed by Sobro
factory certified service, unless otherwise specified by StoreBound. Service will be provided
during normal business hours.
TERMS APPLICABLE TO EACH WARRANTY
The warranty applies only to products installed for normal residential use. The warranty
applies only to products installed in any one of the 50 states of the United States, the District
of Columbia or the 10 provinces of Canada. This warranty does not cover any parts or labor to
correct any defect caused by negligence, accident or improper use, maintenance, installation,
service or repair.
THE REMEDIES DESCRIBED ABOVE FOR EACH WARRANTY ARE THE ONLY ONES THAT
STOREBOUND, LLC WILL PROVIDE, EITHER UNDER THIS WARRANTY OR UNDER ANY
WARRANTY ARISING BY OPERATION OF LAW. STOREBOUND, LLC WILL NOT BE RESPONSIBLE
FOR ANY CONSEQUENTIAL OR INCIDENTAL DAMAGES ARISING FROM THE BREACH OF THIS
WARRANTY OR ANY OTHER WARRANTY, WHETHER EXPRESS, IMPLIED OR STATUTORY.
Some states do not allow the exclusion or limitation of incidental or consequential damages,
so the above limitation or exclusion may not apply to you. This warranty gives you specific legal
rights and you may also have other legal rights that vary from state to state.
To receive parts and/or service and the name of Sobro factory certified service nearest you,
contact Customer Support at 1-800-898-6970 or email us at [email protected].
*Any opening of the circuit board cabinet or refrigerator parts cabinet by customer or non-
Sobro factory certified service provider will void all warranties for this product.
SOCTB300_20170718_V4
IMPORTANT NOTES FCC STATEMENT:
This device complies with part 15 of the FCC Rules. Operation is subject to following
two conditions: (1)this device may not cause harmful interference, and (2)this device
must accept any interference received, including interference that may cause undesired
operation.
Changes or modifications not expressly approved by the party responsible for compliance
could void the user’s authority to operate the equipment.
NOTE: This equipment has been tested and found to comply with the limits for a Class
B digital device, pursuant to Part 15 of the FCC Rules. These limits are designed to
provide reasonable protection against harmful interference in a residential installation.
This equipment generates, uses and can radiate radio frequency energy and, if not
installed and used in accordance with the instructions, may cause harmful interference
to radio communications. However, there is no guarantee that interference will not occur
in a particular installation. If this equipment does cause harmful interference to radio
or television reception, which can be determined by turning the equipment off and on,
the user is encouraged to try to correct the interference by one or more of the following
measures:
–Reorient or relocate the receiving antenna.
–Increase the separation between the equipment and receiver.
– Connect the equipment into an outlet on a circuit different from that to which the receiver
is connected.
–Consult the dealer or an experienced radio/TV technician for help.
INDUSTRY CANADA:
This device complies with Industry Canada license-exempt RSS standard(s). Operation is
subject to the following two conditions: (1) this device may not cause interference, and (2)
this device must accept any interference, including interference that may cause undesired
operation of the device.
Le présent appareil est conforme aux CNR d’Industrie Canada applocables aux appareils
radio exempts de licence. L’exploitation est autorisée aux deux conditions suivantes
: (1) I’appareil ne doit pas produire de brouillage, et. (2) I’utilisater de I’appareil doit
accepter tout brouillage radioélectrique subi, même si le brouillage est susceptile d’en
compromettre le fonctionnement.
30 ∙ warranty & FCC statement

Coffee Table Quickstart
Coffee Table User Manual
Designed in NYC | Patent Pending | 1-800-898-6970 | storebound.com
Table of contents
Other Sobro Refrigerator manuals


