SOGEDIS 243 Owner's manual

FREEZER –243
JANUARY 2017
1
INFORMATION
1. Ice tray
2. Freezer control panel
3. No Frost air circulation system
4. Freezer upper room cover
5. Freezer bottom room cover
6. Freezer compartment drawers
7. Adjusable Foot

FREEZER –243
JANUARY 2017
2
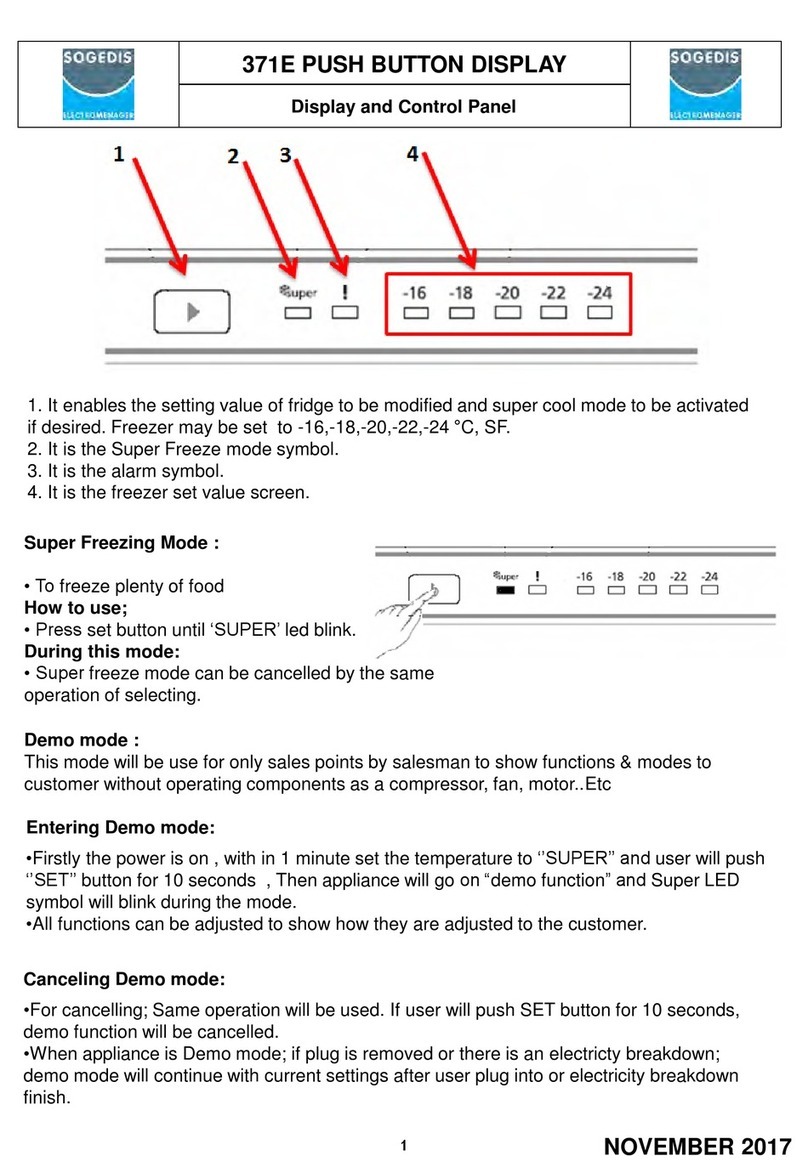
DISPLAY and CONTROL PANEL
1. It enables the setting value of fridge to be modified and super cool mode to be activated
if desired. Freezer may be set to -16,-18,-20,-22,-24 °C, SF.
2. It is the Super Freeze mode symbol.
3. It is the alarm symbol.
4. It is the freezer set value screen.
Super Freezing Mode :
1
2
34
When would it be used?
• To freeze huge quantities of food.
• To freeze fast food.
• To freeze food quickly.
• To store seasonal food for a long time.
How to use?
• Press temperature set button until super freezing light comes on.
• Super freezing led will light during this mode.
• Maximum amount of fresh food (in kilograms) to be frozen within 24 hours is shown on the appliance
label.
• For optimal appliance performance in maximum freezer capacity, set the appliance to active SF mode
24 hours before you put the fresh food into the freezer.
During this mode:
If you press temperature set button, the mode will be cancelled and the setting will be restored from -16.
Note: “Super Freezer” mode will be automatically cancelled after 24 hours or when freezer sensor
temperature drops beneath -32 °C.

FREEZER –243
JANUARY 2017
3
DISPLAY and CONTROL PANEL
Demo mode :
This mode will be use for only sales points by salesman to show functions & modes to customer
without operating components as a compressor, fan, motor..Etc
Entering Demo mode:
•Firstly the power is on , with in 1 minute set the temperature to ‘’SUPER’’ and user will push ‘’SET’’
button for 10 seconds , Then appliance will go on “demo function” and Super LED symbol will blink
during the mode.
•All functions can be adjusted to show how they are adjusted to the customer.
Canceling Demo mode:
•For cancelling; Same operation will be used. If user will push SET button for 10 seconds, demo
function will be cancelled.
•When appliance is Demo mode; if plug is removed or there is an electricty breakdown; demo mode
will continue with current settings after user plug into or electricity breakdown finish.
Recommended Temperature Values for Fridge
When would it be adjusted? Inner Temperature
For Minimum Freezing Capacity -16˚C
In Normal Usage -18˚C, -20˚C,-22˚C
For Maximum Freezeing Capacity -24˚C, SF
• The initial temperature of the Setting Display is -18°C.
• Press freezer setting button once.
• Every time you press the button, the setting temperature will decrease. (-16°C, -18°C, -
20°C,.. super freezing)
• If you press freezer setting button until super freezer symbol is displayed on Freezer
Settings Display and you do not press any button within the following 3 seconds,
Super Freezing will blink.
• If you keep on pressing, it will restart from last value.
Freezer Temperature Settings

FREEZER –243
JANUARY 2017
4
FAULT CODES
Sensor short open circuit defect on display
Component defect on display
DEFECT TYPE
DETAILS
USER MODE
REACTION
SERVICE MODE
REACTION
Compressor
Defect
D sensor
temp >-10°C
(D sensor
temp.
unchanges
for10 min.
continuous
compressor
run
)
Display
ALARM Symbol
blinks
-
20 Set Symbol blinks
SENSOR
TEMPERATURE
USER MODE
REACTION
SERVICE MODE
REACTION
(1)
Freezer
>+50
°C or <-50°C
(sensor is
short or open)
Display
ALARM
Symbol
blinks
-
16 Set Symbol blinks
(2) Refrigerator
NA
NA
(3)
Defrost
Short
(< 100W) or <-50°C
-
18 Set Symbol blinks
(4) AT sensor
NA
NA
Breakdown of (1) and (2)
NA
Breakdown of (1) and (3)
-
16,-18 Set Symbol
blinks
Breakdown of (1) and (4)
NA
Breakdown of (2) and (3)
NA
Breakdown of (2) and (4)
NA
Breakdown of (3) and (4)
NA
Breakdown of (2) and (3) and (4)
NA
Breakdown of (1) and (3) and (4)
NA
Breakdown of (1) and (2) and (4)
NA
Breakdown of (1) and (2) and (3)
NA
Breakdown of all sensors
NA
Compressor Defect Error on display
***NOTE:To prevent the wrong alarms, this alarm status is disabled on following conditions:
•During the first 6 hours after the product was firstly connected.
•During the defrost period
•During the 30 minutes after a defrost
•During the first 2 hours that if door was open.

FREEZER –243
JANUARY 2017
5
SERVICE MODE
Entering service mode:
Push SET button continuously for 10 seconds when -24 set symbol active. Appliance will
enter service mode 10 sec. later.
Canceling service mode:
Push SET button continuously for 10 seconds when -24 set symbol active. Appliance will
enter service mode 10 sec. later.
If service man do not push any buttons for 30 minutes when appliance is in service mode.
Service mode will be canceled automatically.
Service mode will be used only by professionals.
1.Push Starting program
Push set button 5 second at service mode.
Freezer set value screen light as components are checked.
“-16 set symbol” will light when compressor is ON
“-18 set symbol” will light heater will be ON
“-20 set symbol” will light fan will be ON
2.Push Forced Defrost and Forced Canceling of Defrost
-18 set symbol will light during this mode.. Mode can be canceled manually or automatically.
Manual canceling will be done by pushing SET button. Symbol will be OFF if defrost is
canceled manually.Appliance will return to initial Service mode reaction.
If manual canceling of this function is not performed in 40 min.
Service mode will be canceled.Appliance will check if defrost is finished in this 40min. It
YES, appliance will go on from previous set values. But if defrost is not finished , appliance
will go on defrost till it finishes and then go on from previous set values.

FREEZER –243
JANUARY 2017
CHANGING THE DOORWAY DIRECTION
3. Replace the door top bushing (Pic-3.1) and top bushing cap. (Pic-3.2)
Picture-1
1. Remove the hinge cover. (Pic-1) 2. Unscrew the screws fixing the upper hinge and
remove it. (Pic-2)
Picture-2
Picture-4
4 . Remove the adjustable foots. (Pic-4)
Picture-3.1
6
Picture-3.2

FREEZER –243
JANUARY 2017
7
5 . Unscrew the bottom hinge fixing screws and insert them the left side. (Pic-5.1 / Pic-5.2)
6. Remove the door bottom bushing and insert it
into left hole. (Pic-6)
CHANGING THE DOORWAY DIRECTION
Picture-5.1 Picture-5.2
Picture-6
8. Assemble the door. Screw the top hinge and hinge cover. (Pic-7.1 / Pic-7.2)
Picture-7.1 Picture-7.2

FREEZER –243
JANUARY 2017
8
ASSEMBLE & DISASSEMBLE
Warning: Make sure the unit is unplugged.
Replacement Main Board
1. Unscrew the head panel caps and screws. (Pic-1.1 / Pic-1.2)
Picture-1.1 Picture-1.2
Picture-2 Picture-3
3. Unplug socket on the board assembled
head panel. (Pic-3)
2- Remove the head panel. (Pic-2)
4- Unscrew the screws fixing the main
board and remove it. (Pic-4) 5- After changing the main board insert
the new one into the head panel and
make the connections. (Pic-5)
Picture-4 Picture-5

FREEZER –243
JANUARY 2017
ASSEMBLE & DISASSEMBLE
Warning: Make sure the unit is unplugged.
3. Remove the sealing material at the
housing. (Fig-3)
1. Unscrew the condanser screws. (Pic-1) 2. Push the condanser up side and remove.(Pic-2)
4. Fix the heat exchanger pipe. (Fig-4)
Replacement Fin Evap Group
Picture-1 Picture-2
Picture-3 Picture-4

FREEZER –243
JANUARY 2017
5. Unscrew the 2 screws shown at the picture. (Pic-5.1 / Pic-5.2)
6. Remove the flap cover supports left and right. (Pic-6.1 / Pic-6.2)
8. Remove the fin evap strafoam. (Pic-8)7. Take out the fin evap group. (Pic-7)
ASSEMBLE & DISASSEMBLE
Picture-5.1 Picture-5.2
Picture-6.1 Picture-6.2
Picture-7 Picture-8

FREEZER –243
JANUARY 2017
9. Remove the fin evap box. (Pic-9.1 / Pic-9.2)
10. Remove the black metal clippers.
(Pic-10) 11. Detach the evaporator from the defrost
heater. (Pic-11)
12. Take out the fin evap heater connector.
(Pic-11)
ASSEMBLE & DISASSEMBLE
Picture-9.1 Picture-9.2
Picture-10 Picture-11
Picture-12
Table of contents
Other SOGEDIS Freezer manuals
