Sole Digital AirWay AWT100 User manual

AirWay
Wireless Signal Transceiver
Model AWT100, Version 1.0
Installation and User Manual
V1.2: 28/08/2012
© CASWA Pty Ltd –2012

© CASWA Pty Ltd –2012 2 | Page
CONTENTS
1OVERVIEW............................................................................................................................ 3
2SPECIFICATIONS.................................................................................................................... 4
2.1 Physical Specifications ............................................................................................................4
2.2 Electrical Specifications........................................................................................................... 5
2.3 Communication Specifications................................................................................................ 5
2.3.1 Communications Range ...........................................................................................5
3INSTALLATION DETAILS ......................................................................................................... 6
3.1 Prior to Installation .................................................................................................................6
3.2 Wiring Diagrams...................................................................................................................... 7
3.2.1 Connecting Two AirWay Units Communicating Together .......................................7
3.2.2 AirWay Providing Remote Inputs for a LiftlogXL......................................................8
3.2.3 Implementing a Link Status Output ......................................................................... 9
4COMMISSIONING DETAILS .................................................................................................. 10
4.1 Installing and Launching the FSU Application.......................................................................10
4.1.1 FSU Program Installation........................................................................................10
4.1.2 Installing the FSU application.................................................................................10
4.1.3 Launching the application ......................................................................................10
4.2 Connecting to the Device......................................................................................................11
4.3 Checking for Firmware..........................................................................................................11
4.4 AirWay General Configuration Screen ..................................................................................12
4.5 Binding the AirWay to a Device ............................................................................................12
4.5.1 Selecting the Input Signals .....................................................................................13
4.5.2 Configuring the Outputs.........................................................................................13
5OPERATING BEHAVIOUR ..................................................................................................... 14
6ROUTINE MAINTENANCE .................................................................................................... 15
APPENDIX A: COMMUNICATION PROTOCOL ............................................................................... 16
APPENDIX B: FSU SYSTEM REQUIREMENTS ................................................................................. 17

© CASWA Pty Ltd –2012 3 | Page
1OVERVIEW
AirWay is an electronic device that wirelessly transmits and receives up to 4 input/output control
signals. It can be used to provide remote I/O for products such as CASWA’s Liftlog™or Liftlog XL
data logger, where the desired signals cannot be cabled into the logger directly. Alternatively, two
AirWay units can be used together to provide up to 4 virtual connections.

© CASWA Pty Ltd –2012 4 | Page
2SPECIFICATIONS
2.1 Physical Specifications
Overall length (mm):
161
Overall width (mm):
91
Overall height (mm):
30
Weight (kg):
0.2
Mounting
2 x 8.5mm screws OR
4 x 5mm screws
Figure 1: Case Dimensions

© CASWA Pty Ltd –2012 5 | Page
2.2 Electrical Specifications
Parameter
Description
Min
Typ
Max
Units
Vin
Supply voltage
32
250
VAC
Iin
Supply current
7
20
50
mA
Lmax
Input pin voltage
32
250
V
Vfault
Max voltage for output relays
250
32
V AC
V DC
Ifault
Max current sink per output set point relay
4
A
Allowable operating temperature
-40
85 Note1
°C
Note1: Extended operation at maximum temperature will reduce the life the device.
2.3 Communication Specifications
Communications between the device and a host is usually via a Bluetooth radio link. The Bluetooth
device name will be set to the Crane ID, the PIN is 0000.
For more details on the communication protocol used to communicate with the AirWay, see
Appendix A.
2.3.1 Communications Range
When installed in such a way as to create an uninterrupted path (ie line of sight) between the two
units (either two AirWay units or an AirWay and a Liftlog™or LiftlogXL), range is approximately
500m.
When one AirWay unit is in a metal enclosure, subtract 150m, and when both units are in metal
enclosures, subtract 300m. When the transmission path is not line of sight, range is difficult to
predict but is usually around 100-200m.
© CASWA Pty Ltd –2012 6 | Page
3INSTALLATION DETAILS
3.1 Prior to Installation
Before installing your AirWay device visually inspect the device and check that the case is not
damaged and fits together securely.
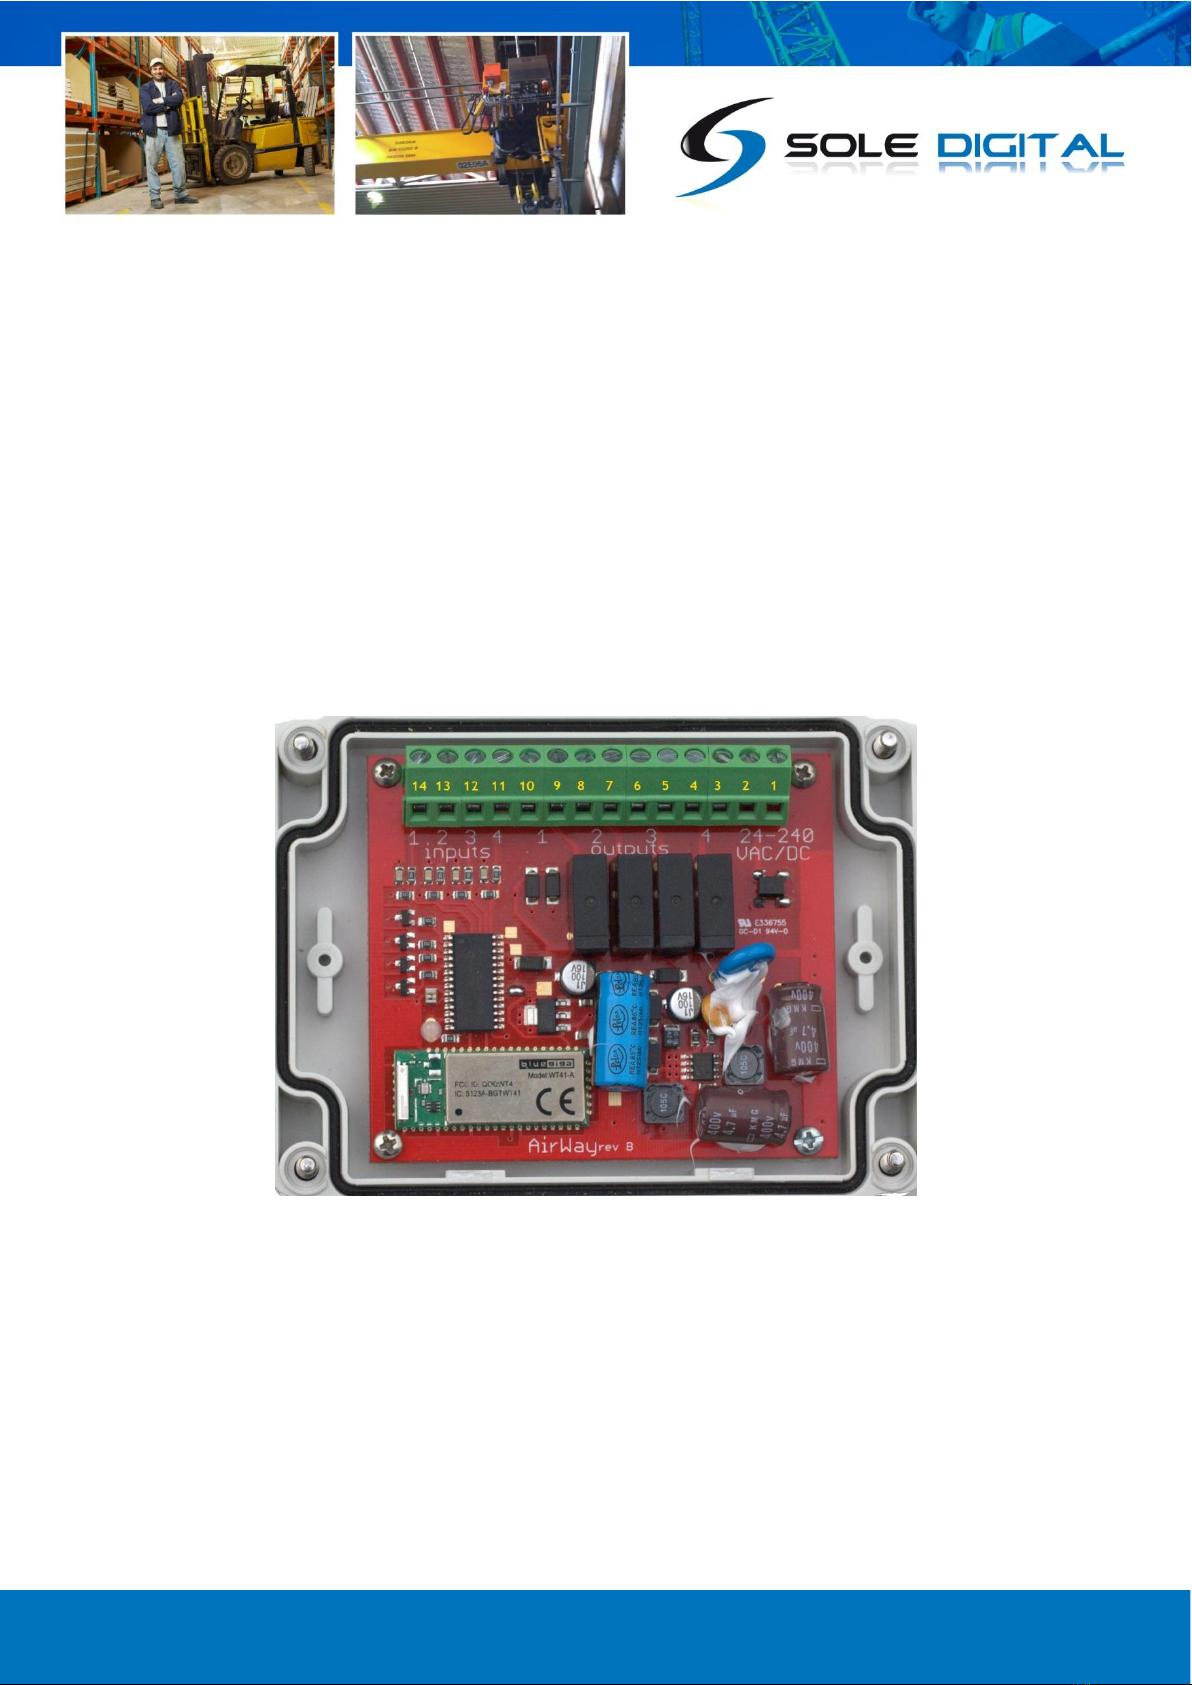
Remove the cover by undoing the 4 screws on the rear of the device to access the circuit board and
screwed terminals inside. The board is shown in Figure 2.
AirWay has four single wire digital inputs, four sets of dry contact outputs and a pair of terminals for
connecting power (24-240V AC/DC). These are shown on the circuit board underneath the
respective terminals.
Figure 2: AirWay Circuit Board

© CASWA Pty Ltd –2012 7 | Page
3.2 Wiring Diagrams
3.2.1 Connecting Two AirWay Units Communicating Together
NB: Output pins (3-4, 5-6, 7-8 and 9-10) are Normally Open and rated for 250V AC/32VDC 4A. They
can be reconfigured to Normally Closed using the FSU software.
1. 0V
4.
5.
13. Input 2
2. 32-240VAC
8.
7.
3.
6.
9.
10.
11. Input 4
12. Input 3
14. Input 1
Output 4
Output 3
Output 2
Output 1
Existing
control circuit
Figure 3: Connecting up 2 AirWay units

© CASWA Pty Ltd –2012 8 | Page
3.2.2 AirWay Providing Remote Inputs for a LiftlogXL
AirWay can be used to provide remote inputs for other devices (e.g. Liftlog or LiftlogXL). Figure 4
provides the wiring details for using an AirWay to transmit the longitudinal travel motions from a
LiftlogXL.
Figure 4: Connecting an AirWay to Provide Remote Inputs for
Long Travel on a LiftlogXL data logger
1. 0V
4.
5.
13. Input 2
2. 32-240VAC
8.
7.
3.
6.
9.
10.
11. Input 4
12. Input 3
14. Input 1
Output 4
Output 3
Output 2
Output 1
FAST
Existing control
circuit
STH
NTH
© CASWA Pty Ltd –2012 9 | Page
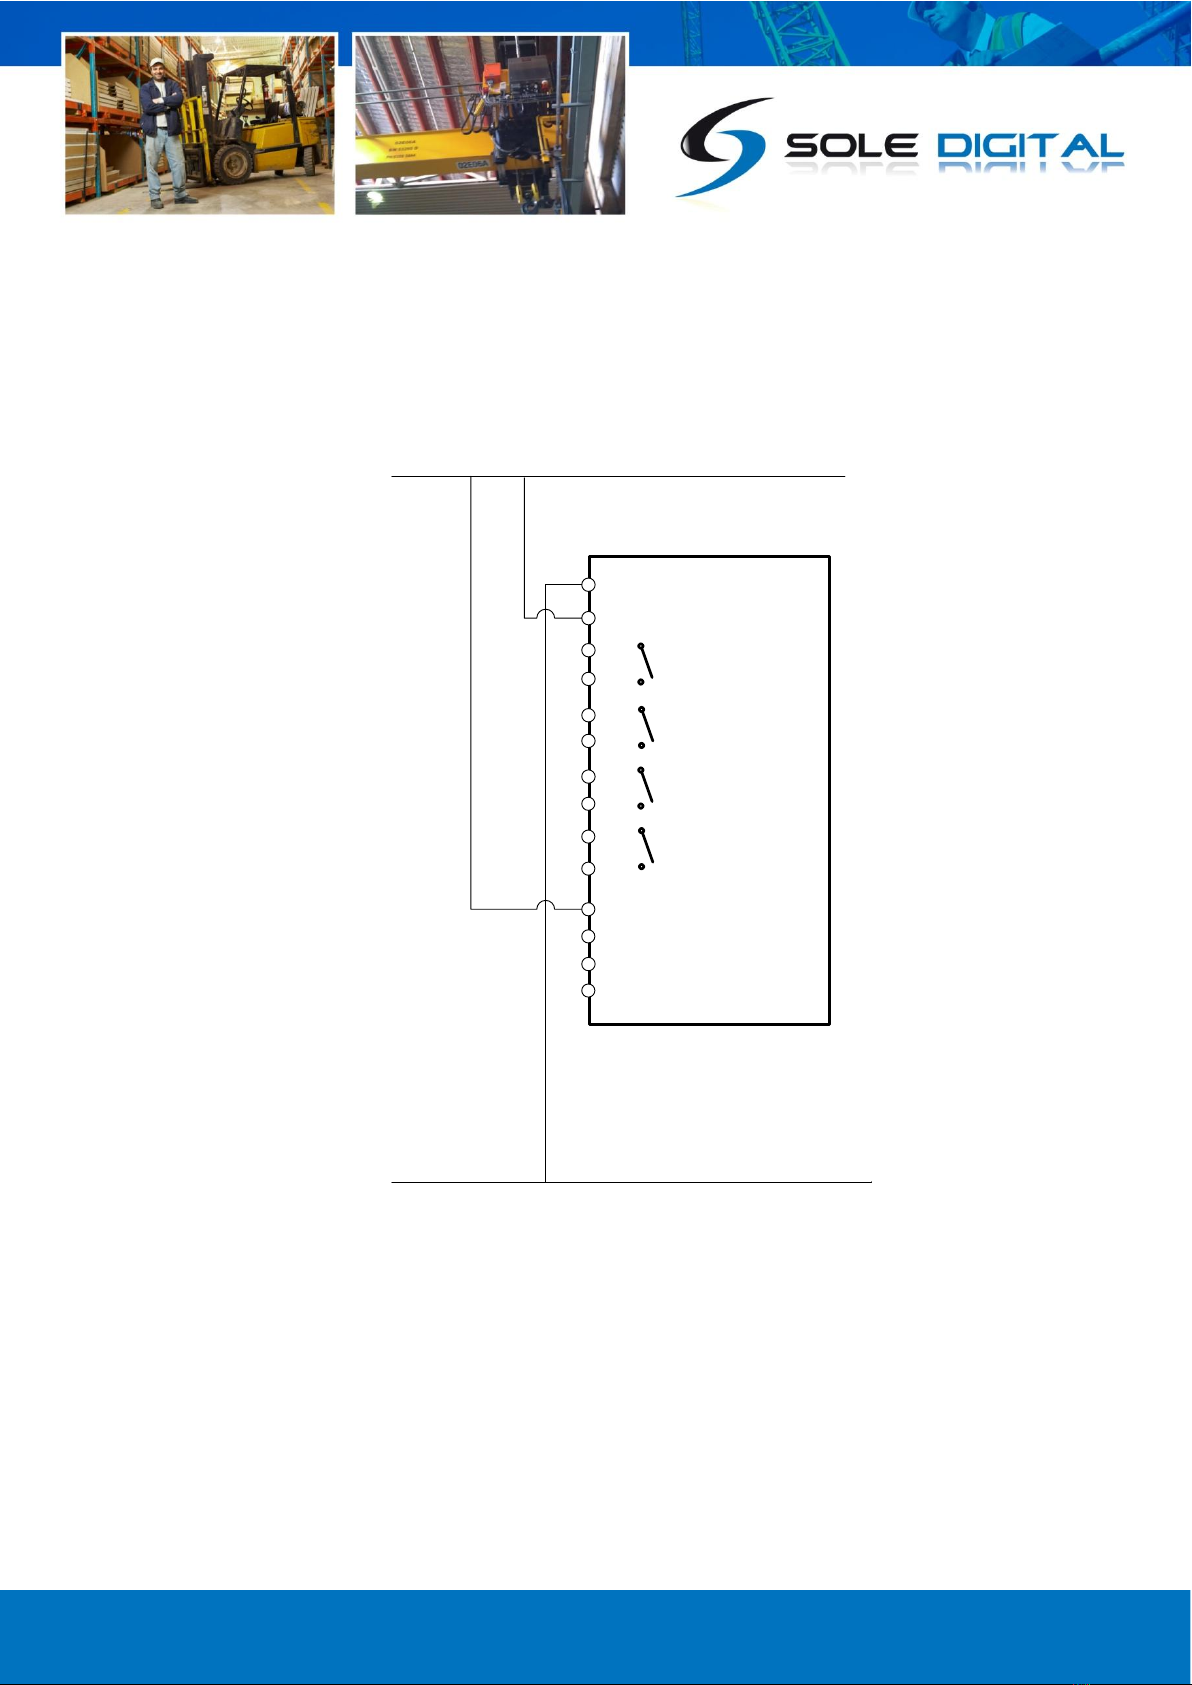
3.2.3 Implementing a Link Status Output
By connecting one of the inputs to the supply voltage, the AirWay will send the assigned signal
continuously once a connection is made. The receiving device can then determine when a link is
active.
Figure 5: Implementing a Link Status Output
1. 0V
4.
5.
13. Input 2
2. 32-240VAC
8.
7.
3.
6.
9.
10.
11. Input 4
12. Input 3
14. Input 1
Output 4
Output 3
Output 2
Output 1

© CASWA Pty Ltd –2012 10 | Page
4COMMISSIONING DETAILS
AirWay is designed to be commissioned using a laptop computer. You will need a CASWA LINK-2
Bluetooth Modem and the Field Service Utility (FSU) software application loaded on a laptop.
4.1 Installing and Launching the FSU Application
4.1.1 FSU Program Installation
Ensure that your computer is switched on, connected to the internet and that the minimum required
software versions are installed (see 0 for minimum system requirements). Ensure that the LINK-2
modem is installed and that the drivers have loaded.
More information on installing the LINK-2 modem can be found in the document Link-2 installation,
which can be downloaded from http://www.Liftlog™.com.au/literature.asp.
4.1.2 Installing the FSU application
The latest LINK-2 FSU software (Link-2_FSU) can be downloaded from
http://Liftlog™.com.au/updates.asp.
You should check this location periodically for updates and information.
4.1.3 Launching the application
Double click on the FSU program icon: .

© CASWA Pty Ltd –2012 11 | Page
4.2 Connecting to the Device
The FSU will scan for Bluetooth enabled devices. This
process takes approximately 10 seconds, when
complete a list of all CASWA devices within range will
be displayed.
If a particular AirWay unit is not found, ensure it is
powered up and press <Look for devices> to repeat the
search.
NB: The Bluetooth link between the Laptop using a
Link-2 and a AirWay has a range of approximately
200m.
Select the AirWay you wish to configure and press
<Connect>.
4.3 Checking for Firmware
After you have selected your desired AirWay, a connection will be made and the software will check
if the device has the current firmware. If a new firmware version is available the following window
will pop up:
Press <Update> to update the AirWay to the latest
available firmware version (recommended). The new
firmware will be installed on the device. DO NOT switch
off the computer or remove the LINK2 modem until this
is complete –doing so may leave the Liftlog™ in an
unrecoverable state.
Alternatively, press <Not now> to update firmware at a
later time.
NB: If you did not see this window, then your device already has the most current firmware.
© CASWA Pty Ltd –2012 12 | Page
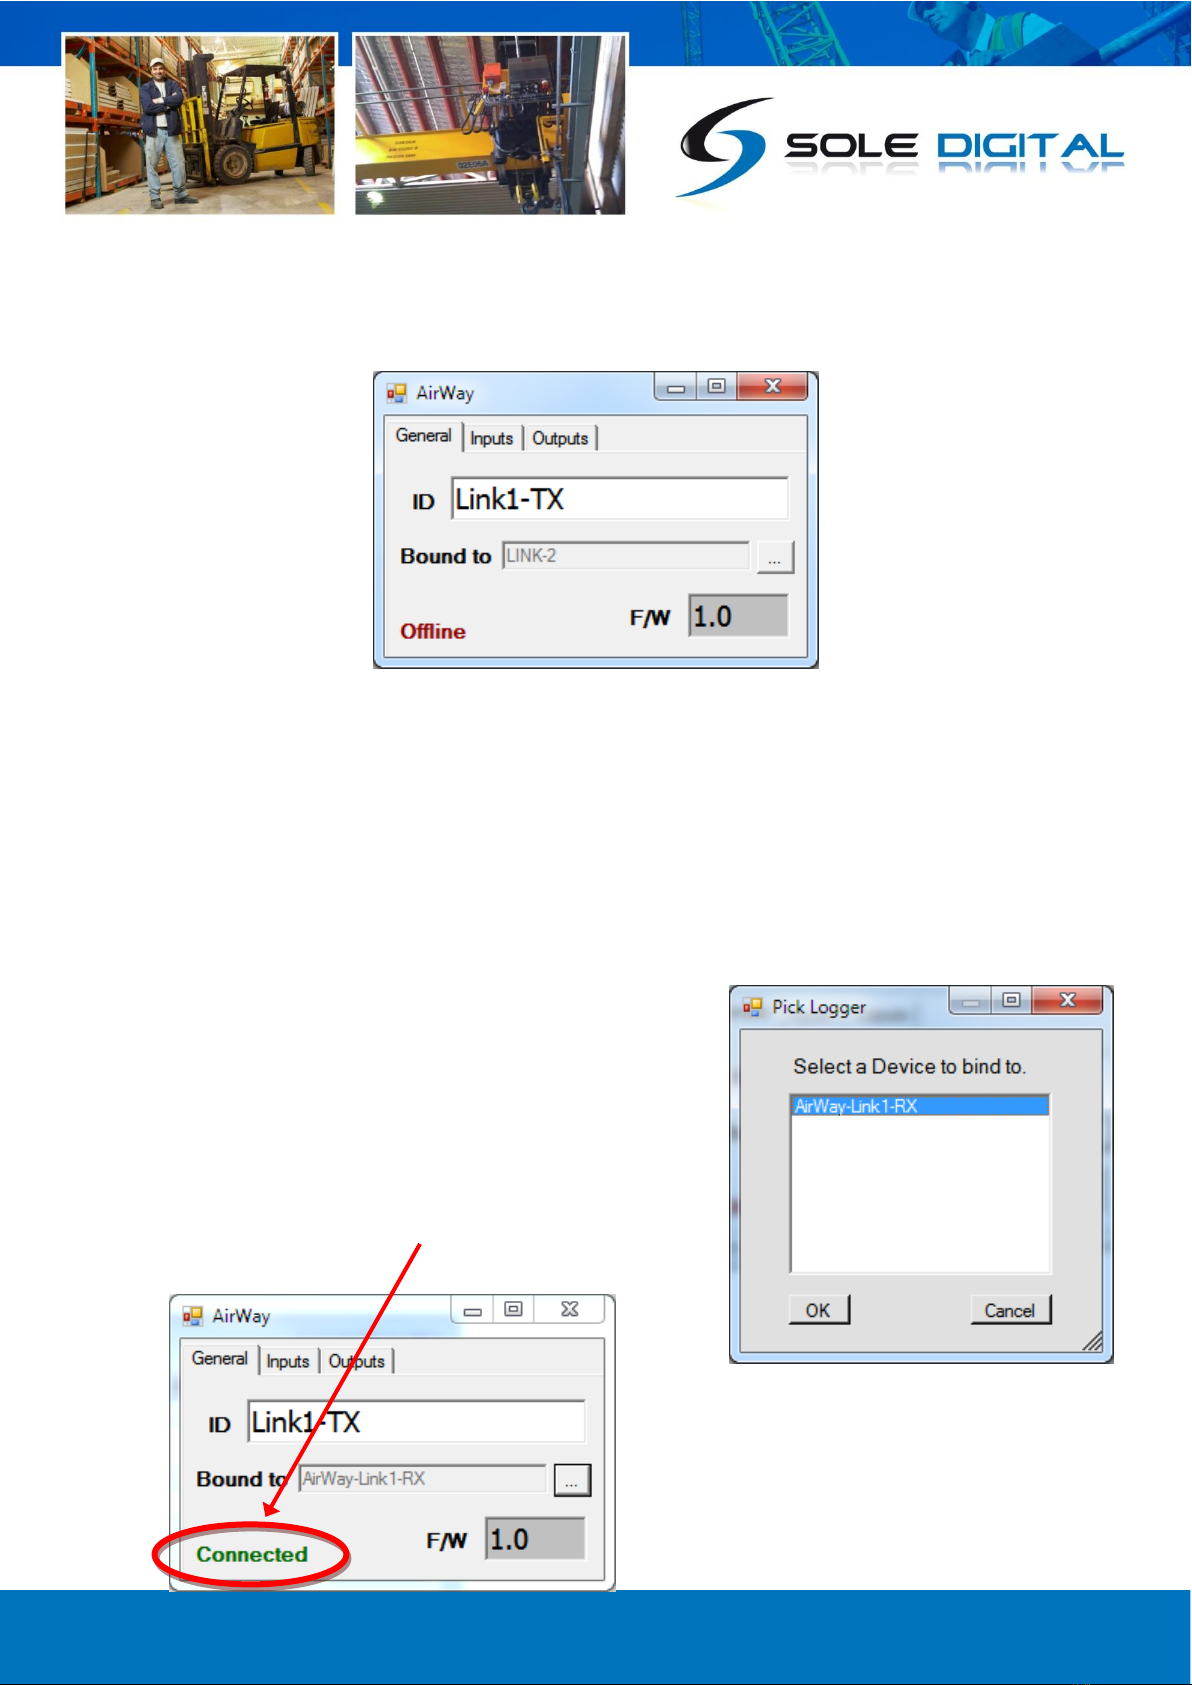
4.4 AirWay General Configuration Screen
Once the firmware version has been verified, the following screen will appear.
This screen shows the:
AirWay ID
The device it is bound to.
Current firmware version operating on the device.
The connected status of the AirWay being configured
To enter/change the CraneID, type the desired name into the ID field.
4.5 Binding the AirWay to a Device
Unless your AirWay device has been preconfigured. You will
need to select the device it will communicate with. Nb. If the
installation consists of two AirWay units you only need to bind
one unit to the other. Leave the second unit unbound.
Shortly after selecting the bound device and clicking <OK> the
connected status on the General tab will change to Connected.

© CASWA Pty Ltd –2012 13 | Page
4.5.1 Selecting the Input Signals
The input tab allows you to select what signals
will be sent to the bound device when each of
the AirWay inputs is activated.
Additionally, currently active inputs are
highlighted.
Shown here are two example configurations,
one that might be used when the AirWay being
configured is bound to a second AirWay unit and
a simple 1 to 1 mapping of inputs and outputs is
required
The second example would be typical of an
AirWay unit bound to a Liftlog or LiftlogXL and
configured to send long travel signals.
4.5.2 Configuring the Outputs
The Outputs tab allows you to select normally open
or normally closed (inverted) behaviour of the
output relays.
Additionally, currently active outputs are highlighted.

© CASWA Pty Ltd –2012 14 | Page
5OPERATING BEHAVIOUR
The AirWay is fitted with a multi-colour LED on the
front panel that indicates connectivity. This has two
modes:
Green = Connected
Red = Not Connected
A connection usually takes about 5 seconds to initiate
after power-up.

© CASWA Pty Ltd –2012 15 | Page
6ROUTINE MAINTENANCE
There is not routine maintenance for this device.

© CASWA Pty Ltd –2012 16 | Page
APPENDIX A: COMMUNICATION PROTOCOL
The host sends single character commands to the device to write or query parameters.
Each command must be followed by a carriage return <CR>(ASCII 13).
Where the command is a query command, no arguments are sent and the device will respond with a
single line (except for the “u” and “E” commands) the requested value in ASCI text followed by a
<CR>.
Where the command is a set command, an argument may be included between the command and
the <CR> .
Where numbers are sent or received, they are sent as clear text; eg “1234”
Code
Function
0
Disabled
1
Output 1
2
Output 2
3
Output 3
4
Output 4
5
North
6
South
7
NS Fast
8
East
9
West
10
EW Fast
11
Up
12
Down
13
UD Fast
14
Aux1
15
Aux2
16
Aux3
17
Main Top Limit
18
Aux Top Limit
19
Main Side Pull
20
Aux Side Pull
21
Aux Limit 1
22
Aux Limit 2

© CASWA Pty Ltd –2012 17 | Page
APPENDIX B: FSU SYSTEM REQUIREMENTS
The minimum requirements for operating CASWA’s Field Service Utility (FSU) and Link-2 Bluetooth
modem are:
Laptop computer running Windows XP SP3 or later;
One Spare USB port;
Microsoft .NET framework 3.5.
Table of contents


