Sonus Faber ARENA User manual

OWNER’S MANUAL
ARENA
HOME CINEMA SOLUTIONS
Sonus faber S.p.A.
Via Meucci, 10 - 36057 Arcugnano (VI) - Italy
Tel. 0444/288788 - fax 0444/288722 - info@sonusfaber.com

3
IT
SOMMARIO
1. Informazioni generali
1.1 Informazioni per l’utente
1.2 Garanzia e assistenza post vendita
2. Informazioni di sicurezza
3. Installazione
3.1 Contenuto dell’imballo
3.2 Disimballo
3.3 Montaggio
3.4 Rimozione del diffusore
4. Manutenzione e pulizia
5. Speciche tecniche
1. INFORMAZIONI GENERALI
1.1 - INFORMAZIONI PER L’UTENTE
Gentile Cliente,
Desideriamo ringraziarLa e complimentarci con Lei per aver scelto i diffusori Arena per il suo
impianto audio/audio-video.
Poiché è nostro preciso interesse che Lei ottenga il miglior risultato possibile nell’ascolto e che ciò
avvenga nella piena sicurezza, La invitiamo a leggere attentamente, prima dell’installazione, questo
manuale d’istruzioni.
Qualora dovessero sorgerLe dubbi o curiosità, Le consigliamo di rivolgersi al personale tecnico del
Suo punto vendita, al distributore ufciale Sonus faber del Paese in cui vive o prendere contatto
direttamente con Sonus faber scrivendo a customerservice@sonusfaber.com.
Inne Le suggeriamo vivamente di registrarsi on-line sul sito www.sonusfaber.com: in questo modo
verrà informato da Sonus faber di tutte le novità, iniziative ed eventuali promozioni.
Buona Musica!
1.2 - GARANZIA E ASSISTENZA POST-VENDITA
I nostri diffusori acustici sono stati progettati e fabbricati secondo i più alti standard qualitativi.
Tuttavia, qualora si vericasse un guasto o un malfunzionamento, i prodotti Sonus faber sono
coperti da una garanzia standard che comprende tutti i difetti di fabbricazione, tecnici o di materiali,
per due (2) anni dalla data di acquisto del consumatore.
La informiamo che è possibile estendere il periodo di garanzia registrando il Suo prodotto su
https://www.sonusfaber.com/en/register-product/.
Per maggiori informazioni, consigliamo di approfondire le condizioni di garanzia su
www.sonusfaber.com/warranty-policy.
3
3
3
4
5
5
5
6
10
11
12

4
IT
Inoltre, nel Suo interesse, ci permettiamo di fare presente quanto segue:
• La garanzia sui diffusori acustici copre eventuali difetti di costruzione;
• Conservare il documento comprovante l’acquisto in modo da poterlo esibire al rivenditore in
caso di necessità;
• Conservare l’imballo originale dei diffusori acustici perché possano essere trasportati senza
danni in caso di spedizione presso il centro assistenza autorizzato;
• I diffusori acustici devono essere accompagnati da una descrizione del malfunzionamento o
del difetto eventualmente riscontrato.
Le seguenti condizioni fanno decadere la garanzia sul prodotto:
• Il diffusore acustico è stato smontato o modicato da personale diverso da quello del centro
assistenza autorizzato da Sonus faber;
• Il diffusore acustico è stato usato in modo non conforme a quanto descritto in questo manuale.
2. INFORMAZIONI DI SICUREZZA
• Leggere il presente manuale d’istruzioni e conservarlo in luogo a portata di mano per ogni
eventuale esigenza.
• Assicurarsi che il ssaggio a muro/a controsoftto sia adeguatamente stabile.
• Vericare in via preliminare che la portata della supercie di montaggio sia sufciente a
sostenere il peso del/dei diffusori acustici.
• Nel corso del funzionamento dell’impianto audio evitare un ascolto ad alto volume ed in
prossimità degli altoparlanti. Ciò può provocare danni anche permanenti all’apparato uditivo.
Mantenere i bambini ad una distanza di sicurezza dal diffusore acustico di almeno 50 cm.
• Gli altoparlanti producono attorno ad essi un campo elettromagnetico innocuo per l’essere
umano e per gli animali ma che può disturbare il funzionamento di apparecchiature elettroniche
come monitor e televisori con schermo a tubo catodico qualora queste vengano collocate nelle
immediate vicinanze del diffusore acustico. Nel caso in cui ciò si verichi, aumentare la distanza
di tali apparecchiature dai diffusori acustici.
• La tecnologia di funzionamento degli altoparlanti verte su principi dell’elettromagnetismo,
pertanto l’utilizzatore dovrà evitare di utilizzare apparati che generino forti campi
elettromagnetici, i quali potrebbero disturbare il funzionamento dei diffusori acustici.
• Non collegare i diffusori acustici in parallelo tra loro o direttamente ad un impianto per diffusione
sonora a tensione costante (100 V, 70,7 V o simili). Ciò può determinare il sovraccarico
dell’impianto con possibile danneggiamento del diffusore acustico e/o dell’amplicatore.
• Non avvicinare tra loro cavi audio e cavi elettrici di alimentazione. In prossimità dei cavi di
alimentazione è presente un campo elettromagnetico che può causare un fastidioso ronzio. Nel
caso ciò si verichi, provvedere ad allontanare tra di loro cavi audio e i cavi di alimentazione.
• I collegamenti vanno effettuati con gli apparecchi spenti. Fare attenzione alla polarità dei
morsetti durante il collegamento.
• Collegare il diffusore ad una sorgente certicata PS1 secondo la IEC62368-1.

5
IT
3. INSTALLAZIONE
3.1 - CONTENUTO DELL’IMBALLO
• Diffusore
• Cornice
• Template per il foro
• Copertura protettiva
• Scatola accessori: griglie in tessuto, viti, copri viti.
3.2 - DISIMBALLO
Procedere al disimballo come indicato di seguito.
Seguire le seguenti indicazioni generali:
• È consigliabile disimballare i prodotti il più vicino possibile alla posizione nale
• Usare un attrezzo appropriato per aprire l’imballo. Non inserire a fondo la lama per evitare di
danneggiare il contenuto.
• Conservare gli imballi per eventuali futuri trasporti.
• Non indossare orologi, braccialetti, anelli, etc. per evitare di grafare i diffusori acustici e le
loro niture. Uguale attenzione si dovrà porre nella protezione da eventuali elementi metallici
presenti nell’abbigliamento indossato quali cerniere, bottoni, bbie, rivetti, ecc.
• Controllare il contenuto dell’imballo. In caso di mancanza di uno o più di questi articoli, avvertire
il rivenditore dove è stato effettuato l’acquisto.
• Fare attenzione a non toccare gli altoparlanti durante le operazioni di disimballo.
Per la movimentazione in sicurezza dei diffusori, è vivamente consigliato attenersi alle indicazioni
riportate nella tabella sottostante:
Tenere saldamente i diffusori acustici con entrambe le mani per evitare di farli cadere.
I materiali da imballaggio possono essere inquinanti. Non smaltire questi materiali
come riuti domestici ma consegnarli ad un centro raccolta e riciclo dei riuti.
Non lasciare i materiali per l’imballaggio a disposizione dei bambini!
Possibilità di avvelenamento o soffocamento a causa di ingestione.
Nel caso di impiego di uno stand dedicato, quest’ultimo può essere utilizzato
unicamente con i diffusori acustici per i quali esso è stato progettato.
L’uso con altri modelli di diffusori acustici può provocare danni e lesioni.
Fino ai 20 kg Una persona
Dai 20 kg ai 40 kg Almeno 2 persone
Dai 40 kg ai 60 kg Almeno 3 persone
Dai 60 kg agli 80 kg Almeno 4 persone

6
IT
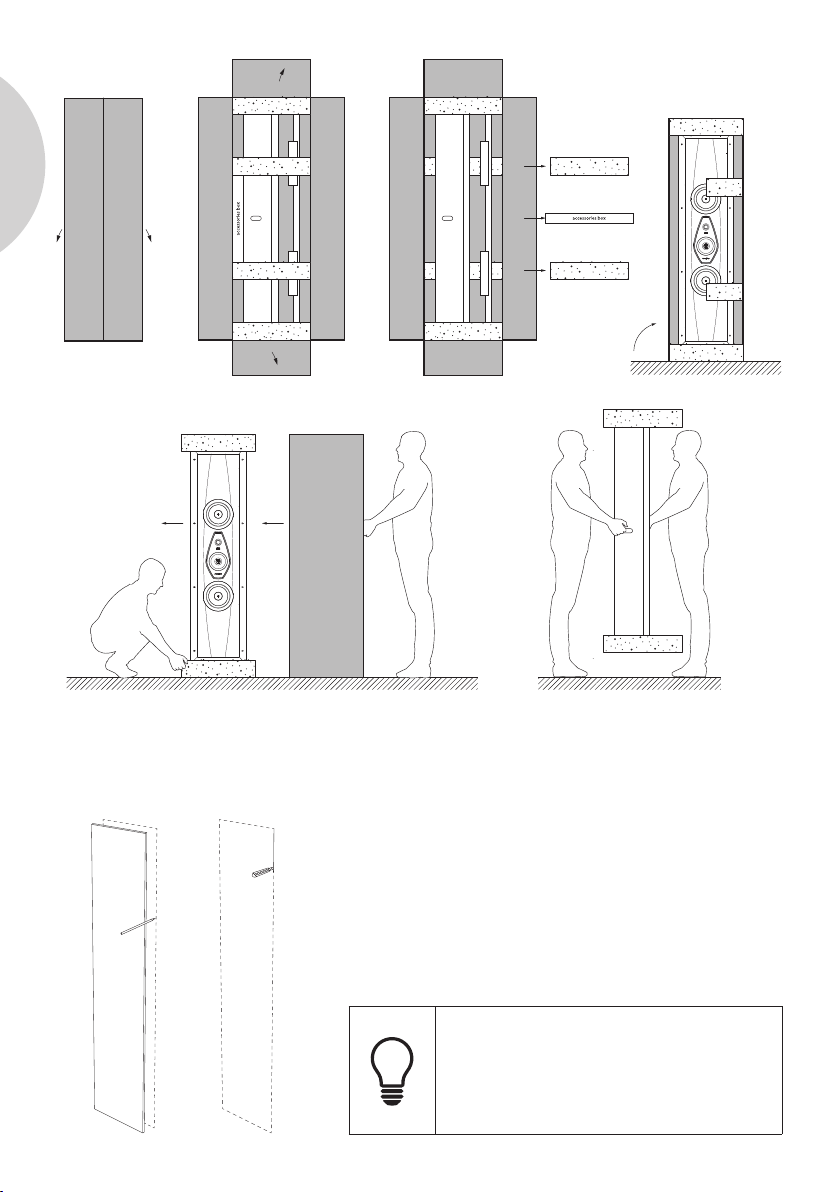
Assicurarsi, in via preventiva, che l’area di
taglio sia compresa tra i due montanti.
Per il corretto funzionamento del sistema di
ssaggio, mantenere una distanza di almeno
4 cm tra il bordo laterale del foro e il montante
più vicino.
3.3 - MONTAGGIO
3.3.1 - SEGNARE SULLA PARETE L’AREA DI TAGLIO MEDIANTE IL TEMPLATE IN DOTAZIONE
TAGLIARE LUNGO IL PERIMETRO SEGNATO

7
IT
3.3.2 - COLLEGARE I CAVI AUDIO AL DIFFUSORE
Fare attenzione alla polarità dei morsetti durante il collegamento.
I collegamenti vanno effettuati con gli apparecchi spenti!

8
IT
3.3.3 - INSERIRE LA CORNICE NEL FORO PRATICATO
3.3.4 - SPINGERE LE ALETTE METALLICHE A CONTATTO CON IL MURO INTERNO
Rimuovere gli elastici ferma posizione.

9
IT
Avvitare no a ne corsa senza forzare le viti di
ssaggio per evitare di danneggiare il sistema di
bloccaggio.
3.3.5 - AVVITARE LA CORNICE
3.3.6 - INSERIRE IL DIFFUSORE ACUSTICO NELLA CORNICE

10
IT
3.4 - RIMOZIONE DEL DIFFUSORE
3.4.1 - SVITARE IL DIFFUSORE ACUSTICO DALLA CORNICE
3.3.7 - AVVITARE IL DIFFUSORE ACUSTICO ALLA CORNICE
CHIUDERE CON I COPRI VITI
3.4.2 - SCOLLEGARE I CAVI AUDIO DAL DIFFUSORE

11
IT
Effettuare l’operazione con gli apparecchi spenti!
3.4.3 - SVITARE LA CORNICE E ALLINEARE LE ALETTE METALLICHE
RIMUOVERE LA CORNICE DAL MURO
4. MANUTENZIONE E PULIZIA
I diffusori acustici non necessitano di manutenzioni particolari se non di una periodica pulizia
generale.
Per l’eventuale polvere depositata sul mobile, sui pannelli frontali e sugli altoparlanti, usare un
pennello morbido facendo molta attenzione a non danneggiare le delicate membrane degli
altoparlanti.
Per la cura delle superci metalliche e di vetro, utilizzare il panno e il liquido in dotazione (ove
presenti). Non utilizzare prodotti chimici aggressivi a basi forti quali acetone, trielina, acidi, abrasivi,
sgrassanti forti, alcol, limone o vino.
Queste attenzioni conserveranno i diffusori acustici perfetti per molti anni. Il tempo contribuirà a
migliorare il suono per effetto del rodaggio delle parti in movimento (membrane e sospensioni) e
la camera acustica risponderà sempre meglio quanto più sarà usata: sono le stesse regole che
valgono per gli strumenti musicali a corda!

12
IT
5. SPECIFICHE TECNICHE
ARENA 30 ARENA 20 ARENA S15
Speaker type 4 way 3.5 way Array Balanced
Sub-Woofer
Low frequency transducer 2 x 8 in 2 x 8 in 4 x 6.5 in
Mid/High frequency
transducer
2 x 6.25 in - 38 mm Dome Tw
+ 19 mm Super Tw 6.25 in - 19 mm Dome Tw -
Maximum recommended
power 600 W 400 W 400 W
Low-frequency cut-off
(-6dB) 44.30 Hz 55 Hz 29 Hz
Low-frequency cut-off
(-3dB) - - 31.50 Hz
Frequency response
(-6dB on-axis) - - 29 Hz 180 Hz
Frequency Response
(-3dB on-axis) 55.50 Hz 60 Hz 31.50 Hz 180 Hz
Max SPL 1 Meter 121 dB 117 dB -
Sensitivity 2.83 Vrms@1m 94.00 dB 92.00 dB 90.00 dB
Nominal Impedance 4 Ω 4 Ω 4 Ω
Minimal impedance 2.8 Ω 2.8 Ω 3.5 Ω
Crossover frequencies 200 Hz / 2k Hz / 10k Hz 160 Hz / 220 Hz / 3100 Hz -
Enclosure type Closed Box Closed Box Patentable
Acoustical Load
Mounting Depth 162 mm - 6.3 in 144 mm - 5.6 in 202 mm - 7.9 in
Weight 58.7 kg - 129.4 lb 47.2 kg - 104 lb 38.7 kg - 85.3 lb
Depth 167 mm - 6.5 in 150 mm - 5.9 in 208 mm - 8.1 in
Width 321 mm - 12.6 in 321 mm - 12.6 in 432 mm - 17 in
Height 1,774 mm - 69.8 in 1,577 mm - 62 in 947 mm - 37.2 in

EN
1313
CONTENTS
1. General information
1.1 Information for the user
1.2 Warranty and after sales support
2. Safety information
3. Installation
3.1 Packaging contents
3.2 Unpacking
3.3 Assembly
3.4 Remove the loudspeaker
4. Maintenance and cleaning
5. Technical specications
1. GENERAL INFORMATION
1.1 - INFORMATION FOR THE USER
Dear Customer,
We would like to thank and congratulate you on choosing Arena loudspeakers for your audio/audio-
video system.
Since we want you to obtain the best possible listening result in full safety, please read this
instruction manual carefully before installation.
Should you have any doubts or enquiries, please contact your sales point’s technical staff, the ofcial
Sonus faber distributor in your country, or Sonus faber directly by writing to
Finally, we highly suggest registering on-line with the website www.sonusfaber.com in order to
keep up to date on all the latest news, initiatives and promotions offered by Sonus faber.
Enjoy your music!
1.2 - WARRANTY AND AFTER SALES SUPPORT
The loudspeakers are designed and manufactured according to the highest quality standards.
Should however a fault or a malfunction occur, all Sonus faber products are covered by a standard
warranty that covers material, technical and manufacturing defects and/or inconsistencies for two
(2) years from the date of purchase by the original owner.
Please be aware that you can extend the warranty period by registering your product on
https://www.sonusfaber.com/en/register-product/.
Check the complete Warranty Policy at www.sonusfaber.com/warranty-policy.
13
13
13
14
15
15
15
16
20
21
22

14
EN
The following should also be kept in mind for your convenience:
• The warranty on the loudspeakers covers any manufacturing defects;
• Keep the receipt as proof of purchase to show to the retailer if necessary;
• Keep the loudspeakers’ original packaging so that they can be transported without suffering
damage if they need to be shipped to an authorized service center;
• The loudspeakers must be accompanied by a description of the malfunction or defect
encountered.
The product warranty will be void under the following conditions:
• If the product has been disassembled or modied by persons other than a Sonus faber
authorized service center;
• If the product has been used in a manner that is not consistent with the indications contained
within this manual.
2. SAFETY INFORMATION
• This instruction manual must be read carefully and kept in an accessible location for any needs
that may arise.
• Make sure that in-wall/in-ceiling xing is suitably stable.
• Previously check that the capacity of the mounting surface is sufcient to support the weight
of the loudspeaker/s.
• Avoid staying in close proximity to the loudspeakers while the audio system is operating at
high volume. This can cause permanent damage to your hearing. Children must be kept at a
safety distance of least 50 cm from the loudspeaker.
• The speakers generate an electromagnetic eld that is harmless to humans and pets, but
can compromise the proper functionality of electronic equipment, such as CRT monitors or
TVs, when placed in close proximity. If this occurs, increase the equipment’s distance from the
loudspeakers.
• The technology underlying the speakers’ functionality is based on the principles of
electromagnetism, and the user should therefore avoid operating equipment that generates
strong electromagnetic elds, as these could affect the loudspeaker’s proper functionality.
• Do not connect the loudspeakers parallel to each other or directly to a constant voltage sound
distribution system (100 V, 70.7 V or similar) without an adapter transformer. This could result
in a serious system overload, with possible damage to the loudspeaker and/or the amplier.
• Do not place audio cables and electrical power cables in close proximity to one another.
An electromagnetic eld is present in the vicinity of the power cables, which can cause an
unpleasant humming noise. If this should occur, move the audio cables and electrical power
cables away from each other.
• The connections must be made with the equipment turned off. Pay attention to the polarities
of the terminals during connection.
• Connect the loudspeaker to a PS1 certied source pursuant to the IEC 62368-1 Standard.

EN
1515
3. INSTALLATION
3.1 - PACKAGING CONTENTS
• Speaker
• Frame
• Template for the hole
• Protective cover
• Accessories box: fabric grids, screws, screw covers.
3.2 - UNPACKING
Respect the following general indications:
• It is advisable to open the packaging as close to the nal location as possible.
• Use a proper tool to open the packaging. Do not insert the blade too deep to avoid damaging
the contents.
• Keep all the packaging elements for any future transport operations.
• Do not wear any watches, bracelets, rings, etc., in order to avoid scratching the loudspeakers
and their nishes. The same care must be taken in order to protect the loudspeakers from any
metal elements present on the clothes you are wearing, such as zippers, buttons, belt clasps,
rivets, etc.
• Check the content of the packaging. If one or more of the items is missing, notify the dealer
where the product was purchased.
• Do not touch the drivers during the operation.
For the safe handling of the loudspeakers, it is strongly recommended to follow the instructions
given in the table below:
Hold the loudspeaker securely with both hands in order to avoid dropping it.
The packaging materials can cause pollution. These materials must not be disposed
of as domestic waste and must be brought to a waste collection and recycling center.
Do not leave the packaging materials within the reach of children!
They could pose a risk of poisoning or suffocation if ingested.
If using a dedicated stand, do not use it with any speaker system other than the one
for which it was designed. Improper use of the stand can result in damage or injury.
Up to 44 lb A person
From 44 lb to 88 lb At least 2 people
From 88 lb to 132 lb At least 3 people
From 132 lb to 176 lb At least 4 people

16
EN
3.3 - ASSEMBLY
3.3.1 - MARK THE AREA TO BE CUT ON THE WALL USING THE TEMPLATE SUPPLIED
Previously, make sure that the cutting area is
between the two uprights!
For correct operation of the xing system,
maintain a distance of at least 4 cm between
the lateral edge of the hole and the nearest
upright.

EN
1717
Pay attention to the polarities of the terminals during connection.
The connections must be made with the equipment turned off!
3.3.2 - COLLEGARE I CAVI AUDIO AL DIFFUSORE

18
EN
3.3.3 - INSERT THE FRAME IN THE DRILLED HOLE
3.3.4 - PUSH THE METALLIC FINS INTO CONTACT WITH THE INTERNAL WALL
Remove the rubber bands

EN
1919
Tighten the locking screws fully home without
force, to prevent damage to the locking system!
3.3.5 - SCREW THE FRAME
3.3.6 - INSERT THE LOUDSPEAKER IN THE FRAME

20
EN 3.4 - REMOVE THE LOUDSPEAKER
3.4.1 - UNSCREW THE LOUDSPEAKER FROM THE FRAME
3.3.7 - SCREW THE LOUDSPEAKER TO THE FRAME
CLOSE WITH THE SCREW COVERS
3.4.2 - DISCONNECT THE AUDIO CABLES FROM THE LOUDSPEAKER

EN
21
Perform the operation with the appliances off!
3.4.3 - UNSCREW THE FRAME AND ALIGN THE METAL FINS
REMOVE THE FRAME FROM THE WALL
4. MAINTENANCE AND CLEANING
The loudspeakers do not require any particular maintenance operations, just general periodic
cleaning.
It is recommended to use a soft brush to eliminate any dust that may have accumulated on
the cabinet, the front panels, and the loudspeakers themselves, taking care not to damage the
loudspeakers’ delicate membranes.
It is recommended to use the supplied cloth and liquid to clean the metal and glass surfaces (where
present). Do not use aggressive strong chemical products such as acetone, trichloroethylene, acids,
abrasive agents, strong de-greasers, alcohol, lemon or wine. These measures will help you to
keep your loudspeakers’ working perfectly for years to come. Time will help improve the sound by
breaking in the speakers’ moving parts (membranes and suspensions), and the acoustic chamber
will become accustomed to music being played the more it is used - much like what happens with
acoustic string instruments!
Other manuals for ARENA
1
Table of contents
Languages: