Sound Projections Freedom FR-2 User manual
Sound Projections
22130 S. Vermont Ave, unit E
Torrance, California 90502
(310) 618-9619
Fax (310) 618-9620
www.soundprojections.com
®
S
ound
P
rojections
®
user guide
Freedom FR-2
Sound Projections® brand products are warranted to be free from defects
in materials and workmanship for a period of 3 years from the date of
original purchase, subject to the following conditions:
•This warranty excludes defects caused by normal wear,abuse, shipping
damage or failure to use a product in accordance with instructions.
Any service or modifications performed without authorization from
Sound Projections may void this warranty.
•The internal rechargeable battery and option 11 CD player are warranted
for a period of one year.
•Prior to returning your unit for repair and/or warranty service,
please contact our customer service department at the address below
for a Return Authorization (RA) number.
Three Year Limited Warranty
560-15, Rev A, 11/04
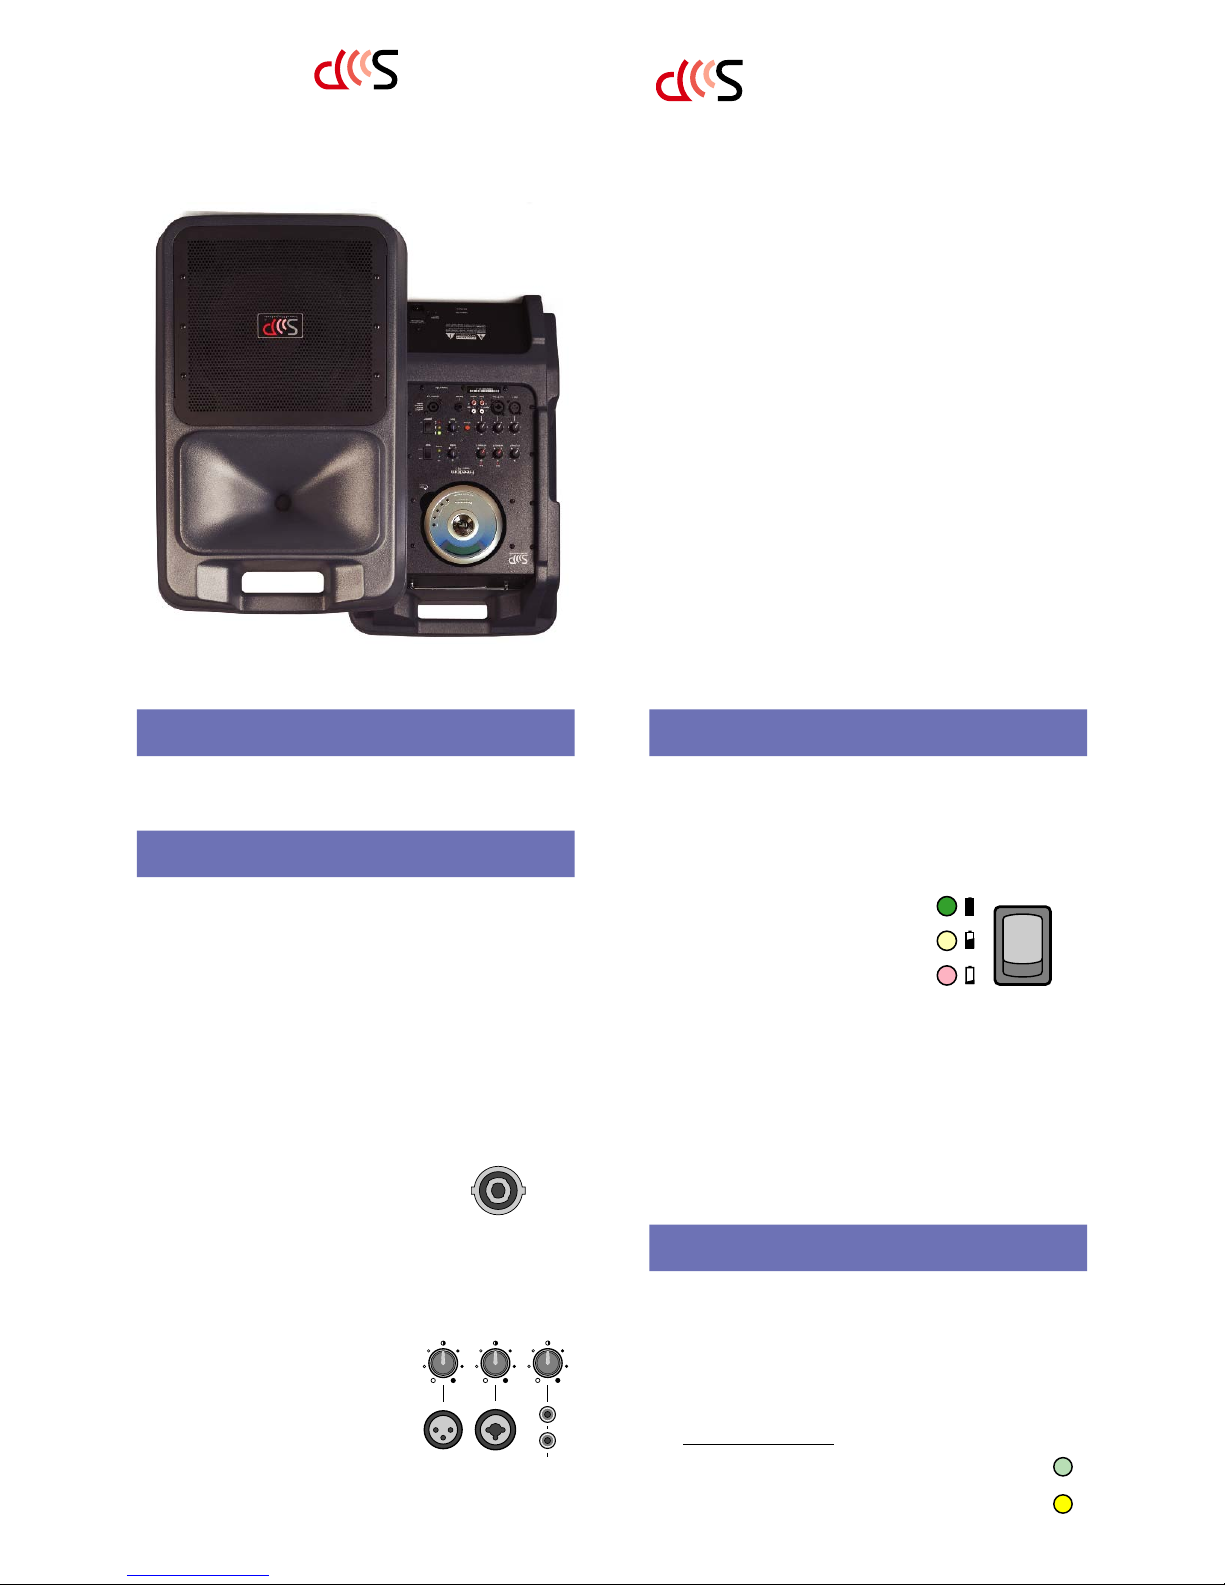
Whether you’re a first-time user or an experienced presentation professional,
the Freedom FR-2 was designed with you in mind. Loaded with features and
easy to use, you’ll need only a few minutes to set up and begin operating the
system. This user guide is full of valuable information — please read it!
!! Charge the battery!
Your Freedom sound system will arrive with the battery at or near full
charge. The battery should be recharged after every use, and also if
stored over 30 days after charging.See “Charging the Battery.”
1. Set up the sound system in front of your audience.
Proper set-up is important. For best sound distribution,put the unit
on a speaker stand or table so the sound projects overthe audience.
Connecting an FR-1C Companion Speaker.
(note: The speaker output is not included on models with “option 44”.)
For expanded crowd coverage,connect an
unpowered companion speaker model FR-1C
to the speaker output jack located on the con-
trol panel of the Freedom.
Note: The speaker output, companion speaker (FR-1C) input and
connecting cable (SC55-4W) have a 4-wire configuration designed
specifically for use with the Freedom — do NOT use other type external
speakers or damage to it or the FR-2 may result!)
2. Plug a microphone or audio source into an input jack.
Connect a microphone, tape player or
other source to the matching input jack;
turn down the corresponding volume
knobbefore turning on the FR-2.
(See “Choosing Inputs and Outputs” for
more information on input selection.)
If using the optional wireless micro-
phone system, use the corresponding knob to control the input volume.
The optional CD player may have a volume control on the panel or
electronic volume control push-buttons on the CD player (see separate
instructions for operation and features of optional equipment).
Start Here!
input
L
R
tape/cd
mic 1 mic 2 / line
3. Turn the power switch ON.
Observe the LED indicators to
confirm battery level and power.
Battery Power:The green light indicates
the battery is at or near full charge and
ready to use. The yellow light means 30-
60% usage remains, and red means less
than 30% remains and the battery should be charged before use (see
“Charging the Battery.”)
When plugged into AC power (100 to 250 VAC), the green LED will
stay on constantly as the system is being powered from the AC line and
not the battery. Occasionally,when playing loudly,the power LED’s
may flicker back and forth between green and yellow - this is normal.
4. Adjust the volume level and sound quality.
Increase the volume of the input being used to desired level (be sure
the microphone or input source is turned on!) Adjust tone controls
and set Vo icePower switch as necessary (see back page for more details).
Charge the battery completely after EVERY use.
The performance of the built-in battery will be greatly improved if
the system is charged completely after each use — storing the unit in a
partially-discharged condition will reduce the service life of the battery.
(The Freedom may be left plugged into an AC outlet during storage for
optimum results.)
Charging the battery.
Turn the power switch off,then plug the cord into a standard
AC outlet to charge the Freedom battery. The unit automati-
cally begins charging,indicated by the yellow “charging”LED.
When the green “full” LED lights steady,the battery is 90%
charged and may be used immediately or left plugged in
another 1-2 hours to top-off the battery before use or storage.
Charging the Battery
charging
full
speaker out
use FR-1C
bi-wired
companion
speaker
power
on
of
f

input output
L
R
L
R
tape/cdtape
mic 1 line outmic 2 / line
Plug a microphone with an XLR
connector into mic input one or two.
The knob above the jack controls the
volume level.
The mic inputs are balanced and low impedance,
and supply phantom power (9 volts) for condenser
type microphones.
When using long mic cables, use a balanced micro-
phone to help prevent hum and interference.
Plug any line-level source with a
1/4" phone plug (tape player,music
instrument, etc) into the line input.
The knob above the jack controls the
volume level.
The line input is an unbalanced line level input.
Use shielded cable to avoid hum or interference.
To daisy-chain two sound systems together for
greater crowd coverage,connect the line output
from one system into the line input of the other.
Plug the outputs from a tape
player or external CD player
with RCA jacks into the
tape/cd input. The knob
above the jacks controls the
volume level.
The tape/cd input is a line level input.
This is a summing input, meaning the left
and right channels will combine for a
mono input signal.
Choosing Inputs and Outputs
Connect the RCA outputs
to a tape player’s input to
record the sound system.
The tape output is a line-level,
summed and composite signal of the
sound system inputs.
Connect line output to
the line input of another
Freedom to daisy-chain
the systems together.
The line output is an unbalanced,
line-level and composite signal of the
sound system inputs.
tx ontx on
wireless 1wireless 2
Operating the optional Wireless System.
Fully raise the antenna vertically for the wireless
system in use (extend both antennas when operating
both mics of a dual-wireless unit).
Install a new 9 volt ALKALINE battery in the transmitter
for best results.
note: Wireless transmitters (microphone or beltpack)
typically typically have a power on and a mute switch,
both of which must be on for the microphone to
operate. See the wireless microphone insert page
describing the features of your wireless microphone.
These knobs control the volume level
of the optional built-in wireless micro-
phone system(s).
The knobs control the volume of the wireless mic in
use (system one or two); the red LED above each knob
indicates RF transmission is being received.
Open the lid, insert your CD and press the
play button. Adjust volume to the desired
level using the push buttons on the CD
player or the corresponding volume control
on the panel (depending on your model of
CD player).
See insert page describing the features and operation of your
CD player.
Wireless Mic Operation
CD Operation
talkove
r
voice
loud
norm
charging
full
bass
treble
Set the voice switch to “loud” for
outdoor and other applications
where powerful voice projection is
needed.
Set the voice switch to the “normal” position when
playing music and for most indoor applications.
Use the treble and bass controls to
adjust the sound for best sound
quality and clarity. The top-center
tic mark indicates a ‘flat’response.
For indoor and/or music playback, set controls to
the flat (12 o’clock) position and then adjust for
desired sound quality (be sure the voice switch is
in the normal position).
Press the red button to turn on the
“talkover” feature, which automatically
lowers the volume of all other inputs,
including optional CD when speaking
on the microphone.
Useful when making voice announcements over music
or other program material — your audience will hear
you clearly without having to manually adjust volume
controls. The volume on other inputs smoothly returns
to normal 3 seconds after you stop speaking into the
microphone. (note: The talkover feature is assigned to
optional wireless Mic 1, or the Mic 1 XLR input if no
wireless microphone is installed.)
Setting Tone Controls
Using the Talkover Feature
Table of contents
Other Sound Projections Stereo System manuals

Popular Stereo System manuals by other brands

Constellation audio
Constellation audio Performance Series DC Filter owner's manual

Panasonic
Panasonic SCAK20 - MINI HES W/CD-P operating instructions

Peaq
Peaq PMS200BT-B/W user manual

Sony
Sony Silentwriter 290 operating instructions

Philips
Philips DCD322 user manual

Kenwood
Kenwood M-313 instruction manual


