Sound Town STCA180-6Z User manual

2019 SOUNDTOWN // Features and specifications are subject to change and or improvement without notice.
STCA180-6Z, STCA360-6Z
PUBLIC ADDRESS AMPLIFIER WITH BLUETOOTH
USER MANUAL
AMPLIFICADOR PA CON BLUETOOTH
MANUAL DE USUARIO
2019 SOUNDTOWN // Las especificaciones y funcionalidades aquí indicadas están sujetas a modificaciones o mejoras sin previo aviso.

IMPORTANT SAFETY INSTRUCTIONS
1. Read all safety and operating instructions before using this product.
2. All safety and operating instructions should be kept for future reference.
3. Read and understand all warnings listed on the operating instructions.
4. Follow all operating instructions to operate this product.
5. This product should not be used near water, i.e. Bathtub, sink, swimming pool, web basement etc.
6. Only use dry cloth to clean this product.
7. Do not block any ventilation openings, it should not be placed flat against a wall or placed in a built-in
enclosure that will impede the flow of cooling air.
8. Do not install this product near any heat sources, such as, radiators, heat registers, stove or other apparatus
(including heat producing amplifiers) that produce heat.
9. Do not defeat the safety purpose of the polarized or grounding-type plug. A polarized plug has two blades
with one wider than the other. A grounding-type plug has two blades and a third grounding prong. The side
blade or the third prong are provided for your safety if the provided plug does not fit into your outlet, consult
an electrician for replacement of the obsolete outlet.
10. Protect the power cord being walked on or pinched particularly at Plugs, convenience receptacles and the
point where they exit from the apparatus. Do not break the ground pin of the power supply cord.
11. Only use attachments specified by the manufacturer.
12. Use only the cart, stand, tripod, bracket, or table specified by the manufacturer or sold with the apparatus.
When a cart is used use caution when moving cart/apparatus combination to avoid injury from tip-over.
13. Unplug this apparatus during lightning storms or when unused for long periods of time.
14. Care should be taken so that objects do not fall and liquids are not spilled into the unit through the ventilation
ports or any other openings.
15. Refer all servicing to qualified service personnel. Servicing is required when the apparatus has been damaged
in any way; such as, power-supply cord or plug is damaged, liquid has been spilled or objects have fallen into
the apparatus, the apparatus has been exposed to rain or moisture, does not operate normally or has been
dropped.
16. WARNING: To reduce the risk of fire or electric shock, do not expose this apparatus to rain or moisture.
17. When the MAINS plug, or an appliance coupler is used as the disconnect device, the disconnect device should
remain readily operable.
18. Protective Ground Terminal: The apparatus shall be connected to an AC main socket with a protective earth
ground connection.
FEATURES
3 MIC (1 Priority MIC) and 2 LINE inputs
1 LINE output
BLUETOOTH, SD, USB, FM input with LCD display
6-segament level indicator, power and fault indicator
Treble / Bass control & effect (REPEAT, SPEED, ECHO)
Over current, short circuit protection
70V / 100V outputs
Low impedance 4~16 ohm output
6 zone outputs with individual volume control
IN THE PACKAGE
1 STCA amplifier
1 Power cable
1 Remote control
1 User Manual
1 Warranty Card
1 2
EN
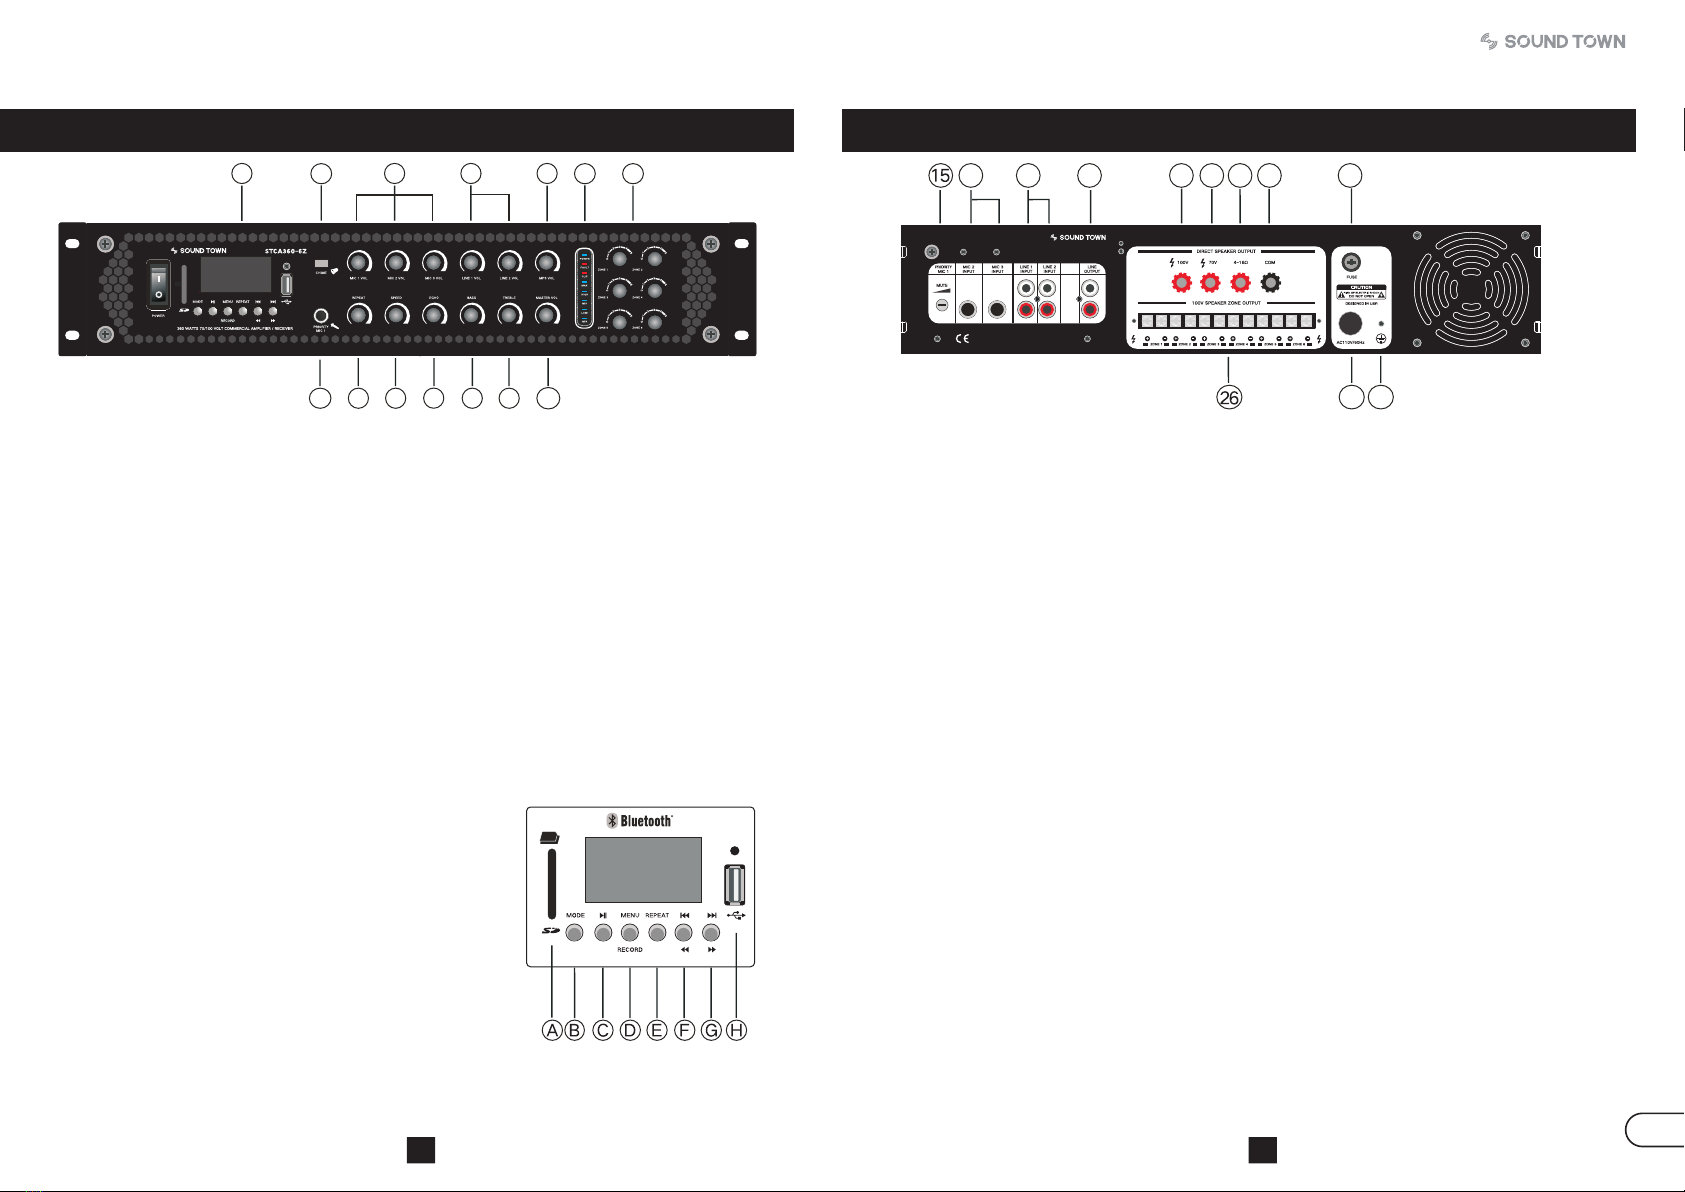
FRONT PANEL
1. MP3 PLAYER: Bluetooth, SD card, USB, FM and recorder (with LCD display)
2. MIC LEVEL CONTROL: 3 rotated knobs to adjust the level of 3 microphone input signals.
3. LINE LEVEL CONTROL: 2 rotated knobs to adjust the level of 2 line input signals.
4. MP3 LEVEL CONTROL: A rotated knob to adjust the level of MP3 signal.
5. REPEAT: To adjust the repeat depth effect.
6. SPEED: To adjust the speed of effect.
7. ECHO: To adjust the volume of echo effect.
8. BASS: To increase or decrease the low frequency of the input signal.
9. TREBLE: To increase or decrease the high frequency of the input signal.
10. MASTER VOLUME: To adjust the overall volume level.
11. MIC1 SOCKET: 1/4" microphone input (priority mic.)
12. CHIME: Push the button for a CHIME.
13. INDICATOR: The power LED illuminates when the amplifier is turned on; the fault LED illuminates when
the amplifier load short-circuited or over heat; 6-segament LED indicates the master output level.
14. 6 ZONE KNOB: To adjust 6 zone volume in 5 steps each.
REAR PANEL
MP3 PLAYER WITH BLUETOOTH AND RECORDER
A. The SD card input.
B. MODE: Press to switch the signal source USB/SD/BLUETOOTH
C. PLAY/PAUSE.
D. Short press to enter the menu; Press and hold to enter the
recording state.
E. REPEAT: Press to change cycle mode.
F. PREV: Short press to jump to previous song; press and hold
to enter rewinding state.
G. NEXT: Short press to jump to next song; press and hold to enter
forwarding state.
H. USB input.
16 17 18 19 20 21 22 23
24 25
15. PRIORITY MIC 1 (MUTE): For signal other than PRIORITY MIC1 attenuation between 0dB
to -30dB.
16. MIC2, MIC3 INPUT SOCKET: 2 x 1/4" jack connector are provided for microphone input.
17. LINE1, LINE2 INPUT: 2 x RCA connector are provided for line level signal input.
18. LINE OUT: One RCA connector are provided for signal output (mixed output).
19. 100V OUTPUT BINDING POST: To provide 100V voltage output, for your speaker with 100V
transformer, connect the positive ends to the '100V' red post and the negative ends to the
'COM' post.
20. 70V OUTPUT BINDING POST: To provide 70V voltage output, for your speaker with 70V
transformer, connect the positive ends to the '70V' red post and the negative ends to the
'COM' post.
21. LOW IMPEDANCE OUTPUT BINDING POST: For a 4~16 ohm low impedance speaker,
connect the positive ends to the '4~16 ohm' red post and the negative ends to the 'COM' post.
22. COM OUTPUT SOCKET: This is the common post, for whichever 70V/100V/4~16ohm
connection, need to connect the negative ends to the 'COM' post.
23. FUSE HOLDER: Only replace the fuse when the device is disconnected from mains. Only
replace the fuse with same power and rate.
24. AC INPUT: 110V/60Hz
25. GROUND: SCREW TERMINAL FOR CONNECTING EARTH.
26. 6 ZONE OUTPUT BINDING POST: To provide 100V voltage output dividing to 6 different zone.
123 4
12 13 14
5 6 7 8 9 10
11
3 4
EN
SPECIFICATIONS
How can we help you?
CONTACT OUR US-BASED SUPPORT TEAM
Simple or complex, your questions are important to us. For service, support
or more information, please contact the Sound Town support team:
Email: support@soundtown.com
MODEL
OUTPUT POWER
OUTPUT TYPE
MIC INPUT
LINE INPUT
FREQ. RANGE
DISTORTION
S/N AUX
RATIO MIC
VOLTAGE
DIMENSION
PACKING SIZE
N.W.
G.W.
STCA180-6Z
180W RMS
70V/100V/4~16Ω
3mV, 600Ω
200mV, 10kΩ
50Hz~20kHz
0.5% (1kHz)
85 dB
116 dB
110V
19" x 15.3" x 3.5" (2U)
21" x 18.7" x 6.9"
22 Lbs
24 Lbs
STCA360-6Z
360W RMS
70V/100V/4~16Ω
3mV, 600Ω
200mV, 10kΩ
50Hz~20kHz
0.5% (1kHz)
85 dB
116 dB
110V
19" x 15.3" x 3.5" (2U)
21" x 18.7" x 6.9"
30 Lbs
32 Lbs
5 6
EN
2 LÍNEAS DE ENTRADA Y 3 MICRÓFONOS (1 DE PRIORIDAD)
1 LÍNEA DE SALIDA
BLUETOOTH, SD, USB, recepción FM con pantalla LCD
6-indicador de nivel segmentado, indicador de encendido y fallos
Control de agudos/graves y efectos (REPETIR, VELOCIDAD, ECO)
Protección contra cortocircuitos y sobrecarga
Salidas 70 V / 100 V
Salida de baja impedancia 4-16 ohmios
6 salidas zonales con controles individuales de volumen
1 amplificador STCA
1 cable de corriente
1 control remoto
1 manual de usuario
1 tarjeta de garantía
INSTRUCCIONES RELEVANTES EN MATERIA DE SEGURIDAD
1. Lea atentamente todas las instrucciones de seguridad y de uso antes de utilizar este producto.
2. Conserve todas las instrucciones de seguridad y de uso a mano para futuras consultas.
3. Lea y comprenda todas las advertencias extendidas en las instrucciones de uso.
4. Siga todas las instrucciones de uso al utilizar este producto.
5. No utilice este producto cerca del agua (por ejemplo, cerca de una bañera, lavabo, piscina,
sótano húmedo, etc.).
6. Limpie este producto únicamente con un paño seco.
7. No obstruya ninguna abertura de ventilación. No coloque contra una pared ni en un recinto
encerrado que impida un flujo apropiado de aire para su ventilación.
8. No instale este producto en la cercanía de fuentes de calor tales como radiadores, rejillas de
calefacción, hornos u otros aparatos (incluyendo otros amplificadores que produzcan calor).
9. No ignore el mecanismo de seguridad del enchufe con toma a tierra o polarizado. Un enchufe
polarizado cuenta con dos clavijas, siendo una más ancha que la otra. Un enchufe con toma a
tierra tiene dos clavijas además de una tercera de tierra. Para su seguridad, se suministra un
aspa lateral o tercera clavija. Si el enchufe suministrado no encaja correctamente en su
tomacorriente, consulte con un electricista para reemplazar el tomacorriente obsoleto.
10.Proteja el cable de alimentación para que no se le pise o pinche, especialmente en las clavijas,
el tomacorriente y el punto en el que parte del equipo. No rompa la clavija a tierra del cable de
corriente.
11.Use únicamente aquellos conectores especificados por el fabricante.
12.Utilice únicamente el carro, soporte, trípode, estante o mesa especificado por el fabricante o
que se venda junto con el equipo. Si utiliza un carro, tenga cuidado al mover el carro con el
equipo a fin de evitar lesiones por caídas.
13.Desenchufe el equipo durante tormentas eléctricas o si no lo piensa utilizar por un período
prolongado.
14.Tenga cuidado de que no caiga ningún objeto ni se derrame ningún líquido dentro de la unidad a
través de las aberturas de ventilación o cualquier otra abertura.
15.En caso que necesite servicio técnico, consulte con el personal calificado. Necesitará servicio
técnico cuando el equipo haya sido dañado de manera alguna, como por ejemplo: el cable de
corriente o las clavijas están dañados, se ha derramado líquido o algún objeto ha caído dentro
del equipo, el equipo ha quedado expuesto a la lluvia o la humedad, no funciona normalmente o
se ha caído.
16.ADVERTENCIA: a fin de reducir los riesgos de incendio o de descarga eléctrica, no exponga
este equipo a la lluvia ni la humedad.
17.Cuando se utilice el enchufe a la RED ELÉCTRICA o un acoplador como sistema de desconexión,
este último deberá permanecer siempre en funcionamiento.
18.Terminal a tierra de protección: el equipo debe ir conectado a un tomacorriente de CA de la red
eléctrica que cuente con la debida conexión a tierra.
AVISO
RIESGO DE DESCARGA ELÉCTRICA
NO ABRIR
A FIN DE REDUCIR EL RIESGO DE DESCARGA
ELÉCTRICA, NO RETIRE LA CARCASA. ESTE EQUIPO NO
CONTIENE PIEZAS EN SU INTERIOR QUE PUEDAN SER
REPARADAS POR EL USUARIO. EN CASO QUE
NECESITE SERVICIO TÉCNICO, CONSULTE CON EL
PERSONAL CALIFICADO.
AVISO:
FUNCIONALIDADES
SUMINISTRADO EN EL EMBALAJE
7 8
ES

16 17 18 19 20 21 22 23
24 25
123 4
12 13 14
5 6 7 8 9 10
11
1. REPRODUCTOR MP3: Bluetooth, tarjeta SD, USB, FM y grabadora (con pantalla LCD)
2. CONTROL NIVEL MIC.: 3 perillas rotativas empleadas para ajustar el nivel de las señales
de entrada de los 3 micrófonos.
3. CONTROL NIVEL LÍNEA: 2 perillas rotativas empleadas para ajustar el nivel de las señales
de entrada de las 2 líneas.
4. CONTROL NIVEL MP3: una perilla rotativa empleada para ajustar el nivel de la señal de
MP3.
5. REPETIR: empleado para ajustar el efecto de profundidad de la repetición.
6. Limpie este producto únicamente con un paño seco.
7. ECO: empleado para ajustar el volumen del efecto de eco.
8. GRAVES: empleado para incrementar o reducir las bajas frecuencias de la señal de
entrada.
9. AGUDOS: empleado para incrementar o reducir las altas frecuencias de la señal de
entrada.
10.VOLUMEN MAESTRO: empleado para ajustar el nivel general del volumen.
11.CONECTOR MIC.1: entrada de micrófono de 1/4" (mic. prioritario)
12.CAMPANA: presione el botón para una CAMPANADA.
13.INDICADOR: el LED de encendido se enciende cuando el amplificador está encendido; el
LED de fallo se enciende cuando el amplificador sufre un cortocircuito
osobrecalentamiento; el LED de 6 segmentos indica el nivel maestro de salida.
14.6 PERILLAS ZONALES: empleadas para ajustar el volumen según 6 zonas con 5 pasos cada una.
REPRODUCTOR MP3 CON BLUETOOTH Y GRABADORA
A. La entrada de tarjeta SD.
B. MODO: presione para alternar entre las diferentes
fuentes de señal: USB/SD/BLUETOOTH
C. REPRODUCIR/PAUSAR
D. Presione brevemente para ingresar al menú.
Mantenga presionado para ingresar al modo de
grabación.
E. REPETIR: presione para cambiar el modo de ciclo.
F. ANTERIOR: presione para saltar a la canción
anterior. Mantenga presionado para ingresar al
modo de retroceso.
G. SIGUIENTE: presione para saltar a la siguiente
canción. Mantenga presionado para ingresar al
modo de avance rápido.
H. Entrada USB. 9
10
15. MIC. 1 PRIORIDAD (SILENCIO): Para alternar otra señal que no sea la del
MIC. 1 DE PRIORIDAD entre 0dB y -30dB.
16. CONECTOR ENTRADA MIC2, MIC3: se suministran 2 x conectores jack de
1/4" para las entradas de micrófono.
17. ENTRADAS LÍNEA 1, LÍNEA 2: se suministran 2 x conectores RCA para las
entradas de señal de línea.
18. SALIDA DE LÍNEA: se suministra un conector RCA para la salida de señal
(salida mezclada).
19. PUERTO DE SALIDA 100 V: a fin de suministrar una salida con una tensión de
100 V para el transformador de su altavoz de 100 V, conecte los extremos
positivos al puerto rojo "100 V" y los extremos negativos al puerto "COM".
20. PUERTO DE SALIDA 70 V: a fin de suministrar una salida con una tensión de
70 V para el transformador de su altavoz de 70 V, conecte los extremos
positivos al puerto rojo "70 V" y los extremos negativos al puerto "COM".
21. PUERTO DE SALIDA BAJA IMPEDANCIA: para un altavoz de baja impedancia
de 4- 16 ohmios, conecte los extremos positivos al puerto rojo "4-16 ohm" y
los extremos negativos al puerto "COM".
22. CONECTOR COM DE SALIDA: este es el puerto común para toda conexión de
70 V / 100 V / 4-16 ohmios, es necesario conectar los extremos negativos
al puerto "COM".
23. SOPORTE DEL FUSIBLE: reemplace el fusible únicamente mientras el
dispositivo esté desconectado de la red eléctrica. Reemplace únicamente
por un fusible que tenga la misma potencia y capacidad nominal.
24. ENTRADA CA: 110 V / 60 Hz
25. TIERRA: TERMINAL CON TORNILLO PARA CONEXIÓN A TIERRA.
26. PUERTO DE SALIDA DE 6 ZONAS: para suministrar una salida de 100 V de
tensión dividida en 6 diferentes zonas.
ES
PANEL POSTERIORPANEL FRONTAL
STCA180-6Z
180W RMS
70V/100V/4~16Ω
3mV, 600Ω
200mV, 10kΩ
50Hz~20kHz
0.5% (1kHz)
85 dB
116 dB
110V
19" x 15.3" x 3.5" (2U)
21" x 18.7" x 6.9"
22 Lbs
24 Lbs
STCA360-6Z
360W RMS
70V/100V/4~16Ω
3mV, 600Ω
200mV, 10kΩ
50Hz~20kHz
0.5% (1kHz)
85 dB
116 dB
110V
19" x 15.3" x 3.5" (2U)
21" x 18.7" x 6.9"
30 Lbs
32 Lbs
¿En qué podemos ayudarle?
PÓNGASE EN CONTACTO CON NUESTRO EQUIPO DE ASISTENCIA DE LOS EE.
UU.
Sean simples o complejas, sus preguntas nos preocupan. Si necesita servicio
técnico, asistencia o más información, póngase en contacto con el equipo de
asistencia de Sound Town:
Email: support@soundtown.com
MODELO
POTENCIA DE SALIDA
TIPO DE SALIDA
ENTRADA DE MIC.
ENTRADA LÍNEA
FRECUENCIA RANGO
DISTORSIÓN
RELACIÓN SEÑAL
RUIDO
AUX.
MIC
TENSIÓN
DIMENSIONES
DIMENSIONES EMBALAJE
PESO NETO
PESO BRUTO
11
12
ES
ESPECIFICACIONES
This manual suits for next models
1
Table of contents
Languages:
Other Sound Town Amplifier manuals


