SoundX Blast SMI440BT User manual
SMC Global® is a registered trademark or The Singing Machine Co., Inc.
SMC Global® es marca registrada de The Singing Machine Co., Inc.
SMI440BT
INSTRUCTION MANUAL
MANUAL DE INSTRUCCIONES
Distributed by SMC Global®
SMI440 v3_Layout 1 6/21/13 9:43 AM Page 1
1
Warnings
CAUTION: TO REDUCE THE RIS OF ELECTRIC SHOC , DO NOT
REMOVE COVER (OR BAC ). NO USER-SERVICEABLE PARTS
INSIDE. REFER SERVICING TO QUALIFIED SERVICE PERSONNEL.
The Caution marking is located on the bottom panel.
CAUTION
RISK OF ELECTRIC SHOCK
DO NOT OPEN
DANGEROUS VOLTAGE: The lightning flash with arrowhead
symbol within an equilateral triangle is intended to alert the
user to the presence of uninsulated dangerous voltage
within the product’s enclosure that may be of sufficient
magnitude to constitute a risk of electric shock to persons.
CAUTION: TO PREVENT ELECTRIC SHOC , MATCH WIDE BLADE OF
PLUG TO WIDE SLOT AND FULLY INSERT.
WARNING: TO PREVENT FIRE OR SHOC HAZARD, DO NOT EXPOSE
THIS UNIT TO RAIN OR MOISTURE.
ATTENTION: The exclamation point within an equilateral
triangle is intended to alert the user to the presence of
important operating and maintenance (servicing)
instructions in the literature accompanying this product.
FCC WARNING:
This device complies with part 15 of the FCC Rules. Operation is subject
to the following two conditions: (1) This device may not cause harmful
interference, and (2) this device must accept any interference received,
including interference that may cause undesired operation.
Warning: Changes or modifications to this unit not expressly approved
by the party responsible for compliance could void the user’s authority
to operate the equipment.
NOTE: This equipment has been tested and found to comply with the
limits for a Class B digital device, pursuant to part 15 of the FCC Rules.
These limits are designed to provide reasonable protection against
harmful interference in a residential installation. This equipment
generates, uses and can radiate radio frequency energy and, if not
installed and used in accordance with the instructions, may cause harmful
interference to radio communications. However, there is no guarantee
that interference will not occur in a particular installation. If this
equipment does cause harmful interference to radio or television
reception, which can be determined by turning the equipment off and
on, the user is encouraged to try to correct the interference by one or
more of the following measures:
• Reorient or relocate the receiving antenna.
•Increase the separation between the equipment and receiver.
• Connect the equipment into an outlet on a circuit different from that
to which the receiver is connected.
•Consult the dealer or an experienced radio/TV technician for help.
• The rating information is located at the bottom of the unit.
INDUSTR CANADA NOTICE:
This device complies with Industry Canada Iicense-exempt RSS standard(s).
Operation is subject to the following two conditions:
1. This device may not cause interference, and
2. This device must accept any interference, including interference that
may cause undesired operation of the device.
CAN ICES-3(B)/NMB-3(B)
Important Safety Information
1. Read these Instructions.
2. eep these Instructions.
3. Heed all Warnings.
4. Follow all Instructions.
5. Do not use this apparatus near water.
6. Clean only with a dry cloth.
7. Do not block any of the ventilation openings. Install in
accordance with the Manufacturer’s instructions.
8. Do not install near any heat sources such as radiators,
heat registers, stoves, or other apparatus (including
amplifiers) that produce heat.
9. Do not defeat the safety purpose of the polarized or
grounding-type plug. A polarized plug has two blades
with one wider than the other. A grounding type plug has
two blades and a third grounding prong. The wide blade
or the third prong are provided for your safety. When the
provided plug does not fit into your outlet, consult an
electrician for replacement of the obsolete outlet.
10. Protect the power cord from being walked on or pinched
particularly at plugs, convenience receptacles, and the
point where they exit from the apparatus.
11. Only use attachments/accessories specified by the
manufacturer.
12. Use only with a cart, stand, tripod, bracket, or table
specified by the manufacturer, or sold with the apparatus.
When a cart is used, use caution when moving the
cart/apparatus combination to avoid injury from tip-over.
13. Unplug this apparatus during lightning storms or when
unused for long periods of time.
14. Refer all servicing to qualified service personnel. Servicing
is required when the apparatus has been damaged in any
way, such as power-supply cord or plug is damaged,
liquid has been spilled or objects have fallen into the
apparatus, the apparatus has been exposed to rain or
moisture, does not operate normally, or has been
dropped.
15. WARNING: To reduce the risk of fire or electric shock, do
not expose this apparatus to rain or moisture. Do not
place objects filled with water, such as a vase, on the
apparatus.
16. The AC mains plug is used as the power disconnect
device and it should remain readily accessible and
operable during intended use. In order to completely
disconnect the apparatus from power, the mains plug
should be completely removed from the AC outlet
socket.
17. CAUTION: To reduce the risk of fire or explosion, do not
expose batteries to excessive heat such as sunshine, fire
or other heat sources.
SMI440 v3_Layout 1 6/21/13 9:43 AM Page 2
2
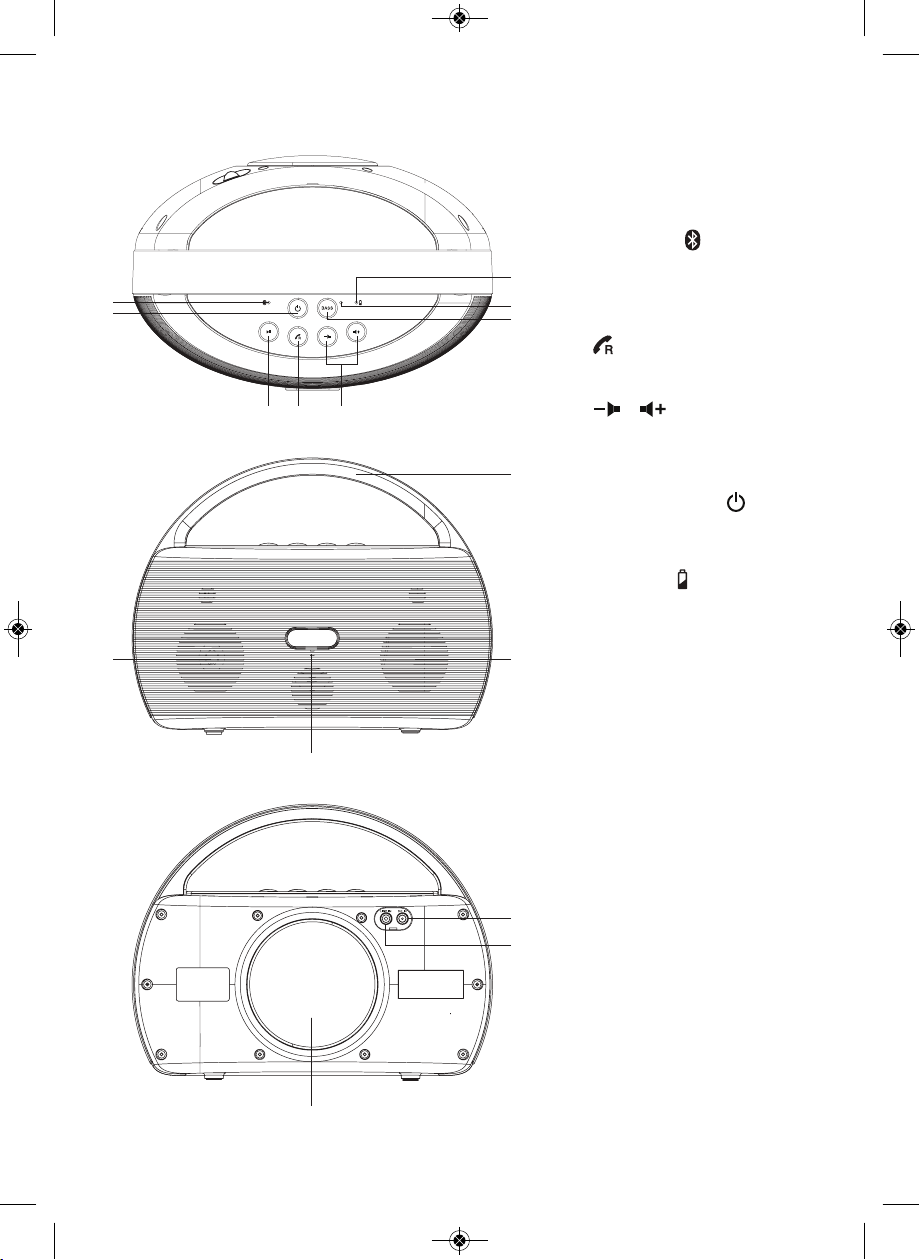
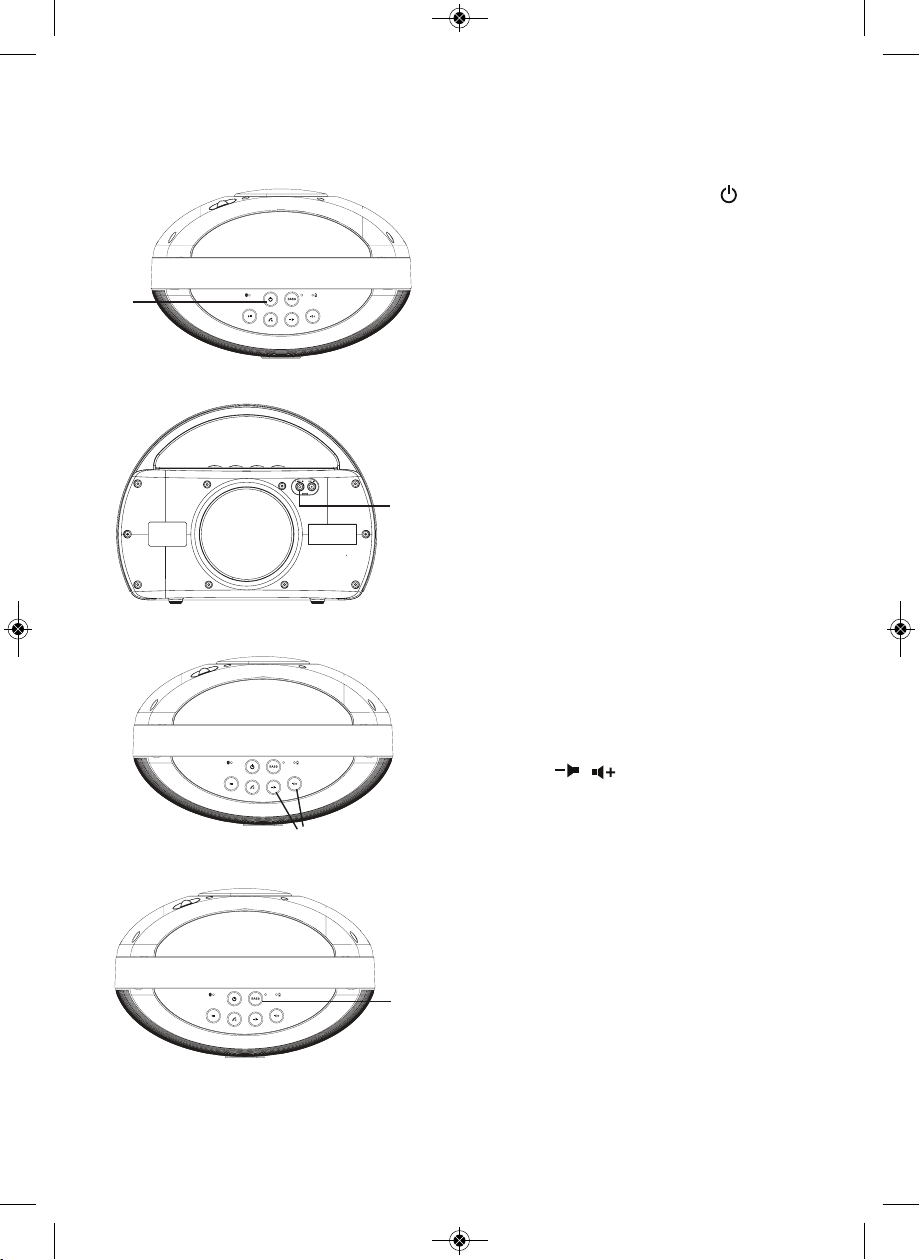
Location of Controls
1. Main Speakers
2. Microphone for calls
3. Bluetooth Indicator
4. Bluetooth Pairing/
Play/Pause4;Button
5. Receive Call/Transfer
Call/Redial Call/End Call
6. / Volume (For
Bluetooth Mode)
Buttons
7. Power On/Off Button
8. BASS Button
9. Charging Indicator
(Red for charging; Green
for fully charged)
10. Carrying Handle
11. Subwoofer
12. LINE IN Jack
13. DC IN Jack
14. BASS Indicator
654
14
8
9
3
7
2
10
11
11
13
12
SMI440 v3_Layout 1 6/21/13 9:43 AM Page 3

3
Installation
Plugging the Unit In/Recharging the Battery
1Insert the small end of the AC
adapter into the DC IN jack on the
rear of the unit. Insert the other
end (with the 2 blades) into a
conveniently located AC outlet
having 110-240V AC, 50/60Hz.
Notes:
•Only use the supplied AC adapter. Failure
to do so may cause a fire or damage the
unit.
• The AC adapter included with this unit is
for its use only. Do not use it with other
equipment.
• Turn off the unit before unplugging the AC adapter from the unit so as to avoid the
unit being damaged.
• When the unit is not going to be used for a long time, disconnect the AC adapter
from the AC outlet.
• If the unit acts erratically or malfunctions, unplug the unit, wait 20 seconds and plug
it back in.
• Never use an AC adapter that is damaged. Route power lead in a safe manner and
make sure it is not subjected to trapping or pinching. If the power lead is damaged,
refer to a qualified service agent.
2The unit has a built-in rechargeable battery (lithium-polymer). With the unit OFF,
charge the built-in battery for at least four hours before using the device for the
first time. The Charging indicator will turn from red to green when the built-in
battery becomes fully charged.
Notes:
• The built-in battery can only be recharged when the unit is off.
• While using the built-in battery, the environmental temperature should be 5°C
(41°F) to 35°C (95°F).
• To get the longest service life from the built-in battery, charge at indoor temperature.
• The built-in battery in this device may present a risk of fire or chemical burn if
mistreated. Do not disassemble, heat above 100°C (212°F), or incinerate.
• The battery should not be exposed to excessive heat such as sunshine, fire or the like.
Do not throw batteries in fire!
• Before throwing away any batteries, consult your local community for specific recycling.
• When the battery is low, the Bluetooth indicator will blink yellow. The unit will
switch to Standby mode automatically when the battery is low.
CAUTION:Danger of explosion if battery is incorrectly replaced. Replace only with the
same or equivalent type.
u
SMI440 v3_Layout 1 6/21/13 9:43 AM Page 4

4
Operation
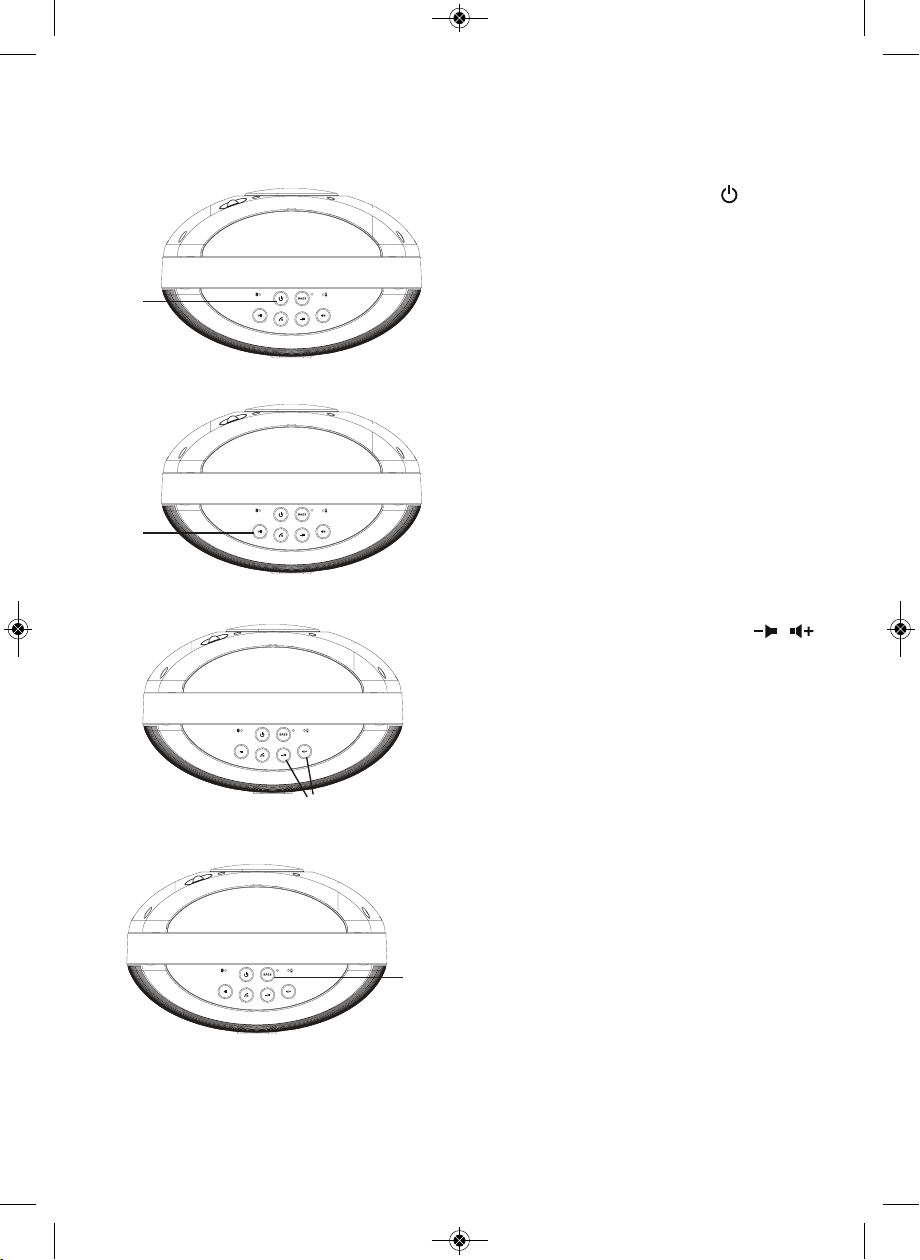
u
1Press the Power On/Off button to
turn the unit on; the Bluetooth
indicator will blink yellow. After four
seconds, it will slowly blink blue, and
then after six seconds, it will start
blinking rapidly to indicate it is in
Pairing mode.
2On the Bluetooth device, enable
Bluetooth and select “OUTDOOR
SPEA ER” from the Device List.
(Refer to the user manual of the
device to be connected for detailed
operations.) Press the Bluetooth
Pairing/Play/Pause4;button to
initiate pairing. If the Bluetooth
device prompts for a passcode, use
“0000”. Some Bluetooth devices will
ask you to accept the connection. If
the units are paired properly, the
speaker will beep twice. If it failed, the
Bluetooth indicator will blink slowly.
If the pairing fails, perform the following:
3Press and hold the Bluetooth Pairing/
Play/Pause4;button until the
Bluetooth indicator blinks quickly to
enter the Pairing mode. On the
Bluetooth device, enable Bluetooth
and select “OUTDOOR SPEA ER” from
the Device List (see step 2 above).
Pairing a Bluetooth Device
w
On some devices such as computers, once paired you must select the unit from the
Bluetooth menu and choose “Use as Audio Device (stereo)” or similar. Pairing remains
intact when the unit and/or your Bluetooth device is taken out of communication range.
An active connection will be re-established when your Bluetooth device returns within
range. When the Bluetooth function of your Bluetooth enabled device is turned on
again, reconnection can be achieved by pressing the button.
Tip: If you want to connect your
Bluetooth speaker to another Bluetooth
audio device, you need to disconnect
current device first and follow the steps
at right to make a new connection.
SMI440 v3_Layout 1 6/21/13 9:43 AM Page 5
5
Operation
1Press the Power On/Off button to
turn the SMI440BT on. With a unit
paired (see previous section),
operate your Bluetooth device and
its sound will be heard through the
SMI440BT’s speakers.
2Press the Bluetooth Pairing/Play/
Pause4;button to pause playback.
Press again to resume playback.
3Adjust the volume using the /
Volume buttons. You can also adjust
the volume on the device to which
you are paired.
4Enhance the bass sound by pressing
the BASS button.
Using a Bluetooth Device
u
v
w
x
SMI440 v3_Layout 1 6/21/13 9:43 AM Page 6

6
Operation
This unit is equipped with a built-in
microphone (located below the brand plate
on front panel), which allows you to make
or end calls of a connected mobile phone
through this unit. Make sure your Bluetooth-
enabled mobile phone is paired with the
unit. When there is an incoming call to the
connected mobile phone, you will hear an
incoming call alert tone from the unit.
To Use This Feature:
1. Press the button to answer the
incoming call.
2. Press the button again to end call.
3. To reject the incoming call, press and hold
the button.
4. To transfer the sound between the
mobile phone and the unit, press and
hold the button during a call.
5. To redial the last number retained in the
memory of the mobile phone, press the
button twice.
Notes:
• Re-dialing function is unavailable if there
is no dial record feature in your mobile
phone.
• This unit will not operate or may operate
improperly with some Bluetooth mobile
phones/audio players.
• If the conversation is not clear, try to
move closer to the microphone (located
below the brand plate on front panel).
Receiving/Dialing a Phone Call
SMI440 v3_Layout 1 6/21/13 9:43 AM Page 7
7
Operation
1Press the Power On/Off button to
turn the SMI440BT on.
2Insert one end of an audio cable
(not included) into the LINE OUT or
Headphone jack on your external
audio unit and the other end into the
LINE IN jack on the rear of the
SMI440BT; the unit will automatically
switch to Line In mode. The Bluetooth
indicator’s color will change to
yellow, indicating that the unit is in
Line In mode.
3Start playback of the external unit
and the external audio unit’s output
sound will be heard through the
SMI440BT’s speakers.
The /Volume buttons are not
used in the Line-in mode. To adjust
volume, use the volume control on
the external audio unit.
4Enhance the bass sound by pressing
the BASS button.
5To stop playback, disconnect the line
in cable from the Line In jack; the
unit will switch to Bluetooth mode
automatically. The Bluetooth indicator
will light solid blue.
Using the Line In Jack
u
v
w
x
SMI440 v3_Layout 1 6/21/13 9:43 AM Page 8

8
Troubleshooting Guide
Should this unit exhibit a problem, check the following before seeking service:
No Power
• Power is not on; press the Power On/Off button to turn the power on.
• Make sure unit is connected to AC power.
• Make sure the batteries are recharged (if not connected to AC power).
No Sound – General
• External device’s volume is set to minimum; raise volume.
• The SMI440BT’s volume is set to minimum; raise volume.
• The audio cable is plugged in. Unplug cable if not using Line In function.
The Bluetooth device cannot pair or connect with the unit.
• You have not activated the Bluetooth function of your device. Refer to the user
manual of your device to activate Bluetooth function.
• The unit is not in pairing mode. Press and hold the Bluetooth Pairing/Play/Pause4;
button until the Bluetooth indicator blinks fast.
• The unit is already connected with another Bluetooth device; disconnect that device
and then try again.
Unit acts erratically or does not react when buttons are pressed.
•Remove AC adapter, wait 20 seconds and reconnect. Then turn on the unit again.
SMI440 v3_Layout 1 6/21/13 9:43 AM Page 9

9
Specifications
GENERAL
Power ......................................................................................................... 110-240V AC, 50/60Hz
Power Output..................................................................................................................... DC 15V 2A
Max. Output Power.............................................................. 2x5 W (Main) + 20W (Subwoofer)
Dimensions ............................................... 13.11 x 8.46 x 9.88 inches (33 x 21.5 x 25.1 cm)
Weight........................................................................................................................ 4.84 lbs (2.2 kg)
RECHARGEABLE BATTER
Battery Type ............................................................. 11.1V 1700mAh Lithium Polymer Battery
Charging Voltage ...................................................................................................................... 15V DC
Operating Time ........................................ Approx. 4 hours at 50% volume after fully charged
Charging Time ........................................................................................................ Approx. 3.5 hours
BLUETOOTH
Bluetooth Version ................................................................................................................ V2.1+EDR
Working Distance....................................................... Up to 10 meters measured in open space
.......................................................................... (wall and structures may affect range of device)
Specifications are subject to change without notice.
SMI440 v3_Layout 1 6/21/13 9:43 AM Page 10

10
SMI440 v3_Layout 1 6/21/13 9:43 AM Page 11

NOTES IMPORTANTES
Évitez d'installer cette unité dans les endroits exposés à la lumière du soleil directe ou près de la
chaleur rayonnant des appareils tels que les radiateurs électriques, sur l'autre matériel stéréo qui
rayonne trop de chaleur, des endroits manquant de la ventilation ou des zones poussiéreuses, des
endroits sujet à la vibration constante et/ou des zones humides ou moites.
Avertissement: Les modifications ou les modifications à cette unité pas expressément approuvée
par la partie responsable de la conformité ont pu vider l'autorité de l'utilisateur pour actionner le
matériel.
NOTE: Ce matériel a été testé et avéré pour être conforme aux limites pour un appareil numérique
de la classe B, conformément à la partie 15 des réglementations de la FCC. Ces limites sont conçues
pour assurer la protection raisonnable contre l'interférence néfaste dans une installation résidentielle.
Ce matériel se produit, des utilisations et peut rayonner l'énergie de radio frequency et, sinon installé
et utilisé selon les instructions, peut entraîner l'interférence néfaste aux communications par radio.
Cependant, il n'y a aucune garantie que l'interférence ne se produira pas dans une installation
particulière. Si ce matériel entraîne l'interférence néfaste à la radio ou la réception des émissions
télévisées, qui peut être déterminée en tournant le matériel par intervalles, l'utilisateur est encouragé
à essayer de corriger l'interférence par un ou plusieurs des mesures suivantes :
•Réorientez ou replacez l'antenne de réception.
•Augmentez la séparation entre le matériel et le récepteur.
•Connectez le matériel dans un débouché sur un circuit différent de celui auquel le récepteur est
connecté.
•Consultez le distributeur ou un technicien expérimenté de radio/TV pour l'aide.
Avis d’Industrie Canada
Le présent appareil est conforme aux CNR d’industrie Canada applicables aux appareils radio exem
pts de licence L’exploitation est autorisée aux deux conditions suivantes : (1) l’appareil ne doit pas
produire de brouillage, et (2) l’utillsateur de l’appareil doit accepter brouillage radioélectrique subi
meme si le brouillage est susceptible d’encompromettre le fonctionnement,mauvais fonctionnement
de l’appareil.
CAN ICES-3 (B)/ NMB-3 (B)
FCC IMPORTANTE
Ce dispositif est conforme à la partie 15 des réglementations de la FCC. L'exécution est sous réserve
des conditions suivantes deux conditions:
(1) Ce dispositif n'entraîne pas l'interférence néfaste, et
(2) Ce dispositif doit recevoir n'importe quelle interférence reçue, y compris l'interférence qui peut
entraîner l'exécution peu désirée.
Table of contents


