Southbend GH10CCH User manual

Manual 1177596 Rev 3 (02/23)
$21.00
Marathoner Gold Half-Size Gas
Convection Ovens
Manual Section CO
IMPORTANT FOR FUTURE REFERENCE
Please complete this information and retain this
manual for the life of the equipment:
Model #:
___________________________
Serial #:
___________________________
Date Purchased:
_____________________
WARNING
Improper installation, adjustment, alteration, service or maintenance can cause property damage, injury
or death. Read the installation, operating and maintenance instructions thoroughly before installing or
servicing this equipment.
Model GH/10TC
Marathoner Gold Half-Size
Gas Convection Ovens
GH/10CCH, GH/10SC, GH/10TC
GH/20CCH, GH/20SC & GH/20TC
Installation & Operation Manual
SOUTHBEND
A Middleby Company
1100 Old Honeycutt Road Fuquay-Varina, North Carolina 27526 USA
www.southbendnc.com
Model GH/20SC

INSTALLATION & OPERATION MANUAL 1177596 REV 3 (02/23)
PAGE 2 OF 76
Marathoner Gold Half-Size Gas Convection Ovens
SAFETY PRECAUTIONS
Before installing and operating this equipment, be sure everyone involved in its operation is fully trained and aware of
precautions. Accidents and problems can be caused by failure to follow fundamental rules and precautions.
The following symbols, found throughout this manual, alert you to potentially dangerous conditions to the operator,
service personnel, or to the equipment.
CAUTION
WARNING
NOTICE
This symbol warns of immediate hazards that will result in severe injury or death.
This symbol refers to a potential hazard or unsafe practice that could result in injury or death.
This symbol refers to a potential hazard or unsafe practice that could result in injury, product
damage, or property damage.
This symbol refers to information that needs special attention or must be fully
understood, even though not dangerous.
DANGER
Copyright © 2023 by Southbend. All rights reserved. Published in the United States of America.
SPECIFICATIONS
WARNING
FIRE HAZARD
FOR YOUR SAFETY
Keep area around appliances free and clear of combustibles.
Purchaser of equipment must post in a prominent location detailed instructions to be followed in the event the
operator smells smoke.
NOTICE
Be sure this Operator’s Manual and important papers are given to the proper authority to retain for future reference.
NOTICE
This product is intended for commercial use only. NOT FOR HOUSEHOLD USE.
NOTICE
WARNING
EXPLOSION HAZARD
FOR YOUR SAFETY
Immediately call the emergency phone number of your gas supplier.
IMPORTANT NOTES FOR INSTALLATION AND OPERATION
WARNING
ventilation air to and from your cooking equipment.

INSTALLATION & OPERATION MANUAL 1177596 REV 3 (02/23) PAGE 3 OF 76
Marathoner Gold Half-Size Gas Convection Ovens
RETAIN THIS MANUAL FOR FUTURE REFERENCE.
Table of Contents
........................................................................................................................ 4
Installation............................................................................................................................. 9
Operation .............................................................................................................................. 21
Operation for Touchscreen Models Only ................................................................................... 29
Cooking Hints........................................................................................................................ 39
Cleaning................................................................................................................................ 42
Adjustments .......................................................................................................................... 44
Troubleshooting .................................................................................................................... 45
Parts...................................................................................................................................... 56
TC
You will find that your new equipment, like all Southbend equipment, has been designed and manufactured to
meet the toughest standards in the industry. Each piece of Southbend equipment is carefully engineered and
designs are verified through laboratory tests and field installations. With proper care and field maintenance, you
will experience years of reliable, trouble-free operation. For best results, read this manual carefully.
Read these instructions carefully before attempting installation. Installation and initial startup should be performed by a
experienced in and knowledgeable with the installation of commercial gas an/or electric cooking equipment) then the terms
and conditions on the Manufacturer’s Limited Warranty will be rendered void and no warranty of any kind shall apply.
In the event you have questions concerning the installation, use, care, or service of the product, write to:
Southbend Technical Service
1100 Old Honeycutt Road
Fuquay Varina, North Carolina 27526 USA
The serial plate is located on the interior side of the lower front panel, as shown below.
plate located at the base of the front panel, between the door and the control panel. Letters in the model number are
described below.
PREFIX: G- GAS H- HALF-SIZE
SUFFIX: SC - STANDARD CONTROLS CH - COOK & HOLD CONTROLS TC - TOUCH CONTROL

INSTALLATION & OPERATION MANUAL 1177596 REV 3 (02/23)
PAGE 4 OF 76
Marathoner Gold Half-Size Gas Convection Ovens
NOTICE
Local codes regarding installation vary greatly from one area to another. The National Fire Protection Association, Inc.
states in its NFPA 96 latest edition that local codes are the “authority having jurisdiction” when it comes to installation
requirements for equipment. Therefore, installations should comply with all local codes.
the buyer to corresponding changes, additions, or replacements for previously purchased equipment.
This product is intended for commercial use only, not for household use.
The installation must conform with local codes, or in the absence of local codes, with the National Fuel Gas Code,
ANSI Z223.1, Natural Gas Installation Code, CAN/CGA-B149.1, or the Propane Installation Code CAN/CGA-B149.2,
as applicable, including:
during any pressure testing of the gas supply piping system at test pressures equal to or less than 1/2 psi
WARNING
There must be adequate clearance between the left side of the ovens and combustible construction..
racks and for serviceability.
Although no clearance is required behind the motor on the rear of the oven, care must be taken to provide adequate
air circulation to prevent the motor from overheating.
Do not locate the oven adjacent to any high heat or grease-producing piece of equipment, such as a range top,
DO NOT MOUNT ABOVE OTHER COOKING EQUIPMENT.
MINIMUM CLEARANCES
Minimum Clearance from
Combustible Construction
Minimum Clearance from
Non-Combustible Construction
Minimum Clearance from heat
producing appliance
Back 0” 0” 6”
Right Side 0” 0” 6”
Left Side 2” 0” 6”
Floor 0” 0” 6”

INSTALLATION & OPERATION MANUAL 1177596 REV 3 (02/23) PAGE 5 OF 76
Marathoner Gold Half-Size Gas Convection Ovens
The serial plate is located behind the combustion cover panel, below the oven door. It is on the right side, attached to
the base of the oven. It indicates the type of gas the unit is equipped to burn. All Southbend equipment is adjusted at the
factory. Check type of gas on serial plate.
pressure regulator which is set for 4.5” W.C. on high fan, 2.5: W.c. manifold pressure on low fan for natural gas or 10.5”
W.C. manifold pressure on high fan, 7” W.C. manifold pressure on low fan for propane gas. Use 1/8” pipe tap on the top of
the burner manifold for checking pressure.
An optional gas connection is available through the bottom of the oven base. If the incoming gas line needs to connect
through the bottom of the oven, refer to page 6 for optional gas connection.
If applicable, the vent line from the gas appliance pressure regulator shall be installed to the outdoors in accordance with
local codes, or in the absence of local codes, with the National Fuel Gas Code, ANSI Z223.1, Natural Gas Installation
Code, CAN/CGA-B149.1, or the Propane Installation Code CAN/CGA-B149.2, as applicable.
This appliance should be connected ONLY to the type of gas for which it is equipped.
A 3/4” NPT line is provided at the rear for the gas connection. An adequate gas supply is imperative. Undersized or low
pressure lines will restrict the volume of gas required for satisfactory performance. Fluctuations of more than 25% on
An adequate gas supply line to the unit should be no smaller than the inside diameter of the pipe from the unit to which it
is connected.
Purge the supply line to clean out any dust, dirt, or other foreign matter before connecting the line to the unit. Each unit
joint compound which is suitable for use with LP gas on all threaded connections. Test pipe connections thoroughly for
gas leaks. USE SOAPY WATER ONLY FOR TESTING ON ALL GASES. NEVER USE AN OPEN FLAME TO CHECK
FOR GAS LEAKS. ALL CONNECTIONS MUST BE CHECKED FOR LEAKS AFTER THE UNIT HAS BEEN PUT IN
OPERATION. Test pressure should not exceed 14” W.C.
Model Number # of Ovens Total BTU Type of Gas Orice Size
GH-10… Single-Deck 30,000
Propane 60
Natural Gas 53
GH-20… Double-Deck 60,000
Propane 60
Natural Gas 53

INSTALLATION & OPERATION MANUAL 1177596 REV 3 (02/23)
PAGE 6 OF 76
Marathoner Gold Half-Size Gas Convection Ovens
DIMENSIONS
MISCELLANEOUS
Note:
UTILITY INFORMATION
and must comply with ANSI Z 21.69.
• Clearances from combustibles: Top - 0”, bottom - 0”, right side - 0”
and left side - 2”
• Recommend - install under vented hood
• If the unit is connected directly to the outside flue, an A.G.A
approved down draft diverter must be installed at the flue outlet
of the oven
• Oven cannot be operated without fan in operation
NOTICE:
Southbend has a policy of continuous product research and
product design without notice. Such revisions do not entitle the buyer
to corresponding changes, improvements, additions or replacements
for previously purchased equipment.
MODEL
GH/10 15.80”
21.30”
20”
13”
21”
57.50”
45”
68.1 cu. ft.
420 lbs.
GAS: •
• One 3/4” male connection
• Required minimum inlet pressure:
- Natural gas 7” W.C.
- Propane gas 11” W.C.
ELECTRIC: Standard: 120/60/1 phase, furnished with 6’ cord w/3-
with terminal block located at rear. Total maximum amps 4.3 per deck.
with terminal block located at rear. Total maximum amps 3.8 per deck.
with terminal block located at rear. Total maximum amps 6.0 per deck.
4.0"
(102)
29.0"
(737)
33.0"
(838)
30.0" (762)
26.0"
(660)
29.0"
(737)
55.0"
(1397)
18.6"
(473)
2.0" (51)
7.0"
(178)
26.65" (676)
29.65" (753)
10.5"
(267)
Oven
Bottom
utility
connection
utility
connection
Full 180° Opening
* All units shipped single phase.
Single phase can be easily converted to three phase.

INSTALLATION & OPERATION MANUAL 1177596 REV 3 (02/23) PAGE 7 OF 76
Marathoner Gold Half-Size Gas Convection Ovens
DIMENSIONS
UTILITY INFORMATION
MISCELLANEOUS
3/4” and must comply with ANSI Z 21.69.
• Clearances from combustibles: Top - 0”, bottom - 0”, right side -
0” and left side - 2”
• Recommend - install under vented hood
of the oven
• Oven cannot be operated without fan in operation
NOTICE:
Southbend has a policy of continuous product research and
product design without notice. Such revisions do not entitle the buyer
to corresponding changes, improvements, additions or replacements
for previously purchased equipment.
MODEL
GH/20 15.8”
21.30”
20”
13”
21”
57.50”
45.50”
81.5”
68.1 cu. ft.
850 lbs
GAS: •
• One 3/4” male connection
• Required minimum inlet pressure:
- Natural gas 7” W.C.
- Propane gas 11” W.C.
ELECTRIC: Standard: 120/60/1 phase, furnished with 6’ cord w/3-
with terminal block located at rear. Total maximum amps 4.3 per deck.
with terminal block located at rear. Total maximum amps 3.8 per deck.
with terminal block located at rear. Total maximum amps 6.0 per deck.
* All units shipped single phase.
Single phase can be easily converted to three phase.
13.0"
(330)
26.65" (676)
29.65" (753)
16.5"
(419)
Utility Connection
Oven Bottom
42.0"
(1067)
Oven Bottom
45.5"
(1156)
Utility Connection
30.0" (762)
29.0"
(737)
29.0"
(737)
64.0"
(1626)
6.0"
(152)
18.6"
(473)
2.0" (51)
utility
connection
Full 180° Opening
INSTALLATION & OPERATION MANUAL 1177596 REV 3 (02/23)
PAGE 8 OF 76
Marathoner Gold Half-Size Gas Convection Ovens
WARNING
cause headaches, drowsiness, nausea, or could result in death.
Provisions for adequate air supply must be provided. Do not obstruct the front or rear of the unit as combustion air
enters through these areas.
Be sure to inspect and clean the ventilation system according to the ventilation equipment manufacturer’s instructions.
NOTICE
Proper ventilation is the owner’s responsibility. Any problem due to improper ventilation will not be covered by the
warranty.
Convection ovens require connection to a supply of electricity. The appliance, when installed, must be electrically
grounded in accordance with local codes, or in the absence of local codes, with the National Electrical Code,
ANSI/NFPA 70, or the Canadian Electrical Code, CSA C22.2, as applicable. An electrical diagram is located on the
on page 48.
Ovens ordered with the 120V power option are equipped with one or two power cords with a standard 120V single-phase
plug with a ground prong. Single-deck ovens will have one power cord; double-deck ovens will have two.
order. Ovens with other power options have a terminal block on the rear of the oven that must be wired to the power supply.
Depending on how the power supply is connected to the terminal block, the oven can operate on either single-phase of
three-phase power.
120/60/1 120 Volts, 60 Hz, Single Phase Single-Deck
Double-Deck
7.9
15.8
208/60/1or3 190-219 Volts, 60 Hz, Single or Three Phase Single-Deck
Double-Deck
4.3
8.6
240/60/1or3 220-240 Volts, 60 Hz, Single or Three Phase Single-Deck
Double-Deck
3.8
7.5
240/50/1or3 208-240 Volts, 50 Hz, Single or Three Phase Single-Deck
Double-Deck
6.0
12.0
If a ventilation canopy is used, it is recommended that a canopy extend 6” past the appliance and that the bottom edge
fan tends to create a vacuum in the room and may interfere with burner performance. Fresh air openings approximately
equal to the fan area will relieve such a vacuum. In case of unsatisfactory performance on any appliance, check the
appliance with the exhaust fan in the “OFF” position. Do this only long enough to check equipment performance. Then
turn the exhaust fan back on and let it run to remove any exhaust that may have accumulated during the test.

INSTALLATION & OPERATION MANUAL 1177596 REV 3 (02/23) PAGE 9 OF 76
Marathoner Gold Half-Size Gas Convection Ovens
NOTICE
Local codes regarding installation vary greatly from one area to another. The National Fire Protection Association, Inc.
states in its NFPA 96 latest edition that local codes are the “authority having jurisdiction” when it comes to installation
requirements for equipment. Therefore, installations should comply with all local codes.
The installation must conform with local codes, or in the absence of local codes, with the National Fuel Gas Code,
ANSI Z223.1, Natural Gas Installation Code, CAN/CGA-B149.1, or the Propane Installation Code CAN/CGA-B149.2,
as applicable, including:
2. The appliance must be isolated from the gas supply piping system by closing its individual manual shutoff
valve during any pressure testing of the gas supply piping system at test pressures equal to or less than
IMMEDIATELY INSPECT FOR SHIPPING DAMAGE
All containers should be examined for damage before and during unloading. The freight carrier has assumed
responsibility for its safe transit and delivery. If damaged equipment is received, either apparent or concealed, a claim
must be made with the delivering carrier.
Apparent damage or loss must be noted on the freight bill at the time of delivery. The freight bill must then be signed
the necessary forms.
A request for inspection must be made to the carrier within 15 days if there is concealed damage or loss that is not
apparent until after the equipment is uncrated. The carrier should arrange an inspection. Be certain to hold all contents
plus all packing material.
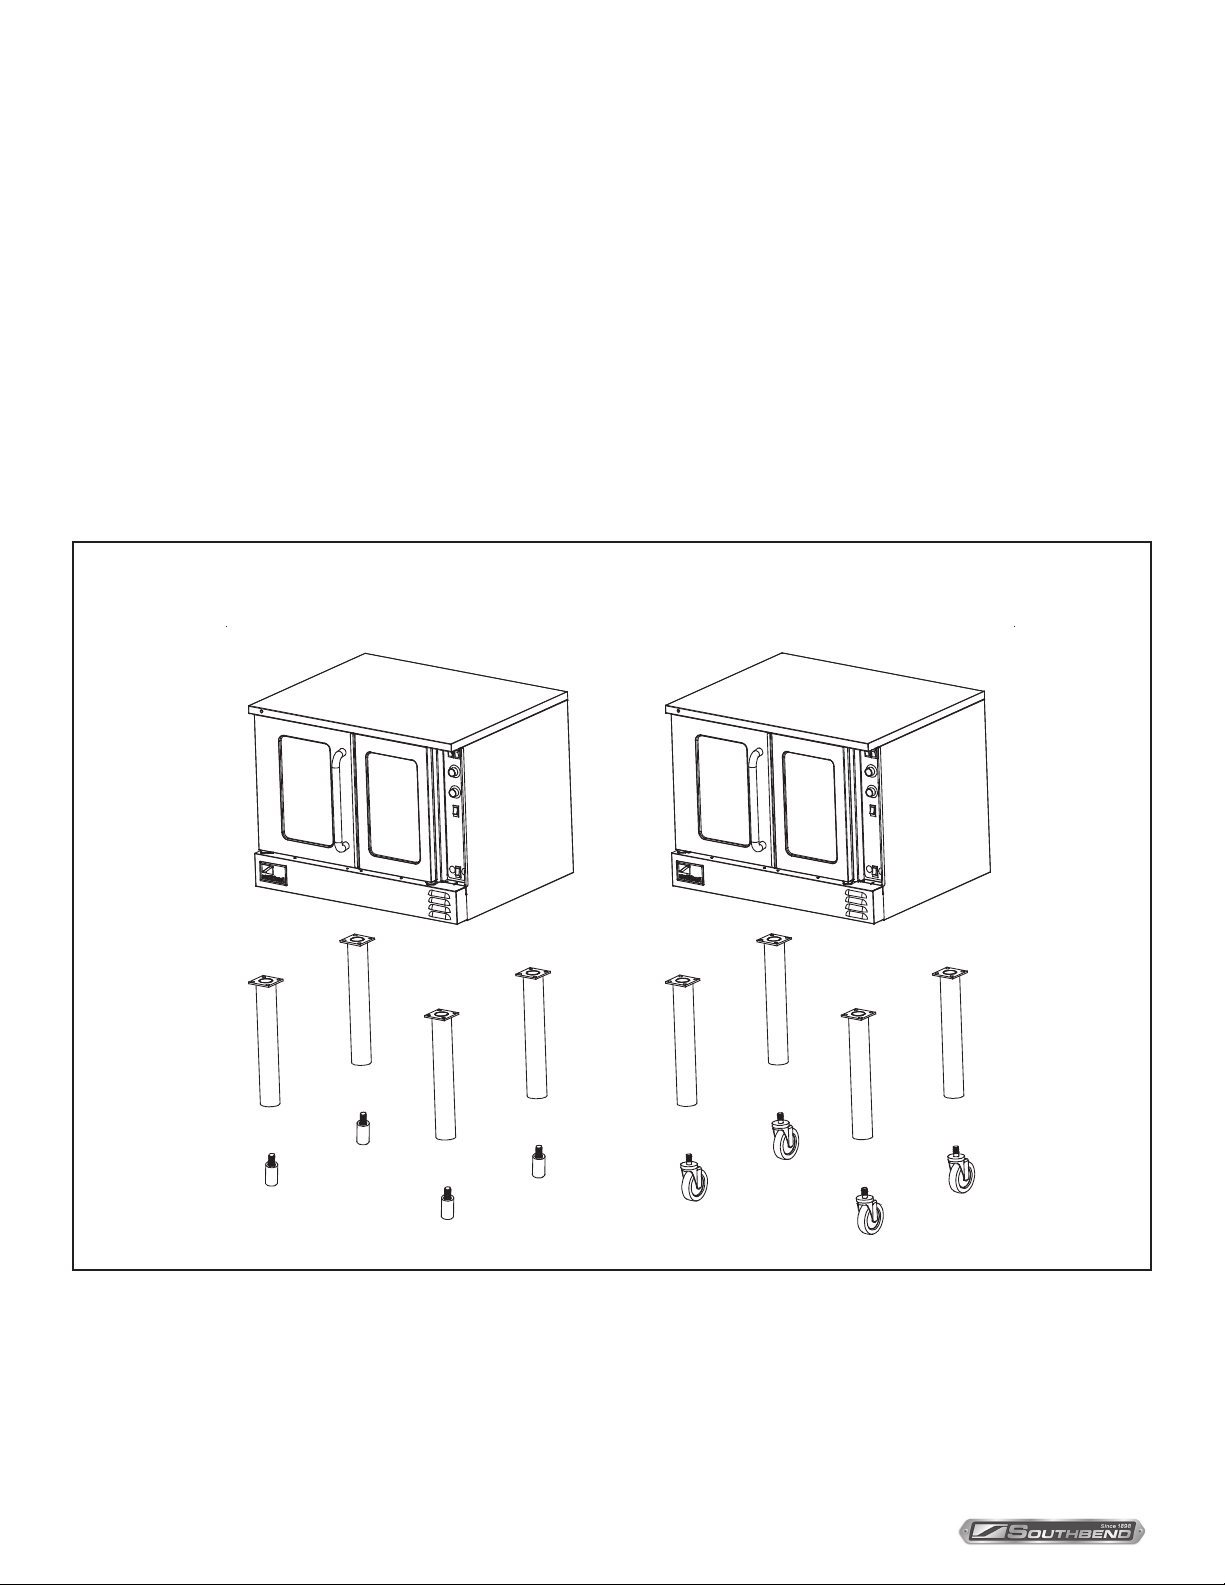
1. Cut banding straps and remove packing material.
2. Cut banding strap holding oven to wooden skid.
3. If you are installing 4” legs on a single-deck oven, go to Step 2a on page 9.
If you are installing 26” legs on a single-deck oven, go to Step 2b on the page 10.
If you are installing a double-deck oven, go to Step 2c on page 11.
means is recommended. For safety, “shore up” and support the oven with an adequate blocking arrangement strong
2. Attach each leg to a bottom corner of the oven by screwing it into the appropriate threaded hole.
3. Lower the oven gently onto a level surface. Never drop or allow the oven to fall.
4. Use a level to make sure that the oven is level. Each leg can be screwed in or out to lower or raise each corner of the
oven.
INSTALLATION & OPERATION MANUAL 1177596 REV 3 (02/23)
PAGE 10 OF 76
Marathoner Gold Half-Size Gas Convection Ovens
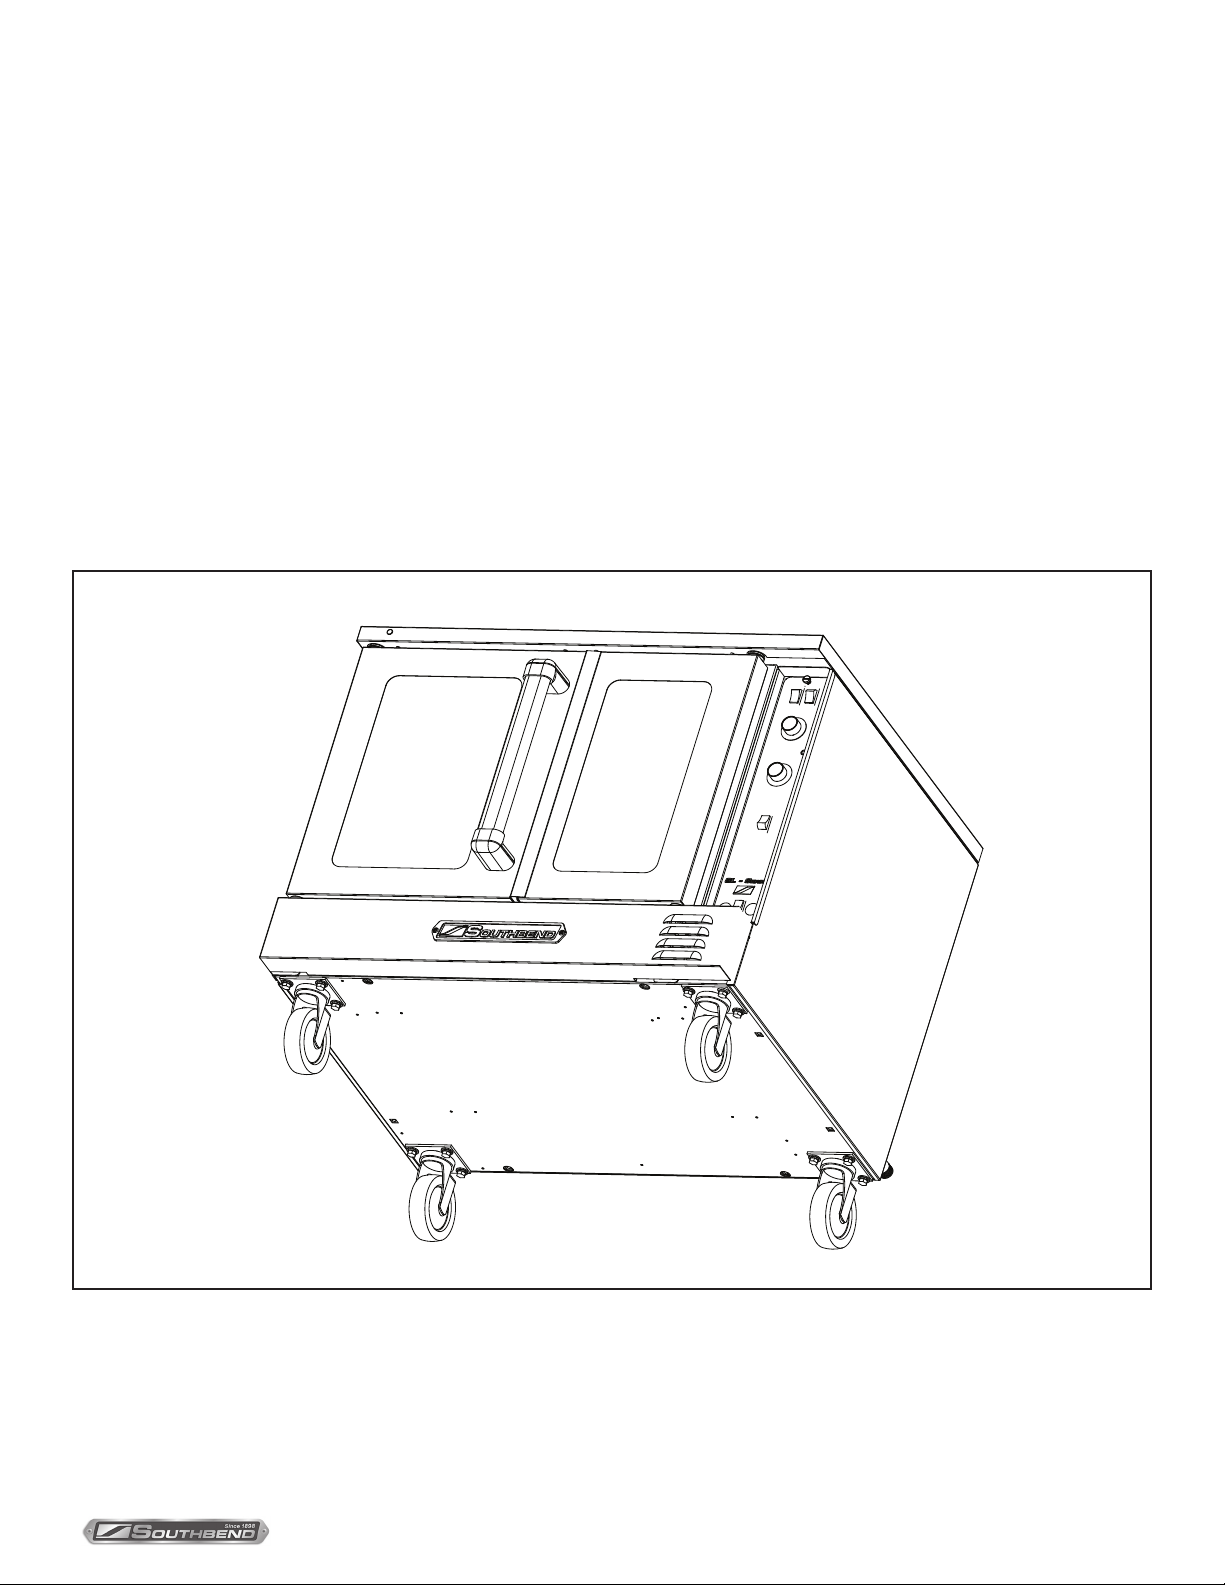
means is recommended. For safety, “shore up” and support the oven with an adequate blocking arrangement strong
Each leg is secured by four screws. The mounting holes are pre-drilled and threaded.
attaching casters, the two casters with brakes should be attached to the front legs.
4. Lower the oven gently onto a level surface. Never drop or allow the oven to fall.
5. Use a level to make sure that the oven is level. The adjustable feet can be screwed in or out to lower or raise each
corner of the oven.
6. If casters were installed, go to Installation Step 3, otherwise go to Step 4.
INSTALLATION & OPERATION MANUAL 1177596 REV 3 (02/23) PAGE 11 OF 76
Marathoner Gold Half-Size Gas Convection Ovens
Double-deck oven can be shipped either already bolted together, or as two separate ovens to be bolted together after
of the oven. Do the following:
means is recommended. For safety, “shore up” and support the oven with an adequate blocking arrangement strong
attaching casters, the two casters with brakes should be attached to the front leg pads.
3. Lower the oven gently onto a level surface. Never drop or allow the oven to fall.
4. Use a level to make sure that the oven is level. The adjustable legs can be screwed in or out to lower or raise each
corner of the oven.
5. If casters were installed, go to Installation Step 3, otherwise go to Step 4.
SCALE 3/8
INSTALLATION & OPERATION MANUAL 1177596 REV 3 (02/23)
PAGE 12 OF 76
Marathoner Gold Half-Size Gas Convection Ovens
NOTICE
Standard for Connectors for Movable Gas Appliances, ANSI Z21.69 or Connectors for Moveable Gas Appliances,
CAN/CGA-6.16, and a quick-disconnect device that complies with the Standard for Quick-Disconnect Devices for
Use With Gas Fuel, ANSI Z21.41, or Quick Disconnect Devices for Use with Gas Fuel, CAN1-6.9
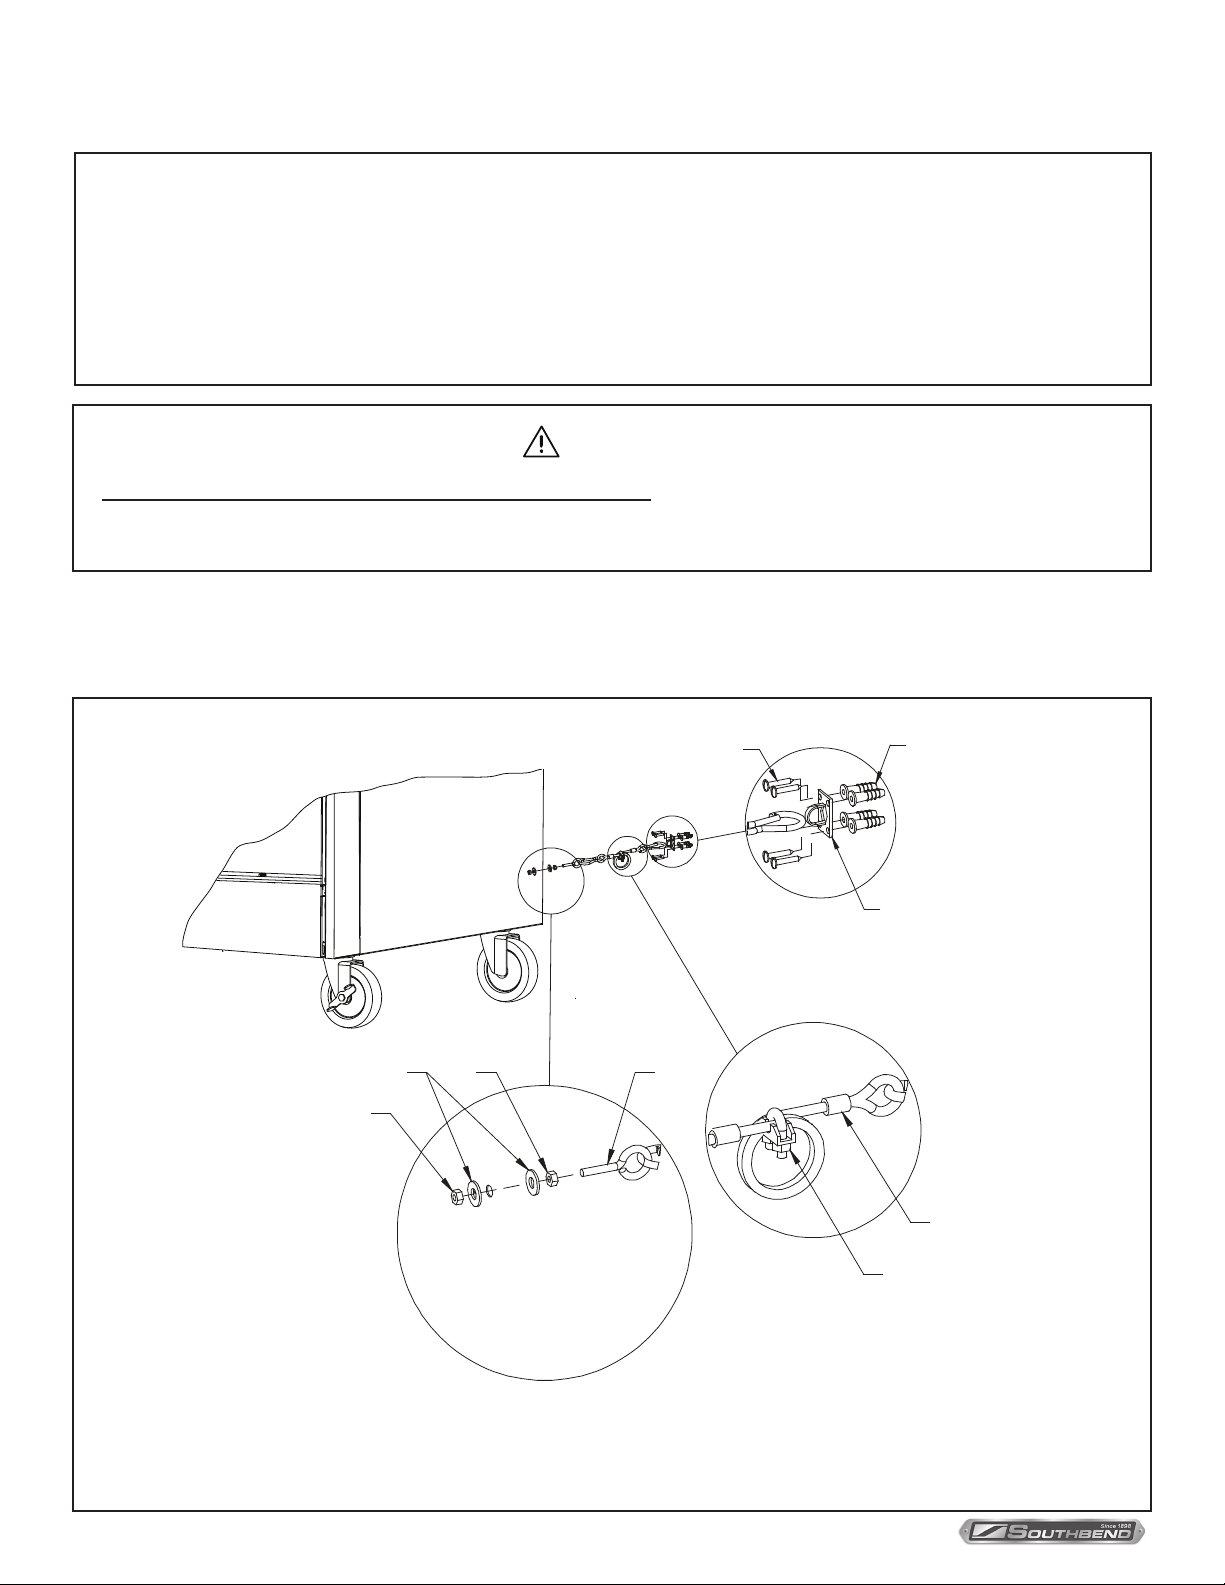
means must be provided to limit the movement of the appliance without depending on the connector and the quick-
attached to a frame member on the back of the unit.
WARNING
To avoid accidental gas disconnection and potential explosion:
If disconnection of this restraint is necessary to move the appliance for cleaning, etc., reconnect it when the
appliance is moved to its originally installed position.
F
G
H
I
B
C
E
D
A
Note: Kit can be purchased from Southbend

INSTALLATION & OPERATION MANUAL 1177596 REV 3 (02/23) PAGE 13 OF 76
Marathoner Gold Half-Size Gas Convection Ovens
member for adequate clearance, drill a 1/4” hole through the frame member.
4. Using the spring-loaded snap hooks, attach the restraining device to the bracket and the eye-bolt.
the appliance connector.
reconnecting, be sure that the oven is switched OFF.
Double-deck ovens can be shipped already assembled, but can instead be shipped as two single-deck ovens to be stacked
This installation step describes the procedure for stacking two single-deck ovens to form a double-deck oven.
2. If the oven that will be the top oven was NOT ordered as part of a double-deck oven, remove the four leg pads from
the bottom of the top oven.
and pull it forward to remove it, then set it aside.
4. Locate and remove the now-accessible screw that secures the lower front corner of the side panel.
Remove the right side panel and insulation and set them aside.
INSTALLATION & OPERATION MANUAL 1177596 REV 3 (02/23)
PAGE 14 OF 76
Marathoner Gold Half-Size Gas Convection Ovens
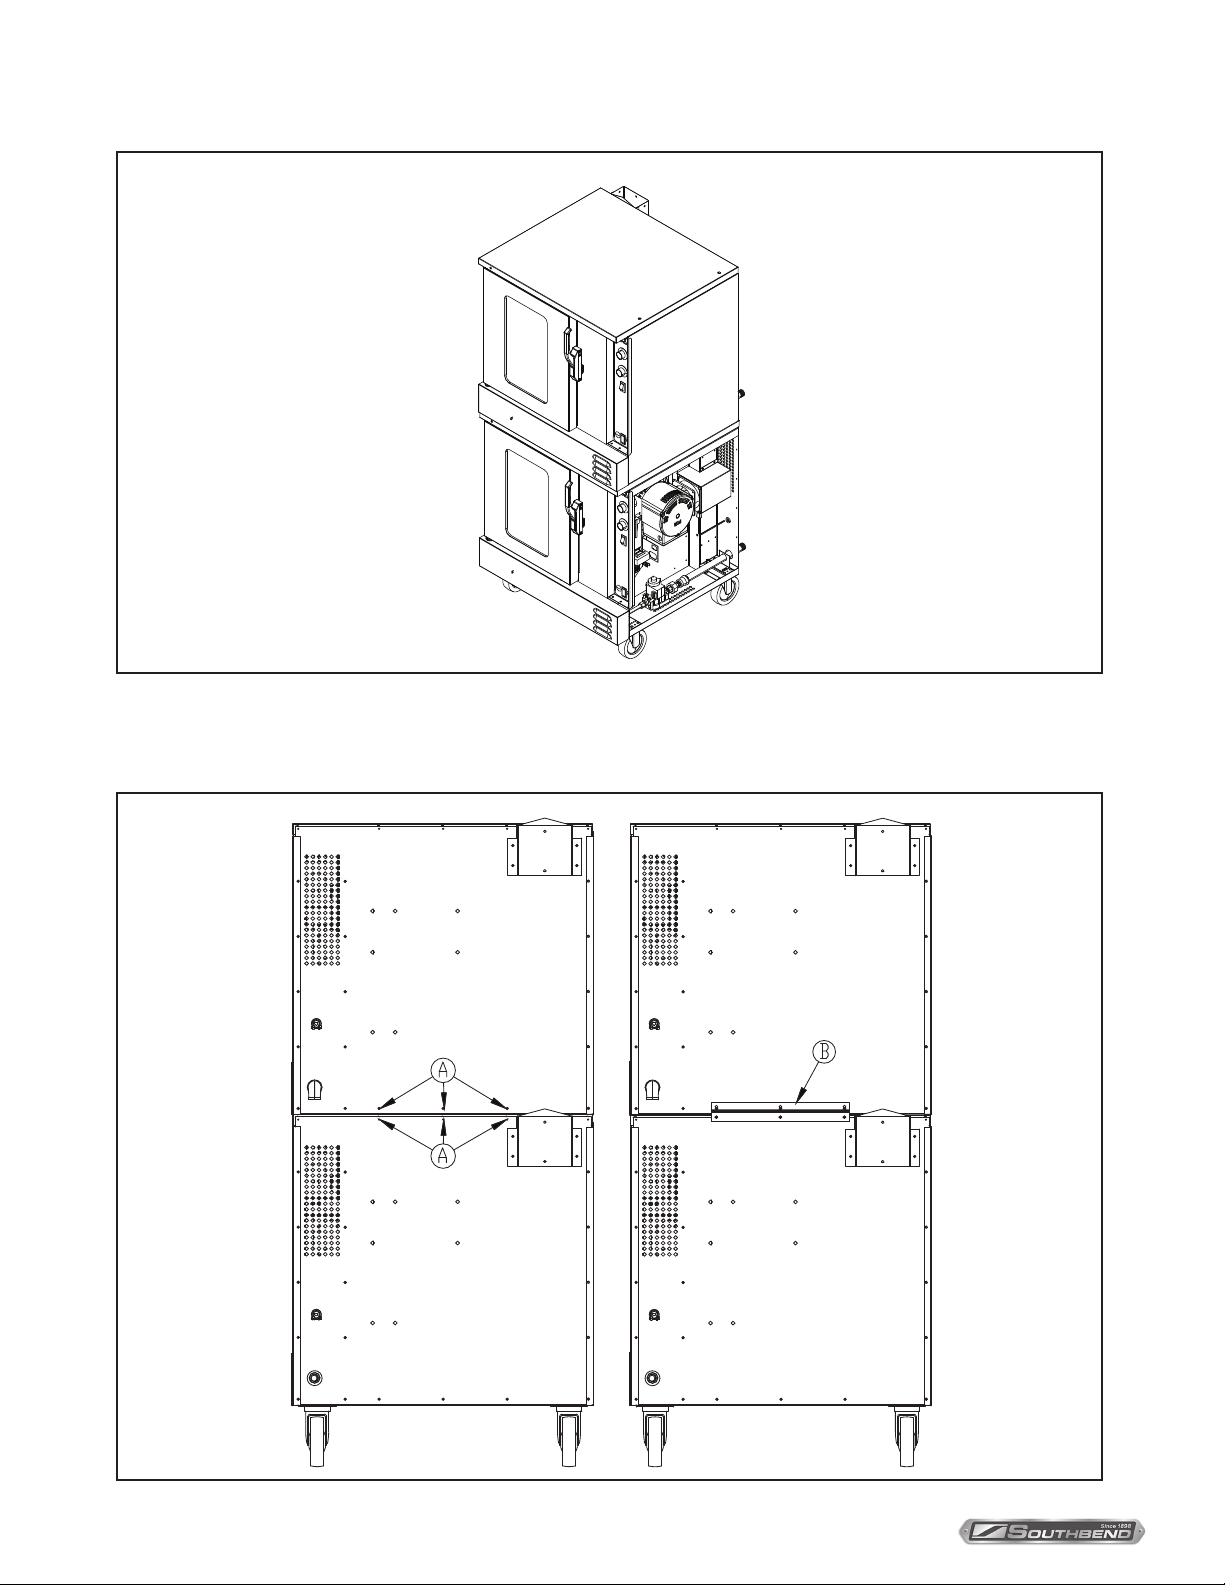
6. Lift the top oven and position it on top of the lower oven, as shown in the drawing below.
7. Move to the rear of the ovens and remove the six screws shown as items “A” in the left-hand drawing below. Position
through the holes in the tie bracket, but do not tighten them yet.
INSTALLATION & OPERATION MANUAL 1177596 REV 3 (02/23) PAGE 15 OF 76
Marathoner Gold Half-Size Gas Convection Ovens
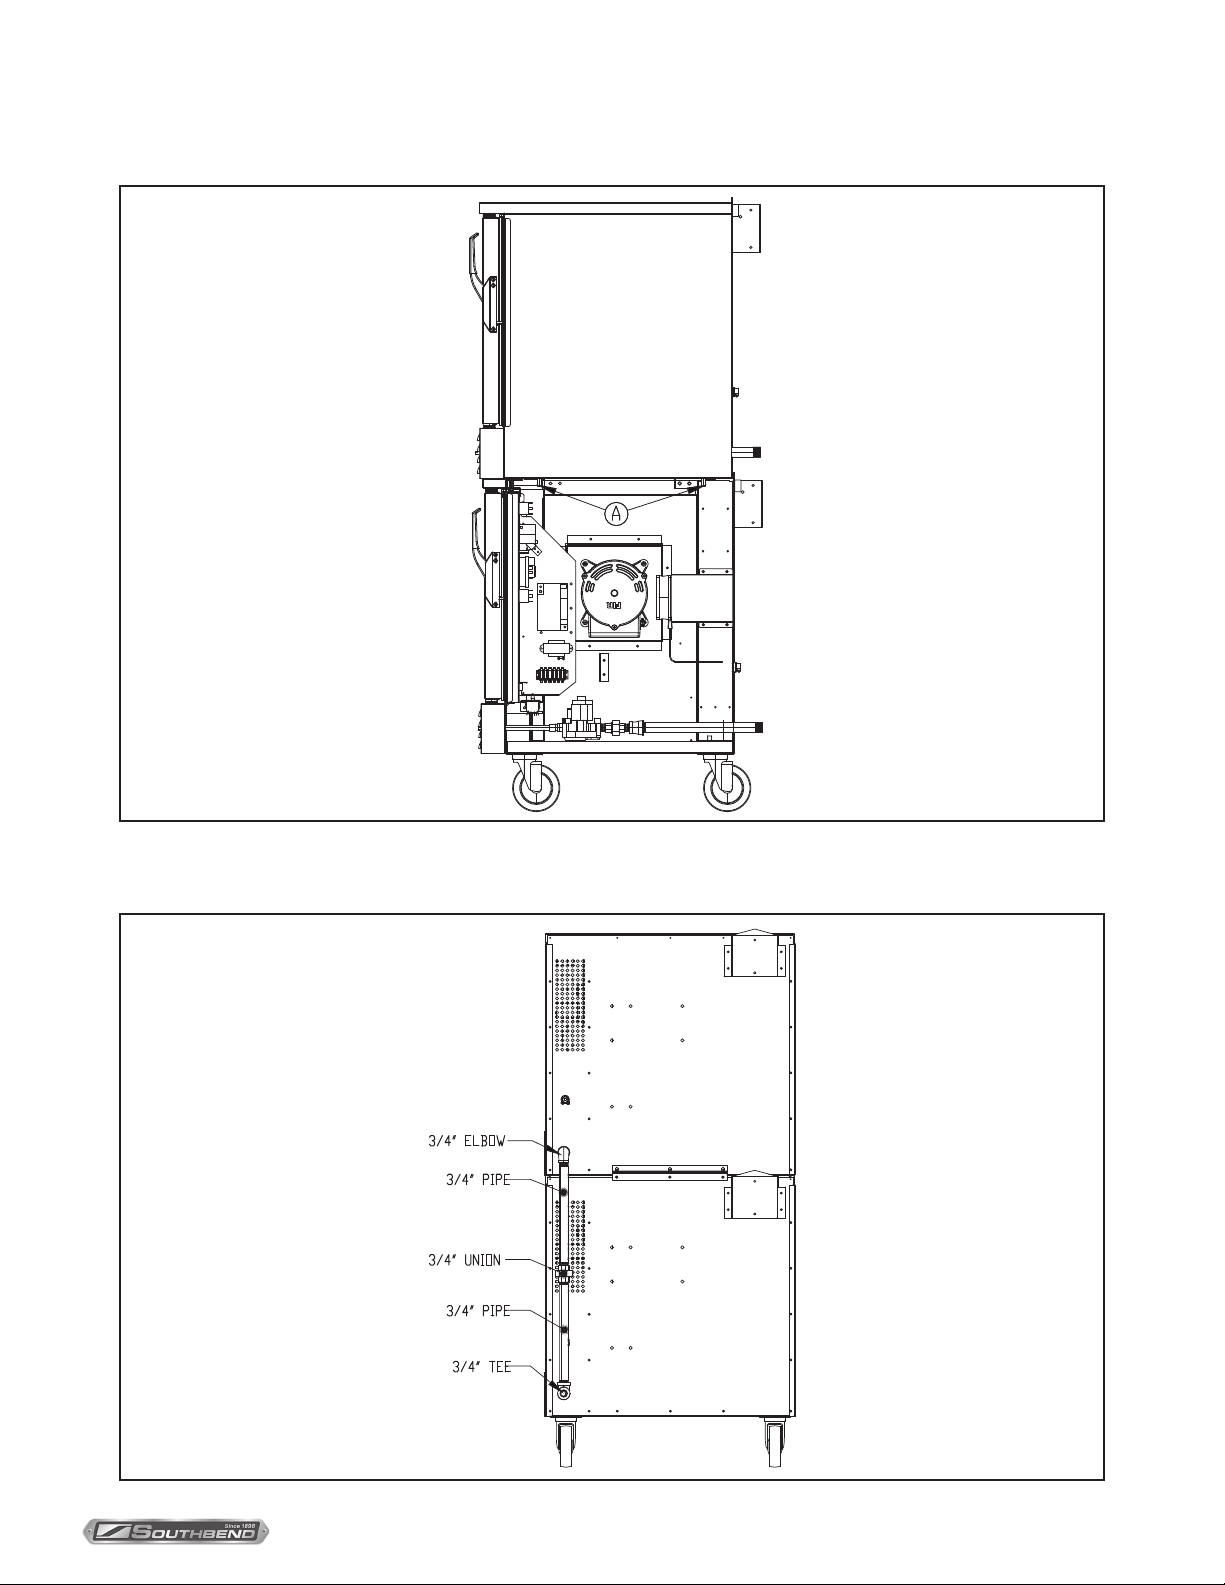
threaded holes in the bottom of the top oven. Tighten these bolts and the screws that you did not tightened in the
previous step.
9. Assemble the gas piping shown in the following drawing. Be sure to check all connections for leaks once the oven has
been installed.

INSTALLATION & OPERATION MANUAL 1177596 REV 3 (02/23)
PAGE 16 OF 76
Marathoner Gold Half-Size Gas Convection Ovens
11. Replace the right side insulation, exterior panel, and lower front panel that you removed in step 4 of this procedure.
INSTALLATION & OPERATION MANUAL 1177596 REV 3 (02/23) PAGE 17 OF 76
Marathoner Gold Half-Size Gas Convection Ovens
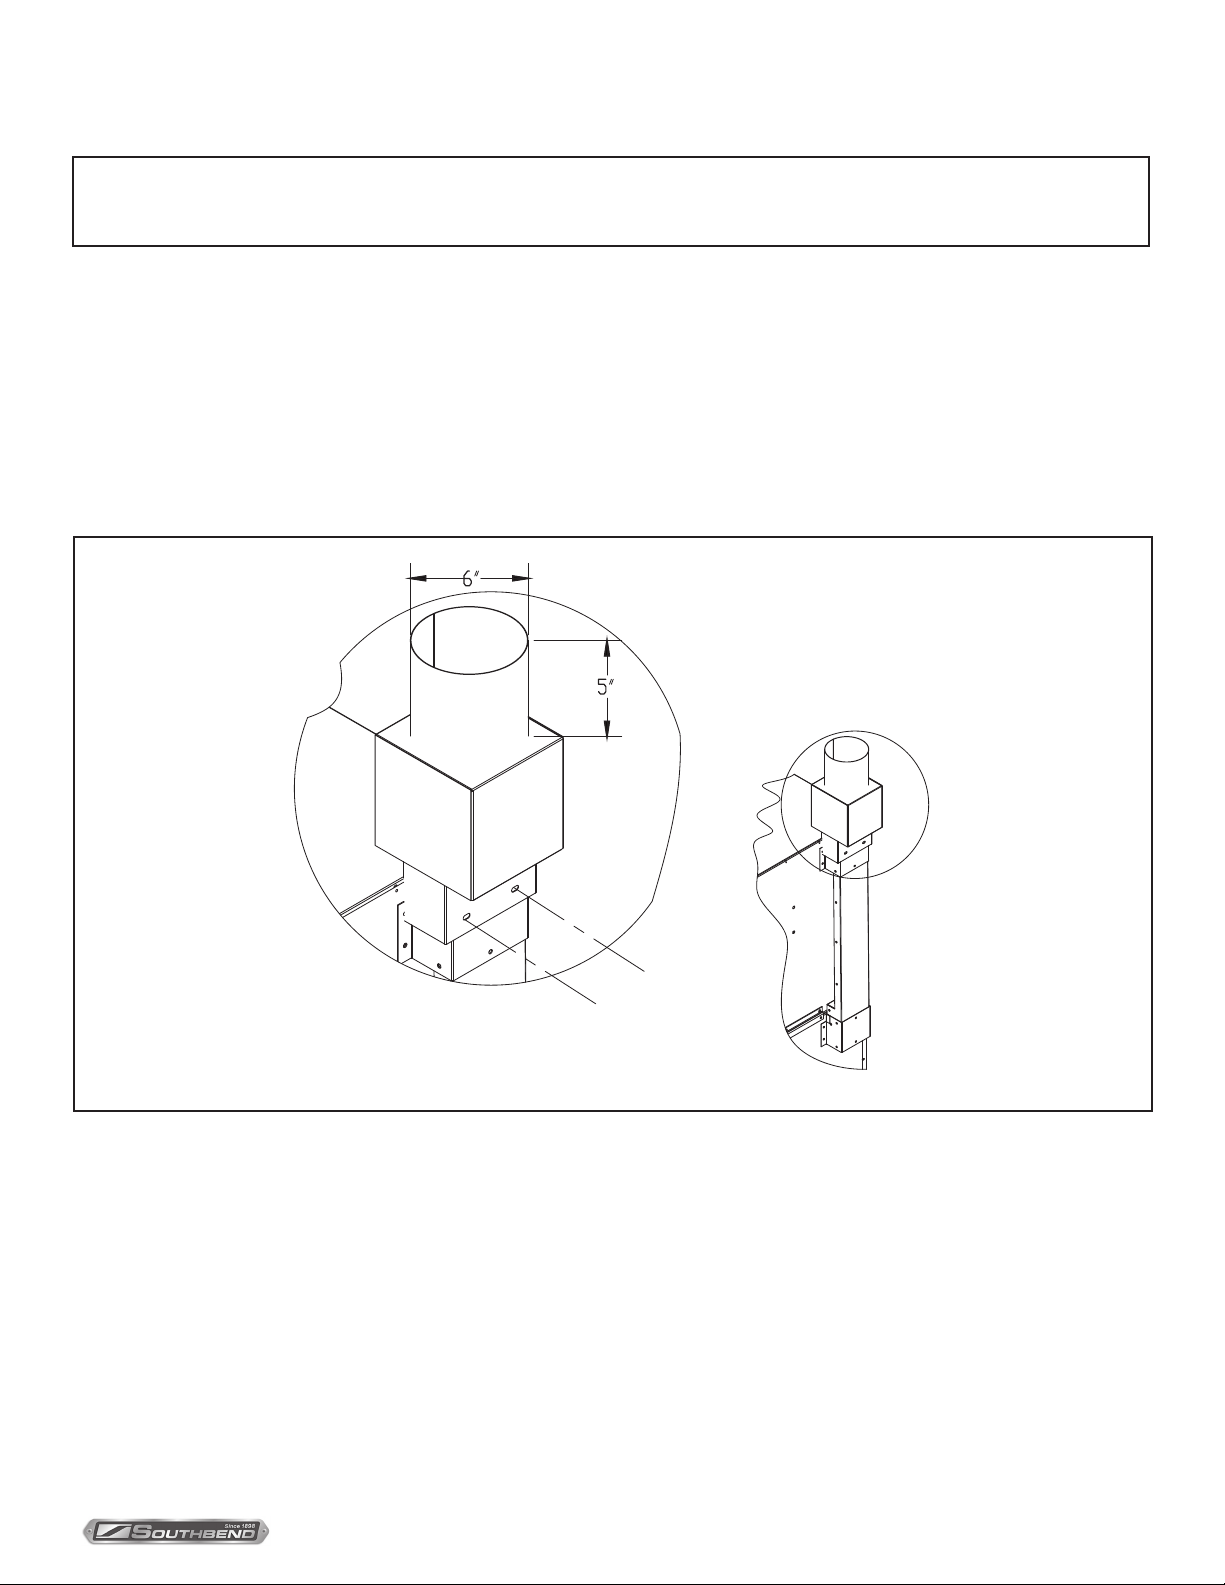
NOTICE
Installation must use approved CSA International down draft diverter supplied by Southbend.
of ventilation pipes through walls and roofs must conform to all local codes. To install the down draft diverter, do the
following:
Allow the diverter to slide down as far as it will go.
INSTALLATION & OPERATION MANUAL 1177596 REV 3 (02/23)
PAGE 18 OF 76
Marathoner Gold Half-Size Gas Convection Ovens
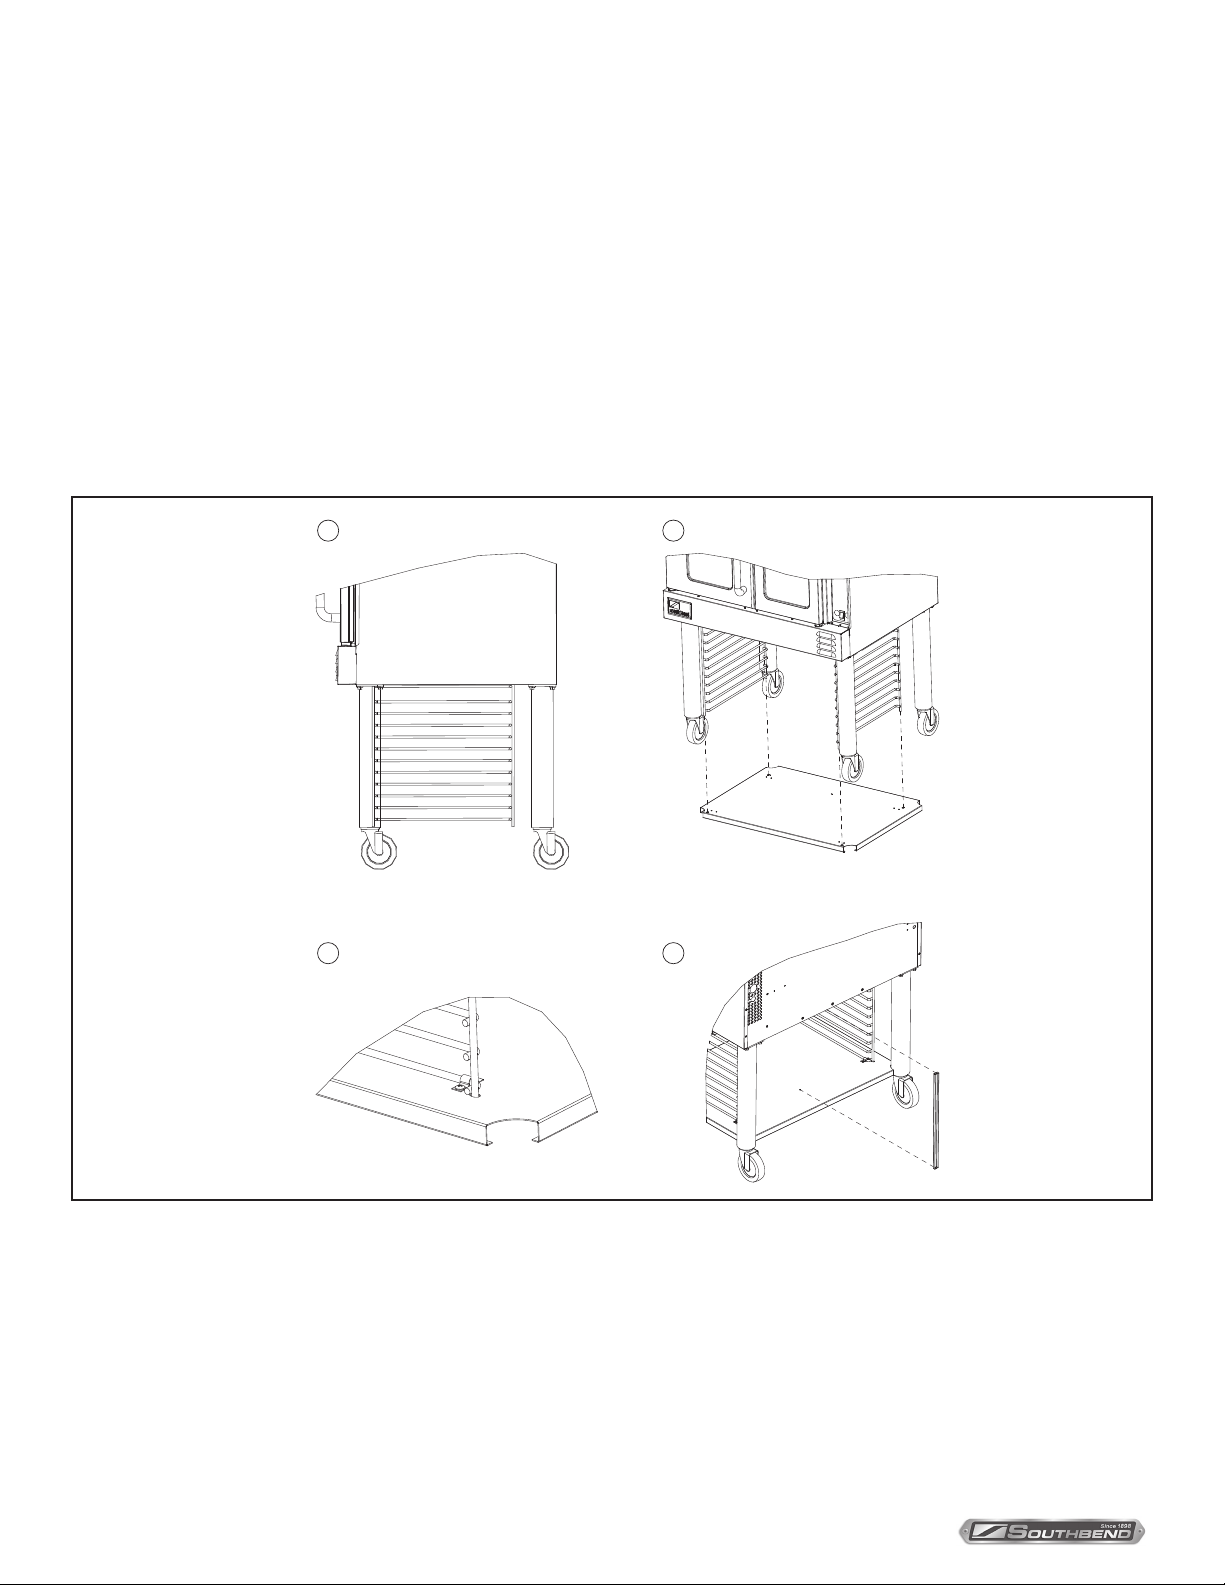
STEP 6:
The following describes how to assemble the optional open storage. All holes are pre-drilled for the provided screws.
1. Attach the legs to the oven as described in installation Step 2b on page 10.
below).
3. Position the shelf below the rack guides and lift it so that the bottom ends of the rack guides pass through the holes in
4. Secure the shelf to the rack guides with four clips, each secured by two screws that thread into the threaded holes on
5. Attach the rack-stop using two screws. Attach the top of the rack stop to the bottom of the oven, and the bottom of the
A B
C D
INSTALLATION & OPERATION MANUAL 1177596 REV 3 (02/23) PAGE 19 OF 76
Marathoner Gold Half-Size Gas Convection Ovens
WARNING
ELECTRIC GROUNDING INSTRUCTIONS
hazard and should be plugged directly into a properly grounded three-prong receptacle. Do not cut or remove the
grounding prong from this plug..
NOTICE
This appliance, when installed, must be electrically grounded in accordance with local codes, or in the absence of local
codes, with the National Electrical Code, ANSI/NFPA 70 or the Canadian Electrical Code, CSA C22.2, as applicable.
Section). Be sure that the input voltage and phase match the requirements shown on the serial plate, which is located
inside the lower front panel.
Ovens ordered to operate on 120V
Do
NOT have factory installed power cords and must be wired as described below.)
Ovens without a power cord have a terminal block. The electric supply must be brought through the service panel in the
Ovens are factory-equipped with a two-pole terminal block, located behind a cover plate located on the rear of the oven.
To connect the supply wires, remove the cover plate, then route the supply wires and the grounding wire through the strain
screws. Insert the ground wire into the grounding lug and tighten the screw. Re-attach the cover plate.
Three phase units are wired as above, using only two supply wires. The third wire is not used and must be properly
terminated.
be accomplished by referring to phase loading and line amperes chart on wiring diagram for wire size and ampere
requirements.
INSTALLATION & OPERATION MANUAL 1177596 REV 3 (02/23)
PAGE 20 OF 76
Marathoner Gold Half-Size Gas Convection Ovens
NOTICE
The installation must conform with local codes, or in the absence of local codes, with the National Fuel Gas
Code, ANSI Z223.1, Natural Gas Installation Code, CAN/CGA-B149.1, or the Propane Installation Code
CAN/CGA-B149.2, as applicable, including:
valve during any pressure testing of the gas supply piping system at test pressures equal to or less than
A 3/4” NPT line is provided at the rear for the gas connection.
the appropriate authorized Southbend Service Representative or the Southbend Service Department. Failure to install
The serial plate is located inside the front lower panel. It indicates the type of gas the unit is equipped to burn. All
Southbend equipment is adjusted at the factory. Check type of gas on serial plate.
deliver a 4.0” W.C. pressure to the manifold. For propane gas, it is set to deliver 11” W.C.
This appliance should be connected ONLY to the type of gas for which it is equipped. The inlet pressure before the
regulator should be 7-10” W.C. for natural gas or 11-14” W.C. for LP gas.
An adequate gas supply is imperative. Undersized or low pressure lines will restrict the volume of gas required for
satisfactory performance. Fluctuations of more than 25% on natural gas or 10% on propane gas will create problems and
An adequate gas supply line to the unit should be no smaller than the I.D. of the pipe from the unit to which it is
connected.
Purge the supply line to clean out dust, dirt, or other foreign matter before connecting the line to the unit.
CAUTION
ALL PIPE JOINTS AND CONNECTIONS MUST BE TESTED THOROUGHLY FOR GAS LEAKS. USE ONLY
SOAPY WATER FOR TESTING ON ALL GASES. NEVER USE AN OPEN FLAME TO CHECK FOR GAS LEAKS.
ALL CONNECTIONS MUST BE CHECKED FOR LEAKS AFTER THE UNIT HAS BEEN PUT INTO OPERATION.
TEST PRESSURE SHOULD NOT EXCEED 1/4” W.C.
1. Check that all screws and bolts are tightened.
2. Move the oven into the position at which it will be operated.
3. Check that the oven is level. If not, adjust the legs.
5. Turn-on supply power and check oven for proper operation.
This manual suits for next models
5
Table of contents
Other Southbend Oven manuals


