SP Evo series User manual
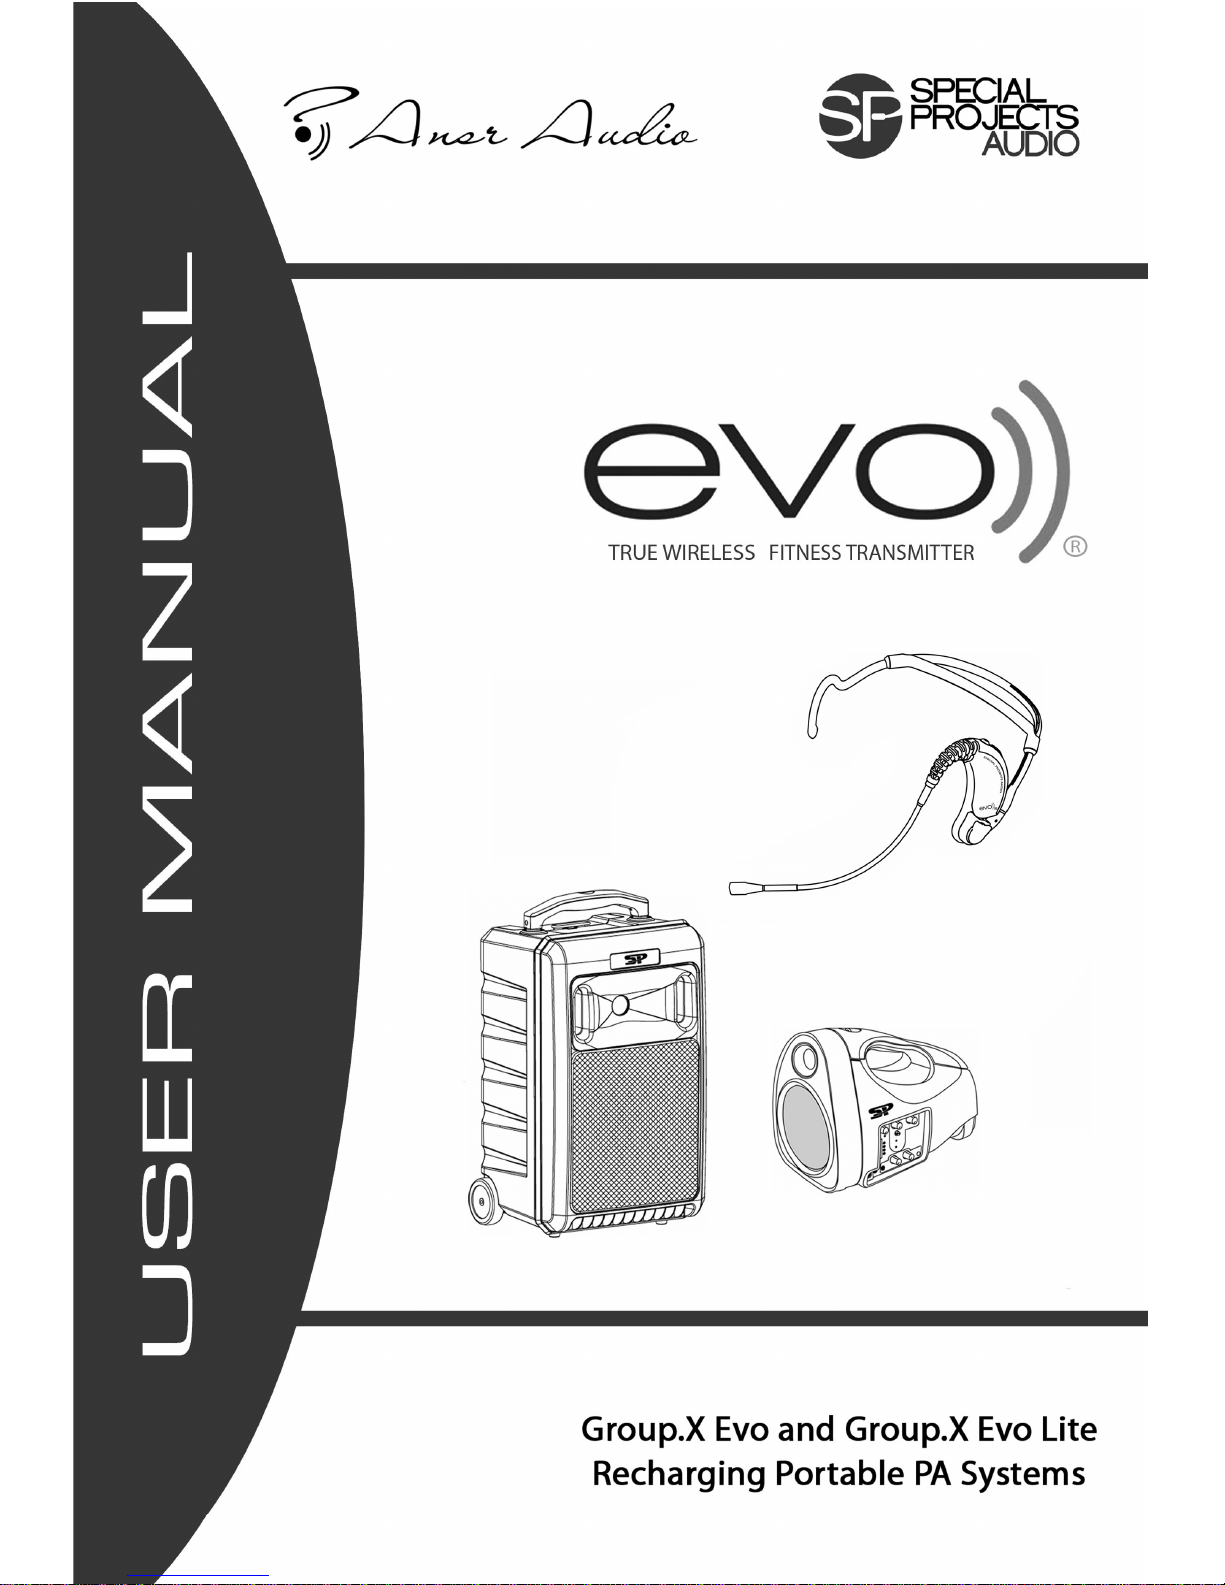


Group.X Evo Portable
Group.X Evo Lite Portable
Table of Contents
Page
1. Care and Use (you really should read this section) 2
2. Wireless Notes 2
3. Qui k Start Guide 3
4. Group.X Evo Portable PA 4
5. Evo Headworm Mi rophone with Transmitter
5.1 Charging the Evo
5.2 Evo transmitter channel set
8
9
10
6. Group.X Evo Lite Portable PA
11
7. System Spe ifi ations 15
8. Troubleshooting 16
9. Warranty
10. Notes
17
17

1. Care and Use of your Group.X Evo and Group.X Evo lite Portable PA
Thank you for purchasing the the only portable A systems featuring the Evo True Wireless
transmitter. This atent ending LL synthesized wireless microphone system operates in an FCC
approved UHF band frequency with 16 selectable channels. lease read this instruction manual
carefully before operating your system. This manual covers the function and operation of the wireless
microphone system and portable A system.
Some things to remember:
While the Evo headset is water and sweat resistant, the portable A units are not. They should not
be stored in humid environments (around the pool, for example).
Not all CDs are created equal. No CD player can guarantee 100% compatibility 100% of the time
with 100% of the CDs available. You may find CDs that will play reliably at home, but not on your
portable A. You may find CDs that will play reliably on your portable A that will not play at home.
If you are playing CDs that you burned yourself, make sure you start with good quality CDs, and
burn them with high quality settings.
If your unit has wheels, remember that they are there as a convenience and that it is not an off-road
vehicle. Don't slam through doorways, over bumps or down stairs. Even though the internals of
your A are designed for durability, use good judgment and caution – protect your investment.
Do not spill liquid on the Group.X and do not drop either unit.
If you have the Group.X Evo Lite, be certain to charge your portable A every two weeks. This
helps to maintain and lengthen the service life of your battery. Failure to do this may damage the
battery.
After charging or setting the channel on your headset, always close the covers to maintain moisture
resistance.
For heavy use installs, periodically apply silicone grease ( art No. S -SG-10 or S -SG-5) to the
charging connector of your Evo headset. You only need a very slight film, and only inside the barrel
of the headset connector. Just put a small amount – the size of a BB - on the tip of the silver
charging jack and insert as normal to charge. Too much will just be messy.
Do not place the units near heat sources such as radiators, amplifiers, or etc.
Do not store in direct sunlight, extremely dusty or humid conditions.
2. Wireless Notes
Before setting up, make sure that the transmitter and receiver are tuned to the same frequency.
Do not use two transmitters tuned to the same frequency. You may, however, use multiple A
systems with receivers tuned to the same channel. This is particularly effective if you want to
spread the sound around the room more evenly. You may have one A unit addressing the first few
rows of the class, and another A unit in the middle (aimed away from the instructor) to cover the
back of the class.
Always operate your system with a fully charged battery.
While checking sound, move the transmitter around the area where you use the system to look for
dead spots (loss of signal). If you find any dead spots, change the receiver position. If it does not
work, avoid such places.
To help avoid interference, do not put the receiver too near substantial metal or reflective objects
and avoid obstructions between transmitter and receiver.
Avoid the interference from TV, radio, other wireless appliances and etc..
Wireless systems depend on fully charged batteries. Low batteries will seriously degrade
performance. Be certain to allow charge time prior to use.
Be certain that the Group.X portable A is exposed and in 'line of sight' with the transmitter.
2

3. Qui k Start Guide
Fully charge the Evo transmitter by connecting the Evo to the supplied wall plug transformer.
Leave your Evo transmitter powered OFF while harging.
Fully charge the Group.X or Group.X Lite ortable A.
Set master volume to minimum, switch Group.X portable A power on. Leave Evo off.
With wireless receiver turned on, but with volume turned down, set the receiver to the desired
channel. If the RF lights (with the Evo transmitter OFF), select another channel with no RF
activity.
Turn on your Evo transmitter and select the matching channel. Note the below table describing
the channels! Note that position 0 indicates channel 16. See Se tion 7 for details. Also –
be sure to watch the receiver RF indicator for activity as you select the transmitter channel, as
described in the next step. If the RF lights lights fully on one switch position, you have likely
found the correct channel.
Evo Transmitter Switch Transmit Channel Evo Transmitter Switch Transmit Channel
1 1 9 9
2 2 A 10
3 3 B 11
4 4 C 12
5 5 D 13
6 6 E 14
7 7 F 15
8 8 0 16
Raise wireless volume to approximately midway.
Slowly raise main A volume to desired level. If needed, wireless volume may also be
adjusted.
If setting up a second Evo and A receiver (optional), follow the first five steps for the second
unit before checking volume on each. It is good practice to skip at least one channel when
using multiple transmitter/receivers.
Go forth and be truly wireless!
3

4. Group.X Evo Portable PA
The Group.X Evo is designed for use only with Ansr Audio / Special rojects 16-channel
selectable channel transmitters. The receiver operates in UHF 682-697 MHz frequency band
with LL synthesized control.
While the Evo headset is water and sweat resistant, the portable A units are not. They should
not be stored in humid environments (around the pool, for example).
4

A) Built-in Storage: Ideal for external mics, M 3 players, AC power and charging cables.
B) Wireless Receiver Module(s): LED channel displays the channel number. Second receiver
optional.
B1: RF Indicator – illuminates to indicate signal reception on the selected channel
B2: Selected Channel Display
B3: AF Indicator – illuminates to indicate audio signal (talking, etc.)
B4: Channel Selector
B5: ower On/Off Indicator – illuminates to indicate wireless system is on
B6: ower/Volume Control – after switching on, this controls wireless volume
C) Multi-input CD layer (optional): USB and SD inputs for easy M 3 playback.
5

CD Controls From revious age:
C1: CD ower On/Off
C2: CD/USB/SD Input Select: Switch between CD or SD/USB input. If you are trying to
play from the USB or SD and get nothing, try this. To go back to the CD player,
you must set this switch back to CD.
C3: FB: Fast Backwards
C4: FF: Fast Forward
C5: Folder – If your audio files are arranged in folders, this will scroll through them
C6: Track Skip Reverse
C7: Track Skip Forward
C8: lay / ause – From stop, this will play; from play, this will pause
C9: Stop / Eject – From play, this will stop; from stop, this will eject
C10: IR Window – Receives control signal from remote; do not cover this up
C11: USB Input – To connect M 3 player or storage device (note C2 if using USB)
C12: SD / MMC Input – To connect SD or MMC storage (note C2 if using SD/MMC)
C13: LO ITCH – press to slow playback in increments -1 to -10 (if applicable)
C14: HI ITCH – press to speed playback in increments +1 to +10 (if applicable)
C15: NOR ITCH – press to reset playback to normal speed (if applicable)
D) Input anel: Line input and volume, external microphone input and volume.
D1: CD VOL - volume with ON/OFF switch
D2: TA E VOL - is not used on this version
D3: LINE IN VOL – volume control for ¼ inch or RCA
input. Do not try to use both the ¼ inch and RCA at
the same time.
D4: LINE IN Connections - If you do not use the USB
input for your M 3 player, you will use one of these.
The most common connection is using a cable that
connects from your earbud output connector to the
RCA connectors (red and white).
D5: ECHO LEVEL – Digital echo effect, if applicable.
D6: MIC VOL – External, wired mic volume control
associated with the ¼ inch and XLR inputs
immediately below.
D7: WIRELESS MIC RIORITY – In the ON position,
music will be lowered when the wireless mic is used.
In fitness applications, this will likely be left OFF.
D8: MICRO HONE IN UT – For use with a dynamic
microphone (no phantom power). Do not use both the
¼ inch and XLR inputs at the same time.

E) Master Control anel:
E1: External Speaker Out - For connecting an unpowered speaker.
E2: DC IN – Function not used on this model.
E3: Battery Charge Indicator: Will flash green when charging. Meter indicates battery level
during use.
E4: Mix Out - If you want to send your mixed signal to a recorder or other audio equipment,
use this output.
E5: Master Volume: For overall volume control – set mic/music balance, then use this master
volume to control your overall mix level.
E6, E7: Tone Controls: Bass and treble controls, adjust to taste.
F) Auxiliary Battery Charger: Designated for future use.
G) rimary ower ON /OFF
H) AC ower Input
I) rimary Rechargeable Battery Compartments: This system features a built-in charging
system, eliminating the need to remove the batteries. Contact Ansr Audio / Special rojects
prior to accessing the batteries.
J) Retractable Transport Handle
6

5. Evo True Wireless Headworn Transmitter
1. Microphone Element: Shown without the windscreen. Always be sure the side with the yellow
dot is toward the mouth. In the event that you experience a low audio level with excessive
feedback, check the direction of the microphone element. DO NOT twist the element.
2. Flexible Boom: Adjust so that the microphone element is at the corner or just under the mouth.
To prevent feedback, the Evo uses a noise-canceling element. Mi pla ement is very
important for a good experien e. If you notice the volume 'dip', check to be certain the
element is placed properly.
3. ower On/Off Switch: Turns transmitter power on and off. ress and hold one second to
power on, three seconds to power off. The LED will flash to indicate a change in power status.
After powering on, LED will flash red at 4-5 second intervals to indicate the Evo is on.
4. Channel Selector and Cover: Lift cover to set the transmitter channel via the rotary selector
with the included mini screwdriver. Always be ertain that this over is ompletely losed
prior to use. Failure to do so may affect water resistance and void your warranty!
5. LED Indicator: Green indicates charging, single red indicates power ON, multiple red indicates
power OFF.
6. Adjustable Strap: The Evo headband is designed so that most users can comfortably use the
system with no adjustment. If you need a more snug fit, you may slip this strap forward. Also
see (7) below.
7. Recessed Antenna: rior to use, always be certain the antenna is securely recessed into the
headband. If you need to adjust the strap, be certain the antenna is still properly recessed.
8. Form Fitting Headband: The Evo headband is designed for maximum comfort on most users
without adjustment. See points (6) and (7) for details. The headband will flex for comfort, but
don't test it's limits by spreading it wider than a human head! Really, we know someone out
there will...
9. Charging Connector and Cover: For use with the supplied external charging adapter. Be
ertain to repla e the over before use – failure to do so may void your warranty.
7
This manual suits for next models
2
Table of contents
Popular Fitness Electronic manuals by other brands


Sami
Sami WS-2301 wearable instruction manual

Polar Electro
Polar Electro FT80 Getting started guide

Kettler
Kettler SF1B Training and operating instructions

Kettler
Kettler ST 2610-9 Training and operating instructions

Polar Electro
Polar Electro Team2 Quick guides

Kettler
Kettler ELYX 5 Training and operating instructions


