Space LUMINA User manual

User’s Guide

Thank you for purchasing the WOR(l)D SPACE LUMINA.
discover the real world ›
WOR(l)D SPACE LUMINA is fully integrated
binocular see-through augmented reality
(AR) smart glasses.
Should you have a question, or require additional information or
assistance, please visit our Support site at:
www.worldgn.com\spacelumina\support
www.worldgn.com

Contents

What’s in the box? 6/7
LUMINA at First Glance 8
Part Name and Functions 9/10
Charge Batteries 11/12
Trackpad 13
First Start 14/15
How to use LUMINA 16/17
Listening to the Audio 18
Back-Head Cable 18
Cleaning 19
Prescription Lenses Clip 19
Wireless Bluetooth Keyboard 20
Safety Warning 21
FAQ 22/25
Specifications 26
Contents WOR(l)D SPACE LUMINA
FAQ are available in the Support section of the User BackOffice on the Wor(l)d website. For complete instructions: www.worldgn.com/spacelumina/userguide/
5

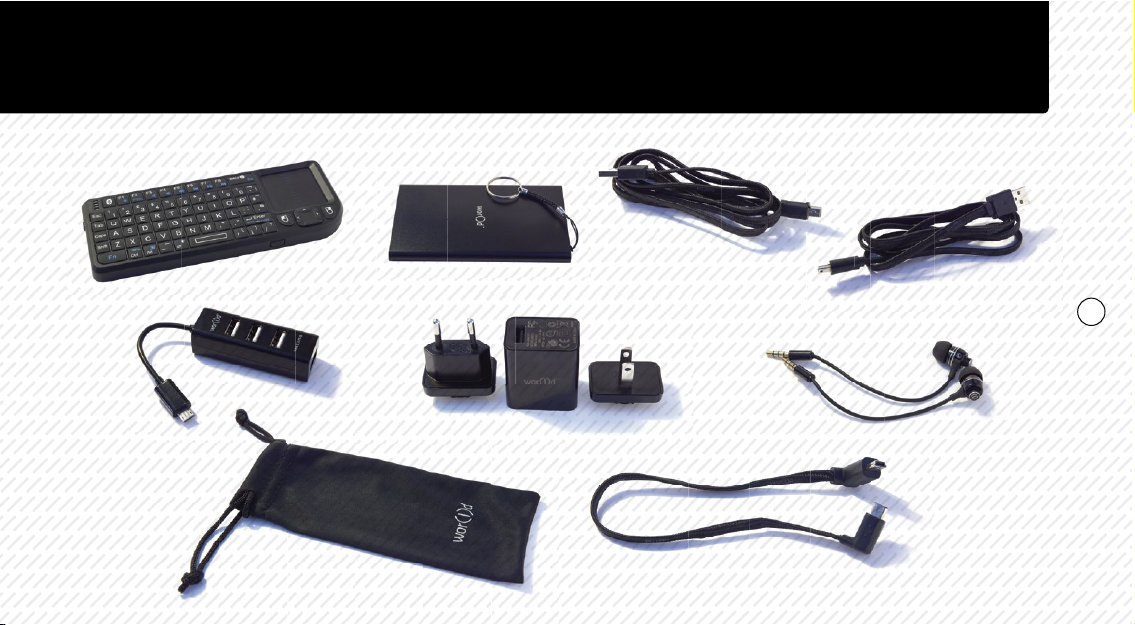
1. Space Lumina Smartglasses
2. Bluetooth Keyboard
3. External Power Bank 4000 mAh
4. Prescription Lens Clip (view page 9)
5. Mini USB-to-USB cable
6. Micro USB-to-USB cable
7. Back-Head, Mini USB to Micro USB cable
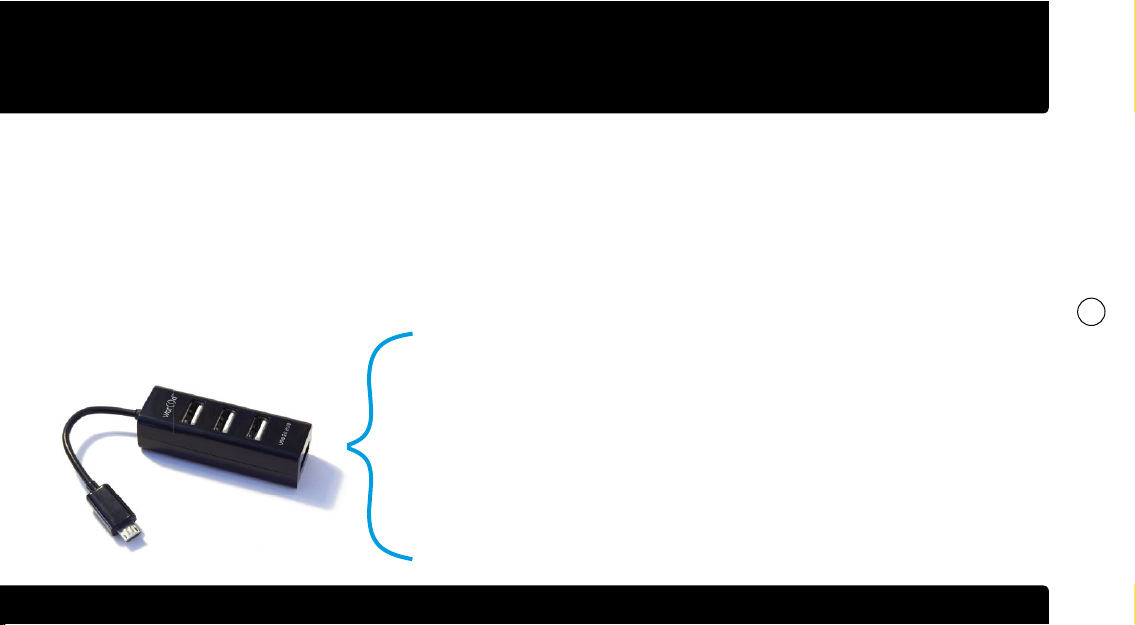
8. OTG USB 4 ports Hub
9. Soft bag with prescription lens clip
10. Charger with two sockets for Eu and Us markets
11. In-ear headphone (1 left + 1 right)
12. Two visors, black and grey
1
12
What’s in the box? WOR(l)D SPACE LUMINA
6
23
5
6
7
8
9
10
11
What’s in the box? WOR(l)D SPACE LUMINA
7

LUMINA at First Glance WOR(l)D SPACE LUMINA
Lightweight and comfortable Italian Style Frame with foldable temples.
Save the moments of your life with its powerful camera.
Take the images as large as 13MP and record wonderful Full HD videos.
See-through exchangeable external lenses.
Work and play anywhere you want with Lumina Binocular Stereoscopic See-through Display System with infinity view
technology right in front of your eyes.
Run any Android App you may need.
Powered by Android OS 4.4.
WOR(l)D Launcher and ALICE Personal Assistant.
FAQ are available in the Support section of the User BackOffice on the Wor(l)d website. For complete instructions: www.worldgn.com/spacelumina/userguide/
8

Part Name and Functions WOR(l)D SPACE LUMINA
ON-OFF button Camera
Visor
Heatsinks
Prescription
Lens Clip
Bone conduction
sound system
4
D
9
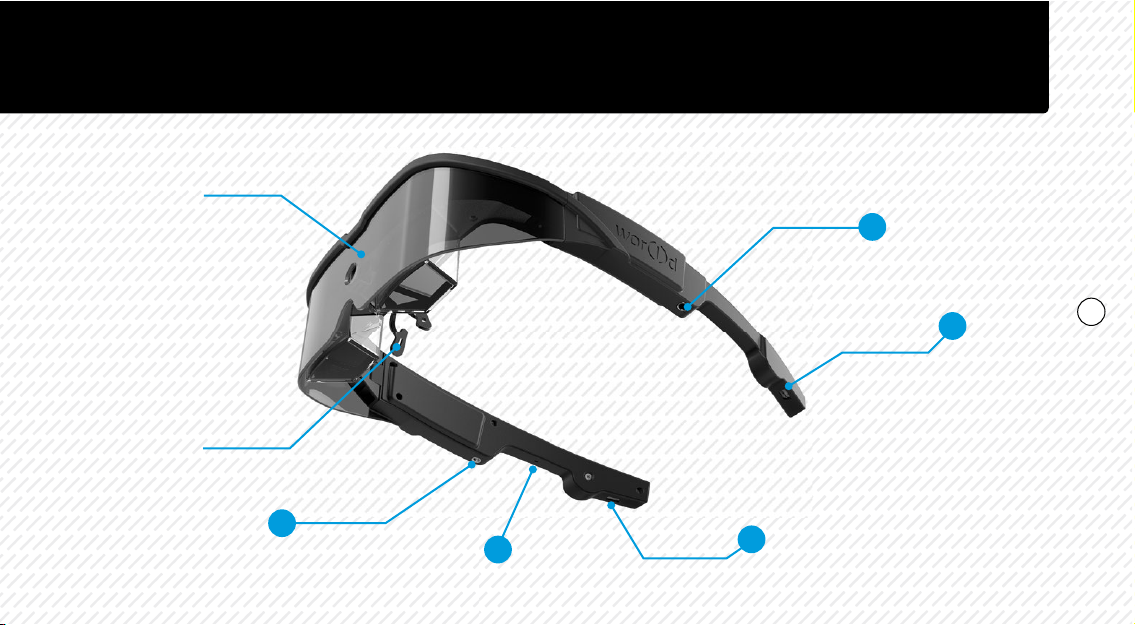
Status LED
In-ear jack
In-ear jack
Mini USB
Micro USB
(to charge Main Battery)
left earbud
right earbud
(to charge internal Power Bank Battery)
Nose bridge
Reset button
E
C
B
A
E
Part Name and Functions WOR(l)D SPACE LUMINA
10
Charge Batteries WOR(l)D SPACE LUMINA
Lumina comes with two batteries: the main battery and the power bank battery.
To charge the main battery please connect
the micro-usb cable 6:
• to the micro-usb connector B on the
left temple and to the power socket with
the power charger 10;
• to the internal power bank battery on
the right temple using the Back-Head
usb cable 7;
• to the Wor(l)d external power bank 3;
• to an external power bank.
To charge the power bank battery please
connect the mini-usb cable 5:
• to the mini-usb connector A on the
right branch and to the power socket
with the power charger 10;
• to the Wor(l)d external power bank 3;
• to an external power bank.
Please, for further information about the items numbers
view Part Name and Functions section at pages 9-10.
B
A
7
B
6
6
A
5
FAQ are available in the Support section of the User BackOffice on the Wor(l)d website. For complete instructions: www.worldgn.com/spacelumina/userguide/
11
Lumina power OFF - on charge
• charging battery = Fixed Led light
• battery full = No Led Light
Lumina power ON - on charge
in standby mode:
• charging battery = Flashing Led light
• battery full = Double Flashing Led Light
in use:
no status Led light
Please follow the charging status with the blue LED indicator near the camera (see picture 6).
6
Charge Batteries WOR(l)D SPACE LUMINA
Please, for further information about the items numbers view Part Name and Functions section at pages 9-10.
My product doesn’t charge when powered
off. What should I do?
Make sure all cables and the AC adapter are
securely plugged in. If these steps do not
resolve your issue, contact Wor(l)d support.
FAQ are available in the Support section of the User BackOffice on the Wor(l)d website. For complete instructions: www.worldgn.com/spacelumina/userguide/
12

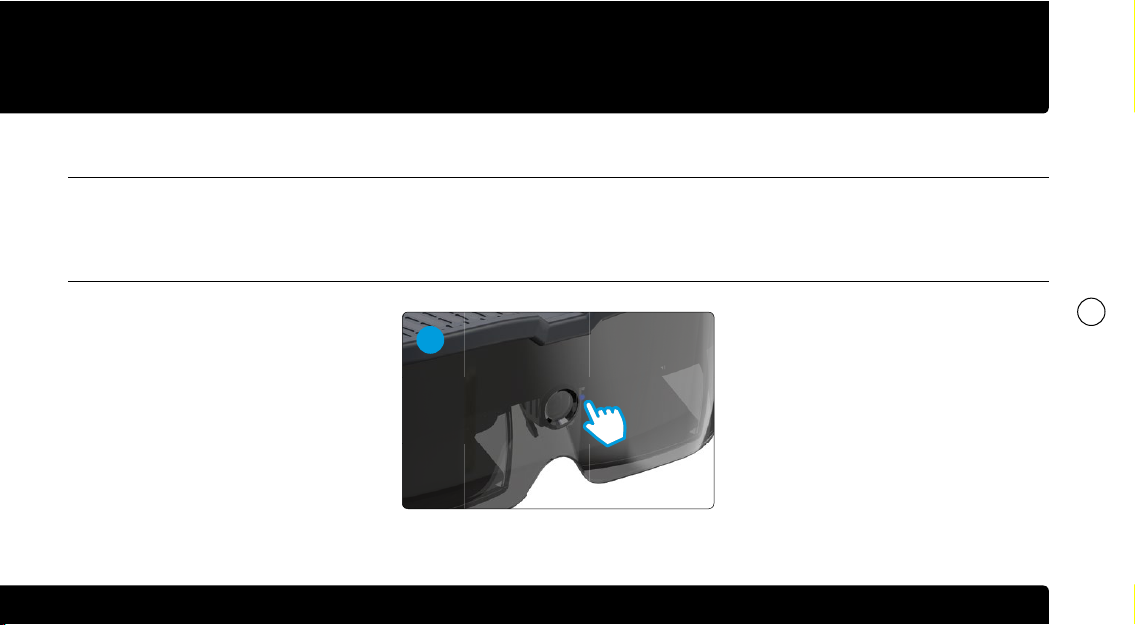
Trackpad WOR(l)D SPACE LUMINA
The trackpad on LUMINA’s right temple is your first input device to communicate with the apps and the system. Move finger at the touch
zone can do the same operation as mouse. Press down on a trackpad to selects an item, quickly double-tap can be achieved with the
mouse double-click function.
You can move the mouse cursor and do the scroll function on the Touchpad:
To do the left button click function of
the mouse, please tab one time with
your finger on the touchpad.
To do the left button double click
function of the mouse, please tab two
times with your finger on the touchpad.
Use two fingers to tap on the touchpad
and then move them up or down to
scroll.
FAQ are available in the Support section of the User BackOffice on the Wor(l)d website. For complete instructions: www.worldgn.com/spacelumina/userguide/
13

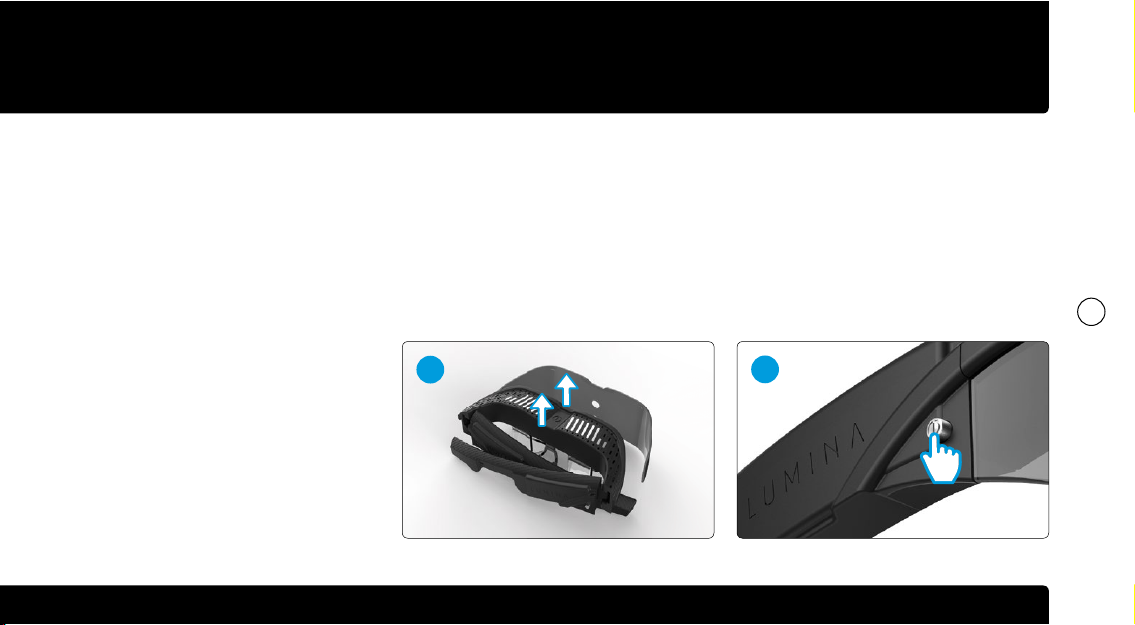
First Start WOR(l)D SPACE LUMINA
To power ON Lumina, push the power
button on the right temple once picture 2.
For start up we advice to use a traditional
mouse and keyboard connected to the
Lumina by the usb-hub 8.
To improve the confort we advice to use the
Back-Head usb cable 7connected between
left and right temples (view page 18).
For the first start please follow all the
steps of the Quick Start Menu (Display
Alignment System*- Languages - Date &
Time - Bluetooth Devices - Wifi - Advanced
Settings). For the Display Alignment
System*you can find the user manual in
the support area.
After insert login and password to access to
WGN System. if new user you can register
to receive the login and password.
To Login or to Register Lumina needs to be
connected to the internet.
2
Please, for further information about the items numbers view Part Name and Functions section at pages 9-10.
*How I can align the display of
Space Lumina?
If there is a misalignment between
the 2 eyes, please follow each step
described in the Display Alignment
User Manual.
FAQ are available in the Support section of the User BackOffice on the Wor(l)d website. For complete instructions: www.worldgn.com/spacelumina/userguide/
14
First Start WOR(l)D SPACE LUMINA
8
With OTG usb hub, ready in the bag, you can connect Lumina to all the usb devices and
peripherals: mouse, keyboard, external hdd, pen drive, etc
NOTE: if there is some device connected to Lumina by OTG you cannot charge the main battery. We
advice to use the OTG only to a limited time (transfer files, input date by mouse or keyboard, etc).
After powering on the LUMINA, you will
see, in the Home Screen, two icons in the
bottom of the screen and one icon on the
right side in the middle.
On the bottom you can find:
1. Wor(l)d Launcher, the fastest way to
reach the settings, the most important
app and Space Media, the media
platform to play movies and music.
2. Alice, our Personal Business Assistant.
For Wor(l)d Launcher and Alice you can find
the user manuals in the support area.
On the right side in the middle you can
select the Apps button to view all the
available apps. While viewing all the
available apps, you will be able to choose
the icons to appear on the Home Screen.
Select the icon by swiping a finger left or
right across the trackpad. Press on the
trackpad to launch the selected app.
FAQ are available in the Support section of the User BackOffice on the Wor(l)d website. For complete instructions: www.worldgn.com/spacelumina/userguide/
15
How to use LUMINA WOR(l)D SPACE LUMINA
Follow the unpacking and packing
instructions to avoid damage to
LUMINA.
Pull up Lumina gently as in the picture 1.
To power on Lumina push one time the
button on the right temple, as in the picture 2,
then wear Lumina.
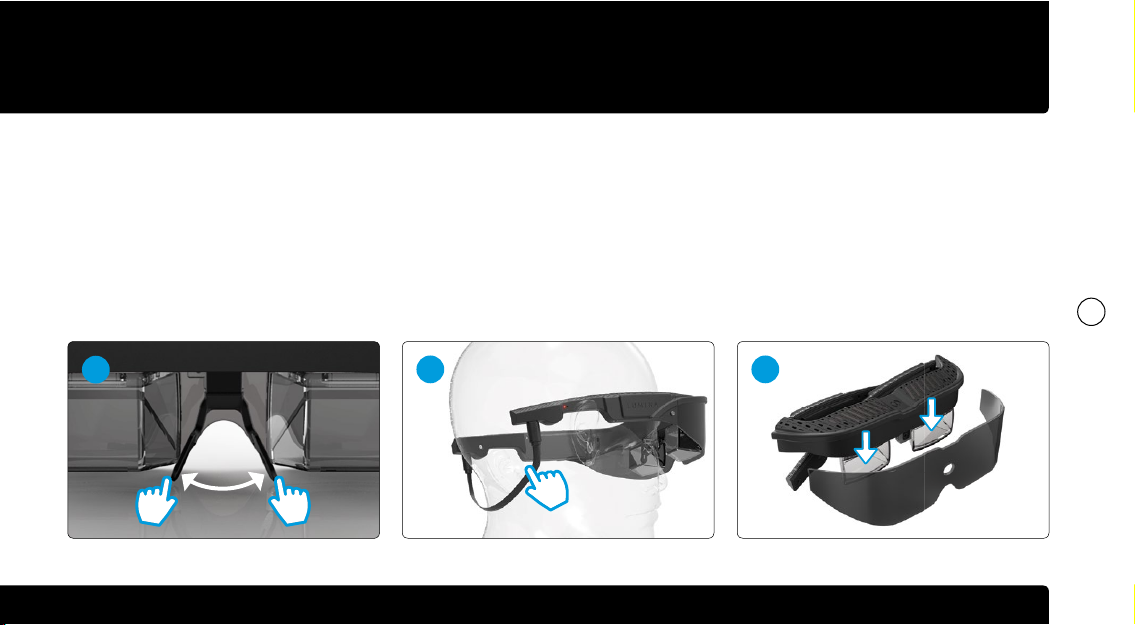
To provide optimal comfort and to
maximize viewing experience:
1. the LUMINA’s nose bridge may be
adjusted through gentle pressure to
the inside or vice versa picture 3. Please
gently wipe the LUMINA with the included
Microfiber Cleaning Cloth after you have
done with the adjustments.
2
1
2. You could connect the back-head cable,
as in the picture 4.
To put in stand-by mode Lumina, push
one time the power button, in this phase
you can preserve the battery consumption
because all the activity will be stopped.
Please, for further information about the items numbers view Part Name and Functions section at pages 9-10.
FAQ are available in the Support section of the User BackOffice on the Wor(l)d website. For complete instructions: www.worldgn.com/spacelumina/userguide/
16
How to use LUMINA WOR(l)D SPACE LUMINA
To power on Lumina from stand-by mode
push again one time the power button.
To power offor restart Lumina push one
time lengthily the power button and select
the appropriate button. After using Lumina,
fold the temples and pull down on the bag,
as in the picture 5.
4 5
3
Please, for further information about the items numbers view Part Name and Functions section at pages 9-10.
FAQ are available in the Support section of the User BackOffice on the Wor(l)d website. For complete instructions: www.worldgn.com/spacelumina/userguide/
17
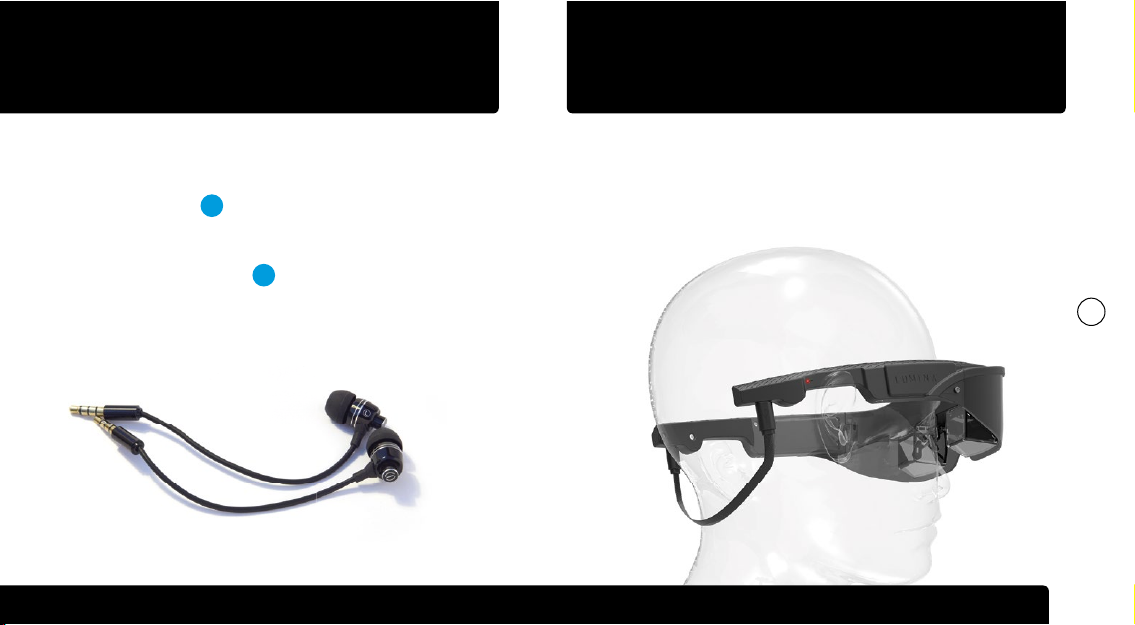
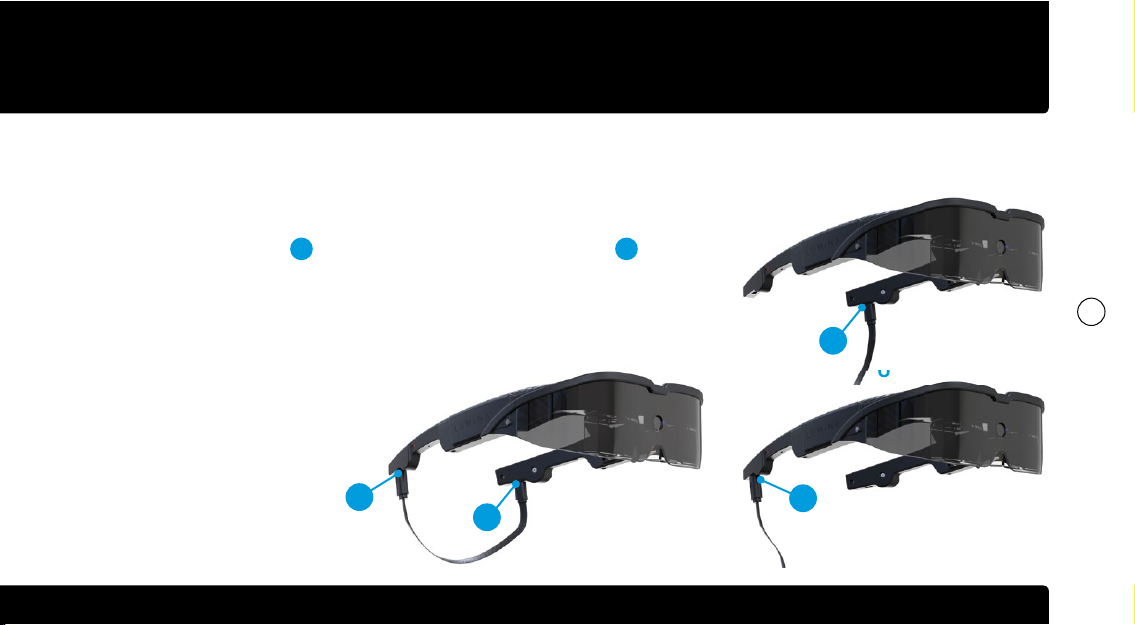
Listening to the Audio Back-Head Cable WOR(l)D SPACE LUMINA
If you want to get LUMINA secured on your head or to improve
your confort, please use included back-head cable.
To connect it, plug the two usb connectors in the usb ports at the
end of each temple.
You have two ways to listen to the audio:
1. Using the Bone conduction sound system located inside
of each temple D ;
2. If you wish to listen to the best quality audio, plug the
included LUMINA earbuds into audio ports located on the
middle of each temple E .
Please be sure to connect the left earbud to the Left audio
jack and the right earbud to the Right audio jack.
Please, for further information about the items numbers
view Part Name and Functions section at pages 9-10.
FAQ are available in the Support section of the User BackOffice on the Wor(l)d website. For complete instructions: www.worldgn.com/spacelumina/userguide/
18

Cleaning Prescription Lenses Clip
Prescription Lenses Clip 4 (view page 9) is available for users who
wear glasses or contact lenses. To install it remove the nose
bridge pulling down.
To remove the Prescription Lenses, slip the fingernail between the
plastic piece and the frame and pull the lens down.
As for the nose bridge, to provide optimal comfort and to
maximize viewing experience the LUMINA’s prescription lens clip
may be adjusted through gentle pressure to the inside or vice
versa.
Please gently wipe the LUMINA with the included Microfiber
Cleaning Cloth after you have done with the adjustments.
It is normal for the surfaces to collect dust, facial oil and
fingerprints. Please use included Microfiber Cleaning Cloth
to gently wipe all the spoiled or marked surfaces until they
get clean.
Use ONLY supplied Microfiber Cleaning Cloth to wipe
optical surfaces. Avoid using handkerchiefs, tissues or
any materials other than Microfiber Cleaning Cloth as it
will inevitably diminish optical quality.
Please, for further information about the items numbers view Part Name and Functions section at pages 9-10.
FAQ are available in the Support section of the User BackOffice on the Wor(l)d website. For complete instructions: www.worldgn.com/spacelumina/userguide/
19
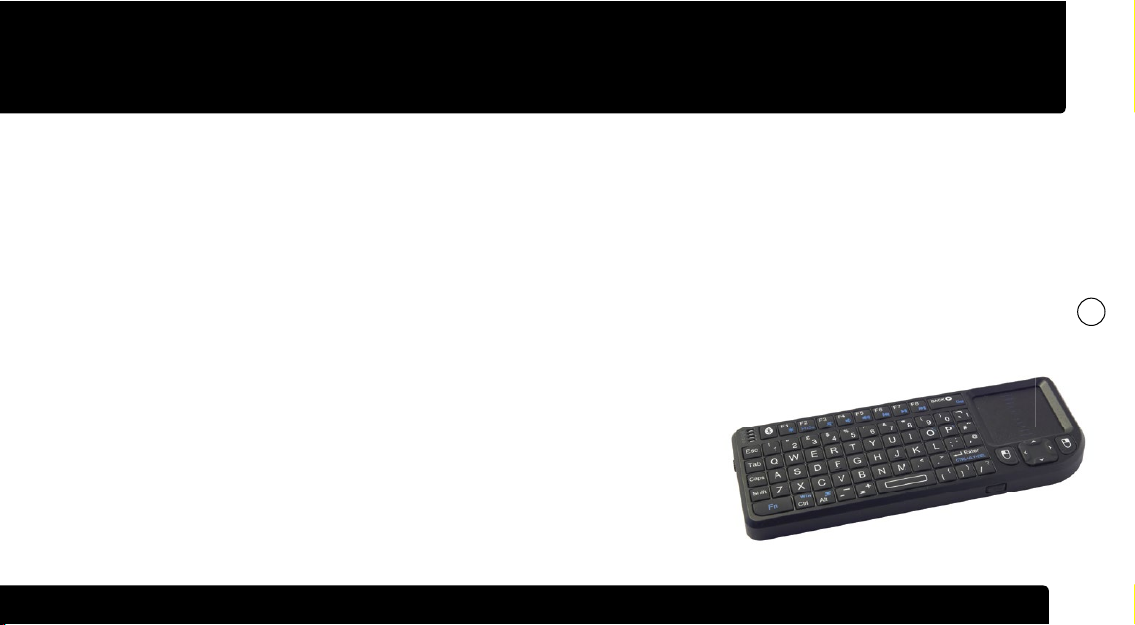
Wireless Bluetooth Keyboard WOR(l)D SPACE LUMINA
You can use the included Wireless
Bluetooth Keyboard as an alternative input
device. To use the keyboard make sure both
LUMINA and the Keyboard are turned on.
To operate the keyboard, switch the
keyboard power button on. If the keyboard
is not already paired with the glasses,
follow the Bluetooth Pairing instructions
below.
Bluetooth Pairing
Unless the LUMINA and the Keyboard have
already been paired, please follow the
Bluetooth pairing instructions.
To enter pairing mode, press the Bluetooth
button on the keyboard until the status
light starts blinking blue. On Lumina go
to the Settings—>Bluetooth, turn on the
bluetooth antenna, click Search Device
and select the keyboard from the list of
available devices.
Charging the Keyboard Battery
To charge the keyboard battery, plug one
end of the included Mini USB-to-USB cable
into the keyboard, and plug the other end
into included power supply. Plug the power
supply into the power outlet. It may take
up to 3 hours to fully charge the Keyboard
Battery.
Please, for further information about the items numbers view Part Name and Functions section at pages 9-10.
FAQ are available in the Support section of the User BackOffice on the Wor(l)d website. For complete instructions: www.worldgn.com/spacelumina/userguide/
20
Table of contents


